Certes KLEAR AUDIO KLR1m User manual

K L E A R A U D I O & C E R T E S . L V
KLR1m USER MANUAL


Table of Contents:
WELCOME AND IMMPORTANT INFORMATION
PRODUCT OWERWIEW
SPECIFICATIONS AND FRONT/REAR PANELS
FIRST START UP OF APL MEASUREMENT SOFTWARE
MEASUREMENT TECHNOLOGY
First measurement, Sequence and Actions
CONNECTION AND USAGE OF KLR C1
USAGE OF KLR1 LS EQUALIZER
KLR TECHNOLOGY MESUREMENT TECHNIQUE
•OVERALL LF & HF BALANCE
•LOUDSPEAKER DIRECTIVITY
•MEASUREMENT CALIBRATION AND TESTING
F A Q
WORKFLOW OF APL WORKSHOP SOFTWARE
APL WORKSHOP FUNCTIONS DESCRIPTION

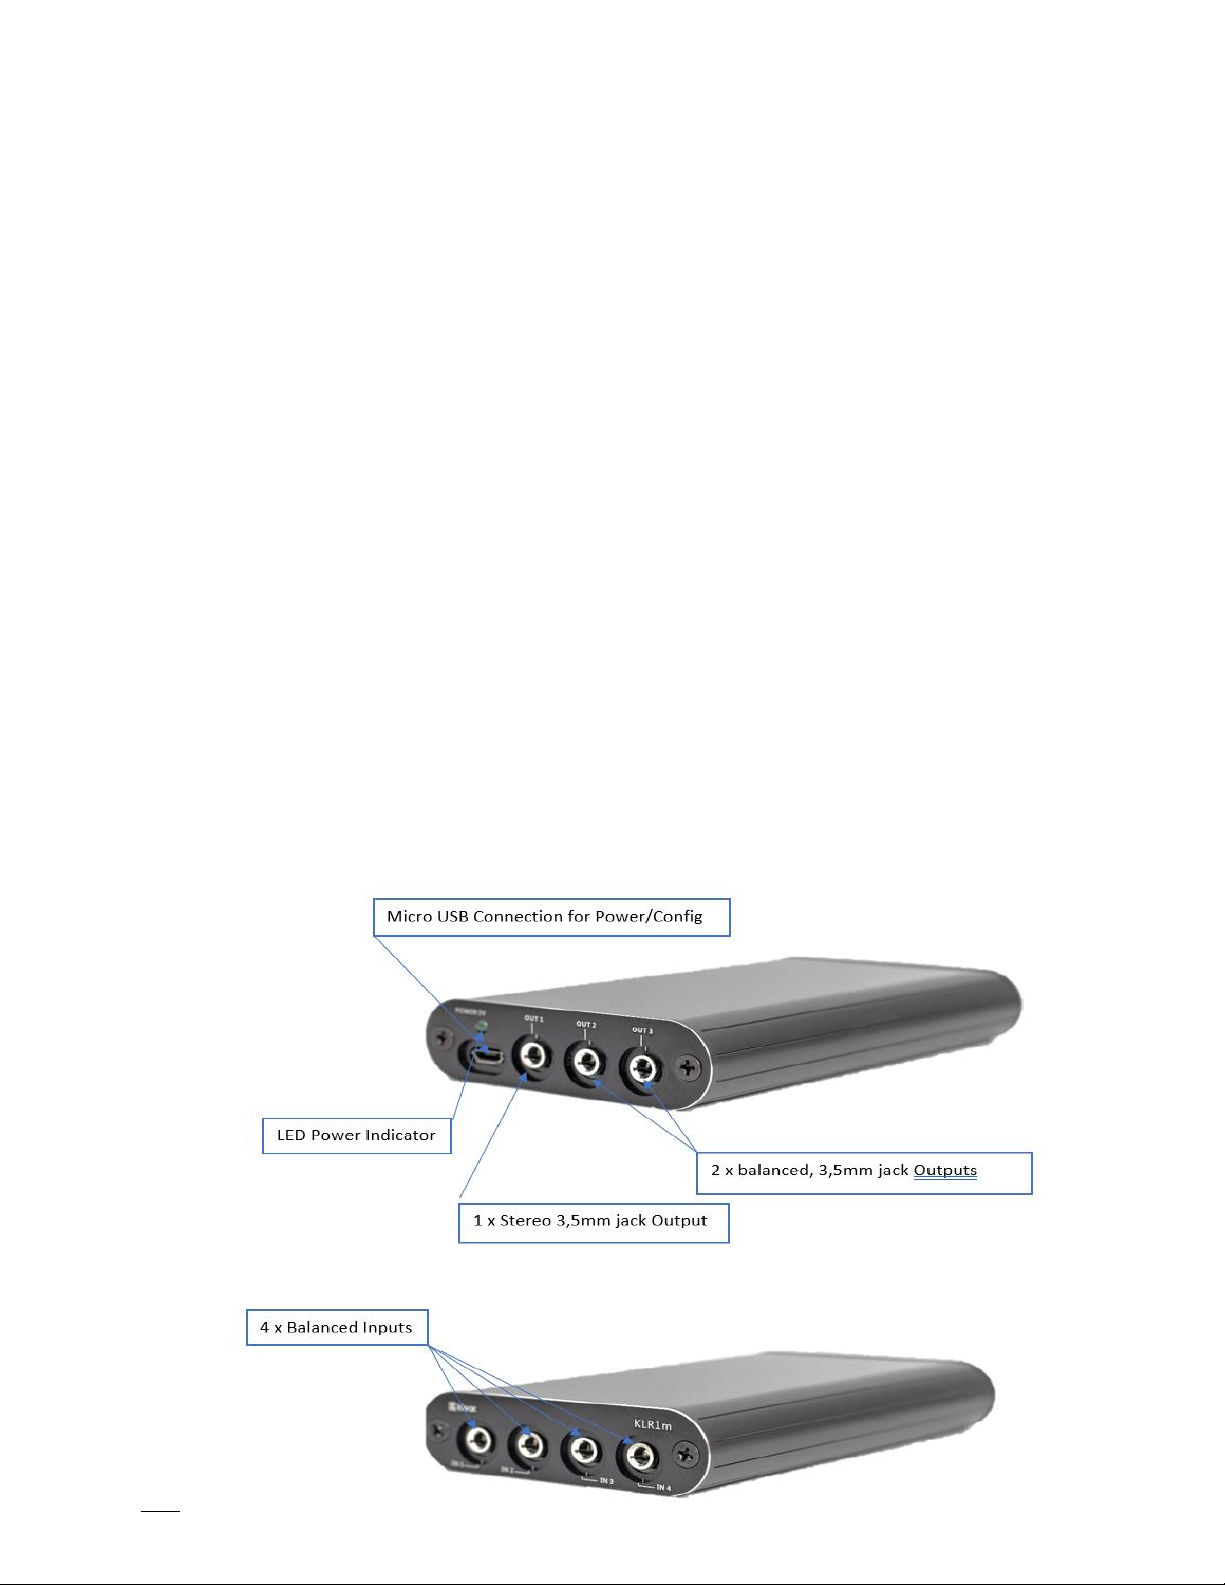
Thank you for choosing KLR1M! To get the most out of your KLR1m FIR filter DSP, please take
the time to read through this manual.
System Requirements:
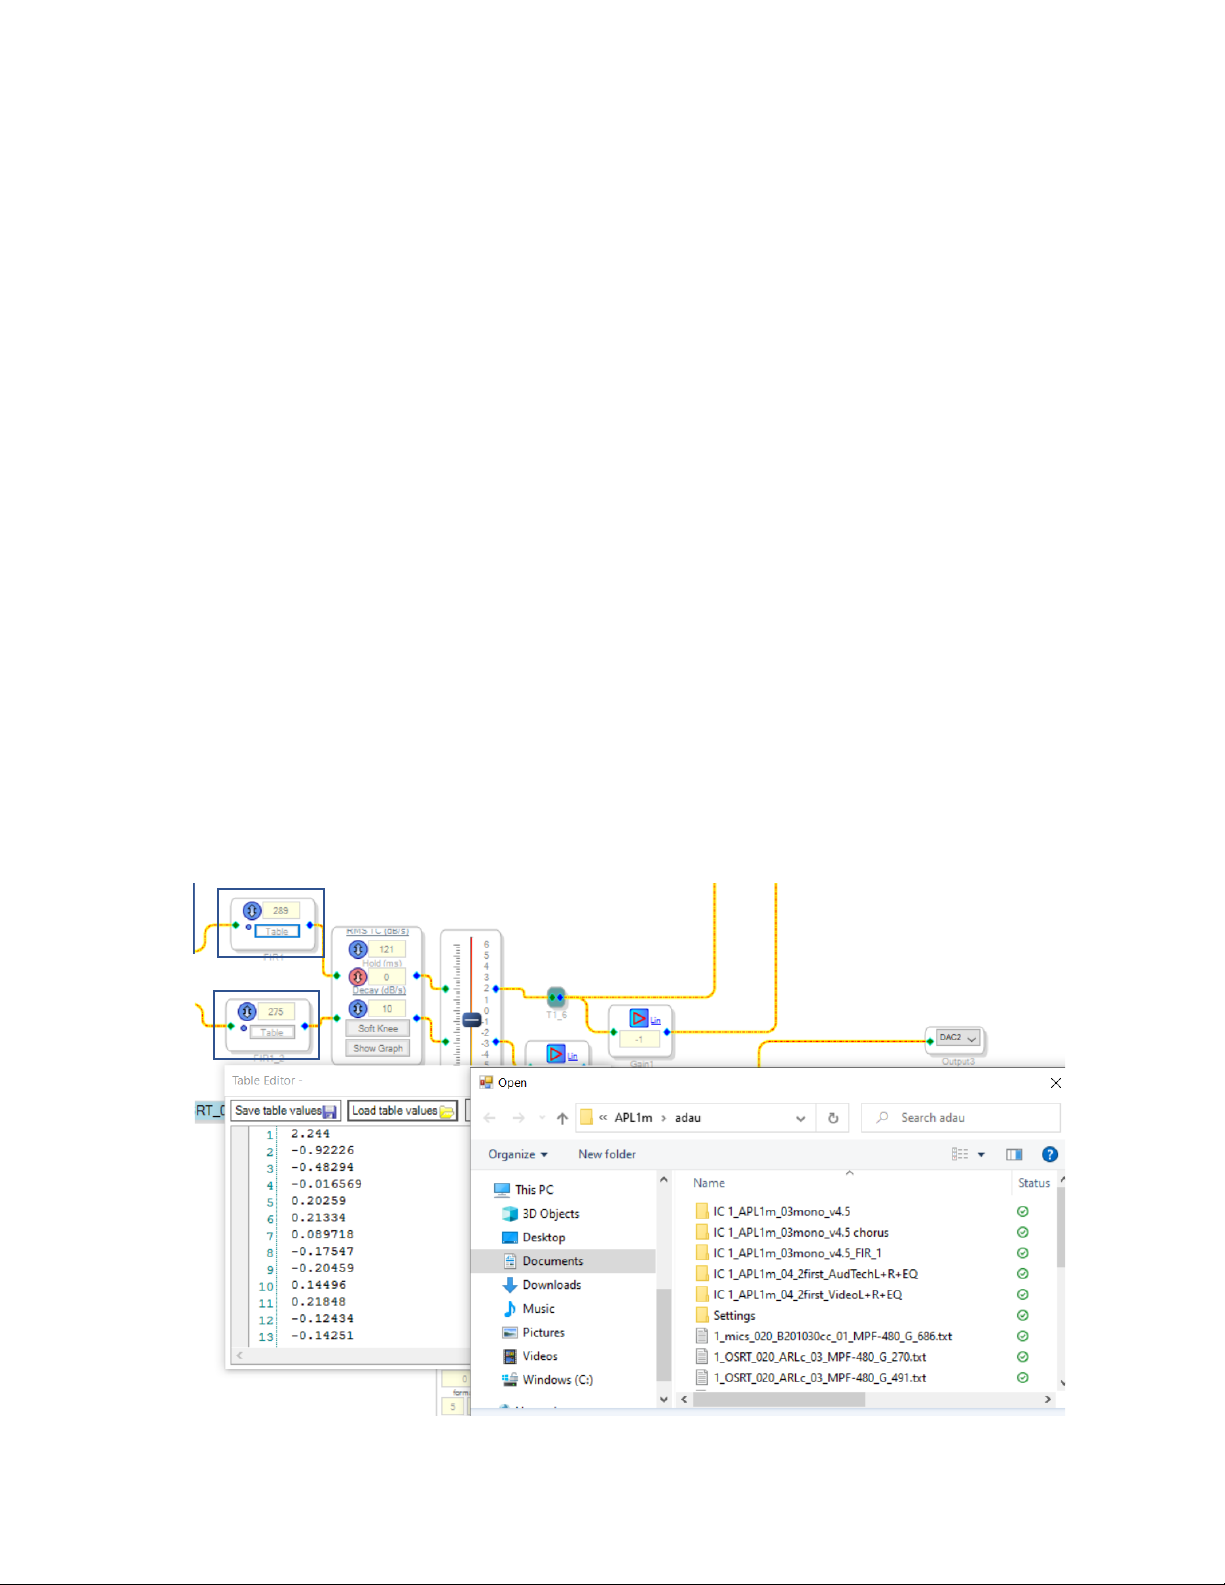
To configure your KLR1m you will require a Windows computer with the fallowing specification:
•PC with at least 1GHz processor. Intel® Pentium®/Celeron®, or AMD K6®/AMD Athlon®, or
compatible processor recommended.
•1 Gigabytes of RAM or higher
•Keyboard and Mouse
•2 Free USB ports
Warning:
Klear cannot be held responsible for any damage that may result from the improper use or incorrect
configuration of this product. Please read this manual carefully to ensure that you fully understand
how to operate and use this product, as incorrect use or use beyond the parameters and ways
recommended in this manual have the potential to cause damage to your audio system.
Safety Instructions:
Location:
•Before moving the device, remove all connected cables.
•Do not expose the device to excessive dust or vibrations, or extreme cold or heat (such as in
direct sunlight, near a heater, or in a to prevent the possibility of panel disfiguration or
damage to the internal components.
Water warning:
•Do not expose the device to rain. Do not use it near water or in damp or wet conditions, or
place containers on it containing liquids which might spill into any openings.
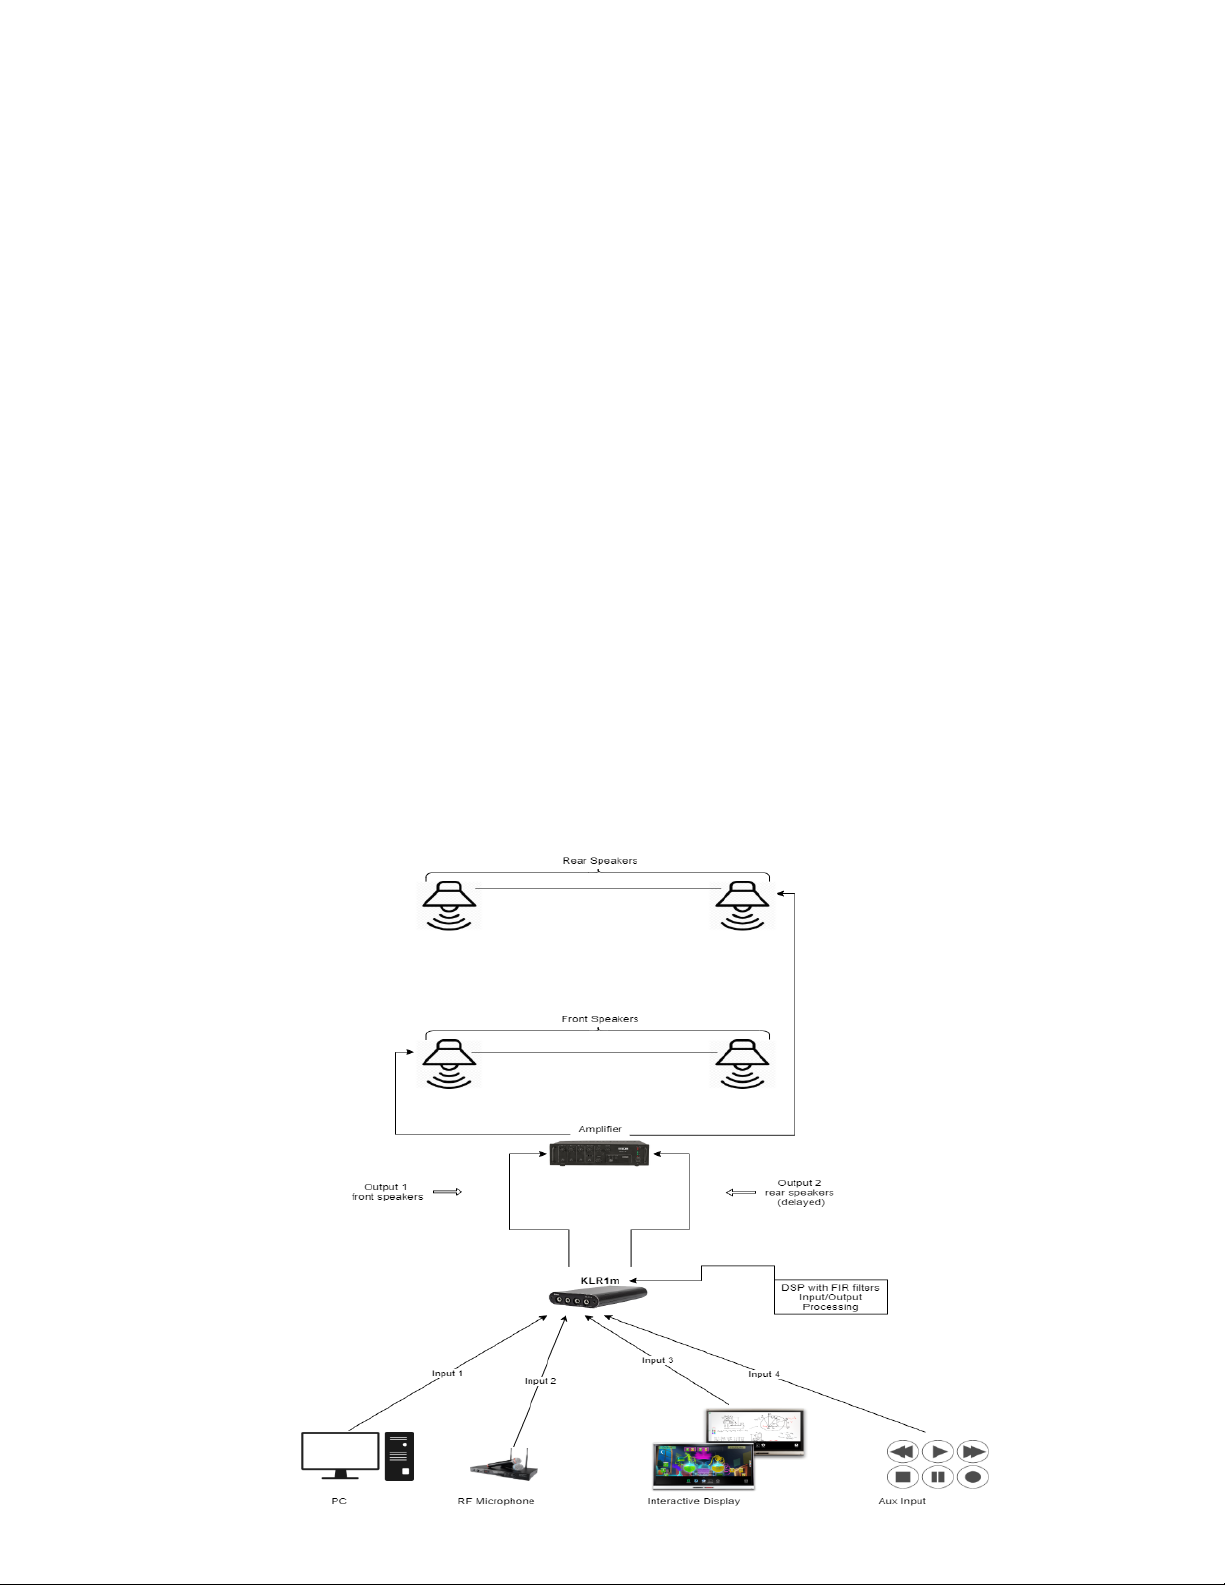
As a general guideline, you should perform the initial configuration of the KLR1m DSP before
enabling audio through any connected output device or amplification. Doing so will help ensure that
the software is correctly configured.
User Serviceable Parts: There are no user serviceable parts inside this product. In case of failure,
customers refer all servicing to the Klear factory.
Please read this user manual carefully. Thanks for your understanding!

KLR1m is a member of KLEAR KLR1 family of FIR based system equalizers. Very compact in size
and cost-effective KLR1 is fully capable DSP with FIR (finite impulse response) filter EQ (700
taps). Class compliant USB graphic interface makes possible to configure every detail of your
audio system and offers pre-configured design templates that can be used as starting points
for a variety of DSP applications. Quick and easy to install it is ideal for small and medium event
rooms, school classrooms, retail spaces and many more, or this pocket size unit can be a great
addition to every audio engineer’s tool kit.
Main Features:
•4 x nalog Inputs, 2 x Balanced and 1 x Stereo outputs
•FIR filterring on all putputs (700 taps) in total
•Fully programmable DSP with wide range of
Parametric EQ, Crossovers and Delays
•Very sleek and compact design
•Real time Configuration
•Wide range of applicatons
Front and Rear panels.

Specifications:
Number of processing channels: 1 or 2, user configurable.
Resolution: 48kHz/24bits.
Frequency resolution of correction curve: 35 Hz, 700 coefficients for FIR filter @ 24 kHz
bandwidth.
Inputs: 4 x analog, balanced.
Outputs: 2 x analog, balanced, 1 x analog stereo output.
Input/output analog signal max levels: +10dBu.
Analog input/output connection types: 3,5mm mini jack.
Analog input impedance: 20 kOhm.
Analog output impedance: 150 Ohm.
Common mode signal rejection (CMSR) of analog input: 60 dB.
Dynamic range (analog input/output): 98 dBA.
THD (analog input/output): -80dB.
Signal delay: 1.6ms
Control and upload interface: I2C (Inter-Integrated Circuit), with Micro USB connector
Interface management: Sigma Studio Software by Analog Devices
Power: 5V 0.12A (0,6W)
Diamensions: 113mm x 20mm x 70mm (L/H/W).
Weight: 140g
Application of use example:

Analog Input and Output Schematic:

The KLR1m workflow:
1. Download and install all the necessary software:
•APL Workshop
•APL FIR Converter
•Sigma Studio by Analog Devices
It will be available from the user downloads section of the KLEAR website. Download and
install the Software fallowing the instructions in the user manual.
2. Familiarize yourself with each software and its user interface before connecting to
the processor.
3. Use the Sigma Studio to set up an initial audio processing configuration as
intended for your application. For example:
1. Input /Output processing
2. Equalization
3. Delays, Limiters etc.
Load the FIR filter Equalizer correction into the Sigma Studio by loading table values from
where the files from your APL FIR Converter are saved. in to the Left and Right Channel FIR
Filter windows.

Please make sure that you enter the right amount of FIR filters used by a FIR converter
in the Left and Right Channel windows.
4. Save the configuration to the file.
5. Make the necessary audio connections. Make sue that your system power is turned off
before connecting the device.
6. Make the I2C bus connection. KLR1m is using I2C bus for writing data to DSP and
power. See I2C Bus usage on page ……… USB Type A to Mini USB Type B connectors from
your computer to KLR1m.
Make sure that in hardware config page (sigma studio) the USB is marked green, not red.
7. Do The fine tuning and real time adjustments. Now you can fine tune your system in
real time by adjusting your parameters.
and then sending the data to the processor via Function F7 button in the Sigma Studios.
8. Write it to the processor memory. When you are happy with the results, you need to
write the data to the DSP by using Function F7 again make sure that you have sent all
the latest changes.
Then in the Hardware Config page right click on the ADAU1701 window and
choose Write Latest Compilation to E2PROM

Sigma Studio Overview:
SigmaStudio™ is a graphical development tool designed by Analog Devices to program
SigmaDSP® audio processors. The software includes an extensive library of algorithms to
perform audio processing such as filtering, mixing, and dynamic processing, as well as basic low-
level DSP functions and controls. All these algorithms are available as processing blocks that can
be wired together as in a schematic: this means that you are not forced to use a predefined
signal processing path, but you can freely decide each and every single detail of it, determining
the number of filters, eq, limiters or delays depending on your actual needs and the amount of
resources available. The compiler takes care of generating DSP-ready code and a control surface
for setting and tuning parameters in real time, listening to the result of the changes you make.
This tool allows engineers with no DSP code writing experience to easily implement a DSP into
their design while remaining powerful enough to satisfy the demands of more experienced DSP
designers.
There is no longer a need to send an email to get a software key, so you should be able to
download SigmaStudio right away from our new website.
Download SigmaStudio using the following set of steps:
To download the software...
• Log in to the Analog Devices website ( http://www.analog.com ) using your myAnalog account.
If you don't already have an account, register for one. You can access myAnalog in the upper
right corner of the webpage.

• After logging in, go to the software download page: http://www.analog.com/en/dsp-
software/ss_sigst_02/sw.html
• Click “Download the latest SigmaStudio release”, or “Download the latest SigmaStudio beta
release”, depending on if you
so Set the labels of input and output channels • Mute unused input and output channels • Set
crossover frequencies and slopes • Set up any essential equalization 5. Save configuration Save
your initial configuration to a file. A configuration is the set of all audio processing parameters.
You should save your configuration to a file on a regular basis, to ensure that you do not lose
your work if you inadvertently restore the processor to default settings. For more information on
configurations, see Working with configurations on page 43. 6. Make audio connections With
the initial configuration done and now that you are familiar with the various controls, it’s time to
connect the miniDSP 2x4 HD into your system. Ensure that all power is turned off when making
audio connections. See Hardware connectivity on page 14.
First measurement. Sequence of actions:
1. „Project/New project”- creation of new measurement project. Specify or create
project folder. In this folder all project measurement data of this session will be
saved.
2. „New (measurement)”- button on left side, under measurements tree. It opens
measurement window. Enter measurement name and choose sound card and its
inputs/outputs.

3. „Play”- test signal playback. Input level meter will show signal level received from
measurement microphone. Signal level is not very important and does not
influence the measurement. Main rule –avoid the input level and the whole input
signal route overload (clip).
4. „Record”- after pressing this button the recording of the microphone signal
begins. Move the measurement microphone to cover almost all main beam of the
loudspeakers sound field keeping equal distance to the loudspeaker (read about
measurement technique in 3rd section).
5. „Stop”- stops the measurement. After few calculations measurement result
graphs will pop out. In folder „Your project/Your measurement/01” you can find
all of result curves in a text file format *.DAT and equalizer file *.fir, which should
be loaded into APL equalizer device or plugin.
6. If you want, you can calculate results once more with different APL Workshop
parameters. Just change the parameters and press „Calculate” button. After few
seconds software will create new curves which will be stored in 02 folder (02
recalculation) and placed in measurement tree view.
To make it easier, we suggest moving graph window little bit to the right so that you can see both:
measurement tree and graph window. Then you can click on any measurement recalculation (01, 02, …) and
see respective graphs. Graph window opens (if it is not already open) with a double click on any
measurement recalculation in the measurement tree.


•Install APL1 drivers by running “driver_install.exe” you can find in APL
Configuration Software installation folder.
•Connect APL1 device to your computer with USB cable. Start APL Configuration
Software. Press F1 to connect to APL1 device.
If “driver_install.exe” failed to run (it may happen for some systems), connect APL1 device to
your computer with USB cable. System detects new device and pops out a driver selection
window. Choose the right path to the folder with drivers in APL Configuration software
installation folder.
Please, do not allow the system to install drivers automatically!
Please install drivers manually from driver’s folder from „APL Configuration Software”
installation folder by use of system’s Device Manager.
If connection to APL1 device is successful, choose two correction (equalizer) filter *.fir files
from your measurement folders (left and right), press „Write to Device”. After this action APL1
device is ready to work and do correction (equalization) for your loudspeaker system.
Second possibility, to load the correction filters, is by using “Fast Reload” function in APL
Configuration Software that takes filter files from the file exchange folder on HDD and loads
those files into APL1 device. The file exchange folder will be used by 3 different software’s:
•APL Workshop and C1 to write equalizer files and
•APL Configuration Software to load those files in APL1 device.
This helps to choose equalizer files straight from APL Workshop with right click on any
measurement recalculation in tree of measurements, and chose command:
„Send to 1ch” or „Send to 2ch”.
Respective recalculation filter files will be stored in exchange folder with first symbols 1
and 2 in their names. An activation of Fast Reload function in APL Configuration
Software will upload respective filter files to APL1 device. The use of CTRL+F5 shortcut
will activate Fast Reload function even the window of APL Configuration Software is
minimized or behind others.
The exchange folder must be “root” of one of your PC HD drives.
To set the exchange folder for APL WORKSHOP software –go to Tools/Options/”Filter file
exchange folder” and set it.

Connection and usage of parametric EQ C1:
1. Extract C1 installation archive to HDD.
2. Copy file „apeq_id.txt” to the exchange folder. This sets the exchange folder
place for C1. Run C1. Choose two *.fir files (you can just drag it in with „drag and
drop” option).
3. Make any editions you like –levels, delays, parametric EQ. Press “Apply” for
parametric EQ.
4. Press F5 button in APL Configuration software (Fast Reload function) button and
files from the exchange folder (C1 stored edited files here) will be loaded into
APL1 device. Check this by observing log records in APL Configuration software
window. It is possible to activate Fast Reload function even if APL Configuration
software window is not “in front” – is minimized, by use of keys CTRL+F5
5. You can do new edits on C1 software, press „Apply” button. Then press F5
(CTRL+F5) for APL Configuration software and the result of your work becomes
audible.
P.S. Parametric equalizer C1 overlaps .fir files and changes them in the exchange folder.
Parametric EQ is compatible with Waves preset files. One example is added to C1 folder.

The frequency characteristic measurement of emitted sound power is based on
summarized information about sound pressure in many points on main emitting
segment (of virtual spherical surface around a loudspeaker) of the loudspeaker.
During the measurement, move the measurement microphone evenly, like drawing
imaginable cells, but do it in only in one dimension –vertical or horizontal columns.
Vertical movement is more convenient, it is like “painting” one column after another.
Equability is not too important, but you cannot do it negligent way. It is recommended
to “paint” 12-15 columns and perceive 12-15 sweep signals on each of them. Those
measurement principles are the same for loudspeaker systems of any size or placement.
There is one important measurement rule –it is necessary to reach the reflecting
surface(s) (floor/wall). Last measurement column should be next to the wall.
Measurement should be done in a suitable distance which is not less than speaker size
and not less than distance to the closest reflecting surface (wall, ceiling, floor). In places
where close-up measurement is not possible (line array in hall), measurement results
may be influenced by the room. This influence may be both - positive and negative. The
estimation of this impact should be done by measurement curve analysis and careful
listening of the correction results.

The basic goal of APL is to measure and correct exactly the loudspeakers PF
response to obtain uncolored and pure sound out of it. The idea of a hall (room)
correction by introducing pre distortions in loudspeaker sound is risky and should be
well considered. The pre distortions introduced in signal pass before a loudspeaker, will
be not compensated of hall (room) distortions but will create new distortions that we
percept as speaker distortions.
Complicated Band- Pass type subwoofers. (band-pass filter)
There is known problem that Band-Pass type subwoofers have increased GDT (group
delay time). Subwoofers impulse response (APL Workshop is working with impulse
responses obtained for each of measurement points) does not get into measurement
Time Window, which is 50ms by default. To avoid loss of information about LF, it is
necessary to increase time window to 100ms by choosing “100_20Hz.wav” file in
selection “Time window file” and evaluate changes of curve in 30-100 Hz range. If the
changes are significant, then use increased Time window - 100ms in future. You should
consider 200ms windowing usage for some very extreme cases.
Overall balance LF-HF
At the beginning of work it is necessary to consider that naturally, for most of the
loudspeakers (and its placements), low frequencies are boosted, and correction will
correct it by default (if you do not use target curve) and at the first moment after
correction is applied there is a feeling that bass is gone:

It means, you must try to keep the overall balance LF-HF same as it was before
correction, to clearly evaluate correction effect in details (narrow band colorations are
removed) but not being disturbed by the change in overall LF-HF balance.
15years of experience shows that systems that perform well usually have overall LF-HF
balance very close to the one proposed in target curve stored in file “mp1.txt”.
If your measured curve looks like this mp1, you must use mp1 target curve to keep your
overall balance of LF-HF as is.

You can reestablish any balance you like by C1 parametric EQ or by a target curve
application in APL Workshop software, in the field “Targets, Corrections”. (Examples:
mp1.txt, 1dBperOCT.txt, 7dB_krit_INTPc.txt).
Directivity of loudspeaker
There is a problem of APL correction application on loudspeakers with particularly
strong directivity. Those problems are notable in HF range and earlier it was advised to
correct this by usage of parametric EQ but there is also a solution based on
measurement.
Loudspeaker has directivity properties in all frequencies when the size of its emitting
surface becomes commensurate with wavelength. It is fair for all concert equipment
and especially line arrays as well as for “home” loudspeaker with, for example 6,5” cone,
showed directivity right away in MF and HF as well.
And so, actions:
1. Measure PFR (Power Frequency Response, green curve in APL Workshop graphs,
(*_PR.dat file) of a loudspeaker. If loudspeaker surrounding is “strange” (hard to
define reflecting surfaces), place it in a middle of room on the floor, and measure
it at minimal distance commensurate to its size. For concert hall, measure in
minimal admissible distance, but of course leaving loudspeaker at his working
placement.
2. In this Subordinate measurement we should separate (allocate) directivity
effects from the overall PFR curve. For that you should subtract earlier
acquired PFR from this Subordinate curve like using correction. You must set
early measured PFR curve (*_PR.dat file) as correction for this currant,
Subordinate measurement and recalculate it by pressing “Calculate” button
(using *_PR.DAT PFR measurement file). Acquired curve shows just
directivity. LF part of it is usually highly disturbed by wave interference and
therefore you must use LF part with care. Usually, it can’t be used lower than 1
kHz as it is, but higher than 1 kHz, with 1 octave smoothing turned on. You
can use this curve to introduce compensation of directivity by adding this
curve to original PFR such way –1) set “ignore curve” to 1 kHz, for example,
and “low frequency limiter” to 0 dB (that sets curve to 0 from LF to 1kHz), set

“smoothing” to 1 okt., press “Calculate”. Now you have edited directivity
curve. 2) go to first (initial) PFR measurement (select it) in measurement tree,
set check box in lowest place in “Compensations, corrections, targets”, brows
for *_PRS.dat file of previous recalculation, press “v” button to see is your
selection right, check the check box “Inv”, press “Calculate”. APL Workshop
software will sum two curves –initial PFR curve and directivity curve. Now
you have curve that represents PFR of loudspeaker with directivity
compensated.
Or you may evaluate that “raw” directivity curve “by eye” and use appropriate
parametric EQ.
Both actions can be combined in pursuit of an ideal result.
Measurement microphone calibration and verification
For measurement microphone testing there is no need for measurement (anechoic)
camera.
This test may be done by comparison of 2 or more microphones. You can use any “on
table” loudspeaker, which has wide frequency range, to compare those
microphones and find correction curve for one of them if you know curve of another
one.
Measure loudspeaker with one microphone, then with another one and then compare
curves in any manner you prefer. It is important that measurement “painted” area is as
equal as much as possible for both measurements.
For this reason you can practice with the same microphone by measuring the
loudspeaker for few times to train your hand to get highly repetitive results. You
should make marks on table to perform same “painting” for each measurement.
To find the curve of the microphone under test you must subtract loudspeakers curve
(obtained by the reference microphone - reference curve) from curve obtained by the
microphone under test. This should be done by adding the reference curve as
“correction” in APL Workshop software “Compensations, corrections, targets” for the
measurement obtained by the microphone under test.
Usually, the measurement microphone curves have sloping characteristics. There is no
sharp unevenness on them.
I recommend having available 2 microphones, whose you can compare any time and
one is always in reserve. If you have found a pair which is equal that means that both
of them are accurate.
Table of contents
Popular Stereo Equalizer manuals by other brands

Wet Sounds
Wet Sounds WS 420 SQ instruction manual

Harman Kardon
Harman Kardon The Citation Seventeen Technical manual

Extron electronics
Extron electronics DVI Cable Equalizer DVI 101 Specifications

Universal Audio
Universal Audio 535 operating instructions

Sony
Sony XE-70 Service manual

Directed Audio
Directed Audio 2500 owner's manual