Cetrek Chartnav 343 User manual

Chartnav 343
Users Guide
Issue 03

EMC Directive 89/336/EEC
This product has been designed to be compliant with the
above Directive.
Maximum performance and compliance with the EMC
Directive can only be ensured by correct installation. It is
strongly recommended that the installation conforms with the
following Standards:
SMALL CRAFT - ELECTRICAL SYSTEMS:
a) ISO 10133 - Extra Low-Voltage DC Installations
b) ISO 13297 - Alternating Current Installations
ISO - International Standards Organisation
The information contained in this manual is believed to be accurate at the
time of going to print but no responsibility direct or consequential can be
accepted by Cetrek Ltd. for damage resulting from use of this information.
Cetrek Ltd. reserve the right to make changes without notice to any of its
products, documentation or services
© Cetrek Ltd. 1996

WELCOME
All of us at Cetrek would like to welcome you to the world of
Cetrek Autopilot and Control Systems.
Cetrek has now been producing quality marine electronics for
over 25 years and with the companys reputation for
performance and reliability, you can relax knowing you have
chosen your instrument wisely.
The Chartnav 343 chart plotter features a high resolution 8
LCD screen. Its clear displays and the simplicity of its operation
make it one the most user-friendly plotters available.
Safety
The use of a Chartnav does NOT avoid the need for normal
watchkeeping. The Chartnav should not be your only source
of navigation. It should be backed up with traditional paper
charts, navigational instruments and knowledge of their use.
We also remind you that in certain countries you are required
by law to carry on board, and use, the officially published and
approved nautical charts.
Document
Reference:
803430
Issue 03
June 1998

CONTENTS
1. Introduction ..................................................... 7
1.1 The Chartnav 343 ...................................... 7
1.2 A Word of Caution ..................................... 7
1.3 For the New Chartnav User ......................... 7
2. Using your Chartnav 343 ................................. 9
2.1 The Chart Cards ........................................ 9
2.2 Powering up ............................................. 9
3. The Basics ....................................................... 11
3.1 A Tutorial to Navigate to a Single Waypoint ... 15
3.2 A Tutorial to Enter a Route .......................... 16
3.3 A Tutorial to Recall and Navigate a Route ...... 17
4. The PLOTTER Page .......................................... 19
4.1 PLOTTER Page Symbols .............................. 23
4.2 The Pop-Up Window ................................. 24
4.3 Distance and Bearing Between Two Points .... 25
4.4 Track Plot Mode ....................................... 26
4.5 Chart Boundaries ....................................... 26
4.6 Change Colour - Colour only ....................... 26
4.7 Course Up/Resolution - Colour only .............. 26
4.8 The PLOTTER Page Menu System ................. 27
4.9 The Menu Structure ................................... 28
5. The DISPLAY Page ........................................... 31
5.1 The Display Menu ..................................... 31
6. The NAVIGATION DATA Page .......................... 33
7. The GPS STATUS Page ...................................... 35
7.1 The GPS Menu ......................................... 36
8. Alarms ............................................................. 37
8.1 Waypoint Arrival Alarm .............................. 38
8.2 Audible Alarm .......................................... 38
8.3 Key Beep ................................................. 38
8.4 Reported Alarms ....................................... 38
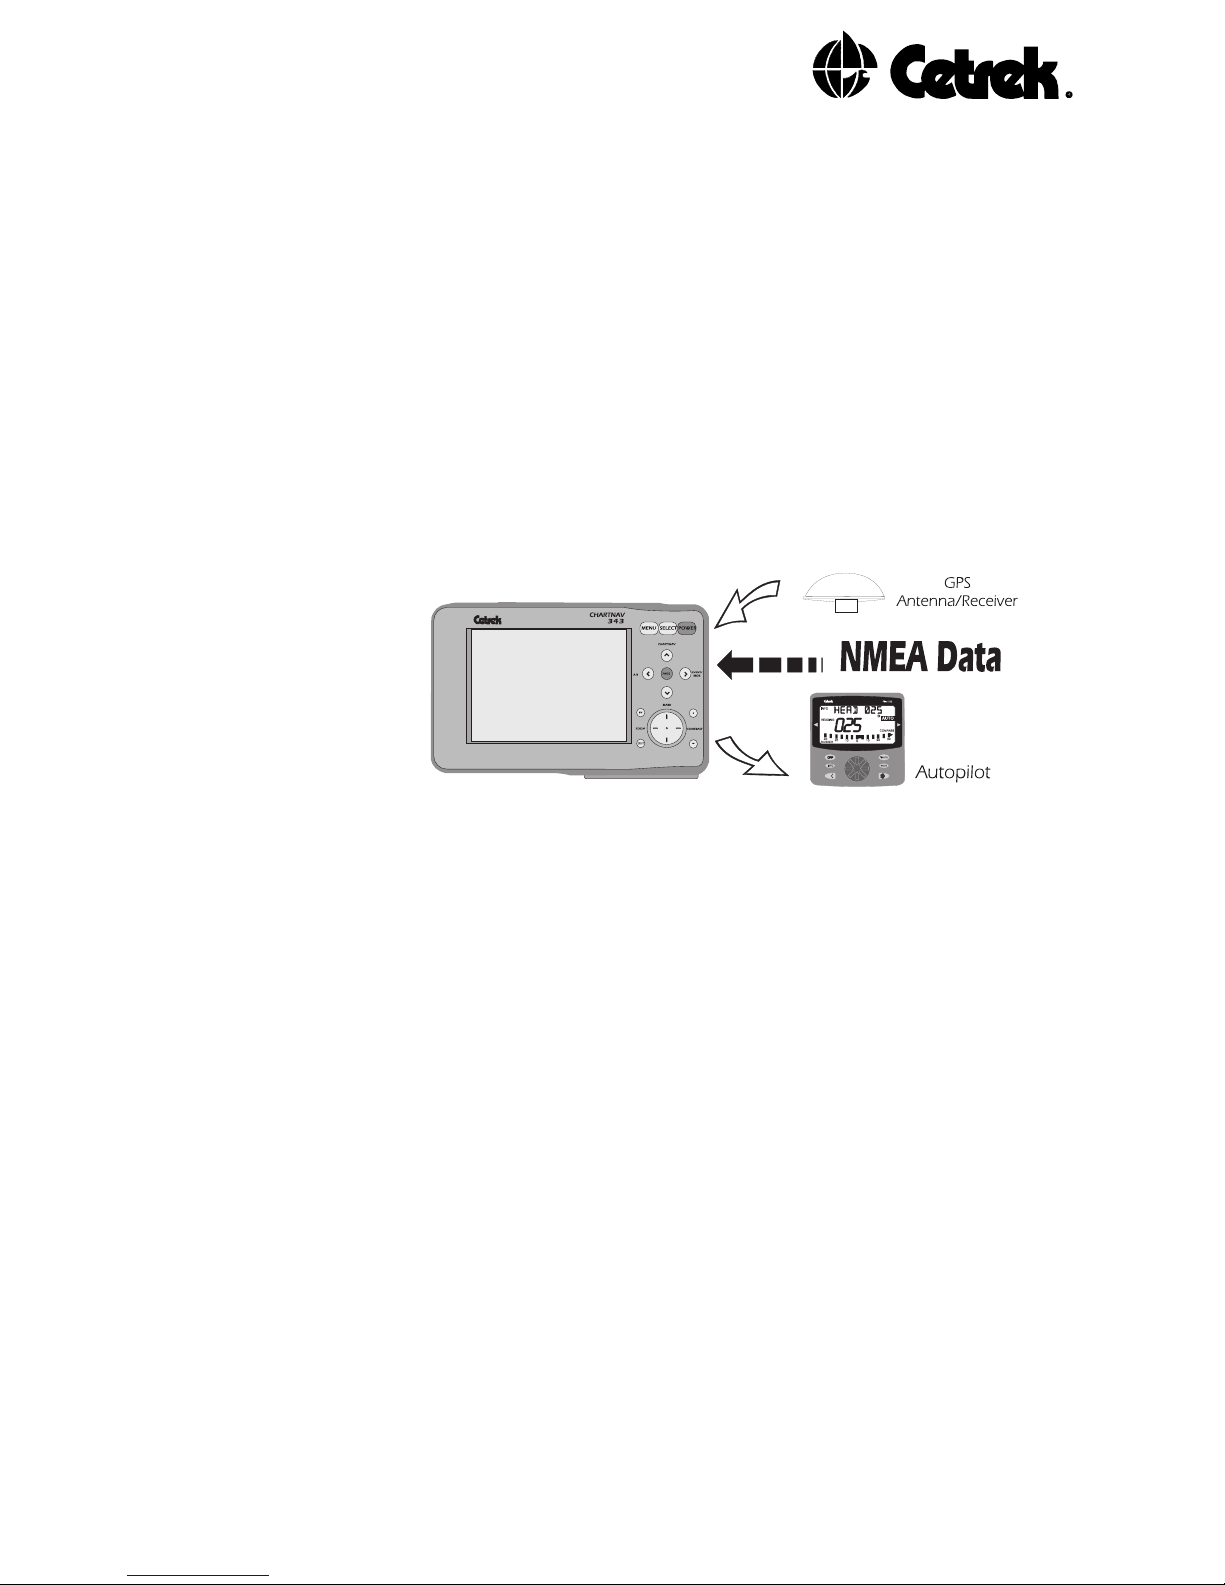
9. Understanding the Equipment ........................ 39
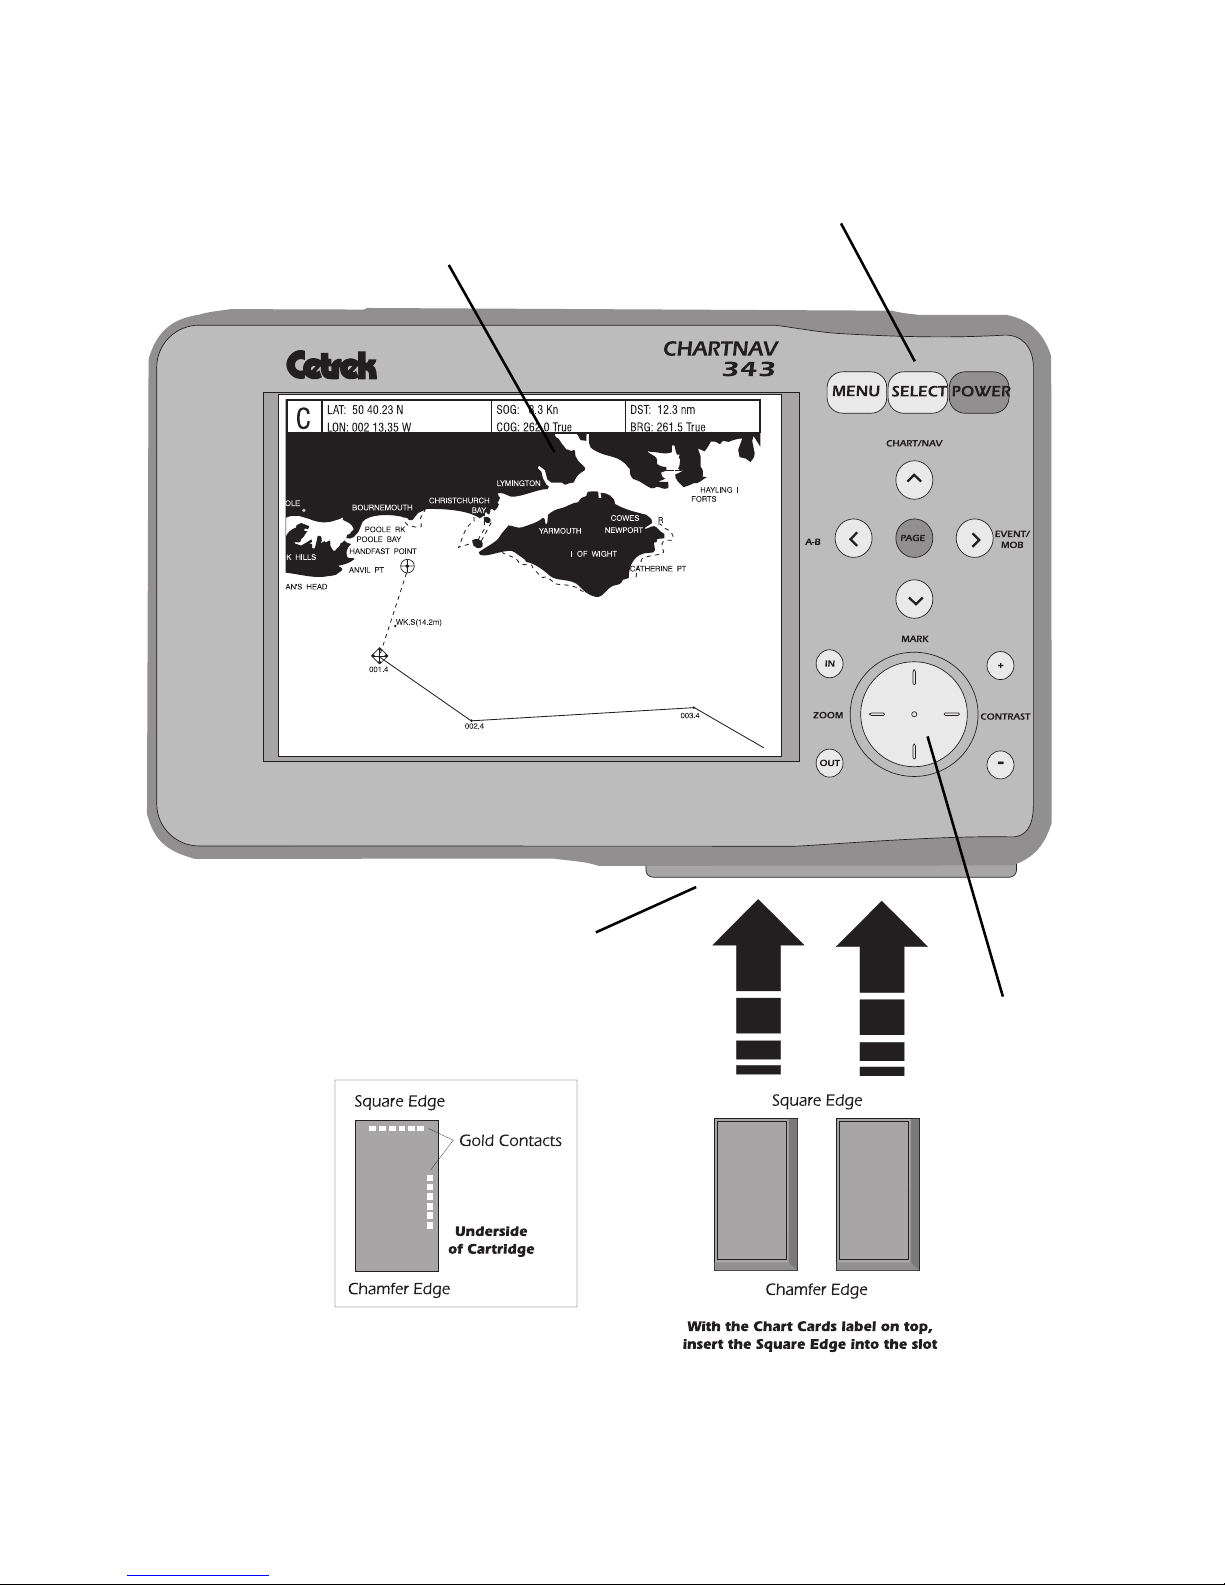
9.1 The Chartnav Control Unit.......................... 39
9.2 The Chart Cards ........................................ 39
9.3 The Trackerpad ......................................... 41
9.4 The Function Keys ..................................... 41

10. Charting and Navigate Modes ...................... 45
10.1 Charting Mode .......................................45
10.2 Navigate Mode ....................................... 45
11. Using Marks and Events ................................ 47
11.1 Placing Marks and Events ......................... 47
11.2 Editing a Mark or Event Pop-Up Window ....47
11.3 Clearing Marks, Events and A-B ................. 48
11.4 Man Overboard Sequence ........................ 49
12. Using Routes ................................................. 51
12.1 Routes MENU ........................................ 51
12.2 Viewing and Selecting Routes .................... 52
12.3 Clear Route ............................................ 52
12.4 Starting a New Route .............................. 53
12.5 Add to Route ......................................... 53
12.6 Clear Last W/P ........................................ 54
12.7 Edit Route Sub-Menu ...............................54
12.8 Insert W/P .............................................. 54
12.9 Delete W/P ............................................. 54
12.10 Move W/P ............................................ 54
12.11 Copy a Route ....................................... 55
12.12 Link Two Routes .................................... 55
12.13 Display All Routes .................................. 57
12.14 Clear All Route ...................................... 57
12.15 Editing Waypoint Information .................. 57
12.16 Receiving and Transmitting Data .............. 57
13. Using Targets ................................................ 59
13.1 Clearing the Target .................................. 60
14. Customising your Chartnav 343 .................. 61
14.1 The TRACK Menu .................................... 61
14.2 The Lat/Long Menu ................................. 63
14.3 The User Settings Sub-Menu ..................... 64
14.4 Chart Features ........................................ 64
14.5 Install Settings ........................................ 65
14.6 The Correct Position Menu .......................69
14.7 The Lighting Menu .................................. 70

CHARTNAV 343
6
15. Installing your Chartnav 343 ........................ 71
15.1 Before You Start ...................................... 71
15.2 Suggested Procedure ............................... 71
15.3 Good Wiring Practice ............................... 72
15.4 The Chartnav Control Unit ........................ 72
15.5 Mounting .............................................. 73
15.6 Clearance Dimensions .............................. 73
15.7 Template ............................................... 74
15.8 Connecting Your Position-Finding Instrument74
15.9 Connecting An Autopilot .......................... 74
15.10 Route Transfer Connections ..................... 75
15.11 Connecting the Power Supply .................. 75
15.12 Installation Schematic ............................. 76
16. Installation Settings ...................................... 77
16.1 NMEA Messages .................................... 78
17. Diagnostic Tests ............................................ 79
17.1 The Serial Interface Test ............................ 80
17.2 Input Data Display .................................. 80
17.3 Change Parameters ................................. 80
17.4 C-Card Test ............................................ 81
17.5 KeyboardTest ........................................ 82
17.6 RAM-ChipsTest ..................................... 82
17.7 Dim Menu ............................................ 82
Warranty
Index

7
1. INTRODUCTION
1.1 The Chartnav 343
The Chartnav 343 is much more than a highly reliable,
innovative chart plotter. It can share and access information
via an NMEA data link. It can quickly step from the chart
screen to three other information packed screens.
The Chartnav 343 on its own is a powerful charting aid.
Add a GPS or other position-finding instrument and the
vessels position and track can be displayed. Add to that an
autopilot and you have an excellent navigation system.
The Chartnav 343 is available with a mono or colour screen.
Figure 1 - System Interactions
1.2 A Word of Caution
You and your analytical abilities are the most important part of
any navigation system. Do not assume that the co-ordinates
you receive from your position-finding instrument are
infallible. Remember also that the Electronic Charts are only as
good as the paper charts they were digitized (copied) from.
The Chartnav 343 is intended as a supplement to standard
paper charts, not a replacement. A prudent navigator always
double-checks his data against other navigational aids, the
safety of your vessel and your crew is at stake.
1.3 For the New Chartnav User
In writing this manual we assume you are familiar with
marine navigation and the use of latitude/longitude co-
ordinates.
Learning how to use the Chartnav is best done before you
find yourself at sea in a heavy fog! Remember your Chartnav
343, and any position-finding device or autopilot must be
installed correctly for safe navigation.

CHARTNAV 343
8
THE CHARTNAV 343
Figure 2 - The Chartnav 343
High Resolution
7 LCD Display
Backlit Function
Keys
C-MAP CF95 Chart Cards
Trackerpad
Internal
Cartridge Reader

9
2. USING YOUR CHARTNAV 343
2.1 The Chart Cards
The Chartnav 343 uses the small C-MAP CF95 chart cards.
Each card contains many charts of the area it covers but you
need to ensure that your cards give you suitable coverage at a
suitable scale for your journey.
You can put your chart cards in to either slot in any order.
2.2 Powering up
Press and release the POWER key to turn the Chartnav 343
on. Pressing and holding the POWER key turns the unit off
so be careful not to hold the key in. The unit will power up
and carry out a self-test routine. As the unit runs through this
test, which will take about 15 seconds, you will see the test
results;
System Unit Test The V*.** is the test software version fitted to your unit.
KERNAL 8000 These identify the operating system as Chartnav 343
SYSTEM WORD 0005 85A1 - A C-Map Reference Number.
EPROM TEST When the unit completes the Eprom Test it will display
PASSED. If the unit finds a fault with the Eprom NOT PASSED
will be shown. A Cetrek Distributor should be consulted.
RAM TEST Having checked the hardware the unit completes the RAM
Test by displaying PASSED. Should a serious hardware error
be found the unit will display NOT PASSED and a Cetrek
Distributor should be consulted.
DATA This checks that the cards are functioning correctly and
displays the identification code of the cards. NOT PRESENT
OR FAULTY will be displayed if there are no cards or if the
card is not in the slot properly. FAULTY will be shown if a
reading error has been found, this is normally due to a
damaged card. Should the card contacts become dirty they
are easily cleaned using an ordinary pencil eraser.

CHARTNAV 343
10
CODE This checks that the software is operating correctly and
displays the software version fitted. Should a reading error be
found, FAULTY, will be shown and the system will reset and
repeat the self-test. If FAULTY is displayed again, consult a
Cetrek Distributor.
Once the tests are complete the Cetrek logo is displayed for a
few seconds, this is then replaced with a Caution Page.
CAUTION
CHARTNAV 343’s displays are based on geographical data that C-MAP
believes to be accurate.
However, you should not rely on these visual map displays as your primary
source of navigation.
The CHARTNAV 343 is designed only to ease and speed up navigation
calculations and must not be relied upon exclusively.
Rather, CHARTNAV 343 should be used only as a backup to official
government paper charts and traditional navigational methods.
Displayed charts are only current on the date of issue shown on the chart
card.
Operating System and Chart Software
Copyright 1987 - 1996 (C) C-MAP s.r.l.
Press SELECT to proceed
Figure 3 - The Caution Page
Make sure you read this caution carefully. Once you have
finished reading this page, press the SELECT key to continue.
After a brief delay the PLOTTER Page will be displayed.

11
3. THE BASICS
By simply pressing the PAGE key you can scroll through four
display pages and can quickly access the desired information
when planning or undertaking a journey.
Figure 4 - The Page Cycle
The Plotter page displays the charts and has access to the
menu system which enables settings to be adjusted and the
Chartnav 343 to be customised to suit you.
The remaining pages are dedicated information pages
providing quick, easy access to navigational data. These are
explained in detail in chapters 5, 6 & 7.

CHARTNAV 343
12
The Plotter Page
The Plotter page is where you plan your route with the
Chartnav 343, its use of windows and on-screen prompts
make this extremely easy.
The charts and information from the cards are shown on the
Plotter page. Zoom in and out with the zoom keys, use the
trackerpad to move the cursor around the chart.
Cursor Symbol
Boat Position
Symbol
Zoom Keys
Tracker Pad
Figure 5 - Zoom and Pan Controls
When the cursor stops over a symbol on the chart, a window
Pops up with brief details about the item the symbol relates
to. This Pop-Up Window also tells you which keys to use to
access further information or functions.
Figure 6 - A Pop-Up Window
The charts are viewed in one of two modes:
Charting Mode is where all distance and bearing information
is taken from the cursor position. If the cursor bumps the
edge of the screen, the chart pans across. The vessels position
can be off the screen. In Charting Mode CHARTING appears
at the top of the Data Display Window.

13
Navigate Mode is where the vessels position is kept on the
screen. Information is taken from the vessels position (this
mode is only of use if a position-finding instrument is
installed). The cursor will not cause the screen to pan, only the
vessels position will. In Navigate Mode NAVIGATE appears at
the top of the Data Display Window.
The CHART/NAV key switches between these two modes.
The Menu System
From the Plotter page you can access the menu structure by
pressing the MENU key. Information, options, settings or
prompts are displayed around the screen.
The cursor arrows surrounding the PAGE key are used to
move around the menus in a simple and logical manner,
following the prompts to press the correct key.
A map of the full menu structure can be seen at section 4.9.
Marks and Events
The Chartnav 343 can remember up to 500 User points and
will display a symbol at that position on any chart.
These are lat/long positions identified by symbols on the
screen. There is a choice of symbol, a 16 character identifier,
position and date entered. There are two ways of entering
one of these, press the MARK key and the position of the
cursor is stored, press the EVENT key and the vessels
position is stored.
A Pop-Up Window is displayed for each point, this can be
edited by following the prompts in the window.
Figure 7 - A User Point Pop-Up Window

CHARTNAV 343
14
Routes
A Route is a series of turning points, called Waypoints,
connected by straight lines. The Chartnav 343 can store up to
6 routes. From the Plotter page, press the MENU key. Plotter
is highlighted (black), so press SELECT and the menu
changes, Routes is highlighted so press SELECT again and
you are at the screen to enter, view or edit your routes. Just
follow the prompts.
Navigating a Route
Providing your system has a position finding device and
suitable autopilot, the Chartnav 343 will feed data to the
autopilot so that the boat will automatically follow a route.
This is done by creating a Target that it steers towards. When
the boat nearly reaches the target the Chartnav 343 will move
the target to the next waypoint in the route and so turn the
boat.
Figure 8 - An Example Route
To create a target: position the cursor over a User Point or
Waypoint, the Pop-Up Window shows. An option at the
bottom of the window will be SELECT to enter target, press
the SELECT key and the Chartnav 343 will immediately start
transmitting suitable data to the autopilot. Switch your
autopilot to navigate mode and youll be on your way.
3.02
3.01
3.03
3.04
Target
Vessels Position
Waypoint 2
of Route 3
Harbour
Harbour

15
3.1 A Tutorial to Navigate to a Single Waypoint
Here we assume that the Chartnav 343 is connected to both a
position finding device such as a GPS, and suitable autopilot.
1. Press the POWER key to turn the unit on. The screen will
show the test information, then the Cetrek globe logo,
then stop at the Caution screen.
2. Press the SELECT key to clear the Caution screen. The
Plotter Page will be displayed.
3. Check that the indicated vessels position is correct. If you
cannot see the vessels position on the screen, press the
CHART/NAV key. This sets the Chartnav 343 to navigator
mode and moves the chart to place the vessels position in
the centre of the screen. Press the CHART/NAV key again
to return to charting mode.
4. Zoom in or out to a comfortable level and move the cursor
to a position away from the vessel where you can safely
travel to in a straight line.
5. Press the MARK key. At the cursor position, a mark
symbol is shown. A Pop-up window is displayed. At the
top of the window the unique User Point number is
shown. You can press the MENU key and edit the window
by putting an identifier name in, change the symbol and
edit the lat/long. This is done by using the arrow keys that
are around the PAGE key and the SELECT key. Press the
MENU key to exit the window editing mode.
6. Press the SELECT key to make the mark the Target. The
symbol will change to a diamond with a cross through it
and a straight line will be drawn between the vessels
position and the target. Check that this is a safe track to
follow.
7. Turn your autopilot to Navigator mode and let the
Chartnav 343 take you there !! When you arrive, the
waypoint arrival alarm will tell you, cancel the alarm and
position the cursor over the Target. When the Pop-up
window shows, press the SELECT key to delete the target.
8. Turn your autopilot back to manual control.

CHARTNAV 343
16
3.2 A Tutorial to Enter a Route
Here we assume that the Chartnav 343 is connected to both a
position finding device such as a GPS, and suitable autopilot.
1. Press the POWER key to turn the unit on. The screen will
show the test information, then the Cetrek globe logo,
then stop at the Caution screen.
2. Press the SELECT key to clear the Caution screen. The
PLOTTER Page will be displayed.
3. Check that the indicated vessels position is correct. If you
cannot see the vessels position on the screen, press the
CHART/NAV key. This sets the Chartnav 343 to navigator
mode and moves the chart to place the vessels position in
the centre of the screen. Press the CHART/NAV key again
to return to charting mode.
4. Zoom in or out to a comfortable level and move the cursor
to a position away from the vessel to the East.
5. Check that there is no Pop-up window showing, move the
cursor off any symbol if there is. Press the MENU key and
the selection bar appears across the top of the screen.
6. PLOTTER is already highlighted, so press the SELECT key
to activate it. The selection bar will change.
7. ROUTES is already highlighted so press the SELECT key
to activate it. The selection bar changes to give 6 route
options,
8. Use the and keys to highlight a route that is
clear. The bottom right window of the screen is a side
menu and START NEW ROUTE is automatically
highlighted.
9. Check that the cursor is in the correct position and press
the SELECT key. This will place a waypoint symbol at the
cursor position and a Pop-up window will show. You can
press the MENU key and edit the window by putting an
identifier name in, change the symbol and edit the lat/long.
This is done by using the arrow keys that are around the
PAGE key and the SELECT key. Press the MENU key to
exit the window editing mode.

17
10.The side menu option will automatically change to ADD
TO ROUTE so reposition the cursor somewhere north of
the first waypoint and press the SELECT key. Again the
Pop-up window will show, edit this if you wish.
11.Move the cursor to a third position, say East of the second,
and press the SELECT key (ADD TO ROUTE is still
highlighted) to position the third waypoint.
12.Move the cursor to a forth position, say South of the third
position, and press the SELECT key to place the forth
waypoint of the route. Edit the Pop-up window if you
wish.
13.Press the PAGE key now to finish the route and return to
the PLOTTER Page. That route is now stored and ready for
recall when you want it.
3.3 A Tutorial to Recall and Navigate a Route
Here we assume that the Chartnav 343 is connected to both a
position finding device such as a GPS, and a suitable autopilot.
1. Press the POWER key to turn the unit on. The screen will
show the test information, then the Cetrek globe logo,
then stop at the Caution screen.
2. Press the SELECT key to clear the Caution screen. The
PLOTTER Page will be displayed.
3. Check that the indicated vessels position is correct. If you
cannot see the vessels position on the screen, press the
CHART/NAV key. This sets the Chartnav 343 to navigator
mode and moves the chart to place the vessels position in
the centre of the screen. Press the CHART/NAV key again
to return to charting mode.
4. Check that there is not a Pop-Up Window showing (if there
is, move the cursor off any symbol). Press the MENU key
and the selection bar appears across the top of the screen.
5. PLOTTER is already highlighted, so press the SELECT key
to activate it. The selection bar will change.

CHARTNAV 343
18
6. ROUTES is already highlighted so press the SELECT key
to activate it. The selection bar changes to give 6 route
options,
8. Use the and keys to highlight the route that you
wish to recall. When the correct one is selected, press the
PAGE key to return to the PLOTTER page.
9. Move the cursor over any waypoint in the route that you
wish to steer to. When the Pop-up window appears press
the SELECT key to make the waypoint the Target. The
symbol will change to a diamond with a cross through it
and a straight line will be drawn between the vessels
position and the target. Check that this is a safe track to
follow.
10.The Pop-Up Window will tell you which way it will follow
the route, backwards or forwards, which you can change if
you choose to join a route at a waypoint other than an
end one.
11.Turn your autopilot to Navigator Mode and let the
Chartnav 343 take over. When you reach the end of the
route, position the cursor over the Target. When the
Pop-up window shows, press the SELECT key to delete
the target.
12.Turn your autopilot back to manual control.

19
4. THE PLOTTER PAGE
Following power up of the Chartnav 343 and the successful
completion of the self-test routine, the unit will display the
PLOTTER Page. The chart displayed will be determined by the
card available to the Chartnav. The internal software has a
World map always available. For clarity the information
displayed on the Chartnav 343 Mono screen is in a light dot
pattern and in the Chartnav 343 Colour with different colours.
From this page the charts on the cards Marks, Events and
Waypoints (User Points) are placed and edited and Routes are
entered. It is from this page that Target Waypoints are created
so Routes may be navigated and personal chart information
and waypoint libraries are built up.
When the Chartnav is reading information from the card, for
example to redraw, the word Loading is displayed.
Whenever you leave the PLOTTER Page the Chartnav
remembers the settings so that when you return to the page it
will open at the same place and scale as it was left.
Figure 9 - The PLOTTER Page

CHARTNAV 343
20
In Normal Operation the display screen is divided into two
main parts - a larger left and smaller right window. The right
window being further divided into a top and bottom section.
The left window is the Chart Display. On this part of the
screen, the charts that are read from the internal charts or the
Chart Card are displayed, then Routes and other overlaid
information are plotted.
When the edge of the Chart Display Window corresponds
with the edge of the digitised chart, the Chartnav searches the
data card for a new chart which contains the same cursor
position at a scale similar to that of the current chart. If one is
available it automatically changes to it. If there is not one
available, the display will not go beyond that point, so ensure
that you have adequate cards for your journey.
The right window is a Data Display Window, which is divided
into a top half for navigation or charting information, and a
lower half for general information.
Figure 10 - The Data Display Window
The information will always appear in the same location in the
window. Once you have become familiar with the NAVIGATE
and CHARTING layouts, you should be able to find the
information that you need very quickly.
Other manuals for Chartnav 343
1
Table of contents
Other Cetrek GPS manuals
Popular GPS manuals by other brands

Kenwood
Kenwood DNX7120 - Navigation System With DVD player instruction manual

Raytheon
Raytheon NSC 18 user manual

Garmin
Garmin DEZLCAM 785 owner's manual

Garmin
Garmin eTrex Summit Owner's manual and reference guide

Kenwood
Kenwood DNX7210BT instruction manual

Apollo
Apollo Apollo Precedus Quick reference guide