Chairman TS-8800 User manual
TS-8800
MASSAGE CHAIR
MASSAGE CHAIR
Instruc�on For Use
Made in Taiwan
TS-8700
CHAIRMAN


CONTENTS
Safety Precautions ...........................................................
P. 1
...........................................................
P. 4
...........................................................
P. 8
......................................................
P. 9
.................................................
P. 12
............................................
P. 10
................................
P. 5
............................................................................
P. 2
...........................................................................
P. 2
Cautions
Structure
Setup Instructions
Product Functions and Descriptions
Steps of Operation
Product Specifications
Basic Troubleshooting Guide
Basic Replacement Guide

Safety Precautions
TO PREVENT ANY POSSIBLE DAMAGE, ACCIDENT, OR INJURY, PLEASE PAY
ATTENTION TO THE FOLLOWING CAUTIONS:
• DO NOT let children play on the chair.
• DO NOT attempt to uninstall, repair, and modify the chair without the technician’s
accompanying.
• If users feelunwell and ill when using the chair, please stop and turn off the power
immediately.
• Keep hands and feet away from the massage mechanical devices.
•Unplug the power cord when doing the maintenance.
• Persons with any of the following conditions MUST consult their physician before
using the chair:
(1) Persons with heart diseases.
(2) Persons with malignant tumors.
(3) Women who are pregnant.
(4) Persons with spinal abnormalities or curvature.
(5) Persons who are under medical treatment.
(6) Persons with osteoporosis.
(7) Persons who require medical test.
• DO NOT use the chair in a dirty, greasy, smoggy, or humid environment.
• DO NOT expose the chair directly to sunlight and DO NOT place the chair too
close to other electrical appliances.
• DO NOT clean the chair with alcohol or evaporative solutions.
•UNPLUG the power cord and DO NOT use the chair if the leather or fabric cover is
torn or worn out. Contact the company’s technicians immediately.
• Users with hair dressing/pomade- Please place a towel behind your head in order
to protect the leather or cloth cover.
• DO NOT load two or more persons on the chair at the same time.
• Persons under 18 years old DO NOT use the chair without an adult’s supervision.
• Persons who weight over 300 pounds DO NOT use the chair.
• Removal of the cushion from the back pad results in stronger massage.
• DO NOT drink or eat while using the massage chair.
• Please flip back the headrest pillow before starting the massage.
• Please use the massage chair periodically.
- 1 -

Cautions
• DO NOT sit or step on the remote control.
• DO NOT drop the remote control on the floor.
• DO NOT press the remote control too hard. Keep hands dry when using the remote
control.
• DO NOT use foreign and hard objects to operate the remote control, including your
nails.
• Improper use will result in damaging the remote control.
• Users need onlyfinger tipsto press the buttons on the remote control.
• Turn off the power after finishing using the chair.
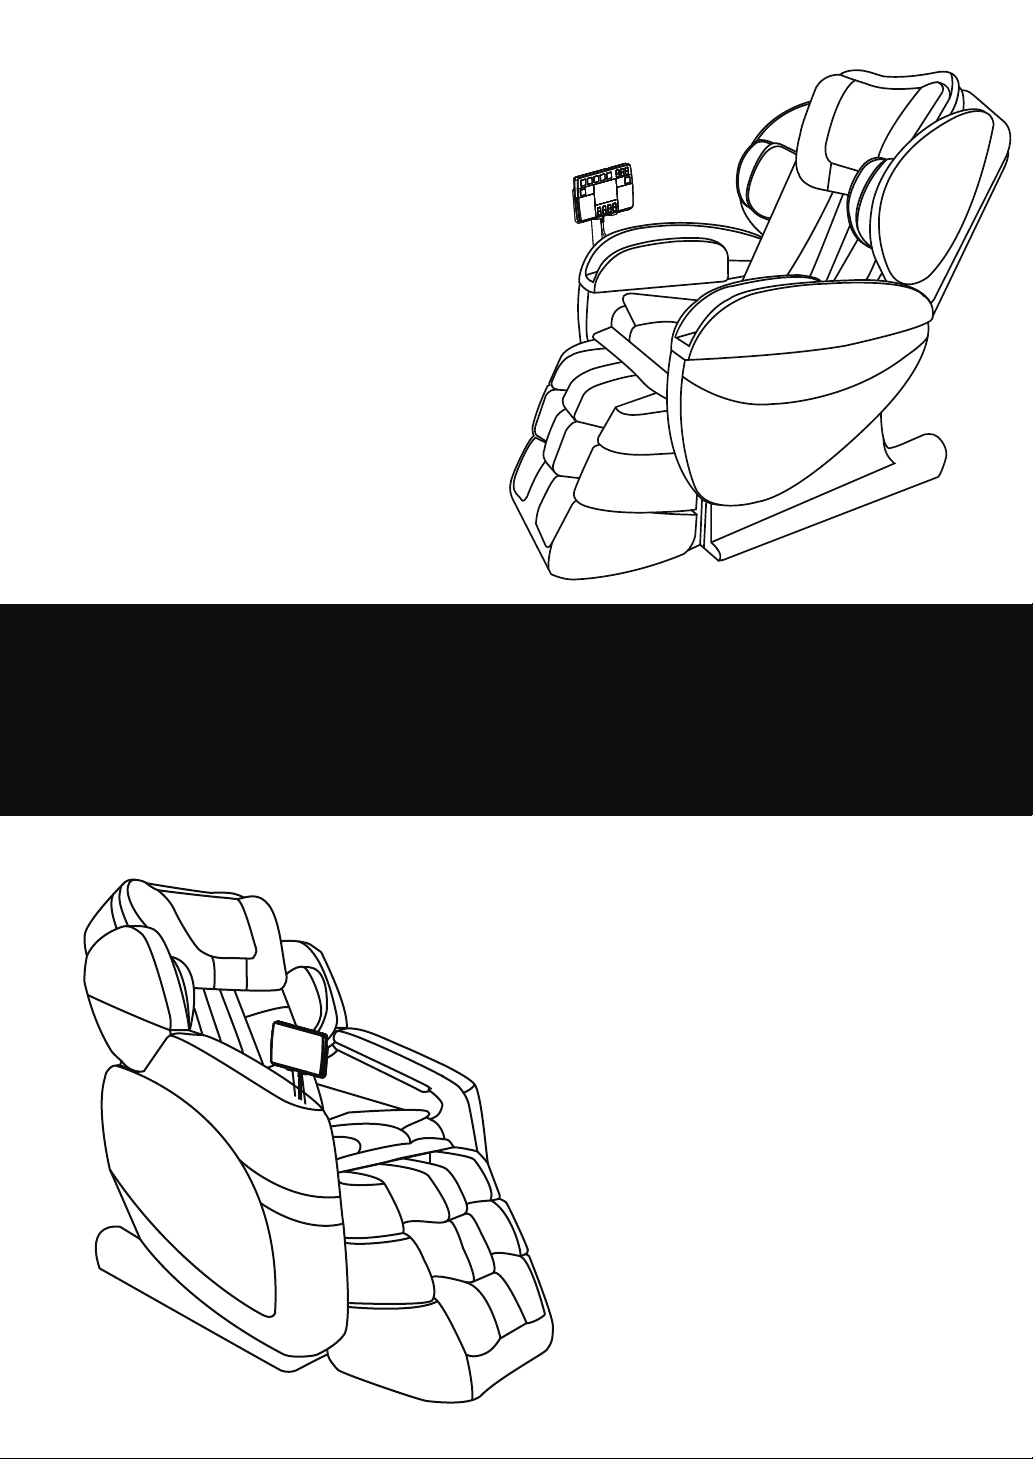
Structu
TS-8800
re
Air Pressure for Shoulders
Air Pressure for
Shoulders
Air Pressure for Armrest
Headrest Pillow
TFT-LCD Remote Control
Air Pressure for Buttocks
Seat Cushion Air Pressure for Armrest
Caster
Power Cord Socket
Fuse Cartridge
Power Switch
Air Pressure for Footrest
- 2 -
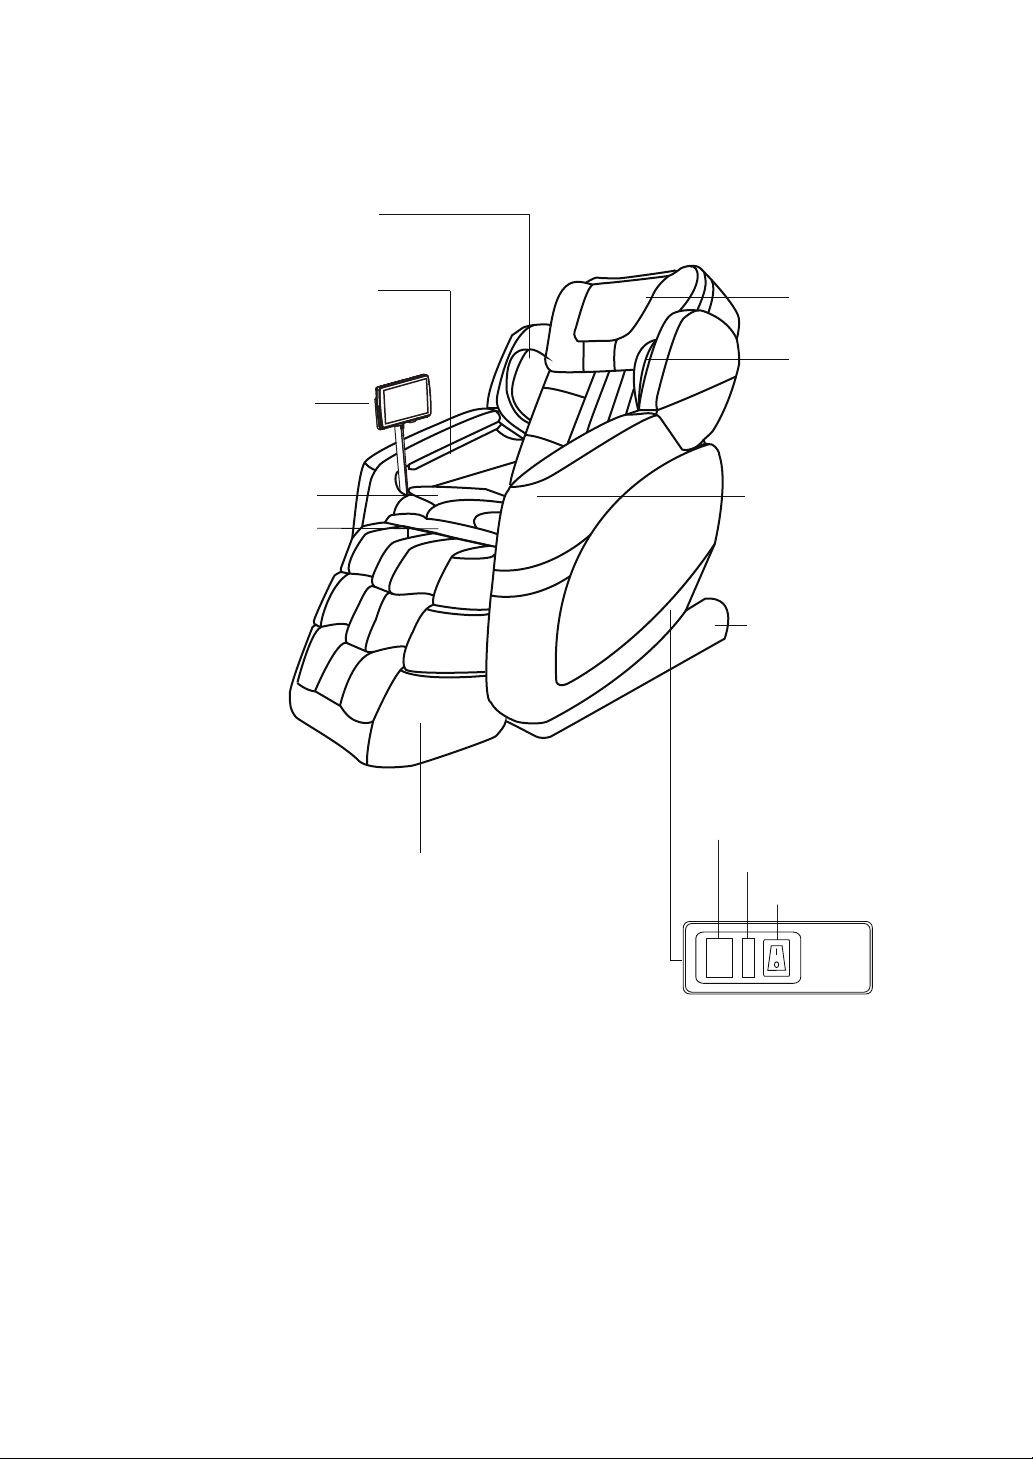
Structure
- 3 -
7”Touch Panel Remote
Control
Air Pressure for Shoulders
Air Pressure for
Shoulders
Air Pressure for Armrest Headrest Pillow
Air Pressure for Buttocks
Seat Cushion
Air Pressure for
Armrest
Caster
Power Cord Socket
Fuse Cartridge
Power Switch
Air Pressure for Footrest
TS-8700

Step 1 :
Take out the chair from the carton. Pull
straight the backrest until you hear a
‘’click’’ sound.
Step 2 :
Please follow steps below to install
the armrest and shoulder part.
a. Assemble air tubes. Make sure
the color is matched.
b. Fix air tubes. Make sure air
tubes are not bent.
c. Fasten all screws.
Step 3 :
Install the remote control holder by
ratcheting wrench and tie tightly.
Step 4 :
Plug in power cord to chair and wall
outlet. Check again above steps is
done properly and massage chair is
ready for using.
- 4 -
Setup Inst
TS-8800
ructions

Setup Inst
TS-8700
ructions
Step 1 :
Take out the chair from the carton. Pull
straight the backrest until you hear a
‘’click’’ sound.
Step 2 :
Please follow steps below to install
the armrest and shoulder part.
a. Assemble air tubes. Make sure
the color is matched.
b. Fix air tubes. Make sure air
tubes are not bent.
c. Fasten all screws.
Step 3 :
Install the remote control holder by
ratcheting wrench and tie tightly.
Step 4 :
Plug in power cord to chair and wall
outlet. Check again above steps is
done properly and massage chair is
ready for using.
- 5 -

Product Functions and Descriptions
- 6 -
Power: Press this button while the chair is activated that causes the rollers and chair
angleto return to their storage positions before the chair is restored.
Stop:Press this button to shut the chair off immediately in an emergency or if there is
a malfunction during operating. The massage rollers will stop working immediately.
ENERGY
AUTO PROGRAMS
SYSTEM BUTTONS
Press thisbutton for programmed massage function for 16 minutes. The program
is mainly designed to leave user feeling rejuvenated and recovering vitality.
RELAX
Press this button for programmed massage function for 20 minutes. The program
is mainly designed to relieve the stress and fatigue by tapping and flapping.
COMFORT
Press thisbutton for programmed massage function for 30 minutes. The program
is mainly designed totow user’s hands and legs by pressing and collocating with
Zero-Gravity function.
STRETCH
Press thisbutton for programmed massage function for 20 minutes. The program
is mainly designed to stretch user’s waist and lumbar for those who are sitting in
front of the office desk for long time and under lots of stress.
QUICK
Press this button for programmed massage function for 8 minutes. With all
massage function, the users can have a quick and effective rest.

SEMI-AUTO MASSAGE
Preset 12 minutes program mainlyfor shoulder massage.
Preset 12 minutes program mainlyfor back massage.
Preset 12 minutes program mainly for waist massage.
AIR MASSAGE :
SEMI-AUTO AIR:
The solo roller will be automatically worked when choosing foot
air massage
The program is mainly designed for arm, foot and seat air massage.
The program is mainly designed in conjunction with arm and shoulder
air massage.
The program is mainly designed in conjunction with thigh and footair
massage.
The program is mainly designed for arm air massage.
The program is mainly designed for shoulder air massage.
The program is mainly designed for thigh air massage.
The program is mainly designed for foot air massa
To start the function, press this button to set massage time for
5/10/15/20/25/30 minutes
ge.
Air +/-: Press this button to adjust the intensity of air massage while the program is in
progress.
MANUAL MASSAGE FUNCTIONS
Press this button to turn on/off the kneading function. It’s preset at speed
ed (6third. Press twice will stop working. User can adjust to the preferred spe
speeds).
Press this button for few selections to massage full body, shoulder, back,
waist or fixed point.
Press this button to turn on/off the tapping function. It’s preset at speed third.
Press twice will stop working. User can adjust to the preferred speed (6 speeds).
Press this button to turn on/ off the kneading and tapping functions. It’s
preset at speed third. Press twice will stop working. User can adjust to the preferred
speed (6 speeds).
t to the preferred speed (3 speeds)
- 7 -
Press this button to turn on/off the flap function. It’s preset at speed first. Press
twice will stop working. User can adjus

Press this button to turn on/ off the shiatsu function. It’s preset to massage
full body. Press twice will stop working.
For adjusting the width of the rollers in three steps for wide, medium and
narrow.
Press this upward and downward button to adjust the rollers to the
desired position.
3D +/-: Press this button to adjust the intensity of the massage while the
program is in progress.
Press this button to turn on / off the warmer in the backrest.
SOLE ROLLER
AFFILIATED FUNCTION
Auto I: The program is mainly designed for sole roller massage
Auto II: The program is mainly designed for sole roller massage
Press this button to turn on / off the sole roller, it is preset at speedfirst.
Press this button for 3 different speeds on sole roller
ANGLE ADJUSTMENT
Zero - gravity position
Inversion position
FOOTREST:
Press the button to adjust the angle of the footrest
RECLINE:
Press the button to adjust the angle of the seat and backrest
ZERO-G:
Press the button to adjust the angle of the seat. Continue pressing this button
for the restore position; continue pressing this button for the Zero - Gravity angle.
FOOT SLIDE:
Press the button to lengthen and shorten footrest
- 8 -
Press this button for 6 different speeds. This function can be used with other
manual functions.

Steps of Operation
Step 1
Plug into the power cord, and then turn on the power switch on the right side.
Please prepare a headphone if you would like to listen to the music while massaging.
Step 2
Please operate the TS-8800 Massage Chair the by following steps.
(1) Automatic Massage Functions
When you press any auto programs, it will automatically adjust the angle of the chair.
Also, you can adjust the angle of the chair to the most comfortable position by pressing
AUTO RECLINER, FOOTREST, RECLINE, ZERO-G and FOOT SLIDE buttons from
the manual setting.
A. If you press ENERGY, RELAX, COMFORT, STRETCH, QUICK, please refer to
the following steps.
Step 1. The massage function will be started after the chair angle is reclined in
position. The back and foot massage are set on the deep massage therapy program.
Step 2. You have finished the setting. Please let your body relaxed, make your mind
empty, and enjoy the whole course of the program.
B. Please press “SHOULDER”,”BACK” or “WAIST” button to select massage area
and have an automatic massage. The AUTO AIR button, auto recliner can be
operated individually or collocating with the massage function.
(2) Manual Massage Functions
Step 1. Press “TIME” button to select massage time.
Step 2. Press “Function” button to select massage functions of KNEAD, KNEAD &
TAP, SHIATSU, FLAP, TAP.
Step 3. Set the body WIDTH, SPEED, REGION, HEAT, REGION ROLL UP / DOWN
as per your favor.
Step 4. The AUTO AIR, HEAT, SOLE ROLLER can be operated individually or
collocating with the massage functions.
(2) Power
Press the POWER button to stop all of the programs while functioning. The massage
rollers will automatically return to the top of the mechanism, and the chair will reset
into full upright position.
(3) When finished, please switch off the power and remove the power cord.
- 9 -

Product Specifications
Model : TS-8800 /TS-87004D massage chair
Power Voltage : □110V □230V
Power Consumption: 120W
Chair Dimensions:
Straight: 155cm(L)x81cm(W)x120cm(H)
Recline: 195cm(L)x81cm(W)x91cm(H)
Weight:107 kgs
The place of origin: Taiwan
- 10 -

Basic Troubleshooting Guide
No power
No display on remote
control, but chair
responds normally
when buttons pressed.
Hearing a squeaking
noise when reclining.
1.Make sure power switch is on, the line icon (-) should
be pushed in - Test Chair, continue to next step if
needed.
2.Check each end of the power cord (where the power
cord plugs into the chair and where it plugs into the
wall outlet) and make sure each end is securely
plugged in – Test chair, continue to next step if needed.
3.Test wall outlet with another appliance – Test chair,
continue to next step if needed.
4.Change fuse near power switch (5 AMP) (Reference
page 11) – Test chair.
1.Turn off the switch power, the circle icon (○) should be
pushed in.
2.Unplug the power cord (for 10 seconds).
3.Plug back the power cord.
4.Turn on the switch power, the line icon (-) should be
pushed in – Test remote control again, continue to next
step if needed.
5.Check the each end of the wire which connects the
remote control fully plugged into the chair, you will need
to open up the remote control (7 screws). – Test chair.
1.Check and test each of the reclining motors (Footrest,
Backrest, and Rotate) to find out which reclining function
is making the squeaking noise.
2.Once you examine which motor/s are making the
squeaking noise, lubricate where the motor travels in
and out of its housing (underneath the chair) with either
WD-40 or 3 in 1 Oil – Test chair, continue to next step if
needed.
3.Use either WD-40 or 3 in 1 Oil to lubricate the side bolts
on the chair (which connected the backrest to the chair
seat frame). These bolts are located between the chairs
armrest and each side of the backrest – Test chair.
Problem
Troubleshooting Methods
l
l
- 11 -

Footrest / Backrest / Rotate
motor can not go up / down
1. Remove the right armrest (when sitting on the chair)
and loose the leg cover of the chair. (Reference page
14 ). So the bottom of the chair is exposed.
2. Check color coded connections underneath of the
chair, make sure those connections are connected.
(Footrest = Yellow; Back recline = Red; Inversion
recline = White; Foot lengthen = Blue) – Test chair,
continue to next step if needed.
3. Examine if motor or motherboard (Reference page 13
) need to be replaced.
A. Disconnect motor connection which is not working
and cross-connect it with a motor connection.
(Footrest
= Yellow; Back recline = Red; Inversion recline =
White; Foot lengthen = Blue; Sole roller = Brown)
*Please note: You can only cross-connect the color
coded connections between the non working motor
and the working motor. B. After cross-connecting the
connections, test for the recline functions which could
not work by using the remote control. Example: Back
recline motor could not go up / down. After cross-
connecting Back recline motor connections with the
Inversion recline motor connections, the buttons on
the remote control which command the Inversion
recline to go up / down, will now control the back
recline motor to go up / down (and vise versa, for the
buttons on the remote control which command the
back recline motor to go up / down, will now control
the Inversion recline motor to go up / down).
4. C.If the motor still cannot go up / down after cross-
connecting the color coded connections by testing
it with the remote control. Then the motor needs to
be replaced. On the other hand, if the motor can go
up / down after cross-connecting the color coded
connections / plugs now. Then the mother board
needs to be replaced.
5. After examining troublesh ooting through above
steps from A to C to find out which parts needs to
be replaced. Please contact service department to
request for replacement parts.
- 12 -

Basic Replacement Guide
Please Note – Always unplug the power cord of the chair from the wall outlet
when replacing and/or maintaining any part/s of the chair.
How to replace the fuse (near the power switch)
1. Turn off the power switch, and unplug the power cord from the chair.(reference
picture 1)
2. Use a small flap tip screw driver to pry out the fuse cartridge. Cartridge slides out
directly towards you. (Reference pictures 2 and 3)
3. Replace the fuse in the clamp (fused currently being used) with the fuse in the
square enclosure (spare fuse). Spare fuses (5 AMP) can be purchased at any local
electronics store. (Reference picture 4)
4. Slide back in the fuse cartridge.
5. Plug back in the power cord to the chair. Turn on the switch power, the line icon (-)
should be pushed in.
6. Test chair and see if it powers up. You should hear a “BEEP” sound when there
has power to the chair.
Picture 1 :
Remove power cord.
Picture 2 :
Fuse cartridge / housing.
Picture 3 :
Use flat tip screw driver to pry out.
Picture 4 :
Fuse cartridge / housing slides out
toward you.
- 13 -

How to replace the massage module in the backrest
1. Release the bottom lock beneath the back cover of the chair, and push forward the
chair backrest so that it rests on top of the chair seat cushion. (Reference picture 1)
2. Loosen the six chrome screws on the back cover. Then remove the back cover.
(Reference picture 2).
3. L oos en th e eigh t s cr e ws on th e m et al fr am e . T hen unplug t h e
conn ec ti ons. (Reference picture 3-4)
4. Lift out the chair back massage module, and exchange it with the replacement
chair back massage module.
5. Plug back the connections on the back massage module.
6. Put back the back cover and fasten six screws.
7. Pull straight the backrest until you hear a “click” sound, which locks the chair’s
backrest into place.
8. Test all of the functions.
Picture 1 :
Release the lock.
Picture 2 :
Six screws on the back cover.
- 14 -

Picture 3 :
Loosen the screws.
Picture 4:
Unplug the connec�ons
- 15 -

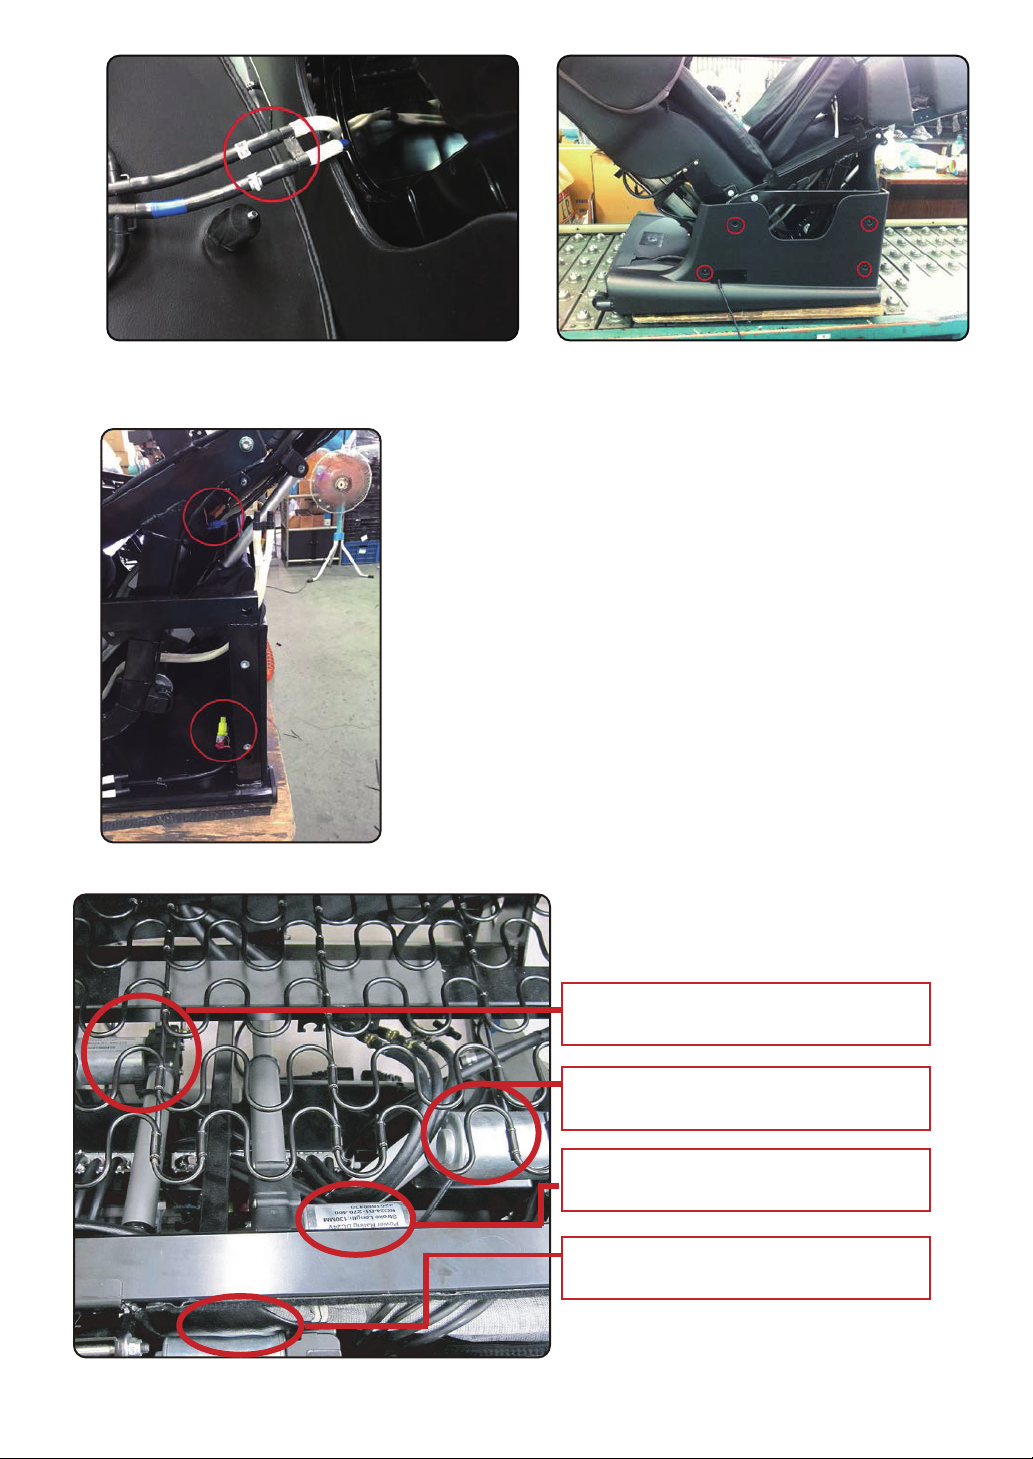
How to replace the motors (Located underneath
the chair)
1. Unzip the zipper on the edge of the seat. (Reference picture 1 and 2)
2. Tear off the Velcro that attached on the seat. (Reference picture 3)
3. Loosen the six chrome screws on the underneath of the seat. (Reference picture 4)
4. Loosen the three flower screws locates on the inner side of armrest (Reference
picture 5 and 6)
5. Disconnect two air hoses from chair. Then remove the right armrest. (Reference
picture 7)
6. Loosen the four screws on the leg of chair. Then you can see the motors and plugs.
(Reference picture 8, 9 and 10)
7. Locate the motor which needs to be replaced (red plug = back recline ; yellow plug
=footrest ; white plug = Inversion recline ; blue plug = foot lengthen)
8. Disconnect the color coded plugs.
9. Loosen the nuts and bolts, and slide out the bolts.
10.You may need to cut any zip ties to completely remove the motor from the frame.
Please be careful to only cut the zip ties, do not cut any wires.
11. Get replacement motor and align it where the old motor was.
12.Slide in the bolts on each end of the motor and fasten the bolts.
13.Connect the color coded plugs.
14.Test and see if the new replaced motor can go up and down.
15.Plug in wire and install the chair as step 7 to 1.
- 16 -
- 15
Picture 7 :
Disconnect 2 air hoses from chair.
Picture 8 :
Loosen the 4 screws, and remove
the partition on the right side of chair.
Diagram Picture
10 : of motors
Footrest motor
Inversion recline motor
Back recline motor
Footlengthen motor
Picture 9: Diagram of connec�ons
- 17 -
Table of contents
Other Chairman Massager manuals


Popular Massager manuals by other brands

HoMedics
HoMedics FS220HAU instruction manual

Infinity
Infinity Riage-X3 installation guide

Interactive Health
Interactive Health iJoy ottoman 3.0 Use & care manual

iRest
iRest Future Foresee SL-A386 Operation instructions

Panasonic
Panasonic EP30005KU operating instructions

Osaki
Osaki Otamic LE OS-3D instruction manual


