Chandler And Me CMP-15-ANZ User manual

WAX
MELTER
User Manual
15 Litre / 4 Gallon
NZ/AU
CMP-15-ANZ
240V 50/60hz with NZ/AU plug
USA
CMP-15-USA
110V 50/60hz with USA plug


This Wax Melter has been designed for use with all types of waxes and oils commonly used in the manufacture
of candles and soap. The unit features a fully integrated, digitally controlled, element with two power settings
along with a fully programmable run timer and start time delay feature.
Main Features
Operating Instructions
Tap Assembly Instructions
4
5
3
7
6
8
9
10
How to change the default settings
Decanting Tips / Overheat Protection / Error Codes
Operating Parameters
Safety
Cleaning
Please read these instructions carefully before use & save for future reference.

3
Tap Assembly Instructions
Before you use your wax melter you will need to assemble the tap handle. Simply follow the instructions below.
You will need (Supplied):
1 x handle
1 x nut
1 x washer
1 x wrench
Instructions:
1. Locate the parts from inside the packaging box.
2. Attach the handle to the tap (see diagram).
3. Use the wrench to x the washer and nut to the tap.
4. Make sure the nut is tight to ensure handle is stable.
4
5
14
2
3
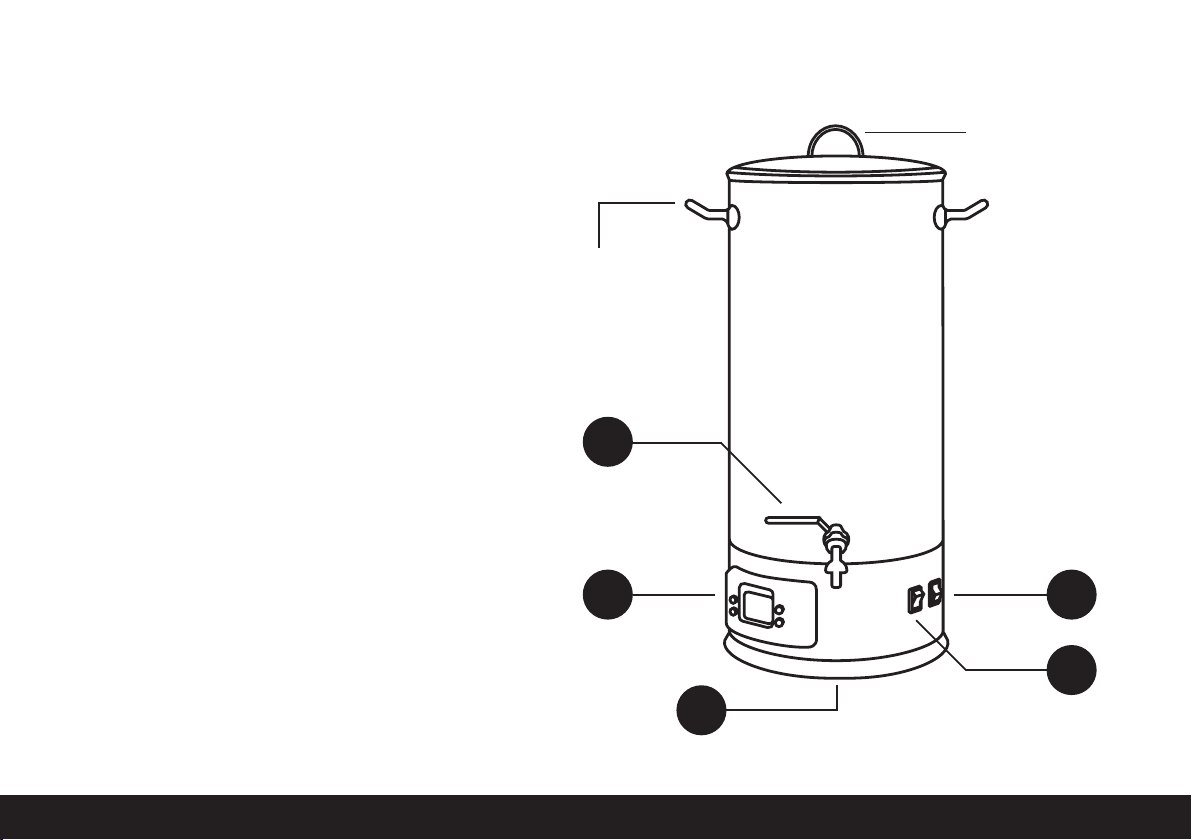
Stainless steel lid
with handle
Stainless steel
side handle
Main Features
1 - Mains Power Switch
3 - Reset Pin (Underneath melter)
The melter features a dry heat protection
system which can be reset using the Reset
Pin underneath the melter.
2 - Element Power Adjust Switch
600W: For ALL initial and small batch melts.
1600W: For harder waxes and larger batches.
4 - LCD Display
The programmable LCD display panel
controls the temperature of the wax, and the
start/run time.
5 - Stainless Steel Tap
Commercial grade stainless steel tap with 90
degree outlet and locking mechanism.

5
1. Load your wax into the tank (you can use akes,
blocks, beads or liquid).
2. Set the element to 600W. Caution! Never use
1600W for your initial melt.
3. Quick Start: Turn on the mains power at the side of
the unit then press “ON/OFF” on the LCD display.
The default temperature and run time will be
briey displayed on the screen. If you do not press
any buttons the default temperature and time is
used for a quick start and your melt will begin in 5
seconds.
The default quick start settings can be manually
pre-set (refer to instructions on page 8).
4. Manual start. You can manually enter the settings
at the start of each melt as follows;
• Set target temperature: within 5 seconds of
Operating Instructions
pressing the “ON/OFF” button press the +/-
buttons to select your target temperature
and then press the SET button.
• Set run time: The “hour” digits will now be
ashing, press the “+” or “-” buttons to adjust
the hours and press SET. Next adjust the
minutes and press SET. If you set this time to
00:00 then the unit will run indenitely. The
maximum setting is 24 hours.
• Set delayed start time: The delay timer digits will
now be ashing. Press “+” or “-” to adjust the time
and press SET. Note that you can only set a delay
by the hour. Leave this at 0:00 if you want the
melt to start right away.
Pressing SET one last time will commence your melt
using your chosen settings.

6
Tips for Decanting
Open the tap gradually and fully to decant the
melted wax into your mixing or pouring pot. When
the wax level is low you can gently tip the tank
toward you to drain the remaining wax through
the tap. Alternatively, you can simply pick the unit
up by placing one hand on a handle and the other
under the plastic base and tip the remaining wax
into your pot.
Any unused wax can be left in the melter to set
and remelted when ready for your next batch.
Always start on 600W.
Pro tip: When decanting melted wax from the
melter into a pot prior to mixing or pouring set the
target temperature a little higher to compensate
for transfer heat loss.
Dry & Overheat Cut-off
Protection
The melter features a cut-o protection system
which will cause the unit to switch o if the wax
level is too low or if the temperature rises too
quickly (such as when using high power mode
with a small amount of wax).
To reset the unit after an E3 or E4 error unplug the
cable from the wall and allow the contents to cool
down to room temperature; then gently tip the
melter on an angle and rmly push the RESET PIN
underneath the melter.
For all other errors contact your supplier.
Error Codes
Sensor short open / Short Circuit
Overheat
Dry Heat
E1 /E2
E3
E4

7
Operating Parameters
Default temperature setting: 180oF / 82oC
Programable Temperature range: 86oF – 212oF / 30oC – 100oC
Minimum recommended dry wax weight: 11 lb / 5kg
Maximum volume (melted wax): 4 gallons / 15 litres
Delayed start timer default setting: 00:00 (no delay)
Delayed start time programmable range: 1 to 24 hours
Runtime default setting: 4 hours
Runtime programmable range: 0 – 24 hours
Dry heat safety cut o temperature: 374oF / 190oC

Change the Default Settings
& F/C Display
Caution! High Heat Mode
1600W
• With the unit in standby mode (mains switch
"On" and LCD Panel Switch "O") press and
hold the “set” button for 10 seconds until the
LCD display lights up.
• Press the + or – buttons to toggle between
F and C and then press the “set” button to
conrm your selection.
• Next use the +/- buttons again to select your
default temperature and press the set button
to conrm.
• Now use the +/- buttons again to select your
desired run time hours and press the set
button to conrm.
• Finally press the +/- buttons again to select
your run time minutes.
The melter has two power settings, 600W and
1600W. For most Soy and vegetable waxes you
will only require the 600W mode however for
larger batches and harder waxes you may want to
use the 1600W mode.
Only use this mode once the initial melt is
complete and the tank is more than half full
of melted wax. Using the 1600W setting with
small amounts of wax can cause a sharp rise
in temperature that can damage your wax and
activate the overheat cut out switch.
8

9
Safety
This appliance is not intended for use by persons with a lack of experience and knowledge, unless they have been
given supervision or instruction concerning use of the appliance by a person responsible for their safety.
Tap handle lock: The tap has a safety lock to prevent accidental opening. Always ensure that the tap is fully closed
and the lock is engaged after each use.
• Children should be supervised to ensure that
they do not play with the appliance.
• This appliance should not be left unattended
during operation.
• When not in use the tap must be closed and the
locking mechanism in place.
• The appliance should be operated on a at
stable surface, NEVER on an incline.
• Do not move the melter when it is in use.
• Be aware that the walls of the melter can be hot
when in operation and could cause burns.
• If the supply cord is damaged, it must be
replaced by the manufacturer, its service agent
or similar qualied persons in order to avoid a
hazard.
• This appliance contains a manual reset thermal
cutout. It also contains a thermal fuse. The
thermal fuse must be replaced by an authorized
agent to avoid a hazard.
• Appliance not intended to be immersed for
cleaning.

Cleaning
Clean your melter after use with a weak solution of dishwashing liquid and ush through the tap.
The tap ttings can be removed for through cleaning.
Scrub the inside with a nylon brush or similar. Wipe down the outside with a damp cloth. Do not immerse in water.
10

Exclusive Distributors
New Zealand
www.candlecreations.co.nz
USA
www.candlescience.com
USA: CMP-15-US | NZ/AU: CMP-15-ANZ
Wax Meltear
This manual suits for next models
1
Table of contents


