Chefwave CW-AF12V2 User manual
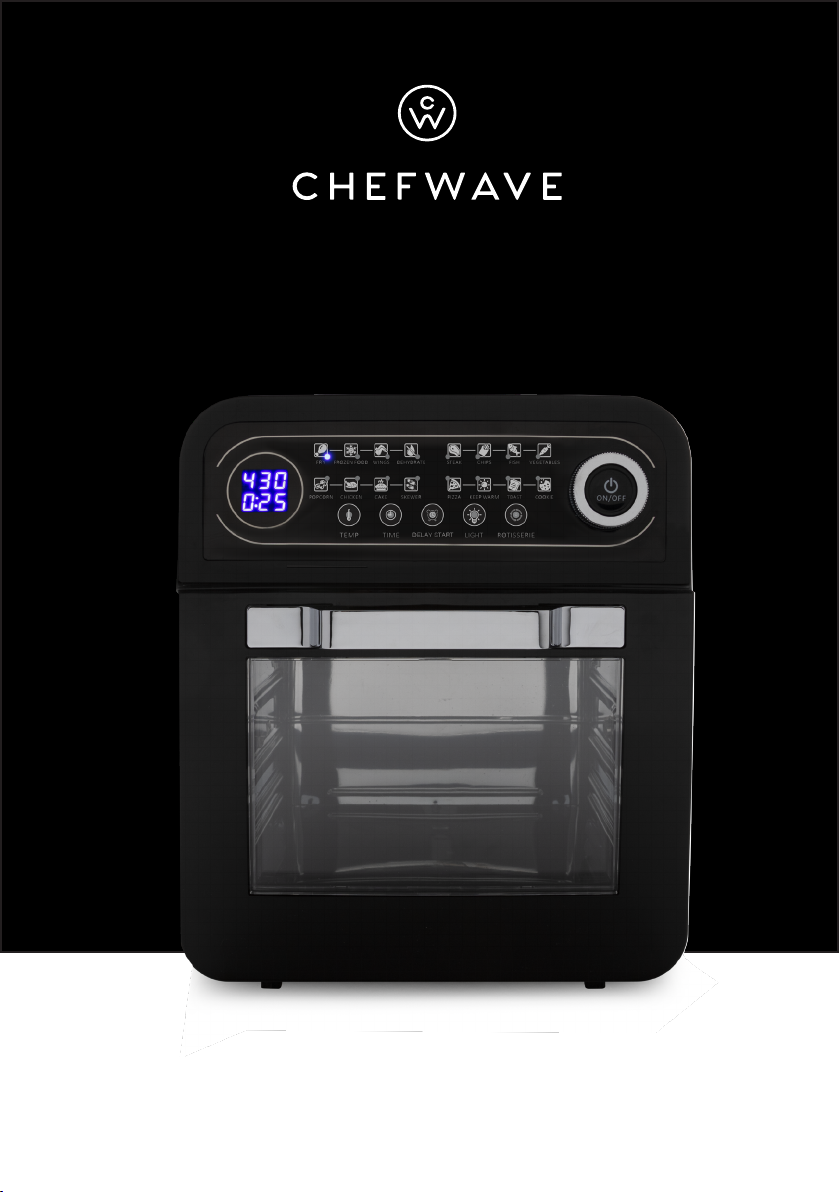
12 QT.
Air Fryer Oven
USER MANUAL
ModEL CW-AF12V2
120V AC, 60Hz
Please read this manual carefully before using the air fryer oven.
Save these instructions.
™

1
WELCoME!
Dear ChefWave™ Customer,
Congratulations on your purchase of the ChefWave™ 12 Quart Air
Fryer Oven with Dehydrator and Rotisserie. To ensure your safety
and many years of trouble-free operation, please read this manual
carefully before using this appliance and keep it in a safe place for
future reference.
Your Air Fryer Oven is built with precision. It features a number of
exciting technologies that combine the functions of an air fryer,
rotisserie, and dehydrator all in one state-of-the-art appliance,
allowing you to broil, grill, roast, fry, bake, barbecue, stir-fry, and
defrost your favorite foods quickly and conveniently.
We hope you enjoy your new ChefWave™ Air Fryer Oven.
Sincerely,
The ChefWave™ Team
@ MYCHEFWAVE
@ CHEFWAVEKITCHEN
For technical assistance and warranty service, please email us at cs@mychefwave.com.

2
TABLE oF CoNTENTS
Safety Instructions 3
Parts & Accessories 6
Control Panel 7
Using the Accessories 9
Operating Instructions 17
Cleaning & Maintenance 21
Important Notice 22

3
SAFETY INSTRUCTIoNS
When using electrical appliances, basic safety precautions should be
observed, including the following:
• To protect yourself from electric shock, do not immerse the cord, plug,
or appliance in water or other liquids. Do not allow any liquid to enter the
appliance.
• Do not allow the cord to hang over the edge of the counter or table. Do not
allow the cord to touch hot surfaces.
• Do not plug in or operate the appliance with wet hands.
• Do not use the appliance with extension cords or external power cord
connections.
• Make sure that your output voltage corresponds to the voltage stated on
the rating label of the appliance.
• Before using, check the appliance, the power cord, and the accessories
for damage. Do not operate if the appliance malfunctions or if it has been
damaged in any manner.
• If the power cord has been damaged, it must be replaced by the
manufacturer, a service technician, or a similarly qualified person in order
to avoid hazard.
• Do not allow children to play with the appliance. Keep the appliance and
its cord out of the reach of children. Close supervision is necessary when
the appliance is used by or near children.
• This appliance is not intended for use by adults with a physical, sensory,
or mental disability or by children under age 8. Such persons should be
supervised or properly instructed by someone responsible for their safety.
• The appliance and its accessories may become very hot during use. Do
not touch any hot surfaces directly.

4
• During operation, hot steam will release through the air outlet. Be sure to
keep your hands and face at a safe distance from the steam and air outlet
openings. When opening the appliance, be cautious of any hot steam that
may escape.
• A fire may occur if the appliance is covered or if it is touching or in close
proximity to flammable materials such as curtains, wallpaper, tablecloths,
and the like while it is in operation. Do not place or use the appliance on or
near any combustible materials.
• Due to high operating temperatures, do not place any plastic containers
or protective films inside the appliance.
• Place the appliance on a stable, horizontal surface during use. Do not
place it on plastic surfaces or any other surfaces that cannot withstand
high heat.
• Do not place the appliance against the wall or other appliances. Keep at
least four inches of space on all sides of the appliance to allow for adequate
air circulation.
• Do not cover any part of the appliance while it is in operation.
• Do not use the appliance for anything other than its intended use.
• Do not leave the appliance unattended while in use.
• Do not place anything on top of the appliance.

5
• When removing accessories from the appliance, be careful not to touch
the heating component.
• If food has cooked for too long, it will burn and smoke will release through
the air outlet. If this occurs, unplug the appliance immediately. After it has
cooled completely, clean the food particles and oil from the accessories.
• After using the appliance, turn the power off and gently unplug it from the
outlet. Do not jerk or pull the power cord.
• The appliance should always remain unplugged from the wall outlet when
not in use.
• Before cleaning the appliance, be sure that it has cooled completely and
that it is unplugged from the outlet.
• Do not use accessories that are not recommended by the manufacturer.
• This appliance is for household use only. Do not use the appliance
outdoors.
• Before using the accessories, be sure that they are clean and dry.
• This appliance contains a built-in safety switch. When the appliance door
is opened during cooking, the cooking function will stop automatically.
• This appliance should not be operated by means of an external timer or a
separate remote control system.
SAVE THESE INSTRUCTIONS

6
Parts
1. Top cover
2. Control panel
3. Upper cover
4. Housing
5. Power cord
6. Inner case
7. Door
8. Knob
9. On/Off button
Accessories
10. Handle tool
11. Rotisserie tool
12. Wire rack
13. Frying basket
14. Drip pan
15. Skewer rack
16. Rotating basket
17. Mesh basket
PARTS & ACCESSoRIES
7
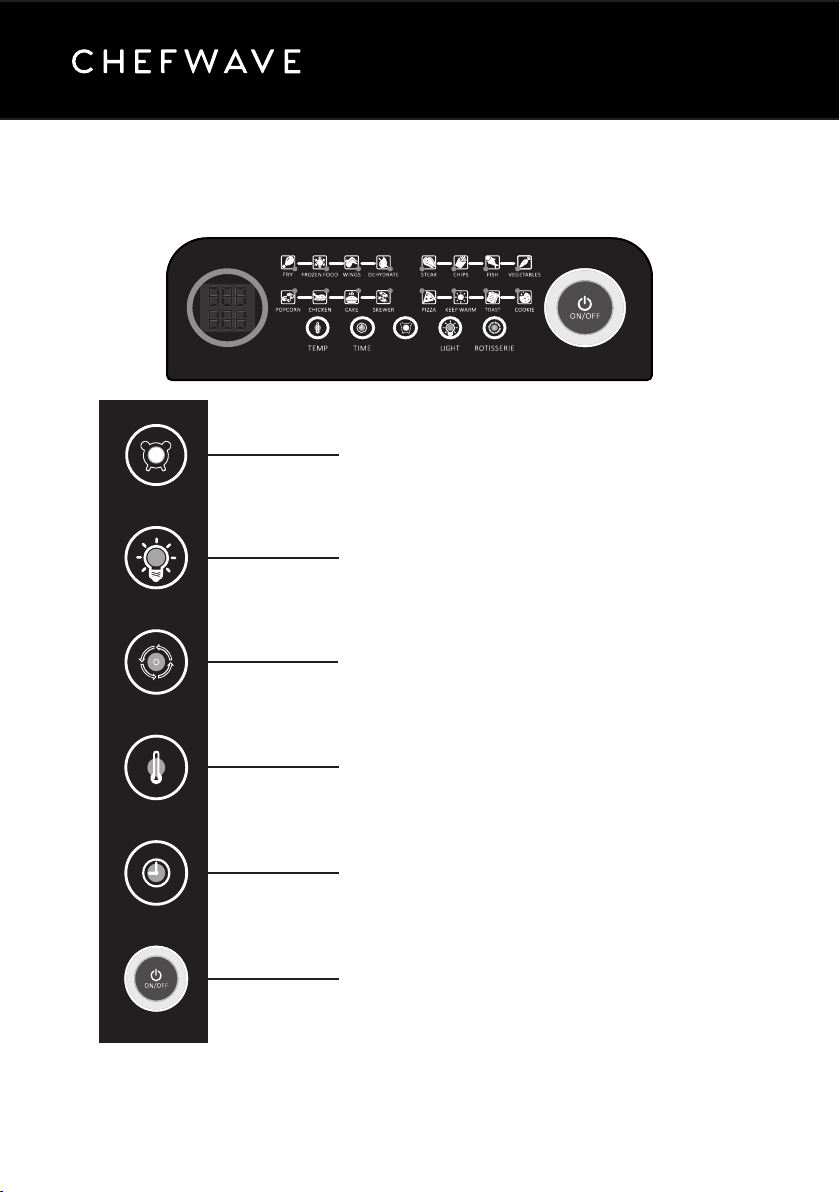
CONTROL PANEL
Delay Start. Use this button to set a delayed
start timer for the cooking process.
Light. Use this button to turn on the light
inside the oven.
*Note: The light will stay on for 30 seconds
whenever the door is opened.
Rotisserie. Use this button to activate the
rotisserie.
Temperature mode. Use this button to set the
cooking temperature.
Time mode. Use this button to set the cooking
time.
On/Off button and adjustment knob. Use
the button to start cooking or to turn off
the power. Use the knob to select a cooking
function and to increase/decrease the cooking
temperature and time.
DELAY START

8
Menu settings. These are the preset cooking functions from which you can choose.
The indicator lights will light up as you turn the knob to toggle through the functions.
Once you make a selection, the corresponding indicator will stay lit throughout the
cooking process.

9
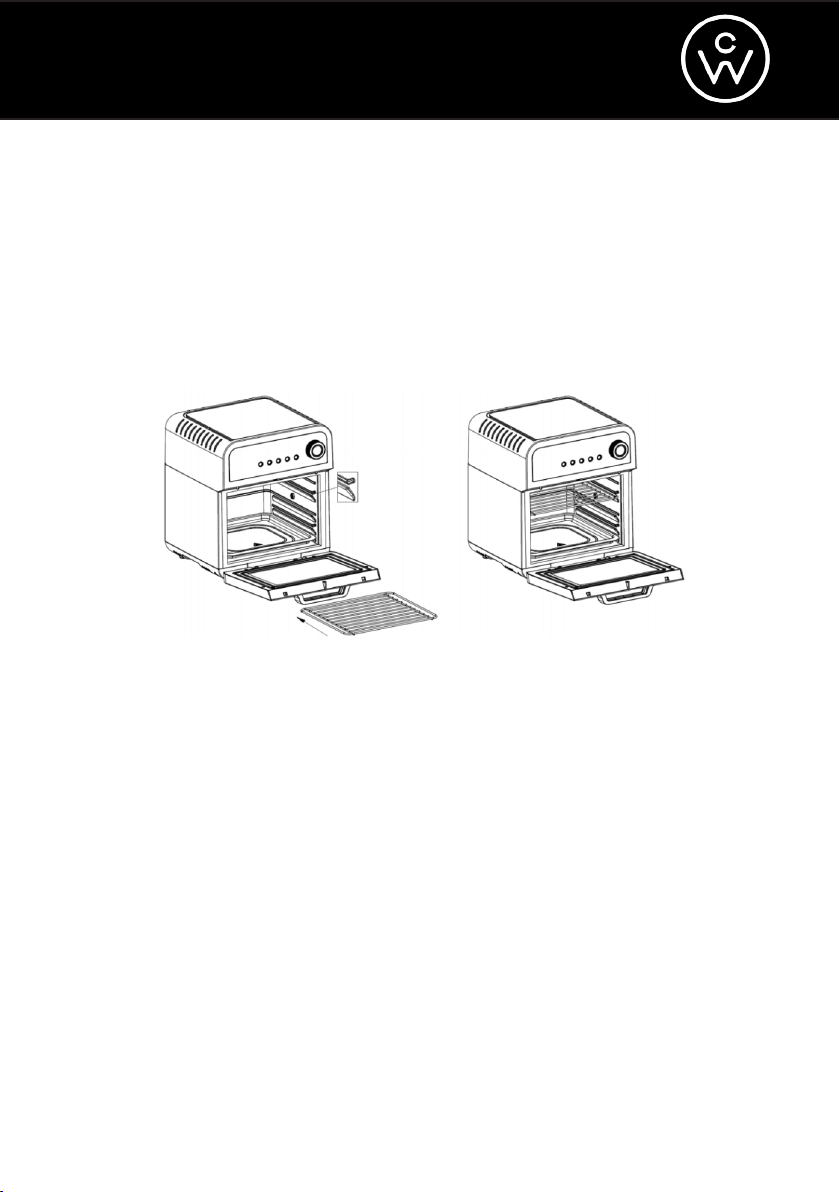
USING THE ACCESSoRIES
The drip pan should always be placed on the lower level of the appliance to catch
grease, oil, and crumbs. Place the drip pan inside the appliance, as shown in the
illustrations above. Always wear protective, insulated oven mitts when removing the
drip pan from the hot air fryer.
DRIP PAN
10
WIRE RACK
When needed, place the wire rack on the top level of the appliance, as shown in the
illustrations above. Always wear protective, insulated oven mitts when removing the
wire rack from the hot air fryer.
11
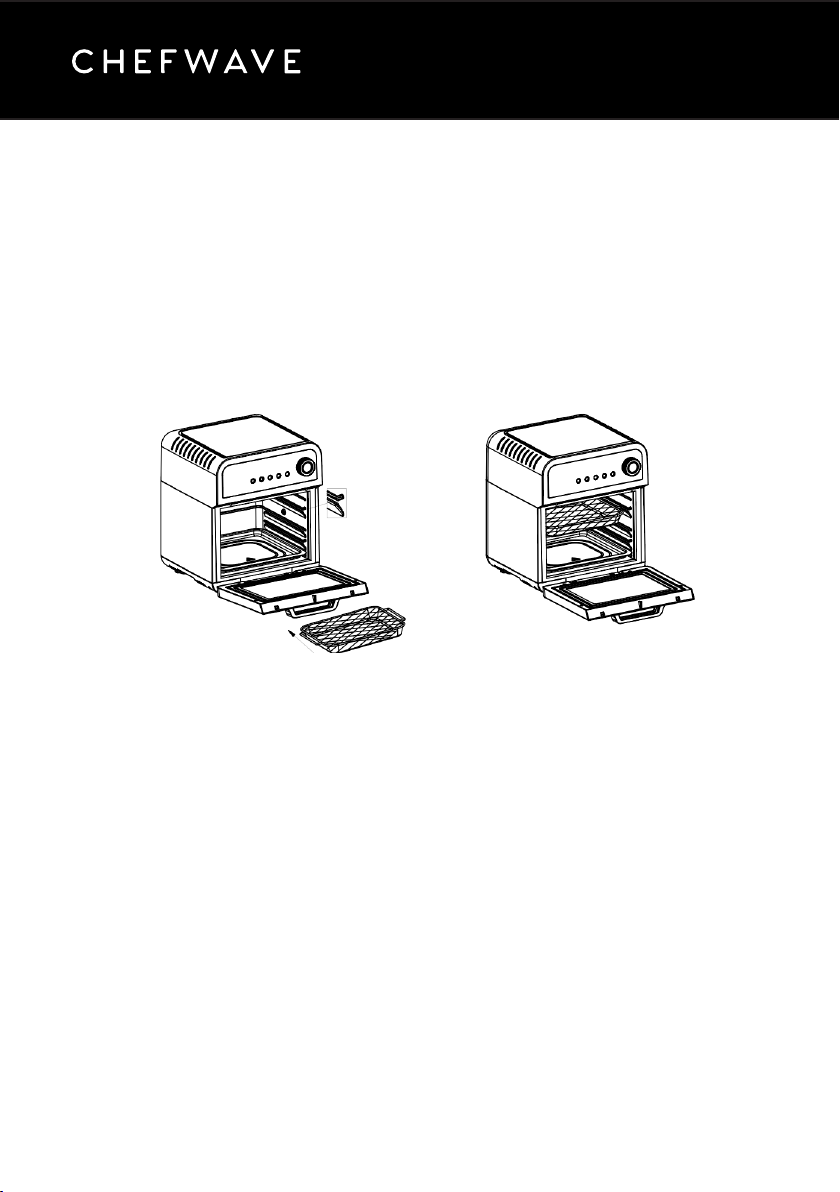
When needed, place the mesh basket on the top level of the appliance, as shown in
the illustrations above. Always wear protective, insulated oven mitts when removing
the mesh basket from the hot air fryer.
MESH BASKET

12
HANDLE TOOL
Always use the handle tool when removing the frying basket, skewer rack, rotating
basket, and rotisserie tool. Handle tool #1, shown in the illustration above, is used to
remove the frying basket. Handle tool #2, shown in the illustration above, is used to
remove the skewer rack, rotating basket, and rotisserie tool.
Clip the handle into the corresponding slot on the front of the frying basket or on
the rod ends on both sides of the rotisserie tool, skewer rack, and rotating basket, as
shown in the illustrations above.
Rotating Basket
Rotisserie Tool Skewer Rack
Frying Basket

13
Place food inside the frying basket. Be careful not to overfill the frying basket, as food
may expand during cooking. Using the handle tool, place the frying basket inside the
appliance. Remove the handle from the basket and close the door, as shown in the
illustrations above.
FRYING BASKET

14
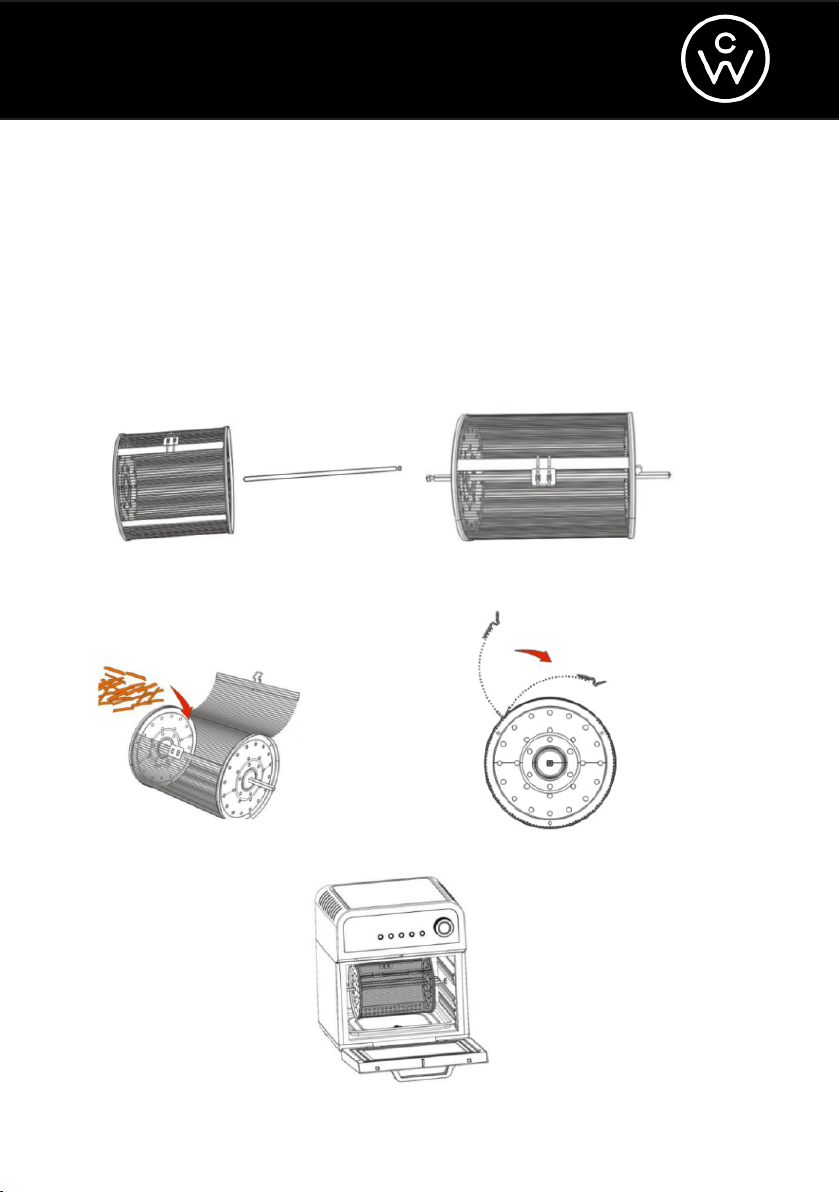
Slide the tool through the center of the chicken and out the bottom end. Firmly attach
the forks to the chicken and place it inside the appliance, as shown in the illustrations
above.
ROTISSERIE TOOL
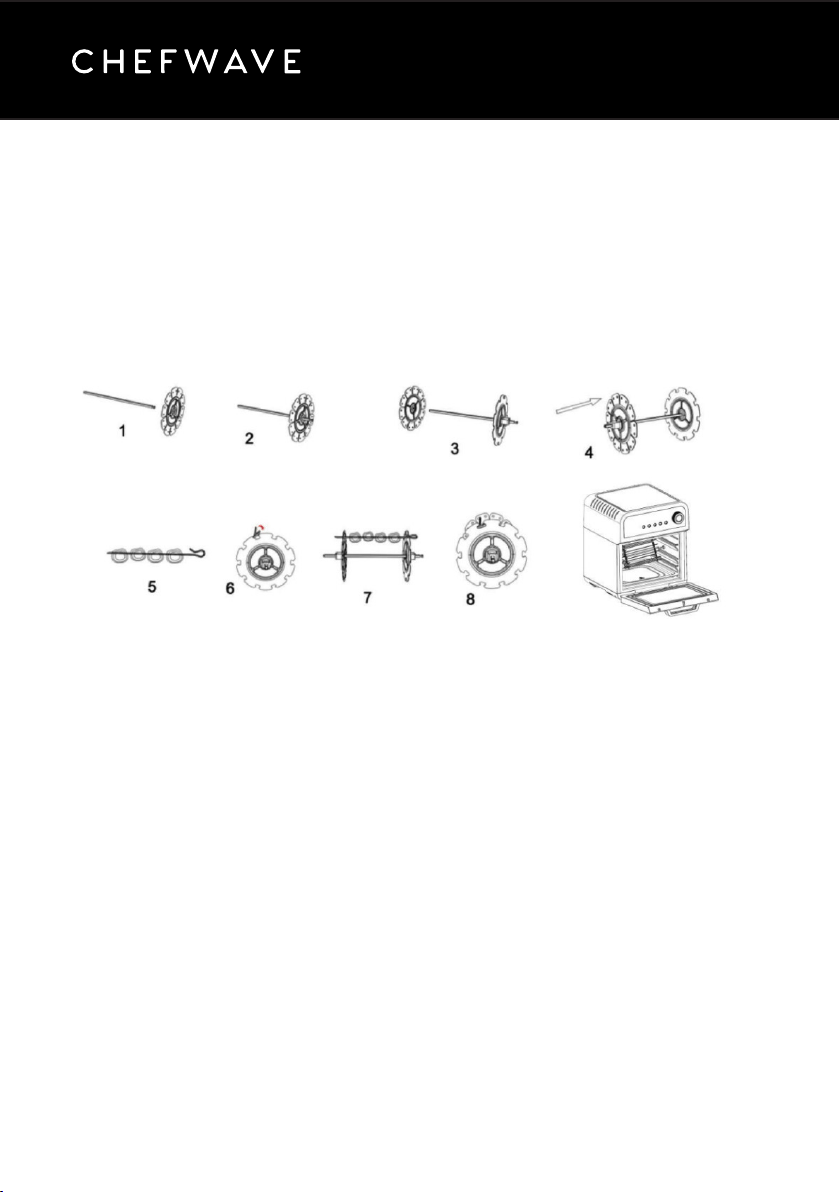
15
Place food onto the skewer as shown in Step 5 below. Then assemble the rack as
shown and place it inside the appliance.
SKEWER RACK
16
Assemble the rotating basket, as shown in the illustrations below. Place food inside
the rotating basket. Be careful not to overfill the basket, as food may expand during
cooking. Place the basket inside the appliance.
ROTATING BASKET
STEP 1 STEP 2
STEP 3 STEP 4
STEP 5

17
oPERATING INSTRUCTIoNS
Before First Use
1. Remove all packing materials, stickers, and labels.
2. Wash all of the accessories with warm water, dish detergent, and a non-
abrasive sponge.
3. Wipe the inside and outside of the appliance with a soft, moist cloth. Do not
wash or immerse the appliance, cord, or plug in water.
4. Place the appliance on a stable, horizontal surface. Do not place it against
the wall or on any surfaces that cannot withstand high heat. Keep at least four
inches of space on all sides of the appliance to allow for adequate air circulation.
Do not place the appliance on or near any combustible materials.
For Normal Use
1. Plug the appliance into the outlet, be sure that the door is closed, and press
the On/Off button. The appliance will enter standby mode. In standby mode,
all buttons are locked except for the On/Off button, the Light button, the Delay
Start button, and the Rotisserie button. While in standby mode, the appliance
will shut down automatically after 60 seconds if no operation is selected.
2. Turn the knob to select a cooking function. Each turn of the knob will toggle
through the 16 cooking function settings. Each time you turn the knob, the
corresponding function will light up on the control panel.
The default temperature and time settings for each of the 16 cooking functions
are specified in the following chart. Please note that if the serving of food is a
large quantity, you may want to adjust the default time and temperature.
3. If desired, press the Temp button to adjust the default temperature setting.
Turn the knob clockwise to increase or counterclockwise to decrease the
cooking temperature. Each turn of the knob will change the temperature by
50°F. The temperature range is 120 to 430°F. (Note: For the dehydrate function,
the temperature can be adjusted from 120°F to 160°F.)

18
FUNCTION DEFAULT TEMPERATURE
(ºF)
DEFAULT TIME
FRY 430 25 MINUTES
FROZEN FOOD 180 10 MINUTES
WINGS 390 10 MINUTES
DEHYDRATE 160 8 HOURS
STEAK 360 12 MINUTES
CHIPS 430 20 MINUTES
FISH 360 15 MINUTES
VEGETABLES 360 12 MINUTES
POPCORN 430 10 MINUTES (PREHEAT
FOR 2 MINUTES)
CHICKEN 430 30 MINUTES
CAKE 360 30 MINUTES
SKEWER 390 15 MINUTES
PIZZA 360 15 MINUTES
KEEP WARM 180 30 MINUTES
TOAST 390 4 MINUTES
COOKIE 360 12 MINUTES

19
4. If desired, press the Time button to adjust the default time setting. Turn the
knob clockwise to increase or counterclockwise to decrease the cooking time.
Each turn of the knob will change the time by 1 minute. The time range is 1 to 60
minutes. (Note: An exception is the dehydrate function at 8 hours cooking time.)
5. When you have selected your desired function and adjusted the temperature
and time as needed, press the On/Off button to begin cooking. If you instead
want to choose a different cooking function, simply wait 5 seconds, and your
selections will reset (alternatively, you can turn the machine off and on). Repeat
steps 2 to 4.
6. During cooking, it may be necessary to shake or turn the food in order to
ensure that the surfaces are cooked evenly. Always wear protective, insulated
oven mitts when handling any food or accessories that have been inside the hot
air fryer.
7. You may pause the cooking process for shaking/turning or for any other
purpose. To do so, simply open the door, and the cooking process will stop
automatically. Close the door to resume the previous cooking process.
*Note: If the door has been opened and more than 10 minutes have elapsed
before the door is closed, the appliance will shut itself down automatically.
*Note: The door is designed with resistance to prevent damage to the handle
and your surfaces. Pull the door down slowly but firmly to open it all the way.
8. When cooking is finished, the appliance will make a sound to alert you, and
the heater will turn off. The fan will continue to operate for 1 minute while the
interior cools down. After the fan has turned off, open the door and remove the
food and cooking accessories using the handle tool and/or protective, insulated
oven mitts.
*Note: If you open the door while the fan is still running, the fan will stop.
9. Press the On/Off button to turn off the power and gently unplug the power
cord from the outlet.
Table of contents
Popular Oven manuals by other brands


Bosch
Bosch HBA554B 0 Series User manual and installation instructions

Fagor
Fagor FDU700X Installation & maintenance

LBC
LBC LMO-E-P Installation, operation & maintenance manual

Cleveland
Cleveland CR-28 FP Specifications

GE
GE JKP18 Series owner's manual

Nerf
Nerf U1GCC0A.0B User manual and installation instructiions