Chelsea Home Imports CIL-E-6 User manual

Dual docking clock radio speaker
CIL-E-6
TBA

GB-1
Some Dos And Don't On The Safe Use Of Equipment
This equipment has been designed and manufactured to meet international safety standards but, like
any electrical equipment, care must be taken if you are to obtain the best results and safety is to be
assured.
***********************************
DO read the operating instructions before you attempt to use the equipment.
DO ensure that all electrical connections (including the mains plug, extension leads and intercon-
nections between the pieces of equipment) are properly made and in accordance with the manufac-
turer’s instructions. Switch off and withdraw the mains plug before making or changing connections.
DO consult your dealer if you are ever in doubt about the installation, operation or safety of your
equipment.
DO route the mains lead so that it is not likely to be walked on, crushed, chafed, or subjected to
excessive wear and tear or heat.
***********************************
DON’T remove any xed cover as this may expose dangerous voltages.
DON’T obstruct the ventilation openings of the equipment with items such as newspaper, tablecloths,
curtains, etc. Overheating will cause damage and shorten the life of the equipment.
DON’T allow electrical equipment to be exposed to dripping or splashing, or objects lled with liquids,
such as vases, to be placed on the equipment.
DON’T place hot object or naked ame sources such as lighted candles or night-lights on, or close to
equipment. High temperatures can melt plastic and lead to res.
DON’T use makeshift stands and NEVER x legs with wood screws-to ensure complete safety al-
ways t the manufacturer’s approved stand or legs with the xings provided according to the instruc-
tions.
DON’T use equipment such as personal stereos or radios so that you are distracted from the require-
ments of trafc safety. It is illegal to watch television whilst driving.
DON’T listen to headphones at high volume, as such use can permanently damage your hearing.
DON’T leave equipment switched on when it is unattended unless it is specically stated that it is
designed for unattended operation or has a stand-by mode. Switch off using the switch on the equip-
ment and make sure that your family know how to do this. Special arrangements may need to be
made for inrm or handicapped people.
DON’T continue to operate the equipment if you are in any doubt about it working normally, or if it is
damaged in any way-switch off, withdraw the mains plug and consult your dealer.
ABOVE ALL,
- NEVER let anyone especially children push anything into holes, slots or any other opening in the
case - this could result in a fatal electrical shock;
- NEVER guess or take chances with electrical equipment of any kind
- it is better to be safe than sorry!
***********************************
BTD612_chelsea_41014711_27 May 14.indd 1 2014-6-10 16:20:05

GB-2
To achieve the utmost in enjoyment and performance, please read this manual carefully before
attempting to operate the unit in order to became familiar with its features, and assure you years of
faithful, trouble free performance and listening pleasure.
Important Notes
* Keep instructions: the safety and operating instructions should be retained for future reference.
* Avoid installing the unit in locations described below:
Places exposed to direct sunlight or close to heat radiating appliances such as electric heaters.
On top of other stereo equipment that radiate too much heat. Places lacking ventilation or dusty
places. Places subject to constant vibration. Humid or moist places, the use of apparatus in
moderate climates.
* Make sure not to obstruct the ventilation openings.
* Before turning on the power for the rst time, make sure the power cord is properly installed.
* Mains plug is used as the disconnect device and it shall remain readily operable.
* The product shall not be exposed to dirpping or splashing and that no objects lled with liquids,
such as vases, shall be placed on the product.
* To completely disconnect the power input, the mains plug of apparatus shall be disconnected
from the main. Unplug the unit from the wall outlet before storms to prevent damage due to
lightning and any power uctuation.
* When the standby LED and display are not illuminated; this inducates that the power switch is set
to off or the set is disconnected from the mains.
* Minimum distances 10cm around the apparatus for sufcient ventilations.
* Attention should be drawn to the environmental aspects of battery disposal.
* The mains plug should not be obstructed or should be easily accessed during intended use.
* The ventilation should not be impeded by covering the ventilation openings with items such as
newspaper, table-clothes, curtains etc.
* No naked ame sources such as lighted candles should be placed on the apparatus.
* Battery shall not be exposed to excessive heat such as sunshine, re or the like.
For safety reasons, do not remove any covers or attempt to gain access to the inside of the product.
Refer any servicing to qualied personnel.
Do not attempt to remove any screws, or open the casing of the unit; there are no user serviceable
parts inside, refer all servicing to qualied service personel.
CAUTION: TO REDUCE THE RISK OF ELECTRIC SHOCK DO NOT REMOVE COVER (OR
BACK), NO USER SERVICEABLE PARTS INSIDE, REFER SERVICING TO
QUALIFIED SERVICE PERSONNEL.
CAUTION
RISK OF ELECTRIC SHOCK
DO NOT OPEN
BTD612_chelsea_41014711_27 May 14.indd 2 2014-6-10 16:20:05

GB-3
WARNING: TO PREVENT FIRE OR SHOCK HAZARD, DO NOT EXPOSE THIS APPLIANCE TO
DRIPPING OR SPLASHING.
Note:
- This unit will become warm when used for a long period of time. This is normal and does not
indicate a problem with the unit.
- If unusual conditions occur in the display or buttons, switch the unit off then turn on the unit again.
- Under the inuence of electrostatic phenomenon, the product may malfunction and require user
to power reset.
- The marking plate is located on the bottom enclosure of the unit.
FCC
This equipment has been tested and found to comply with the limits for a Class B digital device, pursuant
to Part 15 of the FCC Rules. These limits are designed to provide reasonable protection against harmful
interference in a residential installation. This equipment generates uses and can radiate radio frequency
energy and, if not installed and used in accordance with the instructions, may cause harmful interference
to radio communications. However, there is no guarantee that interference will not occur in a particular
installation. If this equipment does cause harmful interference to radio or television reception, which can be
determined by turning the equipment off and on, the user is encouraged to try to correct the interference by
one of the following measures:
- Reorient or relocate the receiving antenna.
- Increase the separation between the equipment and receiver.
- Connect the equipment into an outlet on a circuit different from that
to which the receiver is connected.
- Consult the dealer or an experienced radio/TV technician for help.
This device complies with Part 15 of the FCC Rules. Operation is subject to the following two conditions: (1)
This device may not cause harmful interference, and (2) this device must accept any interference received,
including interference that may cause undesired operation.
Any changes or modications not expressly approved by the party responsible for compliance could void
the user's authority to operate this equipment.
INDUSTRY CANADA
This device complies with Industry Canada licence-exempt RSS standard(s). Operation is subject to the
following two conditions: (1) this device may not cause interference, and (2) this device must accept any
interference, including interference that may cause undesired operation of the device.
Under Industry Canada regulations, this radio transmitter may only operate using an antenna of a type
and maximum (or lesser) gain approved for the transmitter by Industry Canada. To reduce potential
radio interference to other users, the antenna type and its gain should be so chosen that the equivalent
isotropically radiated power (e.i.r.p.) is not more than that necessary for successful communication.
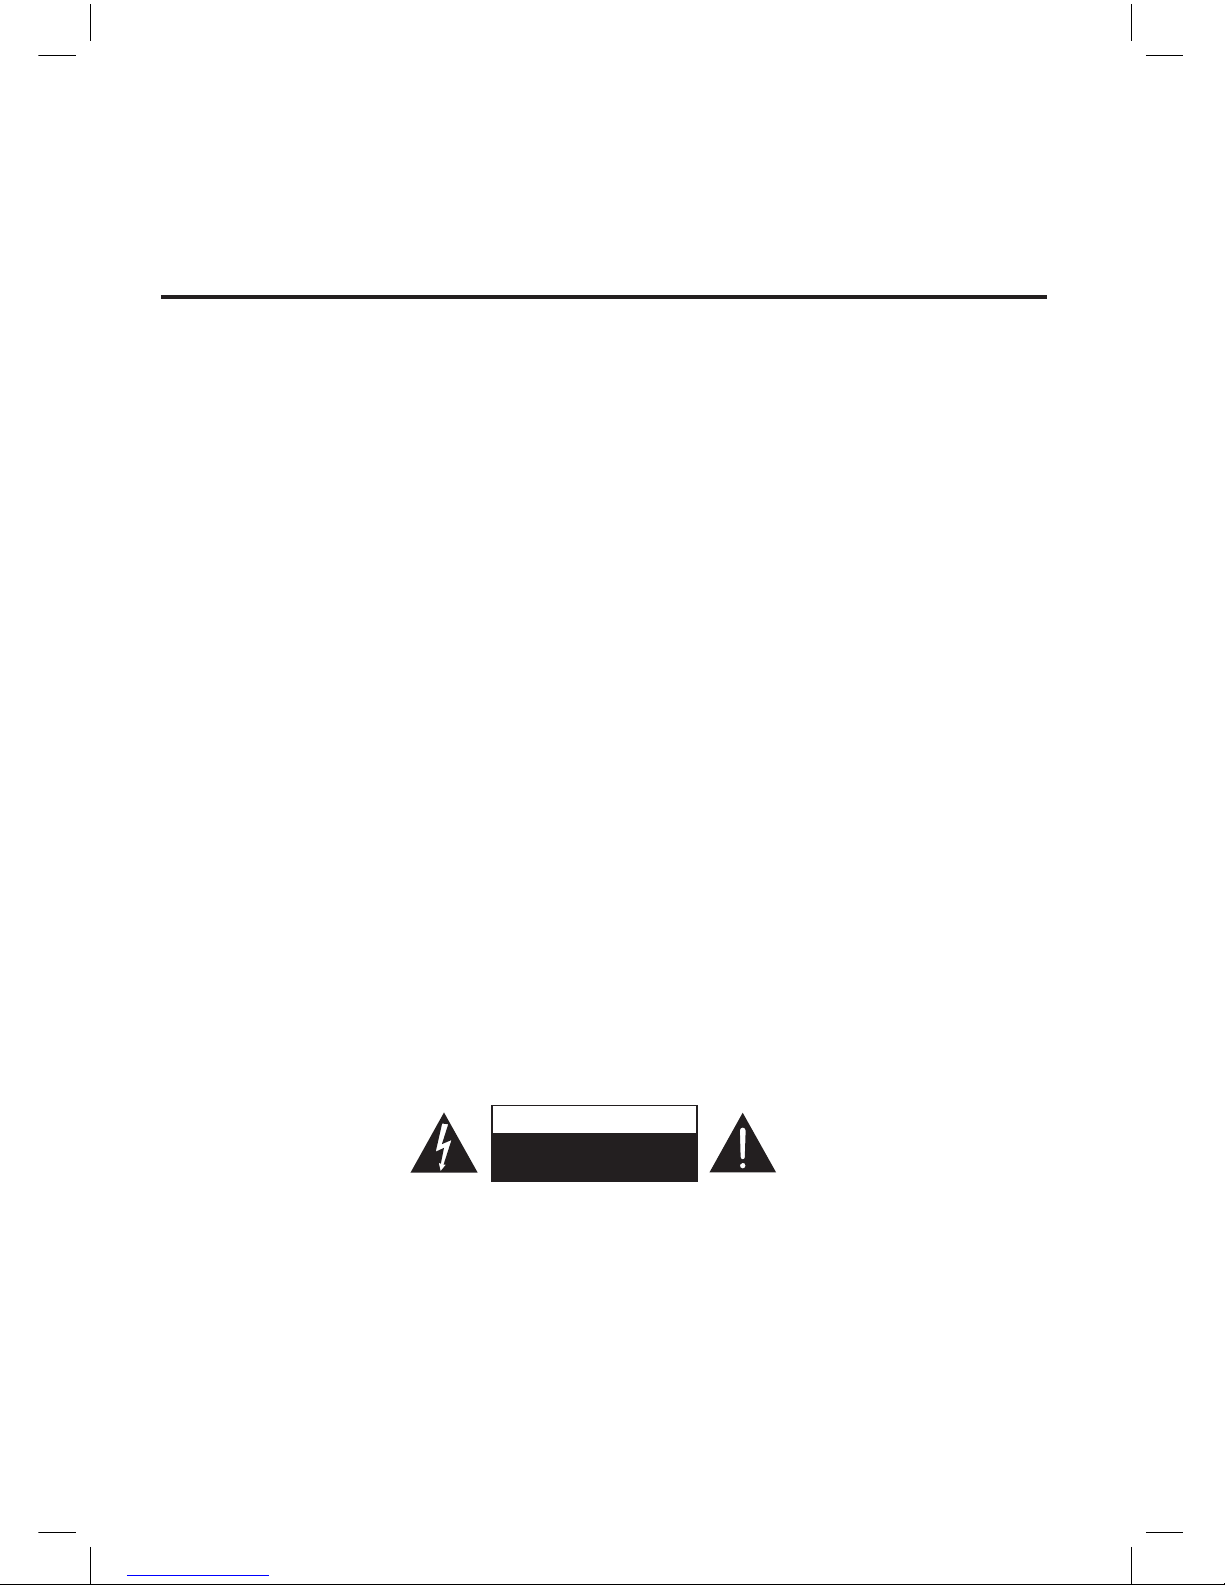
DANGEROUS VOLTAGE
There is high voltage, that may be of sufcient magnitude to constitute a risk
of electric shock to persons is present within this product enclosure.
ATTENTION
The owner manual contains important operating and maintenance instruc-
tions, for your safety, it is necessary to refer to the manual.
BTD612_chelsea_41014711_27 May 14.indd 3 2014-6-10 16:20:05

GB-4
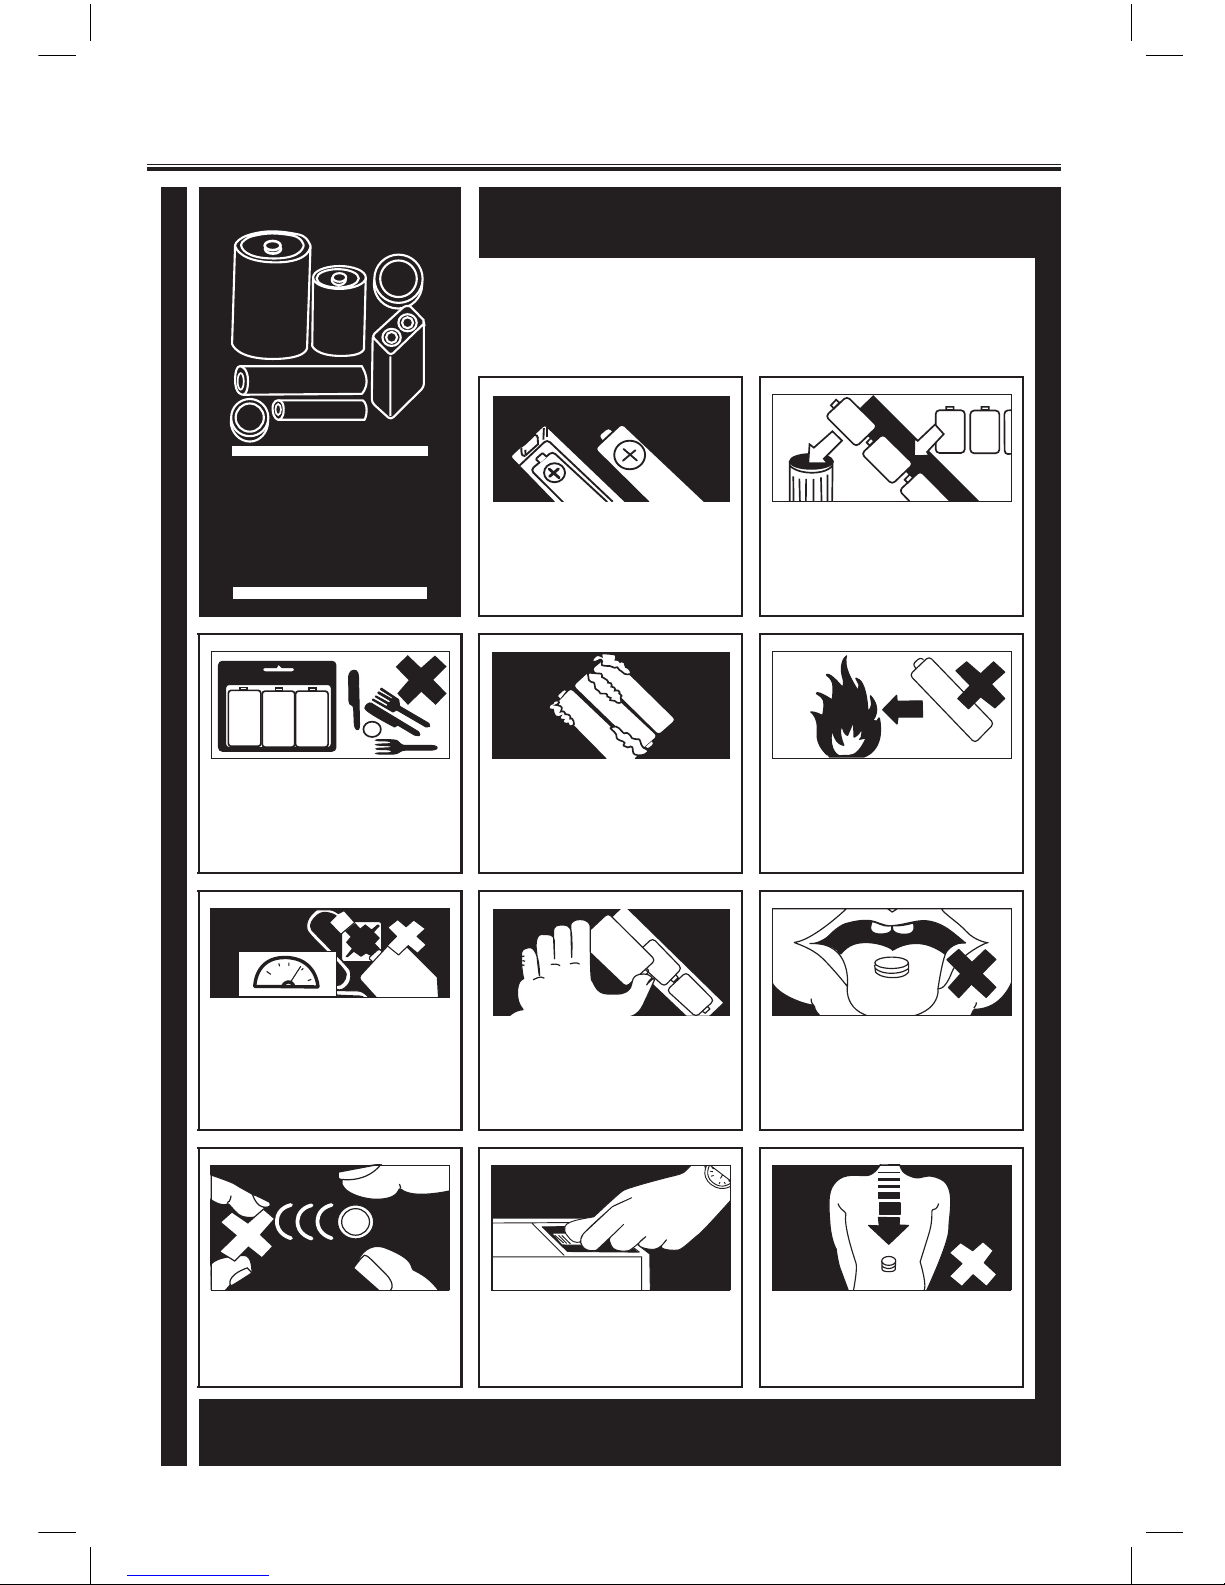
PLEASE PHOTOCOPY AND DISPLAY
BATTERY
SAFETY
GUIDELINES
Used correctly, domestic batteries are a safe and dependable source of
portable power. Problems can occur if they are misused or abused —
resulting in leakage or, in extreme cases, fire or explosion.
Here are some simple guidelines to safe battery use designed to eliminate
any such problems.
Take care to fit your batteries correctly,
observing the plus and minus marks on the
battery and appliance. Incorrect fitting can
cause leakage or, in extreme cases, fire or
even an explosion.
Replace the whole setof batteries at one
time, taking care not to mix old and new
batteries or batteries of different types, since
this can result in leakage or, in extreme
cases, fire or even an explosion.
Store unused batteries in their packaging
and away from metal objects which may
cause a short-circuit resulting in leakage or,
in extreme cases, fire or even an explosion.
Remove dead batteries from
the unit
and
all batteries from
the unit
you
know you
are not going to use for a long time.
Otherwise the batteries may leak and cause
damage.
Never dispose of batteries in fire as this can
cause them to explode. Please recycle
dead batteries; do not put with the
normal household waste.
Never attempt to recharge ordinary
batteries, either in a charger or by applying
heat to them. They may leak, cause fire or
even explode. Thereare special
rechargeable batteries which are clearly
marked as such.
Supervise children if they are replacing
batteries themselves in order to ensure
these guidelines are followed.
Remember that small button cell batteries
such as used in some hearingaids, toys,
games and other appliances, are easily
swallowed by young children and this can be
dangerous.
Keep loose button cells away from young
children.
Make sure battery compartments are
secure.
Seek medical advice if you believe a cell has
been swallowed.
Battery Safety Guidelines
BTD612_chelsea_41014711_27 May 14.indd 4 2014-6-10 16:20:05

GB-5
Table of Contents
Some Dos And Don't On The Safe Use Of Equipment ......................................................................1
Important Notes..................................................................................................................................2
Battery Safety Guidelines...................................................................................................................4
Product Overview ...............................................................................................................................6
The Unit ........................................................................................................................................................ 6
Front View............................................................................................................................................. 6
Top View ................................................................................................................................................ 6
Rear View .............................................................................................................................................. 6
Remote Control Overview............................................................................................................................. 7
Before use ..........................................................................................................................................8
Connect to an external device ...................................................................................................................... 8
Connect a USB storage device..................................................................................................................... 8
Connect power.............................................................................................................................................. 8
Get started..........................................................................................................................................9
Turn on.......................................................................................................................................................... 9
Prepare the remote control ........................................................................................................................... 9
Remote control operation range ................................................................................................................... 9
Set time and date.......................................................................................................................................... 9
Play...................................................................................................................................................10
Play from USB ............................................................................................................................................ 10
Play from iPod/iPhone/iPad ........................................................................................................................ 10
Play from an external device .......................................................................................................................11
Play with Bluetooth device................................................................................................................12
Pairing bluetooth-enabled devices.............................................................................................................. 12
Listen to music from Bluetooth device ........................................................................................................ 12
Listen to radio...................................................................................................................................13
Tune to a radio station ................................................................................................................................ 13
Program radio stations automatically.......................................................................................................... 13
Program radio stations manually ............................................................................................................... 13
Select a preset radio station ....................................................................................................................... 13
Other features...................................................................................................................................14
Set the alarm timer ..................................................................................................................................... 14
View the alarm settings............................................................................................................................... 14
Activate / deactivate alarm timer................................................................................................................. 14
Snooze alarm.............................................................................................................................................. 14
Stop alarm ring ........................................................................................................................................... 14
Set the sleep timer...................................................................................................................................... 14
Adjust display brightness ............................................................................................................................ 14
Adjust sound.....................................................................................................................................15
Adjust volume level..................................................................................................................................... 15
Mute sound ................................................................................................................................................. 15
Select a preset sound effect ....................................................................................................................... 15
Troubleshooting................................................................................................................................16
Product information ..........................................................................................................................17
BTD612_chelsea_41014711_27 May 14.indd 5 2014-6-10 16:20:05

GB-6
Product Overview
The Unit
Front View
Rear View
Top View
1. IR sensor
- Point the remote control at the IR sensor.
2. Display panel
- Show the current status.
3. D / SET TIME
- Search within an audio le.
- Set the clock and date.
4. VOL +/− I/ J
- Adjust volume.
- Scroll up/down.
5. C/ PROG
- Search within an audio le.
- Program radio stations.
6. Dock 2
- Load an iPod/iPhone/iPad.
7. Dock 1
- Load an iPod/iPhone.
8. TUNE +/ I/ TUNE −/ J
- Tune to a radio station.
- Scroll up/down.
9. / PRESET − / PRESET+/
- Skip to the previous/next audio le.
- Select a preset radio station.
10.SLEEP
- Set the sleep timer.
11. STANDBY
- Turn on the unit or switch to standby mode.
12.Alarm1/Alarm2
- Set the alarm timer.
- Turn on/off the alarm tone.
- View alarm settings.
13.SNOOZE/BRIGHTNESS
- Repeat the alarm.
- Adjust the display brightness.
14.SOURCE
- Select a source: FM, USB, AUDIO IN,
Bluetooth, DOCK 1 or DOCK 2
15.
BF / OK
- Start or pause.
- Select FM stereo or FM mono.
- Conrm selection.
16.DC 7.5V
17.USB
18.AUDIO IN
- Jack for an external audio device.
19.FM ANTENNA
SRC
BTD612_chelsea_41014711_27 May 14.indd 6 2014-6-10 16:20:06

GB-7
Product Overview
Remote Control Overview
1. STANDBY
- Turn on the unit or switch to standby mode.
2. OK/BF
- Conrm selection.
- Start or pause.
- Select FM stereo or FM mono.
TUNING/ALBUM
- Tune to a radio station.
- Scroll up.
- Select a previous album folder.
- Adjust time.
- BT: Press and hold clear pairing mode.
TUNING/ALBUM
- Tune to a radio station.
- Scroll down.
- Select a next album folder.
- Adjust time.
H
- Skip to the previous audio le.
- Select a preset radio station.
G
- Skip to the next audio le.
- Select a preset radio station.
3. Bluetooth ( ) / PAIRING
- Select the Bluetooth source.
- Press and hold Cleard the Bluetooth pairing
history.
4. FM / DOCK
- Select the TUNER source.
- Select Dock 1 or Dock 2 source.
5. DISPLAY/SET TIME
- Display current information.
FM mode:
- Display RDS information
USB mode:
- Display ID3 information
- Set the clock and date.
6. S-BASS
- Turn on or off super bass enhancement.
7. P-EQ
- Select a preset equalizer setting.
8. AL 1
- Set the alarm timer.
- Turn on/off the alarm tone.
- View alarm settings.
9. SNOOZE/BRIGHTNESS
-
Repeat the alarm.
- Adjust the display brightness.
10.SLEEP
- Set the sleep timer.
- Reset Bluetooth pairing.
11. AUDIO IN / USB
- Select AUDIO IN or USB source.
12.MUTE
- Mute volume.
13. PROG/MODE
FM mode:
- Program radio stations.
- Tune to a radio station.
USB mode:
- Select repeat play or random play.
14.VOL +/-
- Adjust volume.
15.AL 2
- Set the alarm timer.
- Turn off the alarm tone.
- View alarm settings.
BTD612_chelsea_41014711_27 May 14.indd 7 2014-6-10 16:20:07

GB-8
Before use
Connect to an external device
You can also listen to an external audio device
through this unit.
1. Connect the audio cable to:
· AUDIO IN jack
· External device AUDIO OUT jack
Connect a USB storage device
Insert the USB storage device.
Note: USB port is not support for charge the
iPod/iPhone/iPad.
Connect power
After you made all necessary connections, insert
the AC/DC power plug into a wall outlet, and
your unit ready to use.
Caution:
1. Be sure to unplug the mains plug from the
mains socket when going out or when the
unit is not in use for an extened period of
time.
AUDIO IN
BTD612_chelsea_41014711_27 May 14.indd 8 2014-6-10 16:20:08

GB-9
Get started
* Do not use any batteries other than those
specied.
* Do not heat or disassemble batteries. Never
throw them in re or water.
* Do not carry or store batteries with other
metallic objects. The batteries could short
circuit, leak or explose.
Remote control operation range
1. Point the remote control towards the remote
sensor IR of the front of the unit.
2. Make sure that there is no obstacle between
the infrared remote sensor of the unit and
remote control.
Set time and date
1. In standby mode, press and hold SET TIME
button for 2 seconds, [12H] begins to blink.
2. Press
I/Jbutton on the top panel (or
remote control) to select 12/24 hour format.
3. Press OK button to conrm, 00:00 will
display, and the hour digits begin to blink.
4. Press
I/Jbutton on the top panel (or
remote control) to select.
5. Repeat steps 3-4 to set the hour, minute,
day, month and year.
Note:
1. In 12 hour format, [MONTH-DAY] is displayed.
2. In 24 hour format, [DAY-MONTH] is displayed.
Turn on
Press STANDBY, the unit switches to the last
selected source.
Switch to standby mode
Press STANDBY to switch the unit to standby
mode, the clock (if set) appears on the display
panel.
Prepare the remote control
For rst-time use:
1. Remove the protective tab to activate the
remote control battery.
To replace the remote control batteries:
1. Open the battery compartment.
2. Insert one lithium CR2025 battery with
correct polarity (+/-) as indicated.
3. Close the battery compartment.
*
Be sure to insert the battery with the positive
“+” and negative “-” polarities correctly
positioned.
* If the battery leaks, wipe away the leakage
inside the battery compartment and replace
the battery with a new one.
* If the remote control unit is not to be used
for a long time (more than a month), remove
the battery from the remote control unit to
prevent it from being exhausted.
CR2025
3V
BTD612_chelsea_41014711_27 May 14.indd 9 2014-6-10 16:20:08

GB-10
Play
Play from USB
You can play MP3/WMA les copied on the USB
storage device.
1. Select a USB storage device, press USB
button.
2. Insert the USB storage device, the play
starts automatically.
To select a specied le for play:
1. Press ALBUMI/Jbutton to select a folder,
and then press OK button to conrm.
● To pause or resume play, press BF button.
● To skip to the previous/next le, press H/
Gbutton.
Select repeat/shufe play options:
1. During play, press MODE button repeatedly
to select a play option: repeat one, repeat
all or random.
● To resume normal play, press MODE button
repeatedly until no option is displayed.
Note:
1. The USB port on the unit supports the USB
honest mode of ISO device, you can enjoy
audio from your IOS device via USB cable.
2. The USB port on the unit supports the AOA
protocol technology of Android mobile phone.
If the AOA protocol technology of Android
mobile phone connect to the unit's USB port
through cable, enjoy audio from your
Android-powered device.
3. You can charge your phone at USB source
via USB cable.
Play from iPod/iPhone/iPad
You can enjoy audio from iPod/iPhone/iPad
through this unit.
Compatible iPod/iPhone/iPad
The integrated dual dock unit supports the
following iPod,iPhone and iPad models:
Made for (Dock 2):
● iPod touch 5G
● iPod nano 7G
● iPad (4 generation)
● iPad mini
●
iPhone 5
● iPhone 5C
●
iPhone 5S
Also made for (Dock 1):
●
iPod touch (1st, 2nd, 3rd, and 4th generation)
●
iPod nano (2nd, 3rd, 4th 5th, and 6th
generation)
●
i
Phone
● iPhone 3G
● iPhone 3GS
● iPhone 4
● iPhone 4S
BTD612_chelsea_41014711_27 May 14.indd 10 2014-6-10 16:20:08

GB-11
Play
Listen to the iPod/iPhone/iPad
1. Press DOCK button to select dock source.
2. Place the iPod/iPhone/iPad into the dock.
●
To pause/resure play, press BF.
●
To skip to a track, press / .
●
To search during play, press and hold D/
Con the top panel (or press and hold H
/
Gon the remote control), then release
to resume normal play.
Charge the iPod/iPhone/iPad
When the unit is connected to power, the docked
iPod/iPhone/iPad begins to charge.
Note:
* For certain iPod models are not compatible
with dock charging.
* For certain iPod models, it may take up to a
minute before the charging indication appears.
* When iPod/iPhone/iPad is connected, select
the device to corresponding dock source, the
clock radio synchronizes time from the iPod/
iPhone/iPad automatically.
Play from an external device
You can also listen to an external audio device
through this unit.
1. Press AUDIO IN button to select the source,
is displayed.
2. Connect the cable to:
· AUDIO IN jack
· the AUDIO OUT jack on an external device
3. Start to play the device (see the device user
manual).
BTD612_chelsea_41014711_27 May 14.indd 11 2014-6-10 16:20:09

GB-12
With this unit, you can listen to audio les from a player if bluetooth connection is available.
Pairing bluetooth-enabled devices
To connect your Bluetooth device to the unit, you need to pair the device to the unit. Pairing needs
only to be done once.
Note:
* The operational range between this unit and a Bluetooth device is approximately 10
meters.
* Before you connect a Bluetooth device to this unit, familiarize yourself with the Bluetooth capablities
of the device.
* Compatibility with all Bluetooth devices is not guaranteed.
* Any obstracle between this unit and a Bluetooth device can reduce the operational range.
* Keep this unit away from any other electronic device that may cause interference.
1. Turn on the Bluetooth function on your device.
2. Search for other Bluetooth device with your device.
3. Select “CIL-E-6” in the pairing list.
4. Enter default password “0000” if necessary.
5. Press and hold Pairing Cleared button (PAIRING) more than 2 seconds to clear pairing mode.
Note:
* The device will also be disconnected then the device is moved beyond the operation range.
* If you want to reconnect the device to the unit, place it within the operational range.
* The device will be connected the Bluetooth device pairing already, and also enter pairing mode,
other Bluetooth device can be searching for connecting or pairing.
* When the unit disconnected the Bluetooth device, it will enter pairing mode automatically, other
Bluetooth device can be searching for connection or pairing.
Listen to music from Bluetooth device
If the connected Bluetooth device supports Advanced Audio Distribution Prole (A2DP), you can
listen to the music stored on the device through the unit.
1. Pair the device with the unit.
2. Start play music via device.
Play with Bluetooth device
BTD612_chelsea_41014711_27 May 14.indd 12 2014-6-10 16:20:09

GB-13
Listen to radio
Note:
* Only FM radio reception is available on this unit.
Tune to a radio station
Note:
* Position the antenna as far as possible from
TV, VCR or other radiation source.
* For optimal reception, fully extend and adjust
the position of the antenna.
1. Press FM ( or SOURCE on the top panel) to
select FM tuner.
2. Press and hold TUNE −
/ + button
on the top
panel (or press
TUNING I/ J
button
on the
remote control) for more than 2 seconds, the
radio tunes to a station with strong reception
automatically.
3. Repeat step 2 to tune to more stations, to
tune to a weak station, press TUNE −
/ +
button on the top panel (or press TUNING I/
J
button
on the remote control) repeatedly
until you nd optimal reception.
Note:
* [STEREO] is the default setting for tuner mode.
* In tuner mode, you can press OK button
repeatedly to toggle between [STEREO] and
[MONO], and the unit memorizes your
setting even if you turn off the unit or turn to
other sources.
Program radio stations automatically
You can program a maximum of 20 preset radio
stations.
In tuner tuner mode, press a hold MODE (or
PROG on the top panel) on for 2 seconds to
activate automatic program mode. [AUTO]
is display, the unit automatically stores radio
stations with sufcient signal strength, the rst
programmed radio station is broadcast automati-
cally.
Program radio stations manually
You can program a maximum of 20 preset radio
stations.
1. Tune to a radio station.
2. Press PROG button to activate the program
mode.
3. Press /
( or press H/ Gbutton on
the remote control) to select a number.
4. Press OK button to conrm.
5. Repeat the above steps to program other
stations.
Note:
* To over write a programmed station, store
another station in its place.
* To select FM stereo or FM mono, press OK.
Select a preset radio station
In tuner mode, press /
on the top panel ( or
press H/ Gon the remote control) to select
a preset number.
BTD612_chelsea_41014711_27 May 14.indd 13 2014-6-10 16:20:09

GB-14
Other features
Set the alarm timer
You can set two alarms which go off at different
time.
1. Press and hold ALARM 1 or ALARM 2
button.The hour digits begin to blink, [ALM
SET], [ 1] or [ 2] ashes on the screen.
2. Press
I/Jbutton repeatedly to set the hour.
3. Press OK button to conrm, the minute digits
begin to blink, [ 1] or [ 2] ashes on the
screen.
4. Repeat steps 2-3 to set the minute, select
when to ring alarm, and choose alarm sound
source and alarm volume.
Note:
* If you select DOCK 1/DOCK 2, USB as alarm
sound source, when there is no device docked,
the alarm will automatically switch to buzzer
to ring the alarm.
* If both alarms are set to the same time, only
Alarm 1 will ring.
View the alarm settings
Press ALARM1 or ALARM2 to view alarm
settings.
Activate / deactivate alarm timer
When an alarm setting is shown on the screen,
press AL 1 or AL 2 repeatedly to activate or
deactivate the alarm timer.
- If the timer is activated, [ 1] or [ 2] is
displayed.
- If the timer is deactivated, [ 1] or [ 2] is
disappears.
Snooze alarm
When alarm sounds, press SNOOZE, the alarm
snoozes and repeats ringing 9 minutes later.
Stop alarm ring
When an alarm rings, press the corresponding
STANDBY, SOURCE, ALARM 1 or ALARM 2.
The alarm stops but the alarm settings remain.
Set the sleep timer
This clock radio can switch to standby mode
automatically after a preset period.
* Press SLEEP repeatedly to select the sleep
timer period (in minutes), when the sleep
timer is activated, SLEEP appears.
* To deactivate the sleep timer, press SLEEP
repeatedly until [OFF] (off) appears.
Adjust display brightness
Press BRIGHTNESS button repeatedly to select
different levels of display brightness.
BTD612_chelsea_41014711_27 May 14.indd 14 2014-6-10 16:20:09

GB-15
Adjust volume level
During play, press VOL+/- button to increase/
decrease the volume level.
Mute sound
During play, press MUTE button to mute/unmute
sound.
Adjust sound
Select a preset sound effect
During play, press P-EQ button repeatedly to
select:
·[ROCK]
· [JAZZ]
·[POP]
· [CLASSIC]
·[FLAT]
Note:
You can also press the SET TIME button on the
top panel repeately to select.
BTD612_chelsea_41014711_27 May 14.indd 15 2014-6-10 16:20:09

GB-16
If you are having a problem with your system, check this list for a possible solution before calling
for service. If you cannot solve the problem from the list below, or the system has been physically
damaged, call a qualied person, or your dealer, for service.
No power
・Ensure that the AC power plug of the unit is connected properly.
・Ensure that there is powr at the AC outlet.
No sound
・Adjust the volume.
Poor radio reception
・Increase the distance between the unit and your TV or VCR.
・Fully extend the FM antenna.
Timer does not work
・Set the clock correctly.
・Switch on the timer.
Clock/timer setting erased
・Power has been interrupted or the power plug has been disconnected.
・Reset the clock/timer.
About Bluetooth device
Music playback is unavailable on the system even after successful Bluetooth connection.
・The device cannot be used with the system to play music.
The audio quality is poor after connection with a Bluetooth-enabled device.
・The Bluetooth reception is poor. Move the device closer to the system or remove any obstacle
between the device and the system.
Cannot connect with the system.
・The device does not support the proles required for the system.
・The Bluetooth function of the device is not enabled. Refer to the user manual of the device for
how to enable the function.
・The system is not in the pairing mode.
・The system is already connected with another Bluetooth-enabled device. Disconnect that device
or all other connected devices and then try again.
・Press and hold the PAIRING button to reset Bluetooth function of this system then try again.
Troubleshooting
41014711
BTD612_chelsea_41014711_27 May 14.indd 16 2014-6-10 16:20:09

GB-17
Product information
General information
AC power............................................................................................................... 100-240V ~ 50/60Hz
Output...............................................................................................................................................7.5V 13.5A
Frequency Response ....................................................................................................100Hz ~ 20KHz
Siignal to Noise Ratio............................................................................................................................. > 70 dB
Audio Input ................................................................................................................................. 600 mv
Operation Power Consumption ......................................................................................... 5 x 2 W RMS
Standby Power Consumption (clock display) ..............................................................................≤ 0.5W
Dimensions................................................................................................. 221(W)×130(H)×138(D)mm
FM
FM Tuning Range ...........................................................................................................87.5 - 108 MHz
Speakers
Speakers Impedance......................................................................................................................... 4Ω
Bluetooth
Communication system .........................................................................Bluetooth Standard version 2.1
and EDR specication
Output.............................................................................................. Bluetooth Standard Power Class 2
Maximum communication Range ........................................................................................ approx.10m
Frequency band................................................................................................................2.4 GHz Band
............................................................................................................... (2.4000 GHz - 2.4835 GHz)
Compatible Bluetooth proles............................................ Advanced Audio Distribution Prole (A2DP)
Supported Multi devices pairing ..................................................................................... up to 8 devices
Supported codecs (Receive)............................................................................. SBC(Sub Band Codec)
(Transmit)............................................................................ SBC(Sub Band Codec)
Remote Control
Distance............................................................................................................................................. 6m
Angle ...............................................................................................................................................±30°
Accessories
AC adapter (plug switchable) ............................................................................................................... 1
Remote control (with a battery) ............................................................................................................ 1
User manual ......................................................................................................................................... 1
Declaration of conformity...................................................................................................................... 1
Note: Product information is subject to change without prior notice.
BTD612_chelsea_41014711_27 May 14.indd 17 2014-6-10 16:20:09
Table of contents
Other Chelsea Home Imports Docking Speakers manuals