Chemfree SmartWasher SW-23 Guide

4075-HTRBX-23
Replacement Instructions for SW-23 HEATER
Tools Required: Phillips head screwdriver, 1¼” socket wrench with 3” or larger extension, slip joint pliers, 3/8” nut
driver, drill and 3/16” drill bit, pliers, safety gloves, shop towel
Before beginning, pump any fluid from the machine into buckets or empty fluid boxes. This will make changing the
parts easier and provide a chance to clean out any sludge buildup that may be in the base.
1. Unplug the SmartWasher from the power source.
2. Remove the quick release pins that secure the sink to the base.
3. Disconnect the sink hose from the base by releasing the metal rings on the quick connect coupling.
4. Remove the sink and set aside.
5. On the outside of the base, detach the control box lid by removing four screws with the Phillips head screwdriver.
6. On the inside of the base, detach the heater box lid by removing four screws with the Phillips head screwdriver. BE
CAREFUL NOT TO DROP THE SCREWS INTO THE BASE.
7. Disconnect the probe cable from the control board. Using the pliers, disconnect the pump wires (left) and heater wires
(middle) from the control board. ***See diagram***
8. Feed the pump wires from the control box through the bulkhead fitting into the heater box inside of the base. Repeat
this with the heater wires and the probe cable. Tie the heater wires and probe cable into a loose knot to keep them
from falling into the base.
9. Use the slip joint pliers to loosen the grey liquid tight connector for the pump on the side of the heater box.
Disconnect the grey liquid tight tubing from the liquid tight connector.
10. Pull the pump wires from the heater box through the liquid tight connector. Loosely tie the pump wires to the other
pump hose so that they do not fall into the base.
11. Use the 3/8” nut driver to hold the nut inside of the heater box. Using the Phillips head screwdriver, loosen and
remove the screw inside of control box. Set the nut and screw aside to be reused on the new heater box.
12. Use the 1¼” socket and slip joint pliers to remove the bulkhead fitting nut inside of the heater box. Remove the
washer and nut from inside of the heater box. Carefully remove the heater box, including the probe and heater, from
the base. Remove the rubber washer located on the bulkhead fitting between the heater box and the inside wall of
the base and set aside.
13. Using the slip joint pliers, loosen the two compression nut caps that secure the heater to the heater box. Once heater
can move freely through the connectors, pull heater and wires through the connectors and set aside.
14. Feed the NEW heater wires through the connectors on the bottom of the heater box. The heater should show be
showing 1 ½” inside the heater box. Using the slip joint pliers, tighten the two compression nuts until the heater does
not move freely through the connectors.
15. Tie the heater wires and probe cable in a loose knot.
16. In the base, replace the rubber washer that was removed with the heater box (between the wall of the machine and
the heater box). Place the heater box assembly on the bulkhead fitting. Replace the washer inside the heater box and
tighten the bulkhead fitting nut. To fully tighten, use the 1¼” socket and slip joint pliers.
17. From the control box, insert the screw that was earlier removed into hole and through to the heater box. Place the nut
onto the screw inside the heater box and tighten using the 3/8” nut driver. This screw provides extra support to the
bulkhead fitting.
18. Untie the pump wires from the pump tubing and pull through the grey liquid tight connector into the heater box. Firmly
push the grey tubing into liquid tight connector. Hand tighten the liquid tight compression nut. Use the slip joint pliers
to tighten an additional ¼ turn.
19. Untie the loose knot of probe and heater wires. Feed the probe cable through the bulkhead fitting into the control box
and connect to the control board.***See diagram***
20. Feed the pump wires through the bulkhead fitting into the control box and connect to the control board. From top to
bottom, the wires should be: brown, blue, and yellow/green. ***See diagram***
21. Feed the heater wires through the bulkhead fitting into the control box and attach to the control board. From top to
bottom, the wires should be: black, black, and yellow/green. ***See diagram***
22. Replace the heater box lid and tighten the screws using the Phillips head screwdriver. BE CAREFUL NOT TO DROP
THE SCREWS INTO THE BASE.
23. Replace the control box lid and tighten the screws using the Phillips head screwdriver.
24. Replace the sink. Plug the quick release pins back into the sides of the base. Reconnect the sink hose and push the
metal rings toward the base to lock into place.
25. Replace the fluid in the base of the SmartWasher. Plug unit into power source and test.
If you have any questions about these procedures or if your SmartWasher is configured differently than described in
these instructions, PLEASE CALL CHEMFREE CUSTOMER SERVICE AT 1-800-521-7182 or visit us on the web at
www.chemfree.com for more detailed instructions, including instructional videos.
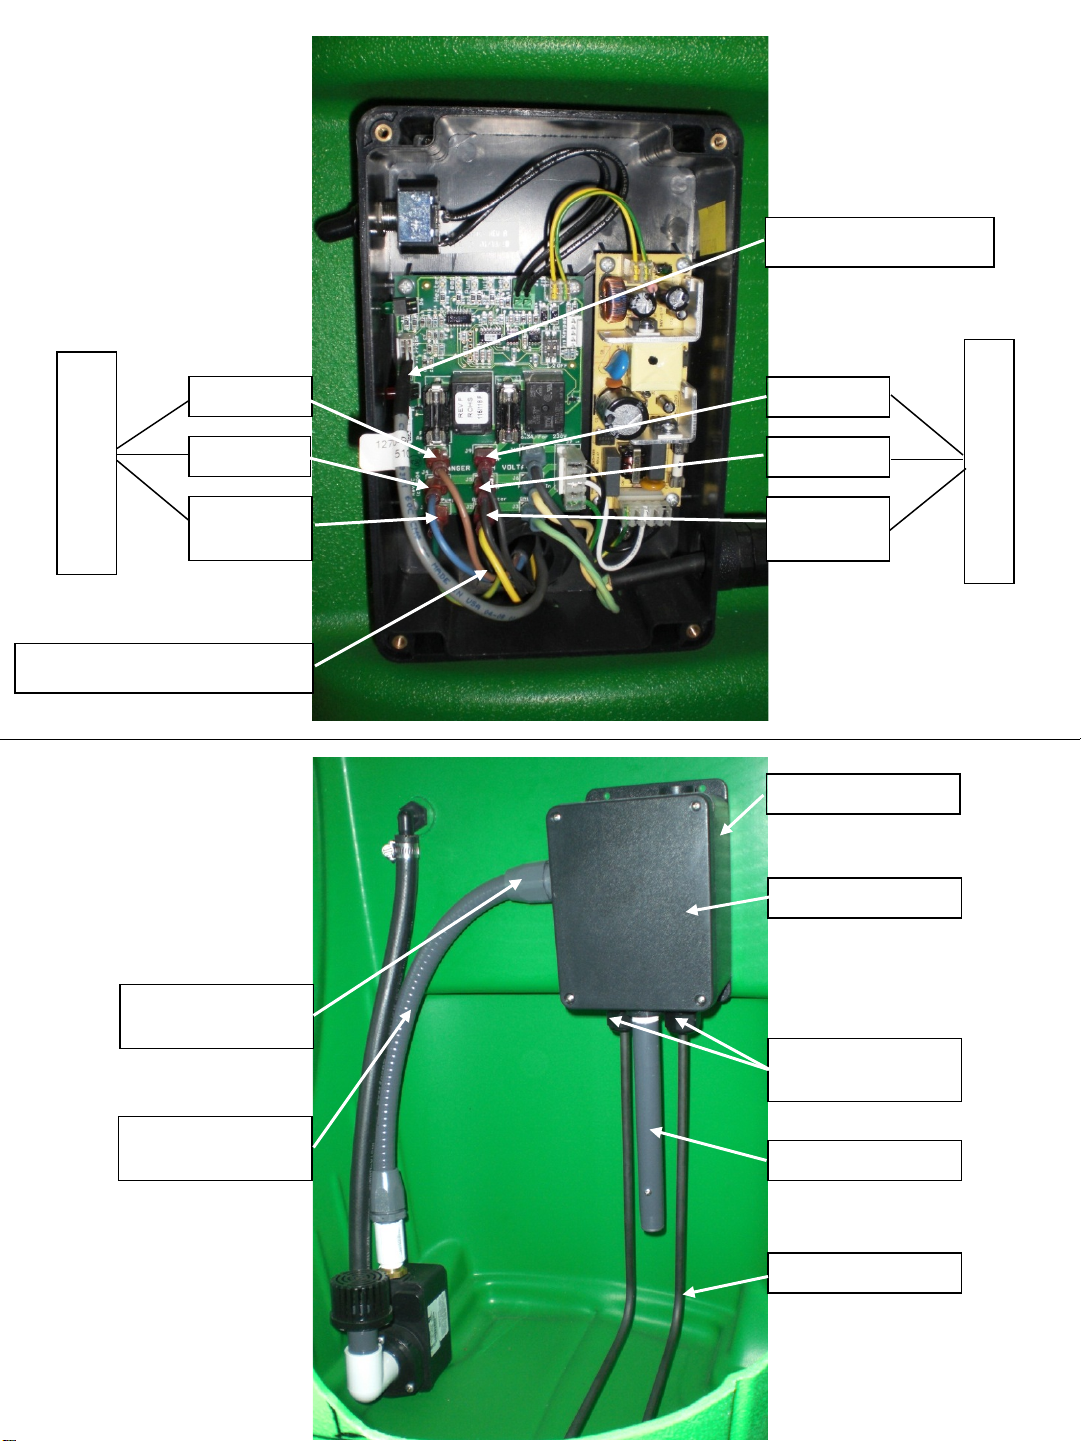
Control Box
Assembly
HEATER WIRES
PROBE CABLE
Brown
Blue
Yellow/
Green
PUMP WIRES
Black
Black
BULKHEAD FITTING
Yellow/
Green
Heater Box
Probe
Heater
Heater Box Lid
Liquid Tight
Connector
Liquid Tight
Tubing
Base Assembly
(interior)
Compression
Nuts
Table of contents


