Chiayo Challenger ICOO User manual

RoHS Compliant
Taiwan Good Design
IC: 3563A-CHALLENGER
IC: 3563A-SQ5016
IC: 3563A-SM5016
UHF/VHF Modulized wireless portable sound system
Operation maunal

-1-
Challenger 1000 Operation Manual
Congratulations and thank you for purchasing this all-in-one portable sound system. To
ensure a trouble-free operation, please read the manual thoroughly to fully understand its
controls and functions.
Followings are main Challenger 1000 variants :
1. Challenger 1000 portable sound system only.(P2)
2. Challenger 1000 with CD/USB Player & Digital Recorder.(P3)
3. Challenger 1000 with DVD/USB Player.(P4)
4. Challenger 1000 with CD/USB Player & Tape Deck.(P5)
All the above versions can be installed with up to 4 receiver modules, among which one
can be transmitter module or MP3 module.
The wireless receiver/transmitter module can be in either UHF or VHF band and is a PLL
synthesized type with 16 preset frequencies.
Conguration
All versions of Challenger 1000 series come equipped with the following :
1. AC power cord.
2. 1~4 or no wireless receiver/transmitter/MP3 module(s).
3. 1~4 transmitters, either handheld or bodypack transmitter (except version with no
module installed).
Optional accessories
1. Weather proof dust cover.
2. Tripod stand
3. Companion powered speaker (Slave speaker).(P6)
4. Companion passive speaker C-SP.(P7)
5. Wired microphone.
Remark
Manufacturer reserves the rights to change the above combinations without prior notice.

-2-
A
B
C
D
123456
10
11
12 13 14
15 16
17
87 9
Challenger 1000 (Master)
(Basic conguration)
A,B,C&D. Receiver or MP3 module
C can be Transmitter module
1. Mic volume control
2. Line-in volume control
3. Tape/DVD power+volume control
4. Tone voulme control (BASS)
5. Tone voulme control (TREBLE)
6. Master volume control
7. Mic input
8. Line input/output
9. Voice priority
10. Slave output
11. Battery low indicator (RED)
12. Charging indicator
13. Fuse
14. 24~32V DC input
15. AC input
16. Power switch
17. Speaker out

-3-
1
10
11
2 3 4 5
6 87 9
1
9
3 245
7
6
811
12
10
19
14
15
18
17 13
20
16
Challenger 1000 (Master)
(CD/USB Player & Digital Recorder)
CD/USB Player
1. LCD display
2. Play/pause
3. Stop
4. Skip
5. Eject
6. CD selector
7. USB selector
8. Folder skip
9. IR led
10. USB input
11. Power/volume control
Digital Recorder
1. Play/Pause
2. Stop
3. SD/USB selector
4. Track number button "1"
5. Track number button "10"
6. Track number button "100"
7. A→B play section
8. Program/Repeat
9. Forward
10. Reverse
11. Folder selector
12. Volume control
13. USB 2.0 input
14. SD card input
15. Copy
16. Record
17. Infrared detector
18. Power on/off
19. Delete
20. LCD display

-4-
1
9
3 2457 6
8
1112 1014
15
13
Challenger 1000 (Master)
(DVD/USB Player)
1. Video signal output
2. Power on/off
3. Eject
4. Stop
5. Up
6. Down
7. Play/Pause
8. USB 2.0 input
9. Infrared detector
10. Function selector
11. N/P
12. Cue
13. Rev
14. Repeat
15. LCD display

-5-
1
9
3
2
4 5
7
6
811 101213
Challenger 1000 (Master)
(CD/USB Player version & Tape Deck)
1. Eject key
2. Counter
3. Variable Speed control
4. Auto reverse indicator
5. Single reverse indicator
6. Single side indicator
7. Mode selector
8. Fast forward
9. Forward play
10. Stop
11. Reverse play
12. Fast reverse
13. Rec

-6-
4
A
8
6
10
12
11
2
5
B
9
7
13
Challenger Companion powered speaker
(Slave speaker)
The Challenger Slave is an active (powered) speaker unit with built-in switching power
supply as well as rechargeable batteries, complete with similar charging circuit as that
of the Challenger 1000 Master unit. It is an extended and indispensable member of the
Challenger Audio Link system.
A,B. Receiver or MP3 module
B can be Transmitter
1. Audio link input
2. Audio link output
3. Volume control
4. Speaker out (switched)
5. Speaker out (unswitched)
6. 24~32V DC input
7. Fuse
8. Power status indicator (RED)
9. Power status indicator (GREEN)
10. Charging indicator
11. AC input
12. Power switch

-7-
Challenger Companion passive speaker
The Challenger Speaker is a passive companion speaker for the Challenger 1000 series.
It is for connection to the switched or unswitched speaker outs of the Challenger 1000
(Master) or the Challenger Slave units.
1. Speaker input
2. Speaker output
1 2

-8-
Operating procedures
After unpacking the unit for the rst time, please charge the unit for at least 6 hours before
operation. This is absolutely necessary as the built-in rechargeable batteries might have
been discharged naturally due to long shipment and storage time, even though it has been
fully charged in the factory prior to shipment.
To operate this portable sound unit, switch on the main POWER switch.If the Battery low
indicator also glows, it means the batteries are weak and please recharge them.
The main POWER switch does NOT switch on the other devices as each of them has
indivudual Power/Volume control. To operate each of them, you must switch them on
accordingly.
Operating the dynamic wired microphone
To use a cable microphone, simply plug it into the MIC IN socket. The mic socket accepts
both phone and Cannon jack. Rotate the dedicated volume control knob and master
volume control, amplied sound could be heard from the speaker when voice is spoken
into the cable microphone.
Operating the wireless microphone system
To operate the wireless system, just switch on the power/volume control on the module
panel and the matching transmitter. Please have the channel setting on both the transmitter
and receiver module be the same before operation. Please as well make sure that master
volume control is set to minimum level before turning the unit on, especially working on
a wireless version! Set the Master volume control to the mid position. Rotate the volume
control knob on receiver panel clockwise to the desired levels. When voice is spoken into
the microphone, amplied sound should be heard over the built-in speaker.
SDR-6200m/SDR-6216m/SDR-6116m receiver modules
1. Channel indicator
2. Power switch/volume control
3. Channel selector
4. Transmitter battery weak indicator
5. Diversity A/B indicator
6. Scan
7. Squelch control
2
3457
6
1

-9-
First turn on the Power of the main unit. Then turn on the individual power of the SDR-
6216m/SDR-6116m receiver module. Select a desired channel by pressing the ▲ or ▼
button and the corresponding channel on the Transmitter.
When transmitter is turned on, either A or B diversity indicator will flash to indicate that
signal has been received. Turning the volume control in clockwise direction can increase
the audio output. Once the power volume on the transmitter is too low, the LED indicator (4)
on this panel grow will grow to remind.
Frequency scanning
It is the automatic scan function key. To perform the scan function, the transmitter must be
switched off. Once the key is being pressed, the unit will do an auto scan and the next
clean channel will be displayed. Change the transmitter channel setting to this setting for
an interference- free operation.
Squelch(SQ) setting
When a channel is in use and undesired interference signal is received, turn the SQ
in clockwise direction to make the receiver less sensitive and thus less susceptible to
interference. If this still does not solve the problem, it means this frequency is not applicable
at current position. Please switch over to the next channel.
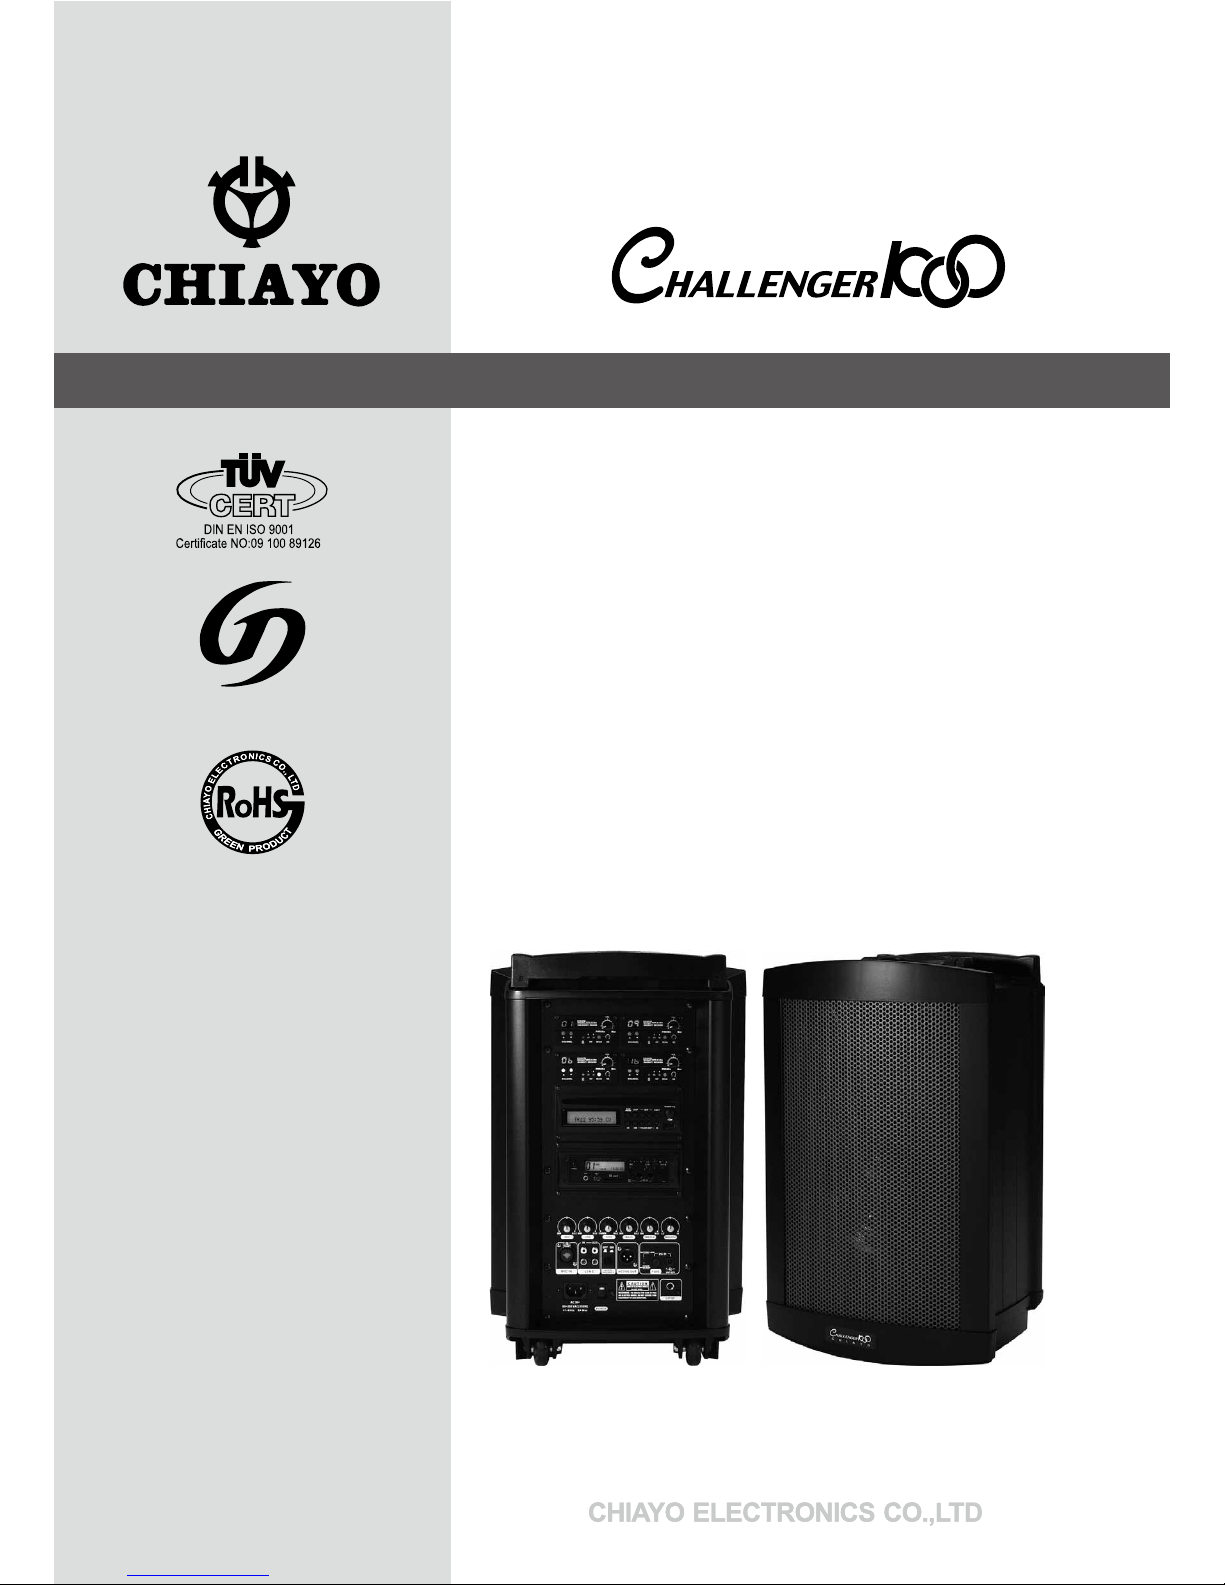
SDR-216M receiver module
1. Power switch/volume control
2. Channel selector
3. Diversity A/B Indicator
4. Power-on LED
5. TEST
6. Squelch control
First turn on the Power of the main unit. Then turn on the individual power of the SDR-
216Mreceiver module. Select a desired channel by pressing the ▲ or ▼ button and the
corresponding channel on the Transmitter.
Switch on the corresponding transmitter. RF or Diversity indicator A or B will light up when
both are of the same channel. The movement of the transmitter causes diversity indicator A
or B to light up alternately. When both transmitter and receiver are on, speak into the
microphone and rotate the separate volume control and main unit volume control, amplied
sound could be heard from the speaker.
Squelch(SQ) setting
When interference occurs, turning the SQ switch in clockwise direction can make it diminish
or disappear completely.
Frequency testing
However if interference noise persists even though SQ is at max. position, then switch to
another channel and press the TEST button. When neither RF A nor B indicator light up,
then this particular channel is considered clean. The corresponding transmitter channel
setting must also be changed accordingly to match the receiver selection.
1
3
24 5 6

-10-
RP-6100m/RP-6016m Transmitter module
1. Channel indicator
2. Antenna socket(TNC type)
3.Channel selectors: Press ▲(up)▼(down) to
increase/decrease channel number. Please select a
non-interfering frequency channel to those used in the
receiver modules.
4. Power on/off
5. Audio sensitivity: Clockwise to increase its
sensitivity level and anticlockwise to reduce.
6. Output power switch. L for LOW output power and H for high output power. LOW output
power will reduce the RF transmission distance and HIGH output power will extend the
possible RF transmission distance.
However, if RP-6016m is installed in portable ampliers, HIGH output power will reduce
more operation time than LOW output power since it requires more power for longer RF
transmission.
DP-600M MP3 module
1
32 4
5 6 7
8
10
9
11
1. LCD display
2. Skip backward(short press), fast reverse(long press).
3. Play/pause(short press), USB/SD(long press).
4. Skip forward(short press), fast foreward(long press).
5. Previous folder.
6. Play modes(POP ROCK JAZZ CLASSIC COUNTRY NORMAL)
Repeat modes(ALL-repeat all, RANDOM-repeat random, SINGLE-repeat single track,
FLDER-repeat single folder)
7. Next folder.
8. Infrared sensoring area.
9. USB input
10. USB/SD card indicator (GREEN). This LED doesn't glow by default. It only ashes
when the track plays.
11. SD card input
12. Power/volume control
To use the USB/SD digital player, simply plug your USB/SD card into the port after the
player is turned on. To prevent any possible damage to the USB/SD card, always detach it
after the player has been shut off.
This player can read MP3 les only. Other formats such as WMA and WAV aren't supported
. The USB and SD card must be FAT/FAT32 formatted.
Operating functions on the panel and the remote:
1
3
2
45
6

-11-
Operating function On the panel On the remote
Play/pause short press
▼
II
Skip forward short press
▼
short press
▼
▼
I
Fast forward long press
▼
long press
▼
▼
I
Skip backward short press
▼
short press I
▼
▼
Fast backward long press
▼
long press I
▼
▼
Track select
(#0-9 buttons)
input track number,
then press
▼
II
USB/SD switch long press
▼
II
Repeat mode switch
(ALL/RANDOM/SINGLE/FLDER)
long press MODE
short press MODE
EQ mode switch
(POP/ROCK/JAZZ/CLASSIC/COUNTRY/NORMAL)
short press MODE
short press EQ
Voice Priority (Ducking) operation
Voice Priority operation is only necessary when Cassette tape or CD is playing.
When the Voice Priority switch is put to ON position, the ducking function will be
activated. While the music is playing, a voice input from either a Wired or Wireless
Microphone will temporary override and turn down the volume of the background music
and voice could be heard clearly.
Background music will return to its original setting when no audio input is entering the
microphone for a certain time. However, if the microphone is not switch off, the reentering
of music into the microphone will also activate the voice priority function. So, Voice
priority is best operated using microphones with on/off switch.
Battery Charging
Internally, the Challenger 1000 contains 2 pcs of 12V/5AH maintenance free lead acid
battery, which has no memory effect.
When the batteries are weak, the battery low indicator LED will stay RED. To charge the
batteries, simply plug in the AC power supply, the charging process will start automatically.
While charging, the charging indicator will ash RED. When batteries are fully charged, the
charging indicator will stay GREEN.
Replacing the module button covers
To identify different matches of receiver and transmitter, there are 4 extra sets of button
covers with different colors for replacement.
STEP 1: Power off the module.
STEP 2: Screw off the panel.
STEP 3: Separate the panel and the board.
STEP 4: Use a clamp to hold the button and remove the cover.
STEP 5: Repeat STEP 4 to remove the other 2 covers. After the replacement is completed,
please assemble the module reversely.
Remark
This procedure is strongly recommended to be operated by technician of importer or
dealer.

-12-
MASTER
SLAVE
SLAVE
SLAVE
SLAVE
SLAVE
SLAVE
Wir ed Audio Lin k Connectio n
Wired Audio Link
The Challenger 1000 could be operated as MASTER as well as SLAVE. This depends on
the setting of Master/Slave selector switch. However, the Challenger Slave can only be
operated as SLAVE.
In order to operate Audio Link, you must have a Challenger 1000 unit that operates as a
MASTER. Only one unit is allowed to act as MASTER and the other(s) MUST operate as
SLAVE(s). A MASTER unit is capable of connecting up to about 20 SLAVE units.
For the MASTER unit, the MASTER/SLAVE selector switch must be set to MASTER mode.
The Challenger SLAVE unit does not have this selector. If you have two units of Challenger
1000, you could use one as Master and the other Challenger 1000 as slave. To do that, just
put the MASTER/SLAVE selector switch of the second Challenger 1000 to SLAVE mode.
For the MASTER unit, Audio Link IN jack should NOT be connected.
To operate Audio Link, connect the Output jack of the MASTER to the Audio Link IN jack of
the 1st SLAVE unit. The Output jack of this SLAVE should be connected to the Input jack
of the 2nd SLAVE unit. Similar connection shall continue as such for the following SLAVE
units.
Volume Control for MASTER or SLAVE
When used on the MASTER, it controls the MASTER as well as all the SLAVE units. When
used on the SLAVE unit, it only controls that particular SLAVE unit volume. Maximum
number of SLAVE units to be connected with a MASTER is about 20.
Remark : There should NOT be a connection between the last SLAVE unit output and the
input of the MASTER unit.
Wireless Audio Link
Different from Wired Audio Link, with new SLAVE's capability of installation of receiver and
transmitter modules it eliminates all cable connection and largely extends the number limit
of SLAVEs.

-13-
Application: For crowds of 1000 to 2000, ex.speeches or forums.
Conguration: One Master + several SLAVEs (with receiver module built in)
R1
T2
T1
R2
R2
PLATFORM
section 1
section 2
section 2 section 4
section 5
section 6
T6
R2
T2
R1
T7
R6
R7 R4
T3
R2
T4
R3
T1
Application: For crowds of over 3000, ex.stadiums.
Conguration: One Master + several SLAVEs (with receiver and transmitter module built in)
R1
T2
T1
R2
R2
PLATFORM
section 1
section 2
section 2 section 4
section 5
section 6
T6
R2
T2
R1
T7
R6
R7 R4
T3
R2
T4
R3
T1
T:Transmitter R: Receiver Channel:1,2,3,...
T1 matches R1, T2 matches R2, T3 matches R3, T4...
Battery Charging
Internally, the Challenger 1000 contains 2 pcs of 12V/5AH maintenance free lead acid
battery, which has no memory effect.
When the batteries are weak, the battery low indicator LED will stay RED. To charge the
batteries, simply plug in the AC power supply, the charging process will start automatically.
While charging, the charging indicator will ash RED. When batteries are fully charged, the
charging indicator will stay GREEN.

-14-
Replacing the module button covers
To identify different matches of receiver and transmitter, there are 4 extra sets of button
covers with different colors for replacement.
STEP 1: Power off the module.
STEP 2: Screw off the panel.
STEP 3: Separate the panel and the board.
STEP 4: Use a clamp to hold the button and remove the cover.
STEP 5: Repeat STEP 4 to remove the other 2 covers. After the replacement is completed,
please assemble the module reversely.
Remark
This procedure is strongly recommended to be operated by technician of importer or
dealer.
Operating the Tape Deck
To begin operation switch on the TAPE Power after the main power of Challenger 1000 has
been turned on.
Keys Functions
FF Fast Forward Press this key for fast forward.
FP Forward Play Press this key for play in forward direction.
Stop Press this key to stop the tape.
RP Reverse Play Press this key for play in reverse direction.
FR Fast Reverse Press this key for fast reverse.
Record Press this key together with FP or RP key for recording.
Mode selector This key is pressed to select one of the following three modes.
Active in Forward nor Reverse direction, the cassette tape will play to
the end and stop automatically. This mode may be used for Record
and Play.
The cassette tape will play to the end, stop, reverse direction to the
end of the second side and stop. This mode may be used for Record
and Play.
This mode provides continuous “Play” operation. It is not operable
in Record mode, however, it will record one complete cycle if the
recording is begun in the Forward direction.
Speed Control Normal tape speed at center position. Clockwise direction increases
tape speed. Counter-clockwise direction reduces tape speed.
Eject This key is pressed for ejecting the tape.

-15-
Operating the CD/USB Player
Front remotable is a unique feature of Challenger 1000. User can easily control this CD
player by clicking its remote from both front and rear Challenger 1000.
To begin operation switch on the CD Power after the main power of Challenger 1000 has
been turned on.
Keys Functions
PLAY/PAUSE When this key is pushed during CD stop, play will start after track
search.
When this key is pushed during CD is playing, it will be changed to
pause.
When this key is pushed during CD is pausing, it will be changed to
play.
STOP When CD is not stop, if this key is pushed then CD will stop.
CD When press this key will change to cd-mp3 mode.
USB When press this key will changed to USB mode.
SKIP+UP/CUE In stop mode:
Change the starting play track (le) during stop mode, cyclic to the
rst track, if it is in the last track.
In program entry mode:
Change to the next track(le) for program select .
In play mode, pause mode, program play mode, random play mode:
Single pressed, skip the playing track (le) to next track(le) for normal
play/pause mode, to next program index track(le) for program play/
pause mode, to next random track(le) for random play /pause mode.
Continue pressed , fast forward during play/pause when pressed more
than 0.7sec.
SKIP-DONW/REV In stop mode:
Change the starting play track (le) during stop mode, cyclic to the
last track, if it is in the rst track.
In program Entry mode:
Change to the previous track (le) for program select.
In play mode, pause mode, program play mode:
Single pressed, skip the playing track (le) to precious track (le) for
normal play/pause mode, to previous program index track (le) for
program play/pause mode.
Continue pressed, fast reverse during play/pause when pressed more
than 0.7sec.
FOLDER-UP In stop mode:
Skip the starting play folder to next folder during stop mode, cyclic to
the rst folder if it is in the last folder.
In program entry mode:
Change the le for program select to next folder’s rst le, cyclic to the
rst folder if it is in the last folder.
In normal play mode:
Skip the playing le to the next folder’s rst le.

-16-
FOLDER-DOWN In stop mode:
Skip the starting play folder to previous folder during stop mode, cyclic
to the last folder if it is in the rst folder.
In program entry mode:
Change the le for program select to previous folder’s rst le, cyclic
to the last folder if it is in the rst folder.
In normal play mode:
Skip the playing le to the previous folder’s rst le.
PLAY MODE In mp3 mode and in USB mode .
If this key is pushed, PLAY mode is changed cyclically shown below.
PLAY ALL RANDOM→REPEAT TRACK→REPEAT FOLDER→
REPEAT ALL→RANDOM REPEAT→PLAY ALL
IN CD mode If this key is pushed, PLAY mode is changed cyclically
shown below.
PLAY ALL RANDOM→REPEAT TRACK→REPEAT ALL→
RANDOM REPEAT→PLAY ALL.
EJECT When this key is pushed, door is moved out.
PROG Set to programming mode.
When programming mode, “stop” key is pushed then program is all
cleared.
MUTE When this key is pushed during CD is playing, the set will mute the
output. Pushing again can recovery the output.
POWER Power SW of the set.
ESP In CDDA mode, Press ”ESP” key, The ESP display lighted and the set
is in electronic anti-shock state. The electronic anti-shock time is about
40 seconds. Press “ESP” key again, cancel the ESP function.
FIND In MP3 mode : Press this key once FILE search mode changed .
Press this key twice ALBUM search mode changed. Long press this
key to display the track. Press twice to display ID3 TAG.
0~10 You can use these keys to select the track you want directly.
VOL.- When this key is pushed, the volume will decrease by 1dB per step,
the min. volume is 0dB.
VOL.+ When this key is pushed, the volume will increase by 1dB per step, the
max. volume is 30dB.
Caution: This player does not accept 8-cm diameter CD. User is advised to have the USB 2.0
formatted in “ FAT “ or “ FAT 32 “. The built-in USB 2.0 player can not be able to read the
MP3 les stored in your USB if it is not formatted by either “ FAT “ or “ FAT-32 “. To avoid
damage to the USB, remember to detach it only after switching off the player.

-17-
Operating the Digital Recorder Player
Features
- Recording through the Line-in recording directly to a USB or SD Card
- Offer USB and SD Card function of each replication.
- Recording format is most popular MP3 audio format.
- Accept the capacity of 128MB to 16G USB/SD Card/SDHC
- With a language learning function, can be broadcast repeatedly at designated areas
- Adjustable recording quality, provide choice of 44.1 KHz, 128 Kbps and 192Kbps.
- Able to store up to 99 folders, or 999 tracks in SD Card or USB
Easy to use
- Play through the LINE IN audio recording les into the directory folder simply select "REC"
- Play copied USB or SD Card copy les into the directory folder simply select "CPY"
- Direct delete function when plan single song
- Can copy single, multiple songs or whole folder
Operation and function of the use of panel description
POWER : Switching power on/off.
VOLUME: Volume control button, turning to adjust the volume
USB socket: To insert a USB storage device
SD CARD socket : To insert a SD CARD
100/10/1: The number buttons to select directory, or track.
- Button 1, indicating the single digit 1 to 9, press once to increase every 1 single digit.
- Button 10, indicating the 10-digit, press once to increase every 10-digit. If total tracks are
88, the LCD display will only show to “8”. Keep pressing will back to “0”.
- Button 100, indicating the 100-digit, press once to increase every 100-digits. If the total
tracks below the 100, the button has no effect.
FOLDER: Folder selection key and adjust the recording quality
-Select folder
Press FOLDER button, LCD screen display F, then REW or F. FWD button with the
numbers 0 to 9 button to select the directory . Double-click the Cancel catalog select, LCD
screen, "F" disappears
-Recording quality adjustment: Press FOLDER button more than 3 seconds can choose
the recording quality. Press REW or F. FWD key to select 44.1 KHz,128Kbps or 192Kbps
Recording
■REC: Recording function key, need to use this key to record through the Line-in channel
When USB and SD Card are both in the device
- Press the REC button. LCD display ashing to indicate will be recorded to USB or SD.
- Use USB/SD button to select the option to record to USB or SD card.
- Press REC to start to recording, LCD starts to ashing indicated that they are recording
- Press STOP button to stop recording.
When only single USB or SD Card in the device
- Press REC to begin recording, LCD starts to ash and indicating that they are recording,

-18-
press STOP button to stop recording.
Sound recording through the REC function keys are saved in the directory folder REC
-To Play REC track in folder: press FOLDER button, LCD display F. Use REV or F. WD
button to select the directory REC, press PLAY/II to start playing.
-The track number in the REC Folder will start from “ REC 001 “, and increase gradually.
Therefore if want to check the recording le after nish record, the song will be recorded at
the last track in the REC folder.
COPY: Copy function key. It has to operate copy function in STOP status when use this key
for USB Copy to SD or SD Copy to USB.
Press STOP key, the device should be at stop mode
Insert USB and SD Card, use USB/SD button to select the device you want to copy the
source of any of the following options
Copy single: Press REV , F. WD button or Numerals key to select tracks. Press COPY
button to start copying
Copy the multi-tracks or multi-directories:
- Select the tracks and store the tracks in the Memory Program first(for PROG feature
instruction, please refer to PROG)
- Press COPY button to copy the tracks stored in the Program, if the copy to SD, LCD
display will ash SD and indicates that it is recording to the SD card.
Copy the whole directory:
- Press FOLDER button, LCD display F, use REV button & F. WD to select the directory
you want to copy
- Press COPY key to start to copy the selected directory. If copy to SD, LCD display will
ash SD and indicates that it is recording to the SD card.
- The tracked recorded through COPY function are stored in the folder “CPY”
- To play folder “CPY” of the tracks, press FOLDER button, LCD display F. Press REV
keys F. WD button to select the directory CPY, press PLAY/II to start playing
- The time required to copy according to the le size and track the numbers
-Copy function is copying without folder. For example, if wants to copy each 5 tracks in 3
folders (total 15 tracks) and there will be storage to CPY001 ~ CPY015 at the CPY folder
after copying. If copy a new song after it, it will be storage at CPY016.
A↔ B: Section Repeat Play
Press once to start playing the beginning of memory.
Press again to stop at the end of memory area. The device repeats to play memory area.
Press it again to stop playing.
USB/SD Playing
■PLAY/II: Play and pause, press to play, play again to pause.
■STOP: Press to stop playing
■USB/SD: Select to use US or SD CARD
■REPEAT /PROG: Press to select Repeat or Program memory function
Repeat function : Need to operate in the playing mode
- Press once, LCD screen displays "REP", will repeatedly playback currently playing track.
- Press twice, LCD screen displays "REP F", will repeat the entire directory is currently

-19-
being played
- Press 3rd times, LCD screen displays "REP ALL", will be repeated play all tracks.
- Press 4th times, cancel repeat playback function. The words on LCD screen will be
eliminated.
Memory function: Need to operate in the stop-play mode, can be memories up to 99 songs
- Single or multi-tracks memory:
Press the STOP button to stop playback.
Press PROG/REPEAT button, LCD screen displays PROGRAM. Select desired songs by
using FOLDER button and number keys 0 to 9 and REV key or F. WD key.
Press PROG/REPEAT button to store 1st song, LCD display shows “00 01” for the 1st
song. Press << PROG/REPEAT >> again for storing 2nd song; LCD display shows “00 02”.
Start over above process for storing more songs. Press PLAY/II memory to play the tracks
stored in the Program.
-Whole folder memory:
Press the STOP function keys to stop playback
Press PROG/REPEAT button, LCD screen display shows PROG, press the FOLDER
button with the number of combination of keys or REV keys F. WD button to select the
folder
Press PROG to store selected folder. To store more folders, repeat above steps.
Press PLAY/II button to start play memorized folders.
To memorize multi-folders or multiple tracks, repeat above steps
LCD will display shows FULL when stored 99 songs
To cancel program feature, keep pressing PROG button until LCD display PROG
disappeared
■REV I
▲
▲
: Backwards. Press to backward to last track. Press for 3 seconds to fast
reverse the track
■F. WD
▼
▼
I: Fast forward. Press to forward to next track. Press for 3 seconds to fast
forward the track
■IR sensor: Infrared remote control eye.
■DEL: Delete single/folder/all of the les.
Delete current playing track, can be operated under “Stop” mode or during “Playing” mode
Press DEL button, LCD displays ash DEL FILE, reminding you to delete the le, and then
press DEL to conrm the deletion, LCD display shows DEL END.
Delete a folder: To delete the specied folder, press FOLDER button to select the folder you
want to delete, click the DEL, LCD display ashes DEL FOLDER , reminding whether you
want to delete the folder, and then press DEL again to conrm the deletion, LCD displays
DEL END, the folder is removed
Delete all the les: In the stop-play mode operation
- Press the Stop button
- Long DEL key to more than 5 seconds
- LCD display shows "DEL ALL" to conrm whether you want to delete all the les
- Then press DEL key again to delete all the les
Table of contents
Other Chiayo Stereo System manuals