Chilipepper CP9000 User manual

Chilipepper CP9000
Installation Instructions
READ BEFORE INSTALLING:
* The Chilipepper is not desi ned to be connected with ri id pipin like copper or
alvanized pipes. *Flexible hoses MUST be used.
* The Chilipepper fittin s are desi ned for flexible hoses that have a rubber asket to
make a water-ti ht seal.
* Do not use putty/pipe dope on the fittin s for the Chilipepper.
*Teflon tape is ok, IF USED CORRECTLY, and the Teflon tape does not et inside the
pump head.
WARNING: Risk of electric shock. This pump is supplied with a roundin conductor
and a roundin -type attachment plu . To reduce the risk of electric shock, be
certain that it is connected only to a properly rounded roundin -type receptacle.
Package Contents Items Needed to Install the Chilipepper
The Chilipepper Appliance 110 Volt Outlet
Remote Key Fob Two Braided type hoses:
Brass Fittin with Temperature Sensor 3/8" Comp x 1/2" FIP
White Washer for Brass Fittin Wrench for the hoses
2 - Brass “T” Fittin s
Hex Adjustin Tool
Screw Driver for Adjustin Temperature
Settin & Remote Codes
Helpful troubleshootin tips are at the back of this booklet.
Chilipepper Sales, Inc., 1410 Greg Street, Suite #408, Sparks, NV 89431
1

STEP ONE
Connect the Brass Fittin and Sensor Cable
First insert the white washer into the brass fittin and thread onto the cold water outlet
(the tall fittin on the pump head). Teflon tape is not needed. The white washer in the
brass fittin will make a ood seal. DO NOT USE PUTTY/PIPE DOPE.
Next, insert the male connector on the end of the white sensor cable into the base of the
Chilipepper. The male connector will only o into the circuit one way. Normally the two
raised rid es on the male connector will be in the up position. The male connector will
then slide into its connection smoothly. If it does not, recheck that it is positioned
correctly. Do Not Force the connection.
PLEASE NOTE:
•There may be some water in the pump head due to our water testin of the units.
•The Brass Fittin with the Temperature Sensor is packa ed separately to avoid
dama e to the White Sensor Cable and Male Connector that plu s into the circuit.
Chilipepper Sales, Inc., 1410 Greg Street, Suite #408, Sparks, NV 89431
2

STEP TWO
Under the Sink
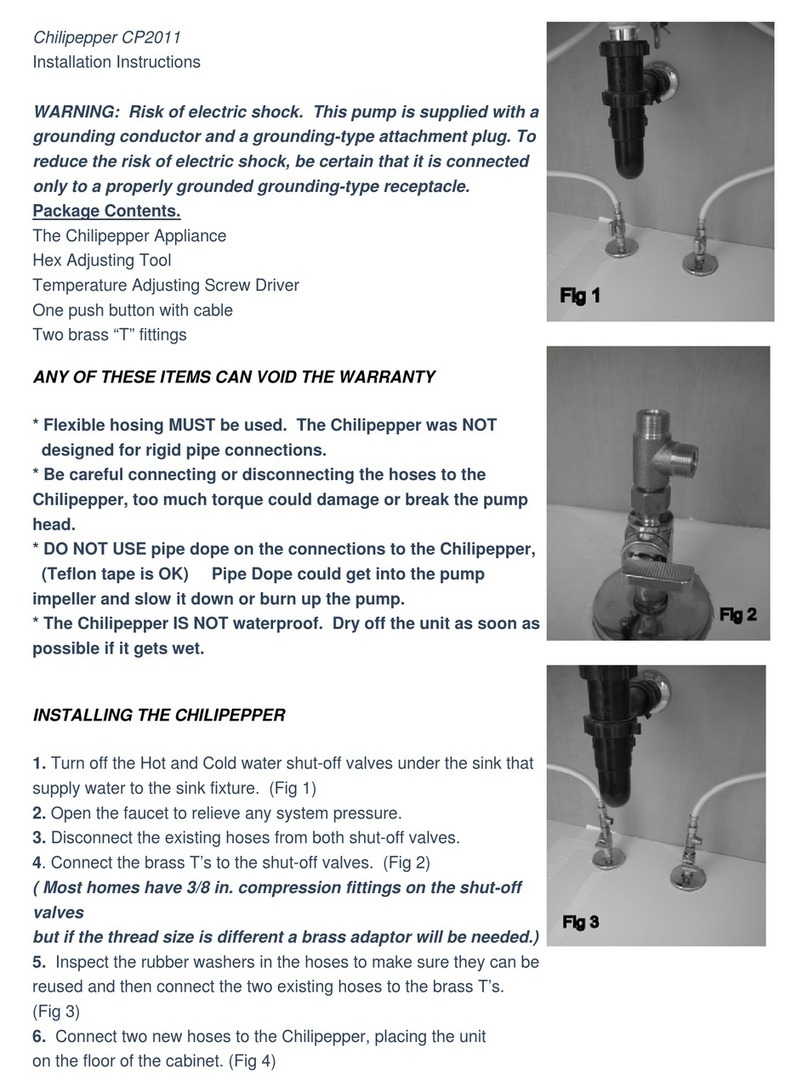
1. Turn off the Hot and Cold water shut-off valves under
the sink that supply water to the sink fixture. (Fi 1)
2. Open the faucet to relieve any system pressure.
3. Disconnect the existin hoses from both shut-off valves.
4. Connect the brass T’s to the shut-off valves. (Fi 2)
( Most homes have 3/8 in. compression fittin s on the shut-off valves. If the thread
size is different a brass adapter will be needed.)
5. Inspect the rubber washers in the two existin hoses to make sure they can be reused
and then connect them to the brass T’s. (Fi 3)
6. Connect two new hoses to the Chilipepper. (Fi 4)
7. Connect the remainin ends of the hoses to the brass T’s, makin sure the hoses o to
the correct Hot or Cold supply. (Fi 4 & Fi 6)
Chilipepper Sales, Inc., 1410 Greg Street, Suite #408, Sparks, NV 89431
3

STEP THREE
Primin the Pump
Primin and Removin all the air from the water lines and the pump is the most
important step that can be done to insure a lon life for the Chilipepper. The
Chilipepper is a very hi h speed, powerful pump and runnin it for any len th of
time without water will either dama e the shaft seal or the pump head, resultin in
a water leak and will VOID THE WARRANTY.
NOTE: These primin instructions are intended for use with the
installation procedure in this booklet. Alternate instructions for
installation with a standard recirculation system are available on our
website. When primin the pump with an alternate installation, be sure to
look and listen to the pump. You should be able to see and hear the water
flowin throu h the pump.
PRI ING THE PU P
UNDER THE SINK at the ater supply valves:
Keep or turn OFF the COLD ater valve and turn ON the HOT ater valve.
No , turn ON the COLD ater fixture at the sink.
LOOK and LISTEN. When the air is removed from the ater lines you should see and
hear ater running through the pump head.
Finally turn ON the COLD ater supply valve UNDER THE SINK.
Double Check to Make Sure the Valves are Fully Open
Check All Connections and Fittin s for leaks.
An old plumber’s trick is to place a clean newspaper under the
connection after the installation. If there’s a leak it will be easy to find.
Plu the Chilipepper into the electrical outlet.
Before activatin the Chilipepper for the first time, turn the hot and cold
water faucets ON with a low flow and then press the button for the
Chilipepper. This will remove any remainin air
from the lines and finish the primin of the pump.
Chilipepper Sales, Inc., 1410 Greg Street, Suite #408, Sparks, NV 89431
4

STEP FOUR
Usin the Remote
The Remote Key Fob is pre-set to operate the Chilipepper unit
and is ready to use once the pump is installed. Key Fob styles
and colors may vary. Some styles may have a cover over the
button. To access the button simply slide the cover open.
After a final inspection for leaks, the Chilipepper
can be put into the plastic container.
The Chilipepper and plastic container can also be put into the
foam box with the foam lid if desired. This can help to lessen the
operatin sound of the pump.
Temperature and Remote Code Adjustment
On the side of the Chilipepper there are two round openin s (Fi 9). Inside the top
openin is a Sensitivity Adjustment. The adjustment can be done with the included screw
driver or any small flat-head screw driver.
Turnin the sensitivity adjustment clockwise
(#4 maximum) increases the distance the hot water
travels and will result in hotter water at the faucet. This
may cause some warm water to enter the cold water
line for a few feet but the warm water will be removed
when the faucet is used.
Turnin the Sensitivity counter-clockwise
(#1 minimum) reduces the distance the hot water travels, resultin in cooler hot water.
The lower openin is the Remote Code Settin Adjustment. Match the arrow next to the
slot to the correct code number on the dial. The code settin has to match the Key Fob
Remote Transmitter bein used. The Chilipepper will be packa ed with the Key Fob Code
preset.
The White key-fob is normally Code 1. The Brown key-fob is normally Code 2.
Chilipepper Sales, Inc., 1410 Greg Street, Suite #408, Sparks, NV 89431
5

CP9000
Features and Notes
1. Built-in Moisture Detector and Alarm which will alert the user of any moisture
accumulation in the Chilipepper.
2. If the Chilipepper ets wet for any reason, the alarm will sound and stop the pump
from operatin .
3. The pump will o into LOCK OUT at 95 de rees and will not turn on a ain until the
temperature drops below 95 de rees at the brass sensor.
4. If the button is pushed while in LOCK OUT, the alarm will beep 2 times.
5. To avoid overheatin , the pump has an automatic shutoff feature that allows the
pump to run for a maximum of 3 minutes with each activation,
6. The temperature sensor has 4 sensitivity adjustments for your convenience. Settin
1 is the lowest and 4 is the hi hest.
7. It is not necessary for the faucet to be open when the Chilipepper is in use (except
for the first use at installation).
Trouble Shootin
Note: When workin on the plumbin in a home where the Chilipepper is
installed it may be necessary to shut the hot or cold valves off at the fixture where the
Chilipepper is installed to isolate the hot and cold water lines durin the plumbin
repairs.
Press the start button and nothing happens.
1. Be sure there is electricity at the outlet. Sometimes the disposal outlet has only one of
the two receptacles wired to the switch, and sometimes the whole outlet is wired to the
switch. To test this, try runnin an extension cord from another outlet and see if the
Chilipepper starts.
2. Check the Sensor Cable. If it is not inserted properly it will not make a ood connection
and the Chilipepper may not start.
Press the start button and hear 2 beeps but the water is not hot.
Check that the sensor is firmly seated in its connection at the base of the unit.
Wait ½ hour and try a ain. Sometimes the sensor detects latent heat from bein handled.
Chilipepper Sales, Inc., 1410 Greg Street, Suite #408, Sparks, NV 89431
6

The Chilipepper runs but hot water doesn’t reach the sink, or takes longer than
without the Chilipepper.
Make sure that both supply valves under the sink are fully open. Check that the hot and
cold lines are connected correctly – the taller outlet with the brass fittin is for the cold
line and the shorter inlet in the center is for the hot water. Check the temperature
adjustment settin . If the water is warm but not hot enou h, adjust the dial clockwise to
increase the temperature.
Hot water is in my cold line when the Chilipepper has not been operating.
There are 3 reasons for this to happen:
1. The sprin check valve is dirty.
2. There's an exterior hose bib or sprinkler line very close to where the Chilipepper is
installed.
3. The Chilipepper is much hi her than the water heater.
The first thin to do in all cases is to clean and inspect the check valve for dirt, Teflon tape
or other object that could stop the rubber check valve
from closin . If everythin is clean and you have a
situation like #2 or #3 above then you may need more
pressure on the rubber check valve by usin the Hex
Adjustin Tool, (Fi 10) Start with one full rotation .
This will put more pressure on the sprin , requirin
more water pressure to open the check valve.
How to clean the spring loaded check valve:
First, Disconnect the Temperature Sensor from the bottom of the Chilipepper. This is
done by pullin on the white connector ONLY and wi lin it side to side at the same
time. DO NOT PULL ON THE WIRES
Next, remove the brass adapter from the cold outlet (Fi 4) of the Chilipepper makin
sure not to lose the white washer. Remove the threaded retainer with the Hex adjustin
tool and remove the sprin and rubber Check valve. Check for dirt, sand, etc. and clean.
Then replace the check valve, sprin , threaded retainer in the same position that you
removed, next replace the brass adapter and reconnect the temperature sensor.
If these troubleshootin tips do not resolve the problem, please contact us - we are happy
to help: Phone (775) 359-1223 Email: [email protected]
Chilipepper Sales, Inc., 1410 Greg Street, Suite #408, Sparks, NV 89431
7

Refer to our website: www.chilipepperapp.com
for Installation Updates, Trouble Shootin Updates,
FAQ,'s, Warranties and Service Request Forms.
READ BEFORE INSTALLING:
* The Chilipepper is not desi ned to be connected with ri id pipin like copper or
alvanized pipes. *Flexible hoses MUST be used.
* The Chilipepper fittin s are desi ned for flexible hoses that have a rubber asket to
make a water-ti ht seal.
* Do not use putty/pipe dope on the fittin s for the Chilipepper.
* Teflon tape is OK, IF USED CORRECTLY, and the Teflon tape does not et inside the
pump head.
Chilipepper Sales, Inc., 1410 Greg Street, Suite #408, Sparks, NV 89431
8
Table of contents
Other Chilipepper Water Pump manuals
Popular Water Pump manuals by other brands

Speck
Speck Normblock Multi 65/250 Operation manual

Gardena
Gardena 5500/5 inox operating instructions

Sealey
Sealey AK4560D.V2 quick start guide

Pentair
Pentair JUNG PUMPEN HEBEFIX PLUS instruction manual

FLOJET
FLOJET BevJet Compact Installation/operation instruction manual

Neptun
Neptun NHW 110 Inox operating instructions