Chinook Beneteau 373 Quick start guide

1
Notes from the Owners
Welcome aboard!
It is our pleasure for Chinook to continue to accommodate visitors to the San Juan Islands as she has for
many seasons. She became a part of our family in 2018, and we have enjoyed upgrading her systems for
our own use as well as for guests to enjoy. Beneteau yachts are appreciated for their livability and
performance, and there are many reasons why the Beneteau 373 was named Boat of the Year (2005) by the
Cruising World judges. From the bright and spacious saloon, the roomy stand up shower/head
combination, the spacious cockpit with pivoting wheel, and the roomy fore and aft cabins, to the storage
and excellent galley, there are so many features to like about this boat! But looks are not Chinook’s only
virtue. She has excellent sailing abilities in both heavy and light winds. This boat is a lot of fun! We trust
these owner’s notes will get you on your way quickly and easily. Thanks for taking great care of our boat!
CHINOOK’S SPECS
OTHER MEASUREMENTS:
Year: 2005
Refrigeration:
- Front-load refrigerator 12” W x 16” D x 26” H
- Top-load freezer 19” W x 14” D x 21” H
LOA: 37' LWL: 32' 10"
Beam: 12' 4" Draft: 6' 3"
Displacement: 15,013 lbs (dry)
Berth Mattresses:
- V-Berth 6’ 6” L X 5’ 6” W at head & 24” at ft
- QTR Berth 6’ 6” L X 5’ 6” W (minus “seat”)
Mast height above WL: 53’ 6”
Fuel: 33 gal.
Water: 98 gal. (2 tanks) Hot water: 6 gal.
Headroom:
- V-Berth 6’ 5” -Shower 6’ 8”
- Salon 6’ 7’, - Qtr berth 6’ 9”
Holding: 22 gal.
Engine: 39 hp. Yanmar
INDEX:
1. Emergencies
13. Engine and Operating Under Power
2. Anchors & Windlass
14. Enrichment
3. Barbecue Grill
15. Fuel Tank
4. Batteries
16. Head and Holding Tank
5. Berths
17. Refrigeration
6. Cabin Interior
18. Repairs (Tools & Spares)
7. Cabin Heat
19. Sails and Rigging
8. Dinghy & Outboard
20. Sailing Characteristics
9. Docking and Boat Handling
21. Showers
10. Dodger & Bimini
22. Steering Wheel
11. Electrical Panels
23. Stove/Oven
12. Electronics/instruments
24. Water & Water Heater

`
2
Key to Markings:Throughout these notes we have use the following convention:
•Italics –used for headings.
•ALL CAPS –used for safety and operational warnings.
•Underlining –indicates the location of things.
•bold –indicates important knowledge or data.
1. Emergencies:
Fire –There are four ABC rated fire extinguishers onboard, there location are:
1. Forward cabin, below berth
2. Under Nav station desk
3. Aft cabin, above cabin door
4. Starboard cockpit locker
If you have a fire at the stove turn off the LP Gas breaker at the electrical panel.
Hitting a Log, or Running Aground –In case of a log hit or running aground, immediately
check for leaks in the bilge and then check for cracks in the fore and aft sections of the bilge where
the keel attaches to the hull. Also check all keel bolts. Once you are sure no water is entering the
hull contact San Juan Sailing at 800-677-7245 and proceed to the nearest.
Leaks –First, get bilge pumps going, both manual and electric. Then determine the source of the
water, check the prop shaft first and then the through-hulls. There is a diagram showing the
location of the through hulls in the notebook. Get the crew on deck and into life jackets. There are
wood plugs wired to each of the through hulls.
There are two bilge pumps. The manual bilge pump is located on the starboard side of the cockpit
wall. The handle is part of the pump housing –pull out to use. The electric bilge pump has an
automatic float switch but the switch on the electrical panel can be used to power the main
pump manually.
Steering Failure –If the steering system fails there is an emergency tiller in the starboard cockpit
locker. It fits on rudderpost which is under the hinged steering seat.
Safety Gear –Flares, horn, etc. are located starboard under seat cushion at NAV table. The Radar
Reflector is located in the starboard cockpit locker. The first aid kit is located in the Nav station
seat.
Spare Parts and Tools –Spare parts and tools are located under the middle and forward port side
settee cushions.
2. Anchors and Windlass: Chinook is equipped with two anchors, one forward (44# Bruce with 200’ of
chain) and a 15# Fortress in the port stern locker along with 50’ of chain and 200’ of rode. The primary
anchor chain and rode is marked with a string at 25’, 2 at 50’ and 3 at 75’. Then there is a 10’ string
at 100’ followed by the one at 125’, etc. pattern..
The scope normally used in the islands is 4 to 1, definitely not 7 to 1 (unless conditions call for it, i.e.
sustained winds over 25 knots). Most of the anchorages are well protected and popular, so you will likely
have someone anchored nearby. Most coves are 20’- 40’ deep; so expect to pay out about 100’-175’ of
chain. After you have paid out the suitable amount of chain, 1-2 minutes of idle reverse sets the anchor.
Also, the tides can change water depth up to 13 feet in our waters so be aware of where you are in the cycle
when choosing an anchorage and deciding how much chain to put out. Here is an easy formula for how
much chain you need; add the water depth on sounder, plus any tide increase expected during the
night, plus 4’(to account for the distance from sounder to roller on bow) and take that total and
multiply by 4 (typical example would be 25’ of water + 6’ of tide increase + 4’ = 35’ x 4 = 140’).

3
The anchor windlass requires power from a circuit
breaker located in the aft stateroom under the front of
the berth (see photo). If this breaker trips there will be
a small lever on the bottom which needs to be swung
back into place to reset the breaker. The up-down
controller for the windlass is located in a bag inside the
chain locker. Always operate the windlass while
the engine is running or it will drain the engine
starting battery.
Detailed operating instructions are listed bellow:
Lowering the anchor:
a. Be sure the windlass breaker is on.
b. Untie the line holding the anchor in place (this line doubles as the snubber).
c. Please lower the anchor by hand for the first 5-6 ft. so it does not swing into the bow.
d. Lower the anchor until the needed rode is paid out.
e. Secure the rode on one of the forward cleats.
f.Set the anchor by reversing at 800 RPM for 1-2 minutes, DO NOT go above 1000 RMP.
g. Turn off the windlass switch and, if appropriate, turn on the anchor light.
Raising the anchor:
a. Start the engine.
b. Turn on the windlass breaker and, if needed, turn off the anchor light.
c. When retrieving the anchor, never use the windlass to pull the boat; instead, slowly power
toward the anchor while using the windlass to take up the slack. Also, if the anchor is really stuck
in the mud you will hear the windlass slow under the load. Immediately stop the windlass and
drive the boat forward to free the anchor.
d. Once the anchor is out of the water, please bring onto the boat by hand. Please do not pull
the anchor up onto the rollers using the power of the windlass, doing so will likely chip the
fiberglass as the anchor swings into the bow.
e. Secure the anchor with the snubber.
f.Turn off the windlass breaker.
Stern Ties: There are times when adding a stern tie to shore will be handy, especially in Desolation
Sound. Chinook has 500’ of line on a spool stored in the port cockpit locker. We use the mop handle to
mount the spool in the transom walk-through so the line can easily be deployed and recovered. The
recovered line is usually very wet so we leave the spool sitting on end in the walk-through for a couple
hours to dry before we put it away.
Windlass Circuit
Breaker
Shows Voltage for
selected battery
set.
Picture of face under
berth in aft stateroom
Anchor
Plug controller
in here

`
4
3. Barbecue Grill: The stainless steel propane
barbecue sits on the stern rail. Use the hose in
the propane locker (just forward of the BBQ) to
connect the propane to the BBQ. It’s a simple
connection. Please remember to turn off the
valve to the BBQ and the propane tank after
use and place the hose back into the locker.
Also, as a courtesy to the next guest, please use
the wire brush wired onto the BBQ to clean it
after use. Since the BBQ runs from its own
tank the solenoid switch on the main panel does
NOT need to be on to run the BBQ.
4. Batteries: Chinook has a 2-battery house
bank (440 amp hr) which is located under the
aft berth and a start battery (75 amp hr) located
in front of the engine. Battery voltages can be
checked at the NAV Station (see picture). The
banks are isolated so there is no need to
change the battery switch.
If the house bank gets below 12 volts please
run the engine for a couple hours to charge
them. Please be aware the CO detector
(located under the nav table) will chirp if the
batteries get too low. This is not the loud
alarm sound, just a complaint that its batteries
are low. If this happens it is time to start the
engine and charge for a while.
5. Berths: Our boat sleeps 7; 2 in the private cabin forward, 2 in the aft cabin and 3 in the main salon. The
table adjusts to sleeping position by raise the table up a bit, remove the pin through the center post, lower the table
and reinsert the pin in the lower hole of the compression pillar. Both cabins have the Froli venting system under the
mattresses to help vent moisture and provide more cushion.
6. Cabin interior: Cushions and curtains throughout the interior were replaced in 2019 and we appreciate
your continued excellent care of them. Port covers for privacy are removable and can be stored in cabins
when not in use. If left snapped in place, they will provide filtered sunlight. Rugs add a little something
soft underfoot for comfort and friction. They are all machine washable. We tried to limit the number of
throw pillows and other decorations but we did include a few for personality. We hope you find them more
enjoyable than annoying. These items can be stored in the berths or salon cabinets during your voyage if
desired.
Battery Monitor Selector
Nav Station

5
7. Cabin Heat: Chinook has a Webasto 3500 forced air furnace which is diesel fueled. The thermostat
is located at the nav station (see picture). Simply turn on the switch and set the temperature you want.
There is a 2-3 minute delay from when you turn it on to when you will hear the fan running.
When the furnace is running you may notice a clicking noise, this is the electric fuel pump pulling from the
main diesel tank. Also, we do not recommend running the furnace all night (although it is doable) as its
draw on the batteries is sizable. It is also fairly noisy, especially from outside the boat, so your neighbors
will appreciate it being off most of the night. The heat is dry, comfortable, and on those occasional rainy
days or cool evenings, makes a huge difference in cruising comfort! Two heater vents are located in the
head and under the navigation table seat. We recommend you do not place heat-sensitive items in these
areas when operating the heater.
There is also a 120V AC electric heater located under the port settee should you need this while connected to shore
power.
8. Dinghy and Outboard: Chinook has a new 10’ Kachemak 310 aluminum bottom dinghy. Towing
works best when the dinghy is brought close to the boat —about 4 or 5 feet off the stern. This
guarantees you won't accidentally wrap the painter around the propeller when you back up! We tie the
painter off twice –a cleat tie close and the bitter end we tie onto the stern rail. Others have lost the
dinghy when their cleat tie slipped loose.
As owners, we would very much appreciate your special care when beaching the dinghy. Beaches in the
San Juans are seldom gentle, sandy beaches; they are usually rocky and covered by barnacles equipped
with extra sharp rubber cutters. Here’s what works best: launch a person off the dinghy bow as you
approach shore; then offload everyone over the bow. Lift the dinghy above barnacle height and deposit it
gently on the beach. We also secure the painter under a rock or to a log –a rising tide can leave you high,
dry and dinghyless!
The outboard has a four stroke engines, so do not add oil to the gasoline mixture –it uses straight
gasoline. San Juan Sailing will be sure you have a full gas can, which is normally in the dinghy. Also
please do not cruise with the outboards on the dinghy as a large wake or gust of wind can overturn
the dinghy.
The combination for the Honda’s padlock is 1776.
(Operating instructions for the outboard are on the next page)
Thermostat
Main Switch for
Furnace

`
6
Honda 2.3 hp Operating Instructions:
Starting the Outboard:
a. Push the fuel valve lever (starboard aft corner of the outboard) aft to open.
b. Pull out the choke switch (starboard forward corner of the outboard).
c. Open the air vent on the top of the fuel cap by turning counter-clockwise.
d. Make sure the black U-shaped kill clip (with the red lanyard) is clipped into the red shut-off
knob (port forward corner of the outboard).
e. Turn the handle throttle ¼ turn counter-clockwise.
f.Pull the cord until it starts (you shouldn’t have to pull it more than 5 times).
g. There is no transmission--just throttle up to go forward and throttle down to stop. If you want to
go in reverse--just swivel the outboard around 180 degrees.
To Shut Off:
a. Shut the outboard off by pushing in the red shut-off knob (where the kill clip is clipped in). Or,
just pull the red lanyard until the clip pops off.
b. To avoid prop damage, shut the outboard off and raise it out of the water before you reach the
shore. Pull the outboard forward and out of the water until it clicks and stays in place.
c. To put the outboard down, release the stainless steel lever on the starboard side of the shaft.
d. Put the outboard back on the outboard mount on the stern rail and tighten both braces.
a. Push the fuel valve lever forward to close and close the air vent on top of the fuel cap.
Troubleshooting:
If the engine won’t start, review steps 1-6 above to make sure you’ve done all 6 steps. There is a
spare spark plug and spark plug wrench in with the safety equipment in case you need them. If the
outboard is running and you’re heading toward shore, and the engine suddenly quits, it’s usually
that someone has forgotten to vent the fuel cap. If the engine is running fine but the propeller isn’t
moving, the shear pin is probably broken –just take the cotter pin out to remove the propeller and
replace the broken shear pin (a spare pin is located forward of the shaft under the handle grip).
9. Docking and Boat Handling: Chinook is light on her feet (turns in a short radius) and, like most
sailboats, carries momentum well. We find it is helpful for the person handling the lines to take a line
from the mid-ship cleat, this allows them to pull the boat to the dock without ‘losing’the stern. The
other important issue is prop-walk –Chinook has some walk to port, but it is not pronounced. The
MaxProp provides more reverse power than a fixed prop, so reverse idle or slightly above does the
trick most of the time.
Just so you know, most marinas in the islands will help you if you ask for assistance. Asking for docking
assistance, especially in windy conditions or with an inexperience crew is a sign of prudent seamanship.
10. Dodger & Bimini: As with all dodgers, please be gentle. If the glass becomes spotted with salt
please get a pot of fresh water from the galley sink and “flood” the salt crystals off the plastic. Our
dodger has some very handy rails on the back and sides that make staying upright and onboard easier.
The connector canvas between the dodger and bimini can be removed by unzipping it. When you
remove it please fold and store it so the windows do not crease.
7
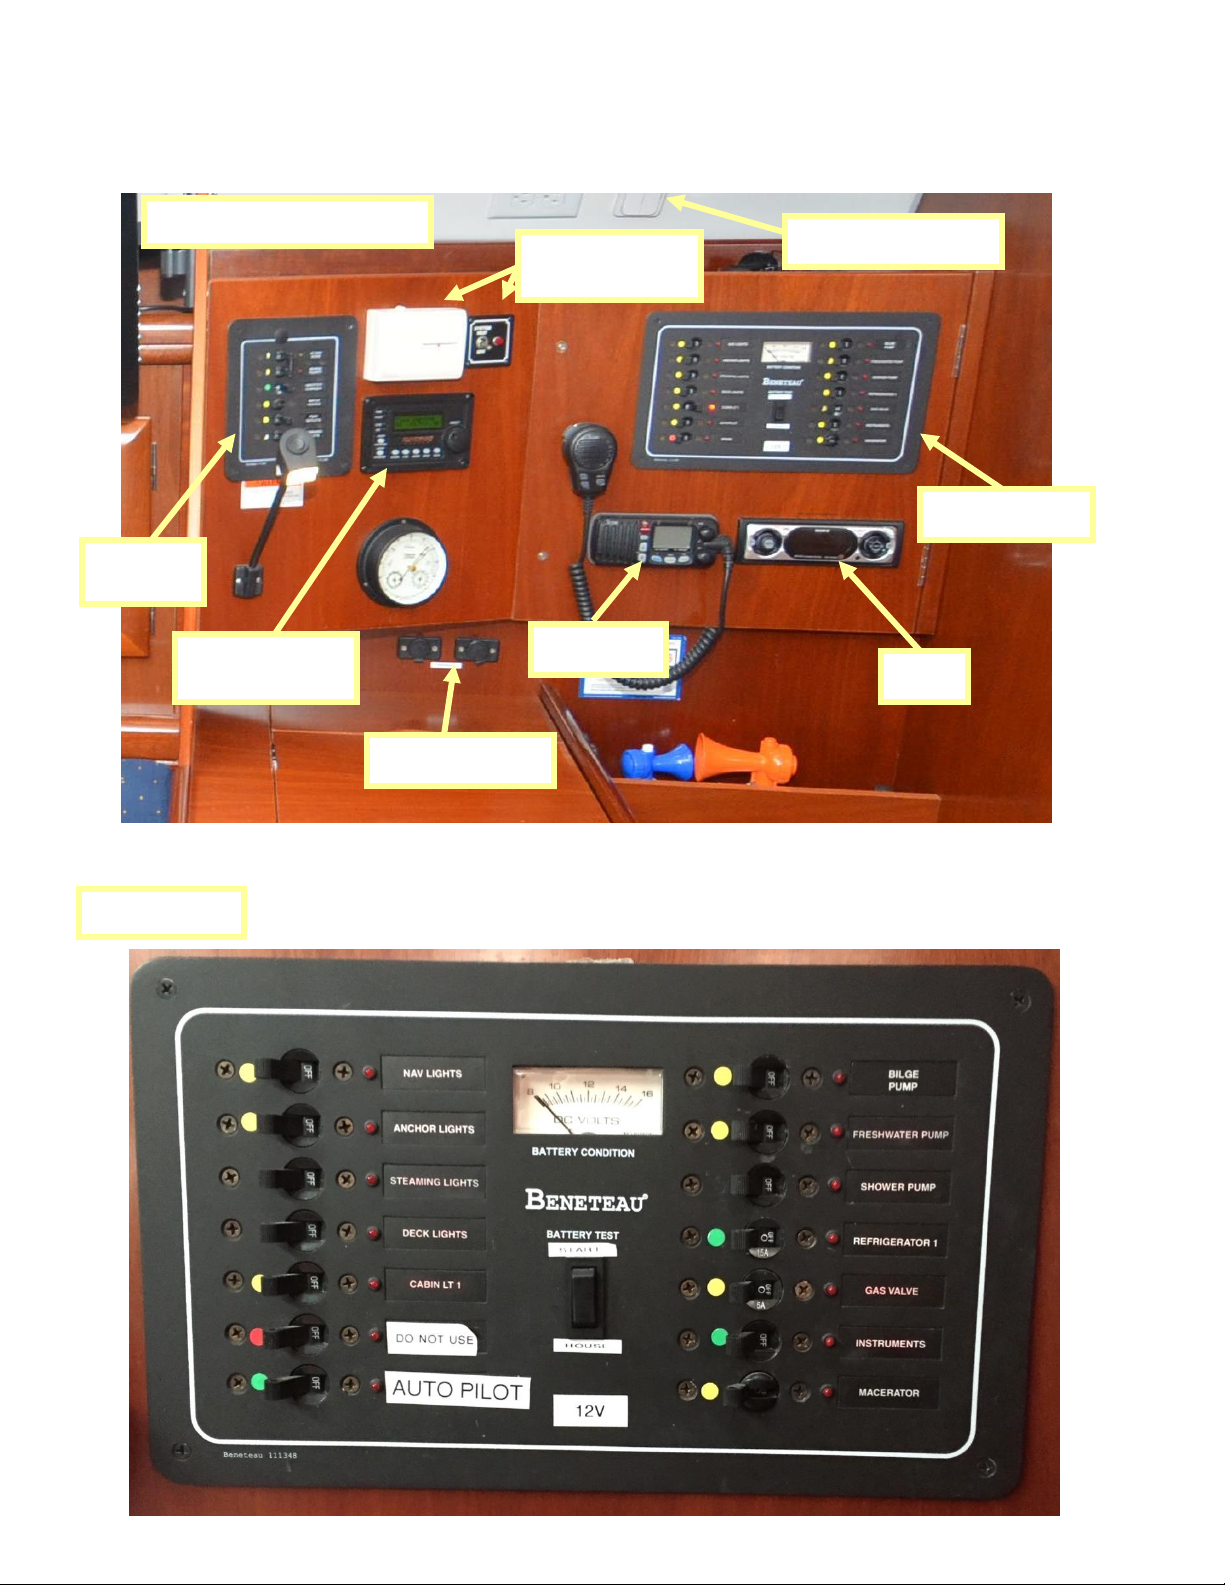
11. Electrical Panels: The electrical panels on Chinook are straightforward and clearly marked. The
picture below gives an overview and pictures on the next page give more detail.
Nav Station Overview
120 VAC
Panel
Heater switch and
thermostat
Stereo
12 VDC Panel
Invertor/Battery
Charger Control
VHF Radio
12 VDC Panel
12 VDC Plug-ins
Salon Light Switches

`
8
DC Panel –Most of the breakers on the 12 VDC panel are
self-explanatory. The Instrument breaker sends power to the
stereo, chart plotter, radar and the VHF radio. The Autopilot
breaker powers the depth sounder, knot meter, and wind
instrument in addition to the autopilot.
AC Power –Chinook has two ways to get AC power, a 30
amp shore power connection and a 2500 watt invertor. The
water heater and the battery charter both require shore power
to work. The outlets and microwave will work on either but
the microwave has a heavy draw on the batteries if run using
the invertor without the engine running. The invertor
controller is pictured below and is located at the nav station.
If it has been sitting for a while the first touch will ‘wake it’
and the second touch will take action.
There is also a breaker for the shore power
located in the aft port side cockpit locker (the
one under the corner seat), see picture.
120 VAC Panel
Inverter ON/OFF
Switch –Leave off
when not in use.
Battery Charger
Switch –Leave on!
Shore Power Breaker

9
12. Chart plotter/Radar
NEW in 2019
See more detailed
chart plotter notes
next page
New for 2019 is a Garmin 942xs chart
plotter with integrated radar. The
[instrument] breaker on the electricalt
panel must be “on”to power the unit.
See more detailed instruction for the
chart plotter on next page.
We recommend your PRIMARY
navigation tool should be the Maptech
waterproof chart book or paper charts
(with the most active “killer rocks”
marked in red). The best way to stay
off the rocks is by knowing where you
are at all times. And the primary role
of the chart plotter is to verify you are
where you think you are. It can also be
used to zoom in to get more detail.
You should have little need of the radar
except for the highly unlikely event that
you are suddenly enveloped by fog,
which is rare in this area. The fog that
we’ve encountered in the islands
usually forms in the wee hours of the
morning and burns off by mid-day. So,
if it’s a little soupy after breakfast, we
put on an extra pot of coffee until it
lifts. Please remember that SJS
contracts do not permit night or
restricted visibility sailing. However,
you can practice by watching the radar
screen and see what’s actually
happening around you to develop a
familiarity with what it looks like. It’s
good to have a sense for how things
work in case the fog rolls in while you
are underway.
Manuals for the chart plotter, radar, and
other instruments are in the starboard
forward salon locker in a waterproof
bag. Chart plotter manual is also
available on-screen.
Depth sounder/
knot meter
Wind
instrument
Auto-pilot

`
10
Using the Touchscreen
•Tap the screen to select an item.
•Drag or swipe your finger across
the screen to pan or scroll.
•Pinch two fingers together to zoom
out.
•Spread two fingers apart to zoom
in.
Locking and Unlocking the Touchscreen
•Select [POWER] > Lock
Touchscreen to lock the screen.
•Select [POWER] to unlock the
screen.
Tips and Shortcuts
Press [POWER] to turn on the chartplotter.
From any screen, press [POWER]
repeatedly to scroll through the brightness
levels. (This can be helpful when the
brightness is so low you cannot see the
screen.)
Select Home from any screen to return to
the Home screen.
Select Menu to open additional settings
about that screen.
Select Menu to close the menu when
finished.
Press [POWER] to open additional options,
such as adjusting the backlight and locking
the touchscreen.
Press [POWER], and select Power > Turn
Off System, or hold
until the Turn Off System bar fills to turn
off the chartplotter.
Press [POWER], and select Power >
Sleep Station to set the chartplotter to
standby mode.
On-screen Buttons
[POWER] BUTTON
Automatic backlight sensor
microSD Card slots

11
Chart plotter quick-start tips!
Upon powering-on the unit, the “favorites” screen is available with options of a full-screen navigation
screen or a split-screen with simultaneous close-up and zoomed-out navigation.
Remember that the unit is a touch screen, so be careful where you touch!
To navigate to a certain location, locate the destination by pinching/dragging the navigation screen and
touch the desired location on the screen then select “route to”. The next step is to touch the screen for each
turn and select “add turn”, working backwards to the starting location. The route can be saved by
selecting “end navigation” and indicating you desire to save/edit/name the route when prompted.
Remember that certain obstacles will not be visible on the navigation screen unless sufficiently
zoomed-in. The chart plotter will not adjust for these obstacles.
To find a saved route, select “user data” from the bottom row of the home screen, then “routes” then
select the desired route from the list, and then “navigate to”.
To re-center the map on Chinook’s current location, select “stop panning” from the lower right corner of
the screen.
To activate the radar select the “radar” icon located in the top left corner of the chart plotter screen. After
selecting, the screen will indicate that the radar is “spinning up” that takes only a few seconds. “Sea clutter”
and “rain clutter” can be adjusted-for on the right side of the radar screen. To exit the radar screen,
“unselect” the radar button in the upper left.
Personal mobile devices with the Garmin ActiveCaptain app installed can be connected to Chinook’s
chart plotter. After installing the app, and in close physical range to the chart plotter, connect to the
“CHINOOK GARMIN” wi-fi network. The password is the owner’s phone number with area code
found at the end of these notes.
Feel free to add additional notes others might find helpful:

`
12
Autopilot –The autopilot is the Raymarine instrument chart plotter (see photo). To engage the
Autopilot simply press the “Auto”button on the controller. To disengage press the “Standby” button. If
the steering wheel ‘locks up’ on you it is likely that the “Auto”button got pressed accidentally.
Please remember to stay situationally aware while using the autopilot, it cannot see logs, rocks or
other boats.
Automatic Identification System (AIS) –Chinook is equipped with an automatic tracking system
device new in 2019. AIS is intended to assist a vessel’s officer with collision avoidance and allow
maritime authorities to track and monitor vessel movements. Vessels fitted with AIS transceivers can be
tracked by AIS base stations located along coast lines and some satellites. The AIS is an added safety
feature for coordinating search and rescue and also allows San Juan Sailing to provide faster assistance in
case of unplanned maintenance issues as well as alert San Juan Sailing of Chinook’s return approach.
Vessels with AIS can be viewed in real-time through mobile device apps and websites like
www.marinetraffic.com that will reveal vessel name, course, speed, track, and other information. The
navigation system has integrated AIS, so you can also select vessels from the touch screen for information.
Depth Sounder –The Depth sounder and knot meter are on the same Raymarine controller above the
chart plotter (see photo). The digital depth sounder will not give accurate readings beyond 400’. In
deeper water, the sensitivity on the unit increases as the transducer tries to get some reading
back. Consequently, when you are in deep water, false readings caused by currents, changes in water
temperature, fish, etc. are common. These false readings often report very shallow water, so knowing you
are in deep water will help prevent panic attacks. Also, if the word DEPTH is blinking on and off it means
the unit is not getting a return signal (i.e. you are in very deep water). The depth showing on the sounder is
being measured from the transducer (about 12” under true water level) so the water under the boat is really
a bit deeper than the reading. But, we strongly recommend leaving 10-12 feet of water under the boat.
***We do not recommend using the alarm. Experience in the islands tells us that it goes off at the wrong
time –usually the middle of the night as a seal or fish passes underneath.
Knot Meter –The knot meter and depth sounder are on the same Raymarine controller above the chart
plotter(see photo). If the digital knot meter shows a reading of “0.00” while underway, the impeller is most
likely clogged. Sometimes it will clear itself; wakes from big powerboats are good for this. You can also
try clearing it by traveling in reverse. The instrument transponders are under the forward end of the saloon
just port of the mast. You can remove the impeller to clear it but only if you are experienced in such
things. If needed, the SOG (speed over ground) reading on the chart plotter will work as a standby knot
meter.
Wind Instruments –Wind speed and direction are displayed on the middle Raymarine controller sbsove
the chart plotter (see photo). Pressing the “True/App”button switches between True and Apparent wind
readings.

13
VHF Radio–Chinook’s radio is located in the
cockpit for easy use while underway. We
recommend that you monitor Channel 16
during your cruise. It is reserved for
emergencies and boat-to-boat initial contact.
After contact, move to a working channel (68,
69, 72, 74 or 78). We listen to weather
channels 1, 2, 3, 4 or 8 (whichever gives the
best reception) before we sail in the morning
and prior to anchoring for the evening. The
islands are generally a light wind region but
weather changes can be sudden. Listen for the
reports identified as “Northern Inland Waters”
for the San Juan Islands. San Juan Sailing
monitors channel 80 during office hours.
VHF Radio PORTABLE - For trips away from Chinook during which you want to be able to
communicate with Chinook or other VHF radios, a battery-powered handheld VHF is be located in the
starboard saloon cabinet behind the television.
Stereo –We have installed a Sony stereo/Bluetooth/CD audio system on the electrical panel and with
speakers in the cabin and cockpit. Please be aware of other boats when you are in harbor and adjust the
fader so that the cockpit speakers are turned off when not in use. The operating manual for the stereo can be
located in the starboard settee with the other manuals or in the Nav table. Remote is in the starboard salon
cabinet behind the TV. Some tips to get started quickly:
To connect a Bluetooth device:
a) Place the device within 3 feet of the stereo.
b) Press MENU button
c) Rotate the control dial to select [BLUETOOTH] then press it.
d) Rotate the control dial to select [SET PAIRING] then press it
e) Rotate the control dial to select {SET DEVICE 1] or [SET DEVICE 2] then press it
f) Perform pairing function on your device so that is detects the stereo unit
g) Connect to [MEX-N5200BT]
h) If Passkey/PIN is required by your device, input [0000]
To Connect with USB port:
a) When an iphone/ipod with iOS5 or later installed is connected to the stereo’s USB port,
the unit is paired automatically.
Pairing is limited to two devices. To connect a third device, unpair either device 1 or device 2 first.
Courtesy Light and
Switch
Back of Binnacle
RAM mic for VHF
Radio –main radio at
nav station.

`
14
TV/DVD Player –We have an TV/DVD player onboard for your enjoyment. You will need the inverter
on to use them unless you are connected to shore power. The remote control and a case of family-friendly
DVD’s are stored in the cabinet behind the TV/DVD.
Personal Electronic Device Use/Charging –Personal electronic devices can be charged/operated while
underway via the two 12V DC outlets on the instrument panel. A USB/USB-C adapter for 12V outlets is
located above the navigation table for your convenience. The AC outlets found throughout Chinook’s
interior require inverter or shore power to operate. The gooseneck reading lights in the private cabins have
USB ports in their bases.
13. Engine and Operating Under Power: We have found the 39 HP Yanmar engine to be very
reliable. Cruising should be done at engine RPMs of 1800 to 2200. The following table gives
approximate cruising information:
RPM’s
Boat Speed
Fuel Consumption
Range
2200
7 Knots
Approx. 0.75 gal/hr
250 Naut. Mi.
The ranges listed assume a 25% reserve in the 33gal fuel tank. We find pushing the engine beyond
2200 RPM does little good, as boat speed does not increase much.
Engine Alarm
Indicator Lights
Fuel Gauge

15
Starting:
a.Please visually inspect the engine compartment daily, if there is no oil or liquid under the engine you
are good to go. All boats in San Juan’s fleet have the engines checked by a mechanic on every
turnaround, so there really is no need to check the oil level unless you are out for more than
one week.
b.Make sure the gearshift is in neutral (vertical), push in the red button at bottom of handle (which
disengages the shifter), then push forward until you feel it engage the throttle a bit.
c. Turn on the key on the engine panel and push the start button.
d.After she starts, check for water flowing out the exhaust.
e. There is no need to warm up the engine as getting off the dock (or anchor) and leaving the harbor
will do this. If you have been sailing and are switching to engine power starting before you furl will
be plenty of warmup.
f. When you are ready to go, return throttle lever to the upright position and move back to inboard
position. Lift the top of the lever and move handle forward for forward gear or reverse for reverse
gear.
Engine Alarms –If the buzzer sounds while the engine is running first look at the engine panel to see if it
is overheating or low oil pressure causing the alarm. If oil pressure alarm is on immediately shutdown the
engine. If it is overheating, check to see if cooling water is flowing out the exhaust before shutting down.
Overheating is the most likely cause for the buzzer. It is worth checking on the oil level, coolant level and
raw water strainer. If you see something obvious and can fix it great, if not please call one of the numbers
on the first page.
Engine Shutdown –First make sure the engine is at idle and the gearshift in neutral. Then push the stop
button on the engine panel for about 2-3 seconds (until the engine dies). DO NOT TURN OFF THE KEY
BEFORE THE ENGINE IS STOPPED, DOING SO CAN DAMAGE THE ALTERNATOR DIODES.
14. Enrichment: Chinook is equipped with two hammocks with straps located under the aft-most port
settee cushion that we enjoy using on deck (not while underway!) with one end strapped around the
furled headsail/stay and the other end attached to a shroud with a carabiner. With a sleeping bag, this
is a quite comfortable sleeping arrangement or a nice way to watch the sun set. Licensed
fisher(wo)men can find the crab ring stored in the starboard cockpit locker. A few of our favorite
games, books, and wildlife identification cards can be found in the port saloon cabinet. “Mood
lighting” by LED string lights and/or tea-light candles is located in the starboard saloon cabinet behind
the TV. Information regarding the TV/DVD player, family-friendly DVD selection and stereo system
in the electronics section above.
15. Fuel Tank: The fuel tank holds 33 gallons and is located under the aft berth. The fuel gauge is
located on the engine panel (see picture above). Fuel gauges on boats have a tendency to stick and
show more fuel than may actually be there. So, it a good idea to note the engine hours (on tach)
when you leave or last filled and then fill up when you have run the engine for 30-35 hrs.
The deck fitting for the tank filling is on the port aft side. When filling the tank listen closely and stop as
soon as you hear fuel coming up the fill pipe. It will foam out the vent if you go further. If fuel spills on
the deck please wash-up with soap as it yellows the fiberglass.
`
16
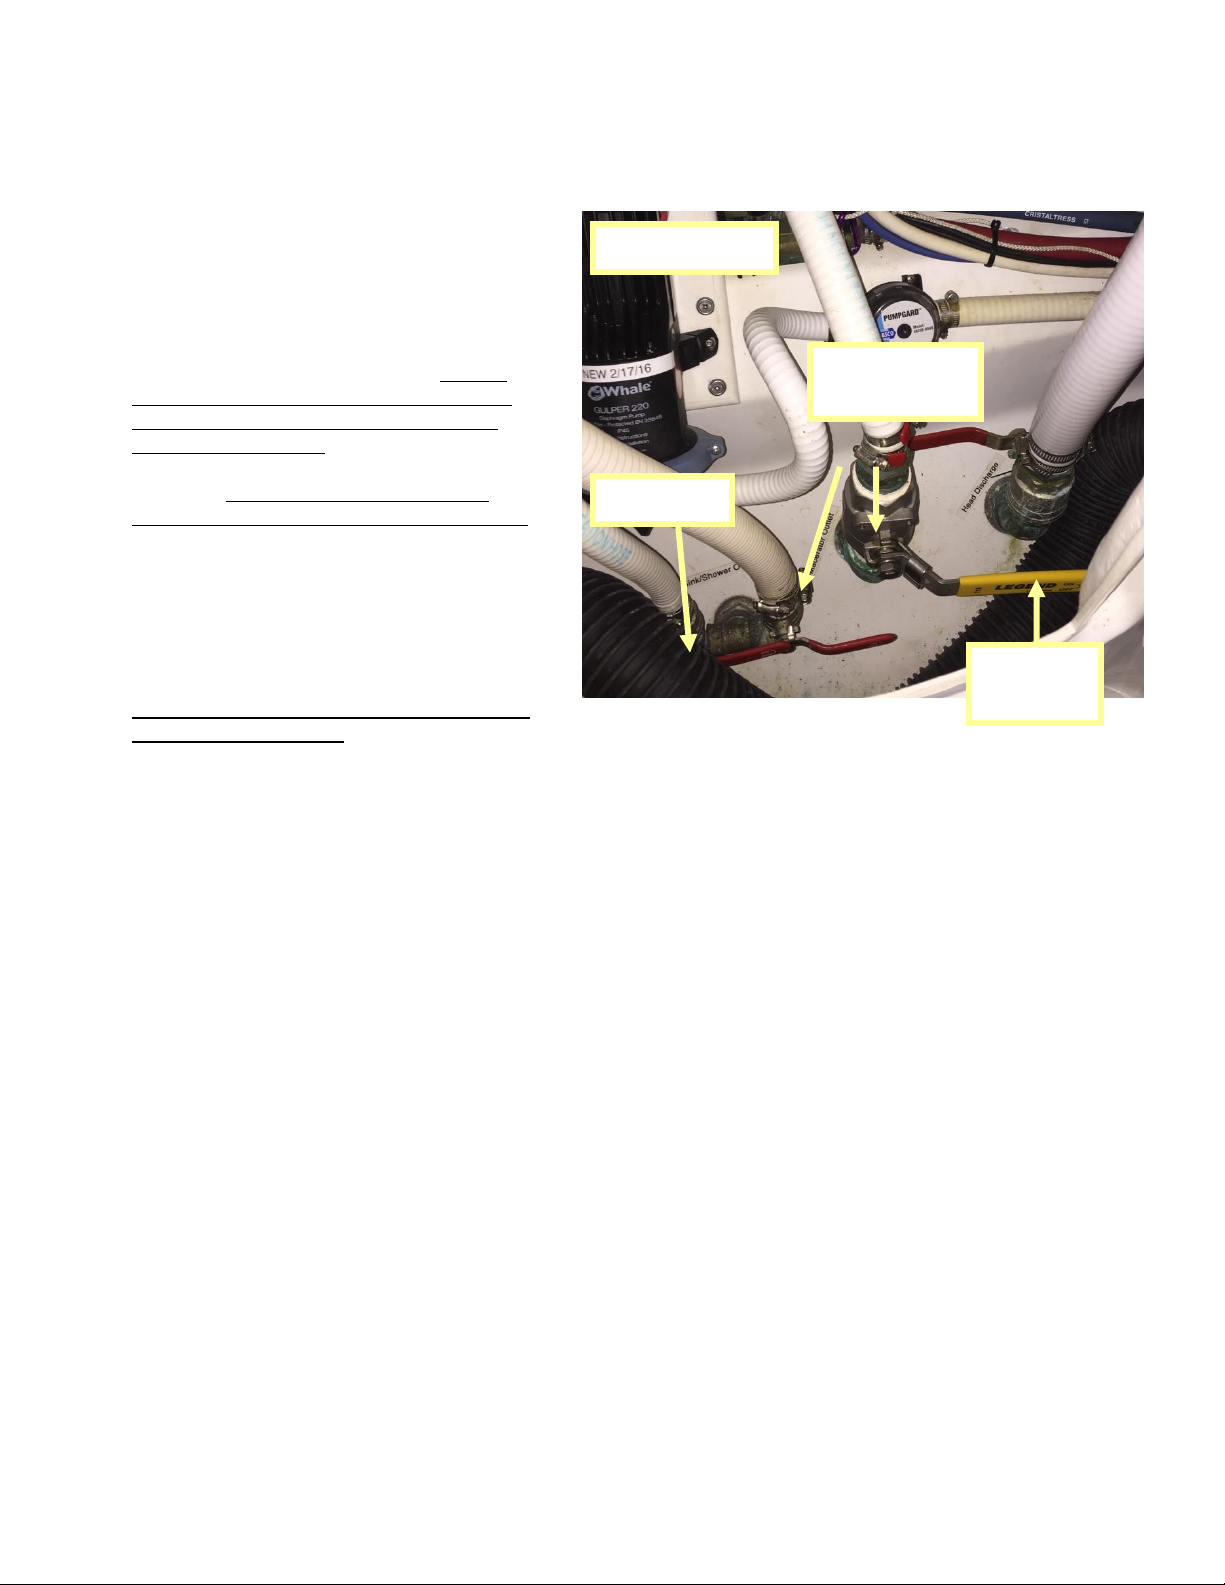
16. Head and Holding Tank:
Please do not put anything in the toilet
that has not been eaten. Experienced
sailors deposit toilet paper in a
wastebasket, not down the toilet because
paper tends to clog the system. The 22
gal. holding tank is located behind door
behind the toilet and thru-hull valve is
under the head sink.
There is a level indicator light for the
holding tank above door behind the toilet
but it does not go on until the tank is
almost full. Don’t wait until it is full to
pump out! To operate the macerator, turn
on the macerator breaker on the
electrical panel then open the thru-hull
(the yellow handle rotates counter-
clockwise to be in-line with the hose.
Then push the switch on the left side of
the head sink vanity. You should be able
to hear the macerator noise change when
the tank empties.
A new electric toilet was installed in 2019.
The “head” breaker on the electrical
panel must be ‘on’ to operate.
(see shower section below for details about
the head shower and swim platform
shower).
Under Head Sink
Head Intake
Sink and
Shower
Discharges
Macerator
Discharge
17
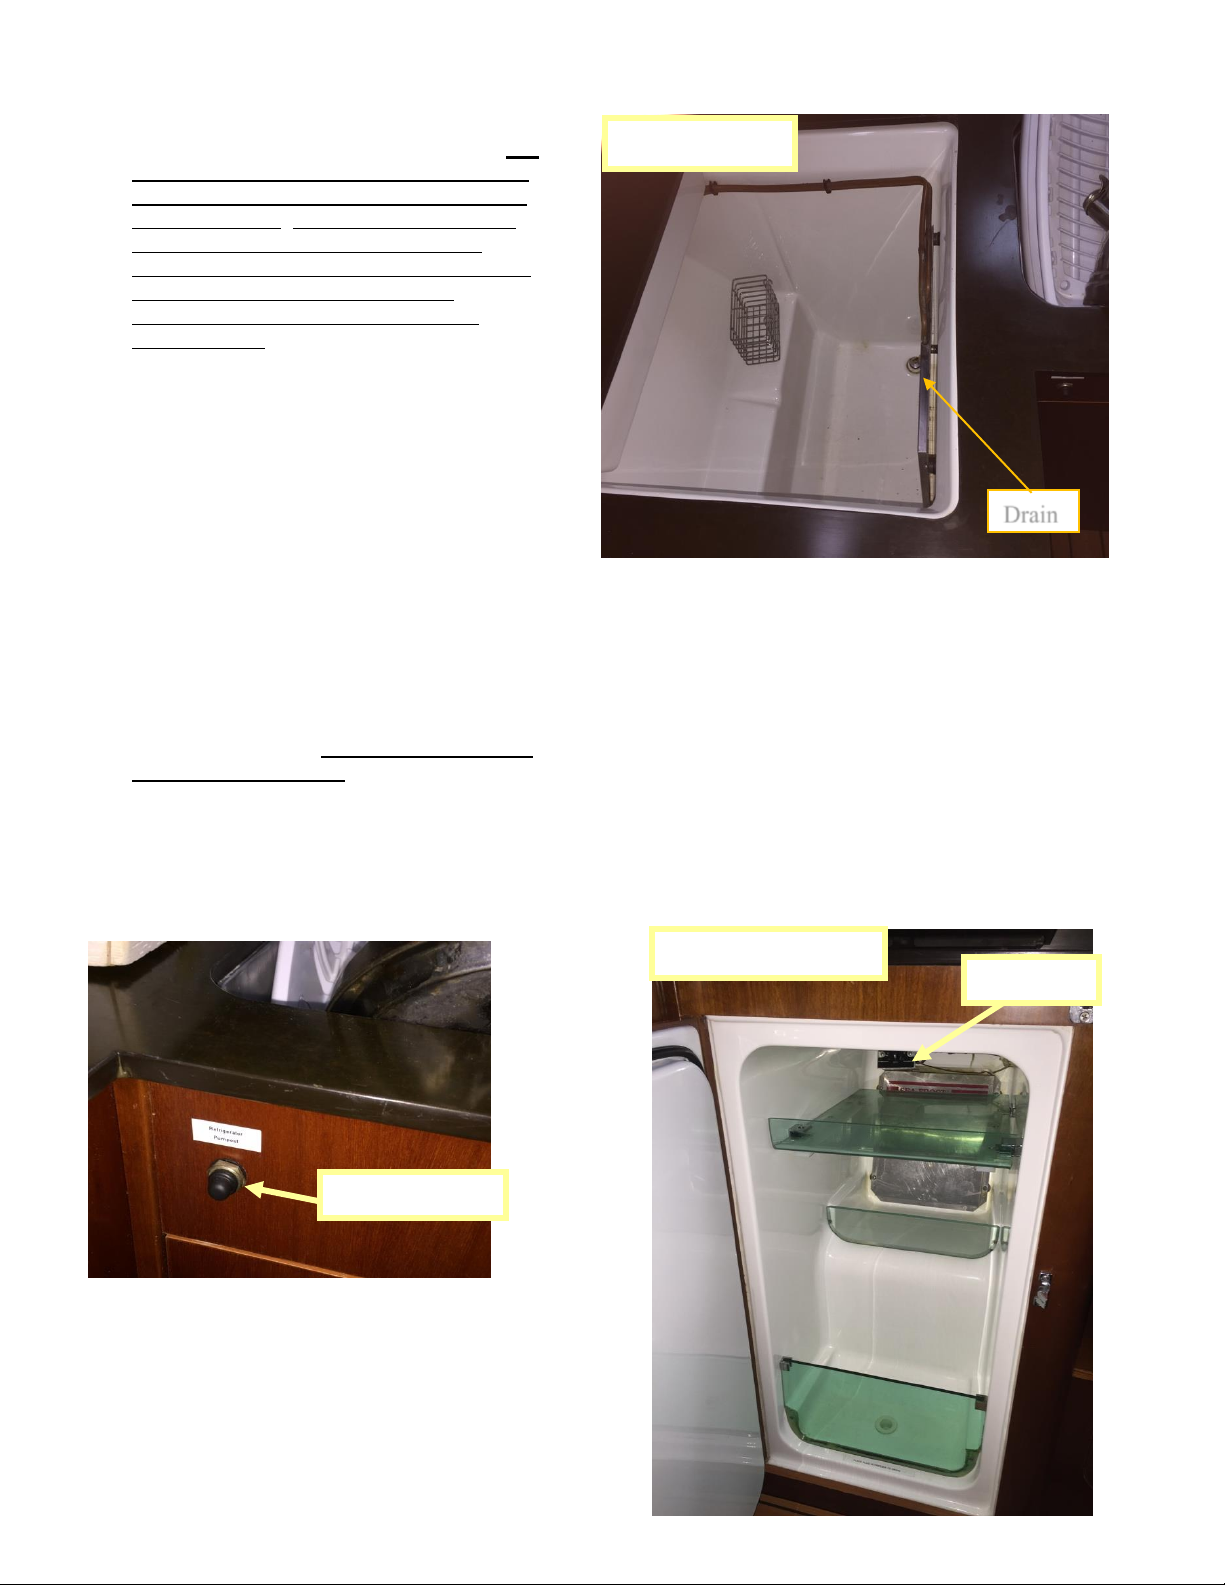
17. Refrigeration: Chinook is equipped
with two refrigerated compartments: a top
load freezer located forward of the stove
and a front-load refrigerator below and
left of the stove The on/off switch is on
the electrical panel. The thermostat,
located in the top back of the refrigerator,
is a dial labeled with the numbers
1(warmest) to 7(coldest) (see photo
bottom right). Setting the thermostat to 2-
3 seems to keep food cold without
freezing it, although fresh food will
definitely freeze if placed close to the
thermos-plate in the back. We find that
bagged or block ice lasts several days in
the freezer if care is taken to limit the
frequency and duration of lid-opening.
The freezer compartment keeps
previously-frozen items frozen, but it is
not good at freezing new items.
Water that has collected in the bottom of
the refrigerator or freezer can be removed
by pressing the labeled pump-out
button/switch just under the sink (see
photo below). The shower pump breaker
must be ‘on’. The freezer plug is located
in the navigation table and must be
inserted for the refrigerator to drain.
Turning off the refrigerator breaker on
the electrical panel at night will help
conserve battery-life.
Thermostat
Pump-out Switch.
Top-load Freezer
Front-load Refrigerator
Drain

`
18
18. Repairs (Tools & Spares): Spare
parts and tools are located under the port
settee cushions.
19. Sails and Rigging: Both the main and the 140% jib are furling sails. Be low we list a few tips on
handling these sails.
Mainsail –Unlike a standard main, it is best to have wind in a furling main when deploying, similar
to deploying a furling jib. The wind adds even pressure all the way up the mast and helps the sail
deploy. Note, because of this, it matters not which sail is deployed first. This even works going
down wind (in moderate winds, up to about 15 knots). Therefore, pointing the boat into the wind
to deploy the main is unnecessary, in fact it is a bad idea.
Here are the basic steps to unfurl the main:
•Open the Vang and Mainsheet clutches –this allows the boom some movement. Then pull a
few feet of mainsheet thru the clutch and close the mainsheet clutch. This will keep the sail
from running free as the wind gets into it.
•Open the In-haul and Out-haul clutches.
•Pull the Out-haul line by hand until you run out of muscle and then put on the winch. If you
are planning on setting a reefed main have the In-haul line around a winch, but loose, so you
can stop the main where desired. Once the sail is out as far as desired, close the In-haul clutch
and then tighten the Out-haul to achieve desired draft. You will need to put the Out-haul on
the winch to set your draft.
•Remove the Out-haul from the winch and put the mainsheet on it. Once the load is on the
winch, open the mainsheet clutch.
•Set vang and mainsheet as desired.
When furling in the main keeping a little tension on the outhaul (keeping a little air in the sail also
helps) will help ensure a tight wrap on the main furler. The last foot-and-a-half of the mainsail
(the part covered with gray sun cover) is supposed to be left outside the mast. If you do
accidentally furl part of the sun cover you may have to go on deck and pull outhaul by hand to get
sail started next time you unfurl the sail.
Headsail - The jib is on a roller furling. It has good sail shape at the full out position. During
periods of heavier winds, furl the headsail as desired. Boat heel will be greatly reduced when sailing
under reefed main and partially furled headsail in winds over 20 knots. Please note that slight
tension on the roller furling line when deploying the headsail, and on the sheets when furling,
prevents problems from either a rat's nest on the drum or "candy striping" of the furled sail.
Engine –If the engine was running during the sail-setting process and the boat never came to a stop,
the propeller may still be turning (auto-rotating) –even after the engine has been shut down. There is
usually a whirring sound below deck when this happens. To stop the auto-rotation, simply shift
the engine into reverse for half a second and then back to neutral. Doing this allows the
Maxprop to feather and increases sailing performance by reducing drag.
20. Sailing Characteristics: Chinook is a delight to sail. Her sloop rig makes for easy sail handling,
and gives a variety of options for various weather conditions. Her all around perfect breeze is 10 to 15
knots. Full sails can easily be carried in winds to 20 knots. As the wind picks up it is best to furl the
mainsail first.
19
21. Showers: Before taking a shower turn on the Shower Pump breaker on the 12V panel. The switch
to run the pump is on the aft side of the sink vanity. Experienced cruisers know the sailor's shower:
get wet, turn it off, soap up, rinse off to save water. And it is best to shower when the engine is
running (or when on shore power) as it will refresh the hot water supply. CAUTION: THE ENGINE
CAN HEAT THE WATER TO SCALDING TEMPERATURES!
There is also a shower fixture back at the swim platform located on the port side of the transom above
the swim step. This is useful for washing off shoes after returning from the beach.
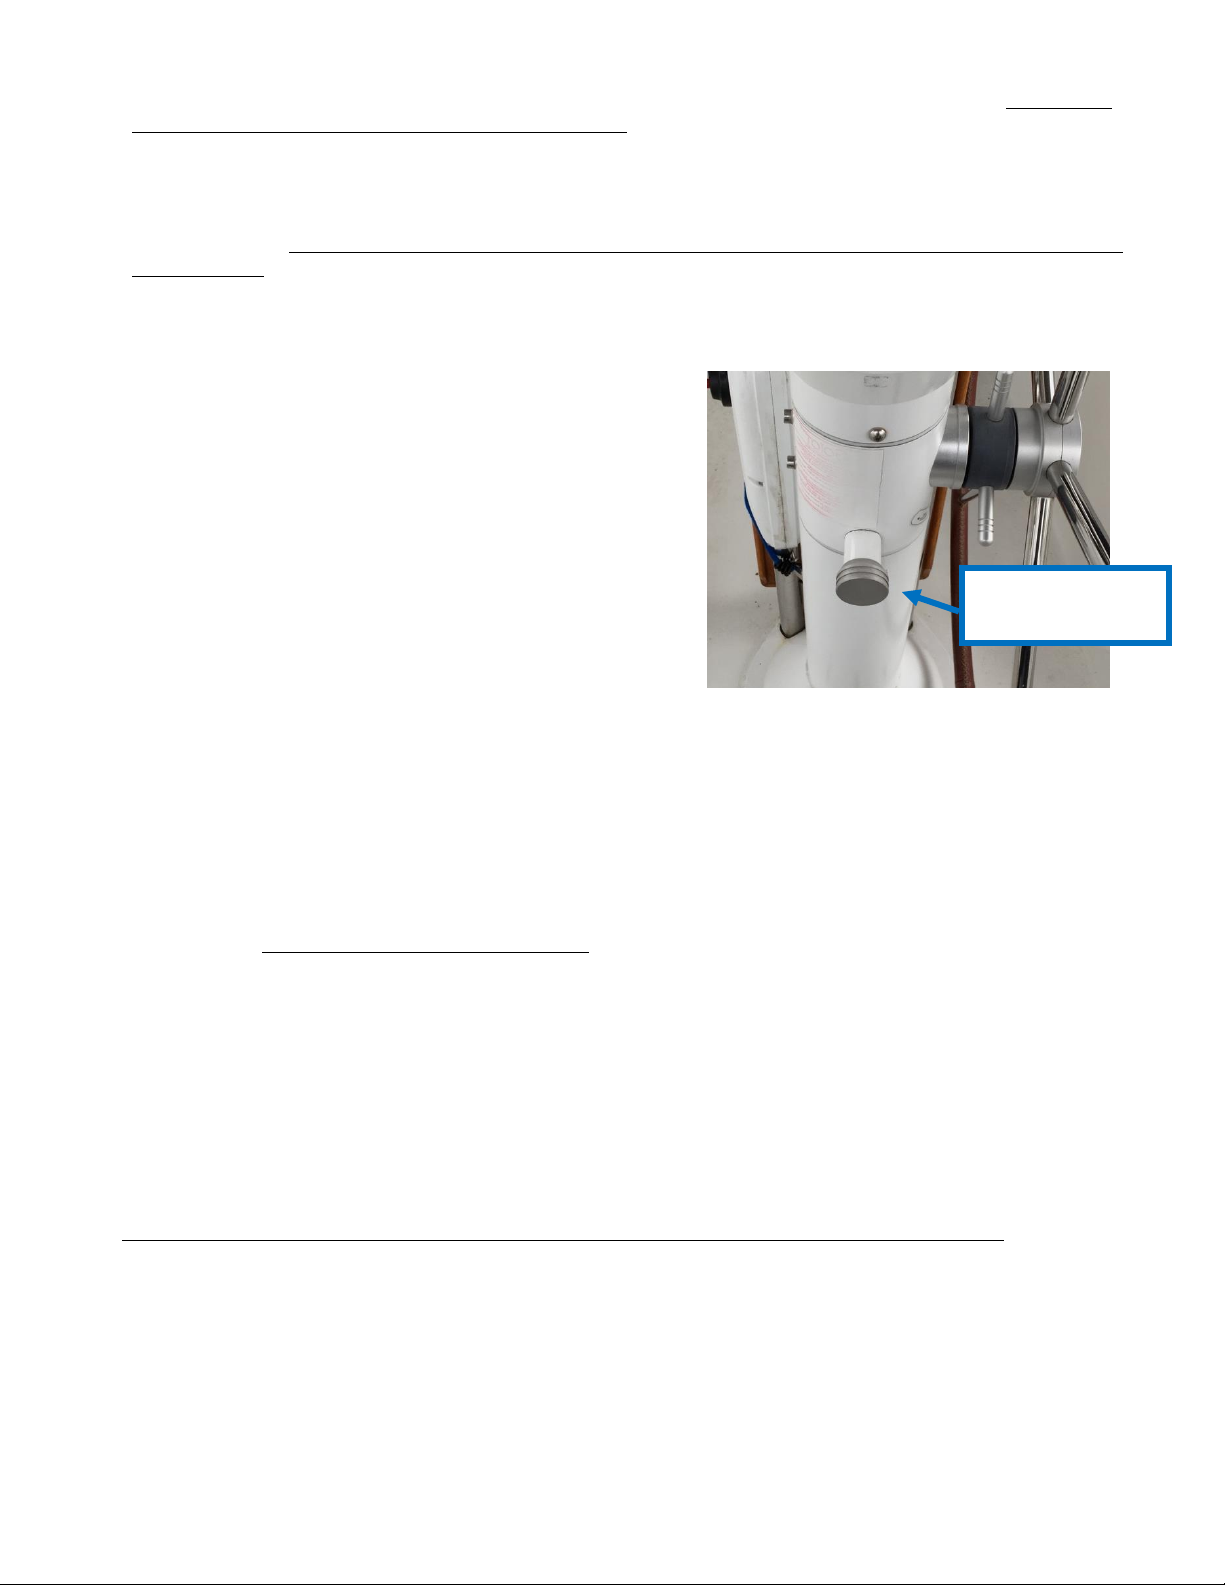
22. Steering Wheel: The steering wheel on Chinook
can be swung around to the side of binnacle to make
passage easier when transiting to the back of the boat.
To swing the wheel, pull out on the knob on the
forward side of the binnacle post (see picture). Do
not try to operate the boat with the wheel swung to
the side –it is not engaged in this position.
Also, please cover the binnacle and wheel with their
respective covers when stopped for the day. Doing so
protects the wheel leather and the instruments from the
sun. Thanks.
23. Stove/Oven: The gimbaled propane stove has two burners and an oven. Propane is heavier than air
and requires caution. For your safety, please follow these procedures:
a. Make sure all stove controls are in the “off” position. As with the BBQ, having the stove valves open
when the solenoid is opened will cause the safety system to kick in. This will severely limit the
flow to the stove. If this happens close all the valves, including the one on top of the tank. Then
open the tank valve, then the solenoid and final open the valves at the stove.
b.Turn on the LP Gas breaker on the main panel.
c. Light a match or the butane lighter and push in the stove knob and turn to high. The burners will take
a while to light on the first use. When the flame lights, hold in the knob for about 3 seconds to
allow the thermocouple to sense the flame.
d.When you are finished with the stove, immediately turn the solenoid switch and breaker off.
To light the oven you will need to push in and turn the “oven”control knob on the front of the stove.
Then put your butane lighter through one of the two holes in the bottom metal “floor” of the oven. You
should hear the burner ignite (and see through the hole). If you have trouble lighting it, remove the
metal floor/bottom of the oven, exposing the U-shape oven burner. You’ll easily be able to light it
when exposed. Replace the metal floor/bottom after it is lit.
Please note both propane tanks are located in the propane locker, aft port side of the cockpit, which is
vented and isolated from the rest of the boat. That way, any leaks will be vented away from the boat.
San Juan Sailing’s staff fills the propane tanks every 3 weeks. One tank normally lasts 6 weeks or
more.
Pull out on this knob
to turn wheel.
`
20
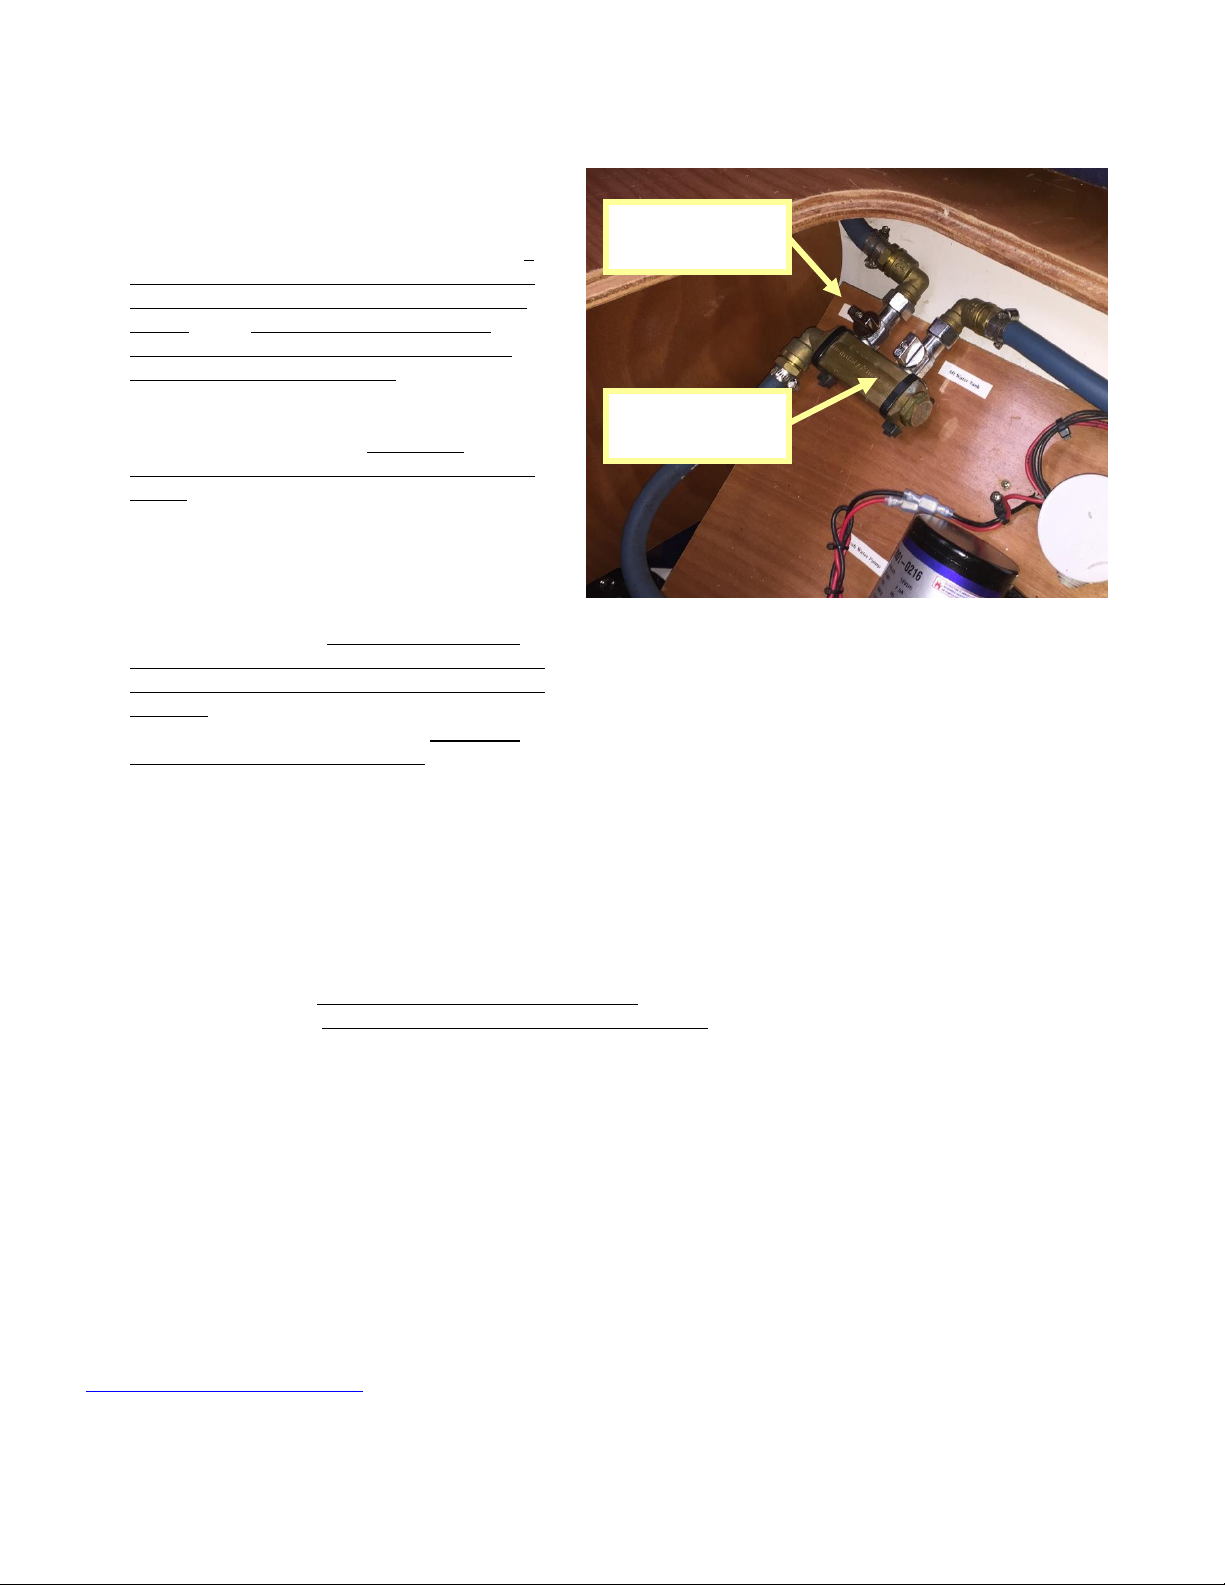
24. Water:
Water pressure –Chinook’s total water
capacity is 98 gal. There are two tanks, a
54 gal. tank located under the V-berth and
a 44 gal. tank under the starboard cockpit
locker. The valves to switch between
tanks are located under the MIDDLE of
the starboard settee cushion (picture to
right). Chinook has no water level
monitoring system at this time (but check
back for 2020 season!) The water
pressure switch is located on the electrical
panel. Please switch this off when
motoring or sailing. You could burn out
the water pump if the tank runs dry (and
you would not hear the pump running over
the sounds of motoring or sailing).
Filling the tanks - Deck fill fittings for
both tanks are located on the starboard side
walkway, one forward of the mast one near
the aft. We would appreciate if the deck
fittings are tightened with the deck key
located in the navigation table rather than
using the winch handle which can over-
tighten them. That being said, if you find
that the deck fittings are too tight, we have
used a winch handle in the past to loosen
them.
Water Heater –The water is heated automatically when the engine runs under load (it takes about
30 minutes), running it at idle in the morning doesn’t work, sorry. CAUTION: THE ENGINE CAN
HEAT THE WATER TO SCALDING TEMPERATURES! The hot water tank holds 6 gallons, so
use it wisely. The tank is located under the aft berth. It can also be heated electrically when shore
power is available. The switch is located on the 120V panel.
In Closing…
We hope this information helps make your stay most enjoyable! Have a great time!
Share your memories and follow Chinook’s travels on our social media!
Jami & James Lewis
509-290-4304
Sailboat Chinook on Facebook
@sailboatchinook on Instagram
Fwd tank valve
(closed as shown)
Fwd tank valve
(open as shown)
Table of contents
Popular Boat manuals by other brands


Oru Kayak
Oru Kayak INLET Assembly guide

Intex
Intex CHALLENGER 1 owner's manual

Boston Whaler
Boston Whaler 210 Montauk owner's manual

Horizon Yacht Charters
Horizon Yacht Charters Lagoon 440 'Fly Bye' 2006 Information and operating instructions

RS SAILING
RS SAILING Feva Rigging manual

Grady-White Boats
Grady-White Boats Adventure 208 owner's manual


