CIDMATE GH94578 User manual

1
Contents
Safety Instructions --------------------------------------------------------------------------------------------3
Getting Started ------------------------------------------------------------------------------------------------ 5
Desk Mounting ------------------------------------------------------------------------------------------------- 8
Wall Mounting -------------------------------------------------------------------------------------------------9
Cordless Telephone Operation ------------------------------------------------------------------------- 11
Preparing for Use---------------------------------------------------------------------------------------- 11
“NO LINE“Indicator ------------------------------------------------------------------------------------ 11
Receiving Calls ------------------------------------------------------------------------------------------ 11
Placing Calls --------------------------------------------------------------------------------------------- 12
Using the Headset Feature --------------------------------------------------------------------------- 13
Redial Feature ------------------------------------------------------------------------------------------- 13
Caller ID System Operation------------------------------------------------------------------------------ 14
Caller ID System----------------------------------------------------------------------------------------- 14
Viewing Caller Information During Incoming Calls-------------------------------------- 14
“MSG WAITING“(Message Waiting) --------------------------------------------------------- 14
Call Waiting ------------------------------------------------------------------------------------------ 15
Voice Mail Function ------------------------------------------------------------------------------- 15
“C-F“(Forwarded Call) ---------------------------------------------------------------------------- 15
“L-D-C“(Long Distance Call) ------------------------------------------------------------------- 15
Caller List -------------------------------------------------------------------------------------------------- 15
Viewing the Caller List---------------------------------------------------------------------------- 16
Placing a Call From the Caller List ----------------------------------------------------------- 16
Editing the Caller List before Dialing -------------------------------------------------------- 16
Saving the Name and Number in the Caller List into the DIRECTORY ---------- 17
Deleting All Records in the Caller List------------------------------------------------------- 17
Selective Deleting in the Caller List --------------------------------------------------------- 17
Name and Telephone Number DIRECTORY -------------------------------------------------- 17
Viewing the DIRECTORY ------------------------------------------------------------------------ 17
Speed Viewing the DIRECTORY-------------------------------------------------------------- 18

2
Contents
Saving in the DIRECTORY---------------------------------------------------------------------- 18
PREFERRED CALLS ------------------------------------------------------------------------------ 18
BLOCKED CALLS ---------------------------------------------------------------------------------- 18
Editing a Name and Number in the DIRECTORY --------------------------------------- 19
Editing the Number in the DIRECTORY before Dialing ------------------------------- 20
Placing Calls from the DIRECTORY --------------------------------------------------------- 21
Deleting All Records in the DIRECTORY --------------------------------------------------- 21
Selective Deleting in the DIRECTORY ----------------------------------------------------- 21
Function Operation------------------------------------------------------------------------------------- 22
A. Language ---------------------------------------------------------------------------------------- 23
B. Silent On/Off------------------------------------------------------------------------------------ 23
C. Time Set ----------------------------------------------------------------------------------------- 23
D. Ringer Volume --------------------------------------------------------------------------------- 24
E. LCD Contrast ------------------------------------------------------------------------------------ 24
F. PBX Number ------------------------------------------------------------------------------------ 24
G. Flash Time -------------------------------------------------------------------------------------- 25
H. Pause Time ------------------------------------------------------------------------------------- 25
I. Voice Mail --------------------------------------------------------------------------------------- 26
J. MSG Waiting (Message Waiting) --------------------------------------------------------- 26
Telephone Keypad Characters --------------------------------------------------------------------- 27
Security--------------------------------------------------------------------------------------------------------- 28
Recharging the Battery Pack ---------------------------------------------------------------------------- 29
Changing the Battery Pack ------------------------------------------------------------------------------ 30
Problem Solving -------------------------------------------------------------------------------------------- 31
Technical Information ------------------------------------------------------------------------------------- 32
FCC Requirements------------------------------------------------------------------------------------------ 33
Warranty-------------------------------------------------------------------------------------------------------- 35
Wall Mount Template ------------------------------------------------------------------------------------- 39

3
Safety Instructions
IMPORTANT SAFETY INSTRUCTIONS
To reduce the risk of fire, electric shock and/or injury, always follow these basic
safety precautions when using your cordless telephone equipment.
1. Readandunderstand allinstructions.
2. Followallwarnings and instructionsmarkedon thetelephone.
3. Unplug this telephone from the wall outlet before cleaning or replacing the BATTERY
PACK. Donotuse liquid cleanersor aerosol cleaners.Usea dampclothfor cleaning.
4. Donotusethis telephone near water,for example, near abathtub, wash bowl, kitchen
sink,orlaundry tub, inawetbasement, or nearaswimming pool.
5. Placethistelephone on astablesurface. Seriousdamageand/or injurymayresult ifthe
telephonefalls.
6. Do not cover the slots and openings on this telephone. This telephone should not be
placednearor over aradiatoror heat register.This telephone shouldnotbe placed ina
built-ininstallation unlessproperventilation isprovided.
7. Operatethistelephoneusingthe electrical voltage as stated on theBASEUNITof the
telephoneor theOwner s Manual.If youarenotsureofthevoltageinyourhome,consult
yourdealeror local power company.
8. Donotplace anything onthepower cord.Installthe telephonewhereno one willstep or
triponthecord.
9. Do not overload wall outlets or extension cords as this can increase the risk of fire or
electricshock.
10. Neverpushobjectsofanykindthroughslotsinthetelephone.Theycouldtouchdangerous
voltagepointsor short outpartsthat could result inarisk of fireorelectricshock. Never
spillliquid ofanykind onthetelephone.
11. To reduce the risk of electric shock do not disassemble this telephone. Take it to a
qualified serviceman when service or repair work is required. Opening or removing
coversmayexpose youtodangerous voltages orotherrisks. Incorrectreassemblycan
causeelectricshock when the telephone issubsequentlyused.
12. Unplugthistelephone fromthewall outletandconsult aqualifiedservice representative
inanyofthe following situations:
A. When the power supply cord is frayedordamaged.
B. Ifliquid hasbeen spilledintothetelephone.
C. If the telephone hasbeenexposedto rain or water.
D. If the telephone does not operatenormallybyfollowingthe operating instructions.
Adjust only thosecontrols that arecovered by theoperating instructions.Improper
adjustment of other controls may result in damage and will often require
extensive work by a qualified technician to restore the telephone to normal
operation.

4
Safety Instructions
E. Ifthetelephone hasbeendropped or thecasehas beendamaged.
F. Ifthe telephoneexhibits a distinctchangein performance.
13. Donot use thetelephonetoreport a gasleakin the vicinityofthe leak.
14. Neverinstalltelephone wiringduring alightningstorm.
15. Neverinstall telephone jacksinwet locations unlessthe jack isspecificallydesigned for
wetlocations.
16. Nevertouch uninsulatedtelephonewiresorterminalsunlessthetelephonelinehasbeen
disconnectedatthenetwork interface.
17. Usecautionwhen installingormodifying telephonelines.
BatterySafety
CAUTION:
Danger of explosion if the BATTERY PACK is incorrectly replaced. Replace only
with the same or equivalent type. To reduce the risk of fire or personal injury,
read and follow these instructions:
1. Useonlythe following typeandsize of BATTERYPACK:
CordlessTelephoneBATTERYPACK
3.6V,600mAh
U.S.Electronics Inc.
Ni-MhBATTERYPACK:ModelB655
(Seepage29 fororderinginformation.)
2. DonotdisposeoftheBATTERYPACKinafire.It mayexplode. Checkwith localcodes for
possiblespecial disposal instructions.
3. Donotopen or mutilatethe BATTERYPACK.Released electrolyte iscorrosive and may
causedamagetothe eyes or skin. Electrolytemaybetoxic if swallowed.
4. Exercisecarein handling the BATTERYPACKto prevent shortingtheBATTERYPACK
with conductive materials such as rings, bracelets and keys. The BATTERY PACK or
conductormayoverheat and cause burns.
5. ChargetheBATTERYPACKprovided with(oridentified forusewith) thistelephoneonly
inaccordancewith theinstructionsand limitations specifiedin this manual.
6. ObserveproperpolarityorientationbetweentheBATTERYPACKandBATTERYCHARGER.
SAVE THESE INSTRUCTIONS
ATTENTION:
Thetelephone thatyou havepurchased containsa rechargeableBATTERYPACK.Attheend
of its useful life, under various state and local laws, it may be illegal to dispose of this
BATTERYPACK intothemunicipal waste stream.Checkwith yourlocalsolid waste officials
fordetailsinyourarea for proper disposal.
5
Connecting Your Phone
This section is a reference guide to the basic functions and operations of your cordless telephone.
For more detailed descriptions of the operations and features of this telephone, refer to the
Contents on page 1.
1. Carefully remove your cordless telephone from its shipping carton. If there is any visible
damage, do not attempt to operate this equipment. Return it to the place of purchase.
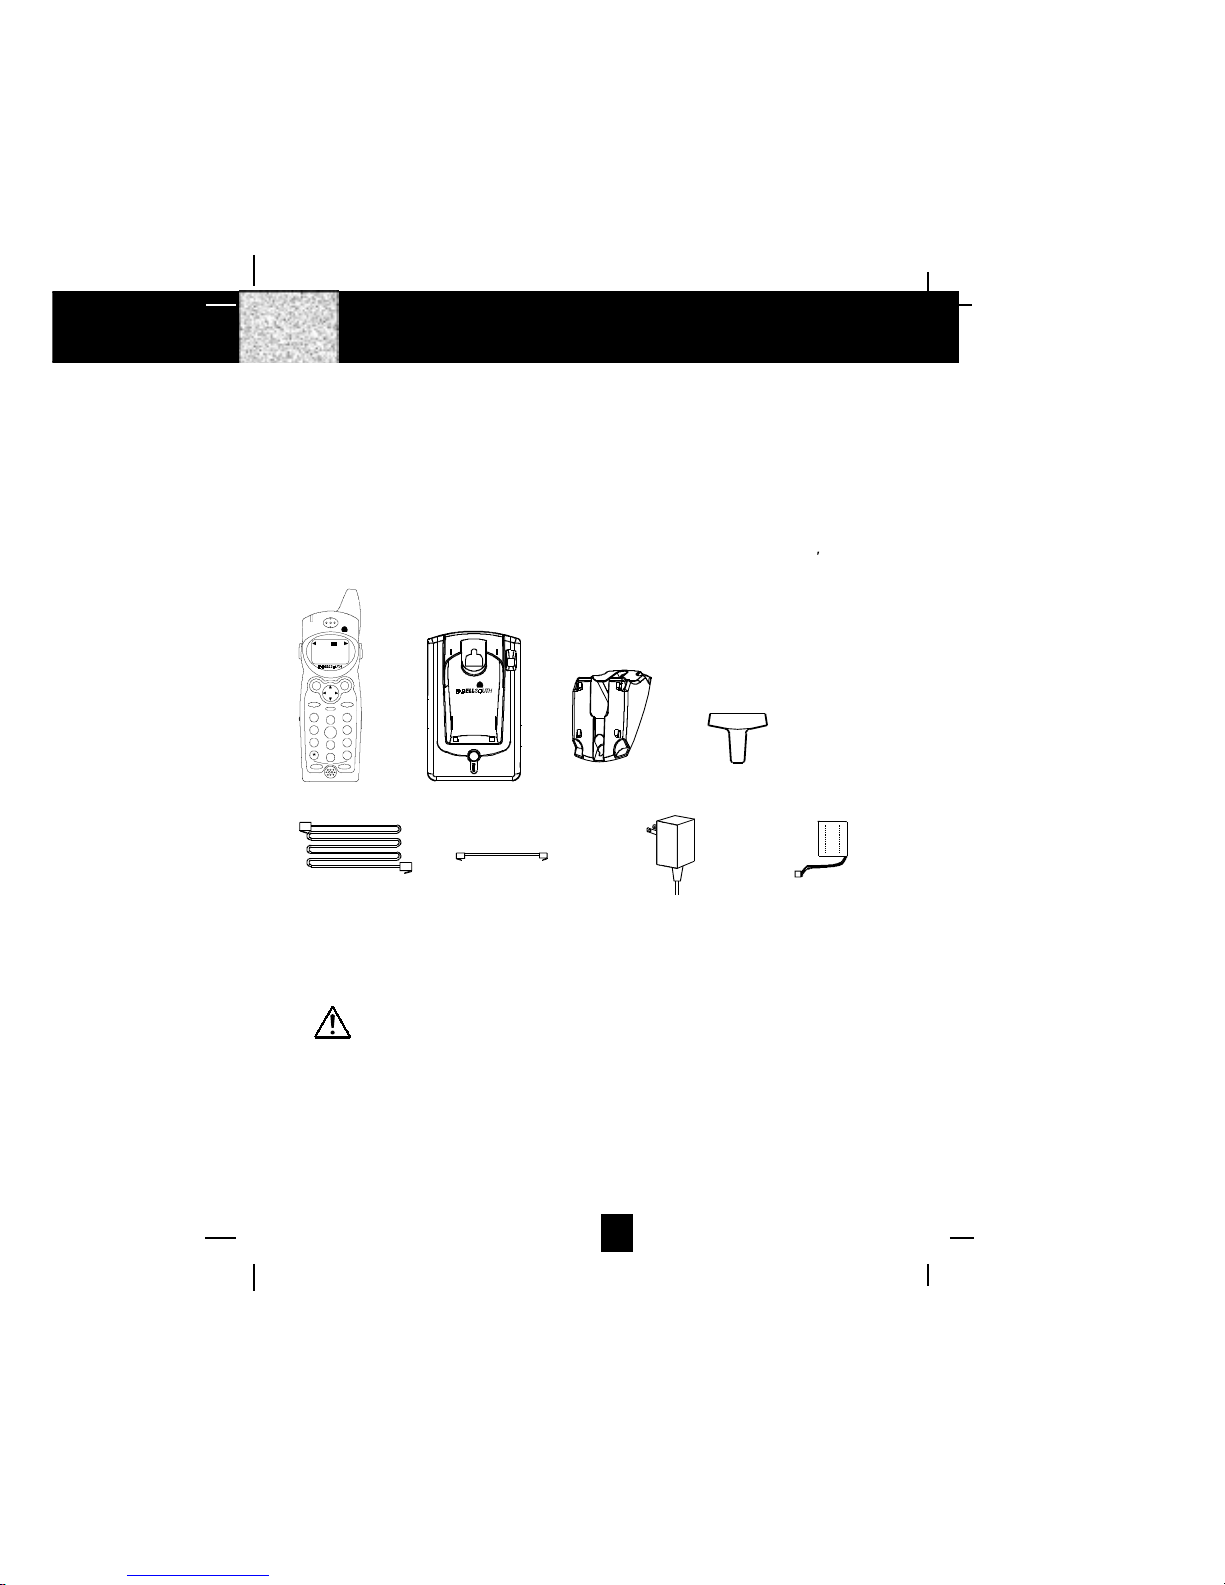
2. Check to be sure you have all items that come with this cordless telephone system. You
should have a HANDSET, BASE UNIT, AC ADAPTER, MOUNTING BRACKET, TELEPHONE
LINE CORD, SHORT TELEPHONE LINE CORD, BELT CLIP, and an OWNER S MANUAL.
3. Insert the small plug on the end of the AC ADAPTER into the POWER-IN CONNECTION
JACK at the back of the BASE UNIT.
4. Plug the AC ADAPTER into a 120V AC wall outlet.
USE ONLY WITH CLASS 2 POWER SOURCE 9V DC, 300mA.
5. Insert one plug of the TELEPHONE LINE CORD into the house TELEPHONE JACK and the
other end into the TELEPHONE LINE CONNECTION JACK at the back of the BASE UNIT. (If
you have an older 4-prong TELEPHONE JACK, you will need an RJ-11C TELEPHONE JACK
ADAPTER. This adapter is available at the same place you purchased your telephone.)
6. We recommend not placing this unit next to appliances. Doing so may cause interference.
Getting Started
AC ADAPTER
SHORT TELEPHONE
LINE CORD
TELEPHONE
LINE CORD
BELT CLIPMOUNTING
BRACKET
BASE UNITHANDSET
2.4GHz
CHARGE
PAGE
INUSE
BATTERY PAC
K
DEF
ABC
GHI JK L MNO
TUV
PRS WX Y
OPER
123
6
5
4
789
0#
NEW CA LL
MSG WA ITING 2.4 GHz
TALK DIR
DELETE
SCANSAVE
RE/PA FUNC/V.M.
DIAL
EDIT FLASH
71+
10
BELLSOUTH
1-212-242-6978
10:00 8/24 18 30
AM NEW
PM TOTAL
L- D-CC-F MSG DIRCALLBATT

6
7. Install the BATTERY PACK by plugging it into
the BATTERY CONNECTOR inside the
BATTERY COMPARTMENT. The HANDSET LCD
Screen will display “RING: HI”.
8. Place the BATTERY PACK inside the BATTERY
COMPARTMENT.
9. Slide the HANDSET BATTERY COMPARTMENT
COVER firmly into place in its closed position.
10. IMPORTANT: Before initial use, charge
the HANDSET for 12 hours.
11. TONE/PULSE Select Switch:
A. If your home is equipped with a tone dialing
system, set the TONE/PULSE Select
Switch to the TONE position.
B. If you have a rotary dialing system, set the
TONE/PULSE Select Switch to the PULSE
position.
C. If you are unsure which system you have, set
the TONE/PULSE Select Switch to the TONE
position. Press the TALK button on the
HANDSET and make a call. If the call connects,
leave the switch as is; otherwise set to the
PULSE position.
Getting Started
TONE PULSE
TEL LINE
!
USE ONLYWITHCLASS 2 POWERSOURCE
9VDC300mA
BASE UNIT
BASE UNIT ANTENNA
TONE/PULSE
SELECT SWITCH
POWER-IN
CONNECTION
JACK
TELEPHONE LINE
CONNECTION JACK
TELEPHONE JACK
TELEPHONE
LINE CORD AC ADAPTER
120V WALL OUTLET
BATTERY
COMPARTMENT
COVER
BATTERY PACK
BATTERY
CONNECTOR
CAUTION
TO RED UCE RI SK OF FIRE OR
INJURY , USE O NLY SAME TYPE
AND MAKE OF BAT TERY PACK,
Ni-Mh 3.6V, 6 00mAh.
U. S . EL EC T RON IC S
MO DEL B6 55
FOR 2.4 GHz
ANALOG HANDSET
RING: HI

7
Getting Started
Press the TALK button to confirm that
you have a dial tone. If you do not get a
dial tone, review steps 3 through 11. If
you still do not have a dial tone, refer to
the Problem Solving section on page 31.
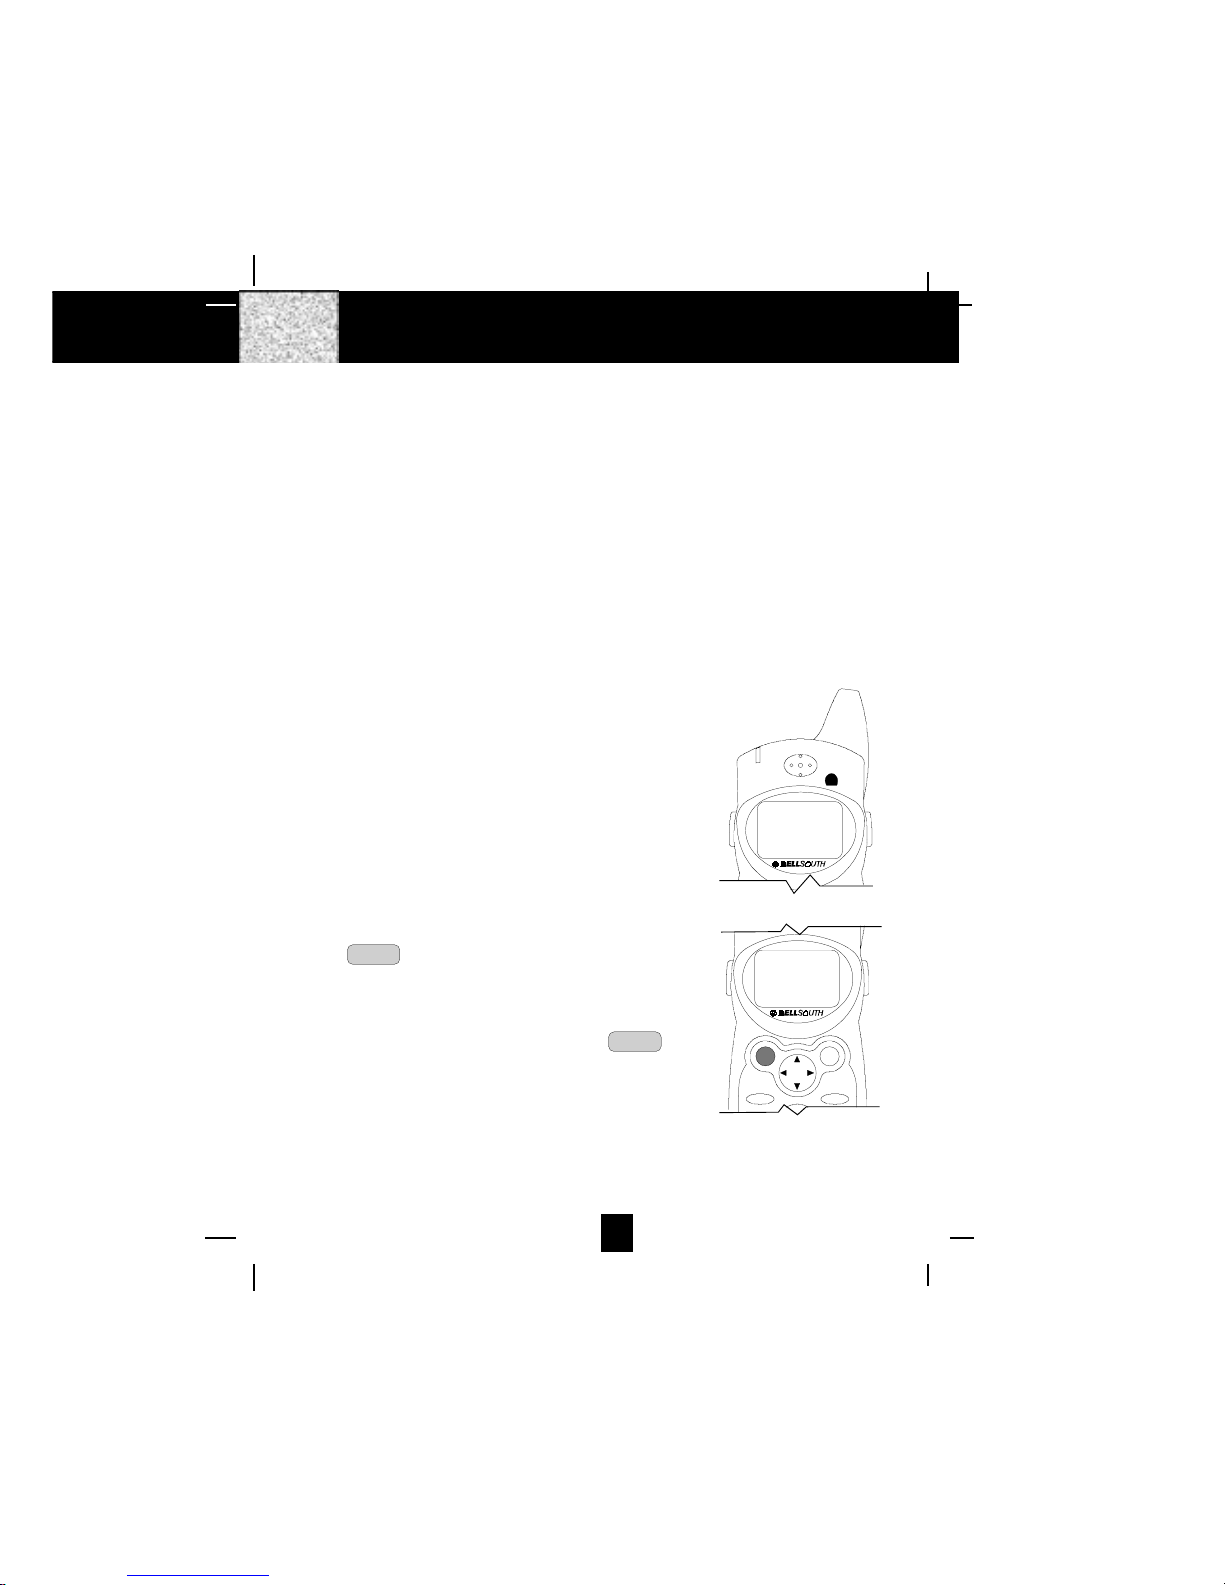
BELT CLIP HOOK
With the back of the HANDSET facing
up, insert one side of the BELT CLIP
HOOK into the matching slot at the top
side of the HANDSET. Press down on the
opposite side of the BELT CLIP until the
other HOOK locks into the slot on the
side of the HANDSET.
IMPORTANT
In order to utilize the Caller ID feature, you must
subscribe to Caller ID service from your local
telephone company.
13. Set the date and time. (See page 23 for details.)
You are now ready to use your new
BellSouth Cordless Telephone.
RE/PA
DIR
DELETE
SCANSAVE
ANTENNA
HANDSET
DEF
ABC
GHI JKL MNO
TUV
PRS WXY
OPER
123
6
5
4
789
0#
NEW CALL
MSG WAITING 2.4GHz
TALK DIR
DELETE
SCANSAVE
RE/PA FUNC/V.M.
DIAL
EDIT FLASH
71+
10
BELLSOUTH
1-212-242-6978
10:00 8/24 18 30
AM NEW
PM TOTAL
L- D-C C- F MSG DI RCALL BATT

8
DeskMounting
One of the special features of your telephone is the unique design of the MOUNTING
BRACKET which can hold your phone at an angle of 30o when desk mounting. There are
two positions to choose from:
1. NORMAL POSITION (MOUNTING BRACKET not required):
For the normal position, as shown in Figure 1, place the BASE UNIT on any desired
but suitable location.
FIGURE 1
2. 30o POSITION (See Figure 2):
With the back of the BASE UNIT facing up, insert the hooks of the MOUNTING
BRACKET (following the arrow direction for the DESK MOUNT) into the matching
slots of the BASE UNIT (as shown in Figure 3). Then slide the MOUNTING BRACKET
into place as indicated by the arrows.
Desk Mounting
FIGURE 2 FIGURE 3

9
WallMounting
WallMounting
You may choose to put the BASE UNIT of your cordless telephone on a wall.
1. With the back of the BASE UNIT facing up, connect the SHORT TELEPHONE LINE CORD to
the TELEPHONE LINE CONNECTION JACK.
2. Insert the free end of the SHORT TELEPHONE LINE CORD through the hole of the MOUNTING
BRACKET.
3. Insert the hooks of the MOUNTING BRACKET (following the arrow direction for the WALL
MOUNT) into the matching slots of the BASE UNIT (as shown below). Then slide the
MOUNTING BRACKET into place as indicated by the arrows. Plug the free end of the
SHORT TELEPHONE LINE CORD into the MODULAR WALL JACK.
4. Align the upper keyhole on the MOUNTING BRACKET with the upper stud of the wall plate,
so that the opening end of the MOUNTING BRACKET matches the lower stud, then pull the
BASE UNIT down until it is securely seated.
TELEPHONE LINE
CONNECTION JACK
SHORT TELEPHONE
LINE CORD
MOUNTING
BRACKET
BASE UNIT
WALL PLATE
STUD
WALL PLATE
BASE UNIT

10
5. This cordless telephone is designed to have a HANGER KNOB located on the BASE UNIT
and a HANGER HOLE matching to the HANGER KNOB located on the back of the HANDSET
to secure the HANDSET to be sat in position when wall mounting.
1. Rotate out the HANDSET KNOB by your finger tip or a small flat tool. (See Figure 1)
2. Place the HANDSET to the cradle with its LCD Screen facing you. (See Figure 2)
IMPORTANT: To prevent the HANDSET from falling and make sure the HANDSET is properly
charged, please place the HANDSET to its cradle carefully and check there is a
beep heard.
WallMounting
2.4GHz
FIGURE 1
FIGURE 2
CHARGE
PAGE
IN USE
DEF
ABC
GHI JKL MNO
TUV
PRS WXY
OPER
123
6
5
4
789
0#
NEWCALL
MSGWAITING 2.4GHz
TALK DIR
DELETE
SCANSAVE
RE/PA FUNC/V.M.
DIAL
EDIT FL ASH
71+
10
BELLSOUTH
1-212-242-6978
10:00 8/24 18 30
AM NEW
PM TOTAL
L-D-C C- F MSGDIRCALL BATT
11
PreparingforUse
Before you can use your cordless telephone, you must charge the HANDSET for 12 hours.
Failure to do so will require recharging of the BATTERY PACK more often.
1. Place the HANDSET on the BASE UNIT for 12 hours.
2. After 12 hours, remove the HANDSET from the BASE UNIT.
Before you can use your cordless telephone, you must charge the HANDSET for 12
hours. Failure to do so will require more frequent charging of the BATTERY PACK. See
page 29 for more information on the BATTERY PACK.
NOTE:
Depending on the frequency of use, once the HANDSET is fully charged, it remains functional
for approximately 4 hours of continuous use and approximately 5 days when the HANDSET is
off the BASE UNIT in STANDBY mode.
“
NOLINE
“
Indicator
This telephone will always check the TELEPHONE LINE
connected to it. If “NO LINE“ appears on the HANDSET
LCD Screen in STANDBY mode, it maybe the
TELEPHONE LINE is not plugged or not properly
connected, or the TELEPHONE LINE plugged is not
workable. When seeing this, you have to check the line
connection and make sure the “NO LINE“ is not displayed
on the HANDSET LCD Screen. Otherwise your cordless
telephone can not be used to receive or make a call.
ReceivingCalls
1. When the phone rings, lift the HANDSET and press
the TALK button. The HANDSET LCD Screen will
display “CALLS“ and “TALKING“, and the BASE UNIT
IN USE LED indicator will light up.
2. Start your conversation.
3. To end your conversation, either press the TALK
button or place the HANDSET on the BASE UNIT. If
you place the HANDSET on the BASE UNIT CHARGE
CRADLE, you activate the automatic STANDBY
feature.
CordlessTelephoneOperation
NEW CALL
MSG WAITING
NO LINE
2.4GHz
TALK DIR
DELETE
SCANSAVE
RE/PA FUNC/V.M.
CALLS
TALKING . . . .
12
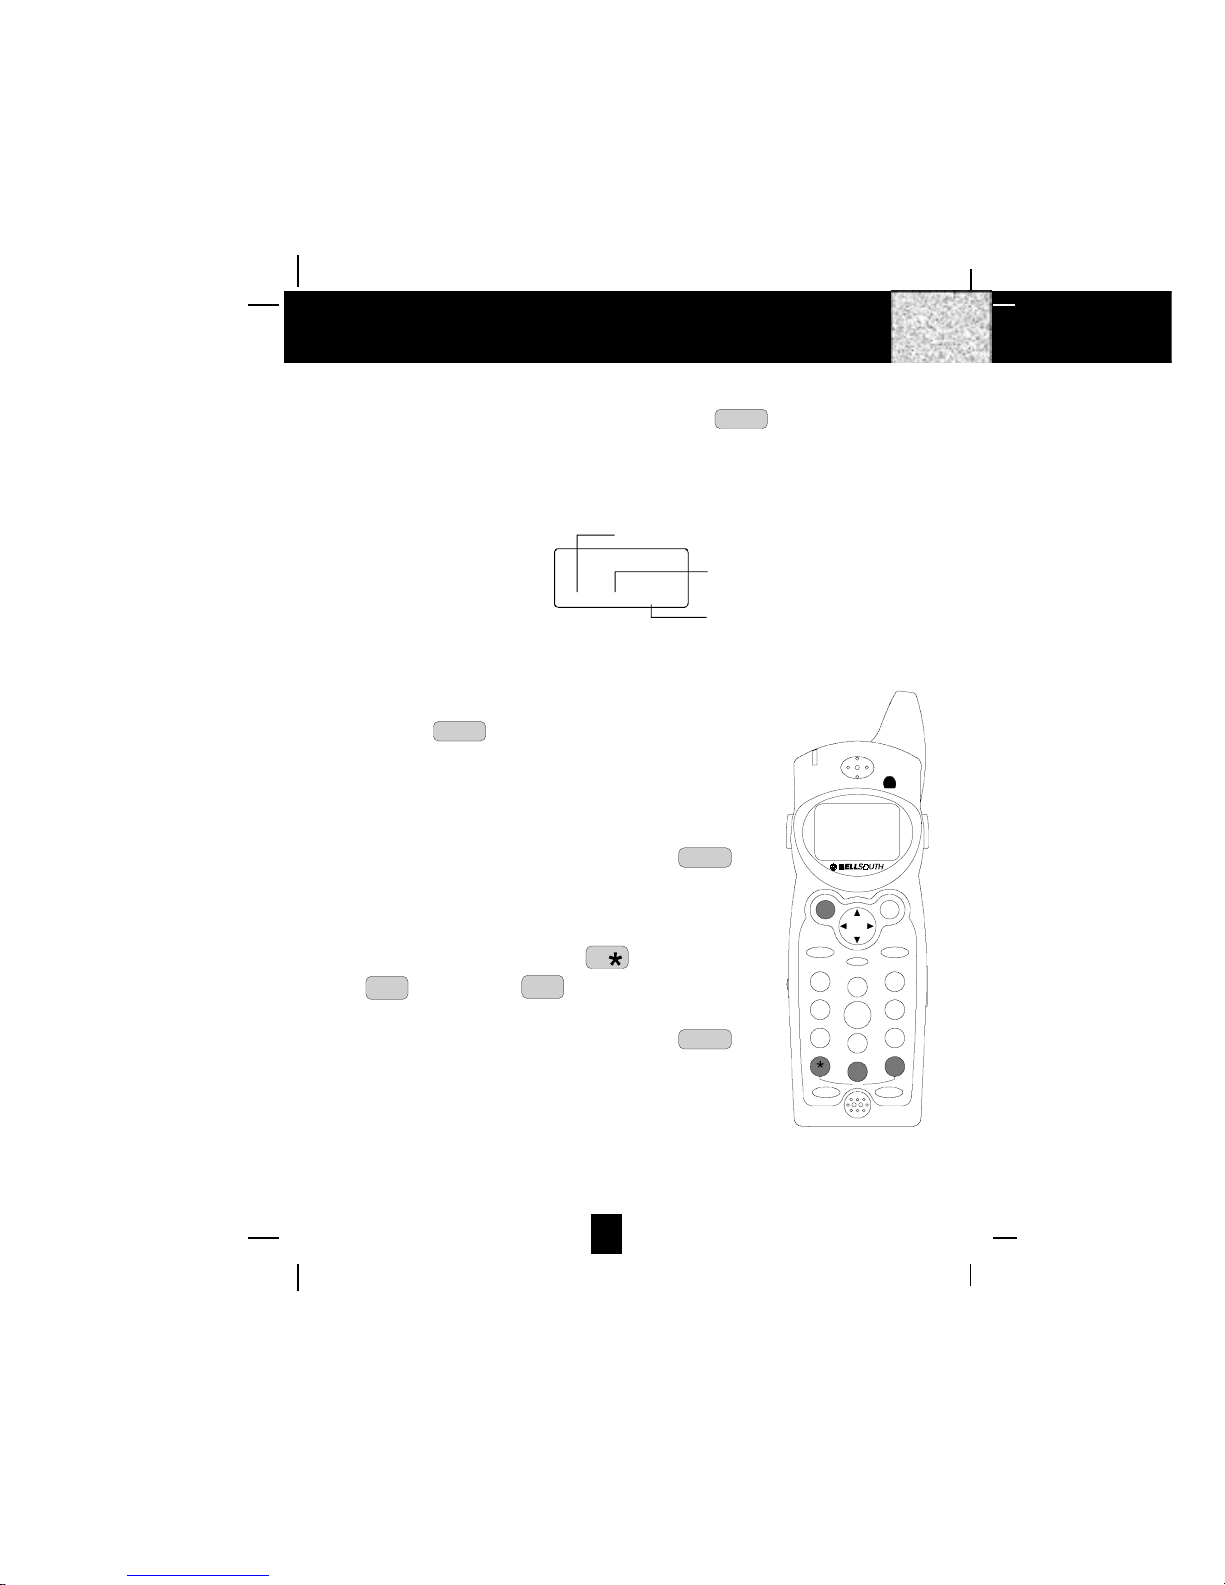
PlacingCalls
1. Press the TALK button, the Call Timer starts to count.
The HANDSET LCD Screen will display “CALLS“, and
“TALKING“, and the BASE UNIT IN USE LED indicator
will light up.
2. Listen for a dial tone.
3. Dial the phone number.
4. When you have finished with your call, press the TALK
button again or place the HANDSET on the BASE UNIT.
OR
1. Dial the phone number.
2. Press and hold down the DIAL 7 7or the DIAL 10
0
10
OPER or the DIAL 1+ #
1+ button. The BASE UNIT
IN USE LED indicator will light up.
3. When you have finished with your call, press the TALK
button again or place the HANDSET on the BASE
UNIT.
CordlessTelephoneOperation
NOTE:
1. The Call Timer will start to count once you press the TALK button.
2. The LCD Screen emits light for 5 seconds every time you press any of the TELEPHONE
KEYPAD buttons.
3. When “CALLS”appears on the LCD Screen, it means that the HANDSET is OFF-HOOK
(connected to the telephone line).
Minutes
00 1 14
Seconds
Channel
CALLS
MIN SEC
CALLS
TALKING . . . .
DEF
ABC
GHI JKL MNO
TUV
PRS WXY
OPER
123
6
5
4
789
0#
NEW CALL
MSG WAITING
TALK DIR
DELETE
SCANSAVE
RE/PA FUNC/V.M.
DIAL
EDIT FLASH
71+
10
2.4GHz
13
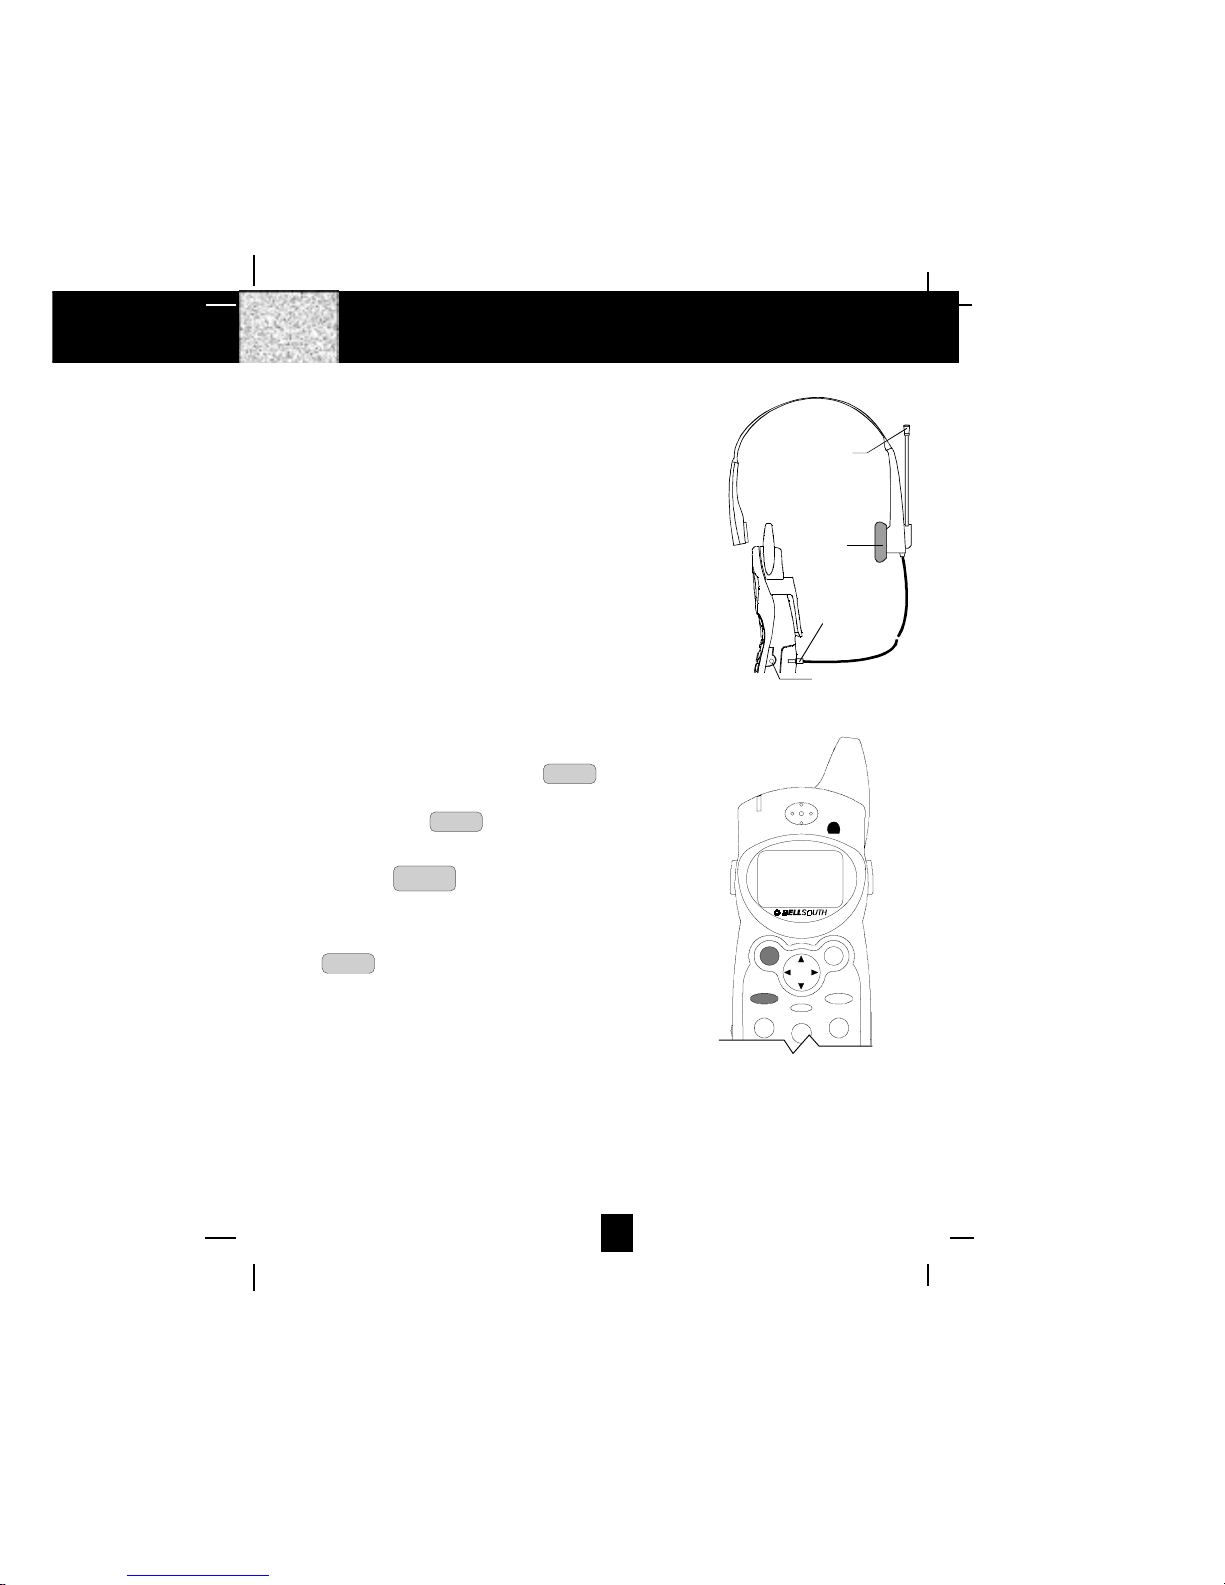
Using the Headset Feature
Your telephone can utilize a headset (not included) to be
connected to your HANDSET for you to enjoy hands-free
communication. Insert the small plug at the end of the
headset into the HEADSET JACK at the right side of the
HANDSET. Follow the procedures discussed in “Receiving
Calls“ and “Placing Calls“to receive and place a call.
NOTE: When you plug the headset plug into the HEADSET
JACK it automatically mutes the MICROPHONE and
SPEAKER of the HANDSET. Unplug the headset to
return the HANDSET to normal use.
Headsets are available at most retail outlets that sell telephone
equipment. The HEADSET JACK is compatible with 2.5
mm headset plugs only.
Redial Feature
1. If you get a busy tone, press the TALK button or
place the HANDSET on the BASE UNIT to hang up.
2. Later, press the TALK button again.
3. Listen for a dial tone.
4. Press the RE/PA
SAVE button. This will automatically
redial the last telephone number you called in TALK
mode.
5. When you have finished with your call, press the
TALK button again (the BASE UNIT IN USE LED
indicator will turn off) or place the HANDSET on the
BASE UNIT.
NOTE:
If you are too far away from the BASE UNIT, the HANDSET emits “beep“sounds to warn you
that the background noise level is too high for proper communication between the HANDSET
and the BASE UNIT. When you hear this sound, you should move closer to the BASE UNIT
to reduce the noise level. Otherwise, the call will automatically cut off.
CordlessTelephoneOperation
HEADSET JACK
HEADSET PLUG
(2.5mm)
SPEAKER
MICROPHONE
HEADSET
DEF
ABC
MNO
123
NEW CALL
MSG WAITING
TALK DIR
DELETE
SCANSAVE
RE/PA FUNC/V.M.
2.4GHz

14
CallerIDSystem
This telephone automatically displays an incoming caller s name and telephone number together
with the date and time of the call. It records up to 80 calls and stores the data in Memory.
IMPORTANT: You must subscribe to the Caller ID service from your local telephone company
to utilize this feature.
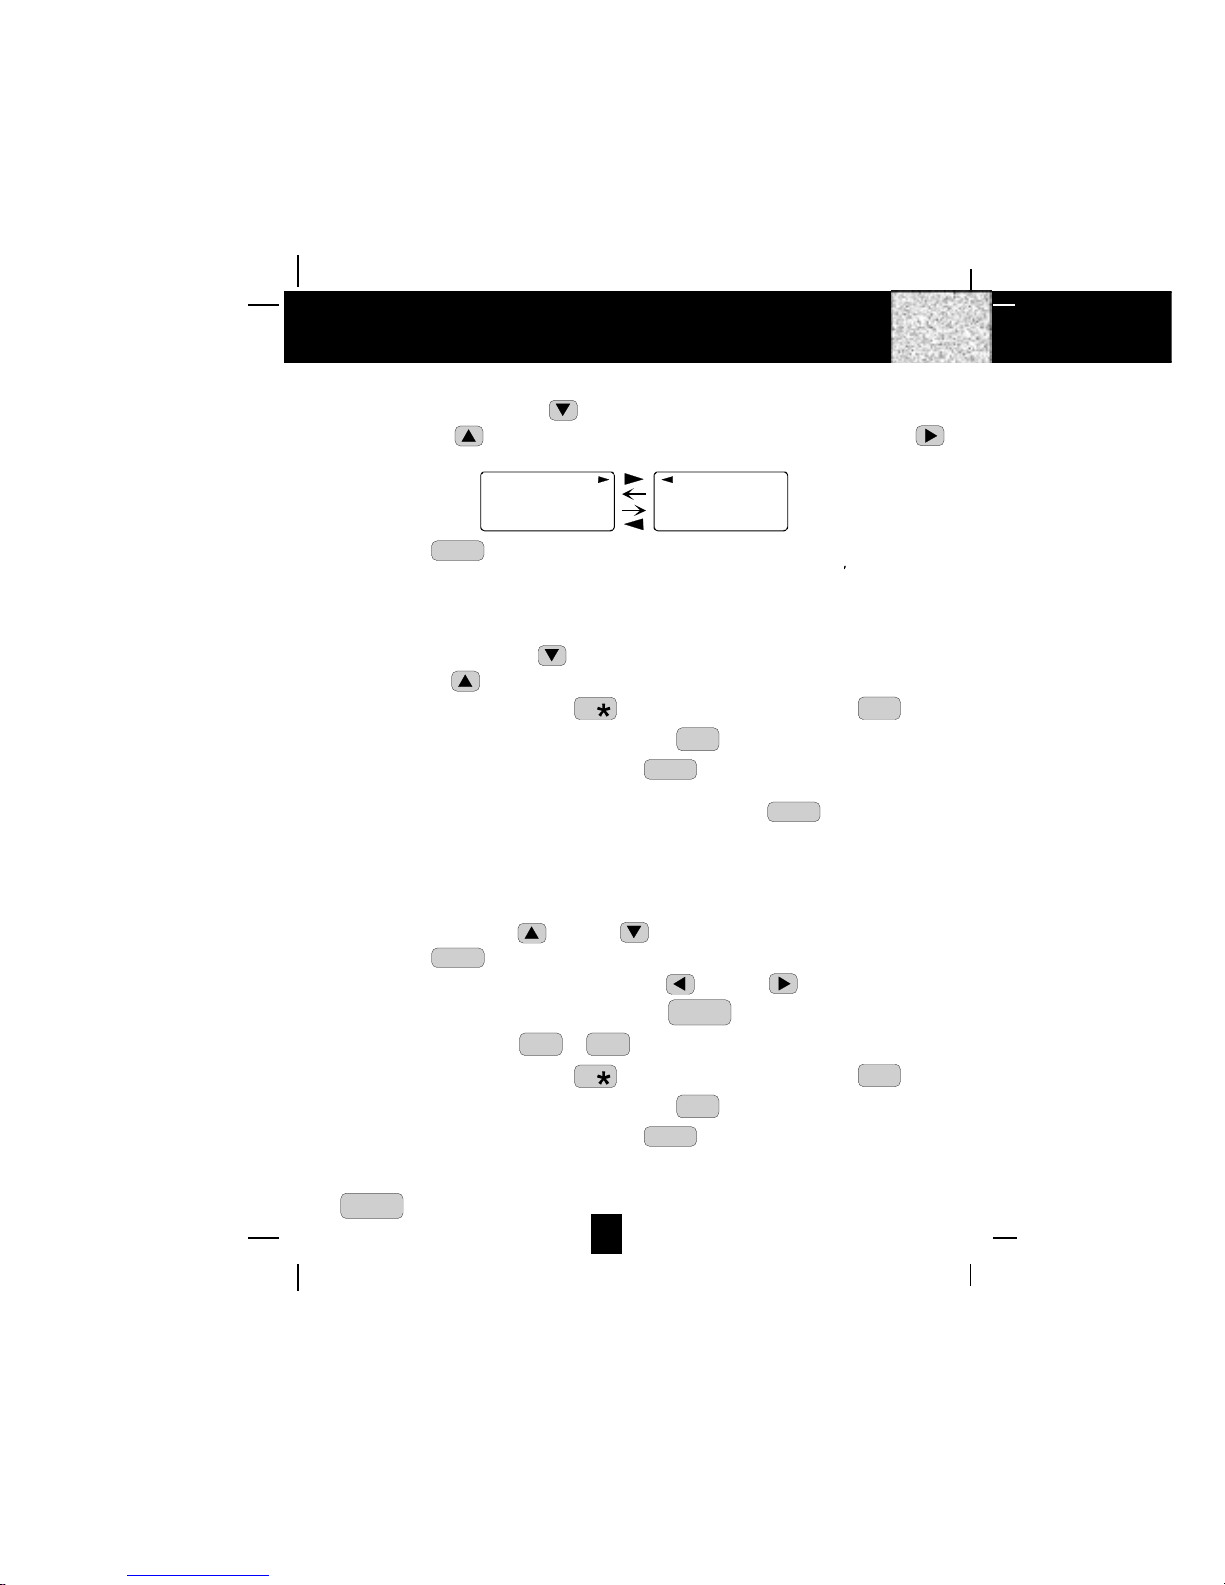
ViewingCallerInformationDuringIncomingCalls
1. When there is an incoming call, the name and the telephone number of the caller will
automatically appear after the second ring. Press the SHIFT RIGHT button to view a
name of more than 11 characters.
MICHAEL BROW
604-555-1212
10:00 8/24 1
AM NEW
BROWING
604-555-1212
10:00 8/24 1
AM NEW
##
Month/Date
Time Number of calls recorded
OR
Caller´s telephone number will appear if the caller´s name is not available.
OR
“OUT OF AREA“ will appear if the origin of the incoming
call does not support the Caller ID system.
OR
“UNKNOWN“ will appear if the origin of the incoming
call has no name and does not support the Caller ID
system.
OR
“PRIVATE“ and/or “P---------“will appear if the caller s
name and/or telephone number is blocked.
OR
“DATA ERROR“ will appear if wrong data was received from the telephone line.
OR
The name stored in the DIRECTORY will appear for an incoming call with matching telephone
numbers.
“
MSGWAITING
“
(MessageWaiting)
The MSG WAITING GREEN LED indicator will blink when there is a message for you from your
telephone company if you have subscribed to Voice Mail message service and if you have
requested Visual Message Indication from your local telephone company. “MSG WAITING“
will appear on the LCD Screen in STANDBY mode. (To remove the MESSAGE WAITING
indicator, see page 26 for detail.)
Caller ID System Operation
UNKNOWN
U- - - - - - - - - -
e.g.
OUT OF AREA
O- - - - - - - - - -
10:00 8/24 13 42
AM NEW TOTAL
e.g.
#
10:00 8/24 13 42
AM NEW TOTAL
#

15
CallWaiting
When you subscribe to a Call Waiting service from your local telephone company, this telephone
will display the name and number of the second caller while you are having a conversation
with your first caller.
1. When you are having a conversation, this telephone
will automatically display the name and number of
the second caller. The name will be blinking.
2. Press the FLASH button to answer the second
caller. The first caller s name and number will be
displayed. The name will be blinking.
3. When you have finished, press the FLASH button
to continue with your conversation with the first caller.
If you do not want to interrupt your phone conversation
with the first caller, you can advise the second caller to
leave a Voice Mail message instead.
VoiceMailFunction
When there is a Voice Mail message for you, this telephone detects a Stutter Dial Tone (if
applicable) and the “MSG“icon on the LCD Screen and the MESSAGE WAITING LED
indicator will blink.
1. To access your Voice Mail message, press the TALK button.
2. After you hear a dial tone, press the FUNC
V.M. button. This will automatically dial the
Voice Mail Post Code in your area and connect you to the Voice Mail service provider.
NOTE: You must store the Voice Mail Post Code number by using the VOICE MAIL function on
page 25. You can also call your Voice Mail service provider by dialing the Voice Mail
Access Code number after pressing the TALK button.
“
C-F
“
(Forwarded Call)
Appears on the upper left hand side, when the incoming call has been assigned to your
telephone number.
“
L-D-C
“
(Long Distance Call)
Appears on the upper left hand side, when the incoming call is a long distance call and the
service is provided by your local telephone company.
CallerList
Record call information for up to 80 incoming calls such as caller s name and telephone
number together with the date and time of the call. After recording a new incoming call, the
NEW CALL indicator will blink and the display will look as shown below:
RING: HI
10:00 8/24 13 42
AM NEW TOTAL
No. of new calls
Maximum calls= 80
Caller ID System Operation
10:00 8/24 13
AM NEW
e.g. JOHN BROWN
235-607-5512
1st Caller
10:00 8/24 14
AM NEW
e.g. ALEX BROWTH
504-555-1212
2nd Caller
16
Viewing the Caller List
1. Press the SCROLL DOWN button to view the latest Caller ID record, or press the
SCROLL UP button to view the first Caller ID record, press the SHIFT RIGHT
button if the name has more than 11 digits.
MICHAEL BROW
604-555-1212
10:00 8/24 1
AM NEW
BROWING
604-555-1212
10:00 8/24 1
AM NEW
##
2. Press the DIR button to go back to STANDBY mode. (If no active buttons are pressed
for 20 seconds or you have viewed the last Caller ID record in the Caller s List, the LCD
Screen will automatically return to STANDBY mode.)
Placing a Call from the Caller List
1. Press the SCROLL DOWN button to select from the latest Caller ID record, or press the
SCROLL UP button to select from the first Caller ID record.
2. Press and hold down the DIAL 7 7button for a local call, or the DIAL 10 0
10
OPER button
for a local call with area code, or the DIAL 1 + #
1+ button for a long distance call.
3. To end your conversation, either press the TALK button or place the HANDSET on the
BASE UNIT.
To place a call from the Caller List in TALK mode, press the TALK button, then follow
steps 1 to 3.
NOTE: You can edit the number before dialing, but you cannot SAVE any changes in the
Caller List.
Editingthe CallerList beforeDialing
1. Press the SCROLL UP or DOWN button to find the caller.
2. Press the EDIT button.
3. Move the cursor by pressing the SHIFT LEFT or RIGHT button to the digit you
want to change. To erase digits, press the SCAN
DELETE button. To add digits, use the
TELEPHONE KEYPAD ~
0
10
OPER 9
WXY buttons.
4. Press and hold down the DIAL 7 7button for a local call, or the DIAL 10 0
10
OPER button
for a local call with area code, or the DIAL 1 + #
1+ button for a long distance call.
5. To end your conversation, either press the TALK button or place the HANDSET on the
BASE UNIT.
To save the edited record from the Caller List, follow steps 1 to 3 then press and hold down the
RE/PA
SAVE button.
Caller ID System Operation

17
Saving the Name and Number in the Caller List into the DIRECTORY
1. Press the SCROLL UP or DOWN button to find the caller.
2. Press and hold down the RE/PA
SAVE button.
NOTE: It is not advisable to save a telephone number without the corresponding name. This
will lead to improper display on Anonymous (Private) and Unknown (Out of Area) calls.
DeletingAll Records inthe Caller List
1. Press and hold down the SCAN
DELETE button for at least
3 seconds while in STANDBY mode.
2. The LCD Screen will automatically return to
STANDBY mode.
Selective Deleting in the Caller List
1. Press the SCROLL UP or DOWN button to find the Caller ID record while in
STANDBY mode.
2. Press and hold down the SCAN
DELETE button for at least
3 seconds, then the LCD Screen will display the next
Caller ID record in the DIRECTORY.
3. Press the DIR button to returnto STANDBYmode.
Nameand Telephone NumberDIRECTORY
This DIRECTORY lets you scroll through the list to find the record you need for one touch dialing.
You can store up to 40 names and telephone numbers in the memory.
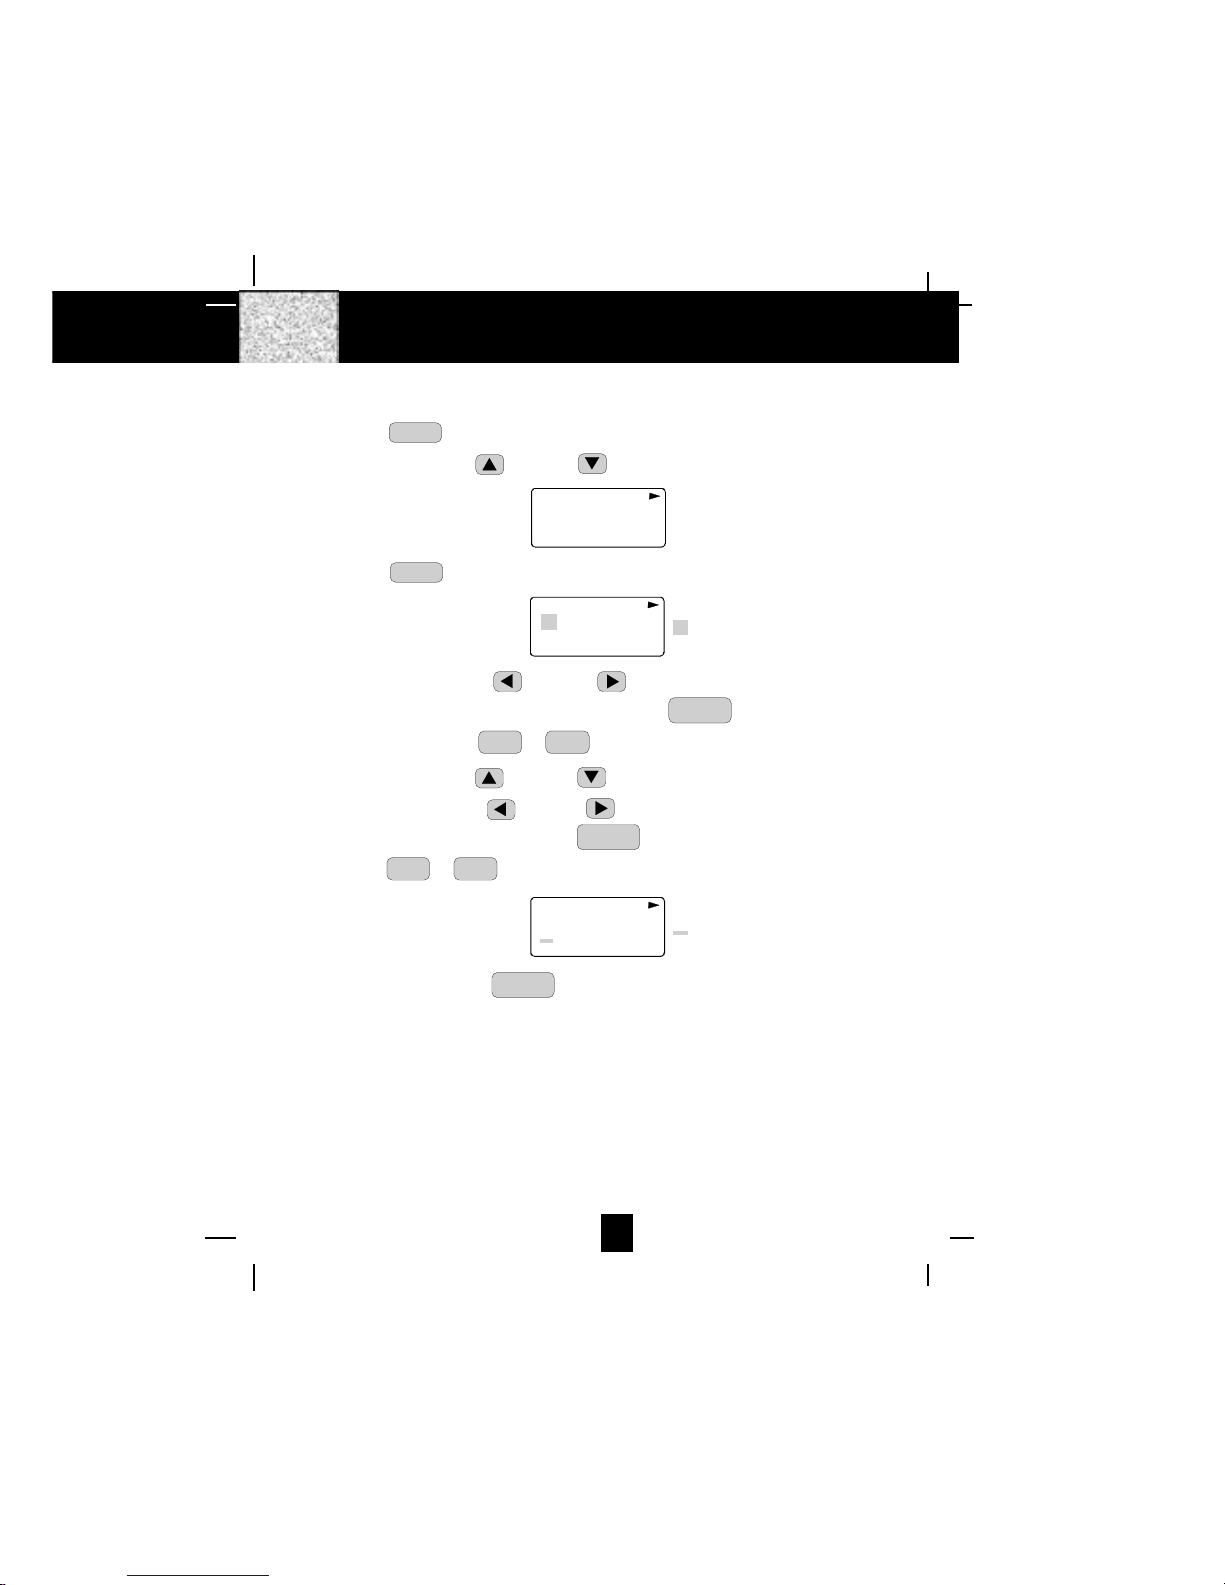
ViewingtheDIRECTORY
1. Press the DIR button.
2. Press the SCROLL UP or DOWN button to find the
one you need, press the SHIFT RIGHT button if the
name or telephone number is more than 11 digits.
NOTE: To exit the DIRECTORY List at anytime, press the DIR
button.
Caller ID System Operation
ALL DELETE
10:00 8/24 0 0
AM NEW TOTAL
DELETE
10:00 8/24 2
AM #
DIRECTORY
10:00 8/24 12
AM TOTAL No. of records stored
DIR
MICHAEL BROW
604-555-1212
8 12
BROWING
604-555-1212
TOTAL 8 12
TOTAL
# #
DIR DIR
DEF
ABC
MNO
123
NEW CALL
MSG WAITING
TALK DIR
DELETE
SCANSAVE
RE/PA FUNC/V.M.
2.4GHz
BELLSOUTH
1-212-242-6978
10:00 8/24 18 30
AM NEW
PM TOTAL
L- D-C C- F MSG DI RCALL BATT

18
Speed Viewing the DIRECTORY
1. Press the DIR button.
2. Enter the first letter of a name. (See Page 27 for detail of entering a letter.)
3. Press the SCROLL DOWN button to find all names with same first letter.
SavingintheDIRECTORY
1. Press the DIR button.
2. Press the EDIT button.
3. Use the TELEPHONE KEYPAD ~
0
10
OPER 9
WXY buttons to enter the name, (see page 27
for detail) you can store up to 15 characters.
4. Press the SCROLL DOWN button once.
5. Enter the telephone number using the TELEPHONE KEYPAD ~
0
10
OPER 9
WXY buttons.
You can store up to 16 digits.
6. Press and hold down the RE/PA
SAVE button.
7. Press the DIR button to go back to STANDBY mode.
(If no active buttons are pressed for 20 seconds, the LCD Screen will automatically return
to STANDBY mode.)
NOTE: It will not save a duplicate telephone number or a name without the corresponding
telephone number in the DIRECTORY.
PREFERRED CALLS
You can assign PREFERRED CALL which will generate a special ringer sound at the start of
the second ring to any welcome caller in the DIRECTORY.
When you are saving the name and number into the DIRECTORY, add a “#“ mark at the
beginning of the name by pressing the #
1+ button.
BLOCKEDCALLS
You can assign BLOCKED CALL which will disable the ringer sound from the second ring to
any caller in the DIRECTORY.
When you are saving the name and number into the DIRECTORY, add an ““ mark at the
beginning of the name by pressing the 7button.
Caller ID System Operation
19
Editinga Nameand Number in the DIRECTORY
1. Press the DIR button.
2. Press the SCROLL UP or DOWN button to find the record you want to edit.
MICHAEL BROW
604-555-1212
8 12
TOTAL
#
DIR
3. Press the EDIT button to edit the name.
8 12
TOTAL
MICHAEL BROW
604 555 1212 cursor is blinking
#
DIR
4. Press the SCROLL LEFT or RIGHT button to move the cursor to the letter or
number you want to change. To erase, press the SCAN
DELETE button. To add, use the
TELEPHONE KEYPAD ~
0
10
OPER 9
WXY buttons. (See page 27 for details.)
5. Press the SCROLL UP or DOWN button to edit the number.
6. Press the SCROLL LEFT or RIGHT button to move the cursor to the number you
want to change. To erase, press the SCAN
DELETE button. To add, use the TELEPHONE
KEYPAD ~
0
10
OPER 9
WXY buttons. (See page 27 for details.)
8 12
TOTAL
MICHAEL BROW
604 555 1212 cursor is blinking
#
DIR
7. Press and hold down the RE/PA
SAVE button to confirm.
IMPORTANT: It is not advisable to save a telephone number without the corresponding name
in the DIRECTORY. This will lead to improper displays on PRIVATE and OUT
OF AREA calls.
NOTE: When no active buttons are pressed for 20 seconds, the LCD Screen will automatically
return to STANDBY mode.
Caller ID System Operation

20
EditingtheNumber in the DIRECTORYbeforeDialing
1. Press the DIR button.
2. Press the SCROLL UP or DOWN button to find the caller.
3. Press the EDIT button to edit the name.
4. Press the SCROLL DOWN button.
e.g.
5. Press the SCROLL LEFT or RIGHT button to move the cursor to the number you
want to change.
To erase, press the SCAN
DELETE button.
To add, use the TELEPHONE KEYPAD ~
0
10
OPER 9
WXY buttons.
6. Press and hold down the DIAL 7 7button for a local call, or press and hold down the
DIAL 10 0
10
OPER button for a local call with area code, or press and hold down the DIAL 1+
#
1+ button for a long distance call.
7. To end your conversation, either press the TALK button or place the HANDSET on the
BASE UNIT.
NOTE: If you want to save the edited number in the DIRECTORY, follow steps 1 through 5
and then press and hold down the RE/PA
SAVE button.
Caller ID System Operation
1 12
TOTAL
MICHAEL BROW
604 555 1212 cursor is blinking
#
DIR
Table of contents


