CKMOVA Vocal M User manual

Vocal M
UHF Dual-Channel Wireless Microphone System
With Independent Audio Recorder
攜獨立錄音筆功能UHF雙通道無線麥克風系統
User Manual
說明書

Introduction:
The CKMOVA Vocal M is dual channel wireless
microphone system with independent audio recorder
features the combination of reliability & broadcast-
quality wireless solution for ENG, filmmakers, EEP,
vloggers, Live Podcast, weddings, mobile journalist
and content creators.
The Vocal M system boasts a range of powerful
feature, including mute, keyboard lock and headphone
monitor on both transmitter and receiver; Mic & Line
input switchable, local memory recording and EQ
setting on transmitter; mono & stereo switchable on
receiver.
The compact, lightweight & durable construction is
convenient working for multiple condition. The OLED
screen displays reception quality, battery status, audio
level and more feature.
The CKMOVA is able to provide mature and stable
UHF technical solutions to ensure stable signal
transmission and deliver high-quality audio, it makes
Vocal M become the clients priority choice.

microphone system with independent audio recorder
vloggers, Live Podcast, weddings, mobile journalist
feature, including mute, keyboard lock and headphone
monitor on both transmitter and receiver; Mic & Line
setting on transmitter; mono & stereo switchable on
The compact, lightweight & durable construction is
The OLED
, battery status, audio
is able to provide mature and stable
transmission and deliver high-quality audio, it makes
Cautions:
Do not use the unit underwater or unprotected in
rainy conditions.
Do not use the unit under overheated or supercooled
conditions.
Do not hold the unit close to loudspeakers.
Do not subject to device to violent collisions, as this
can damage the device
Do not over-tighten the antenna onto the devices
Support up to microSD 32GB memory card, avoid
incompatibility
When using auto IR Pairing, please stay within one
meter, otherwise the signal may be too weak and
the sync will not be successful;
When in use, or when storing, avoid contact with
dust and moisture
Regularly clean the memory card to prevent it from
being full during recording
Available Combo:
Vocal M V1(TX+RX):Vocal M V2(TX+TX+RX):
Vocal M V3(TLX+RX):
Vocal M V4(TLX+TX+RX):
One 3.5mm Transmitter + Receiver
Two 3.5mm Transmitters + Receiver
One Plug-on XLR Transmitter + Receiver
One 3.5mm Transmitter + One Plug-on
XLR Transmitter + Receiver

Highlights:
Dual-channel receiver for camera, mobile, computer
& recorder and etc
OLED display on both transmitter and receiver
Detachable and 360°switchable antenna
Operating Range 150M (Line of sight)
Mono & Stereo output switchable
Locking 3.5mm TRS Mic & Line input switchable
Locking 3.5mm TRS real-time headphone monitor
on receiver
Locking 3.5mm TRS real-time & play-back headphone
monitor on transmitter
Local 3.5mm TRS Mic input jack on receiver
Support up to 32GB microSD card for memory
recording
Low cut filter (40Mhz/80Mhz/120Mhz)
High frequency boost (1dB/2dB/3dB/4dB)
Mute & keypad lock function on both transmitter
& receiver
Built-in rechargeable battery with 12 hours life
Durable aluminum alloy construction
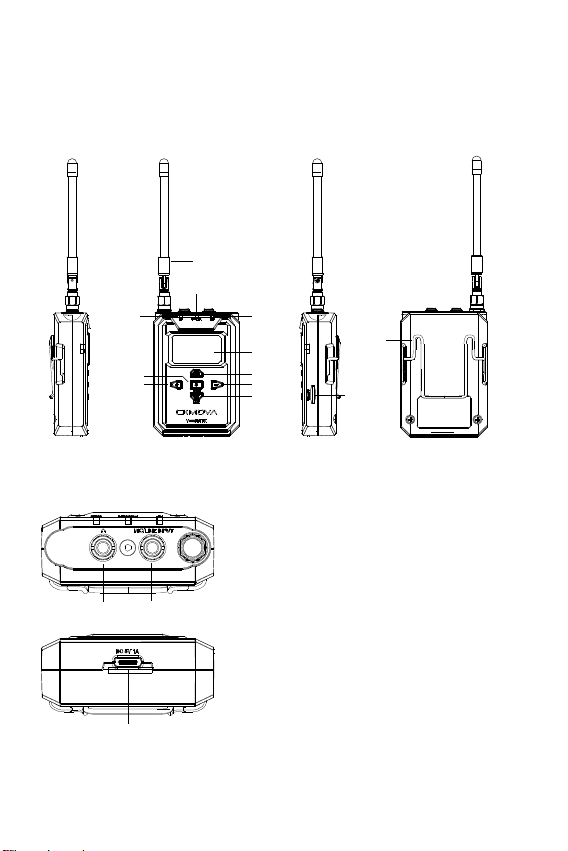
Product Structure:
1. Vocal M TX: Body-pack Transmitter
1. Detachable Antenna
2. Mic & Line Input Jack
Connects to the 3.5mm TRS microphone
and line level devices
3. 3.5mm Headphone Monitor Jack
For Real-time & Play-back local memory
file
4. MicroSD Card Port
5. Type-C Charging Port (DC 5V)
6. RF Indicator
Solid Blue: When paired with receiver
Dim Blue: When unpaired with receiver
2
3
4
5
1
6
7
8
9
10
11
12 13
14
15

7. Power Indicator
Solid Blue: The battery is higher than 5%
Solid Red: The battery is lower than 5%
8. Record Indicator
Solid Blue: When recording
Dim Blue: Pause or exsit recording
9. OLED Display
Display details refer to "OLED Display Readouts"
10. Power & Mute Button
Power On & Off : long press button for 2 seconds
Mute On & Off: short press button
11. Set & Lock Button
Set function: short press button to enter the function control
interface, then short press button to confirm
Keypad lock function: long press button for 2 seconds
12. "+" Button
Short press button to select different function on the display
13. "-" Button
Short press button to select different function on the display
14. REC Button
Long press 2 seconds to enter recording model, short press
start recording then press again pause recording, long press
2 seconds exsit and save recording file
15. Belt Clip
Insert one end of the belt clip into one of two holes, and then
insert the other end into the hole on the other side

2. Vocal M TLX: Plug-on XLR Transmitter
2. 3.5mm Headphone Monitor Jack
For Real-time & Play-back local memory
file
3. MicroSD Card Port
5. RF Indicator
Solid Blue: When paired with receiver
Dim Blue: When unpaired with receiver
6. Power Indicator
Solid Blue: The battery is higher than 5%
Solid Red: The battery is lower than 5%
4. Type-C Charging Port (DC 5V)
1. 3-pin Female XLR Plug Input Jack
Connects to the XLR microphone
1
2
3
4
56
78
9
10
11
12
13
14 15

8. "+48V"Indicator
Solid Blue: +48V Phantom Power ON
Dim Blue: +48V Phantom Power OFF
9. OLED Display
Display details refer to "OLED Display Readouts"
10. Power & Mute Button
Power On & Off : long press button for 2 seconds
Mute On & Off: short press button
11. Set & Lock Button
Set function: short press button to enter the function control
interface, then short press button to confirm
Keypad lock function: long press button for 2 seconds
12. "+" Button
Short press button to select different function on the display
13. "-" Button
Short press button to select different function on the display
14. REC Button
Long press 2 seconds to enter recording model, short press start
recording then press again pause recording, long press 2 seconds
exsit and save recording file
15. "+48V" Button
Short press button to switch on & off
7. Record Indicator
Solid Blue: When recording
Dim Blue: Pause or exsit recording

3. Vocal M RX: Portable Receiver
1. Detachable Antenna
2. Audio Output Jack
Connects to the 3.5mm TRS audio
output cable
3. 3.5mm Headphone Monitor Jack
For Real-time headphone monitor
5. Type-C Charging Port (DC 5V)
6. RF-A Indicator
Solid Blue: When paired with Group A
transmitter
Dim Blue: When unpaired with Group A
transmitter
4. Local Mic Input Jack
Connects to the 3.5mm TRS microphone
2
3
4
1
6
7
8
9
10
11
12 13
14
5
15

7. Power Indicator
Solid Blue: The battery is higher than 5%
Solid Red: The battery is lower than 5%
8. RF-B Indicator
Solid Blue: When paired with Group B transmitter
Dim Blue: When unpaired with Group B transmitter
9. OLED Display
Display details refer to "OLED Display Readouts"
10. Power & Mute Button
Power On & Off : long press button for 2 seconds
Mute On & Off: short press button
11. Set & Lock Button
Set function: short press button to enter the function control
interface, then short press button to confirm
Keypad lock function: long press button for 2 seconds
12. "+" Button
Short press button to select different function on the display
13. "-" Button
Short press button to select different function on the display
14. Belt Clip
Insert one end of the belt clip into one of two holes, and then
insert the other end into the hole on the other side
15. Shoe Mount Adapter
Push the shoe mount adapter in fully until the belt clip fits into
the horizontal groove on the adapter’s holder
TRS microphone

OLED Display Readouts:
Transmitter (Vocal M TX & Vocal M TLX)
Noted: Except Vocal M TLX without Mic & Line input switchable
function screen, all other function screen is same to Vocal
M TX
Homescreen
①Group Indicator
Indicates the current group
②Memory Card
Display on the screen means that the card has been inserted
③④⑤Keypad Lock
Display on the screen means that the keypad lock is open
Battery Level
Please recharge device when the indicator start flashing for low power
Reminding
Channel and Frequency
Indicates the current channel number and frequency
①②③④⑤⑥⑦⑧If no any operation within 5 seconds, the display automatically return
to the home screen
⑥⑦⑧Mic Gain
Set microphone gain from 1 to 10, the default is 7
Input Mode
: Mic Input
: Line Input
: Mic Input Mute On
: Line Input Mute On
Audio Input Dynamic Bar
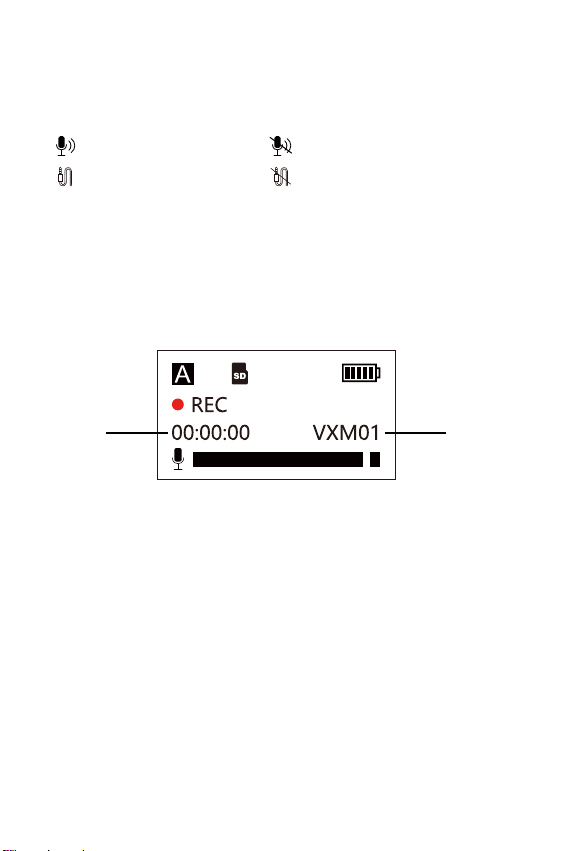
Recording Mode Screen
Long press REC button to enter the recording mode, short press
button to start recording and short press again pause recording,
long press again exit and save recording file.
Noted: When enter recording model, you can plug 3.5mm TRS
headphone for real-time monitor
①②: Recording Time Code
: Current Recording File Name
①②

Group Setting Screen
Press the SET button to enter the menu, use the "+" and "-" to
select A or B group, the default is Group A
Channel Setting Screen
Press the SET button to enter the menu, use the "+" and "-" to
select the channel you need then press the SET button to confirm,
the default is CH01
IR Pairing Screen
Set to pair with the receiver, the screen will display "Pairing",
after successful paring, it will back to pairing setting screen

button to confirm,
Mic Gain Screen
Set microphone gain from 1 to 10, the default is 7
Input Mode Screen
Mic input and Line input can be switchable based on you need,
the default is Mic Input
Low Cut Screen
Low cut with 4 level: OFF; 40MHz; 80MHz; 120MHz
the default is OFF
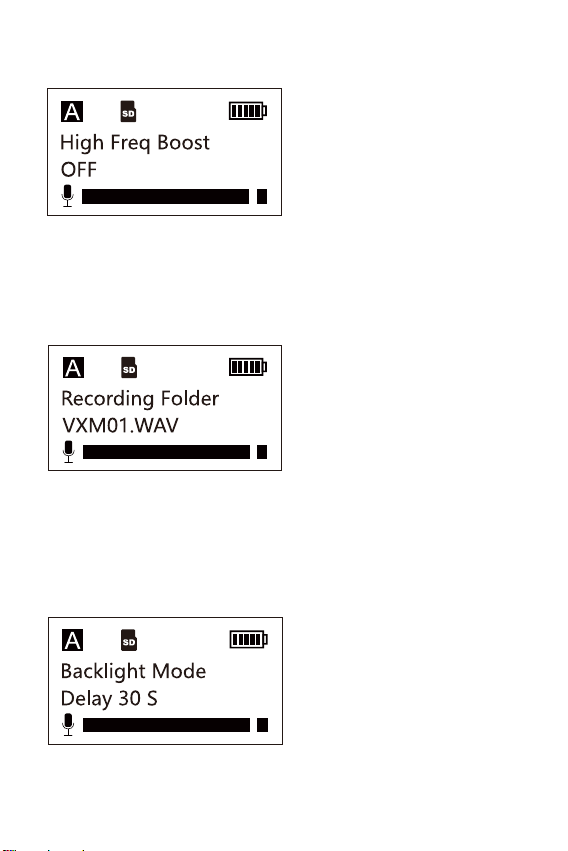
High Frequency Boost Screen
High Frequency Boost with 5 level: OFF; +1dB; +2dB; +3dB;
+4dB, the default is OFF
Recording File Playback Screen
Press SET button to enter recording folder, use the "+" and "-"
to choose needed recording file, then press SET button to
playback recording file via headphone monitor, press again to
exsit
Backlight Mode Screen
Backlight with 3 level: 30s; 60s; ON, the default is 30s
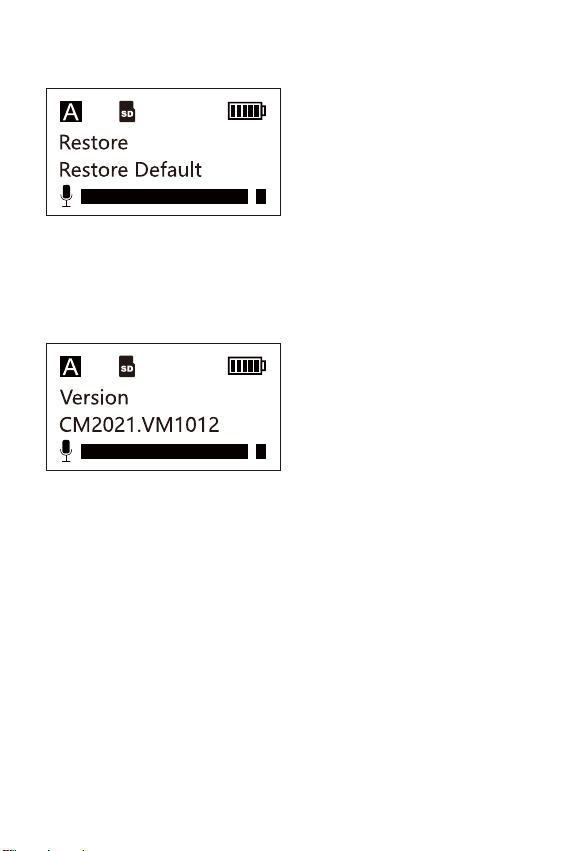
Restore Screen
Yes: Restore factory default
NO: Exsit without any operation
Version Screen
Indicates current version

Receiver (Vocal M RX)
Homescreen
①RF Level Indicator
Indicates the current reception level
②Group Icon
③④⑤Channel
Indicates the current channel number
Mic Gain of Transmitter
Set microphone gain from 1 to 10, the default is 7
Battery Level of Transmitter
Please recharge device when the indicator start flashing for low power
Reminding
⑥Output Mode
The output mode can be set to mono or stereo, the default is mono
:A channel is connected
:A channel is disconnected
: B channel is connected
: B channel is disconnected
①①②②③④⑤⑥⑦⑧③⑤⑨

Please recharge device when the indicator start flashing for low power ⑦⑧Keypad Lock
Output Volume
Display on the screen means that the keypad lock is open
: Mute On
⑨Battery Level of Receiver
Please recharge device when the indicator start flashing for low
power reminding
Set volume from 1 to 10, the default is 7
Group A Setting Screen
Press the SET button to enter the menu, use the "+" and "-" to
select the channel you need then press the SET button to confirm,
the default is CH01
Group B Setting Screen
Press the SET button to enter the menu, use the "+" and "-" to
select the channel you need then press the SET button to confirm,
the default is CH39

IR Pairing with Group A Screen
Set to pair with the transmitter, the screen will display "Pairing",
after successful paring, it will back to pairing setting screen
IR Pairing with Group B Screen
Set to pair with the transmitter, the screen will display "Pairing",
after successful paring, it will back to pairing setting screen
Output Mode Screen
The output mode can be set to mono or stereo, the default is
mono

Output Volume Screen
Set volume from 1 to 10, the default is 7
Backlight Mode Screen
Backlight with 3 level: 30s; 60s; ON, the default is 30s
Restore Screen
Yes: Restore factory default
NO: Exsit without any operation
Table of contents


