Atlas LED GCK TitanONE T112 User manual
©2017 Atlas Sound L.P. and Innovative Electronic Designs, LLC. All Rights Reserved. The Atlas “Circle A”, Soundolier, and Atlas Sound are trademarks of Atlas Sound L.P. IED is a registered trademark of Innovative Electronic Designs, LLC.
All other trademarks are the property of their respective owners. All specs are subject to change without notice. Doc: 1225C Ver:1.0 6/25/2018
1
T112 Stand-Alone
User Manual
TitanONE T112 Stand-Alone Operation
User Manual
Version: 1.0
Date: 25 June 2018
Document Number: 1225C

©2017 Atlas Sound L.P. and Innovative Electronic Designs, LLC. All Rights Reserved. The Atlas “Circle A”, Soundolier, and Atlas Sound are trademarks of Atlas Sound L.P. IED is a registered trademark of Innovative Electronic Designs, LLC.
All other trademarks are the property of their respective owners. All specs are subject to change without notice. Doc: 1225C Ver:1.0 6/25/2018
2
T112 Stand-Alone
User Manual
Copyright Information
Copyright ®2018, Innovative Electronic Designs, LLC. All Rights Reserved
If this document is distributed with software that includes an end user agreement, this document, as well as the software
described in it, is furnished under license and may be used or copied only in accordance with the terms of such license.
Except as permitted by any such license, no part of this document may be reproduced or transmitted in any form or by
any means, electronic or mechanical, including photocopying, recording, storage in an information retrieval system, or
otherwise, without the prior written permission of Innovative Electronic Designs, LLC. Please note that the content in this
guide is protected under copyright law even if it is not distributed with software that includes an end user license
agreement.
The content of this document is furnished for informational use only and is subject to change without notice. It should not
be construed as a commitment by Innovative Electronic Designs, LLC. Innovative Electronic Designs, LLC assumes no
responsibility or liability for any errors or inaccuracies that may appear in the informational content contained in this
document.
Any reference to company names in examples are for demonstration purposes only and are not intended to refer to any
actual organization or an endorsement of any kind.
Innovative Electronic Designs, IED, 500ACS, 500ACS Announcement Control System, CAS, Courtesy Announcement
System, T-CAS, FAS, Flight Announcement System, IED On Call, IED On Call & Design, and LANcom are all registered
trademarks or trademarks of Innovative Electronic Designs, LLC in the United States and/or other countries.
Microsoft, Windows, Windows Vista, Windows 7, Windows Server, SQL Server, and Internet Explorer are all registered
trademarks or trademarks of Microsoft Corporation in the United States and/or other countries.
Software Copyright
Innovative Electronic Designs, LLC (“IED”) products may include copyrighted IED and third-party software stored in
semiconductor memories or other media. Laws in the United States and other countries preserve for IED and third-party
software providers certain exclusive rights for copyrighted software, such as the exclusive rights to distribute or reproduce
the copyrighted software. Accordingly, any copyrighted software contained in IED products may not be modified, reverse-
engineered, distributed, or reproduced in any manner to the extent allowed by law. Furthermore, the purchase of IED
products shall not be deemed to grant either directly or by implication, estoppel, or otherwise, any license under the
copyrights, patents, or patent applications of IED or any third-party software provider, except for the normal, non-
exclusive, royalty-free license to use that arises by operation of law in the sale of a product.
Open Source Information
This device manufactured by Innovative Electronic Designs, LLC (“IED”) may include open source software made publicly
available by IED, including software licensed under the General Public License and/or the Lesser General Public License
(the “open source software”). You may obtain the corresponding source code for any such open source software licensed
under the General Public License and/or the Lesser General Public License (or any other license requiring us to make a
written offer to provide corresponding source code to you) from us for a period of three years after our last shipment of
your IED device and without charge except for the cost of media, shipping, and handling, upon written request to IED.
This offer is valid to anyone in receipt of your IED device. You may send your request in writing to the address (English

©2017 Atlas Sound L.P. and Innovative Electronic Designs, LLC. All Rights Reserved. The Atlas “Circle A”, Soundolier, and Atlas Sound are trademarks of Atlas Sound L.P. IED is a registered trademark of Innovative Electronic Designs, LLC.
All other trademarks are the property of their respective owners. All specs are subject to change without notice. Doc: 1225C Ver:1.0 6/25/2018
3
T112 Stand-Alone
User Manual
only). Please make sure your request includes the “Model number” and the “Build number” associated with the software of
your IED device.
Re: OSS Management
Innovative Electronic Designs, LLC
9701 Taylorsville Road
Louisville, KY 40299
United States of America
The open source software is distributed in the hope it will be useful, but WITHOUT ANY WARRANTY; without even the
implied warranty of MERCHANTABILITY or FITNESS FOR A PARTICULAR PURPOSE. See for example the GNU
General Public License and/or the Lesser General Public License for more information.
To view additional information regarding licenses, acknowledgments and required copyright notices for the open source
software used in your IED device, go to View Licenses in the About window on the device web page.
The device may include software published by parties other than IED. Such third-party software may include open source
software made publicly available by the respective publishers of those applications.
Innovative Electronic Designs, LLC
9701 Taylorsville Road
Louisville, KY 40299
United States of America
www.AtlasIED.com
Document Number 1225C
Version History
Date
Version
Description
Revised By
Comments
27 Apr 18
0.2
First Draft distributed as online help in-house
KAT
24 May 18
0.4
First complete draft of all sections
KAT
25 June 18
1.0
Non-Draft release
KAT

©2017 Atlas Sound L.P. and Innovative Electronic Designs, LLC. All Rights Reserved. The Atlas “Circle A”, Soundolier, and Atlas Sound are trademarks of Atlas Sound L.P. IED is a registered trademark of Innovative Electronic Designs, LLC.
All other trademarks are the property of their respective owners. All specs are subject to change without notice. Doc: 1225C Ver:1.0 6/25/2018
4
T112 Stand-Alone
User Manual
Table of Contents
Copyright Information......................................................2
Version History................................................................3
End User License Agreement.........................................5
1. T112 Stand-Alone Graphical User Interface
Overview...................................................................6
1.1 Introduction .....................................................6
1.2 Getting Started................................................6
2. T112 Main Screen Features and Operation.............7
3. Amplifier Channel Configuration Screen ................12
3.1 EQ Settings Window.....................................15
3.2 Sound Masking Settings Window.................17
4. Configure Analog Input Screen..............................18
4.1 Analog Input EQ Settings Window...............19
5. Configure Logic Inputs Screen...............................21
6. About Window ........................................................21
7. Configure Automated Testing Screen....................22
8. Ambient Sensor Meter Bridge Window..................27
9. System Settings Screen.........................................28

©2017 Atlas Sound L.P. and Innovative Electronic Designs, LLC. All Rights Reserved. The Atlas “Circle A”, Soundolier, and Atlas Sound are trademarks of Atlas Sound L.P. IED is a registered trademark of Innovative Electronic Designs, LLC.
All other trademarks are the property of their respective owners. All specs are subject to change without notice. Doc: 1225C Ver:1.0 6/25/2018
5
T112 Stand-Alone
User Manual
End User License Agreement
Software License Agreement and Limited Warranty
THIS IS A LEGAL AGREEMENT BETWEEN THE USER (“YOU”) AND INNOVATIVE ELECTRONIC DESIGNS (“IED”)
RELATING TO COPYRIGHTED IED SOFTWARE, COPYRIGHTED THIRD-PARTY SOFTWARE, AND DOCUMENTATION
(COLLECTIVELY “SOFTWARE”) PROVIDED WITH IED AUDIO COMPONENTS (“PRODUCTS”) OBTAINED FROM IED
OR ITS AUTHORIZED CONTRACTORS. BY INSTALLING OR USING THE SOFTWARE, YOU ACKNOWLEDGE THAT
YOU HAVE READ AND UNDERSTAND THIS LICENSE AND AGREE TO BE BOUND BY ITS TERMS
License. In return for payment of the license fee, which is part of the price for the Products, and Your agreement to
abide by the terms of this License, IED grants to You a non-exclusive, non-transferrable right to use the Software solely in
connection with use ofthe Products. You may not copy the Software except for archival or backup purposes. You
acknowledge that IED is the sole owner of all rights in the Software (including copyrights, patents, trademarks and other
intellectual property rights), all copies, modifications, enhancements, and derivative works created therefrom, subject only
to the license expressly granted herein. This License does not provide You with ownership of the Software or a copy of it,
but only a right of limited use.
Restrictions. You may not reverse engineer or assemble, decompile, decade or otherwise translate the Software. You
shall not remove any copyright notice or other proprietary or restrictive notice or legend contained or included in or on any
Software or other material provided by IED, and You shall reproduce, copy and include all such information on all copies
made, including such copies for archival or backup purposes. You shall use Your best efforts to assist IED in identifying
any use, copying or disclosure of any portion of theSoftware by any of Your present or former personnel contrary to the
terms of this License.
Termination. You may terminate this License at any time by returning the Software and all copies and extracts thereof to
IED. You are not entitled to a refund upon Your termination. In addition to other available remedies, IED may, at its option,
terminate this License if You fail to pay any fees due or fail to carry out any other obligation under this License. Upon
IED's termination of this License, You are required to return or destroy and certify destruction, as requested by IED, all
copies of the Software in Your possession (whether modified or unmodified). Upon termination, all accrued fees shall he
immediately due and payable.
Law; Scope of Agreement. This License shall be governed by the laws of the Commonwealth of Kentucky as it applies
to contract made and performed in such state without giving effect to conflict of law rules. You consent to jurisdiction and
venue in the Commonwealth of Kentucky, the courts in Jefferson County, Kentucky, and the U.S. District Court for the
Western District of Kentucky in any proceeding arising out of, or relating to, this License or Your use of the Software. If
any term of this License is declared void or unenforceable by any court, such declaration shall have no effect on the
remaining terms hereof. No modification of this License shall be binding on IED unless expressly accepted in writing by
IED, This License is the entire agreement concerning the Software between You and IED, and it supersedes any prior
representation or understanding.
Warning against unlocking the bootloader or altering a product's operating system software. Altering a product's
operating system, which includes unlocking the bootloader, rooting a product or running any operating software other than
the approved versions issued by IED and its partners for your specific product may permanently damage your product,
cause it to be unsafe and/or malfunction and any damage that is caused therefrom will, unless otherwise stated by IED,
not be covered by this limited warranty.
©2017 Atlas Sound L.P. and Innovative Electronic Designs, LLC. All Rights Reserved. The Atlas “Circle A”, Soundolier, and Atlas Sound are trademarks of Atlas Sound L.P. IED is a registered trademark of Innovative Electronic Designs, LLC.
All other trademarks are the property of their respective owners. All specs are subject to change without notice. Doc: 1225C Ver:1.0 6/25/2018
6
T112 Stand-Alone
User Manual
T112 STAND-ALONE OPERATION
USER MANUAL
1. T112 Stand-Alone Graphical User Interface Overview
1.1 Introduction
One way to use the TitanONE T112 is as part of a system where it is configured and controlled by GCK. However, it is
also possible to user the T112 in a stand-alone application. In this case, system configuration and monitoring can be
accomplished via the built-in web pages. This user manual describes the operation and use of this graphical user
interface.
Note, one should be careful when accessing this interface on a T112 frame that is part of a GCK system,
as any changes made via the web pages may conflict with settings made from GCK and therefore may
interfere with proper operation as part of the GCK system.
Use of the web page user interface is explained in the bulk of this document. The T112 also has a two-line display on its
front, along with navigation buttons. Operation of this user interface is covered in the installation manual (Doc: 1225B).
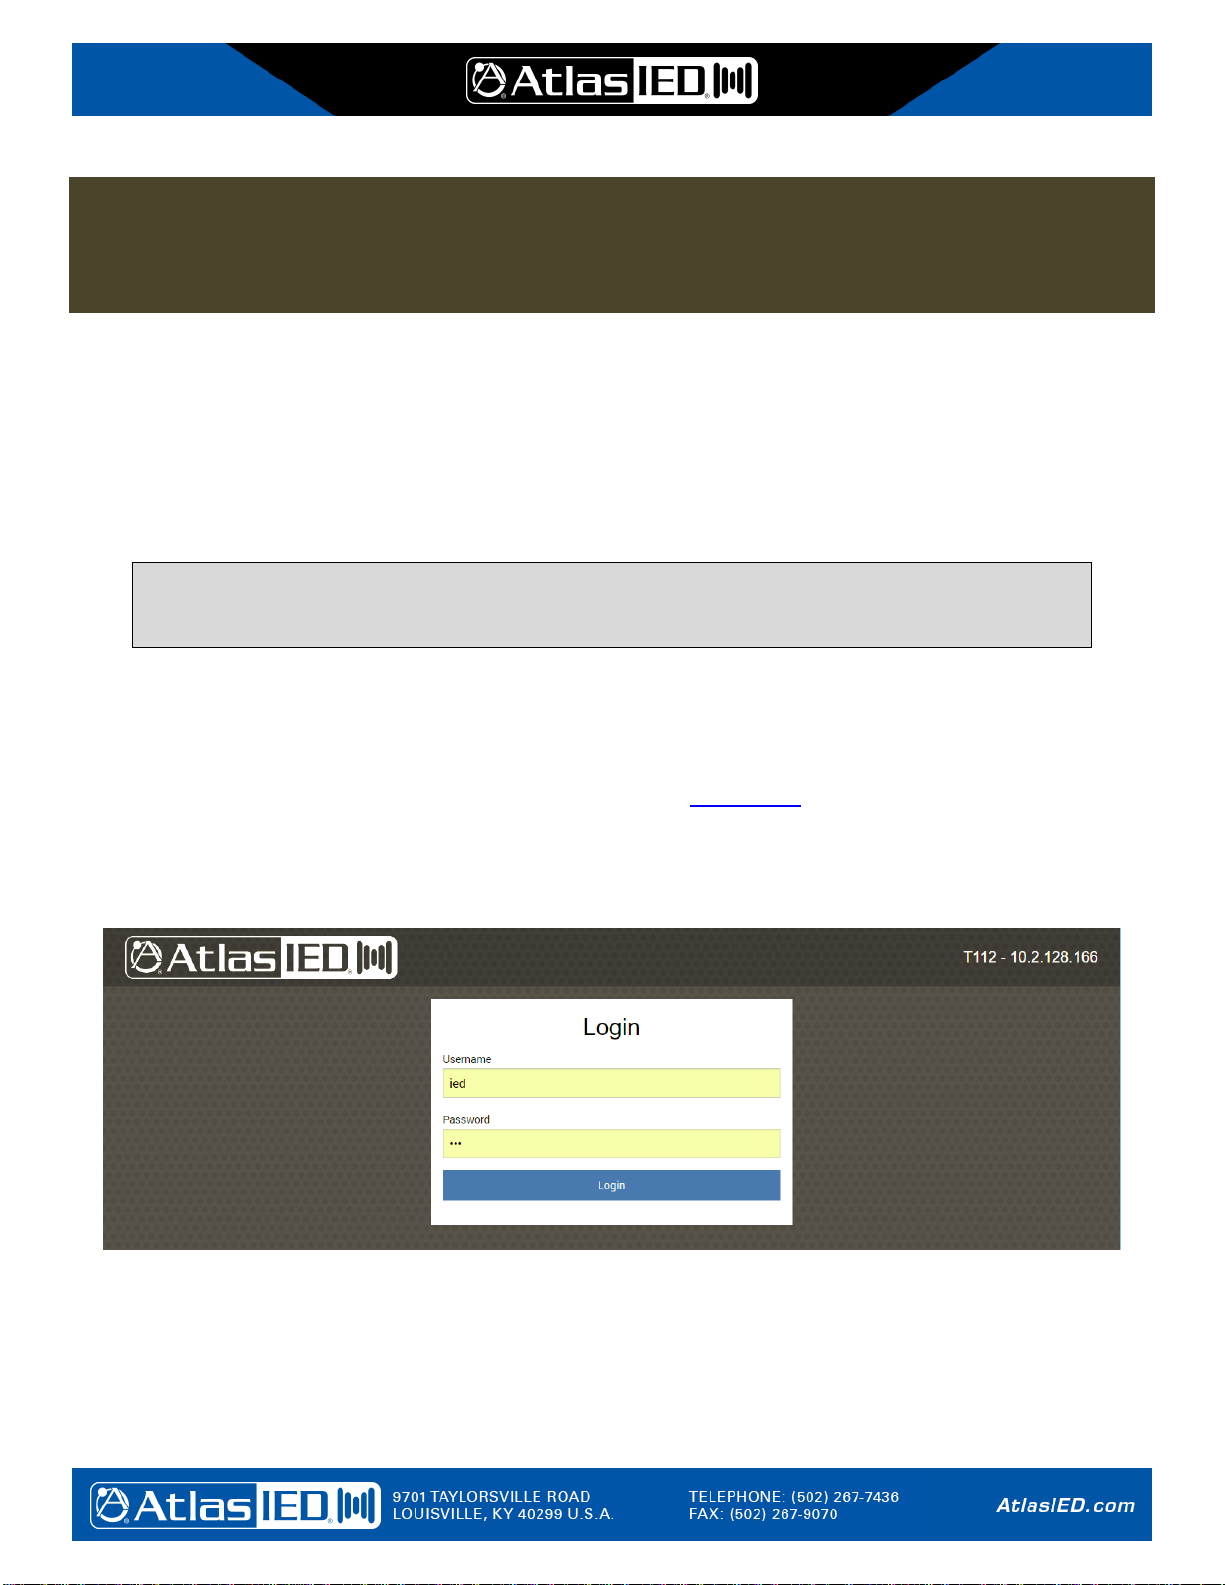
1.2 Getting Started
To access the T112 GUI (Graphical User Interface), one should enter http://w.x.y.z into the address bar of a web browser,
where w.x.y.z is the IP address of the frame. From the factory, the T112 comes without a fixed address, but will obtain
one from a DHCP server on the network. One can find the current address of the T112 frame by using the front panel
interface to read back the current IP address (or optionally assign it). If one needs guidance on how to use the front
panel, see the appendix. The first screen that should appear is the login screen as shown below.
From the factory, the T112 comes with the following login account:
Username: ied
Password: ied
Note, Username and Password are case sensitive, so one should enter them exactly as shown. After entering both, one
can click on the Login button, or hit the [Enter] key on the keyboard to login. This should take one to the Main Screen.
©2017 Atlas Sound L.P. and Innovative Electronic Designs, LLC. All Rights Reserved. The Atlas “Circle A”, Soundolier, and Atlas Sound are trademarks of Atlas Sound L.P. IED is a registered trademark of Innovative Electronic Designs, LLC.
All other trademarks are the property of their respective owners. All specs are subject to change without notice. Doc: 1225C Ver:1.0 6/25/2018
7
T112 Stand-Alone
User Manual
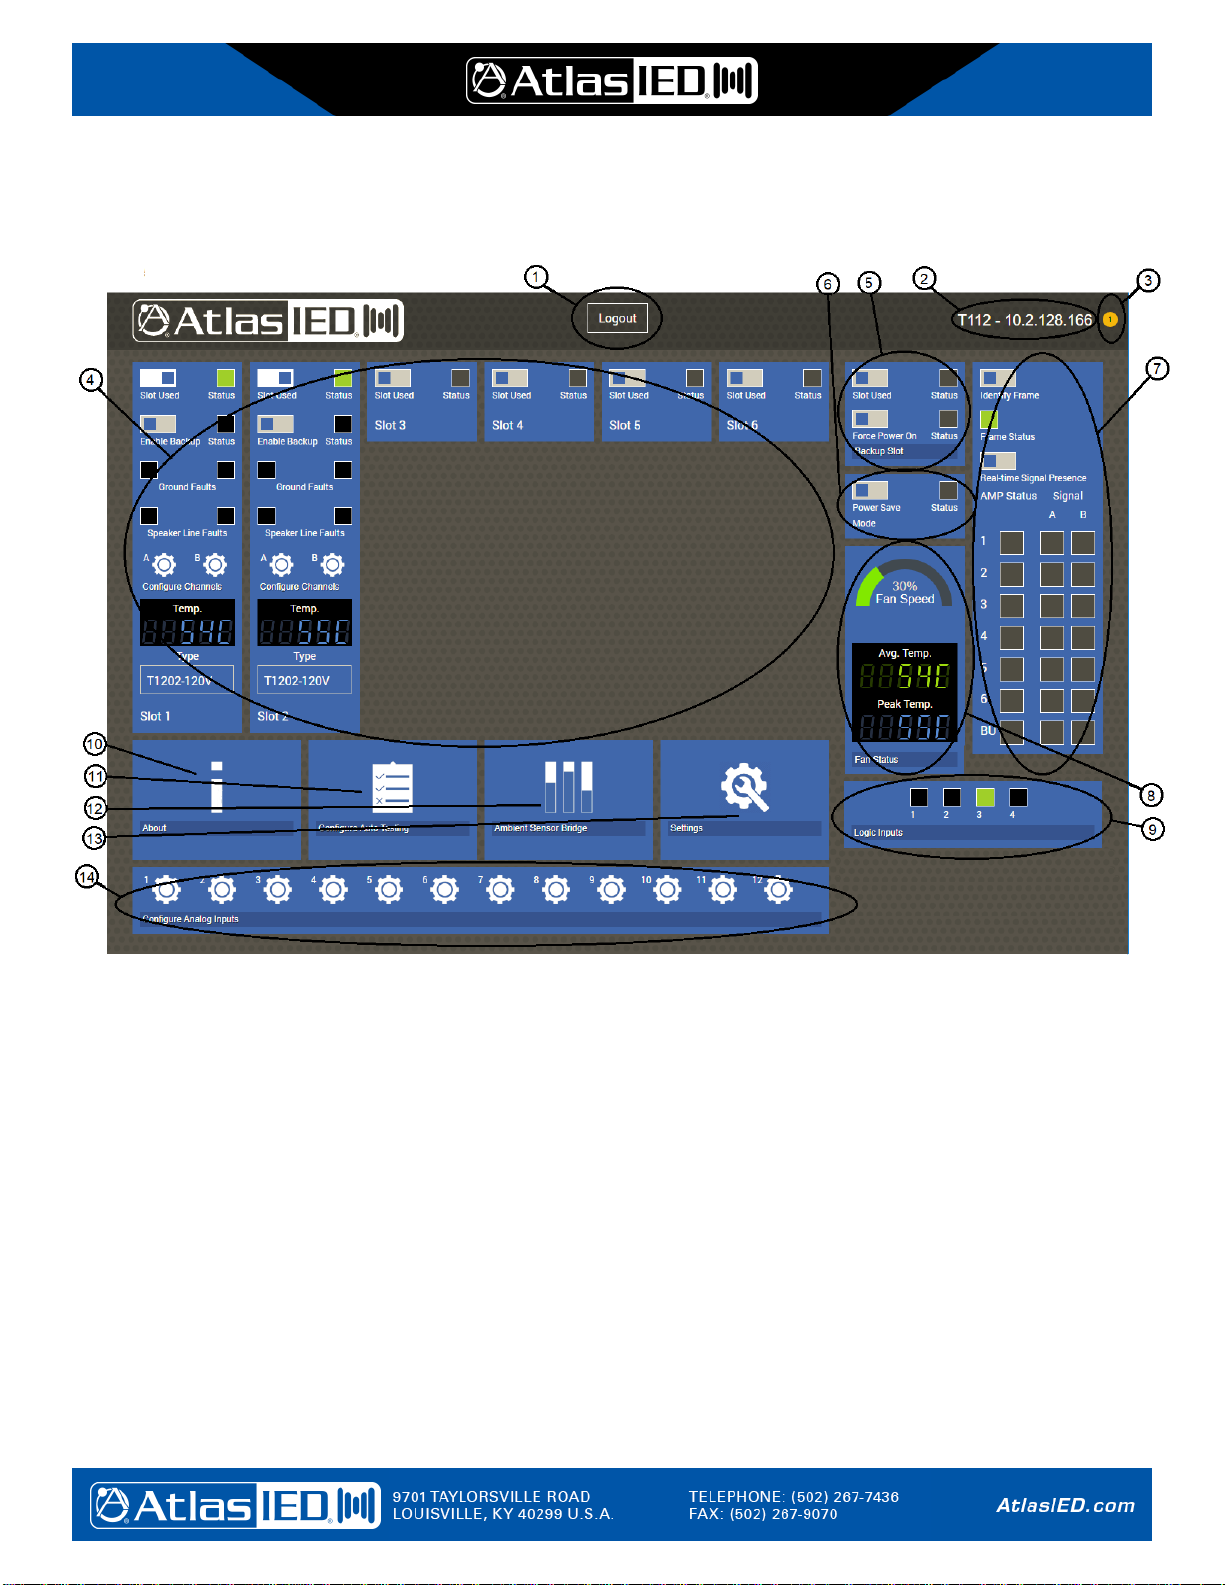
2. T112 Main Screen Features and Operation
The main is the home base for the GUI from which all other screens are accessed. Below is a screenshot of the main
screen with sections of the screen marked. Each of these sections is described below.
Logout
Click on this button/label to log out of the T112 and return to the login screen.
Product Identifier
Product type (T112) and network address of the unit connected to.
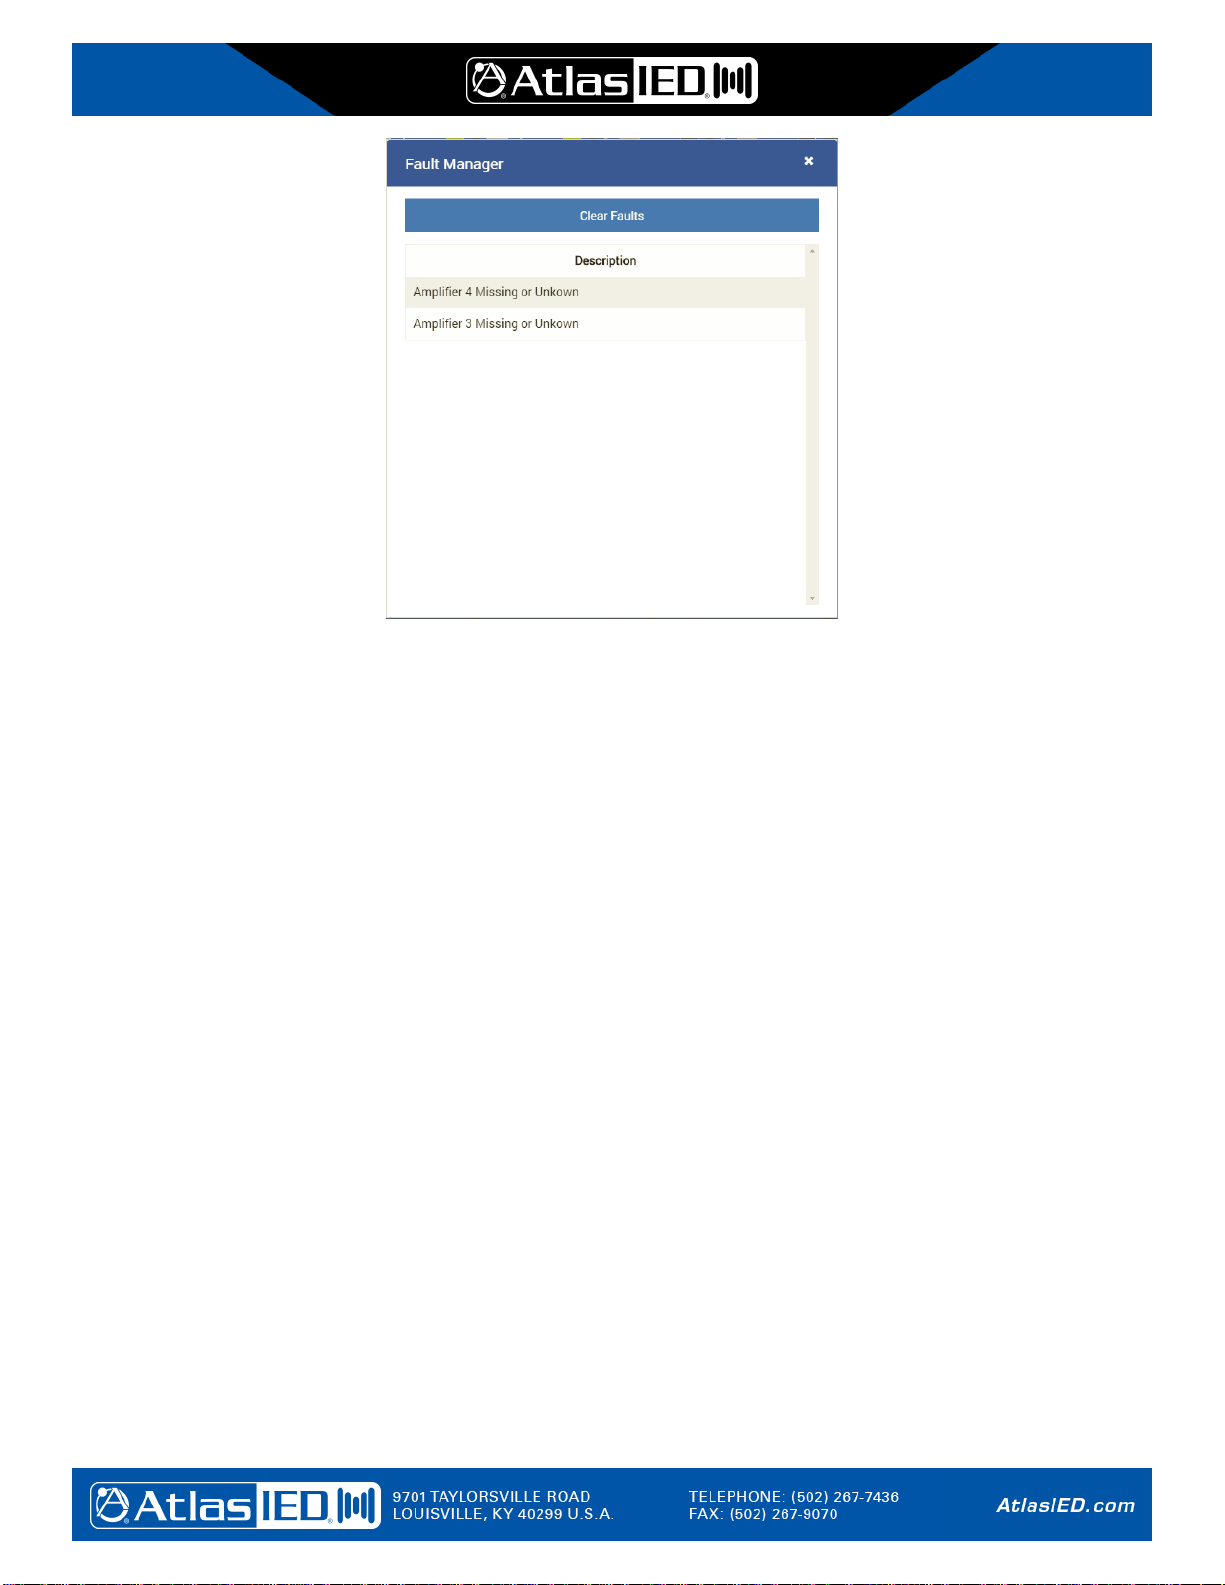
Fault Indicator
Appears when faults are present in the system. Clicking on it brings up a list of faults such as the example below.
On this window, the Clear Faults button can be used to clear the faults from the system. If the fault condition
continues to exist, the fault will re-occur as part of the normal supervision functions of the T112.
©2017 Atlas Sound L.P. and Innovative Electronic Designs, LLC. All Rights Reserved. The Atlas “Circle A”, Soundolier, and Atlas Sound are trademarks of Atlas Sound L.P. IED is a registered trademark of Innovative Electronic Designs, LLC.
All other trademarks are the property of their respective owners. All specs are subject to change without notice. Doc: 1225C Ver:1.0 6/25/2018
8
T112 Stand-Alone
User Manual
Amp Card Status & Control Panels (6 total)
There is one of these sections for each of the six primary amplifier cards slots in the frame. The items in this area
are:
Slot Used Control
Slider control to indicate whether this slot is filled with an amplifier (or line driver) card or not.
Overall Status Indicator
The overall status of the amplifier or line driver card in this slot. This will match the amp status indicator in
section of this page if Real-time Signal Presence is enabled. The meanings of the indicator colors are:
Solid Green –Amplifier is powered on and operating normally
Solid Yellow –Amplifier has a fault condition
Solid Red –Amplifier is processing audio for an alarm (e.g., emergency/evacuation message)
Off –Amplifier is powered off or is not used
Enable Backup Control
Whether the amplifier or line driver card in this slot can be backed up or not.
Backup Status Indicator
When green, it indicates that the amplifier or line driver card in this slot is currently backed up.
Ground Fault Indicators
There are two indicators –for channels A and B –that turn yellow when there is a ground fault on the speaker
line connected to the channel.
Speaker Line Fault Indicators
There are two indicators –for channels A and B –that turn yellow when there is a speaker line short, open or
out of tolerance test condition on the channel.

©2017 Atlas Sound L.P. and Innovative Electronic Designs, LLC. All Rights Reserved. The Atlas “Circle A”, Soundolier, and Atlas Sound are trademarks of Atlas Sound L.P. IED is a registered trademark of Innovative Electronic Designs, LLC.
All other trademarks are the property of their respective owners. All specs are subject to change without notice. Doc: 1225C Ver:1.0 6/25/2018
9
T112 Stand-Alone
User Manual
Type
Displays the amplifier type detected for that slot.
Temp
Displays the amplifier temperature (Celsius) for the amplifier in that slot.
Configure Channels (A and B) Icons
Clicking on one of these gear icons jumps to the Amplifier Configuration Channel screen for the selected
channel (see Chapter 3).
Backup Amplifier Status & Control Panel
This section pertains to the backup amplifier slot in the T112 frame. The items in this area are:
Slot Used Control
Control to indicate whether there is a backup amp (or line driver) card in the slot that can be used for backup.
Backup Amp Status Indicator
Overall status for the backup amplifier with possible colors of black, green and yellow with same meanings as
for primary amplifier statuses (i.e., off, on, fault). Note, that if the backup amplifier is not forced to be powered
on always, then when backup is not required, this indicator will be black since the amp is powered down.
Force Power On Control
Whether to power up the backup amplifier all the time, such as to verify it can power up properly during frame
testing. Normally, the backup amp is only powered up when required for backup (auto-power mode).
Backup Status Indicator
Turns green when currently backing up a primary amplifier.
Power Status/Controls Panel
This section pertains to power control on the amplifiers. The amplifiers can be powered off when not needed by
putting the frame into Power Save Mode (e.g., to conserve energy or backup battery life).
Power Save Mode Control
When in the On position, the frame is forced into Power Save Mode, where the amplifiers are all powered off
unless required for periodic supervision of the speaker lines or for (emergency) announcements.
Power Save Mode Status Indicator
This indicator is green when the unit is in Power Save Mode, whether via the control on this screen, logic
input or network command.
Overall Frame Status Panel
This portion of the main screen is intended to mirror the status indicators
shown on the front of the T112 hardware (such as shown at right). The
indicators/controls in this panels are as follows:
Identify Frame Control
Switching this to ON, causes all the LEDs on the front of the hardware
frame to flash, allowing one to physically locate/identify the frame in an
equipment room or rack.

©2017 Atlas Sound L.P. and Innovative Electronic Designs, LLC. All Rights Reserved. The Atlas “Circle A”, Soundolier, and Atlas Sound are trademarks of Atlas Sound L.P. IED is a registered trademark of Innovative Electronic Designs, LLC.
All other trademarks are the property of their respective owners. All specs are subject to change without notice. Doc: 1225C Ver:1.0 6/25/2018
10
T112 Stand-Alone
User Manual
Frame Status Indicator
This somewhat mirrors the same LED on the front of the T112 hardware. The colors on these indicators have
the following meaning:
Solid Green –unit is powered up and running normally.
Solid Yellow –unit has a fault of some kind.
Real-Time Signal Presence Control
Normally, the real-time indicators below this control are not enabled to reduce overhead traffic between the
web page and the frame. Turning this to On, activates the indicators.
Amp Status Indicators (7 total)
There is one amp status indicator for each of the six main amplifiers (card slots) and for the backup amplifier.
The colors of these indicators have the following meanings:
Solid Green –amplifier is powered up and operating normally
Solid Yellow –amplifier has a fault condition
Solid Red –amplifier is processing audio for an alarm (emergency/evacuation message).
Off –amplifier is powered off or no amplifier is inserted in that slot.
Signal Indicators A and B (14 Total)
There is one signal indicator for each channel of each amplifier card for indicating signal presence and
clipping conditions. The colors of these indicators have the following meanings:
Flickering Green –indicates signal presence above detection threshold.
Flickering/Solid Yellow –indicates signal is being clipped. This may be seen as alternating green-yellow
as the signal goes above or below the clipping level.
Flickering Red –indicates signal presence above detection threshold during an alarm (when amp status
indicator is also red).
Fan Status Panel
This section shows the current fan speed in RPM on the dial indicator along with temperature and fan status
information. Besides the speed dial, the panel also has average and peak temperature readouts which display
both the average temperature inside the T112 frame and the highest current temperature of any amplifier (since
some amplifiers may run hotter than others due to their work load or other factors).
Logic Input Status Panel
The current state of the four logic inputs are shown by green or off indicators labeled 1..4.
About Page
Information about the product such as firmware version and copyright information (see Chapter 6).
(11) Configure Auto Testing Launch Button
Clicking anywhere in this button/panel will jump to the Configure Automated Testing Screen (see Chapter 7).
(12) Ambient Sensor Bridge Launch Button
Clicking anywhere in this button/panel will jump to the Ambient Sensor Meter Bridge Screen (see Chapter 8).

©2017 Atlas Sound L.P. and Innovative Electronic Designs, LLC. All Rights Reserved. The Atlas “Circle A”, Soundolier, and Atlas Sound are trademarks of Atlas Sound L.P. IED is a registered trademark of Innovative Electronic Designs, LLC.
All other trademarks are the property of their respective owners. All specs are subject to change without notice. Doc: 1225C Ver:1.0 6/25/2018
11
T112 Stand-Alone
User Manual
(13) Network Settings Launch Button
Clicking anywhere in this button/panel will jump to the Network Settings Screen (see Chapter 9).
(14) Configure Analog Inputs Panel
On this panel, one can click on the gear icon for any of the 12 analog audio inputs of the T112 frame to jump to
the Configure Analog Input screen for that input (see Chapter 4).
©2017 Atlas Sound L.P. and Innovative Electronic Designs, LLC. All Rights Reserved. The Atlas “Circle A”, Soundolier, and Atlas Sound are trademarks of Atlas Sound L.P. IED is a registered trademark of Innovative Electronic Designs, LLC.
All other trademarks are the property of their respective owners. All specs are subject to change without notice. Doc: 1225C Ver:1.0 6/25/2018
12
T112 Stand-Alone
User Manual
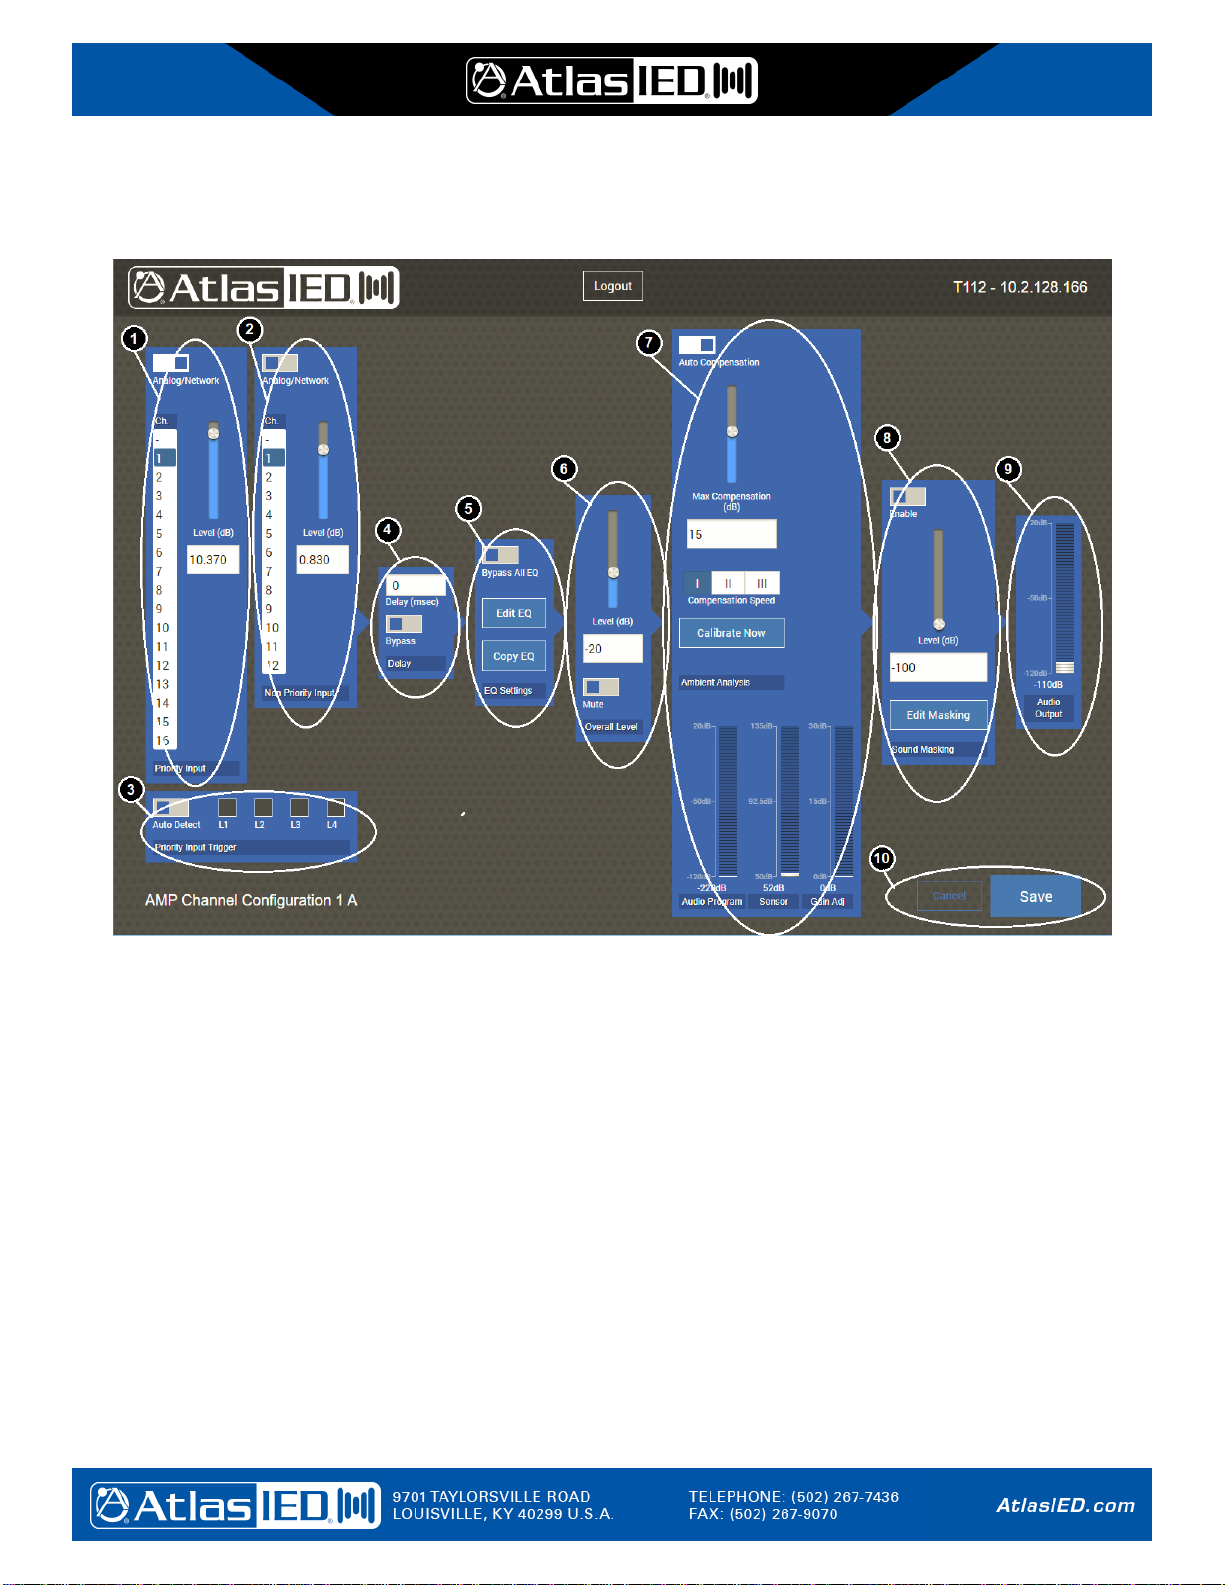
3. Amplifier Channel Configuration Screen
The Amplifier Channel Configuration Screen can be accessed for any of the 12 channels in the system 1A, 1B, 2A, 2B,
etc. and appears as shown below. The sections on this screen and the indicators/controls are described below.
/Priority Input Panel / Non-Priority Input Panel
These controls are used to configure the priority audio input and non-priority audio input. The non-priority input is
typically something like background music (BGM). The priority input is typically something like a paging input or
emergency input that will duck the non-priority input audio when activated or present. The controls in these
panels are as follows:
Analog/Network Selector
Select whether the priority or non-priority audio is coming from one of the 12 analog inputs on the rear of the
T112 frame or from a network audio (Dante) channel. This choice changes the interpretation of the channel
selector on the left to be analog input channel or network audio channel.
Input Selector
This control acts like a set of radio buttons, making one selection undoes a previous selection so only one
input or another is selected as the source for priority or non-priority audio.
Level Control
This control is used to adjust the priority or non-priority input level. One may either click and drag the “knob”
in the slider control or enter a value in the edit box below.

©2017 Atlas Sound L.P. and Innovative Electronic Designs, LLC. All Rights Reserved. The Atlas “Circle A”, Soundolier, and Atlas Sound are trademarks of Atlas Sound L.P. IED is a registered trademark of Innovative Electronic Designs, LLC.
All other trademarks are the property of their respective owners. All specs are subject to change without notice. Doc: 1225C Ver:1.0 6/25/2018
13
T112 Stand-Alone
User Manual
Priority Input Trigger Panel
This panel is used to determine how/when the priority input audio becomes active. The Auto Detect control is
used to enable audio detection on the priority input source signal and use that to active the priority audio (and
duck the non-priority audio). Also shown in this area are four logic input indicators. When a logic input is
configured to activate the priority input for this amplifier channel, this is indicated by a green indicator here. Note,
more than one logic input can be configured to activate the priority input. The actual configuration is done on the
Logic Input Configuration screen (see Chapter 5).
Delay Settings Panel
In this panel, the user can set the audio delay value for this amplifier channel and also (temporarily) bypass all
delay via the bypass selector.
EQ Settings Panel
In this panel, the user can launch the EQ Settings Window for this amplifier
channel (see Section 3.1) and also bypass all EQ settings via the bypass
selector. The user can also copy the EQ settings from another channel by
clicking on the Copy EQ button. When clicked the pop-up window as shown at
right appears. One can select the channel to copy from in the drop list, and then
click on the Copy button to transfer a copy of the EQ settings for that other
channel to the current channel.
Overall Level Panel
The overall level driving the amplifier for this channel is adjusted in this panel. One may either click and drag
the “knob” in the slider control or enter a value in the edit box below. The Mute selector may be used to
(temporarily) mute this amplifier channel entirely (i.e., set to maximum attenuation).
Ambient Analysis Settings Panel
In this panel, the user can configure the ambient analysis feature (AtlasIED patented AlwaysHEARTM technology)
for this amplifier channel. The controls in this panel are:
Auto Compensation Selector
This is used to turn this AlwaysHEAR feature on or off for this amplifier channel. The
other controls on this panel only apply when this is in the On position. When in the Off
position, the panel appears as shown at right. When one changes its state from Off, to
On, one is prompted to calibration the channel. If no configuration has
been done yet, one can click on the close X in the upper right to go ahead
without calibrating at this time.
Max Compensation Control
This control is used to set the maximum amount of level control to apply
to this amplifier channel (0 to 20 dB). One may either click and drag the
box in the slider control, enter a value in the edit box below or use the
up/down arrows that appear in the edit box, such as shown at right.
Compensation Speed Selector
This three-position selector is used to set the speed at which the system will adjust the compensation level.
The three selections, indicated graphically, are slow, medium and fast.
Calibrate Now Button
This button is used to initiate a calibration of AlwaysHEAR on this amplifier channel. Clicking on this brings
up the pop-up as shown above to proceed with the Calibration at this time.

©2017 Atlas Sound L.P. and Innovative Electronic Designs, LLC. All Rights Reserved. The Atlas “Circle A”, Soundolier, and Atlas Sound are trademarks of Atlas Sound L.P. IED is a registered trademark of Innovative Electronic Designs, LLC.
All other trademarks are the property of their respective owners. All specs are subject to change without notice. Doc: 1225C Ver:1.0 6/25/2018
14
T112 Stand-Alone
User Manual
Sound Masking Settings Panel
Each channel can have its own sound masking noise mixed in on top of non-priority or priority input audio. The
controls in this section are used to enable masking noise for this amplifier channel.
Enable Selector
This control enables sound masking noise or not, in accordance with current settings.
Level Control
This control is used to set the overall level of the masking noise (0 to -50 dB). One may either click and drag
the “knob” in the slider control or enter a value in the edit box below.
Edit Masking Button
This button is used to jump to the Sound Masking Settings Window (see section 3.2). The settings primarily
concern the equalization needed to shape the noise for the installation conditions and space.
Channel Level Meter
Use to view the audio passing through the channel in near real time.
Cancel/Save Buttons
One may close the Amplifier Channel Configuration screen via either of these two buttons, one saving all the
changes made and the other discarding any changes.

©2017 Atlas Sound L.P. and Innovative Electronic Designs, LLC. All Rights Reserved. The Atlas “Circle A”, Soundolier, and Atlas Sound are trademarks of Atlas Sound L.P. IED is a registered trademark of Innovative Electronic Designs, LLC.
All other trademarks are the property of their respective owners. All specs are subject to change without notice. Doc: 1225C Ver:1.0 6/25/2018
15
T112 Stand-Alone
User Manual
3.1 EQ Settings Window
The EQ settings can be adjusted via the EQ Settings pop-up window, such as the example shown below. The areas in
this window are described below. The X at top right is used to close this pop-up. The settings are saved when the save
button is pressed on the amplifier channel configuration screen from which this pop-up was launched (or are discarded if
Cancel is pressed instead).
Frequency Response Graph
In this area, an approximation of the frequency response (level) is shown. This area changes in response to the
EQ band controls below it. However, the graphic area can also be used interactively. When the cursor nears one
of the plot points (dots indicating center frequency of the band), a flyover box appears that shows the frequency
and level for the band/point. One can click on the point and drag it up/down to change the level value.

©2017 Atlas Sound L.P. and Innovative Electronic Designs, LLC. All Rights Reserved. The Atlas “Circle A”, Soundolier, and Atlas Sound are trademarks of Atlas Sound L.P. IED is a registered trademark of Innovative Electronic Designs, LLC.
All other trademarks are the property of their respective owners. All specs are subject to change without notice. Doc: 1225C Ver:1.0 6/25/2018
16
T112 Stand-Alone
User Manual
Make All Flat Button
Pressing this button prompts to do the operation first with a Yes/No prompt box. If Yes is selected, then all bands
are set to 0 dB level. Filter type “None” and bandwidth 1.0 Octaves. Note, this operation is not reversible directly,
but will not be saved if one presses the Cancel button on the Amplifier Channel Configuration screen that this
launched from.
Band Type Selector
Each EQ band has a selector with the choices of none, hi pass, low pass, peaking and notch. This choice works
like radio buttons, where selecting one deselects the previous choice.
Frequency Edit Box
The center frequency or “knee” of the band (depending on band type) is entered in this edit box.
Bandwidth Edit Box
For peaking or notch type filters, this is the 3 dB bandwidth measured in octaves. (For example, a third-octave
filter band would have a bandwidth of 0.33.) The value may be typed into the box.
Level Control
This control can set the boost of cut for the band from -15 to +15 dB. One may either click and drag the box in the
slider control, or enter a value in the edit box it.
Bypass Selector
The EQ band processing can be (temporarily) bypassed via this control.
©2017 Atlas Sound L.P. and Innovative Electronic Designs, LLC. All Rights Reserved. The Atlas “Circle A”, Soundolier, and Atlas Sound are trademarks of Atlas Sound L.P. IED is a registered trademark of Innovative Electronic Designs, LLC.
All other trademarks are the property of their respective owners. All specs are subject to change without notice. Doc: 1225C Ver:1.0 6/25/2018
17
T112 Stand-Alone
User Manual
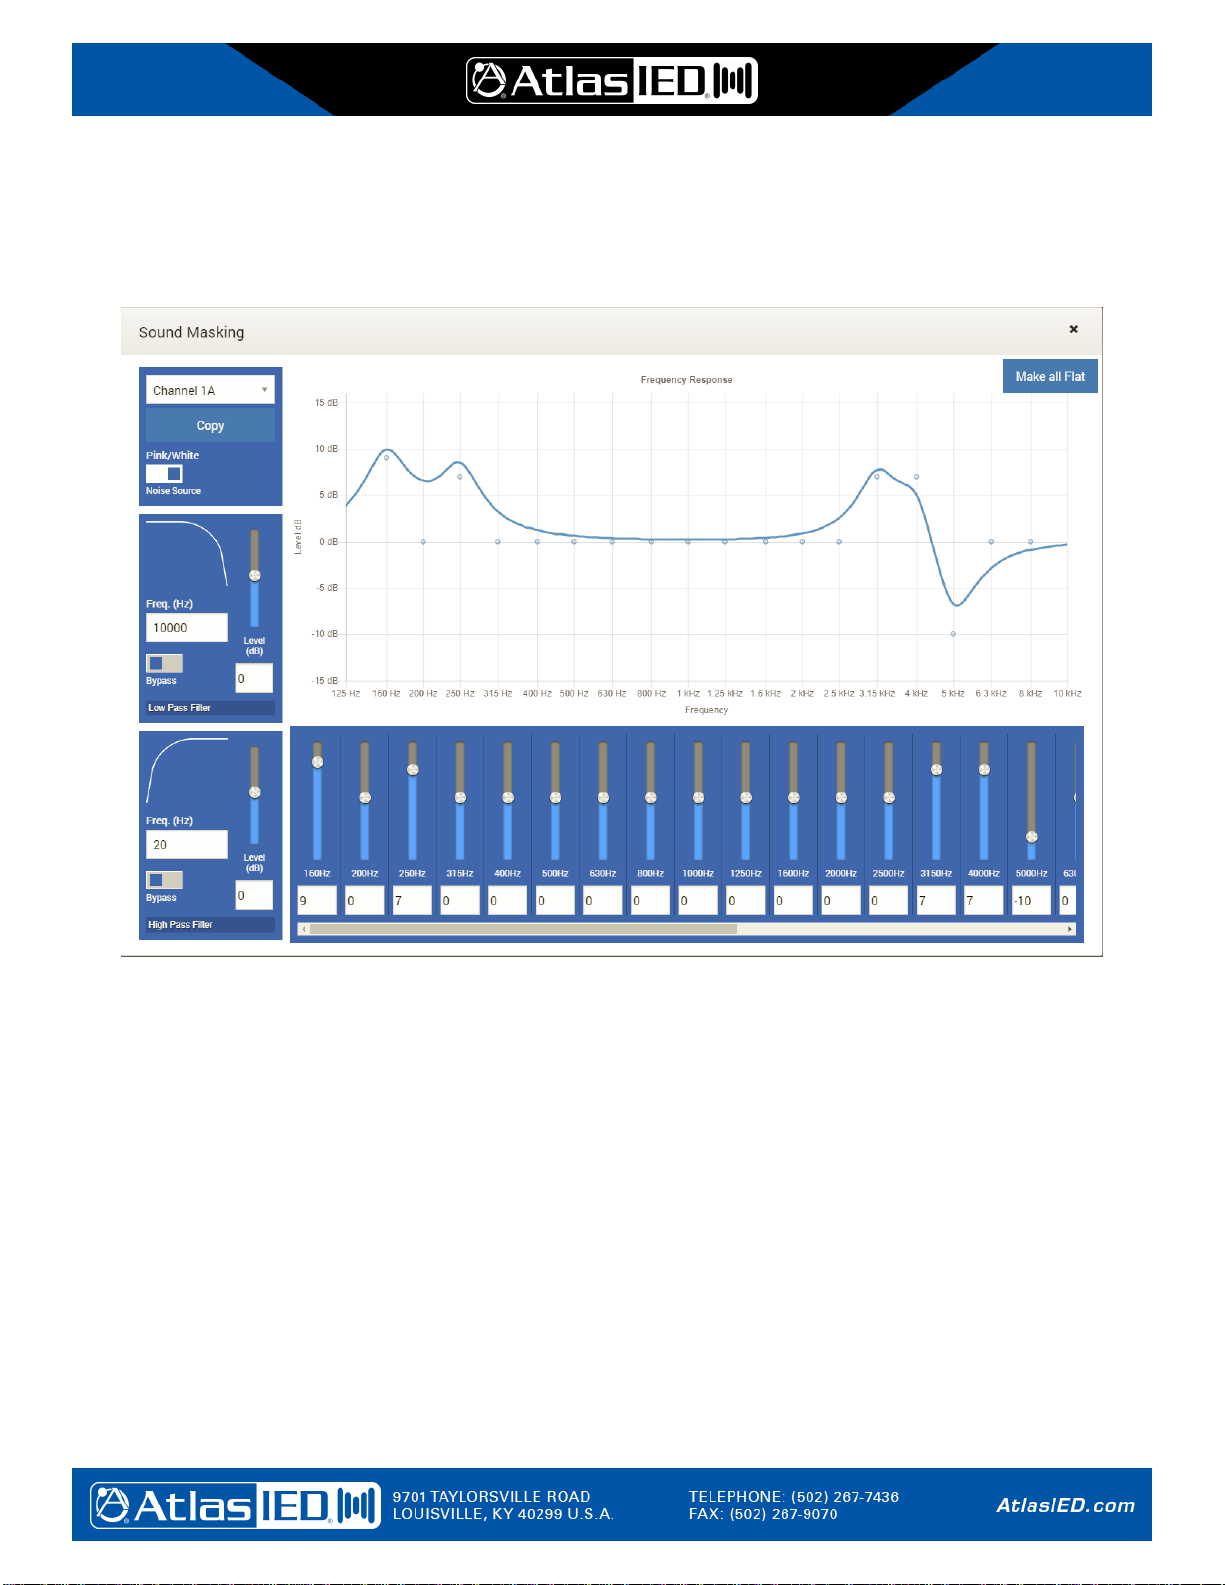
3.2 Sound Masking Settings Window
The sound masking settings for each amplifier channel are configured in a pop-up window such as the one shown below.
If one wishes to copy the settings from another channel into this one, this is done by selecting the channel in the top left
box and then pressing the copy button. This window is closed via the X at top right. The settings are saved/ discarded
when the save/cancel button is pressed on the amp channel configuration screen from which this was launched.
Noise Source Selector
One may select either pink or white noise as the source for this channel via this selector.
Low Pass Filter Controls
One may configure the low pass filter roll-off (“knee”) frequency and level via these controls. Optionally, the filter
may be (temporarily) bypassed via the bypass selector.
High Pass Filter Controls
One may configure the high pass filter roll-off (“knee”) frequency and level via these controls. Optionally, the filter
may be (temporarily) bypassed via the bypass selector.
Third Octave Filter Band Controls
The level for each third octave filter can be controlled via the appropriate slider under the Frequency Response
graph. It may be necessary to operate the slider on the bottom to see all the available bands.
The window is closed, and the user returned to the amplifier channel screen via the close X in the upper right corner.

©2017 Atlas Sound L.P. and Innovative Electronic Designs, LLC. All Rights Reserved. The Atlas “Circle A”, Soundolier, and Atlas Sound are trademarks of Atlas Sound L.P. IED is a registered trademark of Innovative Electronic Designs, LLC.
All other trademarks are the property of their respective owners. All specs are subject to change without notice. Doc: 1225C Ver:1.0 6/25/2018
18
T112 Stand-Alone
User Manual
4. Configure Analog Input Screen
Each of the 12 analog audio inputs on the T112 frame may be configured via the screen such as shown below. The
indicated features are described below.
Input Level Panel
One can adjust lower level line inputs by as much +20 dB using the control in this panel. One may either click
and drag the box in the slider control or enter a value in the edit box below it. The input may be (temporarily)
muted (set to maximum attenuation) via the Mute selector available here.
Compressor Panel
Optionally, a compressor may be configured for this input by setting the properties (typing into the edit boxes)
shown here. The compressor function may be (temporarily) bypassed via the bypass selector.
EQ Panel
One may access the EQ settings for this input via the Edit EQ Settings button. This
calls up the EQ Settings window (see section 4.1). Optionally, one may (temporarily)
bypass the EQ processing via the bypass selector. The user can also copy the EQ
settings from another channel by clicking on the Copy EQ button. When clicked the
pop-up window as shown at right appears. One can select the channel to copy from
in the drop list, and then click on the Copy button to transfer a copy of the EQ
settings for that other channel to the current channel.
Cancel/Save Buttons
One may close this screen via either of these two buttons, one saving all the changes made and the other
discarding any changes.

©2017 Atlas Sound L.P. and Innovative Electronic Designs, LLC. All Rights Reserved. The Atlas “Circle A”, Soundolier, and Atlas Sound are trademarks of Atlas Sound L.P. IED is a registered trademark of Innovative Electronic Designs, LLC.
All other trademarks are the property of their respective owners. All specs are subject to change without notice. Doc: 1225C Ver:1.0 6/25/2018
19
T112 Stand-Alone
User Manual
4.1 Analog Input EQ Settings Window
There are five bands of parametric equalization available on each analog input. These can be adjusted via the controls
on shown in the example below, and explained below that.
Frequency Response Graph
In this area, an approximation of the frequency response (level) is shown. This area changes in response to the
EQ band controls below it. However, the graphic area can also be used interactively. When the cursor nears one
of the plot points (dots indicating center frequency of the band), a flyover box appears that shows the frequency
and level for the band/point. One can click on the point and drag it up/down to change the level value.

©2017 Atlas Sound L.P. and Innovative Electronic Designs, LLC. All Rights Reserved. The Atlas “Circle A”, Soundolier, and Atlas Sound are trademarks of Atlas Sound L.P. IED is a registered trademark of Innovative Electronic Designs, LLC.
All other trademarks are the property of their respective owners. All specs are subject to change without notice. Doc: 1225C Ver:1.0 6/25/2018
20
T112 Stand-Alone
User Manual
Make All Flat Button
Pressing this button prompts to do the operation first with a Yes/No prompt box. If Yes is selected, then all bands
are set to 0 dB level. Filter type “None” and bandwidth 1.0 Octaves. Note, this operation is not reversible directly,
but will not be saved if one presses the Cancel button on the Amplifier Channel Configuration screen that this
launched from.
Band Type Selector
Each EQ band has a selector with the choices of none, hi pass, low pass, peaking and notch. This choice works
like radio buttons, where selecting one deselects the previous choice.
Frequency Edit Box
The center frequency or “knee” of the band (depending on band type) is entered in this edit box.
Bandwidth Edit Box
For peaking or notch type filters, this is the 3 dB bandwidth measured in octaves. (For example, a third-octave
filter band would have a bandwidth of 0.33.) The value may be typed into the box.
Level Control
This control can set the boost of cut for the band from -15 to +15 dB. One may either click and drag the box in the
slider control, enter a value in the edit box below or use the up/down arrows that appear in the edit box.
Bypass Selector
The EQ band processing can be (temporarily) bypassed via this control.
Table of contents


