Classic Cantabile CPK-303 User manual
Classic Cantabile
CPK-303
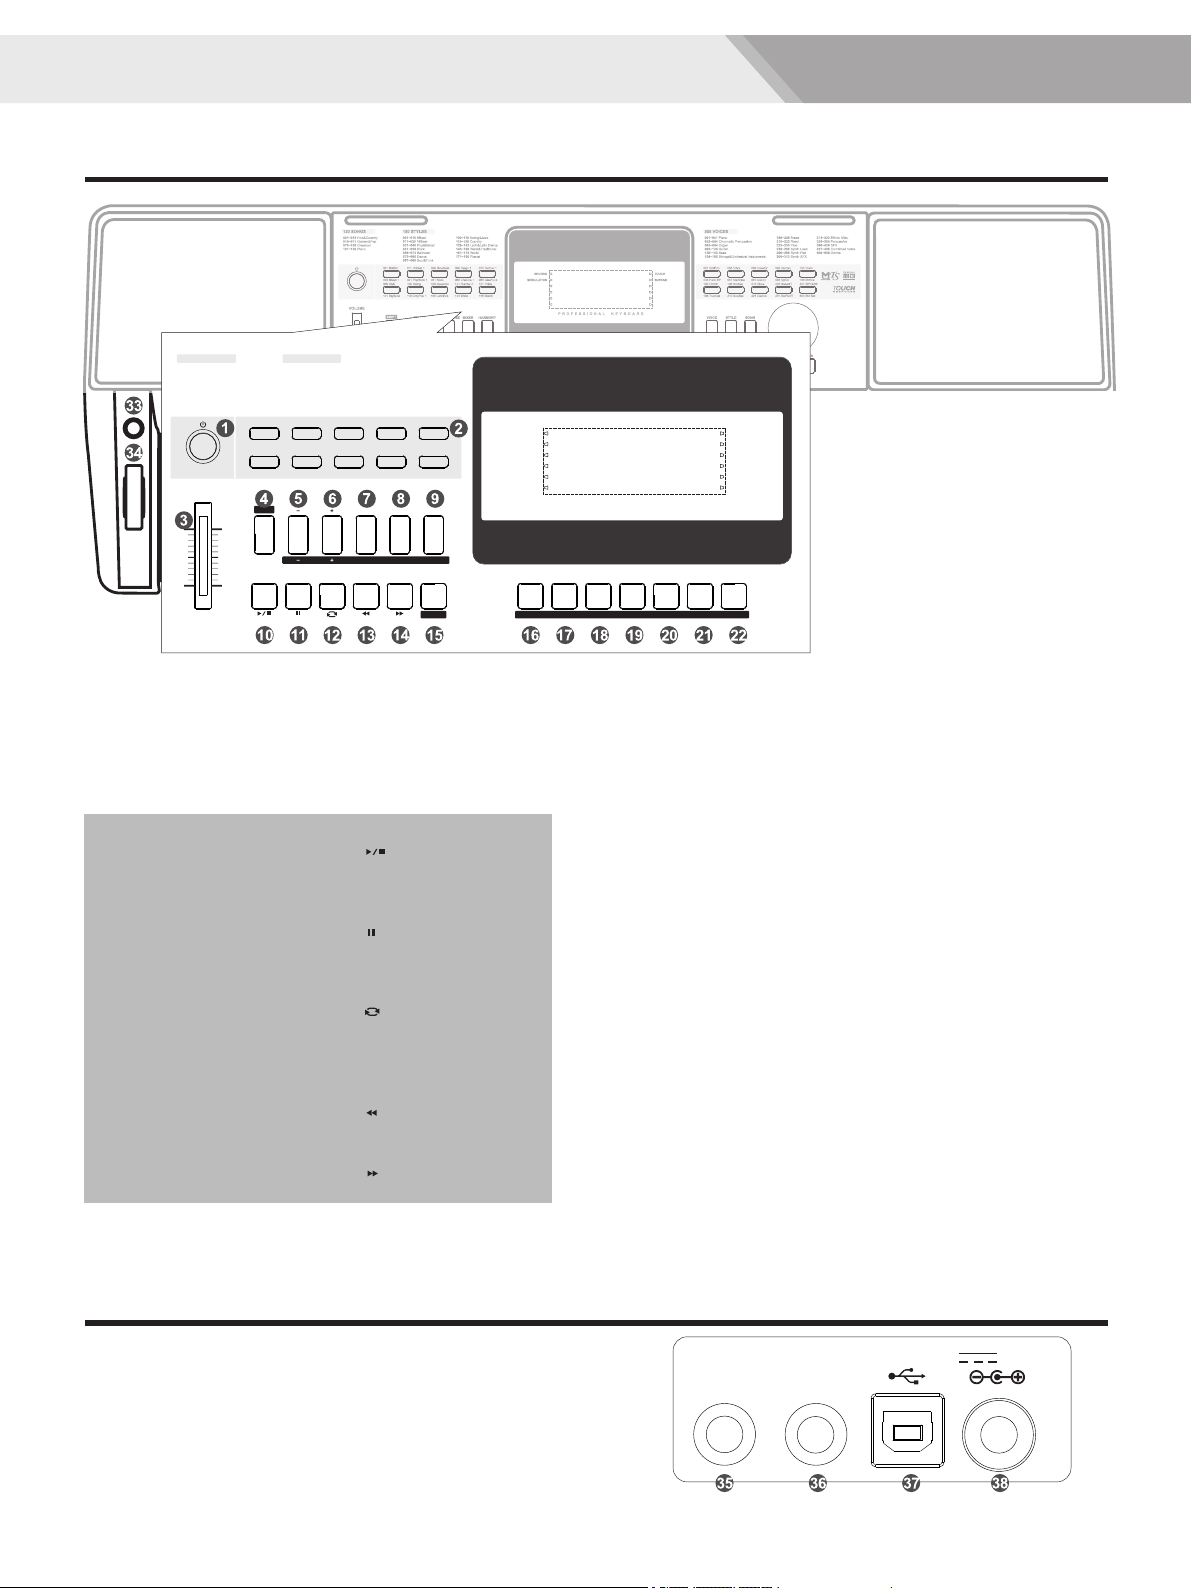
Owner’s Manual
Version 07/2019

2
INFORMATION FOR YOUR SAFETY!
Consult the dealer or an experienced radio/TV technician
This equipment has been tested and found to comply with
the limits for a Class B digital device, pursuant to Part 15 of
the FCC Rules.
Connect the equipment into an outlet on a circuit
Unauthorized changes or modification to this system can
void the user's authority to operate this equipment.
Increase the separation between the equipment and
different from that to which the receiver is connected.
These limits are designed to provide reasonable protection
against harmful interference in a residential installation. This
equipment generates, uses, and can radiate radio frequency
energy and, if not installed and used in accordance with the
instructions, may cause harmful interference to radio
communications. However, there is no guarantee that
interference will not occur in a particular installation.
THE FCC REGULATION WARNING (for USA)
If this equipment does cause harmful interference to radio or
television reception, which can be determined by turning the
equipment off and on, the user is encouraged to try to
correct the interference by one or more of the following
measures:
Reorient or relocate the receiving antenna.
receiver.
for help.
CAUTION
The normal function of the product may be disturbed by
Strong Electro Magnetic Interference. If so, simply reset
the product to resume normal operation by following the
owner's manual. In case the function could not resume,
please use the product in other location.
Please connect the designated AC adaptor to an AC outlet
of the correct voltage.
PRECAUTIONS
PLEASE READ CAREFULLY BEFORE PROCEEDING
Please keep this manual in a safe place for future reference.
Power Supply
Do not connect it to an AC outlet of voltage other than that
for which your instrument is intended.
Unplug the AC power adaptor when not using the
instrument, or during electrical storms.
Connections
Before connecting the instrument to other devices, turn off
the power to all units. This will help prevent malfunction and
/ or damage to other devices.
Location
Extreme temperature or humidity
Close to magnetic fields
Interference with other electrical devices
Excessive dusty or dirty location
Strong vibrations or shocks
Radios and televisions placed nearby may experience
reception interference. Operate this unit at a suitable
distance from radios and televisions.
Cleaning
Clean only with a soft, dry cloth.
Do not apply excessive force to the switches or controls.
Do not let paper, metallic, or other objects into the
instrument. If this happens, unplug the AC adaptor from the
wall outlet. Then have the instrument inspected by qualified
service personnel.
Do not expose the instrument to the following conditions to
avoid deformation, discoloration, or more serious damage:
Handling
Direct sunlight
Do not use paint thinners, solvents, cleaning fluids, or
chemical-impregnated wiping cloths.
Disconnect all cables before moving the instrument.

Contents
3
Quick Start Advanced Use Appendices
Styles
Playing Songs.....................................................10
Playing Different Voices with Both hands-LOWER.11
Playing two voices simultaneously-DUAL...............11
Voices
Play Auto Accompaniment(all tracks)......................12
Accompaniment Sections.......................................12
Fade........................................................................13
Function Menu
Tune........................................................................16
Beat Type................................................................17
Chorus Type............................................................18
Reverb Type............................................................17
Chorus Level...........................................................18
Pedal Type..............................................................17
Harmony Type.........................................................18
Advanced Use
Split Point................................................................16
Reverb Level...........................................................18
MIDI IN/ OUT..........................................................19
Select a Voice.........................................................11
EQ Type..................................................................17
Tempo.....................................................................15
Auto Power Off........................................................19
Playing Different Accompaniment Sections............13
Chord Fingering......................................................14
Record..................................................................10
Accompaniment Volume Control.............................13
Play Auto Accompaniment (rhythm track only).......12
Rear Panel................................................................4
Setup
Connections
LCD...........................................................................5
Power/Master Volume
Setting a Music Stand...............................................6
Connecting a Computer ............................................7
Panel & Display Description
Front Panel...............................................................4
Power Supply............................................................6
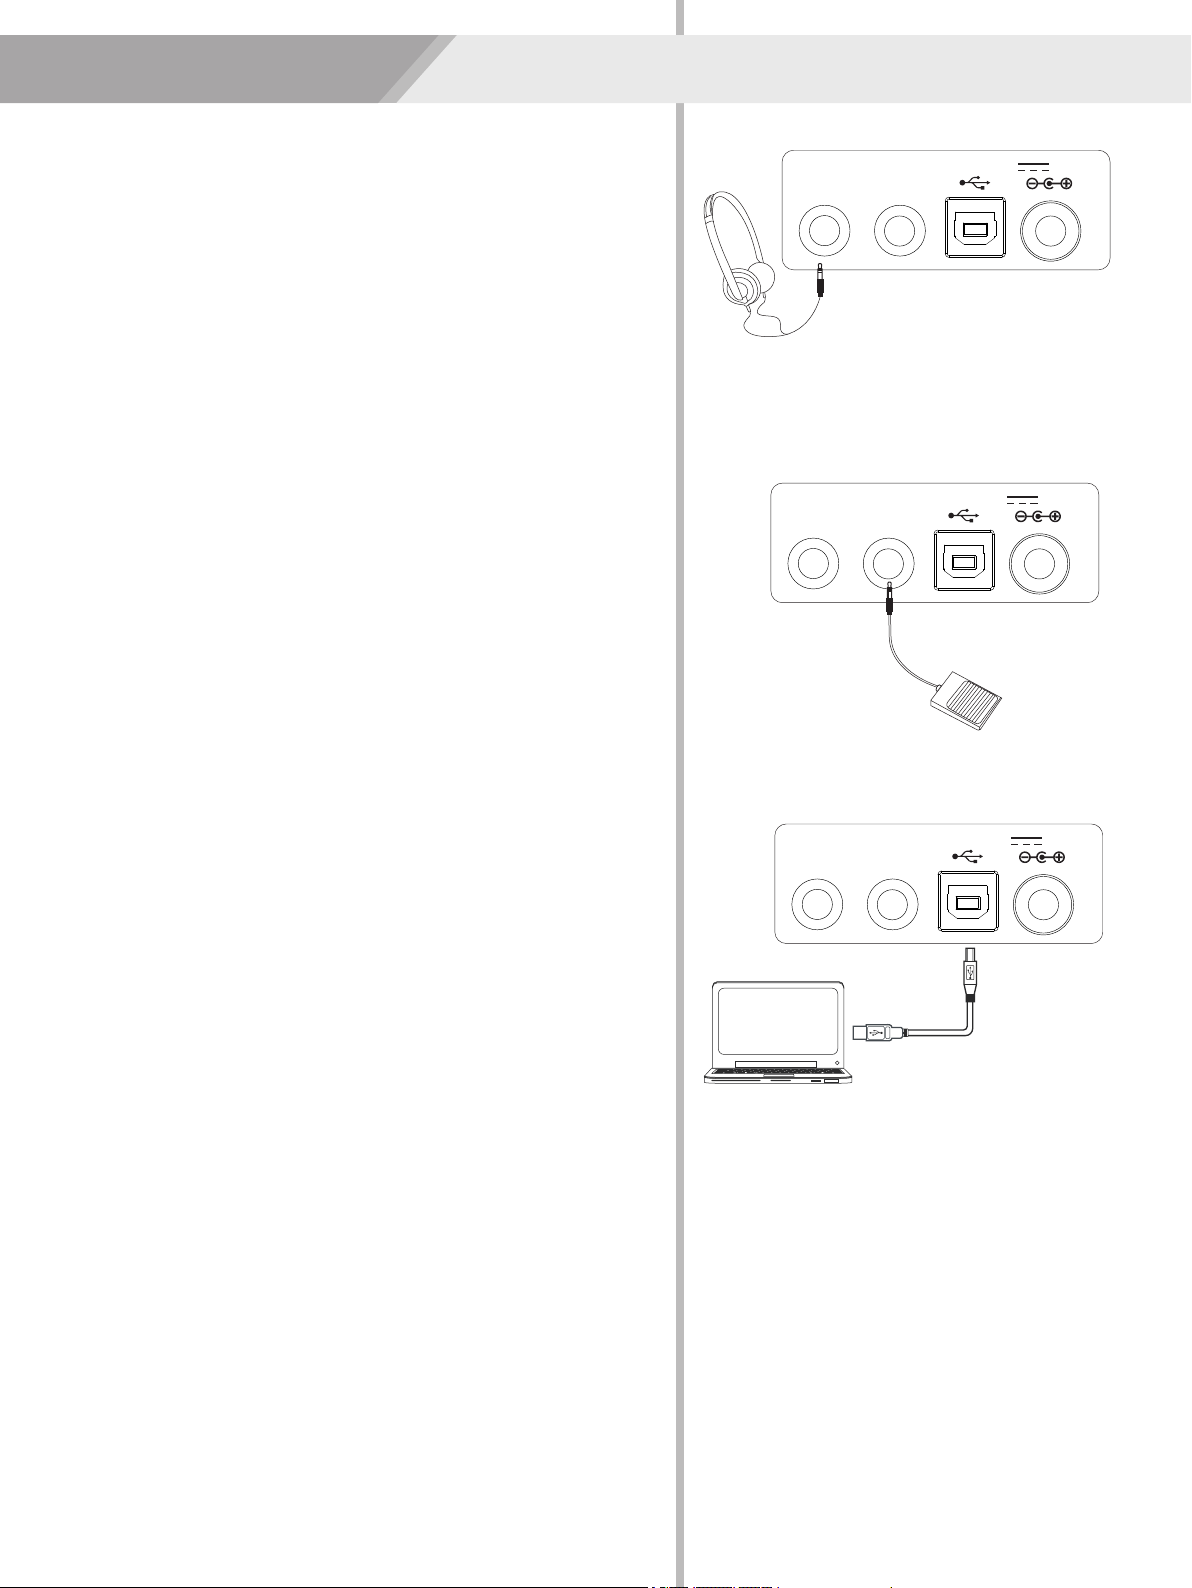
Connecting a pair of Headphones............................7
Using Sustain Pedal..................................................7
Quick Start
Turn the Power On/ Off.............................................8
Adjust the Master Volume.........................................8
Playing Demo Songs...........................................8
Playing Voices......................................................9
Playing Styles.......................................................9
Pitch Bend...............................................................21
Transpose...............................................................21
Touch......................................................................20
Registration Banks..................................................22
Registered Panel Settings......................................22
Mixer......................................................................19
Octave.....................................................................20
Effect Related Settings
Metronome..............................................................20
Modulation..............................................................21
Harmony.................................................................21
Store Parameters to M1-M4....................................22
Sustain....................................................................20
DSP.........................................................................21
Register Memory
Registering the Panel Setting and Recalling the
One Touch Setting.............................................22
Record
Start Recording.......................................................23
Stop Recording.......................................................23
Playback Recording................................................24
Delete User Song....................................................24
Prepare for Recording.............................................23
Playing the Demo Song....................................24
Song
Piano Mode..........................................................25
Listening to the Songs............................................25
Song Control...........................................................25
Style List.................................................................36
MIDI
DICT 1 (Chord Learning Mode)..............................27
Lesson Mode..........................................................26
Pedal Function
What's MIDI?..........................................................29
The main application of MIDI..................................29
MIDI Implementation Chart.....................................40
Appendices
Voice List.................................................................31
Troubleshooting.................................................30
Song List.................................................................38
DICT 2 (Chord Examining Mode)............................27
Exit Chord Dictionary..............................................27
Demo List................................................................39
Chord Dictionary
Multi-function Pedal................................................28
Specifications.....................................................30
VOLUME
FILL A FILL B
START /
STOP
SYNC
START
INTRO /
ENDING
ACCOMP
MIXER
TEMPO
M2 M3 M4 O.T.S.
M1 PIANO DEMO / NO
SHIFT
FADE
METRONOME
BANK STORE
DUAL LOWER TOUCH
OCTAVE TRANSPOSE
RECORD PLAY DSP
SUSTAIN
VOICE STYLE SONG
HARMONY
DICT.
LESSON
LR
&
FUNCTION
120 SONGS 180 STYLES 508 VOICES
001~018 Folk&Country
019~071 Golden&Pop
072~100 Classical
101~120 Piano
001~010 8Beat
011~020 16Beat
021~040 Pop&Ballad
041~055 Rock
056~074 Ballroom
075~086 Dance
087~099 Soul&Funk
100~118 Swing&Jazz
119~128 Country
129~142 Latin&Latin Dance
143~160 Waltz&Traditional
161~170 World
171~180 Pianist
001~051 Piano
052~064 Chromatic Percussion
065~094 Organ
095~128 Guitar
129~153 Bass
154~185 Strings&Orchestral Instruments
186~209 Brass
210~222 Reed
223~235 Pipe
236~268 Synth Lead
269~299 Synth Pad
300~313 Synth SFX
314~323 Ethnic Misc.
324~395 Percussive
396~436 SFX
437~499 Combined Voice
500~508 Drums
/ YES
P R O F E S S I O N A L K E Y B O A R D
RECORD
MODULATION
TOUCH
SUSTAIN
CHORD
MODE
055 Vibra
196 BraSec
066 DrawOr
215 Oboe
090 Harmni
225 SweetFl
154 Violin
437 StPn&Str
001 GrdPno
182 OrcHit
046 Funk EP
186 Trumpet
057 Marimba
210 SopSax
087 Acordi
221 Clarine
095 NylGt
231 SwPanFl
168 StrEns
500 Std Set
001 8BtBld
099 R&B
011 16Beat 1
105 Swing
038 SlowBald
129 BosaNov
056 Tango 1
141 Rumba 3
075 Techno 1
151 Polka
101 BigBand
021 PopRock 1
119 CntyPop 1
041 Rock
135 LatinRck
066 ChaCha 1
143 Waltz
088 ClasFunk
156 March
003 8Beat 1
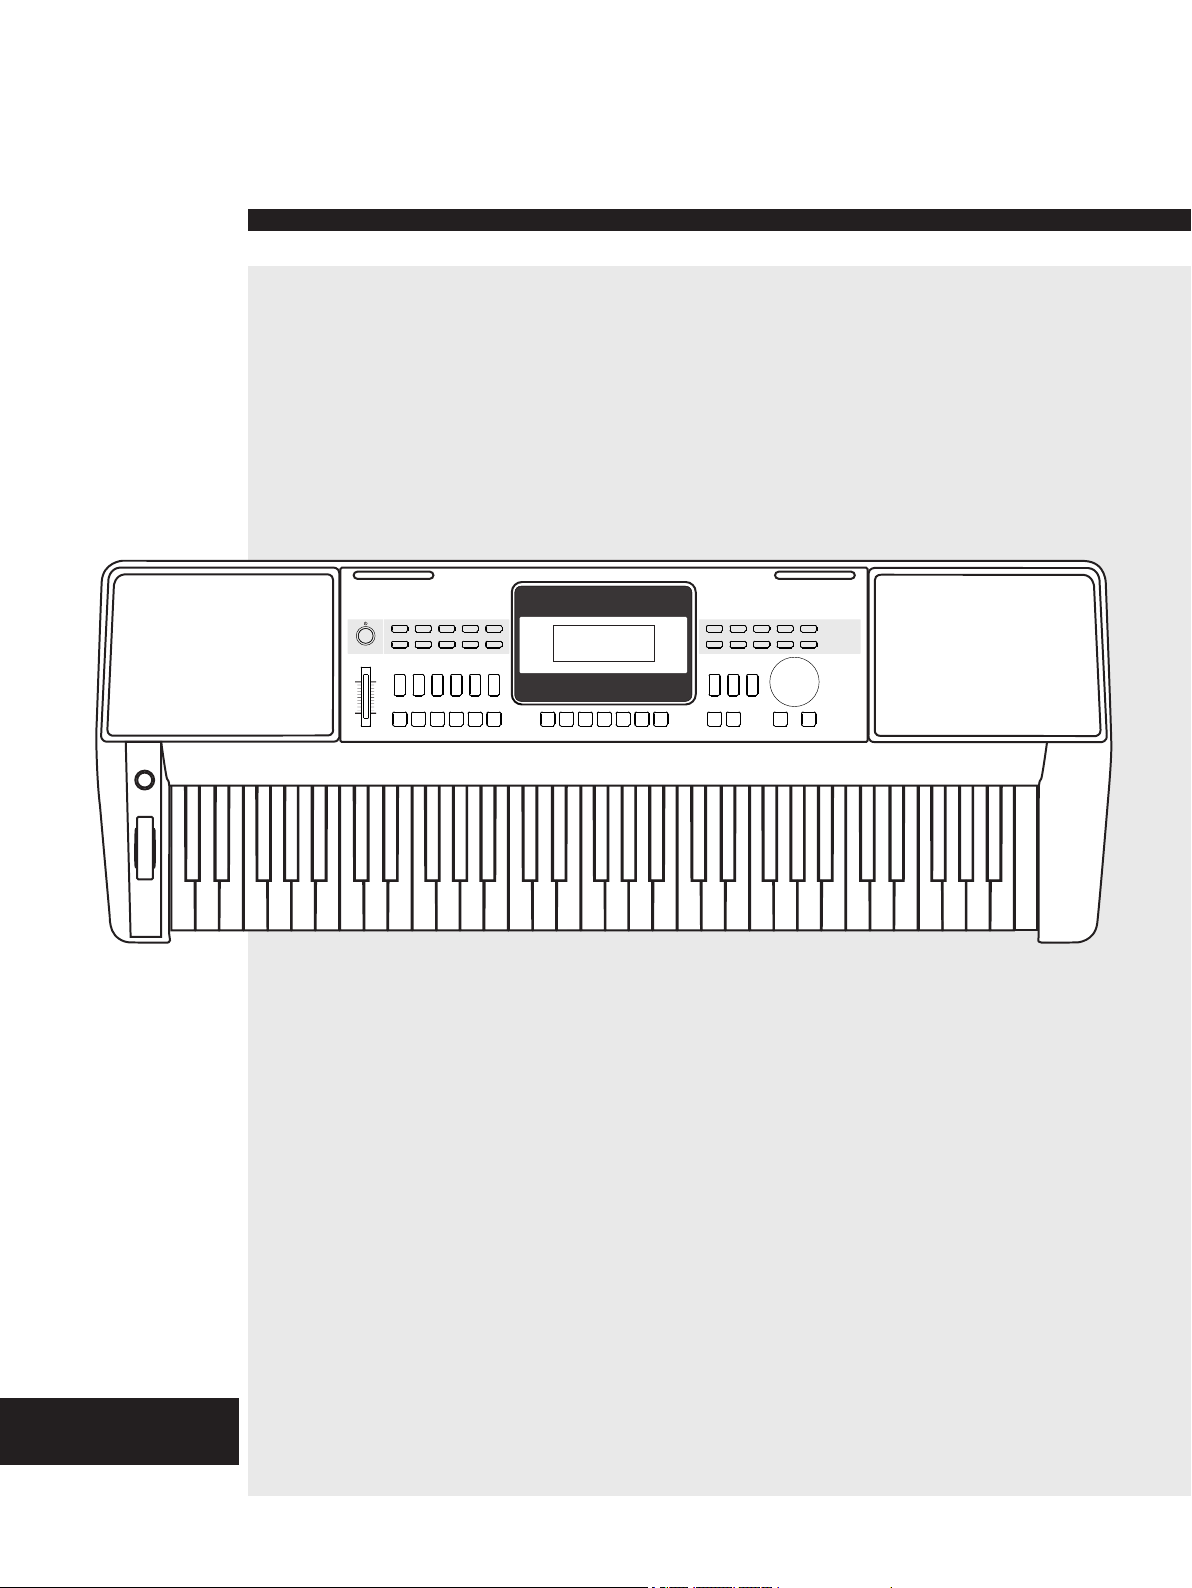
Panel & Display Description
Front Panel
1. POWER SWITCH
Turn the Power on or off.
Adjust the master Volume.
3. [VOLUME] Slider
Produce smooth Fade-ins or
7. [OCTAVE] button
Turn the Octave setting on or off.
15. [FADE] button
18. [DUAL] button
22. [TOUCH] button
or off.
When the [SHIFT] button
pressed
[ACCOMP -] button
16. [RECORD] button
8. [TRANSPOSE] button
Turn the Sustain function on
or off.
5~6. [ACCOMP +]~
Turn the Transpose setting on
or end of style playback.
Turn the Dual function on or off.
Fade-outs at the beginning
Play back recordings.
17. [PLAY] button
Adjust the ACCOMP volume.
9. [SUSTAIN] button
19. [LOWER] button
Turn the Lower function on or
off.
Enter the Record Mode.
20. [DICT.] button
Enter the Chord Dictionary.
21. [DSP] button
Turn the DSP function on or off.
Turn the Touch Response on or
off.
Enter the chord mode.
[TEMPO -] button
Turn the Harmony effect on
5~6. [TEMPO +]~
7. [METRONOME] button
8. [MIXER] button
Enter the Mixer menu.
Turn the metronome on or off.
When the [SHIFT] button
released
9. [HARMONY] button
Adjust the current Tempo.
or off.
15. [CHORD MODE] button
Instantly call up a panel
16. [BANK] button
Register the panel settings.
Turn the One Touch Setting
setting.
22. [O.T.S.] button
17. [STORE] button
18~21. [M1] ~ [M4] buttons
function on or off. Instantly
Switch between Memories.
reconfigure all relevant settings.
13. [FILL A] button
or off.
Play the Intro or Ending.
11. [SYNC START] button
In Style Mode
Start or Stop playing the
10. [START/ STOP] button
style.
Turn the Sync Start on
12. [INTRO/ ENDING]
14. [FILL B] button
A Fill-in B plays.
button
A Fill-in A plays.
Rear Panel
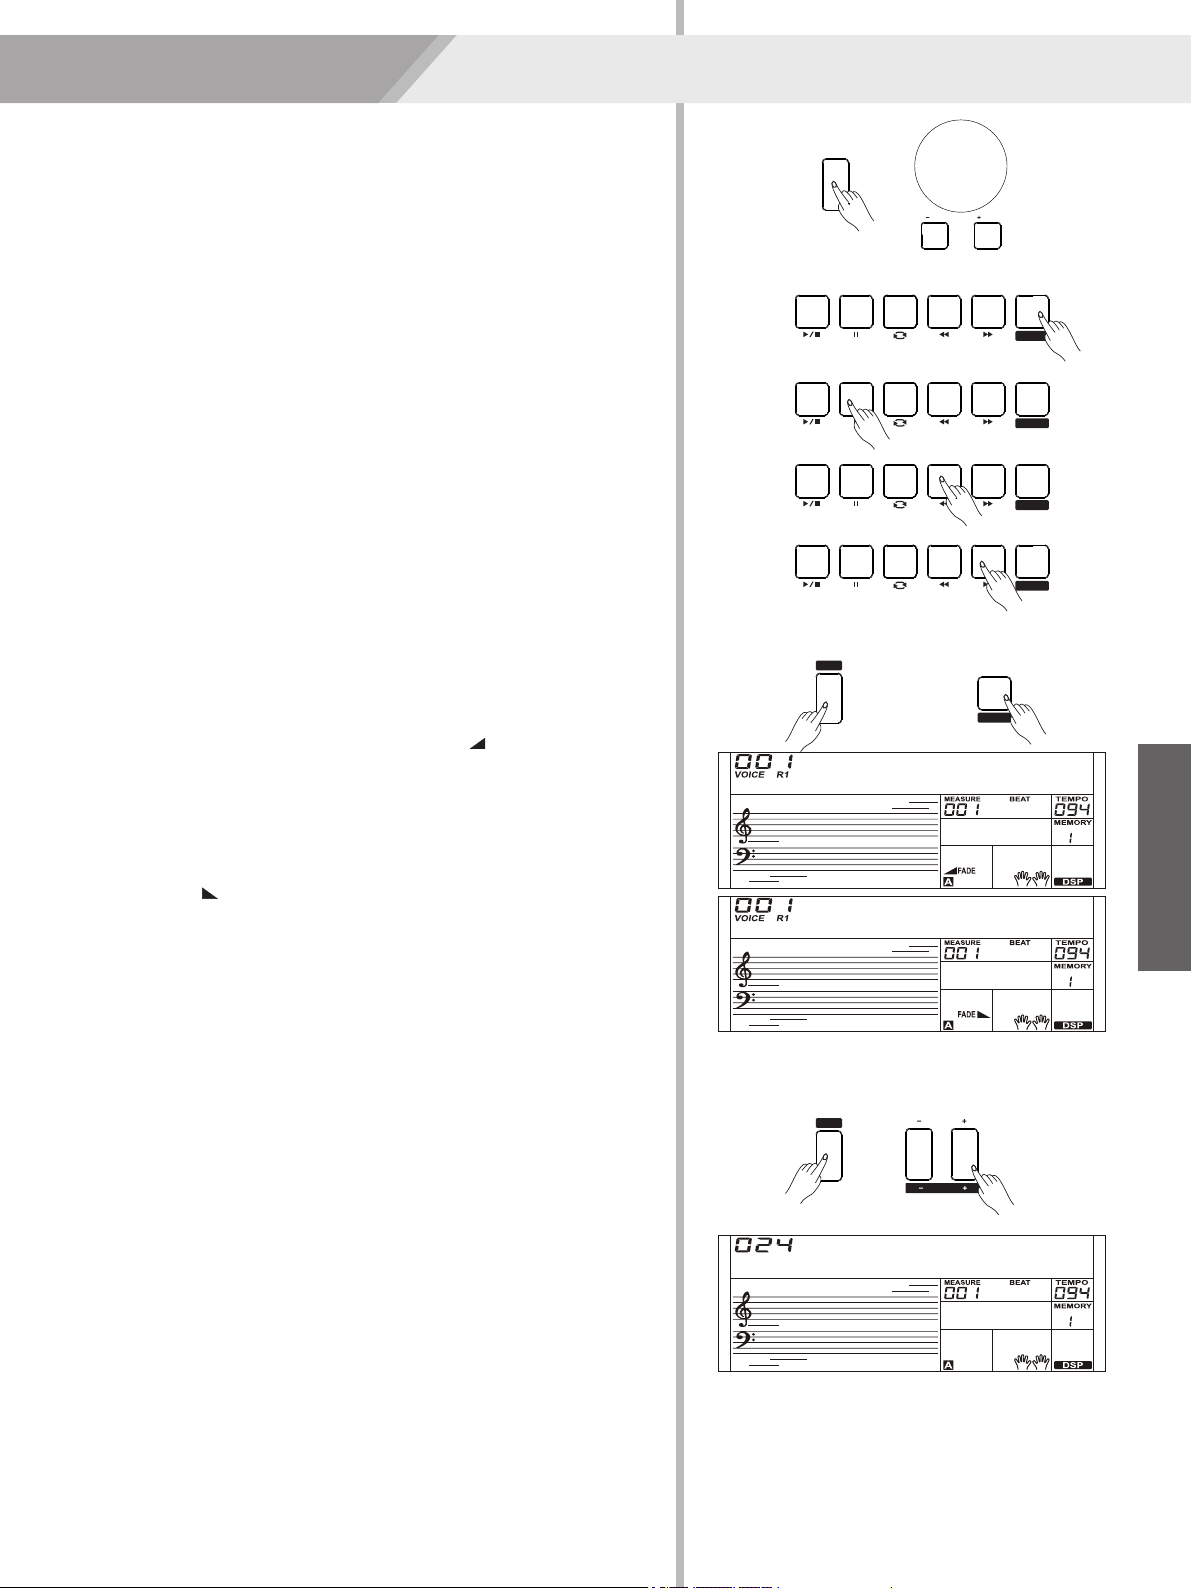
10. [ ] button
In Song Mode
Start or Stop playing the
12. [ ] button
playing the song.
11. [ ] button
14. [ ] button
ending location of loop
Pause or continue
song.
Set the beginning and
to the current song.
Rewind the song.
13. [ ] button
Fast forward the song.
35. PHONE/ OUTPUT jack
Connect a pair of
audio equipment.
36. SUSTAIN jack
Connect a sustain pedal.
headphones or external
37. USB terminal
Connect to a computer to
work as a USB-MIDI device.
38. DC 12V jack
Connect DC 12V power
adaptor(optional).
4
Apply a vibrato effect.
33. [MODULATION] button 34. [PITCH BEND] wheel
Bend notes up or down.
VOLUME
FILL A FILL B
START /
STOP
SYNC
START
INTRO /
ENDING
ACCOMP
MIXER
TEMPO
M2 M3 M4 O.T.S.
M1
SHIFT
FADE
METRONOME
BANK STORE
DUAL LOWER TOUCH
OCTAVE TRANSPOSE
RECORD PLAY DSP
SUSTAIN
HARMONY
DICT.
120 SONGS 180 STYLES
001~018 Folk&Country
019~071 Golden&Pop
072~100 Classical
101~120 Piano
001~010 8Beat
011~020 16Beat
021~040 Pop&Ballad
041~055 Rock
056~074 Ballroom
075~086 Dance
087~099 Soul&Funk
100~118 Swing&Jazz
119~128 Country
129~142 Latin&Latin Dance
143~160 Waltz&Traditional
161~170 World
171~180 Pianist
P R O F E S S I O N A L K E Y B O A R D
RECORD
MODULATION
TOUCH
SUSTAIN
CHORD
MODE
001 8BtBld
099 R&B
011 16Beat 1
105 Swing
038 SlowBald
129 BosaNov
056 Tango 1
141 Rumba 3
075 Techno 1
151 Polka
101 BigBand
021 PopRock 1
119 CntyPop 1
041 Rock
135 LatinRck
066 ChaCha 1
143 Waltz
088 ClasFunk
156 March
003 8Beat 1
2. STYLE DIRECT SELECT
Select the second function
4. [SHIFT] button
Select a direct Style.
BUTTON
of some buttons.
SUSTAINPHONES USB 12V
VOLUME
FILL A FILL B
START /
STOP
SYNC
START
INTRO /
ENDING
ACCOMP
MIXER
TEMPO
M2 M3 M4 O.T.S.
M1 PIANO DEMO / NO
SHIFT
FADE
METRONOME
BANK STORE
DUAL LOWER TOUCH
OCTAVE TRANSPOSE
RECORD PLAY DSP
SUSTAIN
VOICE STYLE SONG
HARMONY
DICT.
LESSON
LR
&
FUNCTION
120 SONGS 180 STYLES 508 VOICES
001~018 Folk&Country
019~071 Golden&Pop
072~100 Classical
101~120 Piano
001~010 8Beat
011~020 16Beat
021~040 Pop&Ballad
041~055 Rock
056~074 Ballroom
075~086 Dance
087~099 Soul&Funk
100~118 Swing&Jazz
119~128 Country
129~142 Latin&Latin Dance
143~160 Waltz&Traditional
161~170 World
171~180 Pianist
001~051 Piano
052~064 Chromatic Percussion
065~094 Organ
095~128 Guitar
129~153 Bass
154~185 Strings&Orchestral Instruments
186~209 Brass
210~222 Reed
223~235 Pipe
236~268 Synth Lead
269~299 Synth Pad
300~313 Synth SFX
314~323 Ethnic Misc.
324~395 Percussive
396~436 SFX
437~499 Combined Voice
500~508 Drums
/ YES
P R O F E S S I O N A L K E Y B O A R D
RECORD
MODULATION
TOUCH
SUSTAIN
CHORD
MODE
055 Vibra
196 BraSec
066 DrawOr
215 Oboe
090 Harmni
225 SweetFl
154 Violin
437 StPn&Str
001 GrdPno
182 OrcHit
046 Funk EP
186 Trumpet
057 Marimba
210 SopSax
087 Acordi
221 Clarine
095 NylGt
231 SwPanFl
168 StrEns
500 Std Set
001 8BtBld
099 R&B
011 16Beat 1
105 Swing
038 SlowBald
129 BosaNov
056 Tango 1
141 Rumba 3
075 Techno 1
151 Polka
101 BigBand
021 PopRock 1
119 CntyPop 1
041 Rock
135 LatinRck
066 ChaCha 1
143 Waltz
088 ClasFunk
156 March
003 8Beat 1
5
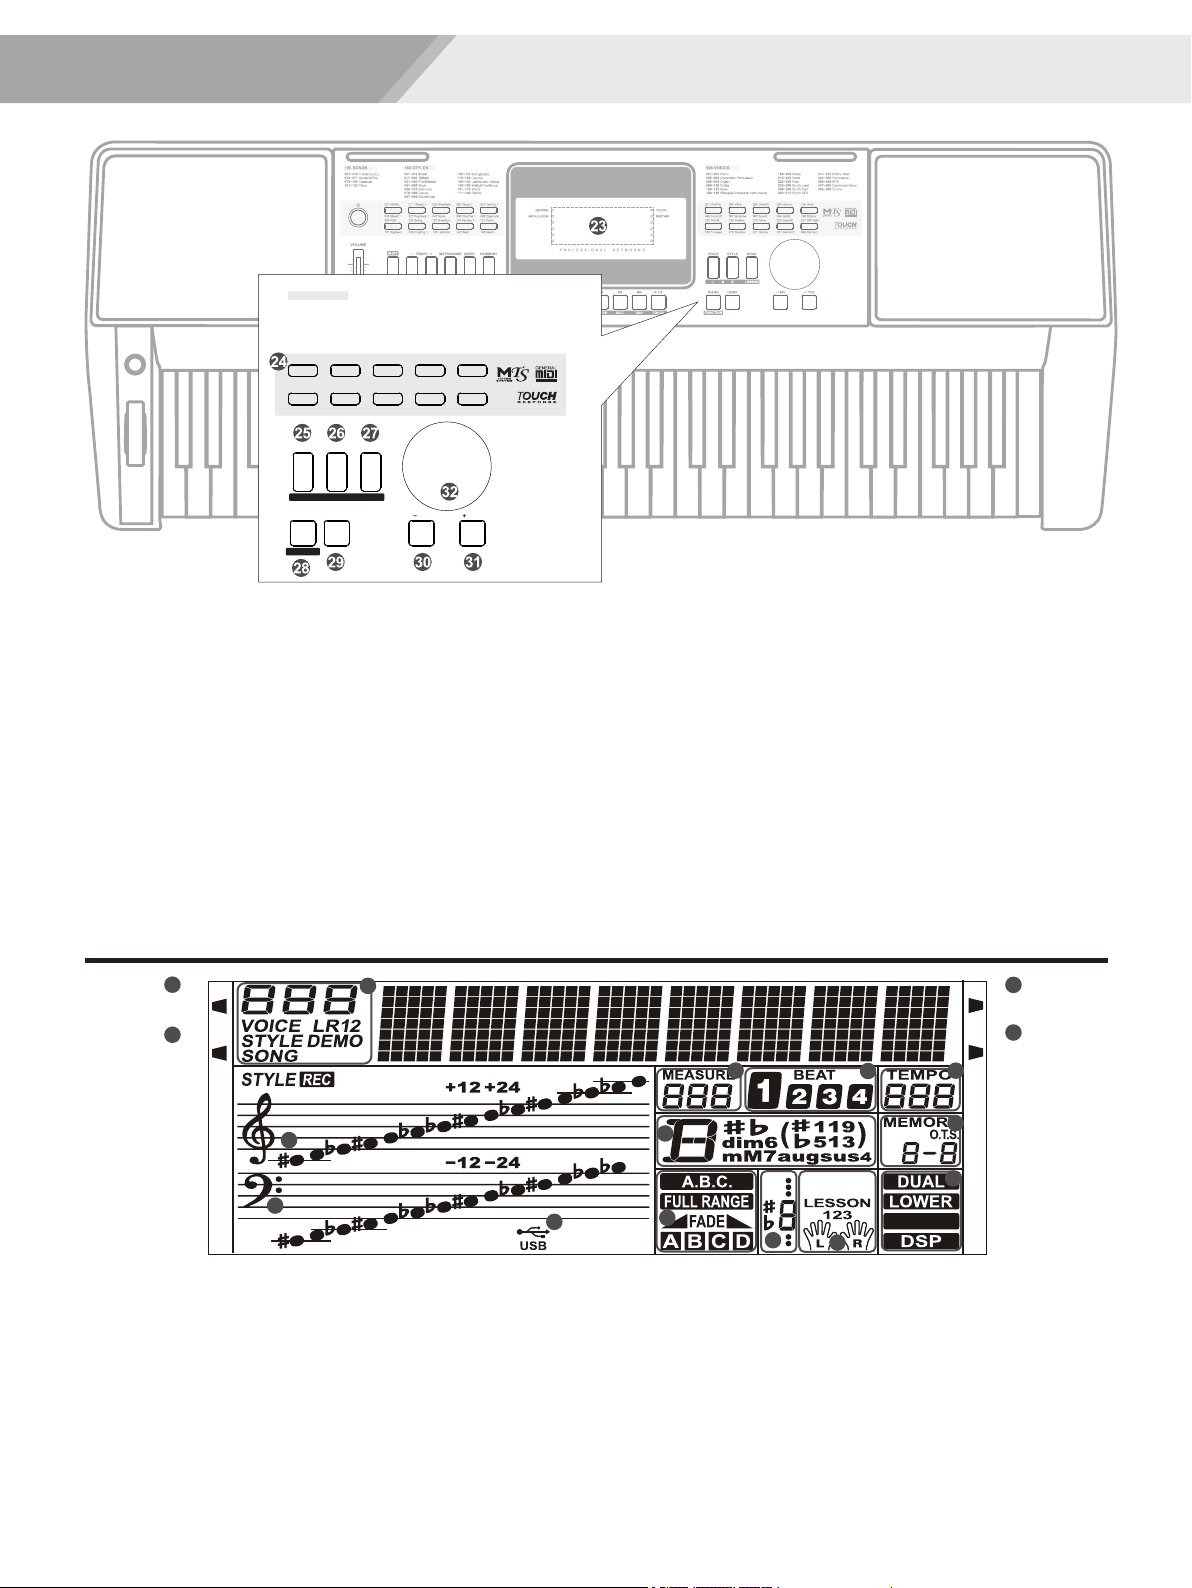
Panel & Display Description
LCD
1. RECORD
5. VOICE/STYLE/DEMO/SONG
6. MEASURE
8. TEMPO
9. M1-M4/ONE TOUCH SETTING
2. MODULATION
4. SUSTAIN
7. BEAT
3. TOUCH
RECORD
MODULATION
TOUCH
SUSTAIN
1
2
3
4
12
13
15
16
17
678
9
10
11
14
5
HARMONY
32. DATA DIAL
29. [DEMO] button
Switch to Demo Mode.
30 ~ 31. [-/NO]/ [+/YES] button
Slowly or quickly adjust the parameter
Select a direct Voice.
23. LCD display
Display important setting information.
24. VOICE DIRECT SELECT BUTTON
Adjust parameter value.
value.
PIANO DEMO / NO
VOICE STYLE SONG
LESSON
LR
&
FUNCTION
508 VOICES
001~051 Piano
052~064 Chromatic Percussion
065~094 Organ
095~128 Guitar
129~153 Bass
154~185 Strings&Orchestral Instruments
186~209 Brass
210~222 Reed
223~235 Pipe
236~268 Synth Lead
269~299 Synth Pad
300~313 Synth SFX
314~323 Ethnic Misc.
324~395 Percussive
396~436 SFX
437~499 Combined Voice
500~508 Drums
/ YES
055 Vibra
196 BraSec
066 DrawOr
215 Oboe
090 Harmni
225 SweetFl
154 Violin
437 StPn&Str
001 GrdPno
182 OrcHit
046 Funk EP
186 Trumpet
057 Marimba
210 SopSax
087 Acordi
221 Clarine
095 NylGt
231 SwPanFl
168 StrEns
500 Std Set
Released
26. [STYLE] button
Enter the Song Mode.
When the [SHIFT] button
Switch to Style Mode.
25. [VOICE] button
28. [PIANO] button
Switch to Voice Mode.
Enter the Piano Mode.
27. [SONG] button
When the [SHIFT] button
25. [LEFT HAND] button
Pressed
26. [RIGHT HAND] button
Choose the Right Hand in Lesson Mode.
Enter the Lesson Mode.
Choose the Left Hand in Lesson Mode.
28. [FUNCTION] button
Enter the Function Mode.
27. [LESSON] button
11. LEFT/RIGHT HAND LESSON MODE
15. TREBLE CLEF
10. DUAL/ LOWER/ HARMONY/ DSP
13. A.B.C. / FULL RANGE/ FADE/A/B
12. NUMBER MUSCIAL NOTATION
14. CHORD
16. BASS CLEF
17. USB
6
cabinet.
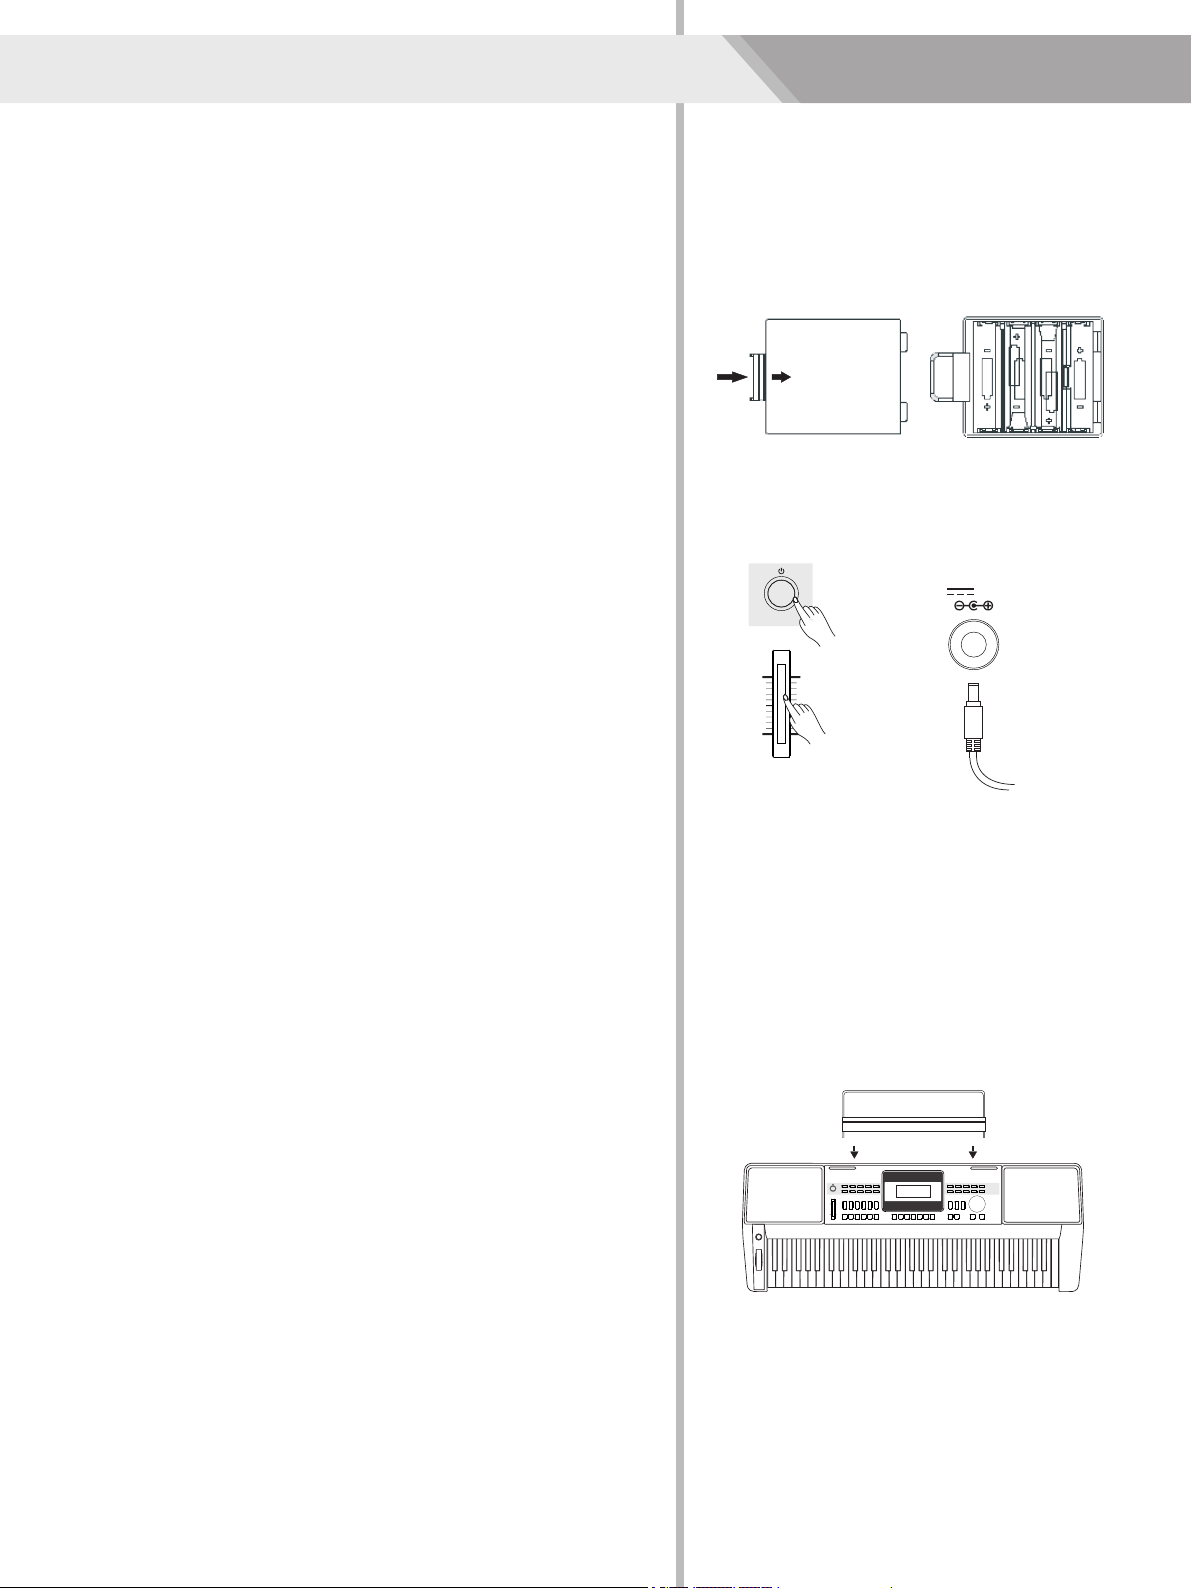
3. Replace the compartment cover, making sure that it locks firmly in
Power Supply
You can power the instrument either by batteries or by power adaptor.
Before you switch your instrument on, turn down the volume of
instrument and the connected audio equipment first.
6 pieces of AA (NO.5) or equivalent alkaline batteries must first be
installed into the battery compartment.
This section contains information about setting up your instrument
and preparing to play. Please go through this section carefully before
turning the power on.
Using Batteries
1. Open the battery compartment cover located on the bottom cabinet
of the unit.
2. Insert the batteries; carefully follow the polarity markings on the
place.
Note:
2. Always use same types of batteries.
3. Always remove the batteries from the unit when it is not being used
for an extended period of time.
Using Power Adapter
1. Connect the AC/DC adaptor to the power supply jack of this
2. Press the POWER SWITCH, the LCD screen is lit, which indicates
the instrument has powered on.
3. If you are ready to turn off the instrument, press the POWER
1. Do not mix old and new batteries.
instrument.
SWITCH again.
refer to “Auto Power Off” for details).
disconnect the power for safety purpose.
Note:
Setting a Music Stand
1. In the idle mode, the instrument will automatically shutdown in 30
minutes if you do not take any action on the instrument (Please
A music stand is supplied with the keyboard. You can easily attach it
to the instrument by inserting it into the slots at the rear of the panel.
2. When the keyboard is not in use or during thunderstorm, please
Setup
12V
Open
VOLUME
SUSTAINPHONES USB 12V
Connections
Using Sustain Pedal
Note:
Note:
To avoid the risk of hearing loss when using headphones, please do
not play the piano with a high volume level for a long time.
Connecting a pair of Headphones
Plug a function pedal into a sustain jack, you can select 4 pedal
functions from the function menu setting: Sustain, Soft, switch to
register memories and start/ stop a style. When using a sustain pedal
in playing, your performance will remain an elegant sustain with
hands out of keys, which makes the performance more expressive
and abundant. (Refer to pedal function of Function Menu for details)
Connecting a Computer
A standard pair of stereo headphones can be connected to the
PHONES jack for private practice or late-night playing. The internal
stereo speaker system is automatically shut off when a pair of head
phones is plugged into this jack.
If this product does not work correctly when connected to USB 3.0
port, you will need to connect to USB 2.0 port.
The instrument receives and transmits MIDI messages via the USB
connector.
7
SUSTAINPHONES USB 12V
SUSTAINPHONES USB 12V

8
Note:
The overall volume is too low, or no sound is heard. The master
volume may set too low. Set it to an appropriate level with the
[MASTER VOLUME] slider. Another reason could be the headphones
are connected, disabling the speak output. Try to unplug the
headphones.
connection.
Note:
Press the POWER SWITCH, if the LCD screen isn’t lit, please check
the power is connected correctly or not.
Adjust the Master Volume
information on the screen, it indicates the instrument is powered on.
Move the MASTER VOLUME slider upwards/ downwards to increase/
decrease the volume level.
2. Press POWER SWITCH, the LCD screen is lit, and displays data
Turn the Power On/Off
1. Firstly, please make sure you have correctly completed power
Playing Demo Songs
3. Press the [DEMO] or [START/STOP] button to stop playing, and exit
back, meanwhile, all the demo songs will loop playing.
This instrument features 5 wonderful demos with different characters.
Please refer to Demo List.
2. Use the data dial or the [+/Yes]/ [-/No] button to select a demo song.
1. Press the [DEMO] button, enter the main interface of demo playing
demo mode. BosaNova
VOLUME
DEMO
/ NO / YES
Power/Master Volume
001 8BtBld
099 R&B
011 16Beat 1
105 Swing
038 SlowBald
129 BosaNov
056 Tango 1
141 Rumba 3
075 Techno 1
151 Polka
101 BigBand
021 PopRock 1
119 CntyPop 1
041 Rock
135 LatinRck
066 ChaCha 1
143 Waltz
088 ClasFunk
156 March
003 8Beat 1
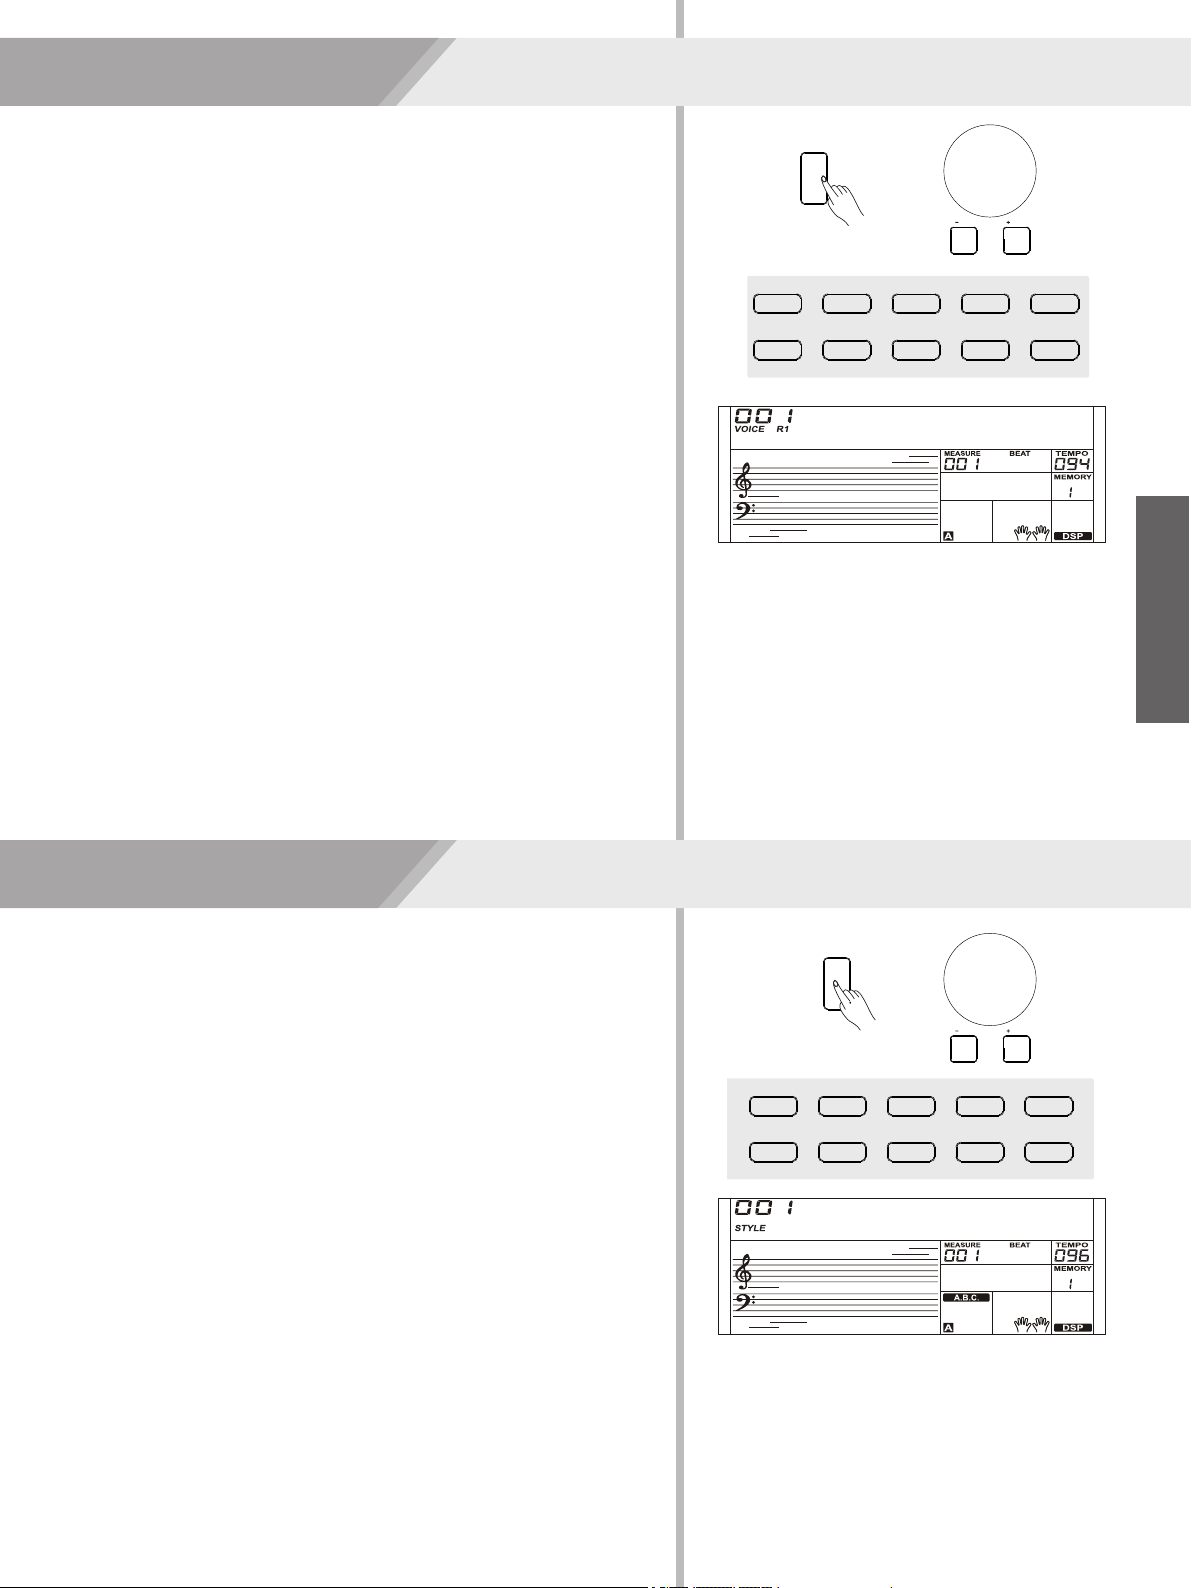
Playing Voices
Enter the Voice Mode. The LCD displays the current default voice
3. Play the Voice.
name and number.
You can play the keyboard and listen to the wonderful voice.
voice. 2 direct voices for each button (upper & lower key).
Note:
While changing a voice, pay attention to the rules. If you press the same
button, the voice will be changed between the upper and lower key.
When the upper/lower voice is on, and then you press another direct
button, the corresponding upper/lower voice will be selected.
Use the data dial or the [+/Yes]/ [-/No] button to select the voice you
1. Press the [VOICE] button.
2. Select a Voice.
want to play. You can also use the Voice Direct Button to select a
GrdPno
While changing a style, please pay attention to the rules. If you press
the same button, the style will be changed between the upper and
lower key.
style. 2 direct styles for each button (upper & lower key).
When the upper/lower style is on, and then you press another direct
button, the corresponding upper/lower style will be selected.
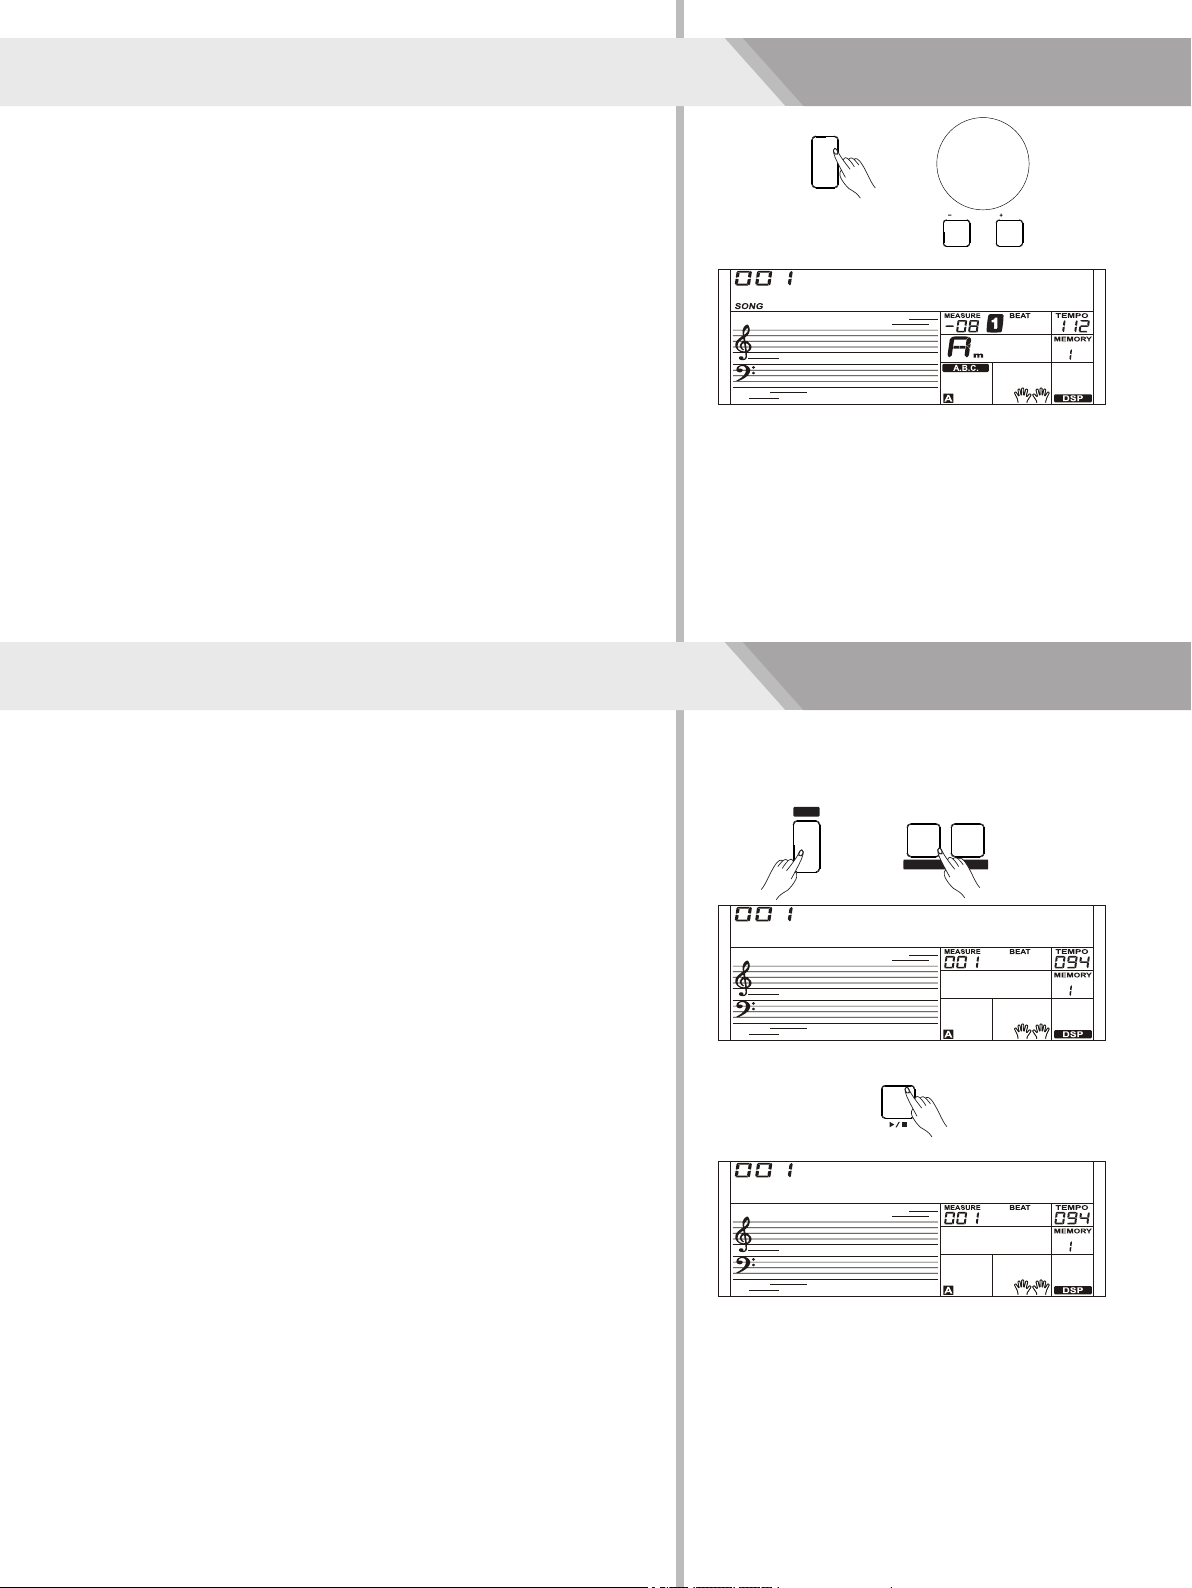
want to play. You can also use the Style Direct Button to select a
3. Play the Style.
start the rhythm playing.
Use the data dial or the [+/Yes]/ [-/No] button to select the style you
you can press the [SYNC START] button, and press any keys to
Note:
Press the [START/STOP] button, directly start a rhythm playing. Or
1. Press the [STYLE] button.
Enter the Style Mode. The LCD displays the current default style
name and number.
2. Select a Style.
Playing Styles
8BtBld
9
VOICE
/ NO / YES
055 Vibra
196 BraSec
066 DrawOr
215 Oboe
090 Harmni
225 SweetFl
154 Violin
437 StPn&Str
001 GrdPno
182 OrcHit
046 Funk EP
186 Trumpet
057 Marimba
210 SopSax
087 Acordi
221 Clarine
095 NylGt
231 SwPanFl
168 StrEns
500 Std Set
/ NO / YES
STYLE
BANK STORE
RECORD PLAY
10
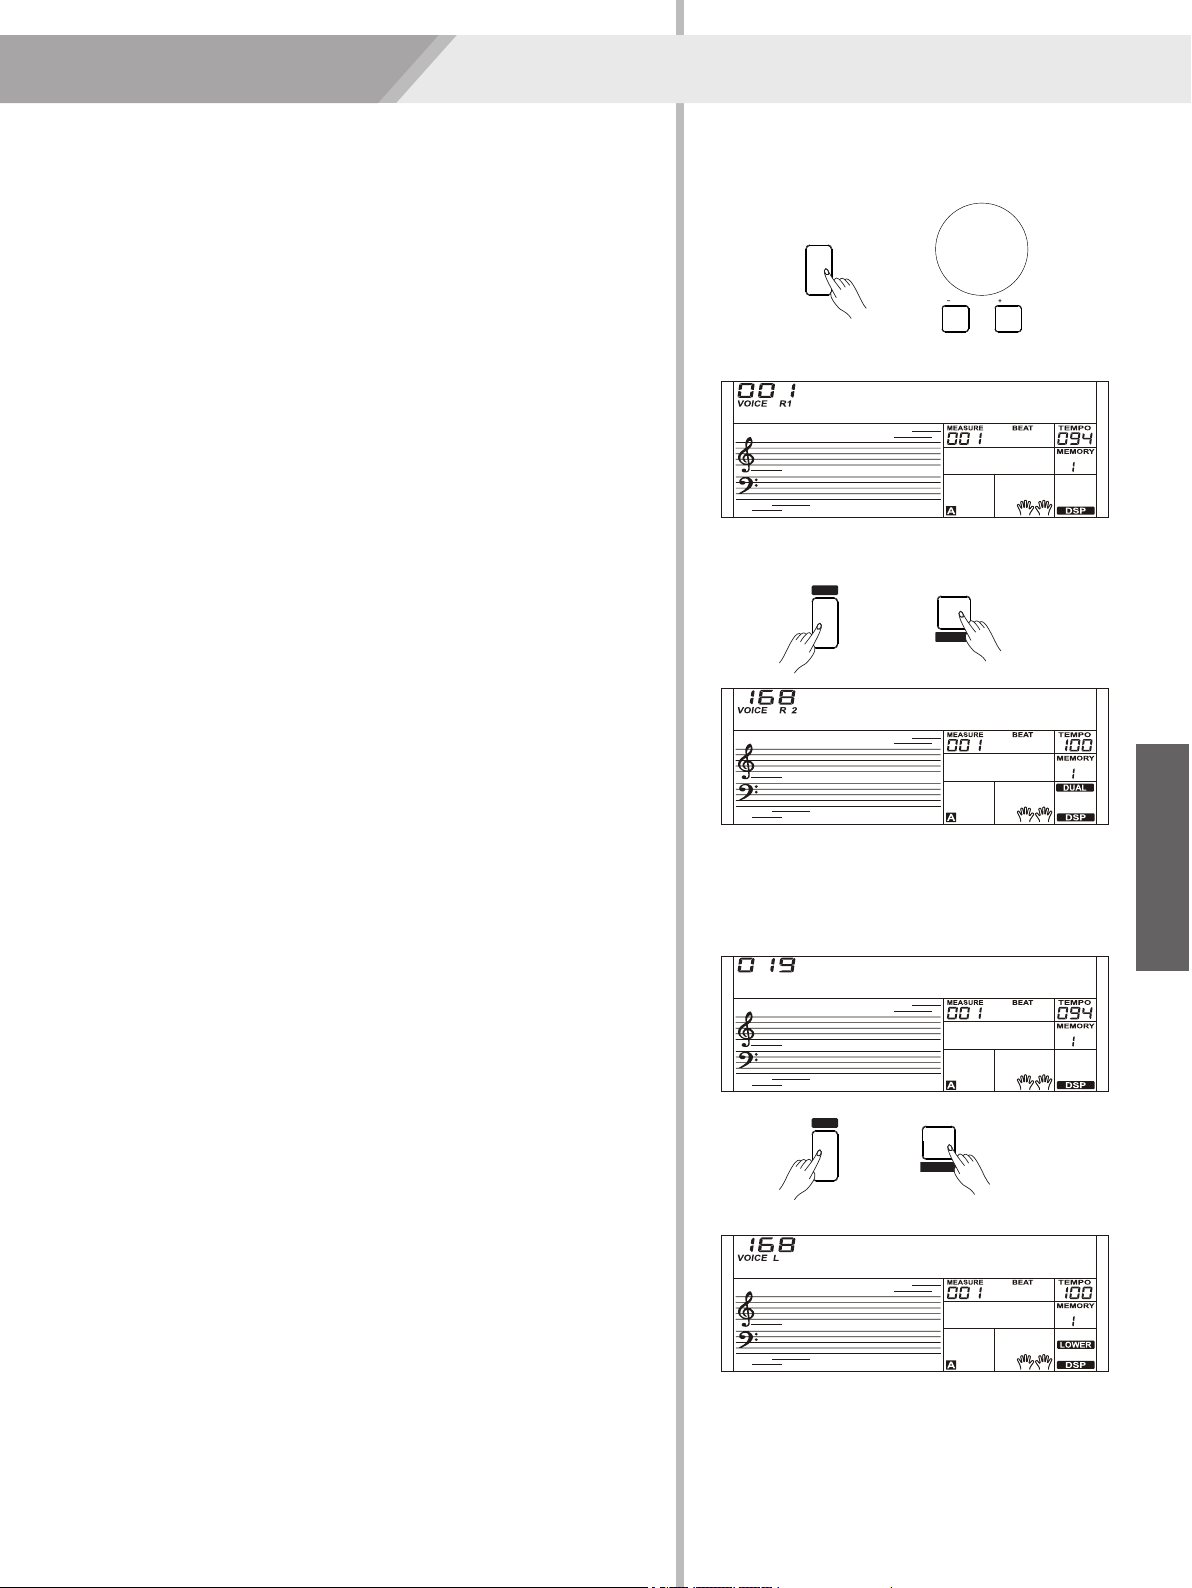
you want to play.
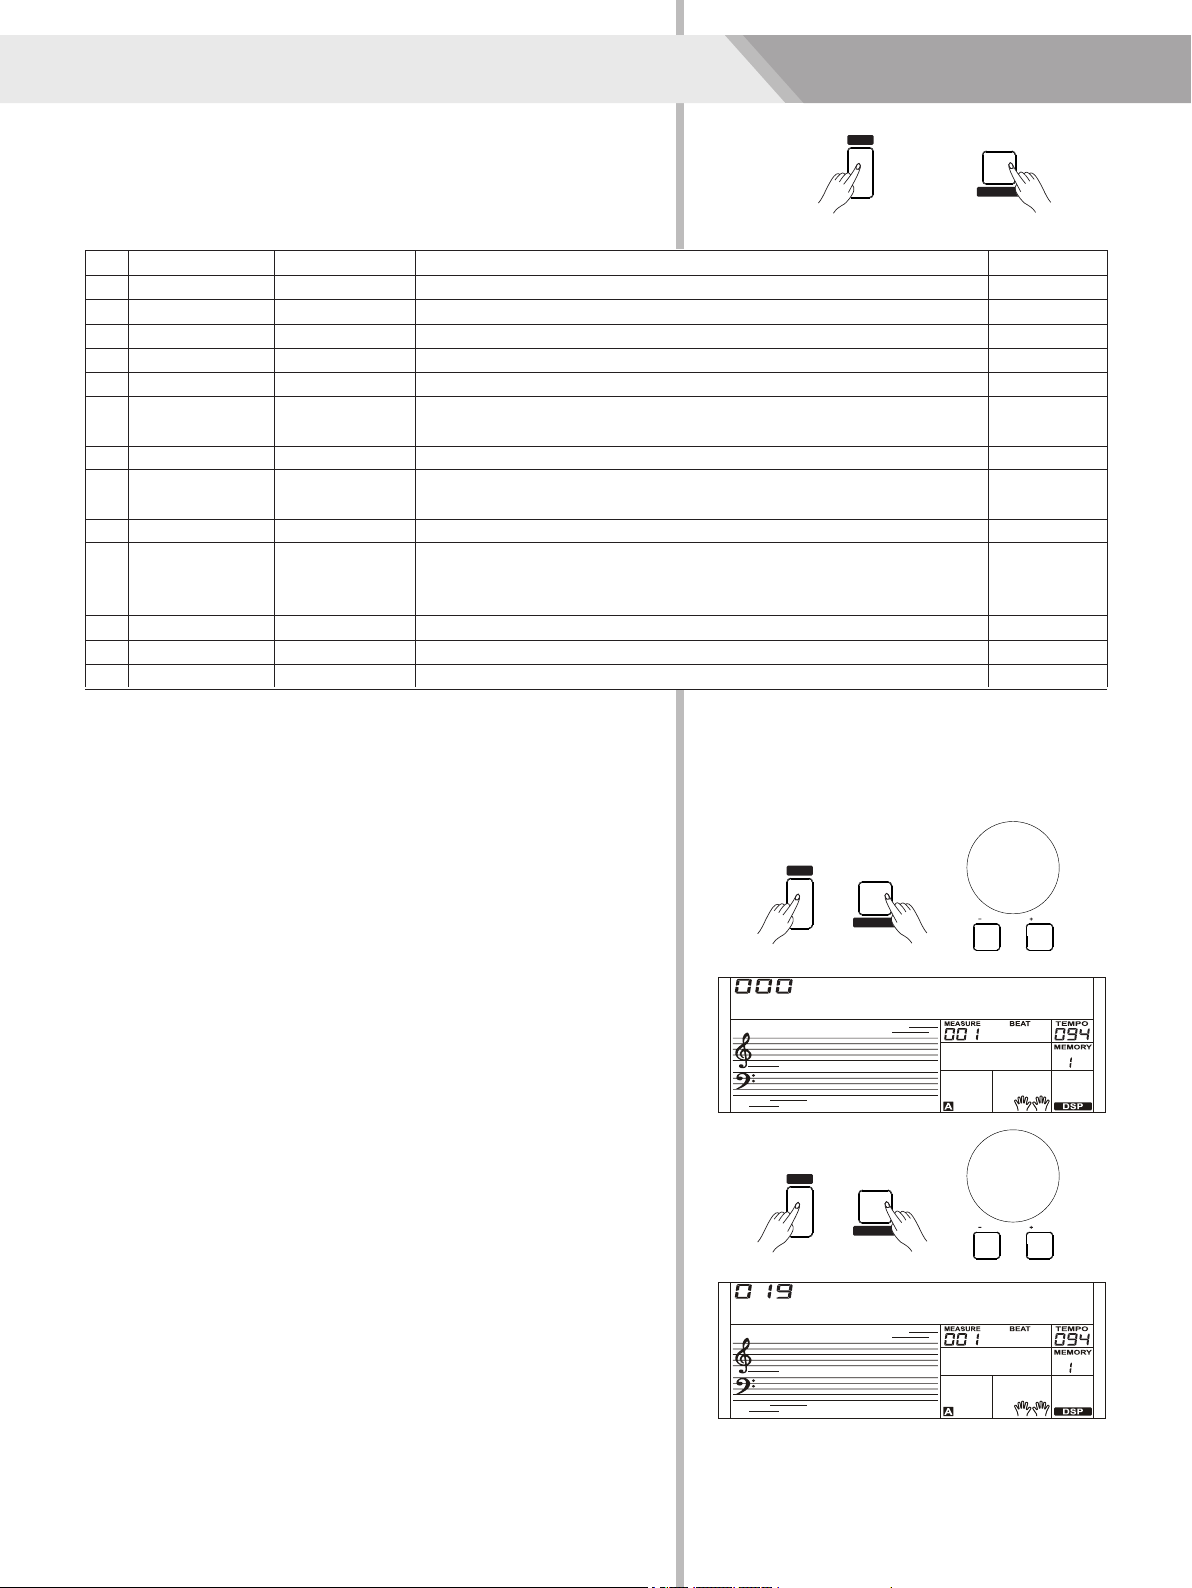
This instrument has featured 120 preset songs, and each song can be
practiced in LESSON mode.
Enter the song selection mode. It will play all songs circularly.
Use the data dial or the [+/YES]/ [-/NO] button to select the song
3. Press the [START/STOP] button.
Once you start playing a song, it will play current song repeatedly.
4. While stop playing a song, press any of [STYLE] or [VOICE] button,
1. Press the [SONG] button.
you can exiting the song mode.
2. Select a song.
Playing Songs
6. While playing back recorded songs, you can press and hold the
back.
7. In the selection interface of record playing back, press and hold the
[SHIFT] button and then press the [RECORD] button, it displays
recorded songs.
“Delete?”, press [+/YES] to confirm delete song, or [-/NO] to cancel
[SHIFT] button and then press the [PLAY] button to exit the playing
this operation and back to the selection interface.
[SHIFT] button, and then press the [PLAY] button to enter the
[RECORD] button and then press the [PLAY] button to play back
style or other parameters to prepare recording.
2. Press and hold the [SHIFT] button, and then press the [RECORD]
[+/YES]/ [-/NO] button to select a user song to be saved.
button. Enter the record standby mode, and you can select voice,
You can record you performance and the accompaniment, this
instrument can record up to 5 user songs.
3. Press the [START/STOP] button or play a key on the keyboard to
button to exit the record mode.
4. Press and hold the [SHIFT] button, and then press the [RECORD]
selection interface. Use the data dial or the [+/YES]/ [-/NO] button to
select the recorded song you want to play back. Press and hold the
5. If you want to play back a record song, you can press and hold
1. Press and hold the [SHIFT] button, and then press the [RECORD]
start recording.
button. Enter the song mode, you can use the data dial or the
Record
Toccata
NoFile_1
Delete?
SONG
/ NO / YES
SHIFT
START /
STOP
M2
LOWER
SHIFT
M1
DUAL
SHIFT
VOICE
Voices
1. In idle mode, press and hold the [SHIFT] button and then press the
different voices.
3. Play the keyboard in different sections, and you will hear two
The lower function splits the keyboard into right and left areas to
create two different voices. The left section voice is lower voice. The
A.B.C. function is on, left section keyboard can control the
accompaniment; the A.B.C. function is off, left section keyboard can
control the lower voice.The default split point of this instrument is: F#3
(19) and you can assign a desire spilt point on the keyboard. Refer to
Split Point Setting for more details.
into two independent sections, and each section has its voice. The
The fectory voice setting is NO.168: String Ensembles.
When the keyboard has been split, only the right hand area will
respond the dual voice, the left hand will not respond to it.
and then press the [LOWER] button will turn lower function off.
lower voice you want to play.
Note:
4. When lower function is on, pressing and hold the [SHIFT] button
LCD displays the left hand voice name and number, and the
[LOWER] button to turn the lower function on. The keyboard is split
2. You can use the data dial or the [+/YES]/[-/NO] button to select the
indicate “VOICE L” and “LOWER”.
Playing Different Voices with Both hands-
LOWER
The instrument features 508 build-in voices. In order to offer you a
better performance experience, we programmed many useful effects
which can be inserted while playing voices. Please refer to Function
Menu.
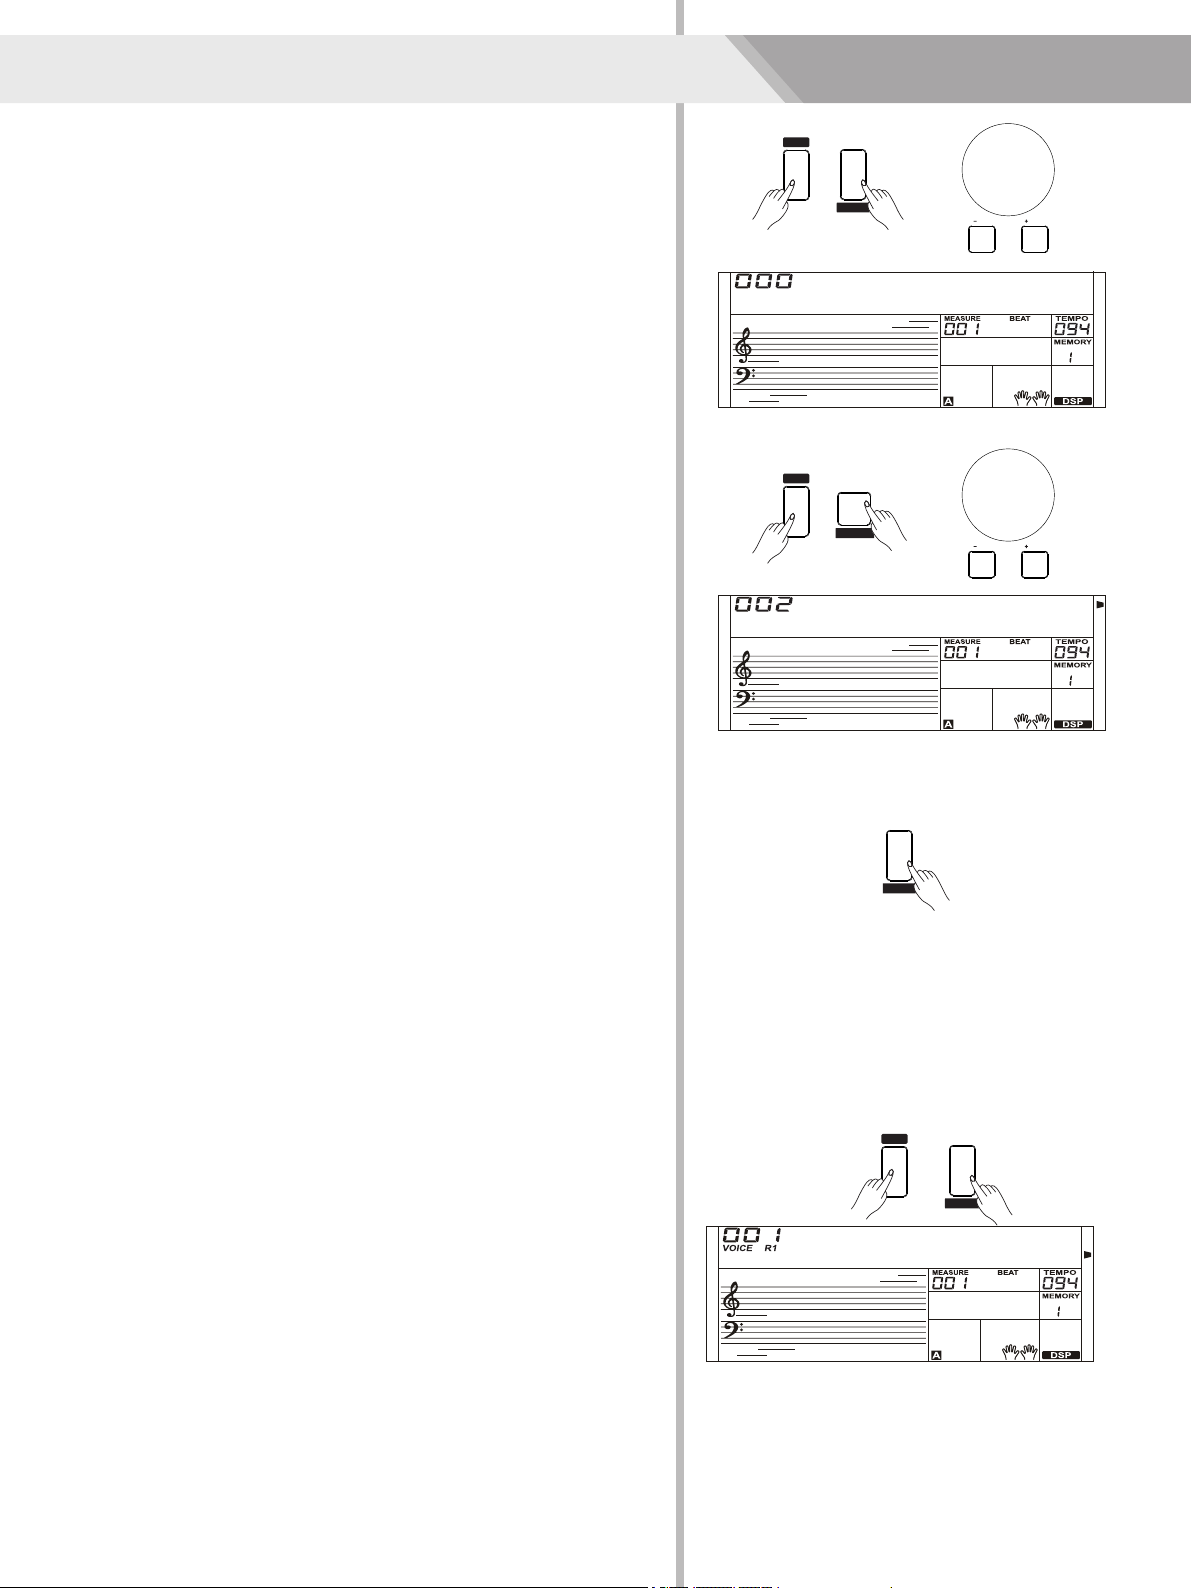
The default voice number is 001 when power on and the “VOICE R1”
icon will be lightening up on the left-top corner of the LCD. The
current voice name and number will be display on the LCD. Use the
data dial or [+/YES]/ [-/NO] button to select the voice you want to play,
or you can also use theVoice Direct Button.
Select a Voice
VOICE R1 -> VOICE R2 -> VOICE L -> VOICE R1
Playing two voices simultaneously-DUAL
Note:
This instrument has a dual voice function. This function is capable to
enhance the delicacy of your music by playing two voices of musical
instruments simultaneously; new combinations of voices and music
could be created then. When the dual function is off, the voice
indicated is VOICE 1, when the dual function is on; the voice indicated
is VOICE 2.
Automatically skip the voices which haven’t turned on.
[DUAL] button to turn dual function on. The LCD displays the
“DUAL”.
You can use the data dial or [+/YES]/ [-/NO] button to select the
dual voice you want to play. The default R2 voice is NO. 168:
1. In idle mode, press and hold the [SHIFT] button and then press the
String Ensembles.
2. Play the keyboard, and then you will hear two different voices are
sounded simultaneously in a layer. It seems like two different
instruments playing at the same time.
Press the [VOICE] button, switch to the voice mode. The “VOICE R1”
icon will be lightening and display the name of upper voice. The
system will judge current dual voice and lower voice are turned on or
off, the sequence is:
current voice name and number, and the indicate “VOICE R 2” and
3. When dual function is on, pressing and hold the [SHIFT] button
and then press the [DUAL] button will turn dual function off.
GrdPno
StrEns
SPlit Pt
StrEns
11
/ NO / YES

FADE
CHORD
MODE SYNC
START
Styles
Auto fill in function automatically adds a fill to your performance. When the
fill-in is finished,accompaniment shifts to the Main section (A,B).
ENDING Section
Ending is used for the ending of the song. When the ending is finished,
accompaniment automatically stops.The length of the ending differs
depending on the selected style.
FILL IN Section
The auto accompaniment feature puts a full backing band at your
fingertips. To use it, all you have to do is to play the chords with your left
hand using your selected accompaniment style, and then the
accompaniment will automatically play along, instantly following the
chords you play. With auto accompaniment, even a solo performer can
enjoy playing with the backing of an entire band or orchestra. This
keyboard features 180 styles in a variety of musical genres. Try to select
some of the different styles (refer to Style List) and enjoy the auto
accompaniment feature.
1. Press [STYLE] button.
Enter the style mode. The “STYLE” icon on the left-top of the LCD will
light up. The LCD displays the name and number of the current style.
2. Select a style.
Play Auto Accompaniment (rhythm track
only)
Use the data dial or the [+/YES]/ [-/NO] button to select a style you
want to play. Or you can use the Style Direct Button to make a
quick selection.
3. Start playing a style.
Press the [START/STOP] button to start the rhythm tracks of the
There are various types of Auto Accompaniment sections that allow you to
vary the arrangement of the accompaniment to match the song you are
playing. They are: Intro, Main (A, B), Fill (A, B), and Ending. By switching
among them during your performance you can easily produce the dynamic
elements of a professional sounding arrangement in your performance.
The main is an important section of the song. And it plays an
accompaniment pattern and repeat infinitely until another section's button
is pressed.
1. Turn the auto accompaniment on.
In style mode, you can press the [CHORD MODE] button to enter the
“auto bass chord” (A.B.C.) mode. The keyboard is split into two
Play Auto Accompaniment(all tracks)
status) you will hear the fantastic accompaniment. Press [CHORD
icon will light up. The whole keyboard is chord detect section.
detect section to start auto accompaniment of all tracks.
You can press [SYNC START] button and then play a chord in chord
will lights up. Now pressing any key in chord detect section (Sync Start
auto accompaniment. Also you can press [SYNC START] and then
play any key to start the rhythm tracks of the auto accompaniment.
sections. Left hand section is chord detect section. The “A.B.C.” icon
When you change a chord, the accompaniment automatically changes.
You can also press [START/STOP] button to start auto
accompaniment of rhythm track, then play a chord in chord detect
Accompaniment Sections
INTRO Section
section. It will start auto accompaniment of all tracks.
The intro is an opening section of the song.
Each preset style features two different patterns. When the intro pattern
finished, the system will automatically shift to the main section.
MAIN Section
2. Start the auto accompaniment.
MODE] button again to enter “full range” mode. The “FULL RANGE”
8BtBld
GrdPno
GrdPno
12
2. Press [FILL A]/ [FILL B] button when style
Note:
repeats continuously until button is released.
the style is playing, the selected fill-in pattern
1. Hold down the [FILL A]/ [FILL B] button when
stops, it will change to the normal section.
STYLE
/ NO / YES
001 8BtBld
099 R&B
011 16Beat 1
105 Swing
038 SlowBald
129 BosaNov
056 Tango 1
141 Rumba 3
101 BigBand
021 PopRock 1
119 CntyPop 1
041 Rock
135 LatinRck
066 ChaCha 1
143 Waltz
003 8Beat 1
075 Techno 1
151 Polka
088 ClasFunk
156 March
FILL A FILL B
START /
STOP
SYNC
START
INTRO /
ENDING
FADE
CHORD
MODE
SHIFT
SHIFT
FADE
CHORD
MODE
FILL A FILL B
START /
STOP
SYNC
START
INTRO /
ENDING
FADE
CHORD
MODE
FILL A FILL B
START /
STOP
SYNC
START
INTRO /
ENDING
FADE
CHORD
MODE
FILL A FILL B
START /
STOP
SYNC
START
INTRO /
ENDING
FADE
CHORD
MODE
FILL A FILL B
START /
STOP
SYNC
START
INTRO /
ENDING
FADE
CHORD
MODE
Styles
Stopping the style with fade out produces a smooth ending, the
Adjust the master accompaniment volume; you can use this function
to balance auto accompaniment part volume and keyboard voice
volume.
accompaniment stops.
The default time value is 10 seconds.
2. Fade Out
[ACCOMP -] buttons simultaneously to restore to its default value:
Note:
3. Fade In/ Out Time
button and then press the [FADE] button during Style playback.
2. Press and hold the [SHIFT] button and then press the
range: 0~32, the LCD displays current accomp volume“XXX
The accompaniment setting will automatically exit if no operation is
done over 5 seconds.
Accomp”. The default value is: 24.
volume value.
lighting up, and then flashing with style playing.
1. Press and hold the [SHIFT] button, and then use the [ACCOMP +]/
[ACCOMP +]/ [ACCOMP -] for a while you can quickly adjust the
volume increases from high to low. Press and hold the [SHIFT]
The “FADE” icon will be lighting up, and then flashing with auto
Accompaniment Volume Control
temporarily showed on the LCD, press the [ACCOMP +] and
3. Press and hold the [SHIFT] button, at the accomp volume
24.
[ACCOMP -] button to set accompaniment volume, adjustable
Chord section. When the playback of the intro is finished, it
and the style is ready to play.
Playing Different Accompaniment
Sections
2. Press the Style Direct Button, data dial or [+/YES]/ [-/NO] button to
select a style.
3. Press [CHORD MODE] button to enter A.B.C. (auto bass chord)
4. Press [SYNC START] button.
5. Press the [FILL A] button, select the Main A section.
1. Press the [STYLE] button.
mode.
6. Press the [INTRO/ENDING] button. Now the “A” indicate on LCD,
7. It will start the accompaniment as soon as you start playing in
automatically leads into Main A section.
the Main B section.
9. Press the [INTRO/ENDING] button again, and it will enter the
Ending Section. When the ending is finished, the auto
accompaniment automatically stops.
Fade
1. Fade In
8. Press the [FILL B] button. A fill-in plays, automatically followed by
Starting the style with fade in produces a smooth beginning, the
volume increases from low to high.
Press and hold the [SHIFT] button and then press the [FADE]
button when Style playback is stopped. The “ FADE” icon will be
GrdPno
GrdPno
Accomp
13
/ NO / YES
STYLE
TEMPO
ACCOMP

Styles
Multi Finger
Chord Inversion
Multi finger type only can recognize those chords have listed in the
chord list, and also can be found in the dictionary function.
Note:
In full range mode, the entire keyboard will only recognize chords
played in normal fingering.
Chord Name
Single finger type not only can detect single finger but also can detect
multi finger. And the single finger makes it easily to play chords
through only one, two or three keys. Including major, minor, seventh,
and minor seventh chord. Refer to relevant picture on the right for
details.
There are following basic triad types:
The chord name contains two parts content: Chord root and Chord
type.
Single Finger
We define this chord its root is not in the bass (i.e., is not the lowest
note) as an inversion chord. When the root is in the bass, we call the
chord: root-position chord. If we put the Third and Fifth in the root
position, then it forms “Inversion”, we call this chord “Inversion Chord”.
See the following major triad and its inverted chord.
How the chords are played or indicated with your left hand (in the
auto accompaniment section of the keyboard) is referred to as
Chord Basics
Chord Fingering
A chord, in music, is any harmonic set of three or more notes that is
heard as if sounding simultaneously. The most frequently encountered
chords are triads. A triad is a set of three notes that can be stacked in
thirds. When stacked in thirds, the triad's members, from lowest
pitched tone to highest, are called: the Root, the Third, and the Fifth.
“fingering”. There are 2 types of fingerings as described below.
Triad Type
14
Root
Fifth
Third
Minor Triad
Major Triad
Diminished
Triad
Augmented
Triad
A root with a major third added above and a perfect
fifth will consist as a “Major Triad”.
A root with a minor third added above and a perfect
fifth will consist as a “Minor Triad”.
A root with a major third added above and an
augmented fifth will consist as an “Augmented Triad”.
A root with a minor third added above and a diminished
fifth will consist as a “Diminished Triad”.
Major Triad Minor Triad
Augmented Triad Diminished Triad
Root Position First Inversion Second Inversion
Chord Root Chord Type
Major Triad
Minor Triad
Only press the root note on
the keyboard.
Seventh chord
Press the root note and the
nearest left white key
simultaneously.
Press the root note and the
nearest left black key
simultaneously.
C7
Cm7
Cm
C
C
0
C6
1 2
CM7CM 7(#11)
3
CM(9)
45
CM7(9)
Caug
78
Cm Cm6
911
Cm7(b5)
6
C6(9) Cm7
10
13
Cm7(9)
14
Cm7(11)
15
CmM 7
16
CmM 7(9)
17
Cdim
Cm(9)
12
18
Cdim7
19
C7
20
C7sus4
21
C7(b5) C7(9)
22 23
C7(#11)
7aug
C
2928
7aug
CM
27
C7(#9)
26
C7(b13)
25
C7(b9)
C7(13)
24
30
Csus 4C1+2+5
31

TEMPO
ACCOMP
Styles
Note:
1. Use the [TEMPO +]/ [TEMPO -] button to change the tempo. While
the tempo data is flashing, use the data dial can also change the
tempo.
Each style of the instrument has been set with a default or standard
tempo; however, this can be changed by using the [TEMPO +]/
[TEMPO -] button.
The tempo will change when changing the style not playing the
accompaniment. The tempo will not change when changing the style
playing the accompaniment.
Tempo
2. Press the [TEMPO+] and [TEMPO-] buttons simultaneously to
restore the default tempo setting.
15
PIANO
FUNCTION
SHIFT
16
Function Menu
The option and parameters are as follows:
Press and hold the [SHIFT] button and then press the [FUNCTION]
button to enter function menu. The LCD displays the default “Tune”
function menu option. Use [+/YES]/ [-/NO] button to set parameter of
the current menu.
6
12
No.
2
3
1
13
11
4
9
8
10
7
5
Tune
Chorus Type
Chorus Level
EQ Type
Harmony Types
Content
Beat Type
Split Point
Pedal Type
Reverb Type
Reverb Level
MIDI Transmit
MIDI Receive
Auto Power Off
LCD display
XXX Tune
XXX Split pt
XXX Beat
XXX Rev Lev
XXX Chr Lev
XXX EQ XXX
XXX ChrGMCr2
XXX Midi Out
XXX PowerOff
XXX RevHall1
XXX HrmDuet
XXX Ped XXX
XXX Midi In
Ped Sust,Ped Soft,Ped St/S,Ped Mem
Range
1-61
-50 ~ +50
0, 2-9
EQ Pop,EQ Rock,EQ Class,EQ Jazz,EQ Dance,EQ Reset
RevHall3,RevChrh1,RevChrh2,RevDelay,RevPnDly
ChrFlgr2,ChrRtry1,ChrRtry2
ChrChrs1, ChrChrs2,ChrGMCr1,ChrGMCr2,ChrFlgr1,
0-32
HrmCtTri,HrmBlock,Hrm4Cls1,Hrm4Cls2,Hrm4Open,
30,60,OFF
HrmDuet,HrmStdTri,HrmFulCd,HrmRkDut,HrmCtDut,
01-16
01-16, ALL
RevRoom1,RevRoom2,RevRoom3,RevHall1,RevHall2,
Hrm1+5,HrmOctv1,HrmOctv2,HrmStrum
0-32
Default
0
19
4
EQ Reset
Ped Sust
RevHall1
ChrGMCr2
23
0
HrmDuet
01
ALL
30
2. Press [+/YES] and [-/NO] buttons simultaneously will set the tune
Note:
[FUNCTION] button to select split point menu. The LCD displays
The function menu status will exit if no operation is done within 5
seconds.
Tune
This function sets the pitch of entire keyboard by steps of cents.
[FUNCTION] button to select the tune menu. The LCD displays
“xxx Tune”.
Use [+/YES]/ [-/NO] button or data dial to change tune value. Its
1. Press and hold the [SHIFT] button and then repeatedly press the
range is from -50 to 50 cents.
3. The setting is applied to both accompaniment and the voice.
Split Point
This function sets the point which separates the entire keyboard to
two sections:
value to its default setting: 0.
1. Press and hold the [SHIFT] button and then repeatedly press the
“xxx Split Pt”. Use [+/YES]/ [-/NO] button or data dial to change
Split Point. The range of Split Point is: 1~61, press the [+/YES] and
2. Press [+] and [-] buttons simultaneously will set the split point value
to its default setting.
Note:
The Split keys belong to the left hand area.
[-/NO] buttons to restore its default setting.
Tune
SPlit Pt
PIANO
FUNCTION
SHIFT
/ NO / YES
PIANO
FUNCTION
SHIFT
/ NO / YES

Function Menu
[FUNCTION] button to select beat type menu. The LCD displays
“xxx Beat”.
Use [+/YES]/ [-/NO] button or data dial to change beat type. The
2. Press [+/YES] and [-/NO] buttons simultaneously will set the beat
type value to its default setting: 4.
Pedal Type
Beat Type
1. Press and hold the [SHIFT] button and then repeatedly press the
1. Press and hold the [SHIFT] button and then repeatedly press the
range of beat type: 0, 2~9.
[FUNCTION] button to select pedal type menu. The LCD displays
“001 Ped Sust”.
3. Press [+] and [-] buttons simultaneously will set the pedal type to
its default setting: Sust.
Use [+/YES]/ [-/NO] button or data dial to change pedal type.
2. There are 4 types of pedal are available.
17
2
1
No.
4
3
Ped Sust
Ped Mem
LCD Display
Ped Soft
Ped St/S Start/Stop Pedal
Soft Pedal
Memory Switch Pedal
Pedal Function
Sustain Pedal
and it would be automatically detect pedal type when powered on.
Note:
There are 6 EQ types are available.
1. This instrument allows normally open and normally closed pedal,
EQ Type
1. Press and hold the [SHIFT] button and then repeatedly press the
[FUNCTION] button to select the EQ type menu. The LCD displays
“006 EQ Reset”.
2. We don’t recommend you pressing the pedal while turning the
inverted.
Use [+/YES]/ [-/NO] button or data dial to change EQ type.
instrument on, because if you do that the pedal function would be
6
1
No.
2
3
4
5
EQ Reset
EQ Class
EQ Jazz
EQ Pop
EQ Dance
LCD Display
EQ Rock
EQ Type
Pop
Classical
Jazz
Dance
Rock
Reset
Press and hold the [SHIFT] button and then repeatedly press the
[FUNCTION] button to select reverb type menu. The LCD displays
“004 RevHall1”.
Use [+/YES]/ [-/NO] button or data dial to change reverb type. The
default setting is Hall 1.
Reverb Type
8
5
7
4
9
10
6
No.
1
2
3
RevChrh2
RevDelay
RevHall3
RevHall1
RevPnDly
LCD Display
RevRoom3
RevChrh1
RevHall2
RevRoom2
RevRoom1
Church 1
Pan Delay
Church 2
Room 1
Room 2
Reverb Type
Room 3
Hall 1
Hall 2
Hall 3
Delay
Beat
Ped Sust
EQ Reset
RevHall1
PIANO
FUNCTION
SHIFT
/ NO / YES
PIANO
FUNCTION
SHIFT
/ NO / YES
PIANO
FUNCTION
SHIFT
/ NO / YES
PIANO
FUNCTION
SHIFT
/ NO / YES

Reverb Level
Press and hold the [SHIFT] button and then repeatedly press the
[FUNCTION] button to select chorus type menu. The LCD displays
“004 ChrGMCr2”, Use the [+/YES]/ [-/NO] button or data dial to
change chorus type, the default setting is GM Chorus 2.
Use the [+/YES]/ [-/NO] button or data dial to change reverb level,
press the [+/YES] and [-/NO] buttons simultaneously to restore its
default setting: 23.
Press and hold the [SHIFT] button and then repeatedly press the
[FUNCTION] button to select reverb level. The LCD displays “xxx Rev
Lev”, adjustable range is: 0-32.
Chorus Type
18
NO.
3
7
8
5
1
6
2
4
ChrFlgr2
ChrRtry1
ChrChrs1
ChrChrs2
ChrFlgr1
ChrRtry2
LCD Display
ChrGMCr1
ChrGMCr2
Rotary 1
Chorus 1
GM Chorus 2
Flanger 1
Chorus Type
Flanger 2
Rotary 2
Chorus 2
GM Chorus 1
Press and hold the [SHIFT] button and then repeatedly press the
[FUNCTION] button to select chorus level menu. The LCD displays
“xxx Chr Lev”, adjustable range: 0-32.
Press and hold the [SHIFT] button and then repeatedly press the
[FUNCTION] button to select harmony type menu. The LCD displays
“001 HrmDuet”.
Use [+/YES]/ [-/NO] button or data dial to change harmony type.
Chorus Level
Harmony Type
Use the [+/YES]/ [-/NO] button or data dial to change chorus level,
Press the [+/YES] and [-/NO] buttons simultaneously to restore its
default setting: 0.
The harmony types are as follows:
7
9
No.
2
3
8
4
5
11
14
1
12
6
10
13
HrmDuet
HrmStdTri
Hrm4Cls1
HrmOctv2
Hrm4Cls2
HrmOctv1
Hrm1+5
HrmBlock
LCD Display
HrmCtDut
HrmStrum
HrmCtTri
HrmRkDut
HrmFulCd
Hrm4Open
Strum
Octave 1
Octave 2
4 Open
Duet
Country Duet
Block
1+5
Rock Duet
Country Trio
StandardTrio
Full Chord
4 Close 1
4 Close 2
Harmony Type
Press [+/YES] and [-/NO] buttons simultaneously restore to its default
setting: Hrm Duet.
Rev Lev
ChrGMCr2
Chr Lev
HrmDuet
Function Menu
PIANO
FUNCTION
SHIFT
/ NO / YES
PIANO
FUNCTION
SHIFT
/ NO / YES
PIANO
FUNCTION
SHIFT
/ NO / YES

MIXER
TRANSPOSE
MIDI IN/ OUT
Press and hold the [SHIFT] button and then repeatedly press the
[FUNCTION] button to select MIDI in/ out menu. The LCD displays
“xxx Midi In”/ “xxx Midi Out”.
1. Use [+/YES]/ [-/NO] button or data dial to change MIDI in channel:
time. This function can offer three options: 30 minutes, 60 minutes
restore MIDI in channel to its default setting: ALL.
1~16, ALL. Press [+/YES] and [-/NO] buttons simultaneously to
Use [+/YES]/ [-/NO] button or data dial to change auto power off
or OFF and the default setting is: 30 minutes.
1. Press and hold the [SHIFT] button and then repeatedly press the
[FUNCTION] button to select auto power off menu. The LCD
displays “xxx Power Off”.
Auto Power Off
2. Use [+/YES]/ [-/NO] button or data dial to change MIDI out channel:
1~16. Press [+/YES] and [-/NO] buttons simultaneously to restore
MIDI out channel to its default setting: 1.
19
Mixer
2. Repeatedly press the [MIXER] button to select one that you want
Mixer function can control the volume of different tracks. It just likes a
mini type mixing controller, separately control the left/right hand track
volume, bass track volume, and rhythm track volume and so on.
The option and parameters are as follows:
to set. Use [+/YES]/ [-/NO] button or data dial to change parameters.
1. Press the [MIXER] button to enter the mixer function menu, the
LCD displays “030 Rhythm_s” for the first time when powered on;
after then it will keep your last options every time.
Adjust the Chord 2 track volume.
Adjust the Percussion track volume.
Adjust the Bass track volume.
Content
Adjust the Chord 3 track volume.
Adjust the Chord 1 track volume.
Adjust the Rhythm track volume.
Adjust the Lower track volume.
Adjust the Upper 2 track volume.
Adjust the Phrase 2 track volume.
Adjust the Upper 1 track volume.
Adjust the Phrase 1 track volume.
XXX Rhythm_s
XXX Upper 1
XXX Bass
XXX Chord1
XXX Chord2
XXX Phrase1
XXX Phrase2
XXX Upper 2
XXX Lower
LCD Display
XXX Rhythm_m
XXX Chord3
Range
0-32
0-32
0-32
0-32
0-32
0-32
0-32
0-32
0-32
0-32
0-32
30
27
30
Value
30
30
30
Default
30
30
22
20
30
The function menu status will exit if no operation is done within 5 seconds.
Note:
Midi In
Midi Out
PowerOff
Rhythm_s
Function Menu
PIANO
FUNCTION
SHIFT
/ NO / YES
/ NO / YES
SUSTAIN
HARMONY
SHIFT
O.T.S.
TOUCH
SHIFT
METRONOME
OCTAVE
SHIFT
Effect Related Settings
Note:
Metronome
Note:
4. The touch function lets you dynamically and expressively controls
The metronome and style can be started at the same time. If you start
the metronome after the style stop playing, the beat type will be
changed as metronome setting; if you start the metronome while the
style is playing, the beat type will be changed as style setting.
then press the [SUSTAIN] button again.
The metronome provides a click sound, giving you an accurate tempo
guide when you practice, or letting you hear and check how a specific
tempo sounds.
the level of the voice with your playing strength – just as on an
Press [METRONOME] button to start the metronome.
button to start sustain function.
If you want a better sustain effect, you can use a sustain pedal. (Refer
to pedal function for more details.)
Sustain
1. Press and hold the [SHIFT] button and then press the [SUSTAIN]
To stop the metronome, press the [METRONOME] button again. (The
metronome type can be set in the function menu.)
acoustic instrument.
All notes will sustain even after releasing the keys.
2. To stop the sustain function, press and hold the [SHIFT] button and
Press and hold the [SHIFT] button and then press the [OCTAVE]
button to select octave function menu. The LCD displays “xxx
Octave”. Use [+/YES]/ [-/NO] button or data dial to change octave
value, adjustable range is: -1~ +1. Press the [+/YES] and [-/NO]
buttons simultaneously to restore default setting: 0.
level. Default level of touch response is 2.
Octave
button to enter touch menu. The LCD displays “xxx Touch”.
3. If the value is set to OFF, that means no touch response to
1. Press and hold the [SHIFT] button and then press the [TOUCH]
2. Use [+/YES]/ [-/NO] button or data dial to change touch response
keyboard.
Touch
20
Octave
Touch
GrdPno SUSTAIN
TOUCH
/ NO / YES
/ NO / YES
METRONOME
OCTAVE
Table of contents


