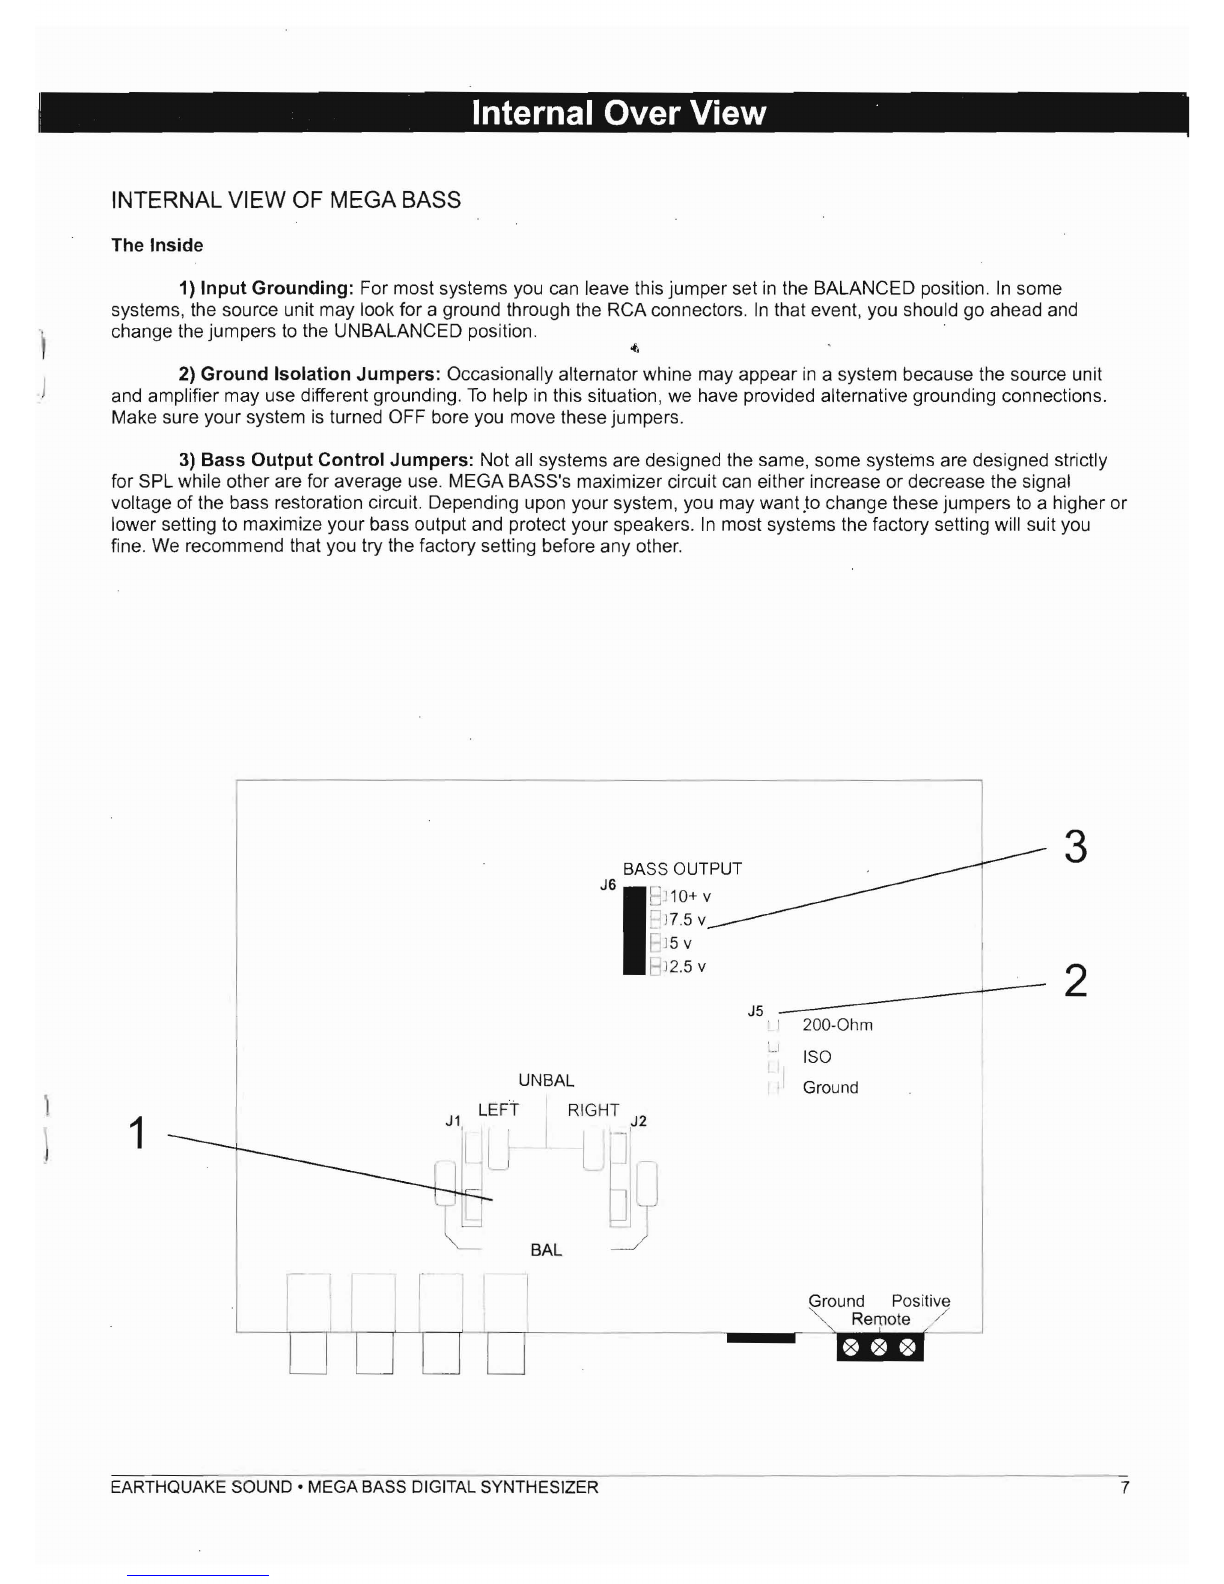
EarthQuake MEGA BASS MB1 Supplement

SOUND
Sound
That WiII Move You.
MB1
Owner's Manual &Warranty
www.earthquakesound.com

Table of Content
Page# 3 Warranty Guidelines
Page# 4......Focus Component Features; Specifications and Mounting Information
Page# 5......Focus Component Included Items
Page# 6......Focus Coaxiallncluded Items
Page# 7 Focus Coaxial Speaker Features, Specifications and Mounting Information
Page# 8......Custom and Factory Replacement Guide Lines
Page# 9 Tweeter Installation
Page# 9......Component set wiring diagram
Digitai
Bass
synthes~zer
Thank youfor choosing Earthquake Sound's MEGA BASS digitai bass synthesizerfor superiorenhancement ofyour vehicle's
audio systern. With proper installation and responsible Iistening, your bass synthesizer will give you years of phenomenal
listening enjoyment.
We strongly recommend you to have your new bass synthesizer installed by an authorized Earthquake Sound dealer:
Installation professionals employed by your dealer have the correct tools and knowledge to install your unit neatly and
successfully. Also, when your new products are installed by an authorized dealer, your product will include a FIVE YEAR
L1MITED
WARRANTY. If you choose to perform your own installation, your warranty will be subject to limitations. Over the
counter authorized dealer warranties may vary from one dealerto the next. Please read the warranty information in its entirety
and use goodjudgmentwhen making these vitaldecisions.
WWW.EARTHQUAKESOUND.COM
2

For
Easy On-line registration, Go To ..
www.earthquakesound.com/form_reg.htm
..
Five (5)
year
limited
warranty:
Earthquake warrants the originai purchaser that ali Factory Sealed New Audio Products be free from defects in material and
workmanship undernormal and proper use for a period of five (5) years fram the date of purchase (as shown on the originai bili of sale with
serial number affixed/written on it). The five (5) year warranty period is valid only if an authorized Earthquake dealer properly installs the
product and the warranty registration card is properly filled out and sent to Earthquake Sound Corporation. If a non-authorized party installs
the productaninety (90) daywarranty period will be applied.
(A) Five (5),years
limited
warranty
pian
coverage
guidelines:
•
First
year: Earthquake pays for labor, parts, and ground freight (only in US mainland, not including Alaska and Hawaii).
•
Second
year: Earthquake pays for labor and parts only, customer
~ust
pay freight both ways.
•
Third,
tourth
&
tifth
year: Earthquake pays labor only. Customer must pay for parts and freight both ways.
(B)
Warning:
Products (sent for repair) that are tested by Earthquake technicians and deemed to have no problem(s) will not be covered by the
five (5) year limited warranty.Customerwill be charged a minimum of one (1)hourof labor(ongoing rates) plus shipping charges back to
customer.
(C)
Earthguake
will
repair
or
replace
- at
our
option
- ali
detective
products/parts
subject
to
the
tollowing
provisions:
• Defective products/parts have not been altered or repaired by other than an Earthquake factory approved technician.
• Products/parts are not subjected to negligence, misuse, improper use, or accident,damaged by improper line voltage, used with
incompatible products, or have its serial number or any part of it altered , defaced or removed, or have been used in any way that is
contrary to Earthquake's written instructions.
(D)
Warranty
Limitations:
Warranty does not cover products that have been modified or abused . Including but not limited to the following:
Damages to speaker cabinet and cabinet finish due to misuse, abuse , or use of improper use of cleaning materials/methods.
Bent speaker frame, broken speaker connectors, holes in speaker eone, surround & dust cap, burnt speaker voice cciI.
Fading, deterioration of speaker components & finish due to improper exposure to elements.
Bent amplifier casing, damaged finish on the casing due to abuse, misuse, or improper use of
c1ean
ing material.
Burnt tracers on PCB.
ProducUpart damaged due to poor packaging or abusive shipping conditions.
Subsequent damage to other products.
Awarranty
c1aim
will not be valid if the warranty registration card is not properly filled & returned to Earthquake with
a copy of the sales invoice.
(E)
Service
Reguest:
Toreceive producUs service, contact Earthquake service department at (510) 732-1000 and request an RMA number(Return
Material Authorization), items shipped without a valid RMA number will be refused. Make sure you provide us with your complete/correct
shipping address, a valid phone number, and a brief description of the problem you are experiencing with the product, In most cases, our
technicians might be able to resolve the problem
overthe
phone, thus eliminating the need to ship the product,
(F)
Shipping
Instructions:
ProducUs must be packaged in its originai pratective box(s) to minimize transport damage. Shipper
c1a
ims regarding items
damaged in transit must be presented to carrier. Earthquake Sound Corporation reserves the right to refuse product improperly packed.
Originai bili of sale must accompany product returned for service. We encourage you to include with the package a written description
ofthe
problem. Ship productto: Earthquake Sound Corpo2727 Mc ConeAvenue, Hayward, CA94545. Ph (510) 732-1000.Youare responsible for
the cost of shipping the productto EarthquakeSound Corporation.
(G)
Disputes
Resolution
:
Ali disputes -between c1ientsand Earthquake Sound Corporation - resulting from the five (5) years Iimited warranty policy
must be resolved according to the laws ®ulations of the countyofAlameda -California.
Please keep this warranty infarmatian in yaur files far
Alternatively
you
may
register
your
products
online
at
future reference if necessary. Il is recommended that http://earthquakesound.com/form,,-reg.htm
you stick your serial number here for future reference.
ISERIAL NUMBER l
EARTHQUAKE SOUND • 5-YEAR WARRANTY 3

Thank You
Congratulations on your purchase of the world's most powerful and accurate bass synthesizer.
Whether this is your first Earthquake Sound product purchase, or you are already a supporter, you
will thoroughly enjoy the MEGA BASS synthesizer.
Now that we have your attention please allow us to break down the basics of bass and how it can
effect your systems performance. Regardless of your age or musical preference, adding low
frequency extension to sound system is an experience that audiophiles can appreciate. Whether you
listen to classical music, rock rnusic, rap music or if your a pure bread competitor, bass will truly
enhance the performance of your system. With that said, some people enjoy mare bass than others
and for that reason MEGA BASS comes with a dash mountable remote and also includes a bass
management center for easy control of the bass potency. So no matter what music you prefer MEGA
BASS is far you.
Moving
ono
Now that your ready to rock, we would like to recommend that read this manual in it's
entirety so that you can fully understand the installàtion instructions and what that big red button
does...before you go pushing il.
Features of the MEGA BASS Digitai Synthesizer:
-Advanced Digitai Bass Restoration System
-Subwoofer Maximization ControI Center
- 100% Voltage Output Enhancement
-Dash-Mounted Remote Control
- Portable Music Enhancement
-Woofer Protection Circuitry
FEATURES SUMMARY
Advanced Bass Maximization:
The MEGA BASS Digitai Synthesizer contains a bass maximization circuit that perfectly reproduces and pumps low
frequency info back into the voltage line. Which means that the syntnesizer will enhance bass impact when using COs,
Tapes and even portable media players, such as iPods and MP3 players.
Bass Circuit:
This is how
IVIEGA
BASS allows you to contrai your new found bassoThis cool equalization circuit contours the restored
bass to your speaker system.
Easy Access Dash Mount ControI Center:
MEGA BASS is designed to be mounted anywhere in your vehicle, with the exception of the obvious things like the
bumpers and in the gas tank. The MEGA BASS package comes with a dash mount contrai center which allows you to
controIthe intensity of your systems bass output right from the drivers seat. In addition the dash mount unit comes with a
built dual LED that dims and brightens as the bass increases and decreases.
't
DCF D.C. Filter:
The DCF aver drive circuit allows the user to have massive bass while protecting the speaker from DC. failure that is
typical in other bass enhancement device.
Bass Expander Limiter:
The MEGA BASS circuitry produces huge amounts of hard hitting, concrete shattering bass without damaging your
speakers. The Bass Expander Limiter circuit allows MEGA BASS to enhance the bass output of any audio system while
controlling damaging burps.
Ali spccincations are subject to chance wuhout notice. WWW.EARTHQUAKESOUND.COM4

Installatlon A,B,Cs
INSTALLATION
~
o
t
e
Bass Control
f--rcr-
Subwoofer
PH2000WD/1
!
~
~
M'
7~
PH2200W/4
~
.
1··
1
Tweete r
Factory Settings Shipped Options
Bass Frequency 40Hz 27Hz - 63Hz
Bass Bandwidth Wide Range fram 30Hz - 250Hz2.5,
Bass Output Control 5 volts 7.5 or 10 volts
Input Circuit Balanced Unbalanced
Ground Isolation Isolated 200 Ohm or Ground
Subsonìc Filter 33Hz 25Hz, 30Hz, 35Hz, 40Hz, 45Hz
.
•
SUB QUT
EQ7000PXi
)
~
]
IRemote Bass Control
Ho
[Q<
MEGA BASS Digitai Synthesizers are required to be installed in the signal path between a head unit and an external
amplifier. Additionally it can be installed after an equalizer, but must be installed before a crassover.
Now that this is complete, you just need to hook up the power, ground and trigger then run the wire to the dash remote
and now you have instant bass at your finger tips. But with
that
said you should continue to read
ono
lt will give you a more
visual understanding of the product that you have just purchased .
EARTHQUAKE SOUND • MEGA BASS DIGITAL SYNTHESIZER 5

Top Over View . :
OVER VIEW OF MEGA BASS
The
Outside
1)
Inputs:
The inputs of MEGA BASS use a balanced input circuit to help minimize feed back. They are also
designed to handle very high signal voltage up to 15 volts.
2)
Outputs:
These RCA connectors should be connected to the next component after MEGA BASS, such as a
crossover, equalizer or amplifier. Just remember that MEGA BASS should be in line before a crossover.
3) Dash
Input
Contrai:
This allows you to connect MEGA BASS to the remote control knob. You can mount the
knob anywhere you want, although somewhere in the font of the vehicle ìs most common. (Remote Must Be Connected
For The Unit Operate Correctly)
4)
Power
Connection:
This connector allows you to connect the Ground and Remote TURN-ON signals to
MEGA BASS. Connect ali of the wires to their appropriate locations in a
welllit
area and then plug it into MEGA BASS
where ever you decided to mount it in your vehicle.
5)
Bass
Controls:
These 2 knobs control the bass functions fo MEGA BASS.
The SWEEP knob allows you to pick the center frequency that you want MEGA BASS's restoration circuit to maximize.
The WlDE knob adjust how wide of a frequency range MEGA BASS will effect.
6) Power: When you have connected ali of your wires correctly the POWER light should illuminate. If it does not
then you need to check your wires. .
~
..
~~.
MtuA
R·~~
~H"(I
\
~
_J
Digitai
Bass
synthesizer
MODEL:
MB1
POWER
.
~~
WIDE SWEEP
BASS
DOUBLER
II .
5 - -
-+--
--
-
--
0
6 POWER
Balanced
L Inputs R L Outputs R Dash Remote
1,
..
1
V 'Q' T
.I
1 23 4
Ali speciftcations are subject lo change withoul notice. WWW.EARTHQUAKESOUND.CdM6

Internai Over View
INTERNAL VIEW OF MEGA BASS
The
Inside
1)
Input
Grounding:
Far most systems you can leave this
jumper
set in the BALANCED position. In some
systems, the source unit may look far a ground through the RCA connectors. In that event, you should go ahead and
" change the jumpers to the UNBALANCED position. 4\
2)
Ground
Isolation
Jumpers:
Occasionally alternator whine may appear in a system because the source unit
J and amplifier may use different grounding. To help in this situation, we have provided alternative grounding connections.
Make sure your system is turned OFF bare you move these jumpers.
3)
Bass
Output
Control
Jumpers:
Not ali systems are designed the same, some systerns are designed strictly
far SPL while other are far average use.
MEGA
BASS's maximizer circuit can either increase or decrease the signal
voltage of the bass restoration circuit. Depending upon your system , you may
wantto
change these jumpers to a higher or
lower setting to maximize your bass output and protect your speakers. In most systems the factory setting will suit you
fine. We recommend that you try the factory setting before any other.
3
BASS OUTPUT
J6 1,
DJ10+ v
8 17 5 v
[1J5 v
8 12.5 v
12
J5 , I
----
, 20
0-0h
m
'_
.1
ISO
UNBAL
'I
Ground
J1 LEFT RIGHT J2
1
~
j
_
1-
Li
~
ç
l
"'-
BAL
~
l Ground Positive
Remote /
'
T
EARTHQUAKE SOUND •
MEGA
BASS DIGITAL SYNTHESIZER 7

Placement and Mounting
INSTALLING MEGA BASS
Placement and Mounting
Placement: MEGA BASS needs to be installed in the signal path as close to your source unit as possible, but
definitely before any crossover circuit. Although MEGA BASS is close to the source unit's signal, the chassis is usually
mounted in the rear of the vehicle as close to the amplifiers as possible. We recommend connecting the MB1 to the
EQ7000PXi SUB OUT and have it drive the bass amplifier.
Mounting:
Once you have selected a permanent mounting location, position the unit and mark the appropriate
mounting holes with a pen or pencil. Before doing anything else, make sure you are not about to drill a hole in a gas tank
or pierce existing wires orcables. Now drill a small pilot hole and mount the unit.
Electrical Connections
WARNING: Failure to
disconnect
the negative
terminai
of
your
battery
prior
to
installation
may
result
in
severe
shock
or
damage
of
you
system
components.
.
Remote In: Connect a 22 to 18 gauge wire from the head-unit's remote turn-on to the REMOTE-IN connector of
MEGABASS.
Positive(+12v)
Connection:
Insert and 18 gauge or larger wire into the connector label'edPOWER on the
connector of MEGA BASS. Connect it to a good constant source of 12 volts, fused at 1-amp.
Ground
Connection:
Use the same gauge wire you did for the 12v connector on MEGA BASS's NEGATIVE
terminai of the battery, a ground bus, or a verified ground location. The factory head unit ground is not a good ground.
When ali connection are complete you may reconnect the negative battery terminai it's originai state.
IRemote Bass
Con
tro
l
l
-
~
ç
_ J Subwoofer
IRemote Bass Control
l-
ir I
PH2000WDI1
:
~
-----,
.1. SUB OUT
I
~I
1[
°'-
~
· "
"
"
~
I
.
(
f E
07
000PXi
PH2200W/4
~
J
~
§
,
.
~
.
,
1
~
1
REMOTE BASS CONTROL INSTALLATION
Placement and Mountinq
The remote bass control may be mounted under the dash using its own bracket or through a custom hole in the
dash. It should be within reach of the driver.
instaliation
~
The bracket is attached to the remote and mounts with two screws which attach to th underside of the dashboard,
or where ever you prefer. Find your preferred location, mark holes, drill pilot holes and then mount the unit.
A!l specificatll)fl Sare 3ubject to Ch;:tl1gc
\."
'
l
t
h
o
~
Jl
nouce
WWW
.EARTHQUAKESOUND.COM8

Bass Control CenterAdjustments
ADJUSTING THE BASS CONTROL CENTER
The bass response in a system is affected by four factors:
1. The acoustics of the vehicle
2. The locations of the speakers
3. The music on the tape, CO or source unit
4. The speakers and or speaker enclosures
..
Because of the variations in the record ing process we developed
MEGA
BASS to help restore any low frequencies lost
during the recording process or from source units, however, the acoustics of various environments are different. With this
in mind our engineers developed this fantastic system.
The SWEEP control allows you to select a center frequency between 27 and 63Hz. The WIOE control then allows
you to control the shape of the filter centered around the SWEEP frequency.
SETTING THE BASS OUTPUT CONTROL
MEGA
BASS is the most powerful bass component on the market. It is able to leap to dramatically enhance any
audio system to audiophile status or preference.
MEGA
BASS is equipped with several different bass output selections. If
you should need to change the settings, please use the chart below for guidance. Before making any changes try listening
to the factor settings...they may be just what your looking for.
RECOMMENDED SETTINGS
Sellinq Amplifier Input Voltage Minimum Speaker Size
2.5 Volt 3 Volts or less 8"
5 Volt . 5 Volts or less 10"
7.5 Volt 7.5 Volts or less 12"
10 Volt 10 Volts or less Some Kind of Beast
DPF D.C. Protection Filter
Many car audio systems truly push the Iimits of their subwoofer, without really knowing it. Tuned
enclosures affect the roll-off of many speakers, yet lots
of
source materiaI forces the speakers to play lower
than expected. The net result i s wasted amplifier power and damaged speakers.
MEGA
BASS's DPF
Overdrive is a programmable subsonic filter. It allows you to only let the speaker play as low as it should be
played. Because every system is different, we allow you to change the DPF roll-off frequency to whatever you
choose.
EARTHQUAKE
SOUNIJ·
MEGA BASS DIGITAL SYNTHESIZER 9
Other manuals for MEGA BASS MB1
2
Table of contents
Other EarthQuake Synthesizer manuals
Popular Synthesizer manuals by other brands

Roland
Roland Sound Canvas SC-55 owner's manual

Moog
Moog Drummer From Another Mother user manual

Kurzweil
Kurzweil K2500 - PERFORMANCE GUIDE REV F PART NUMBER 910251 CHAP... manual

Xaoc Devices
Xaoc Devices KARL MARX STADT Operator's manual

CES
CES CEM3394 quick start guide

Playtime Engineering
Playtime Engineering blipblox quick start guide