Clear One UNITE 200 PTZ User manual
User Manual
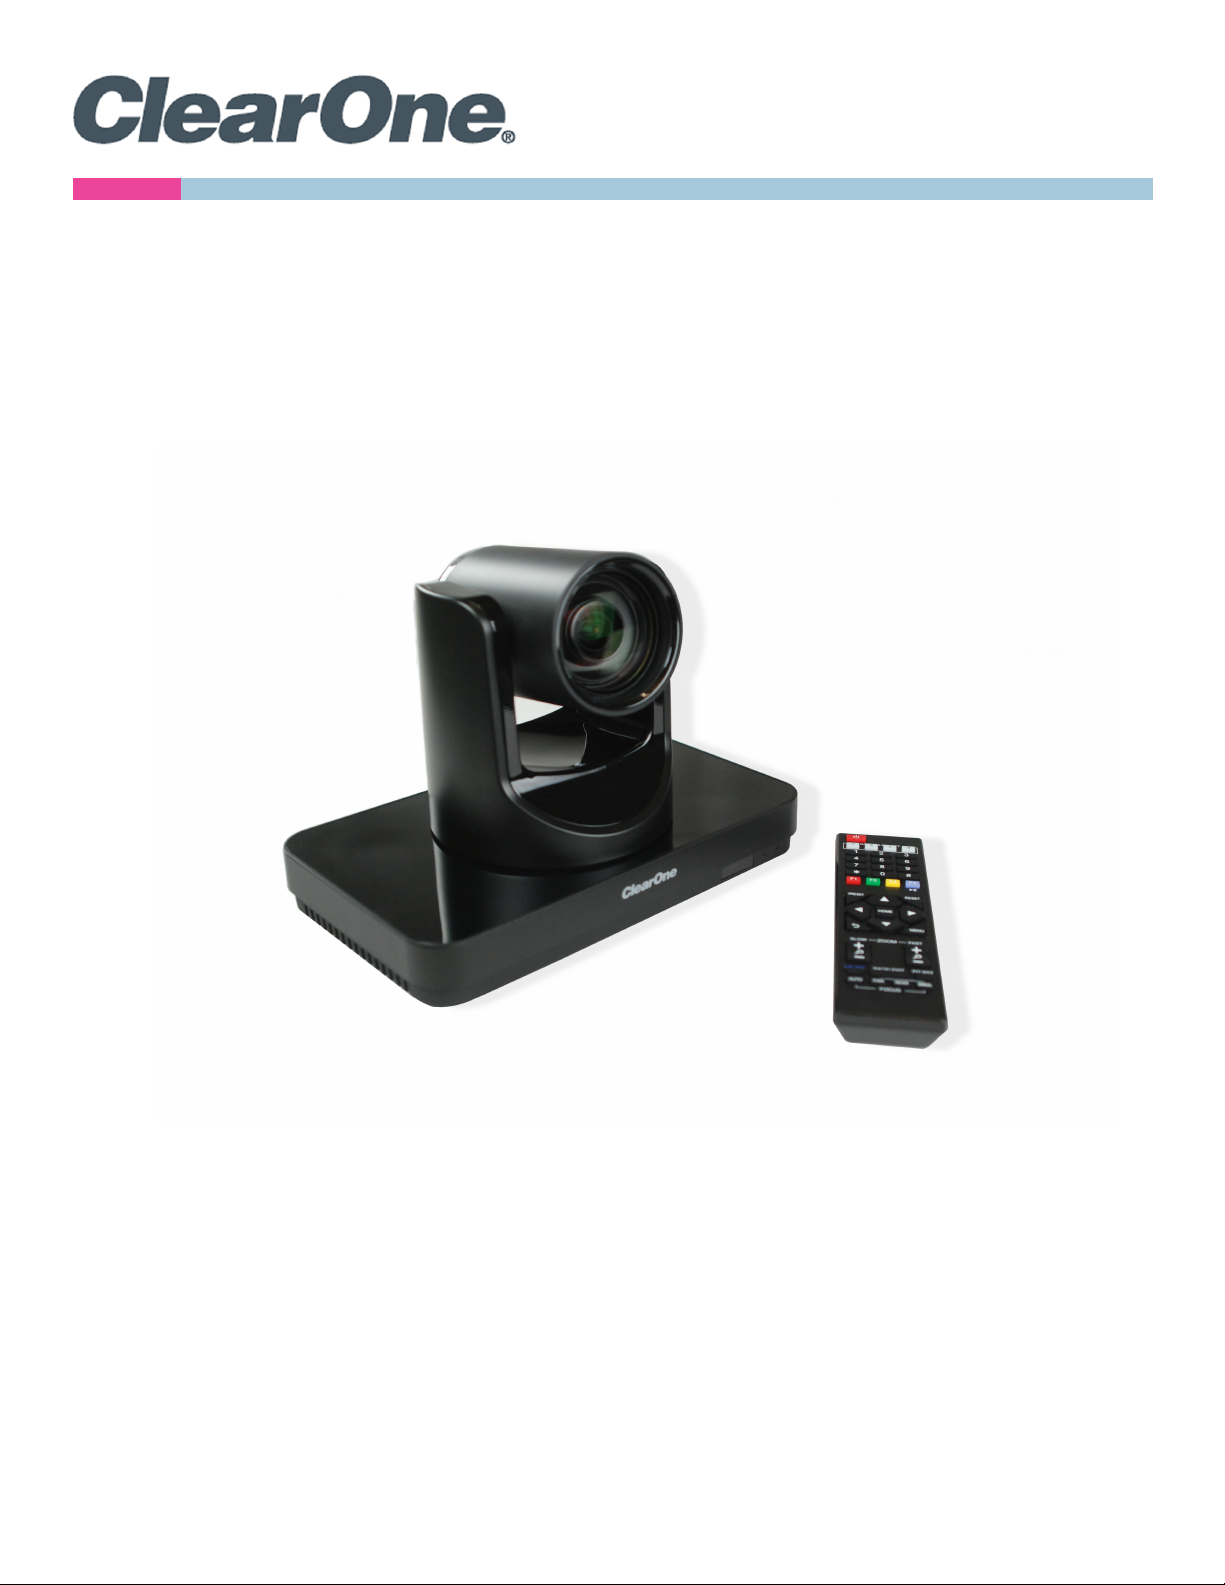
UNITE®200 PTZ HD Camera

UNITE 200 PTZ HD Camera User Manual
iDOC-0263-001v1.6 August 2021
ClearOne®Contacts
Headquarters Headquarters
5225 Wiley Post Way Suite 500 Tel: +1.801.975-7200
Salt Lake City, UT 84116
Sales Technical Support
Tel: +1.801.975.7200 Tel: +1.801.974.3760
Notices
© 2021 ClearOne, Inc. All rights reserved.
Information in this document is subject to change without notice.
Document: DOC-0263-001v1.6, August 2021

UNITE 200 PTZ HD Camera User Manual
ii DOC-0263-001v1.6 August 2021
anchor
Contents
Introduction...............................................................................................1
Remote Control.........................................................................................1
Menu Settings ...........................................................................................3
EXPOSURE.............................................................................................................3
COLOR....................................................................................................................5
NOISE REDUCTION...............................................................................................8
SETUP ....................................................................................................................8
COMMUNICATION SETUP ....................................................................................9
RESTORE DEFAULT.............................................................................................10
USB 3.0 ...................................................................................................10
IP Function ..............................................................................................11
Access Through a Local Area Network (LAN) .....................................................11
Access Through a Wide Area Network (WAN) ....................................................12
IP Camera Parameter Setup.................................................................................12
Control Interface Definition...................................................................................16
Network Configuration .........................................................................................17
Command List ......................................................................................................18
Maintenance and Troubleshooting.........................................................24
Camera Maintenance ...........................................................................................24
Unqualified Application ........................................................................................24
Troubleshooting....................................................................................................24

UNITE 200 PTZ HD Camera
1DOC-0263-001v1.6
User Manual
Back to Table of Contents August 2021
Introduction
This user manual provides advanced information regarding control of the ClearOne UNITE 200 PTZ HD Camera.
Additional information about the camera is provided in the corresponding Datasheet and Quick-Start Guide, which are
available in ClearOne’s Resource Library.
Remote Control
1. Standby Button
Press this button to enter standby mode. Press it again to enter
normal mode.
Note: Power consumption in standby mode is approximately half of
the normal mode
2. Position Buttons
To set preset or call preset
3. * Button
4. Set/Preset Buttons
Set a corresponding numeric key preset position
[PRESET] + Numeric button (0-9)
Note: Preset 0-9 via remote control and the rest from keyboard and
the serial port.
5. Pan-Tilt Control Buttons
Press the arrow buttons to perform panning and tilting. Press the
[HOME] button to face the camera back to front.
6. Return Button
Press to return to previous menu.
7. Zoom Buttons
Slow Zoom: Zoom In [+] or Zoom Out [-] slowly
Fast Zoom: Zoom In [+] or Zoom Out [-] fast
8. L/R Set Button
Press at the same time as the numeric button 1 [STD] and button 2
[REV] to set the direction of the Pan-Tilt
L/R Set +1[STD]: set the Pan-Tilt turn the same direction as the L/R
Set
L/R Set +2[REV]: set the Pan-Tilt turn the opposite direction as the
L/R Set
9. Focus Buttons
Press [AUTO] to adjust the focus on the center of the object auto-
matically.
Press [MANUAL] to adjust the focus manually.
Press [FAR] to focus on a far object.
Press [NEAR] to focus on a near object.
10. Camera Select Buttons
Press the button corresponding to the camera you want to control with the remote controller.
11. # Button
Used with other buttons

UNITE 200 PTZ HD Camera
2DOC-0263-001v1.6
User Manual
Back to Table of Contents August 2021
12. Set Camera IR Address Buttons
Function 1. Set camera IR address
[*]+[#]+[F1]: Address 1
[*]+[#]+[F2]: Address 2
[*]+[#]+[F3]: Address 3
[*]+[#]+[F4]: Address 4
Function 2: Image freezing function
Press [F4] to start the freeze function. The word “Freeze” displays in the upper left. After five seconds, the display
automatically disappears (though the freeze feature continues). To cancel the freeze, press the [F4] key the word
“Unfreeze” displays in the upper left. After five seconds, the display automatically disappears.
13. Reset Buttons
Clear a specific preset: [Reset] + Numeric button (0-9)
Clear all presets: [*]+[#]+[Reset]: Erase all presets
14. Pan/Tilt Control Buttons
Press arrow buttons to perform panning and tilting. Press [HOME] button to face the camera back to front.
15. MENU
Press MENU to enter or exit the OSD menu.
16. BLC (Backlight Compensation) Button
If there is light behind the subject, the subject will appear dark.
Press this button to enable the backlight compensation. Press it again to disable the backlight compensation.
Press the backlight ON / OFF button. To cancel this function, press the backlight ON / OFF button.
Note: The BLC feature is effective only in auto exposure mode.
Note: If light behind the subject exists, the subject appears dark. In this case, press the backlight ON / OFF button.
To cancel this function, press the backlight ON / OFF button.
17. Pan/Tilt Reset
Reset Pan/Tilt self-test.
Shortcut Set:
[*]+[#]+[1]: Display OSD menu in English
[*]+[#]+[3]: Display OSD menu in Chinese
[*]+[#]+[5]: Save OSD
[*]+[#]+[6]: Quickly recover the default settings
[*]+[#]+[8]: Show the camera version
[*]+[#]+[9]: Quickly set mount mode (flip/normal)

UNITE 200 PTZ HD Camera
3DOC-0263-001v1.6
User Manual
Back to Table of Contents August 2021
Press the [MENU] button to display the main menu. Use the arrow
buttons to select the item to be set.
Press the [HOME] button to enter a sub-menu.
EXPOSURE
Select Exposure from the main menu and press the [HOME] button.
The EXPOSURE menu appears.
The table on the following page provides information about Exposure
settings.
Menu Settings
UNITE 200 PTZ HD Camera
4DOC-0263-001v1.6
User Manual
Back to Table of Contents August 2021
Setting Description Options Effective only when the
exposure mode is set to...
Mode • Auto
• Manual
• SAE
• AAE
• Bright
ExpCompMode Exposure compensation
mode
• On
• Off
Auto
ExpComp Exposure
Compensation value
-7 ~ 7 NA
Only when ExpCompMode is on.
Gain Limit Maximum gain limit 0 ~ 15 Auto/AAE/Bright.
Backlight Set the backlight
compensation
• On
• Off
Auto.
DRC DRC strength 0 ~ 8 NA
Bright Intensity control 00~17 Bright.
Anti-Flicker Anti-flicker Auto/Bright.
Meter • Average
• Center
• Bottom
• Top
NA
Iris Aperture value • F1.8
• F2.0
• F2.4
• F2.8
• F3.4
• F4.0
• F4.8
• F5.6
• F6.8
• F8.0
• F9.6
• F11.0
• Close
Manual/AAE
Shutter Shutter value • 1/30
• 1/60
• 1/90
• 1/100
• 1/125
• 1/180
• 1/250
• 1/350
• 1/500
• 1/725
• 1/1000
• 1/1500
• 1/2000
• 1/3000
• 1/4000
• 1/6000
• 1/10000
Manual/SAE
• Off
• 50 Hz
• 60 Hz

UNITE 200 PTZ HD Camera
5DOC-0263-001v1.6
User Manual
Back to Table of Contents August 2021
COLOR
From the main menu, select Color, then press the [HOME] button.
The system displays the COLOR menu.
Setting Description Options Effective only when...
WB-Mode White balance mode • Auto
• Indoor
• Outdoor
• OnePush
• Manual
NA
RG Red gain 0 ~ 255 WB-Mode is set to Manual.
BG Blue gain 0 ~ 255 WB-Mode is set to Manual.
RG Tuning Red gain fine-tuning -10 ~ +10 AWB sens is set at Low.
BG Tuning Blue gain fine-tuning -10 ~ +10 AWB sens is set at Low.
Saturation Saturation 60% ~ 200% NA
Hue Chroma adjustment 0 ~ 14 NA
UNITE 200 PTZ HD Camera
6DOC-0263-001v1.6
User Manual
Back to Table of Contents August 2021
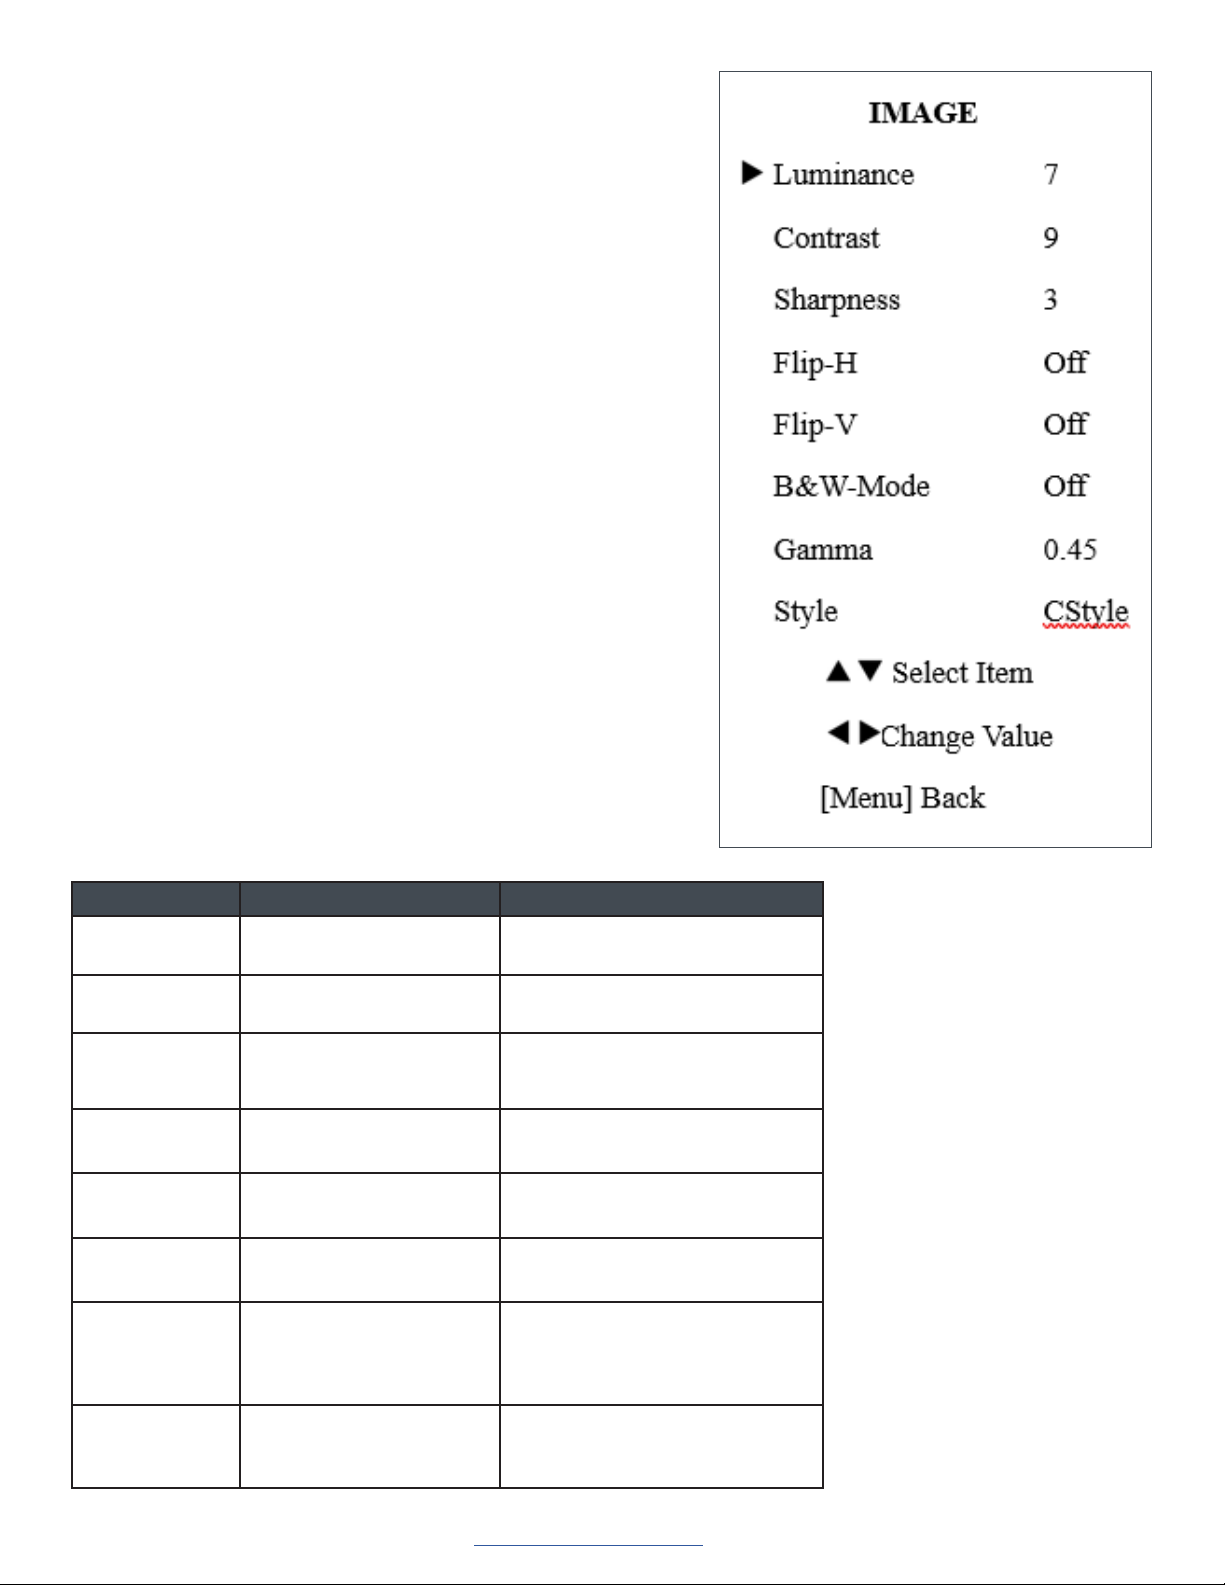
IMAGE
From the main menu, select Image, then press the [HOME] button.
The system displays the IMAGE menu.
Setting Description Options
Luminance Brightness adjustment 0 ~ 14
Contrast Contrast adjustment 0 ~ 14
Sharpness Sharpness adjustment • Auto
• 0 ~ 15
Flip-H Image flipped horizontal • On
• Off
Flip-V Image flipped vertical • On
• Off
B&W-Mode: Image color • On
• Off
Gamma • Default
• 0.45
• 0.5
• 0.56
• 0.63
Style • Norm
• Clarity
• Bright
• CStyle
UNITE 200 PTZ HD Camera
7DOC-0263-001v1.6
User Manual
Back to Table of Contents August 2021
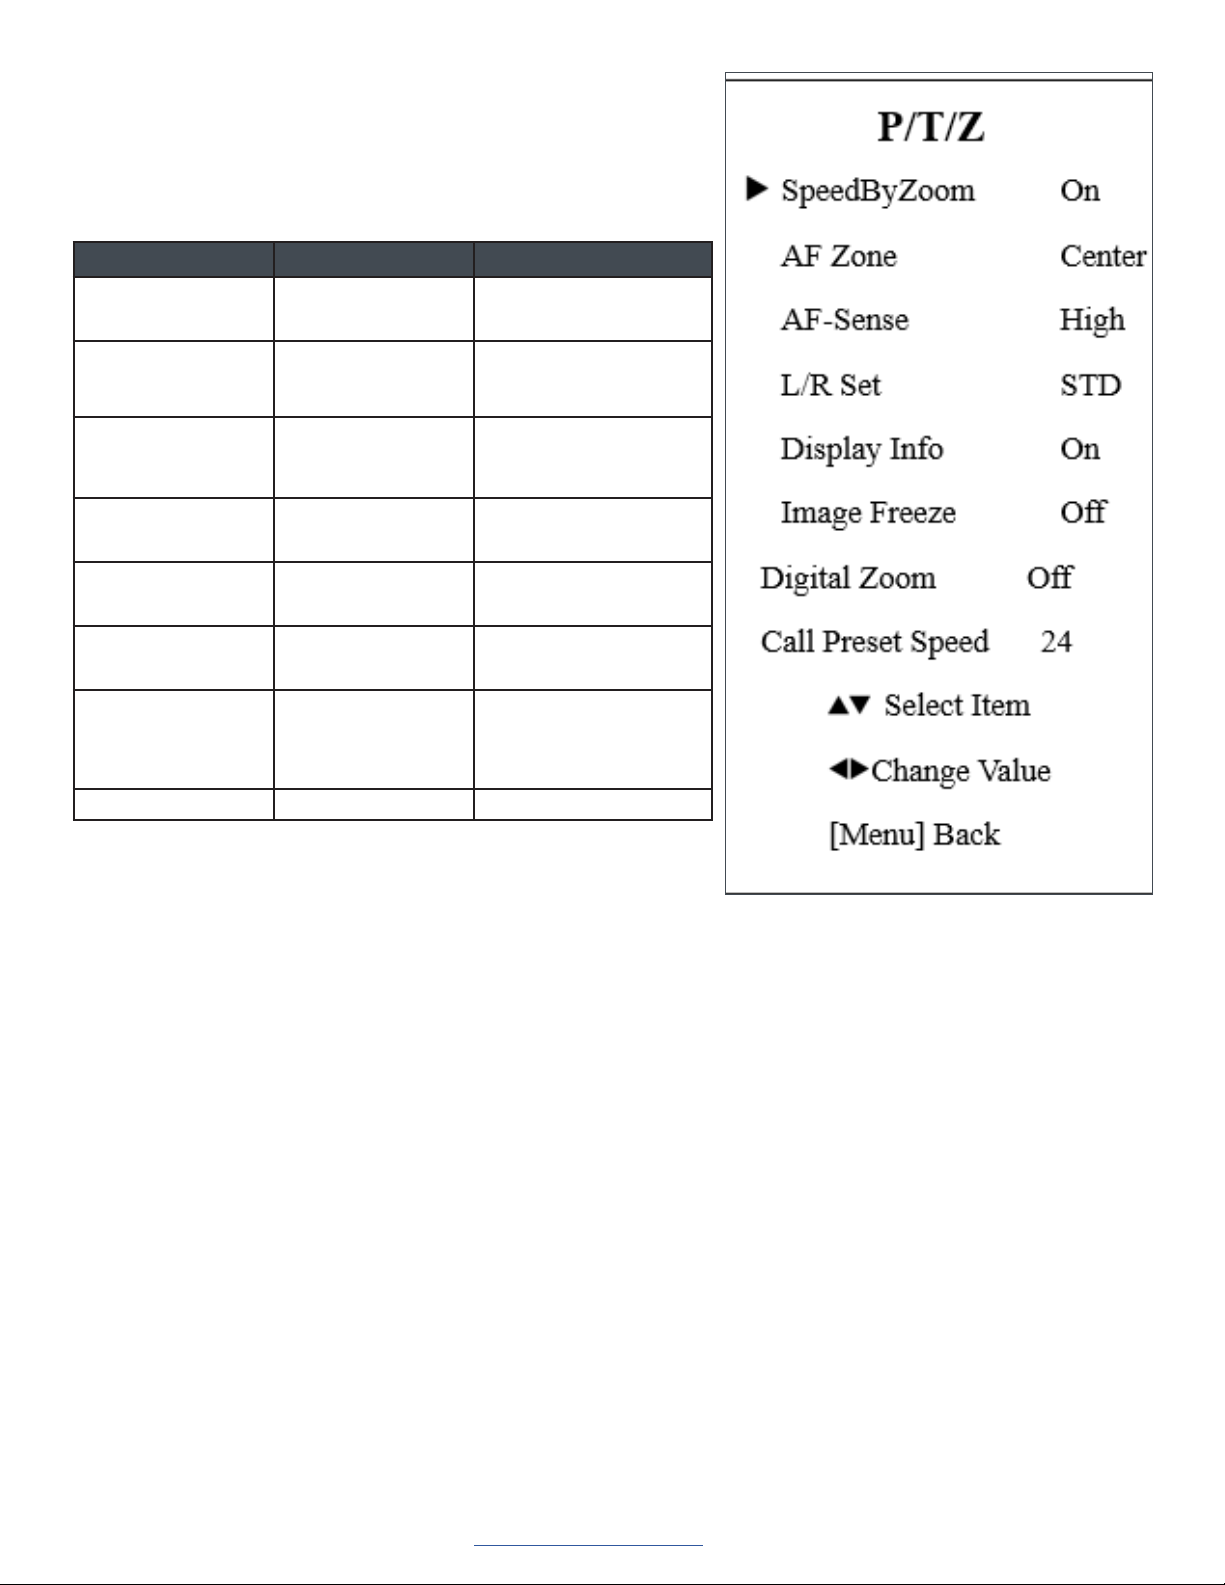
P/T/Z
From the main menu, select P/T/Z, then press the [HOME] button.
The system displays the P/T/Z menu.
Setting Description Options
SpeedByZoom The depth of field
scale switch
• On
• Off
AF-Zone Interested in
focusing area
• Top
• Center
• Bottom
AF-Sense Automatic focusing
sensitivity options
• Low
• Normal
• High
L/R Set • STD
• REV
Display Info • On
• Off
Image Freeze • On
• Off
Digital Zoom • 2X
• 4x
• 8X
• 16X
• Off
Call Preset Speed 1 - 24
UNITE 200 PTZ HD Camera
8DOC-0263-001v1.6
User Manual
Back to Table of Contents August 2021
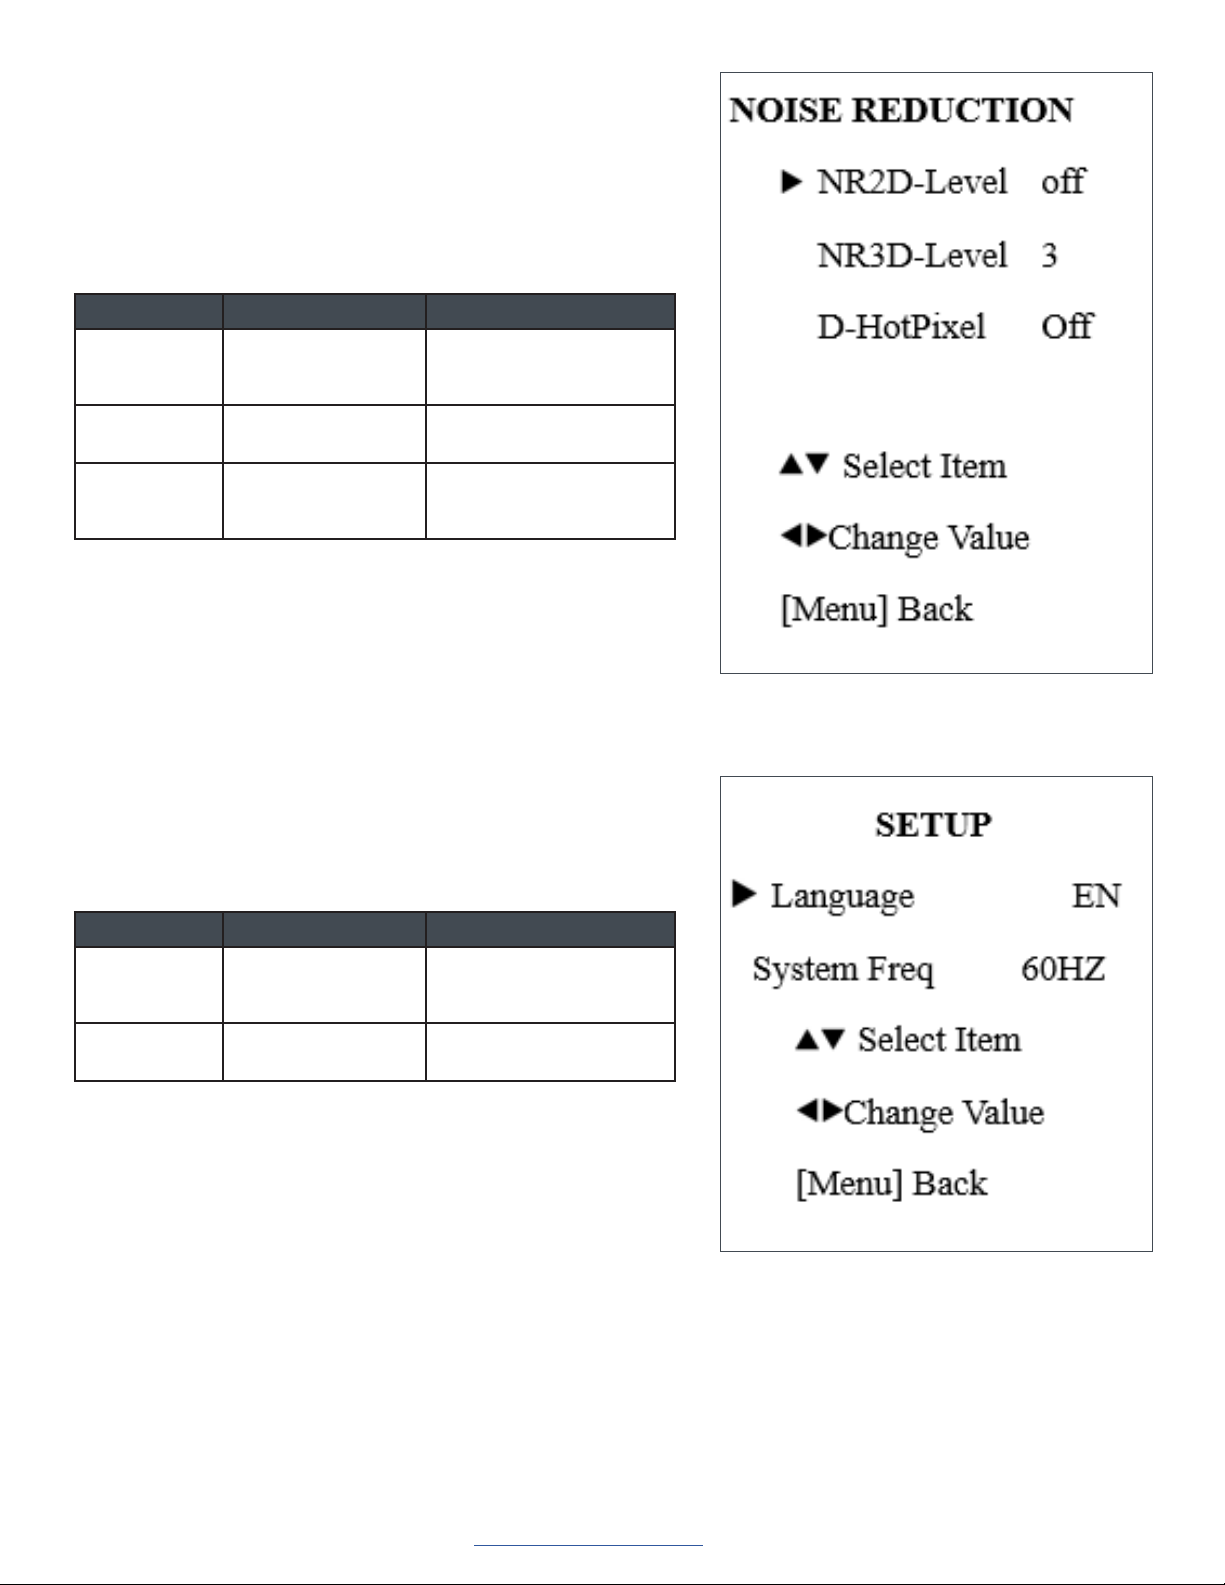
NOISE REDUCTION
From the main menu, select Noise Reduction, then press the [HOME]
button.
The system displays the NOISE REDUCTION menu.
Setting Description Options
NR2D-Level 2D noise reduction • Off
• Auto
• 1 - 5
NR3D-Level 3D noise reduction • Off • 1 - 8
D-HotPixel Dynamic bad points • Off
• Auto
• 1 - 5
SETUP
From the main menu, select Setup, then press the [HOME] button.
The system displays the SETUP menu.
Setting Description Options
Language Menu language • EN
• Chinese
• Russian
System
Frequency
• 50 Hz • 60 Hz
UNITE 200 PTZ HD Camera
9DOC-0263-001v1.6
User Manual
Back to Table of Contents August 2021
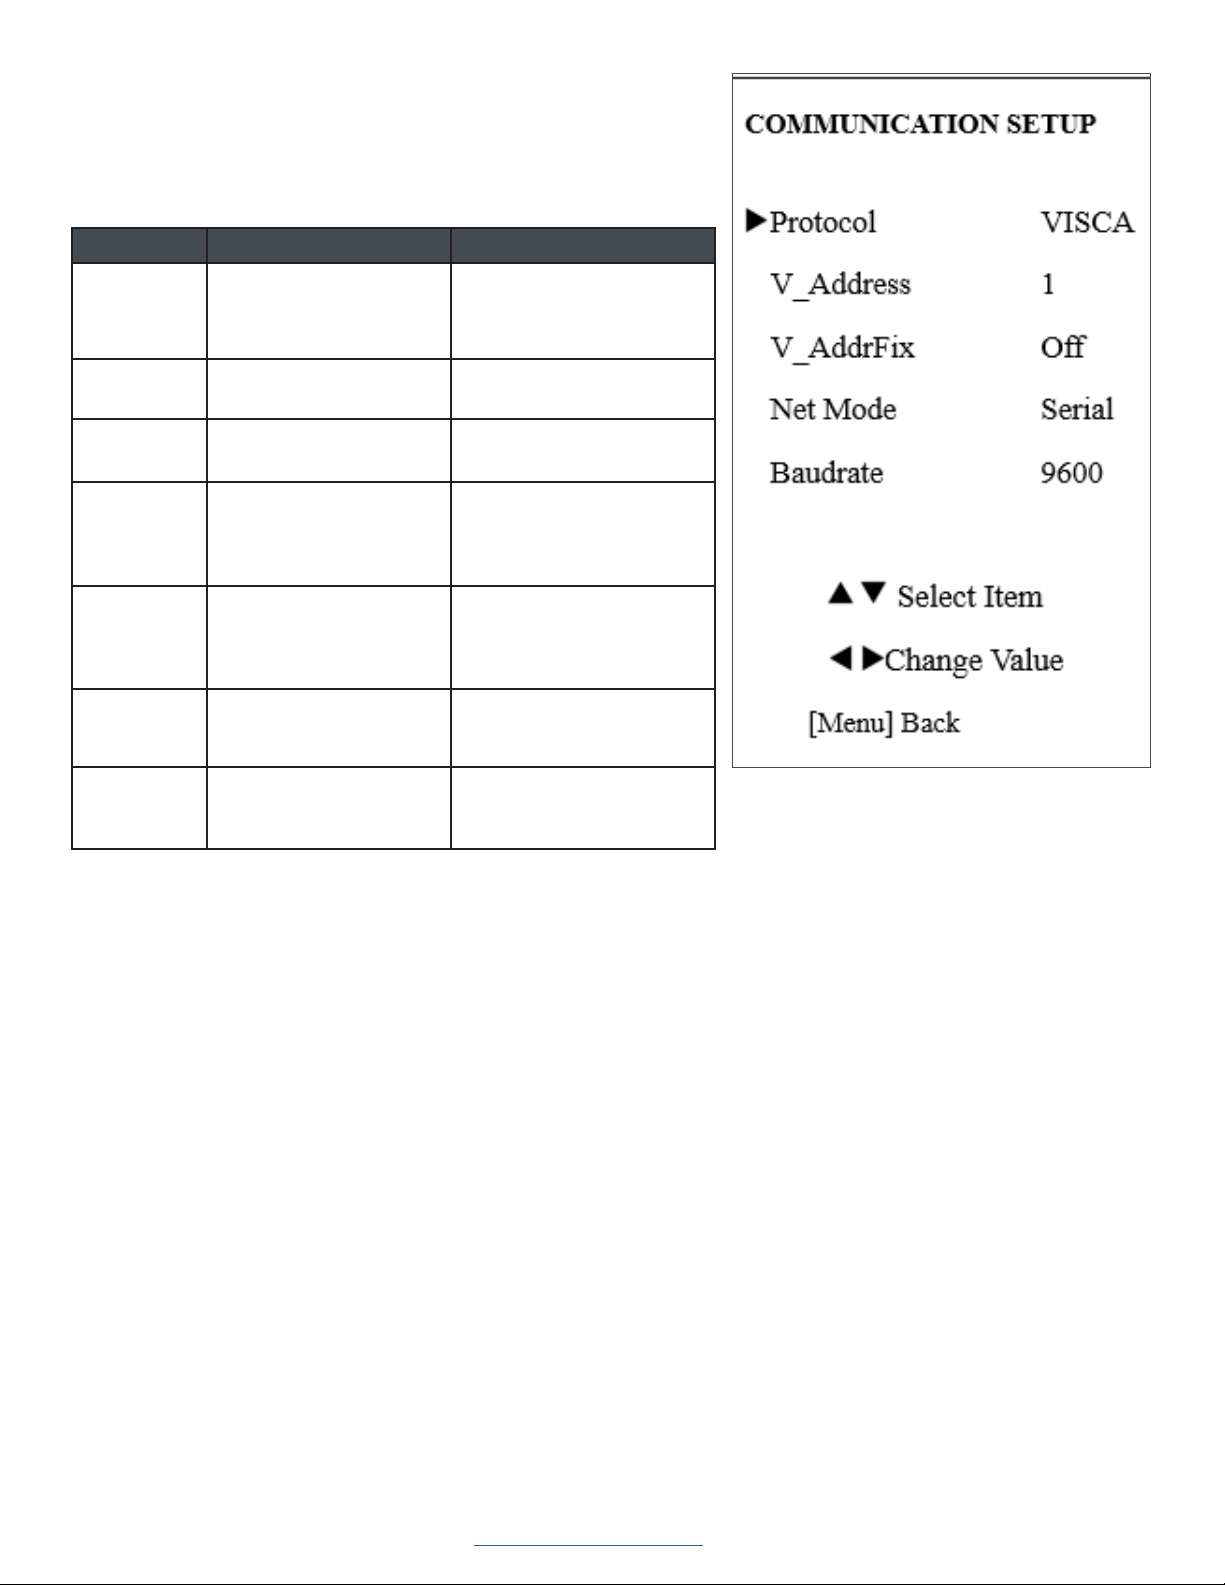
COMMUNICATION SETUP
From the main menu, select Setup, then press the [HOME] button.
The system displays the COMMUNICATION SETUP menu.
Setting Description Options
Protocol Control protocol type • AUTO
• VISCA
• PELCO-D
• PELCO-P
P_D_
Address
PELCO-D protocol 0 ~ 254
P_P_Address PELCO-P protocol 0 ~ 31
V_AddrFix Set whether users can
change VISCA address
through serial port or
keyboard
• On (set to On, useless in
88 30 01 FF Command)
• Off
V_Address Protocol address
decided according
to agreement (AUTO,
VISCA protocol)
1 ~ 7
Net Mode Set the serial port control
networking
• Serial
• Parallel
Baudrate Serial port baud rate • 2400
• 4800
• 9600

UNITE 200 PTZ HD Camera
10 DOC-0263-001v1.6
User Manual
Back to Table of Contents August 2021
RESTORE DEFAULT
From the main menu, select Restore Default, then press the [HOME]
button.
The system displays the RESTORE DEFAULT menu.
Setting Description Options
Restore Confirm restore
factory settings
• Yes
• No
Note: Press [HOME] button to confirm.
USB 3.0
The camera supports UVC protocol, compatible USB 2.0 & USB 3.0.
USB 3.0 support 1920x1080p/30 max output.
Support OS: Windows 7/8/8.1/10, Linux, Mac OS, etc.
General software are as follows:
• Windows: AMCAP, VLC, Debut Video Capture, etc.
• Linux:V412 software driver and VLC media player, etc.
• Mac OS: FaceTime. iChat, Photo Booth and Debut Video Capture, etc.
Note the following:
• ClearOne recommends the use of AMCAP version 8.0 in Windows, as its software performance is more
stable. When you use the high version of AMCAP in a low configuration system, it shows the stream
rendering.
• The first time the camera is accessed by USB cable, you must install a plug-in.

UNITE 200 PTZ HD Camera
11 DOC-0263-001v1.6
User Manual
Back to Table of Contents August 2021
IP Function
Access Through a Local Area Network (LAN)
1. Setup IP address
The camera’s default IP address is
192.168.100.88.
If you forget the camera’s IP address or
have changed it, to show the camera
IP address on screen, on the remote
control, press * and # and 4.
To change the camera’s IP address:
a. Open the camera’s Web interface
(see Access Camera’s Web
Interface later in this Manual for
detailed instructions).
b. On Web interface page, find
“Network”--->Change IP. Enter a
new IP address, then Click “Apply”.
c. Restart camera.
2. Access camera’s web
Input http://192.168.100.88 into a browser (Internet
Explorer and Firefox work best).
Note the following:
• If you have changed the camera’s IP
address, enter the new address.
• To access the camera with an IP address,
you must be on the same network as the
camera.
A login window appears. Input the user name and
password. The default for both is “admin”.
Your login window may not look exactly like this,
depending on your operating system and browser):

UNITE 200 PTZ HD Camera
12 DOC-0263-001v1.6
User Manual
Back to Table of Contents August 2021
After login, the Web interface appears, as shown below:
Note: If this is the first use of the web interface, you must install the VLC player software.
Access Through a Wide Area Network (WAN)
Dynamic DNS setup for accessing the camera
Once you have set a domain name to the camera,
and have forwarded the traffic to the correct address
and port number, you can use a domain name
to access the camera. The access link is: http://
hostname: port number.
For example, set up host computer name as:
youdomain.f3322.org, camera port number: 554.
The access link would be: http://youdomain.f3322.
org:554.
VLC stream media player monitoring
VLC media server procedure
1. Open VLC media player, click “Media”->”Open
Network Steam”, or type “Ctrl + N”.
2. Input stream address: rtsp://ipaddress:port
number/1 (Main stream ).
3. Example: rtsp://192.168.100.88:554/1
4. rtsp://ipaddress:port number/2 (Sub stream).
5. Example: rtsp://192.168.100.88:554/2
Note: The default RTSP port number is 554.
IP Camera Parameter Setup
Homepage
Menu
All pages include two menu bars:
• Real time monitoring: displaying video image
• Parameter setup: with function buttons
Video viewing window
The video viewing window must be the same as video resolution; the bigger the resolution, the bigger the playing area.
To show full-screen, double-click the viewing window; to return to initialized size, double-click again.
UNITE 200 PTZ HD Camera
13 DOC-0263-001v1.6
User Manual
Back to Table of Contents August 2021
• Pan-Tilt control: Up, Down, Left, Right, Home button.
• Rate: You can choose vertical speed as 1 - 24, horizontal direction at the rate of 1 - 20.
Select corresponding speed and click direction button to realize PTZ speed increase or
decrease.
• Zoom In/ Zoom out: for zooming in or zooming out. Focus In/ Focus Out: Focusing on
distant objects or Focusing on close objects.
• Set/Call: After you have set PTZ to a desired position, you can save that configuration
as a preset for later use. Click the “Set” button to save a preset. At any point later, you
can click the “Call” button to call this preset.
Media
Select “Video”.
• Video format
Supports 50 HZ (PAL) and 60 HZ (NTSC), and Dial
priority.
• Encode Protocol
Supports MJPEG, H.264 and H.265.
• Encode Level
Supports baseline, main profile, and high profile.
• Resolution
Main bit rate supports 1920x1080, 1280x720 and
1024x576.
Minor bit rate supports 720x480, 720x576 and
320x240.
The higher the resolution, the clearer the image, but
this uses more network bandwidth.
• Bit Rate
You can assign bit rate/stream. Generally, the higher
the bit rate, the clearer the image. The bit allocation
must combine with network bandwidth. If the network
bandwidth is too low and the allocated bit rate is too
high, the video quality suffers.
• Frame rate
You can specify the frame rate. Generally speaking,
the higher the frame rate, the smoother the image;
the lower the frame rate, the choppier the image.
• I key frame interval
Set the interval between 2 and 150. The larger the interval, smaller the response from the viewing window.
• Bit Rate control
Options:
Constant bit rate: video coder codes per preset speed
Variable bit rate: video coder adjusts the speed to gain the best image quality

UNITE 200 PTZ HD Camera
14 DOC-0263-001v1.6
User Manual
Back to Table of Contents August 2021
• Fluctuate level
Restrain the fluctuation magnitude of variable rate. Options: 1 - 6
Image Setup
Click “Image.”
• Brightness
Image brightness, 0 -14, slider control, on the right
shows the corresponding numerical value. The
default value is 7.
• Saturation
Saturation 0 - 14, slider control, on the right shows
the corresponding numerical value. The default value
is 4.
• Contrast
Contrast 0 - 14, slider control, on the right shows the
corresponding numerical value. The default value is
8.
• Sharpness
Sharpness 0 - 15, slider control, on the right shows
the corresponding numerical value. The default value
is 3.
• Hue
Hue 0 - 14, slider control, on the right shows the
corresponding numerical value. The default value is
6.
• Flip & Mirror
Select Flip to turn the image upside down; select
Mirror to flip the image horizontally. The default value
for both is not selected.
• Apply, Cancel, and Default Buttons
After you adjust any parameters, to save the settings click “Apply”; to cancel the parameter adjustments, click
“Cancel”. To revert to the default value, click “Default”.
Audio Setup
Click “Audio.”
• Audio Type
Option: AAC.
• Sample rate
Options: 44.1K and 48K.
• Bit rate
Options: 96K, 128K, 256K.
• Input Type
Option: line in only
• Input Vol L and Input Vol R
The gain of the Line in.
• Apply and Cancel buttons
To save changes, click “Apply”, or to discard the changes click “Cancel”.

UNITE 200 PTZ HD Camera
15 DOC-0263-001v1.6
User Manual
Back to Table of Contents August 2021
System Setting
Click “System.”
• Work Mode
Work Mode RTSP
• Reboot
Click the “Reboot” button to restart the
system.
• User and password
You can modify the password (letters and
numbers only)
• Apply / Cancel
Modify the password, then to change the
password, click “Apply”, or to cancel the
change click “Cancel”.
Network Setting
Click “System.”
• LAN Settings
The default IP address is
192.168.100.88. The MAC address
can be modified.
• Port Settings
HTTP Port, Default port number: 80
RTSP Port, Supports the RTSP
protocol. Default port number: 554.
PTZ Port, Supports PTZ protocol.
Default port number: 5678.
• Control Protocol Setting
Camera control communication
protocols include Visca address,
Pelco-D address, and Pelco-P
address.
• RTMP Setting
When configuring the camera stream,
can set up two streams, in the two
stream selection control code stream
of “On”, “Off”, “Video”, “Audio”, etc.
• RTSP Setting
Setting network camera RTSP protocol of “On”, “Off”.
• Multicast Setting
Multicast switch, multicast address (default address 224.1.2.3) and port (default port number: 6688) can be set.
• Apply / Cancel
Modify network parameters then click “Apply” to save the changes, or click “Cancel” to discard the changes.

UNITE 200 PTZ HD Camera
16 DOC-0263-001v1.6
User Manual
Back to Table of Contents August 2021
Device Information
Click “Information”, the current device
information as shown.
Serial Command Control
In default working mode, the camera can be controlled via RS-232 or RS-485 (half-duplex mode).
The parameters are as follows:
• Baud rate: 2400/4800/9600 bits
• Start bit: 1 bit
• Data bit: 8 bits
• Stop bit: 1bit
• Parity bit: none
The process of initialization is complete when the camera pan-tilt rotates to the maximum position of top right and then
returns to the center.
Note: If the position preset 0 has been stored, the position preset 0 is called up after initialization, and users can
control the camera with commands in the following command list.
Control Interface Definition
Pin Number Function
1 DTR
2 DSR
3 TXD
4 GND
5 RXD
6 RS485-
7 IR OUT
8 RS485+
54 3
21
86
7

UNITE 200 PTZ HD Camera
17 DOC-0263-001v1.6
User Manual
Back to Table of Contents August 2021
Camera DB - 9 Serial
1. DTR 1. CD
2. DSR 2. RXD
3. TXD 3. TXD
4. GND 4. DTR
5. RXD 5. GND
6. RS485- 6. DSR
7. IR OUT 7. RTS
8. RS485+ 8. CTS
9. RI
Camera In Camera Out
1. DTR 1. DTR
2. DSR 2. DSR
3. TXD 3. TXD
4. GND 4. GND
5. RXD 5. RXD
6. RS485- 6. GND
7. IR OUT 7. NC
8. RS485+ 8. NC
Network Configuration
3
2
1
Pelco-D/P EquipmentPelco-D/P Controller
In
Out
In
Out
In
Out
3
2
1
VISCA EquipmentVISCA Controller
In
Out
In
Out
In
Out
With VISCA With Pelco
Table of contents
Other Clear One Camcorder manuals


