ClearSounds QH2 User manual

QH2 BLUETOOTH PHONE HUB SYSTEM
USER'S GUIDE


1
Welcome!
Thank you for purchasing the ClearSounds QH2 Bluetooth Phone Hub System.
We hope that you enjoy the hands-free conversation that your new system provides. The hub amplies and sends sound between
phones and Bluetooth® headsets, streamers or neckloops.
• Hands-free conversation within 30 feet of the hub
• Answer or place calls without lifting the handset from the base.
• Tone adjustment
• Compatible with Bluetooth listening devices (headsets, streamers or neckloops)
• Compatible with all telephones with keys on the base and with all cordless phones
Contact information
Please contact us with any questions that you might have. We are happy to assist you!
ClearSounds Communications, Inc.
1743 Quincy Avenue, Suite 155
Naperville, IL 60540 USA
800-965-9043 (toll-free)
www.clearsounds.com

2
Carefully read and observe the warnings and cautions in this manual and on the equipment.
Warnings
Warnings must be observed to prevent bodily injury.
WARNING: Use the equipment only in the described manner to avoid bodily injury or damage to the equipment.
WARNING: Locate and use the hub away from water and damp areas, such as swimming pools, bathtubs, sinks and damp
basements, and do not use the hub when you are wet, to avoid electrical shock. If the hub is submerged, unplug the base from
AC power before you retrieve it.
WARNING: Do not overload extension cords or power strips. This can result in electric shock.
WARNING: Use this hub only with the supplied AC power adapter assembly. Other types of power adapter assemblies can
damage the hub and cause personal injury.
WARNING: Avoid using the hub with a corded phone during an electrical storm. There is a slight risk of electrical shock from
lightning during a storm.
WARNING: The hub can amplify volume that can cause hearing loss. For each user, adjust the volume to personal preferences.
WARNING: Do not spill liquid on the hub or clean it while it is plugged in to AC power. This can cause a short circuit, a re or
electric shock.
WARNING: Do not push any type of object into the hub. Contact with dangerous voltage points can occur, resulting in re,
electric shock or parts damage.
Safety precautions

3
WARNING: Do not disassemble the hub. Dangerous voltages or other risks can occur. Use after incorrect reassembly can lead
to electric shock.
Cautions
Cautions indicate practices that could harm the hub or other objects.
CAUTION: Do not place objects on the cables or cords, and place them away from foot trafc.
CAUTION: Locate the hub away from heat sources of any type. Keep slots and openings on the components uncovered to
enable ventilation and protection against overheating.
CAUTION: Connect the supplied AC power adapter assembly into a surge protector. Power surges can damage the equipment.
CAUTION: Use only a damp cloth to clean the unit. Do not use liquid or aerosol cleaners.
CAUTION: In these circumstances, unplug the hub from AC power, and refer to qualied service personnel:
• Liquid spills in the hub, or it is exposed to rain or precipitation.
• The hub does not operate according to descriptions in this manual, or performance distinctly changes.
• The hub is dropped or the casing is damaged.

4
Contents
Contents
Setup .............................................................................................................................................................................................5
Unpack ................................................................................................................................................................................... 5
Install the hub......................................................................................................................................................................... 6
Bluetooth pairing and disconnection .................................................................................................................................... 13
Answer or place a call .................................................................................................................................................................15
Answer or place a call using a corded phone system .......................................................................................................... 15
Answer or place a call using a cordless phone system........................................................................................................ 17
Troubleshooting...........................................................................................................................................................................20
Compliance..................................................................................................................................................................................21
Specications ..............................................................................................................................................................................24
Warranty ......................................................................................................................................................................................25
Accessories .................................................................................................................................................................................26

5
Setup
Unpack
Ensure that your packing box includes all of these parts. If any parts are missing or damaged, please contact your vendor or ClearSounds.
IMPORTANT: YOUR RECEIPT IS REQUIRED FOR WARRANTY. PLEASE RETAIN YOUR RECEIPT.
Hub Hub-to-lifter cable
Handset lifter with two
additional tape pieces AC adapter
Hub-to-base cable Phone line splitter and Hub-to-
splitter cable

6
Setup
Install the hub
You can use the QH2 system with these types of telephones.
• Corded phone with keys on the base and a handset connected with a curly cord
• Cordless phone
To install the hub for use with a corded phone
To answer and place calls, the handset lifter removes the handset from the phone. The instructions in this section include steps for
installing the handset lifter on your phone.
Note: You do not need to install the lifter if either of these conditions apply to you:
• You prefer to lift and replace the handset manually.
• Your phone includes a headset mode feature. In headset mode, you can connect to a Bluetooth listening device without
lifting the handset. If you want to use your telephone's headset mode, consult your telephone user's manual for instructions.

7
2a
2b
1d
2c

8
Setup
1. Install the lifter. (Skip this step if the Note on page 6 applies to you):
a. Remove the handset from the phone.
b. On the underside of the lifter, remove the paper backing from the two pieces of tape.
(Two additional pieces of tape are available for future use, should you need to reposition the lifter.)
c. Firmly press the bottom of the lifter to the phone base, directly below the earpiece well, in a position that will lie
beneath the handset arm.

9
d. Connect the hub-to-lifter cable: Connect the L-shaped connecter to the LIFT port on the bottom of
hub, and then connect the other end of the cable rmly to the port on the top of the lifter.
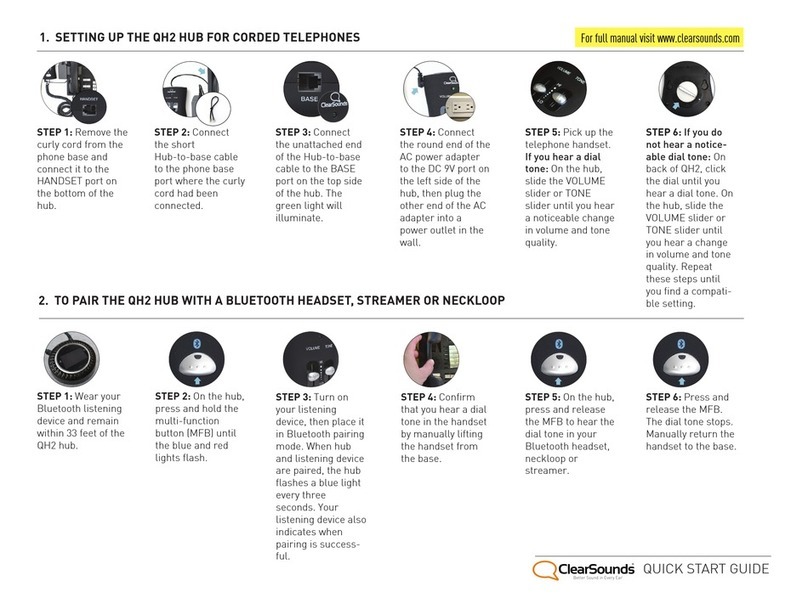
2. Connect the hub:
a. Remove the curly cord from the phone base, and then connect it to the HANDSET port on the
bottom of the hub.
b. Connect one end of the AC power adapter assembly to the DC 9V port on the left side of the hub, and then connect the other
end of the assembly to an AC power outlet in the wall.
c. Connect the (short) Hub-to-base cable to the phone base port where the curly cord was connected.
Connect the other end of the cable to the BASE port on the top of the hub.
The green light on the hub illuminates only if the hub is on the correct compatibility setting for your
phone. If the green light does not illuminate, refer to page 10 for compatibility settings or adjustments.

10
Setup
3. Check for compatibility:
a. Pick up the telephone handset, and listen for a dial tone.
b. Take one of these steps:
• If you hear a dial tone: On the hub, slide the VOLUME slider until you hear a noticeable change in volume, or
slide the TONE slider until you hear a noticeable change in tone quality. If volume or tone do not change, go to
the next bullet step.
• If you do not hear an adjustable volume or dial tone: On the back of the hub, turn the dial until you hear a
dial tone. Once you hear a dial tone, on the front of the hub, slide the VOLUME slider until you hear a noticeable
change in volume, or slide the TONE slider until you hear a noticeable change in tone quality. Repeat these steps
until you nd a compatible setting for your phone.

11
To install the hub for use with a cordless phone
1a
1b

12
Setup
1. Connect the hub:
a. Connect one end of the AC power adapter assembly to the DC 9V port on the left side hub, and then
connect the other end of the assembly to an AC power outlet in the wall.
b. Remove the telephones RJ11 jack from your wall phone line socket. Plug in the provided phone splitter.
c. Connect the hub-to-splitter cable: Connect one end of the cable into the LINE port on the hub, and then
connect the other end of the cable to a port on the phone line splitter.
The green light on the hub will not illuminate until you have connected a bluetooth headset,
neckloop or hearing aid streamer to it and engaged the line. See page 13 for "Bluetooth
Pairing and disconnection."
2. Pick up the telephone handset, and conrm that you hear a dial tone.
TIP: Make sure the compatibility dial on the back of the hub is turned to face the white dot for best results.

13
Bluetooth pairing and disconnection
The rst time that you use the QH2 system, you must pair the hub with the Bluetooth headset, streamer or neckloop that you will wear while
using the system.
To pair the QH2 hub with a Bluetooth headset, streamer or neckloop
If necessary, consult your Bluetooth listening device user's guide to locate its multi-function button for pairing and to identify its pairing
indicators.
1. Wear your Bluetooth listening device, and remain within three feet of the QH2 hub.
2. On the hub, press and hold until the blue and red light ashes.
3. Turn on your listening device, and then put it in the Bluetooth pairing mode.
When the hub and listening device are paired, the hub ashes a blue light every three seconds. Your listening device also indicates
when pairing is successful.
4. Conrm that you hear a dial tone by taking one of these steps:
• For systems using a corded-phone with no headset mode and no installed handset lifter:
a. On the hub, press and release .
b. Manually lift the handset from the base.
You should hear the dial tone in your Bluetooth listening device.

14
Setup
c. Press and release .
The dial tone stops.
d. Manually return the handset to the base.
• For all other corded or cordless system congurations:
a. On the hub, press and release .
You should hear the dial tone in your Bluetooth listening device.
b. Press and release .
The dial tone stops.
c. Check the lifter height: On the hub, press and release .
The lifter rises and lifts the telephone handset, and you should hear a dial tone in your headset. If you do not hear a dial
tone: On the underside of the lifter move the switch that is to the next position, and try the lifter again. There are three switch
positions, and the position determines the lift height.

15
Answer or place a call
To break the Bluetooth connection between the hub and the listening device
If you nd it necessary to break the Bluetooth connection, press and hold on the hub until the red light ashes.
Otherwise, you should keep the Bluetooth power on, so that you are ready to place or answer calls.
You can answer or place a call when the Bluetooth listening device is within 30 feet of the hub.
To remain ready to answer and place calls, keep these components in this state:
• Bluetooth listening device (headset, streamer or neckloop) on and Bluetooth-connected
• QH2 hub connected to AC power and Bluetooth-connected
Note: Instead of pressing on the hub to answer or end a call, you might be able to use a multi-function button on your
Bluetooth listening device. For example, if you are using a ClearSounds Quattro neckloop, you can press the multifunction button twice
to engage a call and once to disconnect a call. Check your listening device user's manual.

16
Answer or place a call
Answer or place a call using a corded phone system
Note: Besides the following instructions for using the system with Bluetooth, you can simply pick up the telephone handset to answer
and place calls. The hub only acts as an amplier in this case, so that you can further amplify or adjust the volume and adjust the tone
for the call by using the sliders on the hub.
To answer a call using a corded phone
1. Within 30 feet of the hub, put on your Bluetooth listening device.
2. On the hub, press and release .
The lifter raises the phone handset, and you hear the caller in your listening device.
Note: If you did not install the handset lifter and your phone does not include a headset mode, you must manually lift the handset
from the phone base.
3. (Optional) Adjust the tone and volume:
• Slide the TONE slider on the hub until you hear the tone that you prefer.
• Adjust volume on your Bluetooth listening device or phone.
Note: If you increase volume on the listening device and the phone, and sound distortion occurs, lower the volume on the
listening device or the phone.
4. To end the call, press and release on the hub.
The lifter returns the phone handset to the resting position on the base.
Note: If you did not install the handset lifter and your phone does not include a headset mode, you must manually return the
handset to the base.

17
To place a call using a corded phone
1. Within 30 feet of the hub, put on your Bluetooth listening device.
2. On the hub, press and release .
The lifter raises the phone handset, and you hear the dial tone in your listening device.
Note: If you did not install the handset lifter and your phone does not include a headset mode, you must manually lift the handset
from the phone base.
3. Press the desired keys on your telephone keypad.
4. (Optional) Adjust the tone and volume:
• Slide the TONE slider on the hub until you hear the tone that you prefer.
• Adjust volume on your Bluetooth listening device or phone.
Note: If you increase volume on the listening device and the phone, and sound distortion occurs, lower the volume on the
listening device or the phone.
5. To end the call, press and release .
The lifter returns the phone handset to the resting position on the base.
Note: If you did not install the handset lifter and your phone does not include a headset mode, you must manually return the
handset to the base.

18
Answer or place a call
Answer or place a call using a cordless phone system
To answer a call using a cordless phone
1. Within 30 feet of the hub, put on your Bluetooth listening device.
2. On the hub, press and release .
You hear the caller in your listening device.
3. (Optional) Adjust the tone and volume:
• Slide the TONE slider on the hub until you hear the tone that you prefer.
• Adjust volume on your Bluetooth listening device.
Note: If you increase volume on the listening device, and sound distortion occurs, lower the volume on the listening device.
4. To end the call, press and release .
To place a call using a cordless phone
1. Within 30 feet of the hub, put on your Bluetooth listening device.
2. Lift your cordless handset, press the handset call button, and then press the desired keys on your telephone keypad.
Other manuals for QH2
1
Table of contents
Other ClearSounds Switch manuals
Popular Switch manuals by other brands

CTC Union
CTC Union IFS+402GSM-4PHE24 Quick installation guide

IOGear
IOGear MiniView III GCS1712 user manual

Videosec
Videosec PS04FE+2FE user guide

SMC Networks
SMC Networks ZSE20AF X576 Series Operation manual

Waters Network Systems
Waters Network Systems ProSwitch-Quad Series Installation guide and operating manual

Raritan
Raritan Dominion KX II user guide

Domosys Corporation
Domosys Corporation E-PBM-0100-A user manual

D-Link
D-Link DES-3028 Cli reference manual

3Com
3Com SuperStack 3 3812 Getting started guide

Xcellon
Xcellon SH10-7H3HC-2 quick start guide

GarrettCom
GarrettCom Magnum 6K8-Series Hardware installation and user's guide

Elmdene
Elmdene 2405STE manual