Coastal M-CBX9.6 2016 User manual

2
TABLES OF CONTENTS
General Information:
a. CE certification Page 3
b. Manufactures Identification Code (MIC) Page 3
Valve Operation Page 4
Inflation of Boat Page 4
Assembly of Boat with Air Deck Page 5
Assembly of Boat with RIB (Rigid Inflatable Boat) Page 6
Assembly of Boat with Aluminum Deck Page 6
Disassemble and Deflate boat Page 9
Cleaning/Maintenance/Storage Page 9
Repair Procedures Page 10
Operation Information
a. Outboard Motor Page 11
b. Operator's Responsibility Page 11
c. Operating in Shallow Area Page11
d. Beaching Page 11
e. Towing the boat Page 12
f. Air Chamber Failure Page 13
Boat Safety Page 13
Boat Warranty Page 14
Release / Indemnification Page 16
Outboard Motor Warranty Information Page 16
Accessories Warranty Information Page 16
3
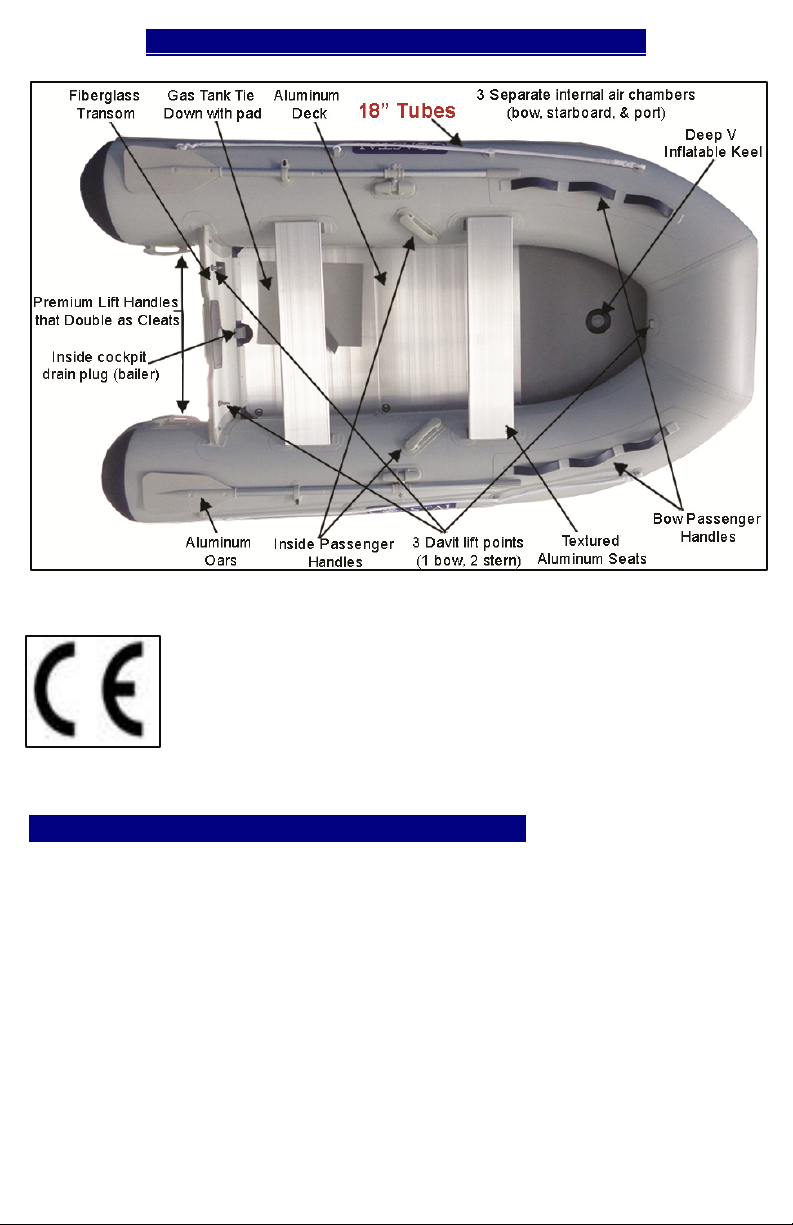
EXAMPLE PICTURE: MODEL M-CBX9.6
All Coastal Inflatable Boats carry the highly recognized CE
certification issued by Lloyds of London. CE Certification
ensures that products are of the highest quality and
reinforces our guarantee of quality and integrity, giving you
peace of mind in terms of safety, durability, build-quality
and insurability.
Manufactures Identification Code (MIC)
Coastal Inflatable Boats confirm with the Federal requirement that every
boat must have its own unique Hull Identification Number (HIN) which the
first 3 characters must contain the company's Manufactures Identification
Code (MIC). Coastal Inflatables, LLC is registered with the Coast Guard
and our MIC is CIB. The HIN is a Federal requirement. The Coast Guard
maintains a searchable database of MICs. You can search the database to
check any inflatable boat/importer to insure they are registered with the
USSG. Check our MIC (CIB) at:
http://www.uscgboating.org/recalls/mic1.aspx?company=coastal&sort=mic

4
HOW TO PROPERLY OPERATE AIR VALVE
ATTENTION: Do not use a compressed air source (i.e.
automotive tire air compressor) to inflate boat. Over
inflation through the use of compressed air may result
in ruptured seams and will void the warranty.
The valve has a special pushpin inside. Do not use any
type of tool to adjust the position. Use your fingers! This
pushpin has two positions, up and down. When it is
pressed in the down position, air will escape. If you turn
the pushpin in any direction it will pop up. This will lock
air inside and prevent it from escaping through the valve.
Before inserting the air pump tube into the valve, please
make sure that the pushpin is in the upper, popped up
position. Once the pin is in the "popped up" position,
insert the air pump adapter into the valve and inflate.
Once you remove the air pump, pressure will seal the
valve and air will not escape. If you would like to deflate the boat, press down on
the pushpin and turn it in any direction until it stays in the pressed down position.
Air will immediately escape from the tubes thru the valve.
INFLATION
Inflate the boat with the pump supplied. NOTE: When using a hand pump, the
boat cannot be over-inflated. If using an electric inflator inflate the boat to about
80% and then finish the inflation procedure with the pump supplied. When
inflating the boat with the hand pump, it is normal for the hand pump to
leak some air where the adapter connects to the valve. Continue to pump
until the tubes become hard. Never drag boat on pavement or
concrete!
Depending on climate and operating conditions, the pressure may
require monitoring during boat use to maintain a correct inflation
level. What is 100% full & don't have a gauge? Inflate the tubes & floor
until the hand pump becomes somewhat difficult to push down.
Due to the boat having a safe valve to prevent over-pressure installed,
a boat inflated for 4 to 5 days may lose pressure and require re-
inflation to correct operating pressure, this is normal. It doesn't mean
that your boat has a leak; it means the safety over-pressure valve is
protecting your boat!
WARNING: DO NOT using a compressed air
source (i.e. compressor) to inflate the boat. Over-
inflation with a compressor may result in ruptured
seams and/or bulkheads.
When inflating, maintain a balance of air between air chambers to
prevent damage to air chamber bulkheads.

5
ASSEMBLY FOR BOATS WITH INFLATABLE DECK
Find flat surface where boat will be assembled.
Remove any sharp objects from the area where boat will be
assembled and inflated.
Unfold and spread boat out flat. Never drag boat on
pavement or concrete!
Connect the pump to the valve by inserting the adapter attached
to the pump hose into the valve, turning it until it tightens. Do
not force it; simply turn it until it locks into place. When
inflating the boat with the hand pump, it is normal for the hand
pump to leak some air where the adapter connects to the valve.
Continue to pump until the tubes become hard.
Inflate the three tubes (Bow, Starboard & Port) to about 50%. If
the air rushes out when you detach the adapter from the valve,
you need to turn the pushpin in the center of the valve (see
above).
Unfold and stretch out the inflatable deck, edging it under the
half-inflated tubes and against the transom making sure the
deck is under the tubes as well as the boards attached to the
bottom of the transom.
If the keel valve does not line up with the opening located near
the bow, remove the floor, and inflate the keel to get any folds
that may have formed during shipping. Deflate the keel; it
should regain its proper shape. Re-inflate the three tubes to
about 50% making sure the keel valve now aligns with open in
the deck.
Inflate the air deck to about 70%
Install the aluminum seats into the seat straps.
Inflate the three tubes to 100%.
Inflate the air deck to 100%.
Inflate the keel to 100%.
Install the oars.
GO BOATING!!!
What is 100% full? Inflate the tubes & floor until the hand pump
becomes somewhat difficult to push down.

6
ASSEMBLY FOR RIGID INFLATABLE BOATS (RIB)
Find flat surface where boat will be assembled.
Never drag boat on pavement or concrete!
Remove any sharp objects from the area where boat will be
assembled and inflated.
Connect the pump to the valve by inserting the adapter attached to
the pump hose into the valve, turning it until it tightens. Do not
force it; simply turn it until it locks into place.
Inflate the three tubes (Bow, Starboard & Port) to about 50%. If the
air rushes out when you detach the adapter from the valve, you need
to turn the pushpin in the center of the valve (see above).
Install the aluminum seats into the seat straps.
Inflate the three tubes to 100%. It is normal to hear escaping from
the valve adapter when filling the boat. Continue to pump air into
the tubes until the tubes are hard.
Install the oars.
Install the plug.
GO BOATING!!!
What is 100% full & don't have a gauge? Inflate the tubes & floor until the
hand pump becomes somewhat difficult to push down.
ASSEMBLY FOR BOATS WITH ALUMINUM DECK
Assemble the deck floor outside the boat first to get the concept of
how the floor is assembled. Different size boats will have a different
number of aluminum panels. The #1 panel is made of wood, the
other panels are aluminum. Never drag boat on pavement
or concrete!
7
Check the inflatable Keel. If it looks out of shape or won't lie
straight, it is because it has been pressed under the weight from
being in the box during shipping. Inflate the keel. It will regain its
shape when inflated. Then deflated it and it should look straight and
should line up with the floor much better!
Inflate the boat to about 50% or until it is extremely "baggy" and
only barely has its shape.
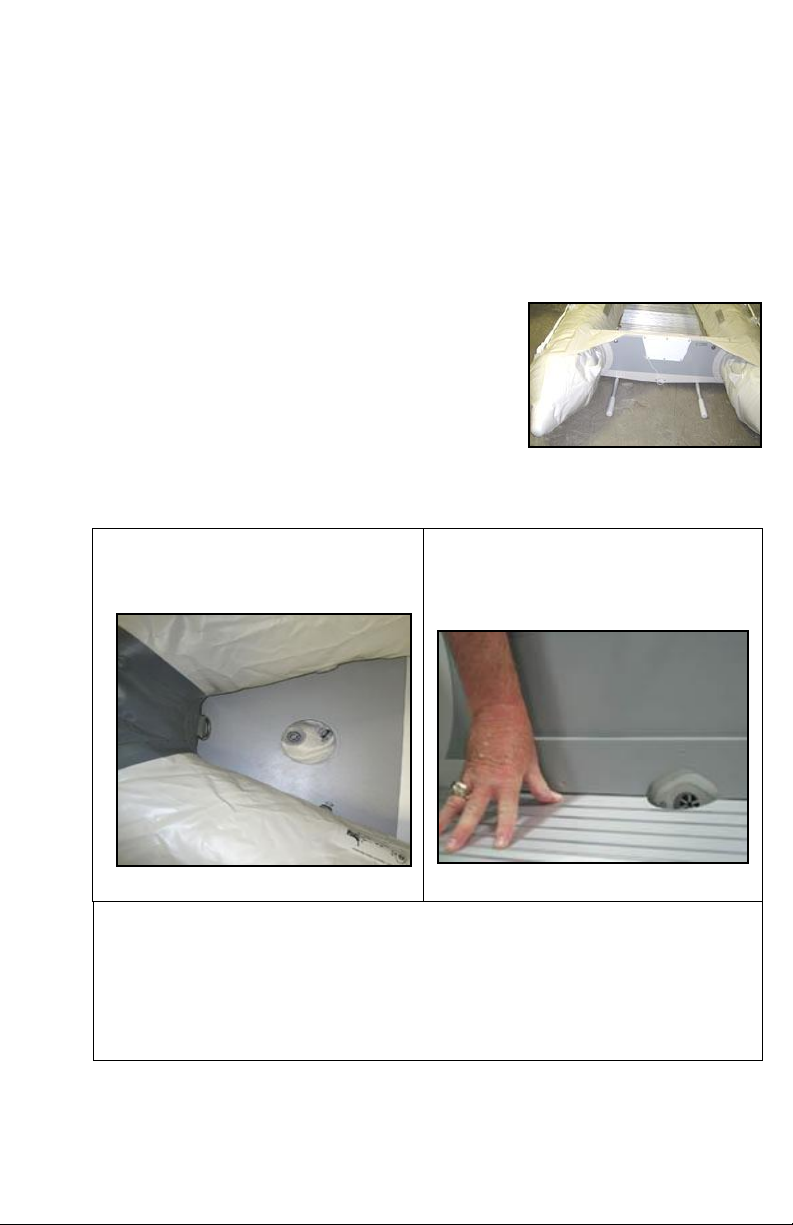
It WILL help if you put something under
the transom to lift the rear of the boat off
the ground by a few inches. The idea is to
get the floor off the hard surface the boat is
on in order to give the bottom of the boat
some "give" which will help to snap the
stringers in place. You can use the oars as
shown in the photo. Anything will work in order to get the bottom of
the boat off the hard floor.
Install wood piece number "1" into
the nose of the boat first (numbers
up on all sections).
Install rear aluminum panel, make
sure it fits under the height board
located on the transom
You also need to make sure the edges of the aluminum panels are
all lined up. This is necessary to make the installation of the
stringers much easier.

8
Install the
stringers onto
each side of the
floor. Each side
should have a
long stringer
(unless you are
assembling a
larger boat).
They need to be
installed so that
they overlap the
joints of the
aluminum floor
pieces. The only purpose of the stringers is to cover the joints
of the aluminum panels. This is what will provide stability of
the floor. This is tricky because it is a tight fit. It may help to
have another person pulling up on the tubes using the straps
that hold the seat.
Install the aluminum seats into the seat straps.
Inflate the three tubes to 100%. It is normal to hear escaping
from the valve adapter when filling the boat. Continue to
pump air into the tubes until the tubes are hard.
Inflate the keel to 100%
Install the oars.
GO BOATING!!!
What is 100% full & don't have a gauge? Inflate the tubes until the hand
pump becomes somewhat difficult to push down.

9
DISASSEMBLE AND DEFLATE BOAT
1. Remove the oars from both sides of the boat.
2. Deflate tubes about 50%.
3. Remove aluminum or air deck, reverse of install process. Deflate Keel.
4. Re-inflate tubes to 100% for cleaning. Clean inside and out.
5. Deflate bow tube first. The valves should be in their "open" position for
disassembly. They are open when they are in the down position. As the
bow tube is deflating, pull up on the bow ropes. This will make it easier to
fold later.
6. Deflate the main tubes. As they are deflating pull up on the side ropes so
that the boat will fold in properly
7. Fold both end tubes over transom. You want the tubes to fold in so the
entire package is not wider than the transom
8. Begin rolling up the boat from the transom.
9. Lay folded inflatable onto the storage bag and tighten the straps around
the boat being careful to make sure the storage bag covers the entire boat.
CLEANING/MAINTENANCE/STORAGE
Proper care and maintenance greatly extends the life of your valuable boat.
During the season: Check the bottom regularly to make sure there is no
excessive build up of marine life. The surface of the boat should be cleaned with a
solution of mild soap and fresh water after each use when possible. To avoid
abrasion and wear, be sure that all the sand, small rocks, oil and dirt have been
flushed away from the boat surfaces, particularly the inside deck next to the tubes.
UV Radiation: The Number One Enemy of PVC Inflatable Boats. With this in
mind, we recommend that you cover your boat when it will not be in use for
extended periods of time. While we realize that it is not practical to cover your boat
every time you get out of it, if the boat is not going to be used for several days it is
advisable to cover it. Aurora Poly Guard, a UV Protectant should also be used to
help protect your boat from the sun. It helps to keep the boat looking like new.
Apply Poly Guard every 4 weeks to extend the life of your boat. Fuel Spills and
Engine Exhaust will damage the fabric of your Inflatable Boat.
IMPORTANT: Products never to use for cleaning your inflatable are: solvents,
MEK, toluene, acetone, bleach, ammonia, highly alkaline cleaners (anything with a
pH greater than11.5), abrasive scrub pads, steel wool. They will weaken damage
and discolor the fabric and attack the adhesives. Never use "Armor All®" on
your boat!
End of Season: It pays to remove dirt and other environmental contaminants
before storing it. Allow your boat to dry thoroughly in the shade before storing it.

10
Store in a dry place. Use care when storing as some rodents love to
burrow into a stored inflatable.Store your craft rodent-safe. It is not
necessary to store the boat deflated. If space is not an issue it is perfectly fine to
leave your boat inflated during off season. Your boat should be clean and dry. It is
not necessary to store your boat in a heated area. Make sure that your boat is not
stored "wet", especially if it will be subjected to freezing conditions during storage.
Freezing and thawing water can damage the seams of the boat.
REPAIR PROCEDURES
If you are losing air pressure check the boat over for air leaks. There will be
normal air loss due to either the safe valve installed on the boat or due to
change in the temperature. The best way to find air leaks is dish detergent
mixed with water in a spray bottle. Start by checking the valves first. Spray
around the valve on a suspected air chamber. If you see bubbles forming,
check your valve fitting and base and be sure the valve insert is screwed on
tight and pushpin is in correct position. If the leak is not in the valve, then
spray the rest of the boat to find the leak. Spray the boat in small areas at a
time until the entire boat is covered. Once the leak is found, cut out a patch
large enough to overlap the damaged area by 1/2 inch on all sides. Center
the patch over the damaged area, and with a pencil trace the outline of the
patch. Apply masking tape around the perimeter of the outlined patch area
to ensure a tight and clean glue line. Clean the patch area on the boat as
well as the backside of the patch.
Apply three thin layers of adhesive with a short bristle brush, in a
circular pattern on the patch area on the boat. Allow each layer to
dry for 5 minutes before applying the next layer.
After applying the third layer on the boat, apply a layer of adhesive
to the patch and then put the patch to the prepared area and press
down firmly. Using a smooth object (a back of a tablespoon works
well), working from the center of the patch to the outside, force out
any air bubbles that may have been trapped under the patch.
After the patching is complete remove the masking tape and allow
24 hours drying time before pressurizing the repaired air chamber.
Important: It is recommended to do repairs in dry weather. Humidity
will decrease glue bond. Do not glue in cold temperatures.

11
OPERATION INFORMATION:
OUTBOARD MOTOR
Choose an outboard for the boat that is in accordance with the horsepower
range and limit. Refer to the Coastal's manufacturer plate on the boat
transom for the maximum outboard capacity. Overpowering can result in
difficult handling and/or stability problems with serious consequences.
Install the outboard along the centerline of the boat transom. Fasten the
outboard to the transom. Check outboard for tightness on transom before
each use. When you install an outboard motor, make sure you place it on
the motor pad on the transom and tighten the butterfly bolts to the transom
Check after 15 minutes of boating to ensure the butterfly bolts are still tight
to the transom.
OPERATOR'S RESPONSIBILITIES
The operator (driver) is responsible for the correct and safe operation of the
boat and safety of its occupants and general public. It is strongly
recommended that each operator (driver) read and understand this entire
manual before operating the boat. Be sure at least one additional person on
board is instructed in the basics of starting and operating the outboard and
boat handling in case the driver is unable to operate the boat. Be familiar
and obey all local applicable rules and regulations.
OPERATING IN SHALLOW AREAS
Reduce speed and proceed with caution whenever you drive a boat in
shallow water areas, or in areas where you suspect underwater obstacles
may exist. These obstacles could be struck by the bottom leg of the
outboard or the boat bottom and cause severe damage to the boat and or
motor. Travel these areas with extreme caution, to reduce injury or impact
damage from striking a floating or submerged object reduce your boat
speed.
BEACHING
It is recommended not to use an engine when beaching. Do not drag the
boat across rocks, sand, gravel or on a pavement as damage to the boat skin
may result. If the boat is to be temporarily left on a beach, part of the boat
should be left in the water so that the internal heat caused by exposure to
sunlight can escape and so that air pressure in the tubes can decrease.
Cover the boat to block direct exposure to sunlight if the boat is to be
removed from the water for an extended period of time.
12
TOWING THE BOAT
If the inflatable boat is to be towed by another boat, the inflatable
boat must be empty. Remove outboard, fuel tank, and equipment.
A towing bridle is necessary in order to properly tow your boat...
Never tow the inflatable boat by connecting rope to the
central lifting handle. Use only the towing D-rings on
both sides of the dinghy bow.
Following the instructions on the towing bridle.
A Towing Line must be rigged to run from the port stern cleat,
through the Towing Ring on the Towing Bridle, and back to the
starboard stern cleat.
At Towing Ring on the Bridle, secure the line with a knot --- the run
each end of the towing line to the aft corner cleats as described
above. This will prevent the dinghy from continual sliding on the
ring while under tow.
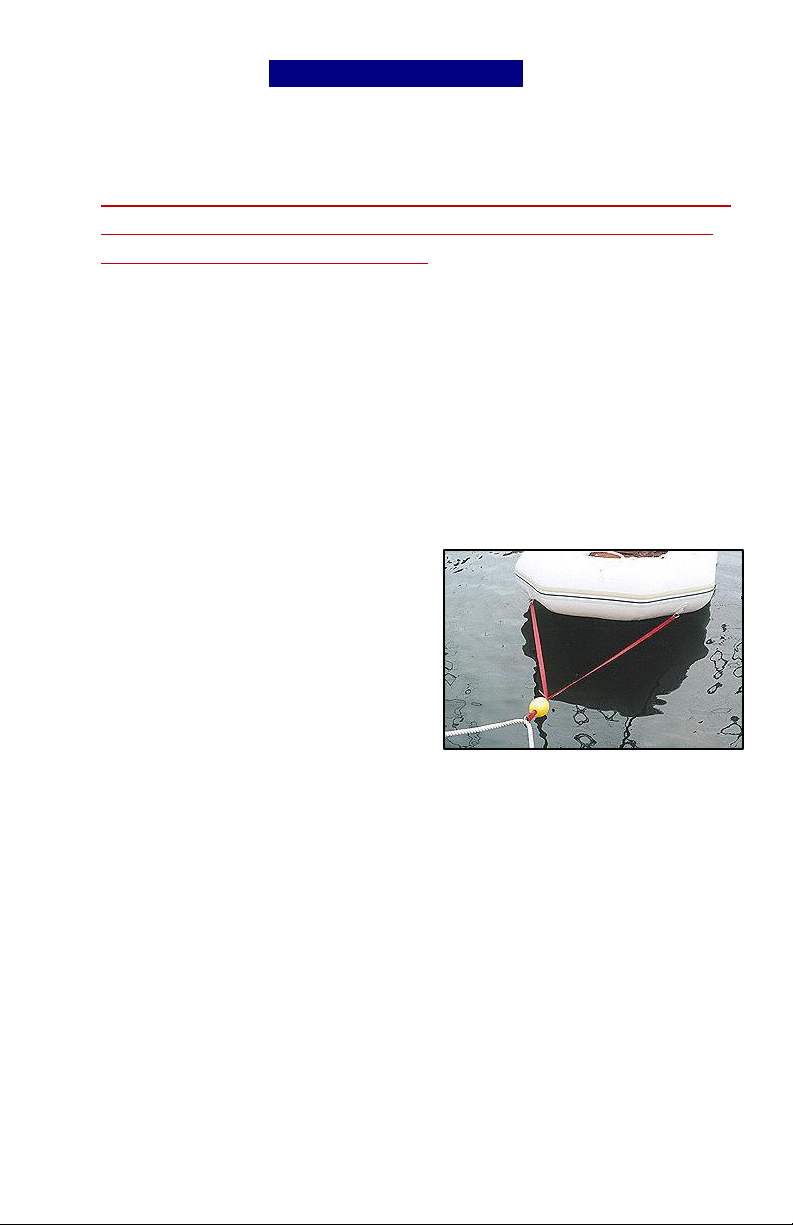
After affixing the Towing Line to the two stern cleats, you will form
an 'X-shaped' bridle of this
Towing Bridle and your towing
line. By towing in this fashion,
the Inflatable will tack straighter
and safer than with a single
towing line led to a single towing
ring on the bow.
Tow the boat at slow speed.
The inflatable must be under constant supervision when it is being
towed.
CAUTION: Never tow the dinghy with the outboard or gas tank
aboard. This added weight adds stress to the towing rings and increases
drag. Make sure there is no water in the boat. Excess water in the boat
can quickly lead to failure of the towing rings, especially when the load
is not being equalized. Even just six inches of water in an inflatable can
weight hundreds of pounds to the boat.

13
AIR CHAMBER FAILURE
If one of the air chambers should accidentally deflate while you are operating the
boat, shift the weight to the opposite side of the deflated chamber and slowly head
for shore.
BOATING SAFETY
In order to safely enjoy the waterways, familiarize yourself with local and other
governmental boating regulations and restrictions, and consider the following
suggestions.
Have an approved personal flotation device of suitable size for each person
aboard the vessel (it is the law) and have it readily accessible.
Do not overload your boat. Coastal boats are rated and certified for
maximum load (weight) capacities (refer to your boat capacity plate
located on the transom).
Perform safety checks and required maintenance.
Follow a regular schedule and ensure that all repairs are properly made.
Know and obey all nautical rules and laws of the waterways.
Boat operators should complete a boating safety course.
Prepare other boat operators. Instruct at least one other person on board
in the basics of starting and
operating the outboard, and boat handling, in case the driver becomes
disabled or falls overboard.
Stop the engine whenever passengers are boarding, unloading, or are near
the back (stern) of the boat. Just shifting the outboard into neutral is not
sufficient.
The operator must have an unobstructed view particularly to the front.
Never operate your boat directly behind a water skier in case the skier
loses control and hits the water.
Use extreme caution around any swimmer, diver or persons in the water.
Check the pressure and the condition of the boat before you start sailing
Pay close attention to the weather conditions for your safety.
Make sure you take repair kits, first aid kit and a pump with you.
Make sure you do not exceed the maximum recommended number of
persons on the capacity plate
Do not exceed the recommended maximum horsepower rating.
IMPORTANT NOTE:
Use of alcohol or drugs is prohibited while operating a water craft.
Alcohol or drug use impairs your judgment and greatly reduces your
ability to react quickly. This carries the same penalty as driving a car if
convicted.

14
BOAT WARRANTY INFORMATION
We warranty each new Coastal Inflatable Boat and accessories attached, thereto
(hereafter referred to as "Product"), to be free from defects in material and
workmanship.
This warranty shall become effective on the purchase date of the boat.
Transfer of warranties is not authorized without prior approval from Coastal
Inflatables, LLC. This is strictly enforced.
This warranty is as follows: All warranty claims for Valmex PVC boats are covered
100% during the first 2 years of the warranty period then pro-rated for the
remaining 3 years. All warranty claims for ORCA CSM boats are covered 100%
during the first 3 years of the warranty period then pro-rated for the remaining 2
years. The percentage covered during the pro-rated period is calculated by dividing
the number of months remaining in the warranty period by the total number of the
months of the warranty (60). Warranty is on the seams & base fabric against
cracking, porosity and rot and that the fabric of which the Product is manufactured
will maintain its original purpose under normal conditions during such period.
There is a two (2) year limited warranty on the transom: The transom is warranted
against delamination, cracking and hull separation.This warranty shall be
ineffective if the boat has been operated with an outboard motor which exceeds the
maximum horsepower rating listed on the serial plate attached to the transom.
The air deck, aluminum floorboards, oars, handles, seats, seat straps, rub rail, D
rings and other factory installed accessories (anything glued to the tubes) are
warranted for one (1) year against defects in material and workmanship. This
warranty does not include any painted or finished surfaces, normal wear and tear,
improper lifting or towing techniques, other abuse or negligence. Wear parts
including but not limited to rubbing strake, keel guard, ropes are not covered by
the warranty. TOW RINGS are not covered by the warranty.
If any Product is purchased or used for rental or other commercial purposes, or
for/by a corporation, partnership, company, organization or association including
without limitation camps, clubs, resorts, schools, or the like, then the term of this
Limited Warranty is limited to a period of one (1) year after the date of original
retail purchase.
Since this warranty applies to defects in material and workmanship, it does not
apply to normal worn fabric or to damage caused by:

15
Neglect, lack of maintenance, accident, abnormal operation, racing
competition, or commercial use.
Use of an accessory or part not manufactured or sold by Coastal Inflatables
LLC.
This warranty will not apply to: Haul-out, launching, storage charge, telephone or
rental charges of any type, inconvenience, shipping, or loss of time and income.
This warranty also does NOT cover:
Normal discoloration or dulling of the fabric;
Abrasions, tears, or punctures;
Normal color fading and spots on the fabric which do not affect the
integrity of the fabric;
Damage or deterioration of the fabric due to exposure to fuel, harsh
solvents, or other chemicals
This warranty does NOT cover product that: Has not been assembled, used, and
maintained as stated in owner's manual accompanying the Product; Damage
caused by an accident; Has been abused, misused or improperly operated; Has
been repaired, modified or tampered with by someone other than Coastal
Inflatables LLC or their designated representative; Do not to attempt to repair
the boat yourself as it will void your warranty. Coastal Boats sole
exclusive obligation under this warranty is limited to, at our option, repairing a
defective part, replacing such part or refunding the purchase price of the Coastal
Boats product. The repair, replacement of the boat, replacement of any parts, or
the performance of service under this warranty does not extend the life of this
warranty beyond its original expiration date.
Damages as a result of shipping must be processed through the shipping company
(UPS or Fed EX). Insurance is required when shipping the boats;
Claims shall be made under this warranty by delivering the Product for
inspection to Coastal Inflatables, LLC, Hampton, NH, who will then either do the
repairs or arrange for the inspection and repair, provided such service is covered
under this warranty. Purchaser shall pay for all related transportation charges. All
shipping expenses related to a warranty claim are the Purchaser's responsibility. If
the service is not covered by this warranty, purchaser shall pay for all related labor
and material and any other expenses associated with that service. Any Product or
parts shipped by purchaser for inspection or repair must be shipped with
transportation charges prepaid. Coastal Inflatables LLC obligation under this
warranty shall be limited to repairing a defective part or at our option replacing
such part or parts as shall be necessary to remedy the malfunction resulting from
defects in material or workmanship as covered by this warranty. We reserve the

16
right to improve or change the design or any Product without assuming any
obligation to modify any Product previously manufactured.
RELEASE: Recognizing that boating poses a potential hazard to others. The buyer
freely and willingly waives all claims to injury to himself or damage to purchased
boat arising out of the improper use. Further, in consideration of the permission of
use granted, buyer hereby release Coastal Inflatable LLC, its directors, officers,
representatives, agents, and employees from any and all liability for injury of any
kind to buyer or to boat or other property buyer may have, incurred by reason of
any act or failure to act, on buyer part, or Coastal Inflatables, LLC, its directors,
officers, representatives, agents, and employees, arising because of the use of above
mentioned inflatable boat.
INDEMNIFICATION: Buyer further agree to indemnify and hold harmless
Coastal Inflatable LLC,, its directors, officers, representatives, agents, and
employees from all costs, suits, judgments, damages, or expenses, direct or
indirect, for injury to other persons and/or their property, including, but not
limited to, loss of use incurred by reason of act or failure to act on buyer part or by
reason of any act, including negligence, of Coastal Inflatables, LLC, directors,
officers, representatives, agents, and employees, arising because of use inflatable
boat. Buyer recognize that these provisions will cause buyer to be personally liable
for his/her act or failure to act during use of the inflatable boat purchased
OUTBOARD MOTOR WARRANTY INFORMATION
All warranties for Tohatsu Outboards will be guaranteed & processed through
Tohatsu Outboards. For details on the Tohatsu outboard warranty please visit the
Tohatsu Outboards website: http://www.tohatsu.com/outboards/index.html
ACCESSORIES WARRANTY INFORMATION
All warranties for accessories will be guaranteed and processed through the
manufacturer of purchased accessories. Please visit the manufacturer's website for
more information.
Coastal Inflatable Boats, 17 High St., Hampton, NH 03842
New England Ski Boat, 445 Concord Ave., Cambridge, MA 02138
(978) 975-1515
Table of contents
Other Coastal Boat manuals


