Columbus V 900 User manual

©2009 Victory Co Ltd.,
Multifunction GPS Data Logger
User Manual
English
V 900

Thank you for choosing our product. Before using it, make sure
you have read this User's Manual and understood how to
correctly use and maintain it. This will start your pleasant GPS
positioning experience!
This Manual is intended to guide you through the safe and correct use of
the product and its accessories, avoiding improper operations that may
result in injury of yourself or any other person or cause device damage.
Never manipulate the product when you are driving a car! Before
manipulating it, make sure that your car has been securely parked. We
cannot assume liabilities for any consequence resulting from the fact that
you manipulate the product while driving.
As a precision electronics, the product contains no component that can be
repaired by your own. Any attempt to disassemble the product will void
the original manufacturer's warranty.
Avoid violently shaking the device or dropping it from a high place. Do not
try to damage or puncture the device; otherwise, electrolyte in its built-in
battery may leak or combust, causing injury or environmental pollution.
Never clean the product with solvents containing alcohol, gasoline,
benzene, or thinner or any other organic solvent, which are likely to cause
fires.
Never remove the memory card while the unit is being used; otherwise,
information stored on it may be lost.
In case that any position information (GPS log files) is not correctly or
completely logged due to a failed logging memory card or system, no
compensation can be made for any damaged log data or any damaged
photo that contains position information.
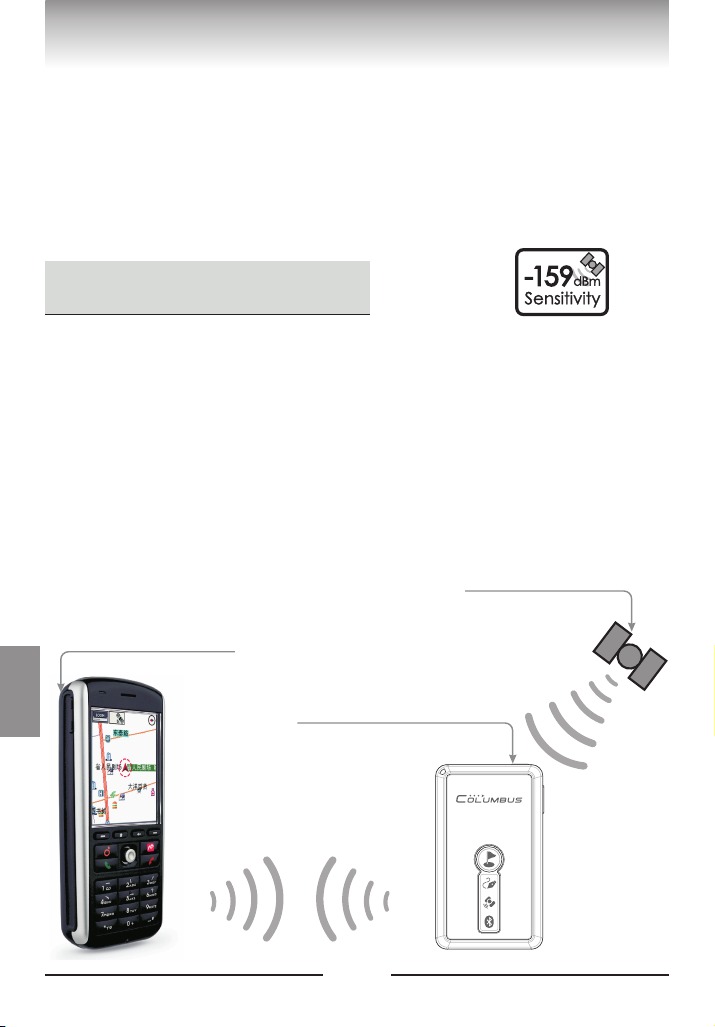
Because the online map service is provided by a third party, it's subject to
content change or termination without notice.
Notes on Data Logged on the Unit
Notes on Online Map View
!
CAUTION!

3
Packing List 04
Parts Description
Part Names
Functions of button
LEDs and audible alerts
05
05
06
07
Part Names 08
Accessories 11
About GPS 12
Getting Started 12
How to charge the battery
Place and carry your receiver
Memory card selection & file format
Setting camera date and time
Introduction and operating modes
Bluetooth connection
Acquiring position and navigating
13
14
15
16
17
18
19
Logging Your Joureny 20
Logging a track
Adding a voice mark point
Adding a POI manually
Starting a new track
Integrating photos with a map
Over-speed alarm
Spy tracking mode
Vehicular Auto ON/OFF
20
21
22
22
23
23
24
25
Relevant Software 26
Time Album
How to install
Configuring settings
Managing tracks
Adding voice and photos
Setting track points
Exporting a track
Configuring the device
Track conversion options
Google Earth
How to install
Playing back a track
Details on track points
Visual GPS
26
26
27
27
28
28
28
29
29
Troubleshooting 33
Specification 38
Signal reception
Bluetooth connection
Track logging
Photos and audio records
Power
33
34
35
35
36
30
30
30
31
32
English
Contents
Contents

4
Please make sure that your package includes the following
items.
Please make sure that your package includes the following
items.
Multifunction GPS Data Logger Main Unit
AC Adaptor (Input: 110-250V, optional)
Car Charger (Input: 12-24V)
Charging Cable (Support Auto ON/OFF
Function 2 meters)
Protective Case
Carrying Strap
USB MicroSD Reader (optional)
User Manual
Software CD
Warranty Card
1.
2.
3.
4.
Packing List
5.
6.
7.
8.
9.
10.
English
Packing List

5
Microphone
Power Connector
MicroSD Card Slot
Hand Strap Hole
Voice Record Button
Power/Function button
1Part Names
Point of Interest Button
Log LED
GPS Status LED
Bluetooth LED
Main Status LED
GPS Active Antenna
(Built-in)
Li-polymer Battery
(Built-in)
Parts Description
English
Part Names

6
2Functions of Button
Power/Function Button
Long press the key to turn on or off the power supply. Short press it to change
among the three modes: Log + Navigation, Log, and Navigation. Refer to P.17 for
detailed operations.
Point of Interest Button
Short press the button to mark the current position as a POI (Point of interest).
Long press the button to start a new track. Refer to P.22 for detailed
operations.
Record Button
Press and hold the Record button to begin audio recording. Release the button
to stop recording and mark the current position as a POI. Refer to P.21 for
detailed operations.
Parts Description
English
Functions of Button

7
3LEDs and
Audible Alerts
There are 3 graphic LEDs on V-900 front face. A status LED is
located at the top left. A mini speaker is integrated in the unit.
These provide vivid audible and visual indications.
Log LED
Log LED indicates the
memory card status and
whether the log function is
on.
GPS LED
This LED indicates the
current GPS satellites
positioning status.
Bluetooth LED
This LED indicates the
Bluetooth connection status
and whether Bluetooth
function is on.
1. Log function on: Always
On
2. Writing to memory card:
Flashing
3. Memory card error:
Continuous flashing
4. Log function off: Off
1. Acquiring satellites:
Always on
2. GPS position is fixed:
Flashing
1. No Bluetooth connection:
Flashing
2. Connected with terminal
device: Always on
3. Bluetooth turns off: Off
1. Power on: Green, always on
2. Low battery: Red, flashing
3. Charging: Red, always on
4. Charging completed: Green, always on
5. Spy mode: Blue always on flashing
Voice ecording: Red, always on
,/
6. r
Run/Power Status LED
This LED indicates the current operating
status, power status, etc.
1. Power on: 2x Short beep Power off:
1x Long beep
2. Start of voice recording: 1x Short beep
End of voice recording: 2x Short beep
3. Short press POI button to mark a POI
x Short beep
4. Long press POI button to create a new
track x Short beep
5. A Bluetooth device is connected /
disconnected: Melody alert
6. Plug / remove the card: Melody alert
7. Memory card error: Continuous short
beeps
8. Over-speed alarm: Continuous beep
until the speed falls below the limit
/
1
: 2
():
(
)
Audible alerts of built
in mini speaker
-
Abundant audible alerts are available to
intuitively indicate the current operating
status.
Parts Description
English
LEDs and
Audible Alerts

8
1Navigation
The unit can be used as a normal Bluetooth GPS receiver,
enabling positioning and navigation through a Bluetooth
connection with a terminal (smart phone, PDA, computer, etc.)
on which a navigation map is installed.
Smartphone receives
position information
from the GPS receiver Receiving GPS signal from the
satellites transferring
position information to a
device through bluetooth.
,
GPS satellite
The unit is a multifunction GPS data logger used to receive and
log geographical position information on an external memory
card.
You can use the unit and its software for:
Function Description
English
Function Descriptions

9
1. This data logger can run offline in a standalone mode, in which it is not
connected to any terminal. In this mode, it can log the date, time, latitude,
longitude, altitude, speed, direction, voice, positioning mode, positioning type,
PDOP, HDOP, VDOP, etc.
2. You may start a new track record at any time.
3. You may use the POI button to highlight the current geographical position
whenever you want.
4. You may use the supplied software to define your personalized logging
parameters, such as the time and distance intervals of logging, the value of
over-speed alarm, etc.
5. You may use map software to view the track information along your journey.
6. This data logger innovatively uses a MicroSD* card as the storage medium,
delivering larger storage and quicker reading than logging with an internal memory.
* MicroSD cards of mainstream brands with the capacity of 64M to 2G are supported. MicroSD card is also called T-Flash card.
This device innovatively enables you to mark a POI using voice. With the
“Voice Record button” on the device unit you can mark the current
geographical position anywhere and anytime. Later, you can listen to and view
the marked voice in Google Earth or other map software application.
,
You may use the device when you take photos using a digital camera, digital
single lens reflect camera, video camera, or a camera phone (collectively
referred to as the "camera" hereinafter). If the deivce operates in the positioning
state, it will log the GPS records along your journey in real time. Then you may
use the supplied software to match your camera photos to the GPS log file, and
geotag and view the places where these photos were taken on a map.
2Track Log
3Mark a POI Along Your
Journey With a Voice Label
4Positioning Photos
Function Description
English
Function Descriptions

10
5Over-speed Alarm
This device allows you to set a certain speed value. When your car travels faster
than this value, the unit emits sharp audible alarm until the speed falls below
the value. When you drive your car at a high speed, this provides you with the
convenience to control the maximum vehicle speed solely with the audible
alarm of the unit without occasionally checking the speedometer reading,
thereby ensuring driving safety.
This device is specially designed with the Super-long Dormant Tracking Mode
(SPY Tacking Mode). You may set the unit to enter the Dormant Tracking Mode
using combination buttons. In this mode, the unit starts at a fixed time interval,
acquires the position, logs the current track and other position information,
and then shuts down. In dormant operation, the power consumption is
extremely low. This can meet your needs of long-term track logging.
7Vehicular
Auto ON/OFF
When you use the unit on your car, the 2m-long charging (auto ON/OFF) cable
enables device to follow the power status of the car cigarette lighter socket and
start up and shut down automatically, that is, the unit will be turned on/off as
soon as you turn on/off the ignition switch.
6Spy Tacking Mode
Function Description
English
Function Descriptions

11
AC Adapter The AC adaptor is designed with a wide voltage range(100-
240 V), for global versatility. The adaptor is for indoor use
only. Exceeding its specified voltage range can damage the
adaptor or device and result in an electric shock accident.
Disconnect the power plug immediately after the charging
is completed.
Note: The device cannot power-on when it is being charged by the AC adaptor.
The car charger can work with the 12-24V car cigarette
lighter socket. It can be only used for the device. Using it
for any other purpose can damage the car charger and
other devices.
The car charger can work with the charging cable to
automatically start up and shut down the device and charge
it.
The cable can work with the car charger for auto ON/OFF
and standard charging. The device turns on as soon as the
vehicle is started and the power supplies to the car
cigarette lighter socket, and as soon as the vehicle
is shut down and the power supply is disconnected. Thus,
the device is automatically turned on or off together with
the vehicle. The cable is not for data transmission purpose.
turns off
The reader works with a MicroSD card carrying log
data and allows you to access, delete, or copy data at a high
speed or format the card through a USB port on your
computer.
To use the hand strap, simply thread it through the hole at
the bottom of your device. You may use the slider
mechanism to adjust the tension.
Do not forcefully pull the hand strap; otherwise, it may
break.
Car Charger
Charging Cable
USB MicroSD Reader
Carrying Strap
Accessories
[Optional]
English
Accessories
[Optional]

12
About GPS
The Global Positioning System (GPS) is a satellite-based navigation system made
up of a network of 24 satellites placed into orbit by the U.S. Department of
Defense. GPS was originally intended for military applications, but in the 1980s,
the government made the system available for civilian use. GPS works in any
weather conditions, anywhere in the world, 24 hours a day. There are no
subscription fees or setup charges to use GPS.
The GPS is operated by the United States government, which is solely
responsible for accuracy and maintenance of the system. The accuracy of
location data can be affected by adjustments to GPS satellites made by the U.S.
government and are subject to change with civil GPS policy and the Federal
Radio navigation Plan. Accuracy can also be affected by poor satellite geometry.
The receiver is a positioning device that receives RF signal from GPS
satellites, which are 20,000km above the earth. To receive the best signals,
use the receiver in open space wherever possible.
The positions of GPS satellites are continuously changing. Depending on
when and where the device is used, it may take long to acquire the
position, or positioning may be temporarily unavailable.
The device may fail to position and track when you are moving at a speed
of more than 800km/h.
Notes:
(1)
(2)
(3)
English
About GPS

13
This device is built in with a 1000mAh Li-polymer battery, which allows for
hundreds of charge-discharge cycles. Proper charging and discharging can
effectively maximize the service life of the battery.
For indoor applications, use the AC adaptor included in the accessories.
For vehicular applications, use the car charger included in the accessories
in addition to the auto ON/OFF adaptor cable.
Normally, the charging can be finished in about 3.5 hours. When the
Charge LED turns from red to green, it means that the battery has been
fully charged. After charging is finished, do not leave the charger at the
power-on state for a long time.
If you will not use the device for an extended period, you should fully
charge the battery before storing the device.
The battery duration is dependent on your selected operating mode. The
battery duration at different operating modes is as follows*:
Navigation & Track log Mode: 13 - 15 hours
Navigation Mode: 15 - 17 hours
Track log Mode: 18 - 24 hours
Spy Mode: Up to 30 days
●
●
●
●
●
●
●
Notes on battery duration
●
* Testing data of the receiver in open spaces. Duration is subject to the
environment of use, operating mode, positioning status, weather,
and data format.
1How to Charge
the Battery
Super
power
Getting Started
English
How to Charge the Battery

14
2
This device is built in with a MTK 51-channels, -159dBm highly sensitive super
single chipset. It can easily fix positions at most places in your car. If you bring
it with you, you also can use it to fix positions in relatively unfavorable outdoor
environments. For the first time, it uses the EPS* technology to improve the GPS
position accuracy and, in certain degree, reduce the drifting.
In the supplied protection case;
On a shelf or anti-slip pad under the front/rear windshield in your car;
In your backpack or in an outer pocket of your clothes.
At the following places or locations, the device can fail to fix positions or its
storage and maintenance can be adversely affected. Avoid using the device at
such places wherever possible.
A place at the window within a house, or in a tunnel, or in the shadow of a
cluster of buildings; or under a viaduct, among tall buildings, or in a
narrow street surrounded by buildings;
An extremely cold, hot, or wet place. For example, if the device is placed
in a car directly exposed to the sunshine, the high temperature may cause
deformation or malfunction of the device;
A place on a platform where the device is easy to slip or fall in your car or
a place at the airbag in the car;
A place near a strong magnetic field, such as that near high-voltage
cables;
A place near a device that generates RF signals of the same band as the
device: a place near a RF device in 1.5GHz band;
The device is a precision device. Avoid using it at sandy or dusty places.
Keep sand or water out of the device; otherwise, the device may fail and
sometimes may suffer unrecoverable failure.
*EPS stands for Enhanced Positioning System, a positioning technology we have specially developed for the device.
It is recommended to place the device:
Do not use the device at the following places:
●
●
●
●
●
●
●
●
●
Place and Carry
Your Receiver
Getting Started
English
Place and carry your receiver

15
3
●If the card is in a non-FAT file format, the device cannot conduct normal
recording. In such a case, it beeps an alarm.
If the track logging function is enabled but no memory card is plugged or
a memory card is improperly plugged, the “Log LED" flashes, alerting
you that GPS track logging cannot be started.
When you are using the device, do not remove or plug the memory card if
the power is on; otherwise, the device can be damaged and data can be
lost. Always remove or plug the card after the device shuts down.
Memory cards of certain models do not support more than 512 files
under a single directory. Data storage will be no longer available if the
files are more than this limit. Please backup excessive records to your
computer whenever necessary.
●
●
●
Memory card selection and file format
This device supports MicroSD cards of most brands. The supported storage
capacity is 64M to 2G. If you need to use the audio recording function, only
high-speed memory cards with the capacity of more than 512M are
supported because the access speeds of small-capacity cards are limited.
You have to properly format the memory card before using it. Plug the
card in the reader and insert the latter to a USB port on you computer.
Then operate as follows:
1
Preparing for Use
Getting Started
English
Memory card selection
and file format
Right click your mouse on the volume label
where the card is located. Select "Format".
Select the "FAT" file system and click
"Start". See the above figure.

16
Setting camera date and time
If the internal clock of your digital camera is incorrectly set, there can be
error between the captured photos and track positions. Please adjust the
camera time by following the correct procedure below.
2
●Click the "Time and Date"
property at the lower right
corner. Open the "Internet
Time" tab. Click "Update
Now". Make sure the time is
successfully synchronized
with the Internet time.
●Return to the "Time and Date"
tab. Now the time is the
correct. It should be the
reference when you adjust
the internal clock of your
digital camera.
●Open the "Time setting" menu of the
digital camera. Usually you can find
the menu in system setup of the
camera.
Set the correct time on your camera
according to the time and date of
your computer. If possible, the
synchronized time should be
accurate to "second".
Second" is unlikely to appear in the
time of a digital camera. Let us
illustrate with the time to the left.
You may set the time to 20:08 at
first and then press the "OK" button
as soon as the reference time
changes from 20:07:59 to 20:08:08.
In view of the error in the internal
clock of your camera, it is
recommended to adjust the clock at
least once per month.
●
●
●
"
Getting Started
English
Setting camera data and time

17
Introduction and changeover of operating modes
V-900 has three normal operating modes. You may switch between these
modes using the Power/Function button as follows:
4
1
Track Log &
Navigation Mode
Track Log
Mode
Navigation
Mode
Power Off
Bluetooth disconnection
over 15 minutes.
Track Log Mode
●In this mode, this
device turns off its
Bluetooth function
and only logs the
track, thereby saving
additional power.
In this mode, you
may short press the
Power/Function
button to awake the
Bluetooth function.
●
Navigation Mode
●In this mode, this device
turns off its logging
function and only works
for navigation, thereby
saving the power.
In this mode, you may
short press the
Power/Function button
to turn on the logging
function once again.
If the Bluetooth
connection between the
terminal and the device
has been terminated for
more than 15 minutes,
the device automatically
shuts down.
●
●
Long press the for 3
seconds two short beeps and
starts up.
,
Short press the
a short beep
,
.
Track Log &
Navigation Mode
●
●
●
●
After the device starts up, it first enters
the Track log & Navigation Mode.
In this mode, both the Bluetooth and
Track Logging functions of the device
are turned on. While functioning as a
navigator, the device also logs the track
information of your journey in real
time.
If the Bluetooth connection between the
terminal and the device has been
disconnected for more than 15
minutes, or the device fails to establish
a Bluetooth connection in 15 minutes,
the device automatically turns off its
Bluetooth function and enters the Log
Mode.
If there isn't any memory card in the
device, the Log LED fast flashes for 8
seconds and then the logging function
is automatically turned off. The device
enters the Navigation Mode.
Start to Use
Short press the
a short beep
,
.
Long press the for 3
seconds a long beep and shuts
down.
,
Long press the for 3 seconds
a long beep and shuts down.
,
Long press the for 3 seconds or
Bluetooth disconnection over 15
minutes, a long beep and shuts down.
Short press the
or there isn’t any
memory card.
Getting Started
English
Introduction and
changeover of operating modes

18
Establishing Bluetooth connection with a terminal
(illustrated with the Windows Mobile 6.0 system)
First of all, long press the power button to turn on the device.
®
2
(1) Open "Setting Bluetooth"
on smart phone, select
"Turn on Bluetooth" and
"make this device
discoverable to other
devices".
(2) Click "New...", then search
Bluetooth device.
(3) Find the Bluetooth
device.
(4) Enter the Passkey "0000",
click "Next".
(5) Click "Yes" to create a
Bluetooth Serial Port.
(6) Finish Bluetooth
Connecting.
●
●
●
,
After the above configuration, you may launch the navigation software to establish the
connection.
After the connection is established, the “Bluetooth LED” will be always on. The
device emits audible alert when the Bluetooth connection is established or cancelled.
The COM port No. may vary depending on the model. All you have to do is to
configure the same port No. in the navigation software. The baud rate of the port
should be "38 400bps".
Getting Started
English
Establishing bluetooth
connection with a terminal

19
Acquiring position and navigating
Notes on acquisition time of the device*
(1) Long press the “power button” for 3s to turn on the device.
(2) In a relatively open outdoor environment, point the device reception
antenna to the sky. Wait for several minutes until the position is fixed.
(The “GPS LED” flashes after the position is fixed)
(3) Pair and establish connection with the terminal as instructed in
previous pages.
(4) Launch the navigation software. Configure the COM port and set the
baud rate to 38,400. When the “Bluetooth LED” becomes always on,
the connection is established and navigation begins.
There are three kinds of GPS acquisition at startup: cold start, warm start,
and hot start.
(1) Cold start: 35s
A cold start is the startup in any of the following situations: the device
is used for the first time; ephemeris is lost due to low battery level; or
the device has been moved for more than 1,000km when it is turned
off.
(2) Warm start: 32s
A warm start is the startup in two or more hours after the last
positioning.
(3) Hot start: 1s
A hot start is the startup within two hours after the last positioning.
*The test environment is a place with relatively open view to the sky.
If it is difficult for the device to fix the position and the GPS LED is always
on, you should point upward the antenna part of the device and wait for a
while. If the position still cannot be fixed after 5 minutes, perhaps you are
situated at a place where GPS signals cannot reach. In such a case, move to
a place as open as possible and try to fix the position once again.
3
Point upward the GPS
reception antenna to help
receive satellite signals.
It is not recommended for the
receiver to fix the position for the
first time at an indoor window or
any other relatively enclosed
environment.
Getting Started
EnglishEnglish
Acquiring position
and navigating
4

20
1
Before running the track logging, you should correctly format your memory
card. Refer to P.15 for the operation.
After the device is turned on and already in the positioning state, it
automatically logs the current track point once per second. A single track may
be unlimited in length. Log LED flashes when the device is writing data to
the memory card.
Every time you turn on the device, a new track file is automatically created.
A track record may be in the standard mode or the expert mode. You may
define the mode. Refer to P.29 for the operation.
The contents of a standard mode (default) record include:
Date, time, latitude, longitude, altitude, speed, heading, and voice
The contents of an professional mode record include:
Date, time, latitude, longitude, altitude, speed, heading, voice, positioning
mode, positioning type, PDOP, HDOP, and VDOP
A MicroSD card with the capacity of 2G may stores about 25 million records.
Note: Never remove the memory card unless the device shuts down;
otherwise, the logged track may be lost!
A track is logged on the memory card as a file. You may manipulate and
manage the file from your computer. A track is conventionally named as
follows:
Example: 09041100.CSV
It means that the track begins on April 11, 2009. The last two digits "00"
represent that the track is the first one of the day, and so on. The range of
these two digits is from "00" to "99". There may be up to 100 tracks in a
single day.
""
Logging Your Journey
Logging a Track
English
Logging a Track
Table of contents
Other Columbus GPS manuals