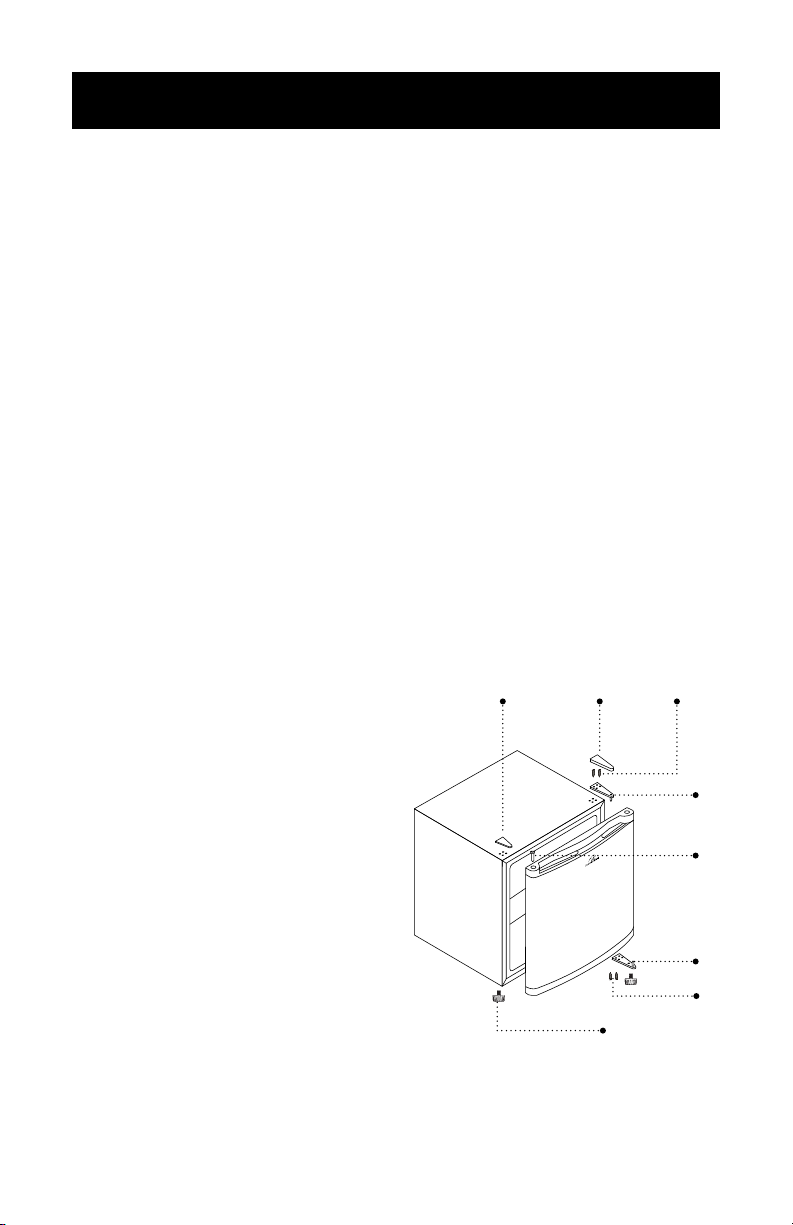
commercial cool CCUK12W User manual

1. READ these instructions carefully before installing and operating the
freezer. Keep them for further reference.
2. Record in the space below the “SERIAL NO.” found on the nameplate on
your freezer and retain this information for future reference.
SERIAL NO.:
Please save sales receipt for warranty.
User Manual
Upright Freezer
MODEL: CCUK12W

Page 2
CONTENTS
PRODUCT REGISTRATION
Thank you for purchasing our
W Appliance product. This easy-to-
use manual will guide you in getting
the best use of your freezer.
Remember to record the model
and serial numbers. They are on a
label on the rear of the freezer.
Staple your receipt to your manual. You will need it to obtain warranty service.
Model number
Serial number
Date of purchase
SAFETY INFORMATION
Important Safety Instructions
Refrigerant
Grounding Instructions
3
4
5
SET UP & USE
Installation Guide
Parts & Features
Operation Instructions
6
7
8
12
12
13
14
TROUBLE SHOOTING & WARRANTY
Before You Call For Service
Customer Service
Troubleshooting
Limited Warranty
CLEANING & CARE 10
MEMO 15

Page 3
SAFETY INFORMATION
IMPORTANT SAFETY INSTRUCTIONS
NOTE: If the freezer has been placed in a horizontal or tilted
position for any period of time, wait 24 hours before
plugging the unit in.
1. Use this appliance only for its intended purpose as described in
this use and care guide.
2. This freezer must be properly installed in accordance with
the installation instructions before it is used. See grounding
instructions in the installation section.
3. Never unplug your freezer by pulling on the power cord. Always
grasp the plug firmly and pull straight out from the outlet.
4. Do not operate any appliance with a damaged cord or plug.
Return appliance to the nearest authorized service facility for
examination, repair or adjustment.
5. Unplug your freezer before cleaning or before making any
repairs. Note: If for any reason this product requires service, we
strongly recommend that a certified technician performs the
service. Component parts shall be replaced with like components
and servicing shall be done by factory authorized service
personell, so as to minimize the risk of possible ignition due to
incorrect parts or improper service.
6. Do not use any electrical device or any sharp instrument in
defrosting your freezer.
7. DANGER – Risk of child entrapment. Before you throw away
your old refrigerator or freezer, take off the doors and leave the
shelves in place to that children may not easily climb inside.
8. After your freezer is in operation, do not touch the cold surfaces
in the freezer compartment, particularly when hands are damp or
wet. Skin may adhere to these extremely cold surfaces.
DANGER
DANGER - Immediate hazards
which WILL result in severe
personal injury or death
WARNING
WARNING - Hazards or unsafe
practices which COULD result in
severe personal injury or death
CAUTION
CAUTION - Hazards or unsafe
practices which COULD result in
minor personal injury
WARNING
When using electrical appliances, basic safety precautions
should be followed, including the following

Page 4
SAFETY INFORMATION
REFRIGERANT
GAS WARNINGS
DANGER - Risk of re or explosion. Flammable refrigerant used. DO NOT use
mechanical devices to defrost freezer. DO NOT puncture refrigerant
tubing.
• DANGER - Risk of re or explosion. Flammable refrigerant used. To be
repaired only by trained service personnel. DO NOT puncture refrigerant
tubing.
• CAUTION - Risk of re or explosion. Flammable refrigerant used. Consult
repair manual/owner’s guide before attempting to service this product. All
safety precautions must be followed.
• CAUTION - Risk of re or explosion. Dispose of property in accordance with
federal or local regulations. Flammable refrigerant used.
• CAUTION - Risk of re or explosion due to puncture of refrigerant tubing;
Follow handling instructions carefully. Flammable refrigerant used.
9. Do not refreeze foods that have been thawed completely. The
United States Department of Agriculture in Home and Garden
Bulletin No. 69 reads: “…You may safely refreeze frozen foods that
have thawed if they still contain ice crystals or if they are still cold-
below 40˚F.
“…Thawed ground meats, poultry, or sh that have any off-odor or
off-color should not be refrozen and should not be eaten. Thawed
ice cream should be discarded. If the odor or color of any food is
poor or questionable, discard it. The food may be dangerous to eat
… Even partial thawing and re-freezing reduce the eating quality of
foods, particularly fruits, vegetables, and prepared foods. The eating
quality of red meats is affected less than that of many other foods.
Use refrozen foods as soon as possible, to save as much of its eating
quality as you can.”
10. This freezer should not be recessed or built-in in an enclosed cabinet.
It is designed for freestanding installation only.
11. Do not operate your freezer in the presence of explosive fumes.
SAVE THESE INSTRUCTIONS
HOUSEHOLD USE ONLY
DANGER
Risk of child entrapment. Before you throw away your old, take off the doors.
Leave the shelves in place so that children may not easily climb inside.

Page 5
SAFETY INFORMATION
GROUNDING INSTRUCTIONS
ELECTRICAL REQUIREMENTS
The electrical requirements are a 115 volt 60 Hz, AC only, 15 amp. It is
recommended that a separate circuit serving only the product be provided. The
product is equipped with a 3-wire cord having a 3-prong grounding plug. It must
be plugged into a wall receptacle that is properly installed and grounded.
This appliance must be grounded. In the event of an electrical short circuit,
grounding reduces risk of electric shock by providing an escape wire for the
electric current. The cord provided with this appliance is equipped with a
grounding wire and a grounding plug. The plug must be plugged into an outlet
that is properly installed and grounded.
Avoid the use of three prong adapters or cutting off the third grounding prong in
order to accommodate a two prong outlet. This is a dangerous practice since it
provides no effective grounding for the freezer and may result in shock hazard.
Consult a qualied electrician or serviceman if:
1) The grounding instructions are not completely understood.
2) You are unsure that the appliance is properly grounded.
3) You have any questions about the grounding or electrical instructions.
POWER SUPPLY CORD
1. Avoid the use of an extension cord because of potential safety hazards under
certain conditions. Have a qualied electrician or serviceman to install an outlet
near the appliance.
2. If it is absolutely necessary to use longer cord sets or an extension cord, extreme
care must be exercised.
a) Use only a grounding type 3-wire extension cord that has a 3-blade grounding
plug and a 3-slot receptacle that will accept the plug on the appliance.
b) The marked electrical rating of the cord set or extension cord must equal to
or greater than the electrical rating of the appliance. The longer cord should
be arranged so that it will not drape over the counter top or table top where it
can be pulled on by children or tripped over unintentionally.
NOTE: Neither W Appliance nor the dealer can accept any liability for damage to the product or
personal injury resulting from failure to observe the electrical connection procedures.
WARNING
Improper use of the grounding plug can result in a risk of electric shock.

Page 6
SET UP & USE
INSTALLATION GUIDE
1. Unpack your freezer by removing all packaging materials like carton, base, foams,
adhesive tape, etc.
2. Remove all accessories, internal packaging material used to hold shelves, ice tray,
etc. in place.
3. Clean the remains of all adhesive tap used and remove all printed material
supplied.
4. Install the freezer in a convenient location away from extreme heat and cold.
Allow sufcient clearance between the freezer and side wall so the door(s) will
open without obstruction. Freezer is not designed for recessed installation.
5. The oor on which the freezer should be placed must be at, hard, solid, and
even. The freezer should not be placed on any soft material such as foam, plastic,
etc.
6. To level your freezer, use the two leveling legs located on the bottom front of
your freezer. Adjust by turning the legs counter clockwise to raise or clockwise
to lower your freezer. The door will close easier if the leveling legs are extended.
The following are recommended minimum clearances around the freezer for
proper air circulation:
Sides: 3/4” (19mm)
Top: 2” (50mm)
Back: 2” (50mm)
Proper air circulation will help your freezer work at maximum efciency.
NOTE: · The appliance must be correctly connected to the power supply.
WARNING
It is important to keep the power cord away from the compressor at the back of
the freezer as during operation, the compressor can reach a high temperature
and could cause serious damage to the power cord.
CAUTION
Care should be taken during the handling moving and use of the freezer to avoid
damaging the refrigerant tubing or increasing the risk of a leak

Page 7
SET UP & USE
PROTECTION FROM HEAT AND MOISTURE
•
Do not install your freezer in any location where heavy moisture is present or if
the location is not properly insulated. This freezer is not designed to operate
in temperature setting below 55° Fahrenheit.
• Location for the freezer should be on a hard surface and away from direct
sunlight and heat source, e.g., radiators, baseboard heaters, cooking
appliances, etc.
DOOR ALIGNMENT
1. Remove the top hinge cover.
2. Loosen the top hinge screws using a Phillips head
screwdriver.
3. Adjust the door or put a spacer in between and then
tighten the screws.
STARTING YOUR NEW FREEZER
1. After cleaning your freezer thoroughly. Wipe the outside with a soft dry cloth, the
interior with a clean moist cloth.
2. Insert the power supply cord into the socket.
3. Turn the thermostat dial to an initial setting of “6” for 15-20 minutes.
NOTE: · As the door gets pressed in during shipping, the gasket may have to be reset. This is
done to prevent the cool refrigerated air from escaping. If there is a gap between the
door gasket and the cabinet, set the gasket by gently pulling it out of the seal gap.
Door Hinge Cap
PARTS & FEATURES
Temperature Control
(not shown bottom rear)
Freezer
Door
Leveling Legs
Fixed Grid
Shelf

Page 8
SET UP & USE
A B
C
H
E
F
D
G
Before reversing the door, ensure the
appliance is unplugged and empty.
Provide additional support for the doors
while hinges are being removed. Do not
depend on the door magnets to hold the
door in place. It is recommended that
two people perform this task. DO NOT
lay the appliance completely at as this
may damage the coolant system.
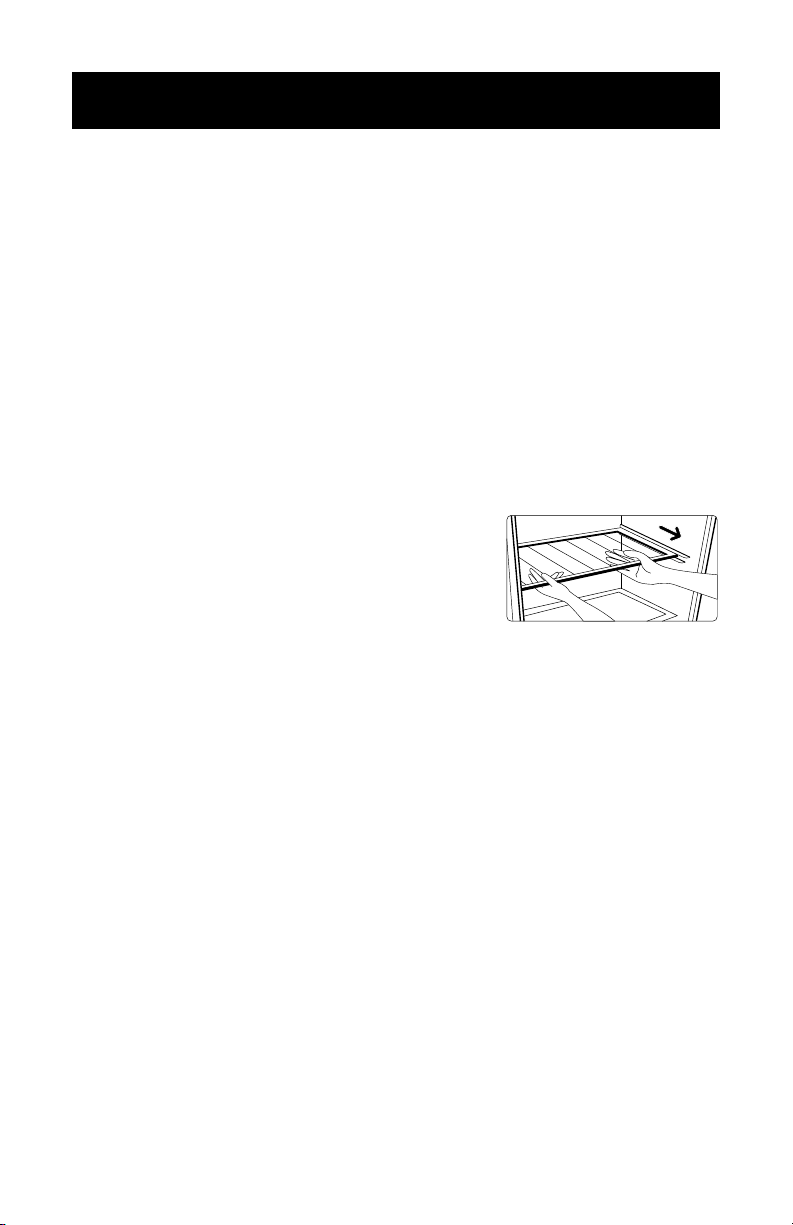
1. Remove any loose items from inside
the freezer (e.g. drip pan, ice tray,
etc.)
2. Using a at head screwdriver remove
the top hinge cover (A).
3. Loosen and remove the two screws
(B) using a Phillips head screwdriver
while holding the upper hinge in
place.
4. Remove the upper hinge (C) and
carefully lift off the door. Place the
door safely to the side.
5. Using a at head screwdriver remove
the screw hold plug (D) from the
opposite side and insert the plug into
the screw hole openings of the just
removed screws.
6. Carefully lay the freezer on its back
on a at secure area.
7. Using a Phillips head screwdriver,
loosen and remove the two screws
(E) holding the bottom hinge (F) in
place. Place the hinge and screws to
the side momentarily.
8. Place the bottom hinge (F) on the
opposite side and insert and tighten
the two screws (E) securely.
9. Place the freezer in its upright
position. Remove the door plug (H)
on the top of the door and insert it
rmly in the hole on the opposite
side. Align the hole in the door
bottom with the pin of the bottom
door hinge (F) and gently push down
until rmly in place.
10. Holding the door in the open position
place the pin of the upper door
hinge (C) into the hole located on
the top of the door. Align the screw
holes of the upper hinge (C) with the
screw holes on the top corner of the
cabinet and insert and tighten loosely
the two screws (B).
11. Check that the door is aligned and
level and then securely tighten the
upper hinge screws.
12. Replace the upper hinge cover (A)
by gently snapping it into place
FREEZER DOOR REVERSAL

Page 9
SET UP & USE
OPERATION INSTRUCTIONS
TEMPERATURE CONTROL
NOTE: · If the freezer has been placed in a horizontal or tilted position for any period of time
wait 24 hours before plugging the unit in.
• The settings of the temperature control are “OFF, 1, 2, 3, 4, 5, 6, 7.” Adjust the
temperature control to the setting that best suits your needs. The setting of
“4” should be appropriate for home or ofce use.
• Turning the temperature to “OFF” position will shut off the cooling cycle, but
does not turn off the electrical power to the unit.
NOTE: · Wait 3-5 minutes before restarting if you unplug the freezer. The unit may fail to
operate properly if restarted too quickly.
· If the ambient temperature is too high, the freezer may not reach the desired target
temperature.
· Large amounts of foods will lower the cooling efciency of the appliance.
· If you choose to change the thermostat setting, adjust thermostat control one
increment at a time. Allow several hours for temperature to stabilize between
adjustments.
FREEZER INTERIOR SHELF
1. Carefully tilt the shelf up and slide forward until
the shelf has been completely removed.
2. Slide the shelf back to replace.

Page 10
CLEANING & CARE
WARNING
Always unplug your freezer before
cleaning to avoid electric shock. Ignoring
this warning may result in death or injury
CAUTION
To avoid personal injury or product damage
always read and follow manufacturer’s
instructions and warnings before using any
cleaning products.
CLEANING AND MAINTAINING
The freezer should be cleaned and maintained once a month. Before doing so,
you must unplug the freezer.
POWER INTERRUPTION
In case of a power interruption/outage, unplug the power cord from the wall
outlet. Replug the power cord to the wall outlet once the power has been
restored. For long period of power outage, inspect and discard the spoiled or
thawed foods from the freezer compartments. Clean the freezer thoroughly
before using again.
CLEANING METHOD
Prepare a cleaning solution of 3-4 tablespoons of baking soda mixed with warm
water. Use sponge or soft cloth, dampened with the cleaning solution to wipe
down your freezer.
• Rinse with clean warm water and dry with a soft cloth.
• Do not use harsh chemicals, abrasives, ammonia, chlorine bleach,
concentrated detergents, solvents or metal scouring pads. Some of these
chemicals may dissolve, damage and/or discolor your freezer.

Page 11
SET UP & USE
DOOR GASKET
Clean door gaskets every three months according to general instructions.
Gasket must be kept clean and pliable to assure a proper seal.
• Petroleum jelly applied lightly on the hinge sides of gaskets will keep the
gasket pliable and ensure a good seal.
VACATION AND MOVING CARE
• When going on vacation, it is best that you empty all the food from your
freezer. Set the temperature dial to “OFF” and unplug the freezer. Clean the
unit as per “Cleaning Method” and leave the door open to remove any odors.
• When travelling or moving the freezer, always transport the unit vertically.
Moving the unit on its sides may damage the freezer and/or its compressor.
HOW TO DEFROST
• Defrost the freezer when the frost accumulated is about 1/8” thick.
• Set the temperature control dial to “OFF” before defrosting. Remove all
contents from the freezer compartment and leave the door open until ice and
frost dissolve thoroughly. Make sure the drip tray is in place and unplug the
unit. After defrosting, empty water from drip tray and wipe the compartment
dry with a soft cloth and then adjust the temperature control dial to the
desired position.
NOTE: · In case you want to speed up the defrosting, you may put a bowl of warm water
(about 122°F) into the freezer.
· Do not heat the evaporator directly with hot water or hair dryer while defrosting.
Doing so will damage the freezer compartment.
· Never use a sharp or metallic instrument to remove frost as it may damage the
freezer and puncture the cooling coils. It will also void the warranty. We recommend
using a plastic scraper.

Page 12
TROUBLESHOOTING & WARRANTYTROUBLESHOOTING & WARRANTY
BEFORE YOU CALL FOR SERVICE
IF THE FREEZER FAILS TO OPERATE:
A) Check to make sure that the freezer is plugged in securely. If it is not, remove
the plug from the outlet, wait 10 seconds and plug it in again securely.
B) Check for a blown circuit fuse or a tripped main circuit breaker. If these seem
to be operating properly, test the outlet with another appliance.
IF NONE OF THE ABOVE SOLVES THE PROBLEM, CONTACT A QUALIFIED
TECHNICIAN. DO NOT TRY TO ADJUST OR REPAIR THE Freezer YOURSELF.
CUSTOMER SERVICE
IMPORTANT DO NOT RETURN THIS PRODUCT TO THE STORE
If you have a problem with this product, please contact the W Appliance
Co. Customer Satisfaction Center at 1-855-855-0294. DATED PROOF OF
PURCHASE, MODEL # AND SERIAL # REQUIRED FOR WARRANTY SERVICE

Page 13
TROUBLESHOOTING & WARRANTY
TROUBLESHOOTING
Troubleshoot your problem by using the chart below. If the freezer still does not
work properly, contact W Appliance Co. customer service center or the nearest
authorized service center. Customers must never troubleshoot internal components.
TROUBLE POSSIBLE CAUSE POSSIBLE REMEDY
Freezer does not
work
A. Freezer is not switched on
B. |Unit is not plugged in or
is loose
C. Fuse has blown or is
defective
D. Wall power socket is
defective
A. Turn on the temperature
control dial. It may be in
the OFF position
B. Plug in the freezer
C. Check fuse, replace if
necessary
D. To be corrected by a
qualied electrician
The food is too
warm
A. Temperature is not
properly adjusted
B. Door was open for an
extended period
C. A large quantity of warm
food was placed in the
freezer within the last 24
hours
D. The freezer is near a heat
source
A. Set the temperature
control dial to a cooler
setting
B. Open the door only as
long as necessary. Check
door gasket for proper
seal
C. Set the temperature
control dial to a colder
setting temporarily
D. Please look in the
“Protection From Heat and
Moisture” section
Heavy build-up of frost,
possibly also on the
door seal
NOTE: This is normal
during high humidity
periods. Frequent door
openings will also cause
heavy frost buildup
A. Door seal is not air-tight
(possibly after reversing
the door)
B. Carefully warm the leaking
sections of the door
gasket with a hair dryer
(on a cool setting). At
the same time, shape the
warmed door seal by hand
such that it sits correctly
Popping or cracking
sounds
A. When compressor comes
on
A. This is a normal sound of
coolant owing through
condenser coils
Freezer door does not
shut properly
A. The freezer door is not
properly aligned
B. Possible blockage from
food containers, shelves,
bins, etc.
A. Re-align the freezer
door. Refer to the “Door
Alignment” section
B. Ensure nothing is blocking
the door
Freezer has an odor A. Foods not properly sealed
B. Interior needs cleaning
A. Removed any
contaminated foods
B. Please refer to “Cleaning
and Care” section

Page 14
TROUBLESHOOTING & WARRANTY
LIMITED WARRANTY
Any repair, replacement, or warranty service,
and all questions about this product should
be directed to W Appliance Co. at 1 (855)
855-0294 from the USA or Puerto Rico.
W Appliance Co. warrants to the original purchaser
that the product will be free from defects in material,
parts and workmanship for the period designated for
this product. The warranty commences the day the
product is purchased and covers up to a period of
1 year (12 months) for labor/1 year (12 months) for
parts (manufacturing defects only)/carry in service/
and a total of 2 years (24 months) for compressor
part only. W Appliance Co. agrees that it will, at its
option, replace the defective product with either
a new or remanufactured unit equivalent to your
original purchase during the warranty period.
Exclusions: This warranty does not apply to the
below:
1. If the appearance or exterior of
the product has been damaged or
defaced, altered or modied in design
or construction.
2. If the product original serial number
has been altered or removed or cannot
be readily determined.
3. If there is damaged due to power line
surge, user damage to the AC power
cord or connection to improper
voltage source.
4. If damage is due to general misuse,
accidents or acts of God.
5. If repair attempts are done by
unauthorized service agents, use of
parts other than genuine parts or parts
obtained from persons other than
authorized service companies.
6. On units that have been transferred
from the original owner.
7. On products that have been purchased
as refurbished, like new, second-hand,
in a “As-Is” or “Final Sale” terms.
8. To products used in a commercial or
rental setting.
9. To products used in settings other than
ordinary household use or used other
than in accordance with the provided
instructions.
10. To damages for service calls for
improper installations.
11. To glass parts and other accessory
items that are included with the unit.
12. Transportation and shipping costs
associated with the replacement of
the unit.
13. Food loss for loss due to product
failure or delay in service, repair or
replacement.
14. Service calls to instruct you how to
use your product.
15. Service calls to repair or replace the
house fuse, reset the circuit breaker or
correct the wiring in the house.
REPAIR OR REPLACEMENT AS PROVIDED UNDER
THIS WARRANTY IS THE EXCLUSIVE REMEDY
OF THE CUSTOMER; W Appliance Co. SHALL
NOT BE LIABLE FOR ANY INCIDENTAL OR
CONSEQUENTIAL DAMAGES FOR BREACH OF
ANY EXPRESS OR IMPLIED WARRANTY ON THIS
PRODUCT, EXCEPT TO THE EXTENT PROHIBITED
BY APPLICABLE LAW. ANY IMPLIED WARRANTY
OF MERCHANTABILITY OF FITNESS FOR A
PARTICULAR PURPOSE ON THIS PRODUCT IS
LIMITED TO THE DURATION OF THE WARRANTY.
Some states do not allow the exclusion or limitations
of incidental or consequential damages, or limitations
on how long the warranty lasts. In these cases the
above exclusions or limitations may not apply to you.
This warranty gives you specic legal rights and you
may also have other rights which vary from state to
state.
Obtaining Service: To obtain service, product
literature, supplies or accessories please call
1 (855) 855-0294 to create a ticket for exchange/
repair. Please make sure to provide the date of
purchase, model number and a brief description of
the problem. Our customer service representative
will contact you or send detailed return instructions.
W Appliance Co. does not warrant that the appliance will work
properly in all environmental conditions, and makes no warranty
and representation, either implied or expressed, with respect
to the quality, performance, merchantability, or tness for a
particular purpose other than the purpose identied within this
user’s manual. W Appliance Co. has made every effort to ensure
that this user’s manual is accurate and disclaims liability for any
inaccuracies or omissions that may have occurred. Information
in this user’s manual is subject to change without notice and
does not represent a commitment on the part of W Appliance
Co.. W Appliance Co. reserves the right to make improvements
to this user’s manual and/or to the products described in this
user’s manual at any time without notice. If you nd information
in this manual that is incorrect, misleading, or incomplete, please
contact us at 1- 855-855-0294.
W Appliance Company LLC,
New York, NY 10018

Page 15

© 2013 W Appliance Company LLC. All Rights Reserved.
110215
Table of contents
Other commercial cool Freezer manuals