manuals.online logo
Brands
  1. Home
  2. •
  3. Brands
  4. •
  5. Conde
  6. •
  7. Digital Signage
  8. •
  9. Conde Desk V2 Screen Quick start guide

Conde Desk V2 Screen Quick start guide

Condeco Desk V2 Screen
Operational Description
Version 1.0 prepared by Xiaofei Zhang
Contents
This is a Heading 1......................................................................................................................................5
This is a Heading 2...................................................................................................................................
1. This is a Heading 1 Numbered.........................................................................................................
1.1. This is a Heading 2 Numbered.................................................................................................
Here’s a table:................................................................................................................................................
About Us .....................................................................................................................................................16
Powering Change ................................................................................................................................16
Who We Work With ..............................................................................................................................16
Desk V2 Screen Design Spec
1. Display: 2.8” LCD 320 x 240 (QVGA) , 4 Wire SPI [KD028FM-1-TP]
2. Touch sensor: 4 wire Resistive touch
3. LED Light bar to display status
4. Processor: CC3200 from Texas Instruments with integrated ARM
Cortex M4 processor
5. SRAM 256KB
6. Permanent storage: External Flash 16MB
7. Power Supply Voltages: 5V provide by USB cable.
8. Power Consumption: 0.3A, 1.5W.
9. WiFi 802.11 b/g/n single band, 2.4GHz [CC3200]
10.RFID HID Prox: 125KHz
Mifare, iClass and Desfire: 13.56MHz
11.Operational temperature +15°C to +35°C
12.Storage temperature 0°C to +70°C
Desk V2 Screen Operational Description
Equipments and software preparation:
1. Desk V2 Screen Programming cable..
2. A USB port to provide 5V power to Desk V2 Screen.
3. A PC with Windows 7 Profectional or later.
4. CCS UniFlash v3.4.0 software for firmware installation. It can be
downloaded for free from internet. Once you have downloaded it
from website, install the UniFlash v3.4.0 on you PC.
5. Condeco Desk V2 Screen firmware.
Desk V2 Screen Firmware Installation:
1. Connect the Desk V2 Programming cable to your PC.
2. Connect the Desk V2 screen’s power lead to your PC’s USB port.
3. Double click the CCS UniFlash icon on your Desktop to start it.
4. Click File on the UniFlash Manu bar and select Open
Configuration.
5. Select and open condeco_prod.usf in C:\ti\uniflash_3.4\condeco\
6. The COM Port number should be the port the USB Programming
Cable connected. It can be find in computer’s Device Manager.
7. Make sure following boxes have been
Checked.
8. Click Format button to format the desk screen’s memory. Choose
the size of the memory as 1Mb.
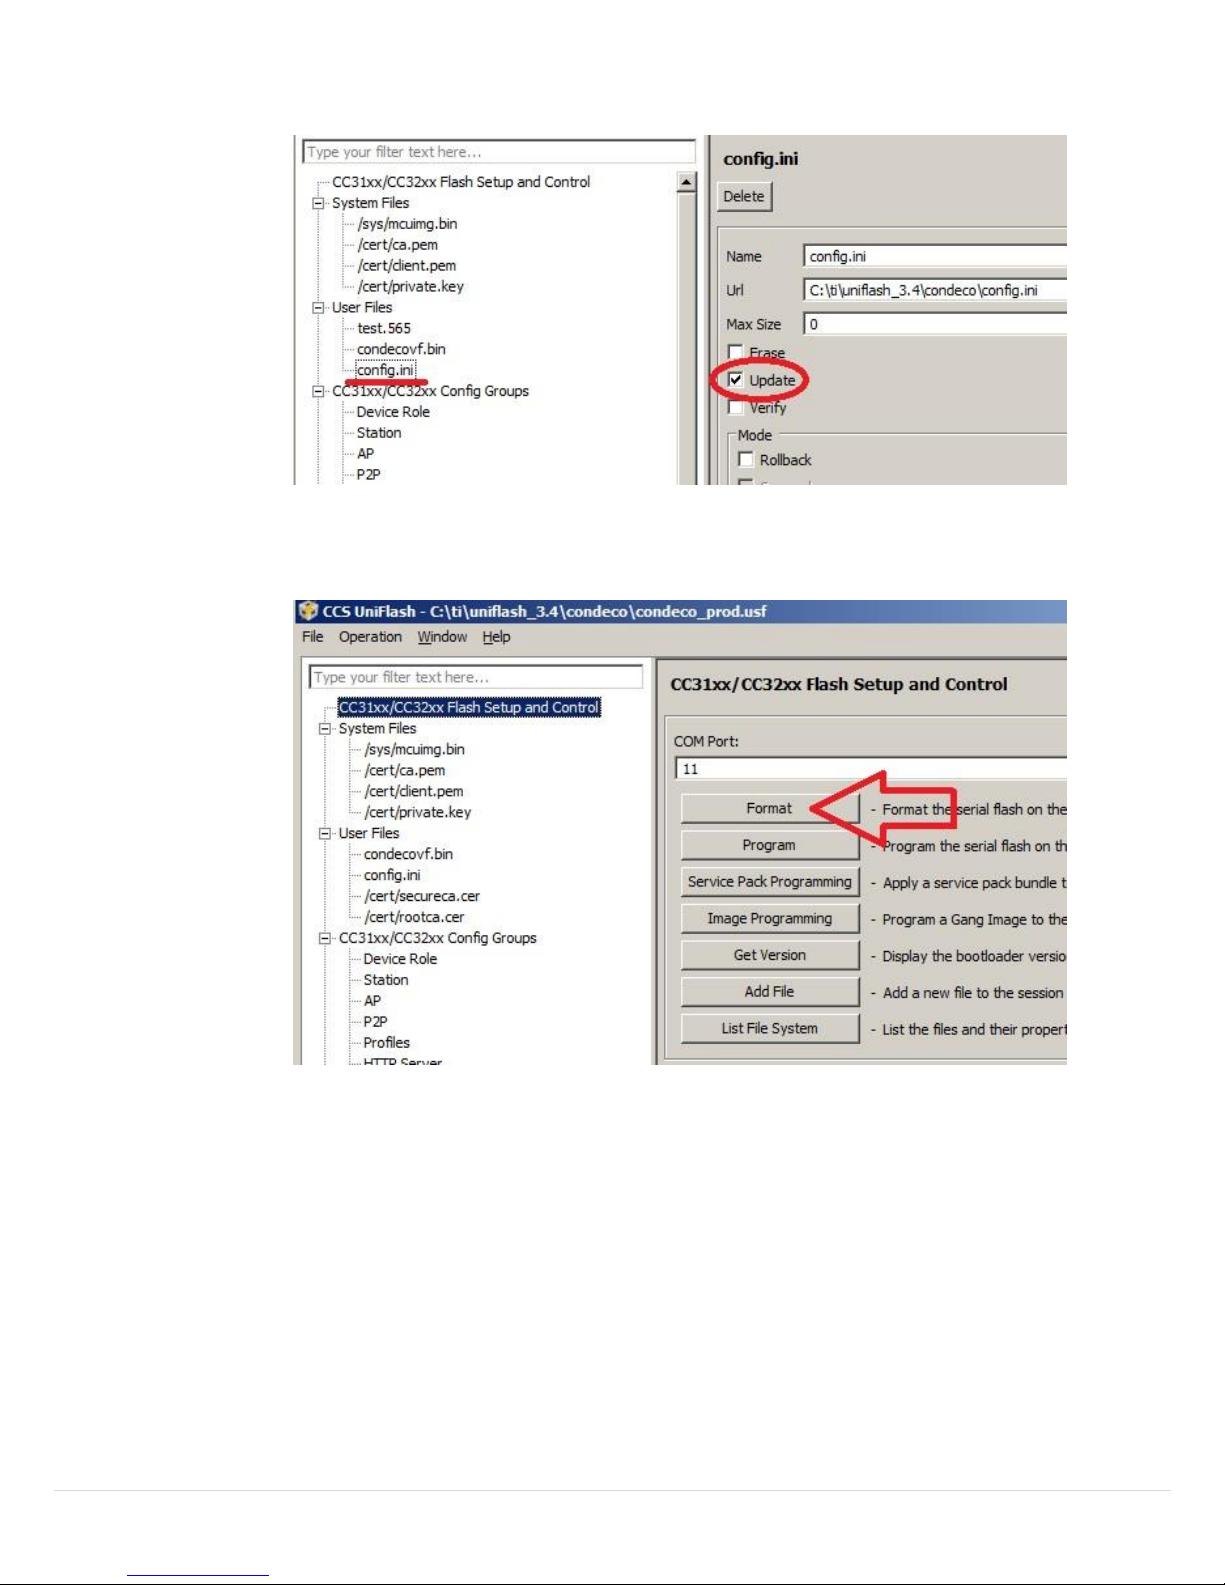
9. After the memory has been formatted, click the Service Pack
Programming button to update the Service Pack.
•If it’s your first time run the Service Pack Programming, it
will shows a message asking you to download the Service
Pack from the link. Once you have downloaded, install it
into the C:\ti\ folder. After Service Pack has been install,
click Service Pack Programming button and indicate the
path of the pack to program it.
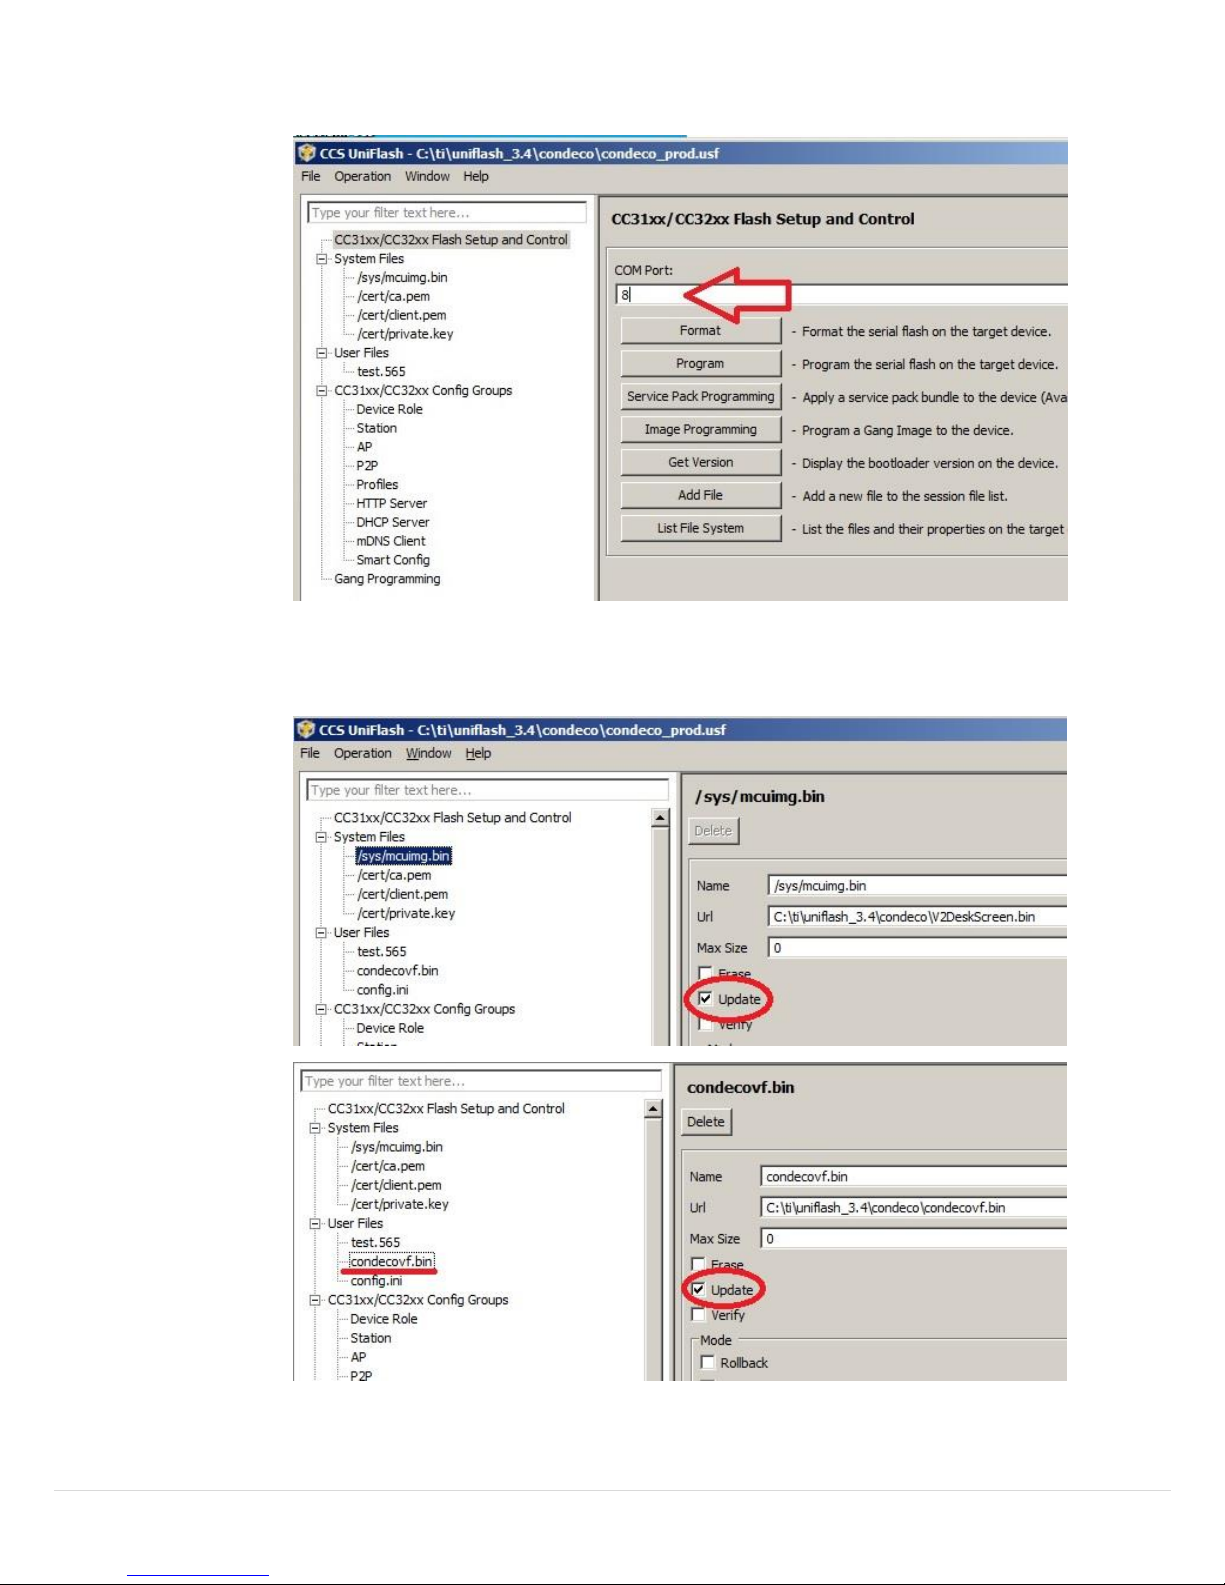
10.After update the Service Pack, click the Program button to load
the Condeco firmware onto the V2 Desk Screen.
11.Once Operation Program returned appears, the programming has
completed.
12.Power off the Desk V2 screen by unplug the power lead from the
USB port.
13.Disconnect the programming cable.
14.Put the back plate on.
15.Finish.
Instruction for Screen Configuration
Desk V2 Screen Configuration:
1. Open the config.ini file in C:\ti\uniflash_3.4\condeco\
2. To Config the Desk ID:
Key in the Desk ID at “resourceid=”, then save the file.
Save the change.
3. To Config http/ https:
In the config.ini file,
“usehttps=0” for http. Set to port 80.
“usehttps=1” for https. Set to port 443.
Save the change.
4. To set or change the URL:
Key in the URL at: “deskservicehost=” and at
“screenservicehost=”
Save the change.
5. To set the secreen rotate position:
1) Set the rotation at 0 °, for install the Desk V2 screen on
the desk.
In the config.ini file, set “rotation=0”
Save the change.
2) Set the rotation at 180°, for install the Desk V2 screen on
the division.
In the config.ini file, set “rotation=180”.
Save the change.
6. Setup the WiFi connection:
In the config.ini file,
Key in the WiFi SSID at “ssid= “
Key in the WiFi password at “key= “
Save the change.
7. Finish.
Desk V2 Screen User Instruction
1. Plug the Desk V2 screen’s USB connecter into a PC’s USB port or a
USB charger to get the 5V power supplied to Desk V2 screen.
2. Desk V2 screen’s LED bar will lights up.
3. Display on LCD will come up and display the Deskscreen V2 and
the version of the software.
4. Screen will automatically try to connect to the WiFi and display
the screen MAC address on the LCD.
5. Once the WiFi has been connected, screen will display the WiFi
SSID name and the IP address.
6. After the screen has been connected to the WiFi, screen will
automatically check the system update from OTA.
7. After completed the update checking, screen will finish the
booting process and starts the desk booking mode.
8. Swipe the RFID card on the Desk V2 screen to book the desk.
9. Once the desk has been booked, the screen and LED bar will be in
red and display the user’s name on LCD.
10.To cancel or finish the booking, just swipe the RFID card on the
screen again. Then screen will be in green again to indication the
desk is free.
USB cable(USB 2.0)
The distance between user and products should be no less than 20cm
la distance entre l'utilisateur et les produits devraient être au moins 20 cm
This device complies with Part 15 of the FCC Rules. Operation is subject to the following two
conditions: (1) this device may not cause harmful interference, and (2) this device must accept any
interference received, including interference that may cause undesired operation.
Changes or modifications not expressly approved by the party responsible for compliance could
void the user's authority to operate the equipment.
NOTE: This equipment has been tested and found to comply with the limits for a Class B digital
device, pursuant to Part 15 of the FCC Rules. These limits are designed to provide reasonable
protection against harmful interference in a residential installation. This equipment generates, uses
instructions, may cause harmful interference to radio communications. However, there is no
guarantee that interference will not occur in a particular installation. If this equipment does cause
harmful interference to radio or television reception, which can be determined by turning the
equipment off and on, the user is encouraged to try to correct the interference by one or more of
the following measures:
-- Reorient or relocate the receiving antenna.
-- Increase the separation between the equipment and receiver.
-- Connect the equipment into an outlet on a circuit different from that to which the receiver is
connected.
-- Consult the dealer or an experienced radio/TV technician for help.
The distance between user and products should be no less than 20cm

Popular Digital Signage manuals by other brands

protech KT-7290 Service manual

protech

protech KT-7290 Service manual

AXIOMTEK DSP500-523 Series user manual

AXIOMTEK

AXIOMTEK DSP500-523 Series user manual

LG LAT240DT1 owner's manual

LG

LG LAT240DT1 owner's manual

LG 32WFC owner's manual

LG

LG 32WFC owner's manual

Liberty AV Digitalinx DL-DMP-A Deployment guide

Liberty AV

Liberty AV Digitalinx DL-DMP-A Deployment guide

LG 55LV75D Easy setup guide

LG

LG 55LV75D Easy setup guide

Enoch Systems DisplayVue A15 user manual

Enoch Systems

Enoch Systems DisplayVue A15 user manual

SETBus Electronic Destination Sign Operation and instruction manual

SETBus

SETBus Electronic Destination Sign Operation and instruction manual

displayit Flare Assembly instructions

displayit

displayit Flare Assembly instructions

Samsung PM55F-BC user manual

Samsung

Samsung PM55F-BC user manual

LG 32LS53A owner's manual

LG

LG 32LS53A owner's manual

LG 43UL3J-B owner's manual

LG

LG 43UL3J-B owner's manual

LG 98UM3DG owner's manual

LG

LG 98UM3DG owner's manual

Elo TouchSystems E898841 user manual

Elo TouchSystems

Elo TouchSystems E898841 user manual

LG 49VH7E-A owner's manual

LG

LG 49VH7E-A owner's manual

Samsung PM32F Quick setup guide

Samsung

Samsung PM32F Quick setup guide

Nightlife crowdDJ installation guide

Nightlife

Nightlife crowdDJ installation guide

BenQ RM750K Installation handbook

BenQ

BenQ RM750K Installation handbook

manuals.online logo
manuals.online logoBrands
  • About & Mission
  • Contact us
  • Privacy Policy
  • Terms and Conditions

Copyright 2025 Manuals.Online. All Rights Reserved.