Converters.TV ID 515 User manual

Network IP Digital Video
Server - 4 port ID# 515
Operation Manual

Introduction
The Network IP Video Server - 4 Port is a Digital Network broadcaster
allows you to transmit audio, video as a streaming over the Internet You
can share your DVD program or TV Program in your Internet web site or
connect to a Video Camera to watch your home or baby room on internet
from anywhere in the world, and you also can email the image to your
friends or families Network IP Video Server - 4 Port supports motion
detection function, and also supports the image quality, image size and
image parameters adjustments functions
Feature
n Pure hardware design, just Plug & Display
n High performance and fully configurable MJPEG compression engine
n Remote view and record through the IE Browser (Suitable for Window
Vi ta)
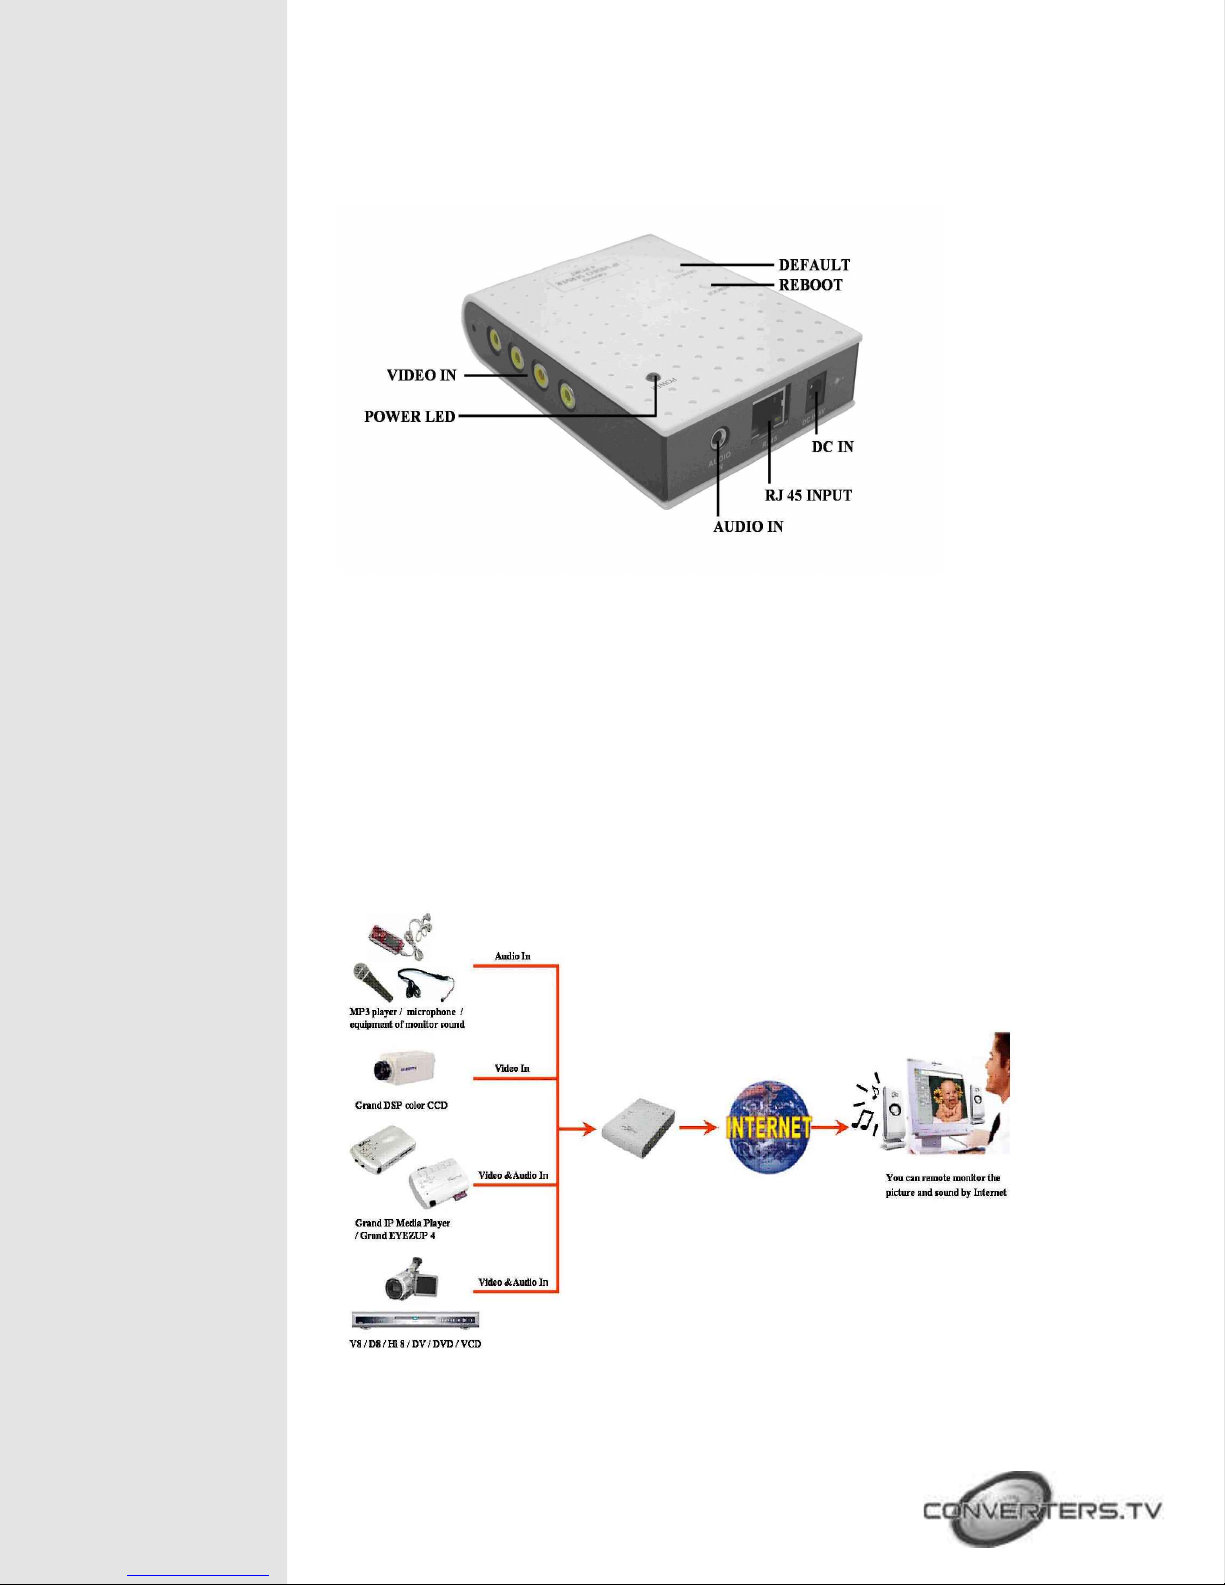
n Supports Input:4 Video Input and 1 Audio Input
n Supports 4 video channels display at the same time
n ActiveX control supports digital signature
n Supports image recording function (MJPEG format) and snapshot function
n Supports motion detection function and send E-mail when something
moving
n Adjustable image quality Lowest / Low / Medium / High / Highest
n Adjustable resolution 160X120 / 176X144 / 320X240 / 352X288 / 640X480
/ 704X576
n Adjustable image frequency Indoor 50 / Indoor 60 / outdoor
n Adjustable image parameters Brightness / Contrast / Saturation / Hue /
Sharpness
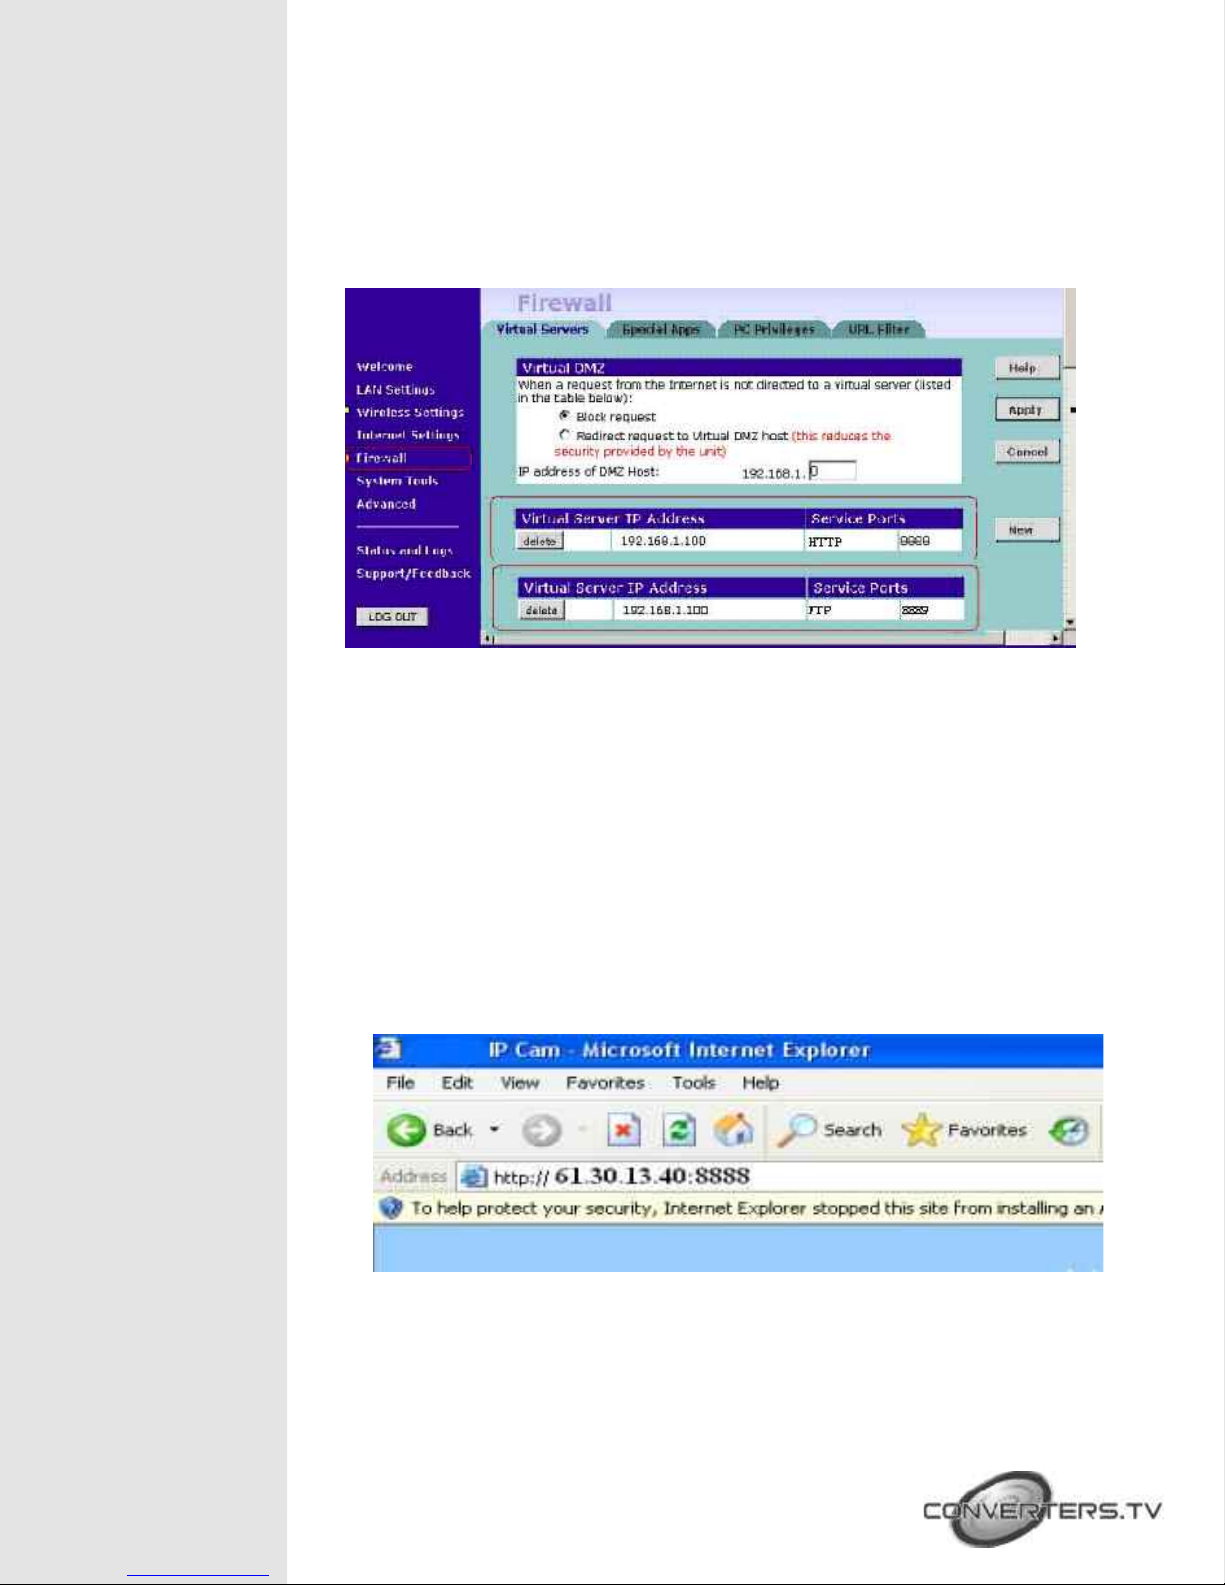
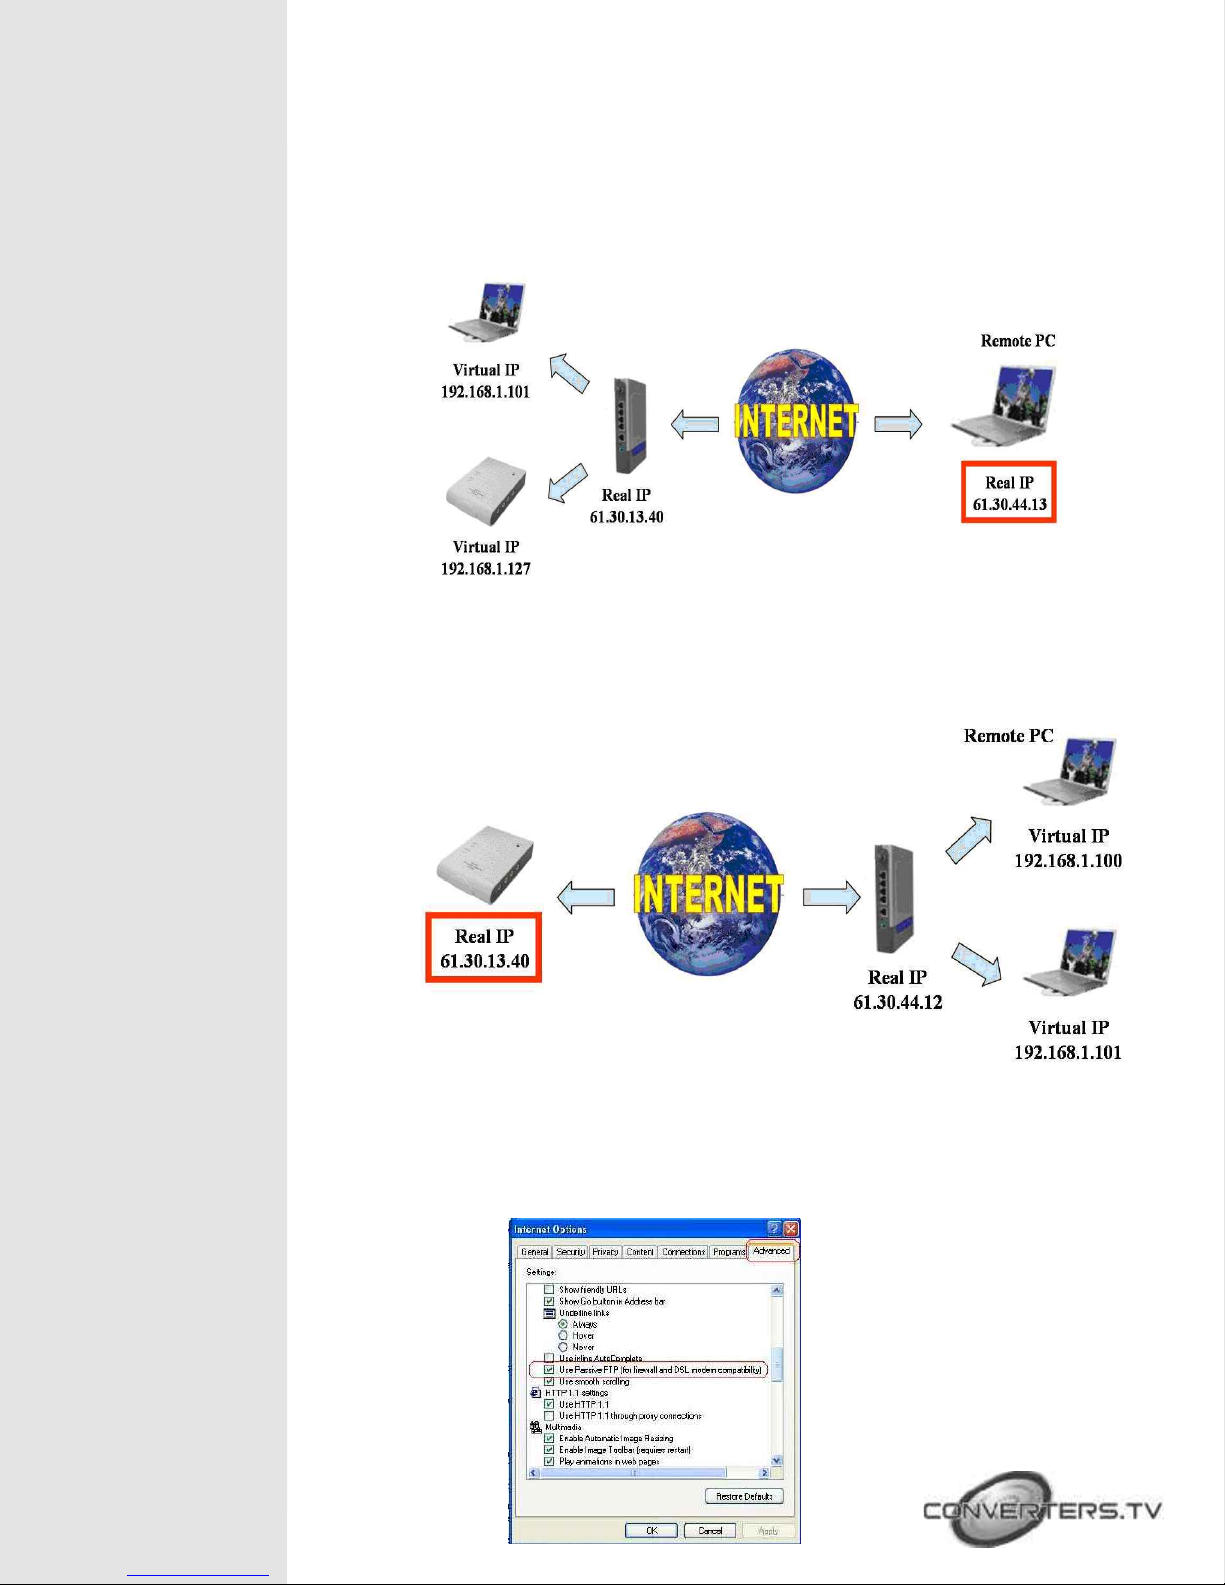
n Support many Network services: HTTP (User Interface), FTP (FTP Client),
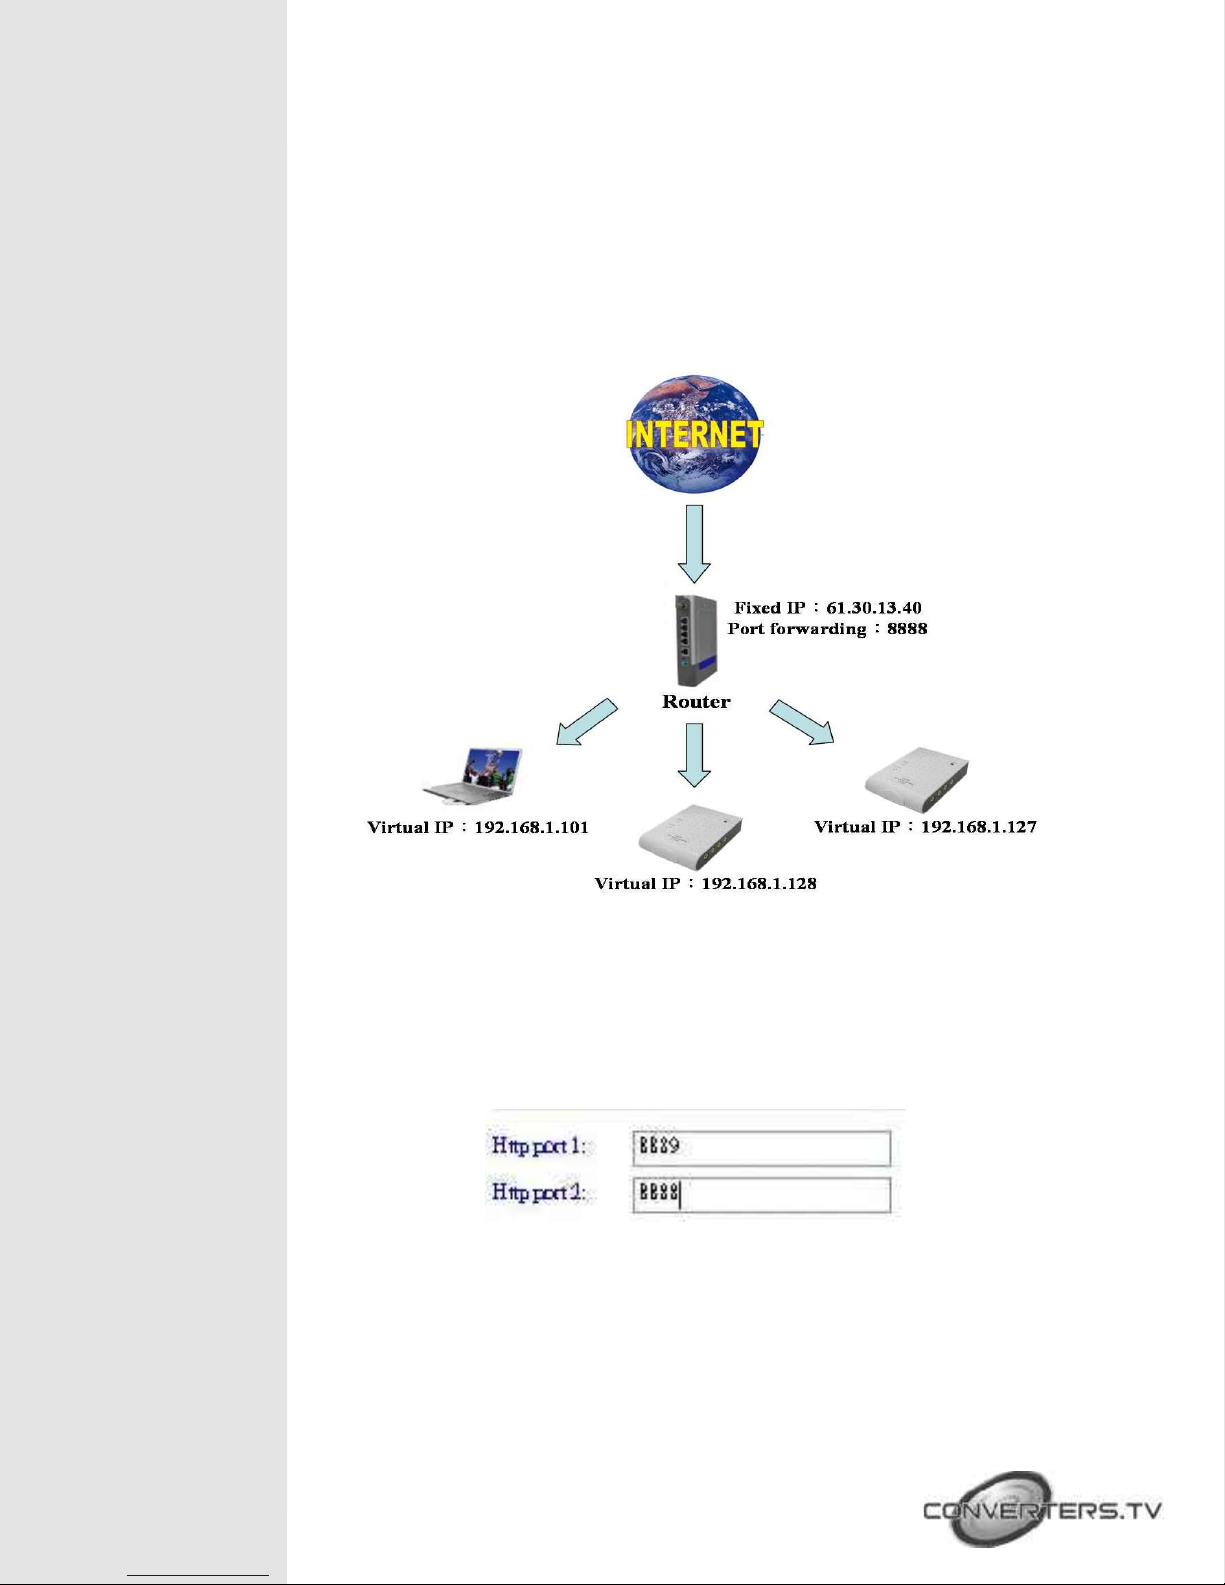
PPPoE (Fixed IP Address is recommended), Dynamic DNS, and firewall
port forwarding (used in virtual IP address)

Hardware Conection
n Default:Press this button to restore the original default parameters
n Reboot (re et):Press this button to restart the Network IP Video Server
n 4 Video IN:Connects to video out of video source (camera、DVD player)
n 1 Audio IN:Connects to sound output (microphone、DVD player)
n RJ 45 Input:Connects to router or PC by RJ-45 Cable
n DC IN:Connects to power adapter (-) ß ( ●à (+), DC 5V/2A
n Power LED:Power LED indicator

Software In tallation
And Operation Guide
Fir t time to login Network IP Video Server 4 Port
Step 1:Please execute the “ipEdit exe” in the CD, and select the “Unblock”
( windows XP SP2 only)
Step 2:“Video Server……192 168 1 127” has been listed in the left side, and
double click ”192 168 1 127” to login the Network IP Video Server 4 Port
ipEdit Tool Window of Video Server 4 Port
If you can not connect to the Address: 192 168 1 127, please according the
following steps to get Network information

Step 3:Click on “Start“ → “Run“ and key in ”command“, then press
“ENTER”
The MS-DOS window will appear, please key in ” ipconfig “ and then press
“ ENTER “ to get the network information
Step 4:Then you can assign IP Address, Netmask (Subnet Mask) and Gateway
(Default Gateway) for the IP Controller
NOTE:You must use the same Subnet Mask” 255 255 255 0 “and Gateway
”192 168 2 254” You can use any IP Address between 192 168 2 1-254, but
please make sure that theIP Address has never been used or is used by any other
IP addressable device
Step 5:For example, key in the following parameters and click “Submit”
Login to the IP Video Server 4 Port
Default IP Address:http://192 168 1 127/

How to U e The
Virtual IP Addre
If your network Architecture supports the following figure, you will need to do
port and local virtual IP forwarding in the firewall or gateway setup
Step 1:In this Page http://192.168.1.127/Ctl/index.htm?Cu ?Audio/, please
select “Configuration” and “Sy tem” assign two different port numbers for the
Http Protocols ( for example HTTP:8889, HTTP:8888 )
(Plea e remember reboot the y tem)

Step 2:Setup your firewall or gateway, and assign a Local Virtual IP:
192 168 1 127 and open a port 8888 and 8889 for the IP Video Server 4 Port, the
following figure is just a example, you need to ask your Internet Service Provider
Step 3:In the Local PC, please open the Internet Explorer then key in the IP
address:
http://192.168.1.127
Step 4:In the Remote PC, please open the Internet Explorer, then key in the IP
address:
http://61.30.13.40:8888
Step 5:Setup the Internet Explorer about FTP Client

Click “Tools” → “Internet” → “Options” → “Advanced”, and then the
“Internet Options“ window will appear, please remove the Item ”Use Passive
FTP(for firewall and DSL modem compatibility )”
Internet option
Limitation of FTP Protocol
If your network Architecture is the same as the figure, you can not transfer Files
with FTP, because FTP server (IP Video Server) and FTP client (Remote PC)
both are virtual IP addresses

n You need to change the Remote PC to be a real IP address, also can change
the IP Video Server to be a real IP Address
Change the Remote PC to be a Real IP addre
Change the IP Video Server 4 Port to be a Real IP address
n Please Setup the Internet Explorer about FTP Client Select the item “Use
Passive FTP(for firewall and DSL modem compatibility )”

Connect To ADSL
n We suggest that you can use the router to dial up the ADSL, more
information please refer to the router Help
n If you want to connect IP Video Server 4 Port with ADSL directly,
please use the following steps to dial up PPPoE, but if the IP Address is
dyna ic, you need to setup DDNS function.

About Internet Security
n Please often change the User ID and Password
n For high Internet Security, we suggest you use the router with the firewall
function.
n After you update those files to the Player, please re e ber to delete
the Port forwarding
n In the next time, you want to update media files, you can connect to the
router (for example: key in the IP address http://61 30 13 40) and reopen the FTP
port 8889 and Http port 8888 once more
n Although this way is inconvenient, but that can get highest Internet Security
After about 10 seconds, the ftp server ftp://192 168 1 127/has been enabled,

Configuration of
Network IP Video
Server 4 Port
•After connected to the IP Video Server 4 Port, and the Video Server window
will appear
•There are “Change Password”, “Camera Control”, ”Channel Select”, “View
Log”, “Configuration” and “Delete a camera” setup selections at the left side
of the Video Server window
Change Pa word
•Before you select “Change Password”, please make sure “User authorization
required” enable the user check function ( click “Configuration” →“User”→
“User authorization required” )
•Click the “Change Password”, then set a new password to replace the old
password

Camera Control
•Quality:To select the image quality and
recording mode
1. Image Quality:Lowest, Low, Medium,
High, Highest
2. Recording Mode:motion ( motion detect
function )
•Re olution:To select the image resolution
(160x120, 176x144, 352x288, 320x240,
640x480, 704x576)
•Frequency:Adjust the light frequency to suit
your country (Outdoor / Indoor 50 / Indoor 60)
• Adju t the image performance:
Click “+” or “-” to adjust the values, and click
“STD” to reset all values to the original settings
Channel Select
Channel 1: Display channel 1 at frame
Channel 2: Display channel 2 at frame
Channel 3: Display channel 3 at frame
Channel 4: Display channel 4 at frame
Quard: Display 4 channels at frame
View Log
Click “View Log” to check the system and client log information of IP Video
Server, including the “Main Info”, “Appended Info”, “Operator IP”, “Operator
MAC” and “Time”
View Log

Configuration
Sy tem
l Camera name:Key in the new name of camera, and select “Change” to
summit it
l Camera’ time:You can chose “NTP” or “Input new time” to set up the
time
- NTP:Key in the Server IP address, and IP Video Server will get the time from
NTP server
- Input new time:Disable the “Synchronize with PC’s time”, you can set up the
time by yourself (please click “Adjust” to adjust the setting after set up)
l Http port:Supports 2 Http port setting
Sy tem Setting
U er
l U er authorization required:Checking the Enable use check function
will enable the user check when the users want to Access the Network IP Video
Server The Login window will prompt for the User name and Password If the
check box is not checked, then the user check will nor be enabled
l Add a u er or change pa word:To create a new user account, or change
current user’s password
l Delete u er:You can delete the current users Select the user account from
the “Username” list box, and click “Delete” to delete it

l Current u er li t:It lists all current users
U er management
Motion Detect
l Motion Detect:Select “Enable” to activate the motion detection And chose
the sensitivity of motion detect (High / Middle / Low)
l Mail Setting
- Setup the “SMTP Maul Server” and E-mail address (Password use or not)
- Key in the sender’s email address and the recipient’s email address
- The content of “Subject” can be modified
l FTP Setting:The motion detected images can also be uploaded to FTP
server
- Key in the IP address or domain name of the FTP Server
- Key in “Username” and “Password” of the FTP Server
- Certain FTP severs need an “Account” field Leave it blank if it is not
needed
- Key in the remote folder upload path information for saving the setting

Motion Detection Setting
Network
l IP A gnment
- Manually:Setting IP address / Subnet mask / Default gateay
- Automatically by DHCP:When IP Video Server is joined into the LAN,
it will issue the DHCP packets to request an IP address that is dynamically
assigned by the DHCP server
- Select “Reboot immediately” to take effect about these setting
l PPPoE
- Save & Dial Now:Press the button to connect to the ADSL line by PPPoE
immediately

- Dial On Power Up:When you select this function, Network IP Video
Server will dial up PPPoE connection automatically after each power up If you
prefer to use PPPoE connection, this function is recommended
- Key in “Username” and “Password” of the PPPoE
- Send mail after dialed:Mail sent out after dialing is completed
- If the mail server needs authentication, the “Password” need to be selected
- Key in the sender’s email address and the recipient’s email address
- The content of “Subject” can be modified
- Click the “Save” to save the setting
Network Setting
Audio
- Select “Pcm” or “Adpcm” to activate the Audio format
- Select “On” or “Off” to activate the Audio output

DDNS
- Select “Enable” or “Disable” to activate the DDNS function or not
- Key in “Username” and “Password” of the DDNS Server
- Key in “Domain Name”, “HTTP Proxy”, “Proxy Username” and “Proxy
Password”, then click “Submit” to save
Dynamic DNS
Delete A Camera
Select one of the image window that you want delete at the right ide, then
click “Delete a camera” to delete.

Other Function
On the IE Browser, right mouse click on the video to active a pop-up menu The
menu includes “View”, “Splits”, “Rotate”, “Resolution” functions of the video,
and includes “Image Recording” and “Save Current Picture As” functions
Image Recording
n Save a JPEG
Step 1:Select “Image Recording(F11)…”, and the “Image Recording” window
will appear, then
select the “Save as JPEG” option
Step 2:Key in the download “Number” to save the desired number of image, or
select “No Limit”
to save the images continuously, unit the “Stop Image Recording” is selected
Step 3:Click the “Save As”, and a pop-up window displays to select the save
path and file name
Step 4:Click “Start” to perform the image download and save the JPEG files
n Save a AVI
Step 1:Select “Image Recording(F11)…”, and the “Image Recording” window
will appear, then
select the “Save as JPEG” option
Step 2:Key in the “Number”, “Size” or “Time” on each AVI file
Step 3:Select “No Limit” option will save the video file unit the “Stop Image
Recording” is selected
Step 4:Click the “Save As”, and a pop-up window displays to select the save
path and file name
Step 5:Click “Start” to perform the video save

Image Recording
Save Current Picture A
Step 1:Click “Save Current Picture As…” option to save the current image
display to the local PC
Step 2:Select the save path and key in the name of the picture, and click
“Save”
Trouble Shooting
Situation Check Point
Forgot the login user name
and password
1 Press continuously the default button of the IP
Video Server 4 ports about 10 seconds to restore the
factory default settings
Default IP Address: 192 168 1 127
This manual suits for next models
1
Table of contents
Popular Server manuals by other brands

HP
HP vc4725 - Thin Client Quick reference guide

SpectraLink
SpectraLink IP-DECT 200 Interoperability guide

Sparc
Sparc Enterprise M3000 installation guide

Cabletron Systems
Cabletron Systems ETSMIM user guide

Samsung
Samsung ML-2010 - B/W Laser Printer manual

Sun Microsystems
Sun Microsystems Sun Fire V445 Administration guide