manuals.online logo
Brands
  1. Home
  2. •
  3. Brands
  4. •
  5. Coomber
  6. •
  7. CD Player
  8. •
  9. Coomber 2010 User manual

Coomber 2010 User manual

Operating Instructions: 2010, 2010/R CD Player Coomber
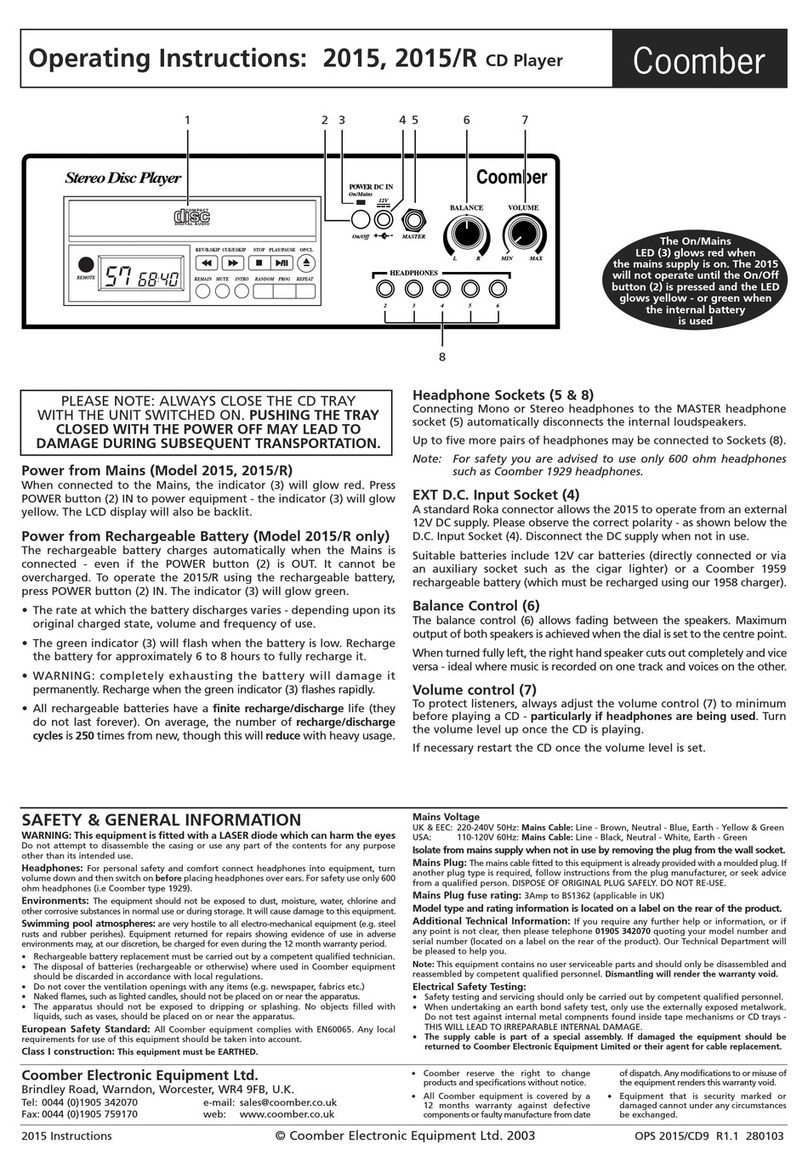
Power from Mains (Model 2010, 2010/R)
Connect to the Mains, the indicator (5) will illuminate red. Press POWER
button (6) to the ‘IN’ position, to power equipment - the indicator (5) will
glow yellow.
Power from Rechargeable Battery (Model 2010/R)
If you have purchased a 2010/R you will be able to use the unit from internal
rechargeable batteries. To power the equipment, press the POWER button (6)
to the ‘IN’ position, the indicator (5) will illuminate green. The rechargeable
battery is charged automatically when the Mains is connected - even if the
POWER button (6) is off. The battery cannot be overcharged.
●When the rechargeable battery is low, the green indicator (5) will flash.
The battery must then be charged for approximately 6 to 8 hours for full
charge. The rate at which this battery is discharged is dependent on its
original charged state, volume and use of CD.
●WARNING - do not allow the battery to become totally exhausted as
this will cause permanent damage to the battery.
●Note: Rechargeable batteries have a finite recharge/discharge life (they
will not last forever). The number of recharge/discharge cycles is
approximately 250 from new and will reduce with increased/heavy usage.
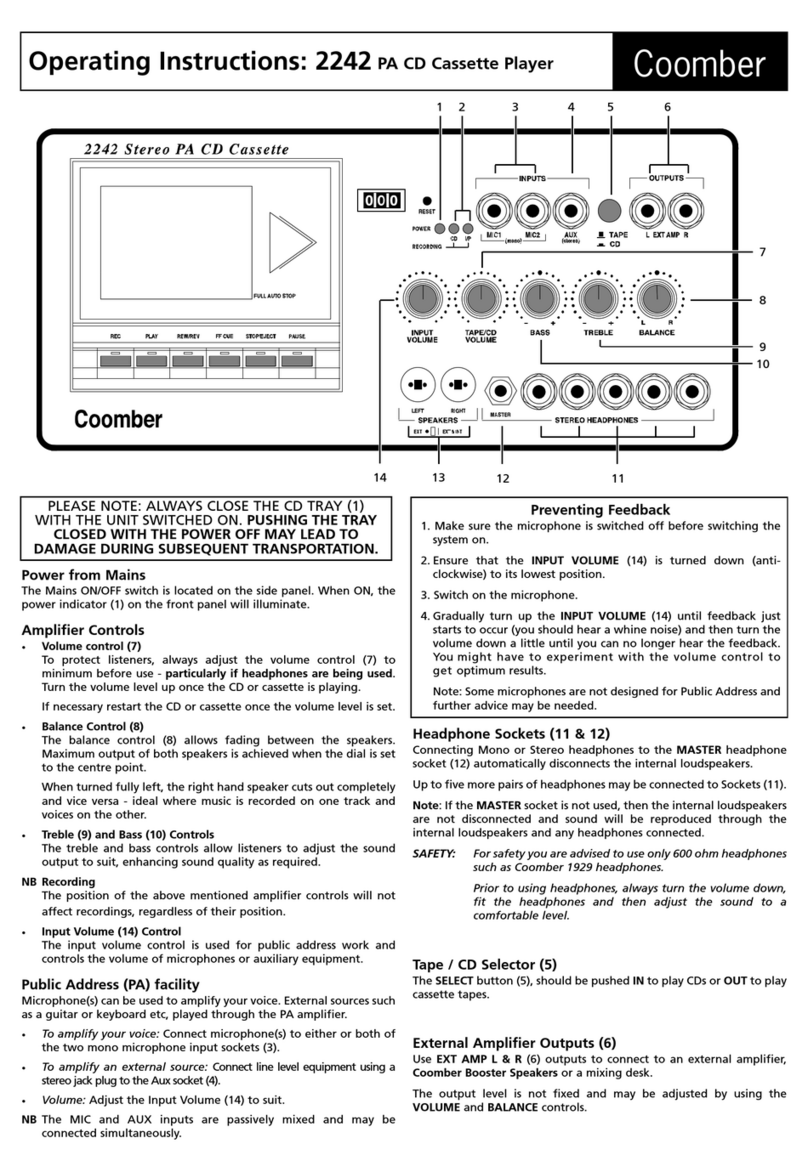
EXT D.C. Input Socket (4)
A standard Roka connector enables the equipment to operate from an
external DC supply of 12V to 24V. Please observe the correct polarity -
shown underneath the D.C. Input Socket (4). Always disconnect the DC
source when not in use.
Suitable batteries are 12V car batteries or Coomber 1959. To recharge
Coomber 1959 battery you must use our 1958 charger.
Basic CD Playback (Goodmans GCD600AC CD Player)
1. Slide the OPEN button (1) to open the CD compartment lid.
2. Adjust the VOLUME (8) to minimum.
3. Insert the CD with the label side facing up.
4. Push down in the centre until the CD is locked in place.
5. Close the lid gently until a click is heard.
6. Press the PLAY button (10) to start playing.
7. Adjust VOLUME (8) to suit.
8. If you are playing a CD at high volume, you may need to activate the
ASP (11) (Anti shock protection) to prevent interruption of the sound.
To PAUSE playback of the CD, press the PLAY/PAUSE button (10), the
current track and elapsed time will flash in the display and the audio
output will be muted. To resume playback, press PLAY/PAUSE button (10)
again.
CAUTION: Wait for the CD to stop spinning before pressing the open
button. To REMOVE the CD, hold the edges of the CD and gently press
the centre pivot.
LCD Display Information
When the PLAY/PAUSE (10) button is pressed
at initial start up, the display will briefly show
“--
” and total disc time, then it will proceed
to start playback automatically. To review the
total number of tracks on the CD and total CD
time, press the STOP button (14) once.
During Playback
The track number and the elapsed playing
time are displayed.
During Pause
The track playback is paused, the elapsed
time is flashing.
CD is Open
When the lid is opened during play mode
“--
” shows in the display indicating the door
is still open.
Skip function
Locating a particular track
To go back to the beginning of the current or a previous track, press the
skip button (15) lightly and repeatedly.
To go to the beginning of the following tracks press the FORWARD skip
button (9) lightly and repeatedly.
Locating a particular point in a track (whilst in PLAY mode)
To go back at high speed keep the BACK skip button (15) pressed
down.
To go forward at high speed keep the FORWARD skip button (9)
pressed down.
Low level audio will be heard during the search process to assist in
locating the desired point in the track.
12
5
6
4
3
7
89
10111213
14
15
The sixth track has
elapsed 2min 30sec.
2010 Instructions © Coomber Electronic Equipment Ltd. 2000 OPS 2010 R1.3 GCD600AC 020301
Coomber Electronic Equipment Ltd.
Brindley Road
Warndon
Worcester WR4 9FB, U.K.
Tel: 01905 342070 Int. Tel. +44 1905 342070
Fax: 01905 759170 Int. Tel. +44 1905 759170
Email: sales@coomber.co.uk
Web: www.coomber.co.uk
We reserve the right to make changes deemed necessary without prior notification.
This equipment employs a LASER diode which if used incorrectly
may result in harm to the eyes
1. Do not attempt to disassemble the casing.
2. Do not touch the lens or poke at it. This may cause damage to the
lens.
3. Do not put anything in the safety slot. If you do, the LASER diode will
be ON when the lid is still open.
4. Do not use this equipment or any part of it for any purpose other than
its intended use.
Headphones
It is recommended that headphones are connected to Coomber
equipment before placing over ears. You are advised only to use 600
ohm headphones such as Coomber model 1929. The use of low
impedance headphones may result in hearing damage.
Environments
The equipment should not be exposed to dust, moisture, water, chlorine
and other corrosive substances in normal use or storage. It will cause
damage to this equipment.
Swimming pool atmospheres are very hostile to all electro-mechanical
equipment (e.g. steel rusts and rubber perishes). Equipment returned to
us for repairs that show evidence of use in these environments may,
at our discretion, be charged even during the 12 month warranty period.
Battery replacement must be carried out by a qualified technician.
The ventilation should not be impeded by covering the ventilation
openings with any items.
No naked flame sources, such as lighted candles, should be placed on
the apparatus.
The apparatus should not be exposed to dripping or splashing. No
objects filled with liquids, such as vases, should be placed on the
apparatus.
Mains Plug
The mains cable fitted to this equipment is already provided with a
moulded plug.
If UK type, a 3A fuse will be fitted. If another plug needs to be fitted,
please follow instructions from the plug manufacturer, if necessary seek
advice from a qualified person. DISPOSE OF ORIGINAL PLUG SAFELY.
DO NOT RE-USE.
Electrical Safety Testing
Safety testing and servicing should only be carried out by qualified
personnel. When making an earth continuity test, only use the earth
bonding bolt (silver) on the base of the cabinet, as other exposed metal
surfaces may be isolated.
Mains Voltage
220-240V 50Hz Mains Cable: Earth - Yellow & Green, Line - Brown,
Neutral - Blue (applicable in UK and EC).
Mains Voltage
110-120V 60Hz Mains Cable: Earth - Green, Line - Black,
Neutral - White 3 wire (applicable in USA).
Class I construction
This equipment must be EARTHED.
Mains Plug fuse rating
3 Amp (applicable in UK).
Model identification and rating information is located on a label on
the rear of the product.
Additional Technical Information
If you require any further help or information, or if any point is not clear,
then please telephone 01905 25168/9 quoting your model number and
serial number (located on a label on the rear of the product). Our
Technical Department will be pleased to help you.
Random play (shuffle)
Enables all the tracks on a CD to be played in a random (shuffle)
sequence. For example if RANDOM (Shuffle) is selected while playing a
track, the random function will commence once the track has ended. If
the FORWARD skip button (9) is pressed, the next random track will
be selected. When all tracks on a CD have been played the player will
automatically stop and power down in approximately 30 seconds.
To initiate random play, press the CD MODE
button (12) four times during playback. Press
CD MODE button (12) again to return to the
normal play mode.
Repeat play modes
Press the CD MODE button once or twice. The corresponding repeat
appears in the display window.
To repeat the current track playing
Press CD MODE button (12) once during
playback.
To repeat all tracks
Press CD MODE button (12) twice during
playback.
INTRO Playback
This function plays the first 10 seconds of each track on the CD.
When in the STOP mode, press the CD MODE button (12) THREE times
and then press the PLAY/PAUSE button (10) to start INTRO playback.
During CD playback mode, press the CD
MODE button THREE times and then press the
FORWARD skip button (9) to start INTRO
playback. Alternatively INTRO will start at the
end of the current playing track.
Programmed track play
This allows selected tracks on the CD to be played in any order.
1. Press the PROGRAM button when the unit is
in the STOP mode or normal PLAY mode.
The PROG indicator flashing appears in the
display.
2. Press the BACK skip button (15) or the
FORWARD skip button (9), to select the
desired track.
3. Press the PROGRAM button (13) to enter the
track into the memory.
4. Repeat step 2 and 3 to programme up to 20 tracks into memory.
5. Press the PLAY button (10) to start the programmed play.
6. To erase the program, press the STOP button (15) twice.
Anti Shock Protection (A.S.P)
The CD player incorporates the latest electronic 40 seconds digital anti-
shock circuit, which helps to prevent interruption of the sound output
when the unit is subjected to higher volumes, shock or vibration during
CD playback. It is recommended that the A.S.P. is turned on when the
unit is playing through the loudspeakers. Button (11) switches the A.S.P.
ON/OFF.
When this feature is activated and the A.S.P. buffer is full, the display will
show:If the A.S.P. is deactivated, the display will show:
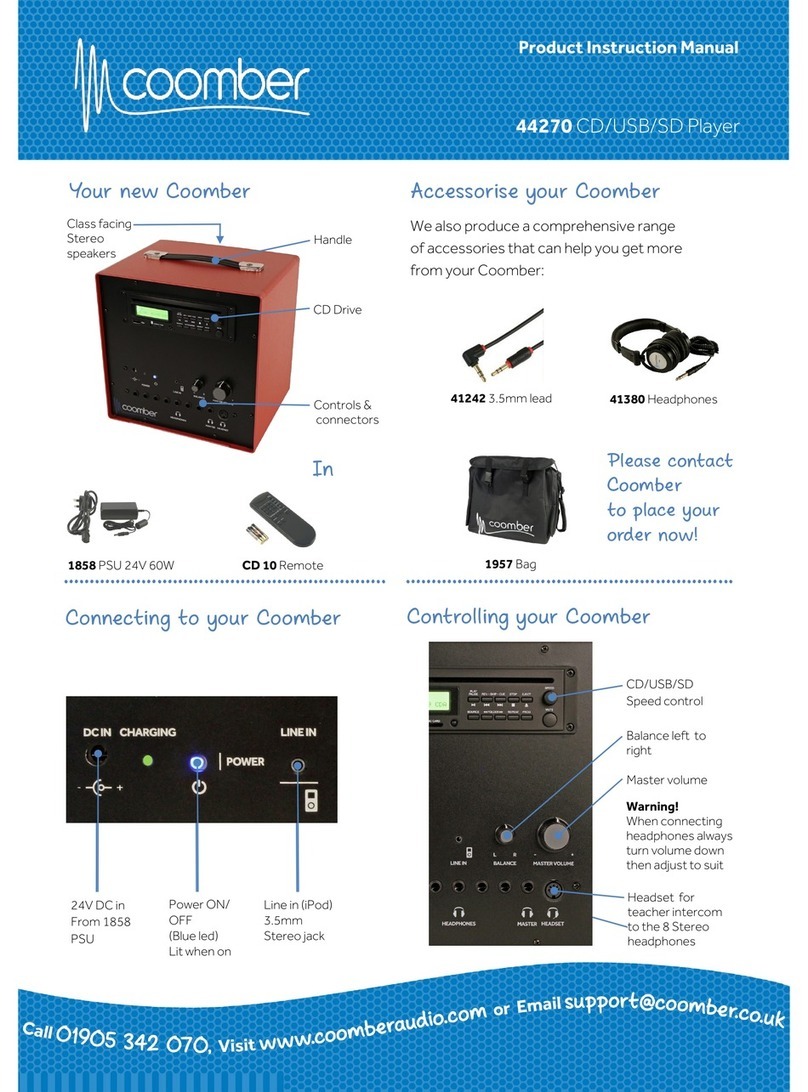
Headphone Sockets (2/3)
Connecting Mono or Stereo headphones to the MASTER headphone
socket (3), automatically disconnects the internal loudspeaker. Up to five
more headphones may be connected to Sockets (2). For safety you are
advised to use only 600ohm headphones such as Coomber 1929
headphones.
Safety
This manual suits for next models

1

Other Coomber CD Player manuals

Coomber 2015 User manual

Coomber

Coomber 2015 User manual

Coomber 2017 User manual

Coomber

Coomber 2017 User manual

Coomber 2018 User manual

Coomber

Coomber 2018 User manual

Coomber 44372 Specification sheet

Coomber

Coomber 44372 Specification sheet

Coomber 3321 User manual

Coomber

Coomber 3321 User manual

Coomber 44370 Specification sheet

Coomber

Coomber 44370 Specification sheet

Coomber 2242 User manual

Coomber

Coomber 2242 User manual

Coomber 44270 User manual

Coomber

Coomber 44270 User manual

Coomber 3320 User manual

Coomber

Coomber 3320 User manual

Coomber 3320 Specification sheet

Coomber

Coomber 3320 Specification sheet

Popular CD Player manuals by other brands

Philips AZ1027 user manual

Philips

Philips AZ1027 user manual

Kenwood KDC-V6017 instruction manual

Kenwood

Kenwood KDC-V6017 instruction manual

Yamaha CDV-1000 owner's manual

Yamaha

Yamaha CDV-1000 owner's manual

Marantz SA-11S3 owner's manual

Marantz

Marantz SA-11S3 owner's manual

Philips AZ1045/05 user manual

Philips

Philips AZ1045/05 user manual

Kenwood DP-M5570 instruction manual

Kenwood

Kenwood DP-M5570 instruction manual

Philips AZ7881 Specifications

Philips

Philips AZ7881 Specifications

PianoDisc PCD User guide and instruction manual

PianoDisc

PianoDisc PCD User guide and instruction manual

Jensen JCD3007 Installation and operation manual

Jensen

Jensen JCD3007 Installation and operation manual

Yamaha YHT-470 owner's manual

Yamaha

Yamaha YHT-470 owner's manual

RSQ T-2 user guide

RSQ

RSQ T-2 user guide

SOUNDMASTER SCD 5400 manual

SOUNDMASTER

SOUNDMASTER SCD 5400 manual

Sony CDX-GT350 operating instructions

Sony

Sony CDX-GT350 operating instructions

Carver sD-450 owner's manual

Carver

Carver sD-450 owner's manual

GPX CDP3107 instruction manual

GPX

GPX CDP3107 instruction manual

Lindemann 822 owner's manual

Lindemann

Lindemann 822 owner's manual

Sony CDX-646 Operating Instructions  (English,Español,... Service manual

Sony

Sony CDX-646 Operating Instructions (English,Español,... Service manual

Sony CDP-C265 operating instructions

Sony

Sony CDP-C265 operating instructions

manuals.online logo
manuals.online logoBrands
  • About & Mission
  • Contact us
  • Privacy Policy
  • Terms and Conditions

Copyright 2025 Manuals.Online. All Rights Reserved.