Coral EVA 260 User manual

EVA 260
EVOLUTION
POWERED
SUBWOOFER

2
ATTENZIONE
Leggete con attenzione questo manuale e seguite passo passo le istruzioni, che
mostrano in modo generico l’installazione di un sistema car audio, ma non
contengono i metodi specifici di installazione sul vostro veicolo.
Un prolungato ascolto a volume molto elevato può causare danni permanenti
al sistema uditivo: raccomandiamo di non eccedere con il volume. Potenti
sistemi car audio possono produrre pressioni sonore che eccedono il limite
previsto da alcune legislazioni: rispettate le norme del vostro Paese.
Durante la guida ascoltate a livello moderato: dovete essere sempre in grado
di udire i rumori esterni per affrontare eventuali emergenze.
Un sistema car audio fornisce le migliori prestazioni solo se correttamente
installato: è quindi necessaria una buona conoscenza delle problematiche
meccaniche ed acustiche dell'auto. Per evitare qualsiasi rischio, raccomandiamo
che l'installazione sia eseguita da personale specializzato, nel rispetto delle
norme di sicurezza vigenti.
La Coral Electronic non risponde di eventuali danni a persone o cose derivati
dalla mancata osservanza di queste raccomandazioni e/o dall'uso improprio
dei propri prodotti.
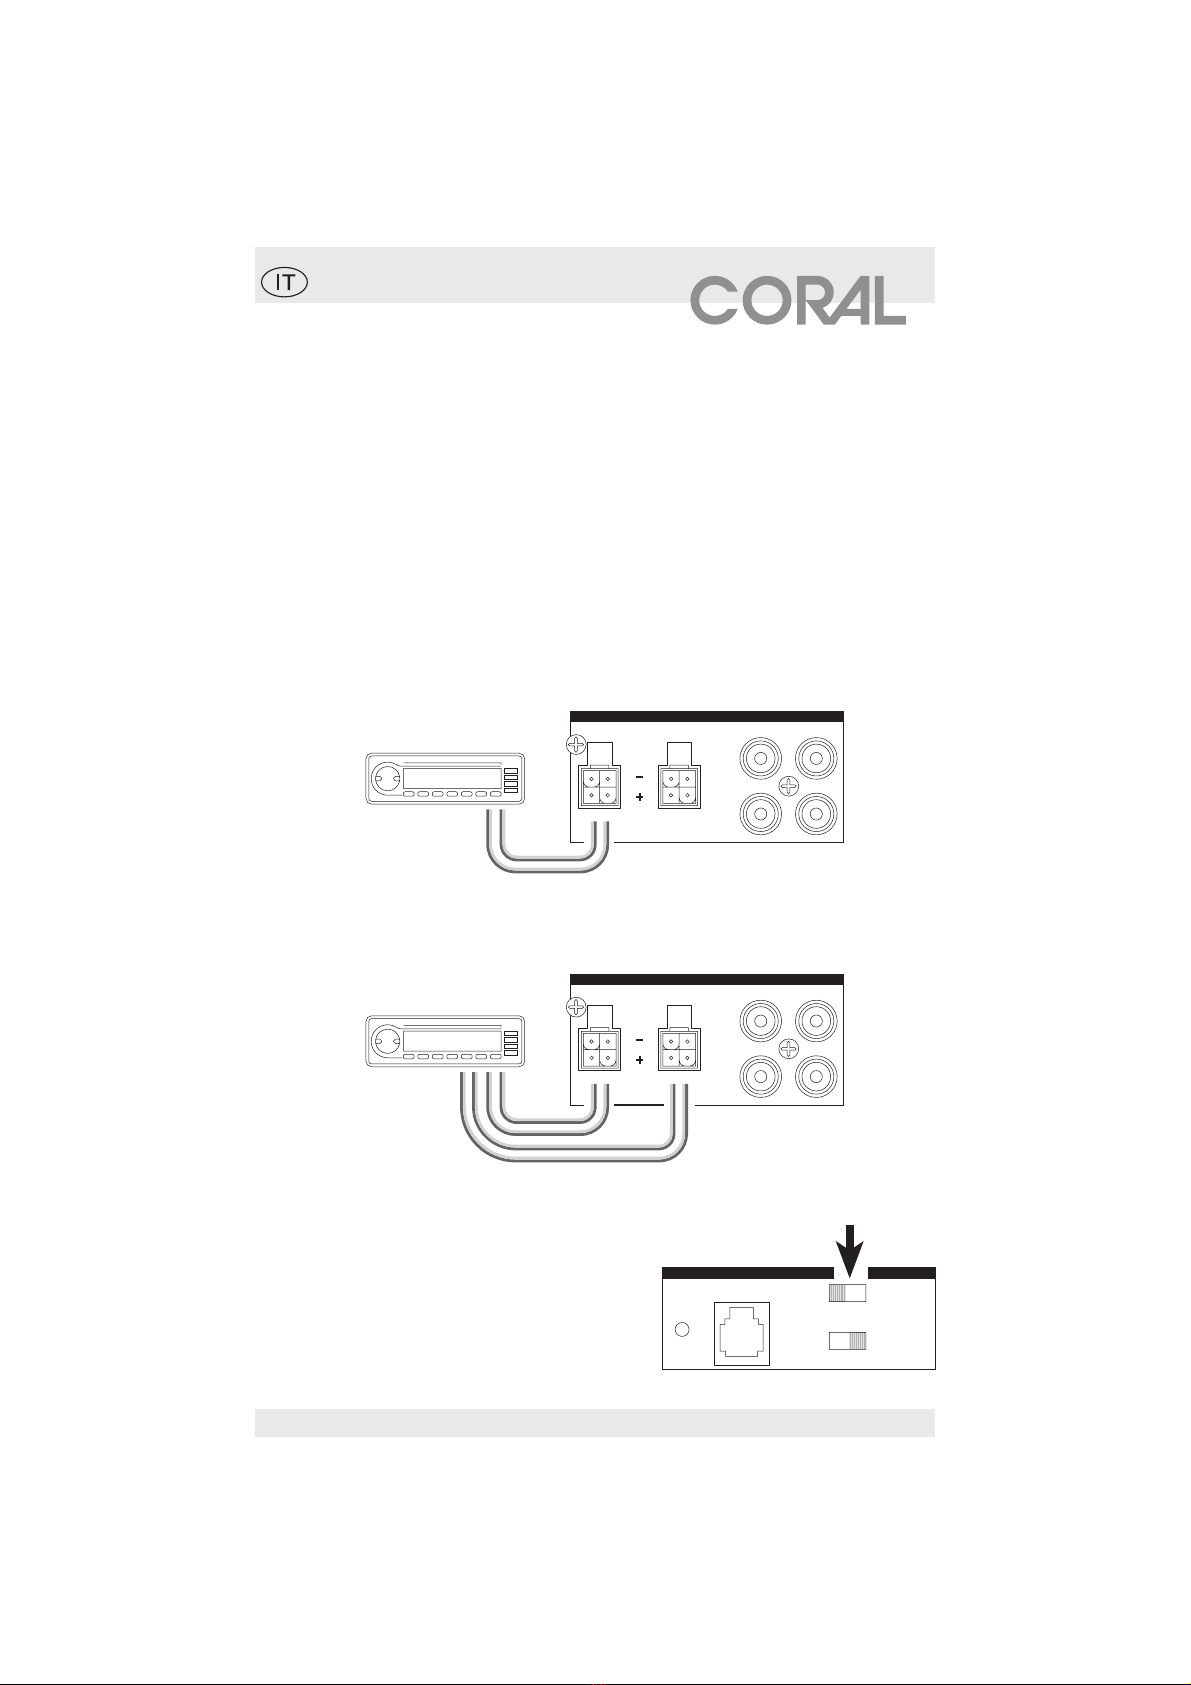
INSTALLAZIONE
Pianificate attentamente l’installazione
del vostro impianto: un sistema car audio
offre le migliori prestazioni solo se
correttamente installato e tarato.
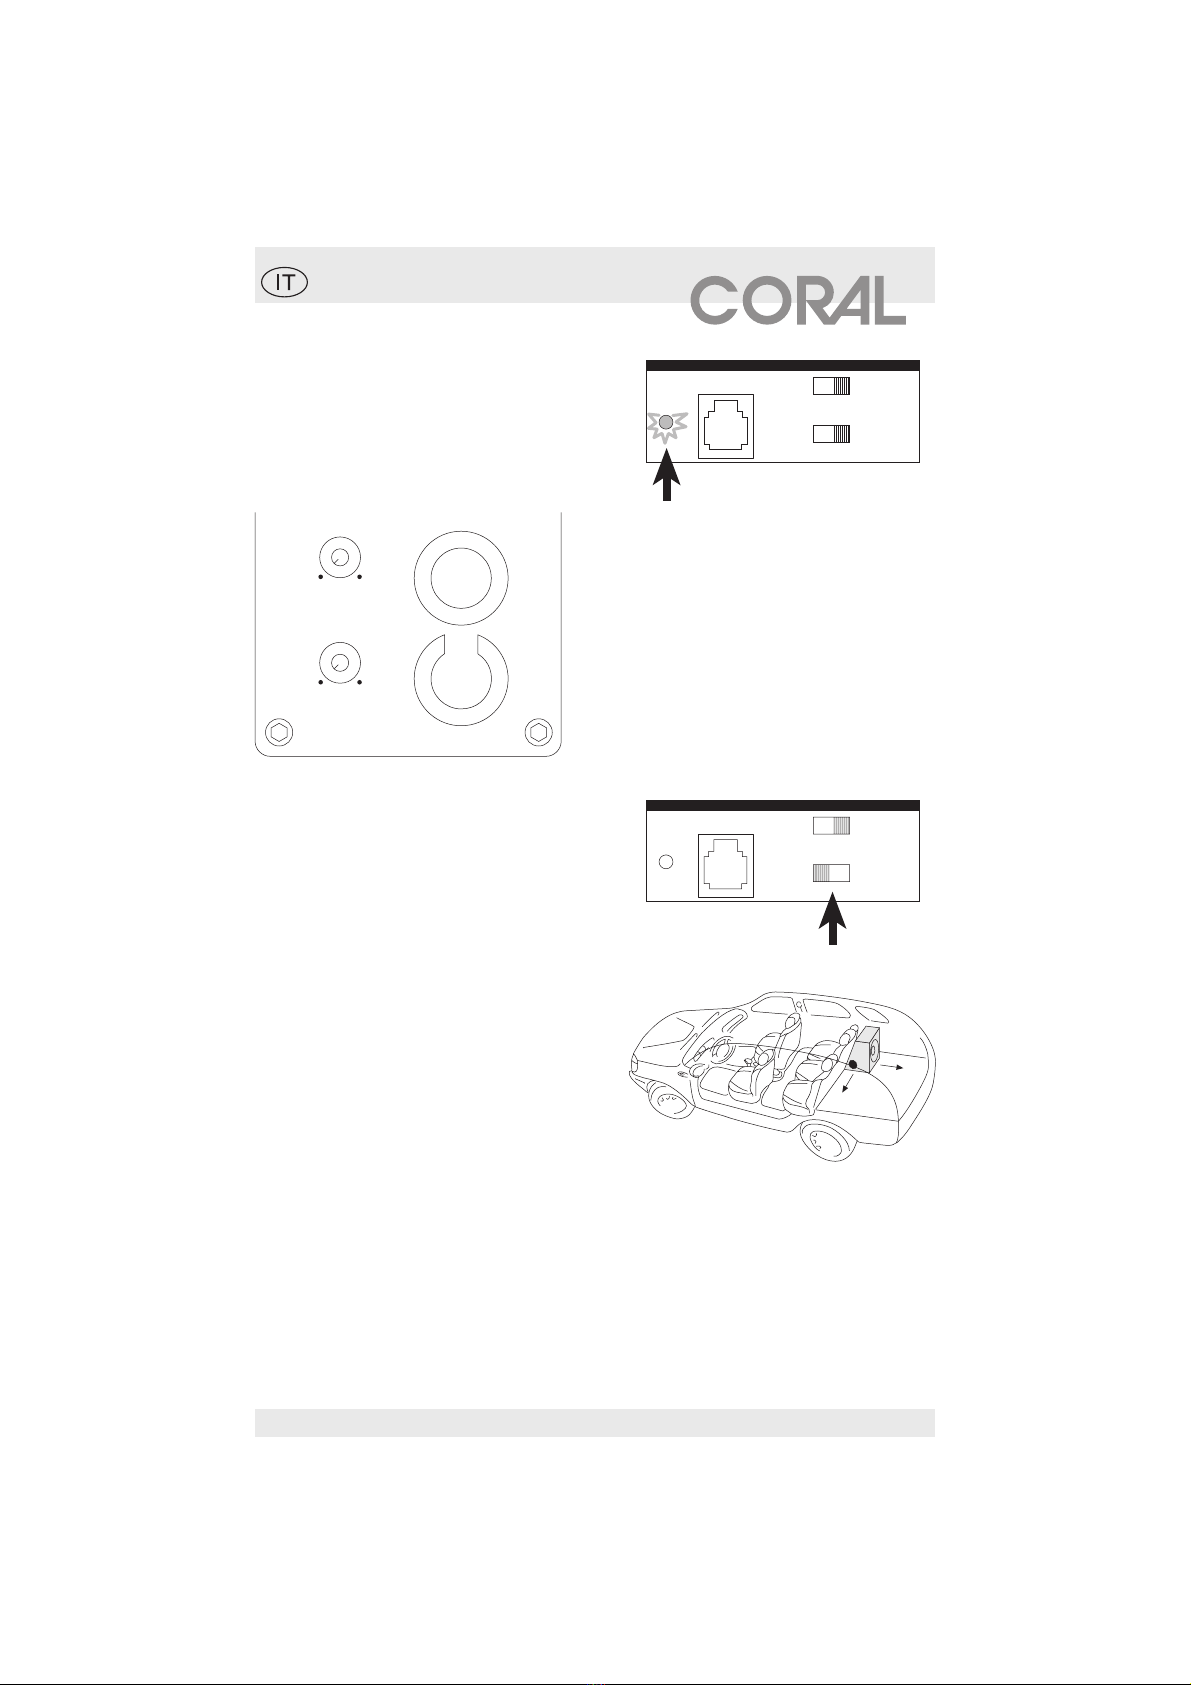
Assicuratevi che il subwoofer non
interferisca con la sicurezza di guida.
Installate il subwoofer in posizione ben
aerata e lontano da componenti che
generano calore, in un luogo protetto
da polvere, umidità ed oggetti in
movimento.
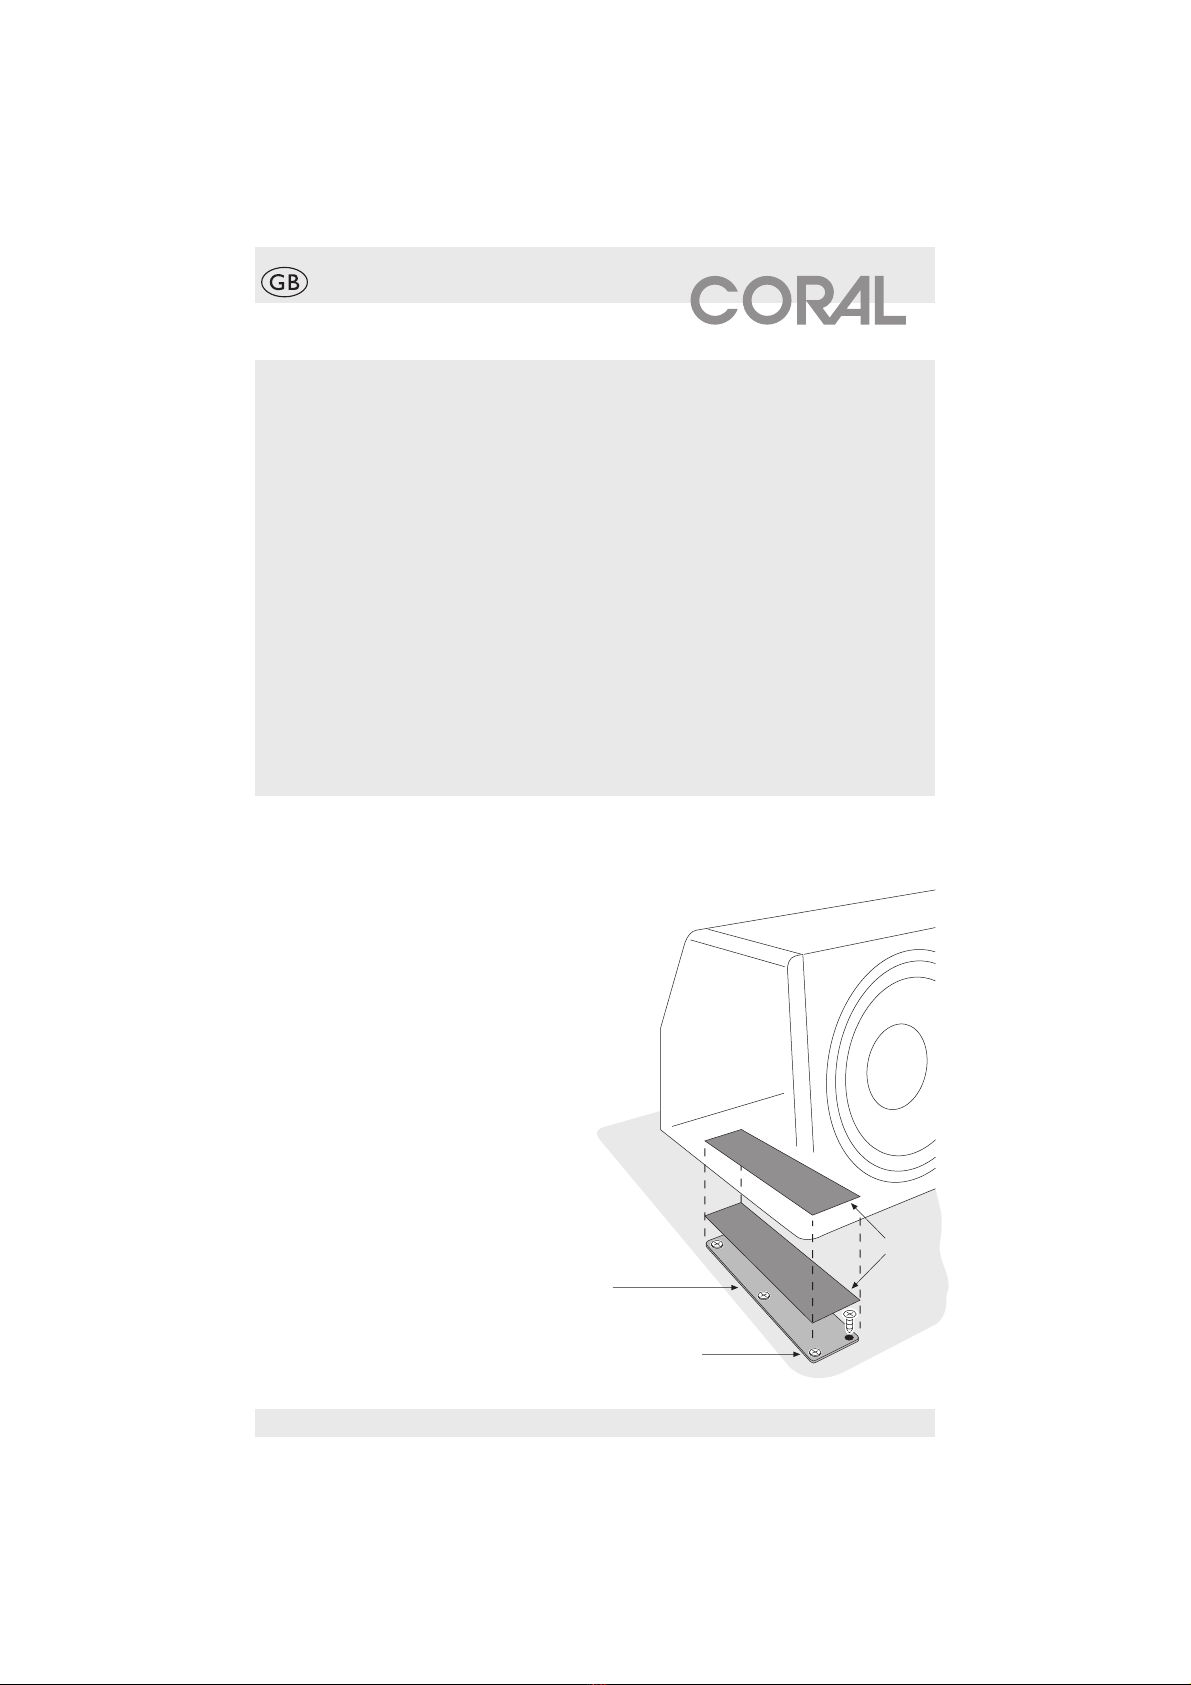
Fissate il box ad una superficie solida,
controllate con cura il posizionamento
per prevenire danni al serbatoio, ai cavi
elettrici o alle condutture idrauliche.
velcro
piastra
viti

3
FUSE
20 A
REM
POWER
fusibile 30 A
remote
batteria
COLLEGAMENTI DI ALIMENTAZIONE
Per evitare possibili danni, prima di effettuare i collegamenti, spegnete l'autoradio e
tutti gli apparati elettronici del sistema audio.
Per prevenire principi d'incendio in caso di cortocircuito, inserite un fusibile da 30 A,
sul cavo positivo, vicino alla batteria.Scollegate il fusibile fino a quando tutti i collegamenti
sono stati verificati. Il fusibile del subwoofer non sostituisce quello sulla batteria.
Collegate l'alimentazione direttamente alla batteria,rispettando le polarità ed utilizzando
cavi da 8 mm2(8 AWG).
Se utilizzate gli ingressi RCA, collegate l'uscita remote dell'autoradio al morsetto REM
del subwoofer con un cavo da 1 mm2(17 AWG) ed impostate l’interruttore AUTO
TURN-ON (auto-accensione) sulla posizione OFF.
Se utilizzate gli ingressi HI-LEVEL,non è necessario collegare il remote dell'autoradio:
impostate l’interruttore AUTO TURN-ON (auto-accensione) sulla posizione AUTO.
Il subwoofer si attiva automaticamente all’accensione dell’autoradio e si disattiva alcuni
minuti dopo lo spegnimento.
Fate scorrere i fili in una guaina di protezione; non passate vicino a centraline
elettroniche, ai cablaggi dell'autovettura o a parti che generano calore.
Verificate più volte tutti i collegamenti, infine inserite il fusibile vicino alla batteria.

4
LR
RR
LL
FRONT REAR
REAR
FRONT
HI-LEVEL
INPUT
LR
RR
LL
FRONT REAR
REAR
FRONT
HI-LEVEL
INPUT
REMOTE LEVEL
SERVO
PHASE
180° 0°
AUTO
TURN-ON
OFF
AUTO
CONTROL
COLLEGAMENTI DI SEGNALE CON USCITE RCA
Per evitare possibili danni, prima di effettuare i collegamenti, spegnete l'autoradio e
tutti gli apparati elettronici del sistema audio.
Collegate l’autoradio al subwoofer utilizzando un cavo di segnale di buona qualità.
Seguite uno degli schemi sotto riportati a seconda delle uscite RCA di cui disponete.
Passate i cavi di segnale lontano dai cavi di alimentazione, la loro vicinanza potrebbe
causare l'insorgere di rumore. Fate scorrere i fili attraverso una guaina di protezione;
non passate vicino a centraline elettroniche, ai cablaggi dell'autovettura o a parti che
generano calore.
Uscite Front & Rear
Solo uscita Front
ovvero
Uscita per Subwoofer
Impostate l’interruttore
AUTO TURN-ON
sulla posizione OFF.

5
REMOTE LEVEL
SERVO
PHASE
180° 0°
AUTO
TURN-ON
OFF
AUTO
CONTROL
LR
RR
LL
FRONT REAR
REAR
FRONT
INPUT
HI-LEVEL
LR
RR
LL
FRONT REAR
REAR
FRONT
INPUT
HI-LEVEL
COLLEGAMENTI DI SEGNALE CON USCITE ALTOPARLANTI
Per evitare possibili danni, prima di effettuare i collegamenti, spegnete l'autoradio e
tutti gli apparati elettronici del sistema audio.
Utilizzate questo collegamento solo se sull'autoradio non sono disponibili uscite RCA.
Collegate le uscite per altoparlanti della radio agli ingressi HI-LEVEL del subwoofer,
utilizzando cavi per altoparlanti. Seguite uno degli schemi sotto riportati a seconda
delle uscite di cui disponete. E’ possibile collegare il subwoofer in parallelo agli
altoparlanti.
Fate scorrere i fili attraverso una guaina di protezione; non passate vicino a centraline
elettroniche, ai cablaggi dell'autovettura o a parti che generano calore.
Solo uscita Front
Uscite Front & Rear
Impostate l’interruttore AUTO TURN-ON sulla
posizione AUTO: il subwoofer si attiva automati-
camente all’accensione dell’autoradio e si disattiva
alcuni minuti dopo lo spegnimento.

6
REMOTE LEVEL
SERVO
PHASE
180° 0°
AUTO
TURN-ON
OFF
AUTO
CONTROL
MAXMIN
SUB LEVEL
MAXMIN
dB
120
Hz
12060
X-PANDER
FILTER
LEVEL
POWER
COLLEGAMENTO DEL CONTROLLO REMOTO DI LIVELLO
Per regolare il livello del subwoofer, è possibile utilizzare l’apposito controllo a distanza
fornito in dotazione, da posizionare all’interno dell’abitacolo.
Fate scorrere il filo di collegamento, fornito in dotazione, attraverso una guaina di
protezione; non passate vicino a centraline elettroniche, ai cablaggi dell'autovettura
o a parti che generano calore.
TARATURA ED USO
Assicuratevi che l’autoradio sia spenta e il
suo controllo di volume al minimo.
Impostate al minimo i controlli LEVEL,
FILTER e X-PANDER.Se avete collegato
il controllo remoto di livello, posizionate la
manopola SUB LEVEL al centro.
Accendete l’autoradio e ascoltate un brano
che contenga una buona quantità di basse
frequenze e posizionate il volume a circa
3/4 del massimo.

7
REMOTE LEVEL
SERVO
PHASE
180° 0°
AUTO
TURN-ON
OFF
AUTO
CONTROL
REMOTE LEVEL
SERVO
PHASE
180° 0°
AUTO
TURN-ON
OFF
AUTO
CONTROL
dB
120
Hz
12060
X-PANDER
FILTER
I volumi dell'abitacolo e del bagagliaio
giocano una parte importante nelle pre-
stazioni di tutto il sistema car audio: è
possibile aggiustare la risposta alle basse
frequenze variando la fase, la posizione
all’interno del bagagliaio e/o la direzione
di emissione del subwoofer.
Ruotate il controllo LEVEL in senso orario
sinché il led SERVO si accende (solo) nei
picchi estremi di basse frequenze; è impor-
tante che il led non rimanga acceso in
modo fisso, in tal caso riducete il livello.
Regolate l'estensione delle basse frequenze
con il controllo FILTER.
Regolate la quantità delle basse frequenze
con il controllo X-PANDER.
Provate a spostare il selettore PHASE su
180°,quindi scegliete la posizione che offre
il miglior risultato nell’auto.
PROTEZIONI
In caso di malfunzionamento i circuiti di protezione disattivano il subwoofer, che si
riattiva spegnendo e riaccendendo l'autoradio.Assicuratevi di aver risolto il problema
prima di riaccendere il subwoofer.
Nel caso sia necessario sostituire il fusibile (FUSE), rimpiazzatelo con uno di uguale
valore, altrimenti la garanzia viene meno e si potrebbe danneggiare il subwoofer.
Assicuratevi di aver risolto il problema prima di riaccendere il subwoofer.

8
WARNING
Please read this manual carefully and follow the instructions step by step.These
instructions generally show you how to install a car audio system,but they do not
explain the specific installation methods for your type of car.
Protracted listening at very high volume level may cause permanent hearing damages:
we recommend to not exceed with high volume. High-powered car audio systems
may produce pressure levels which exceed the limits of legislations in some countries:
please respect such rules of your country.We also recommend the use of a moderate
volume level while driving:you must always be able to hear external noises in order
to face possible emergency situations promptly.
A car audio system gives its best performances only if correctly installed: for this
reason, a good car's acoustical and mechanical knowledge are required.To ensure
total safety,we strongly recommend you to entrust installation to a qualified personnel,
respecting the current safety laws.
Coral Electronic declines any liability for damages caused to people and things in
disregarding the contents of the present manual and/or concerning the improper use
of its products.
INSTALLATION
Before starting the installation, take your
time for a careful planning: a car audio
system can give the best performances only
if correctly installed and tuned.
Carefully check that the subwoofer never
interferes with your total driving safety.
Make sure that the subwoofer is not moun-
ted near hot components and it has sufficient
ventilation,away from dust,moisture and
moving objects.
Fix the subwoofer on a steady surface,
check the mounting location carefully, to
avoid damages to the gas tank,electrical
wires or hydraulic pipes.
velcro
mounting
bracket
screws

9
FUSE
20 A
REM
POWER
30 A fuse
remote
battery
POWER CONNECTIONS
In order to avoid possible damages, before starting connections, turn off the car radio and
all electrical devices in your audio system.
To prevent fire in the event of a shorted cable, place a 30 A fuse, near to the battery, on
the positive pole.Leave the fuse out until everything is checked.The subwoofer's fuse don't
substitute the battery one.
Link both the positive and negative supply connectors directly to the battery,keeping the
polarities and using 8 mm2(8 AWG) power cables.
If the RCA inputs are used,link the car radio remote output to the subwoofer REM connector
by using 1 mm2cable (17AWG); so set the AUTOTURN-ON switch on the OFF position.
If the HI-LEVEL inputs are used,it’s not necessary to link the car radio remote output:simply
set theAUTOTURN-ON switch on the AUTO position;the subwoofer is automatically turned
on by powering up the car radio and is turned off some minutes after the car radio is off.
Route all wires through a protection grummet;don't put the cables close to electronic devices,
car wiring or heat-generating parts.
Double-check every connections; finally, re-connect the battery fuse.

10
LR
RR
LL
FRONT REAR
REAR
FRONT
HI-LEVEL
INPUT
LR
RR
LL
FRONT REAR
REAR
FRONT
HI-LEVEL
INPUT
REMOTE LEVEL
SERVO
PHASE
180° 0°
AUTO
TURN-ON
OFF
AUTO
CONTROL
SIGNAL CONNECTIONS WITH RCA OUTPUTS
In order to avoid possible damages, before starting connections, turn off the car radio and
all electrical devices in your audio system.
Link the car radio to the subwoofer by a high quality signal cable.Follow one of the underneath
schematic diagrams according to the available car radio RCA outputs.
Route the signal cables away from supply wires,as running them close together can generate
some interference noise.Route all wires through a protection grummet;don't put the cables
close to electronic devices, car wiring or heat-generating parts.
Front & Rear outputs
Only Front output
or
Subwoofer output
Set the AUTOTURN-ON
switch on the OFF position.

11
REMOTE LEVEL
SERVO
PHASE
180° 0°
AUTO
TURN-ON
OFF
AUTO
CONTROL
LR
RR
LL
FRONT REAR
REAR
FRONT
INPUT
HI-LEVEL
LR
RR
LL
FRONT REAR
REAR
FRONT
INPUT
HI-LEVEL
SIGNAL CONNECTIONS WITH SPEAKER OUTPUTS
In order to avoid possible damages, before starting connections, turn off the car radio and
all electrical devices in your audio system.
Use this connection method only if the car radio is not provided by RCA outputs.
Link the car radio speaker outputs to the subwoofer HI-LEVEL inputs by speaker cables.
Follow one of the underneath schematic diagrams according to the available car radio outputs.
It is possible to link the subwoofer in parallel with the speakers.
Route all wires through a protection grummet;don't put the cables close to electronic devices,
car wiring or heat-generating parts.
Only Front output
Front & Rear outputs
Set theAUTOTURN-ON switch on theAUTO position:
the subwoofer is automatically turned on by powering
up the car radio and is turned off some minutes after
the car radio is off.

12
REMOTE LEVEL
SERVO
PHASE
180° 0°
AUTO
TURN-ON
OFF
AUTO
CONTROL
MAXMIN
SUB LEVEL
MAXMIN
dB
120
Hz
12060
X-PANDER
FILTER
LEVEL
POWER
REMOTE LEVEL CONTROL LINKING
It is possible to adjust the subwoofer level by the remote level control (included with the
subwoofer), to be placed inside the passenger compartment.
Route the linking cable (included with the subwoofer) through a protection grummet;don't
put the cable close to electronic devices, car wiring or heat-generating parts.
TUNING and USE
Make sure the car radio is off and its volume
control is set to minimum.
Set the LEVEL, FILTER and X-PANDER controls
on minimum. If you have linked the remote
level control, set the SUB LEVEL control on
centre.
Turn on the car radio and play a music track
with a good quantity of low frequencies;set the
volume to approximately 3/4 of full volume.

13
REMOTE LEVEL
SERVO
PHASE
180° 0°
AUTO
TURN-ON
OFF
AUTO
CONTROL
REMOTE LEVEL
SERVO
PHASE
180° 0°
AUTO
TURN-ON
OFF
AUTO
CONTROL
dB
120
Hz
12060
X-PANDER
FILTER
The volumes of passenger compartment and
car's trunk play an important role on perfor-
mances of the complete car audio system:
it's possible to adjust the bass response by
changing the subwoofer's phase,its position
and/or emitting direction.
Adjust the low frequencies extension by
the FILTER control.
Adjust the low frequencies quantity by the
X-PANDER control.
Try to set the PHASE switch on 180°and
chose the position offering the best perfor-
mances on your car.
PROTECTIONS
In the event of a fault condition,the protection circuit turns off the subwoofer;it is re-activable
by turning off and on the car radio.Solve the problem before turn on the subwoofer again.
If you experience blown the FUSE,replace it with same type one.Doing otherwise will avoid
the warranty and can damage your subwoofer.Solve the problem before turn on the subwoofer
again.
Turn the LEVEL control clockwise until the
SERVO led is lit (only) on the bass frequency’s
extreme peaks; it is important the led doesn’t
stay lit continuously, if needed reduce the level.

CARATTERISTICHE TECNICHE
Il potente amplificatore digitale ad elevato rendimento fornisce la sua notevole dinamica
con un limitato consumo di corrente ed un bassissima dissipazione termica.
Le principali regolazioni del subwoofer sono presenti sul pannello frontale: controllo
del guadagno, filtro crossover e livello delle basse frequenze.
Il controllo di fase ed il led “SERVO”, utili per una corretta messa a punto del sistema,
sono posizionati nella parte posteriore del mobile.
Gli ingressi di segnale ad alto e basso livello (RCA) rendono possibile il collegamento
diretto a qualsiasi autoradio, anche a quelle fornite di serie dalle case automobilistiche.
L'altoparlante è provvisto di cono in polpa di cellulosa impregnata, cestello in acciaio
e bobina mobile multistrato avvolta su supporto di alluminio resistente al calore.
Il box è interamente realizzato con pannelli di MDF (Medium Density Fibreboard),
materiale rigido e meccanicamente inerte, di elevato spessore.
TECHNICAL FEATURES
The high efficiency powerful digital amplifier supplies its remarkable dynamics
with a low current consumption and a minimal heat dissipation.
The subwoofer’s main adjustments are on the front panel: gain level, crossover
filter and low frequency level.
The phase control and the “SERVO” led, useful for a fine adjustment of car audio
system, are on the back side of the cabinet.
The hi-level and the low-level (RCA) signal inputs make possible a direct linking
to all kinds of car radios, even the standard in dash ones.
The speaker is provided by air dried and threaded cellulose pulp cone, steel basket
and its multi-layer voice coil is wound on heat resistant aluminium former.
The enclosure is entirely manufactured by high thickness MDF (Medium Density
Fibreboard) panels, a rigid and anti-vibration material.

TECHNICAL DATA
music power Watt 300
rms power Watt 150
frequency range Hertz 32÷120
X-PANDER gain @ 50 Hz dB 0÷12
FILTER cut frequency Hertz 60÷120
FILTER slope dB/oct 12
PHASE control deg 0 /180
RCA input sensitivity Volt 0.5÷4
HI-LEVEL input sensitivity Volt 1÷16
power supply Volt 11÷17
max power current Ampere 12
internal fuse Ampere 20
speaker diameter mm 263
voice coil diameter mm 50
box size (L x W x H) mm 460 x 320 x 305
weight Kg 16
protection grille - included
remote level control - included

GARANZIA
La Coral Electronic garantisce le caratteristiche ed il perfetto funzionamento
di questo apparecchio.
Qualora tuttavia, per un qualsiasi motivo non imputabile ad uso improprio,
erronea installazione o manomissione, esso dovesse presentare difetti di
funzionamento, l’acquirente potrà usufruire dell’assistenza tecnica gratuita per
il periodo di due anni dalla data di acquisto, certificata dal documento di vendita.
In caso di necessità, l’acquirente consegnerà l’apparecchio accuratamente
imballato, preferibilmente nell’imballo originale, al rivenditore presso il quale
è stato effettuato l’acquisto, che provvederà all’inoltro al nostro centro assistenza.
In alternativa, l’acquirente potrà inviare a proprie spese l’apparecchio direttamente
al nostro laboratorio. In ogni caso l’apparecchio dovrà essere accompagnato
dal documento di vendita.
Prima di usufruire del servizio assistenza, oppure in caso di dubbi relativi al
funzionamento ed all’utilizzo dell’apparecchio, consigliamo di rileggere
attentamente le istruzioni.
WARRANTY
Coral Electronic guarantees characteristics and perfect operation of its products. Coral
Electronic will replace those parts which should prove defective within two years from
the date of purchase, certified by the sales receipt.The warranty is void in case of
misuse or illegal opening. For more details, please contact the official distributor in
your country.
Coral Electronic
corso Allamano, 74 - 10090 Rivoli - Torino - Italy - www.coralelectronic.com
Ci riserviamo il diritto di modificazioni senza preavviso. Decliniamo ogni responsabilità per eventuali errori o imprecisioni.
We reserve the right to change the specifications without notice.We decline each liability for any mistake or inaccuracy.
Table of contents
Languages:
Other Coral Subwoofer manuals