Coustic AMP400S User manual


INTRODUCTION
Welcome to Coustic’s world of power and clarity. The new Coustic 2-Channel amplifiers deliver the cleanest
music you’ve ever heard at any power level in the 12-volt environment. Besides the sleek contoured
design, these amplifiers have all the latest and most sophisticated audio features. This manual offers you
a guided tour of all these exciting features. For the best sonic reproduction, please follow the installation
suggestions and recommendations as closely as possible. The time you spend will prove to be worthwhile
when you sit back and enjoy the high fidelity music!
To further explore the potential of your Coustic amplifier, we recommend you match it with our dynamic
full-range speakers or subwoofers and electronic crossovers.
Whatever you need for your ultimate car audio system, look to Coustic for a wide range of car audio
components to meet the most critical demands.
That’s because . . . Coustic is Performance Tuned!
Please take a moment to register your purchase online at coustic.com.
Please also record the serial number of your amplifier in the space provided below and keep this manual
for future reference, as well as your sales receipt as proof of ownership. (The serial number of your
amplifier is marked on the bottom of its metal chassis.)
Serial Number:
Date of Purchase:

FEATURES
• Patented state-of-the-art power supply and output stage
• High mass extruded aluminum heatsink for maximum thermal management and bulletproof
reliability
• Adjustable, HP/LP Crossover - 40Hz-350Hz, 12dB/oct for maximum system design flexibility
• Stereo Gain Control for precision matching between your amplifier and radio
• Fully adjustable Bass Boost - 40Hz, 0-18dB to enhance the low frequency experience in your vehicle.
• Remote subwoofer level control included allows you to fine tune the bass from the driver’s position
when you switch between different musical styles
• High Level Input with patented Intelli-Sense™ auto turn-on for easy installation with factory radios
• CEA 2006 Compliant. All power ratings are not created equal. CEA 2006 Compliance ensures
that the power of this amplifier is measured according to strict standards dictated by the Consumer
Electronics Association.
SPECIFICATIONS
2
RMS per channel @
4Ω (≤ 1% THD+N) 50 Watts 75 Watts 100 Watts 150 Watts
RMS per channel @
2Ω (≤ 1% THD+N) 100 Watts 150 Watts 200 Watts 300 Watts
RMS bridged channels
@ 4Ω (≤ 1% THD+N) 200 Watts 300 Watts 400 Watts 600 Watts
Signal to Noise Ratio 80 dBA 80 dBA 80 dBA 80 dBA
Frequency Response 20Hz to 20kHz (-3dB) 20Hz to 20kHz (-3dB) 20Hz to 20kHz (-3dB) 20Hz to 20kHz (-3dB)
Maximum Input Signal 5V 5V 5V 5V
Maximum Sensitivity 100mV 100mV 100mV 100mV
THD+N
(Distortion) <0.25% (reference:1W
output) <0.25% (reference:1W
output)
AMP400S AMP600S AMP800S AMP1200S

INSTALLATION
Disconnect the ground at the vehicle battery before proceeding.
1. Connect the amplifier to the battery
For maximum amplifier performance, we suggest 4 gauge wire and a 1 Farad stiffening capacitor. A
fuse or circuit breaker is required at maximum distance of 18” from the battery to protect the battery,
the vehicle, and more importantly you. It is highly recommended that installation be carried out by an
authorized dealer.
2. Connect the amplifier remote turn-on
Connect the remote input terminal of the amplifier to the remote output terminal of the source unit (only
if using RCA inputs) to establish amplifier remote on/off through the power on/off of the source unit.
If the source unit does not provide a remote output, connect to a switched 12-volt source, e.g. ignition
switch.
3. Connect the amplifier ground to the vehicle chassis
For maximum amplifier performance we suggest 4 gauge wire. Find a solid piece of metal and scrape
the paint away where the ground will be attached (NO FACTORY BOLTS). Connect the ground cable to the
amplifier at this point.
- NOTE -
For optimum performance and
sound reproduction, prepare
and secure the ground
properly. Remove any surface
material before securing to
your chassis, ensuring a
metal-to-metal ground point.

4. Remote Gain Control
Included is a remote gain control, which is a volume control that is active with the low pass filter engaged.
This control should be mounted near the driver in an easily accessed location. This is not a gain knob, this
is a level control. The level control will attenuate the amp or increase its output to the level of the gain
setting. It is used to adjust bass output between music sources or tracks (see picture below for connection
location).
5. Connecting signal cables to the amplifier
There are two ways to supply the signal to our amplifiers. To get maximum performance, we suggest
connecting a high quality RCA to the corresponding outputs at the source unit and inputs of the
amplifier. If a source unit is being used without RCA outputs, use the high-level inputs for signal which will
turn the amplifier on via our Intelli-Sense™ circuitry (Four-channel amps will only engage on the front
high-level inputs).
6. Reconnect the battery ground to the vehicle battery
Double check all the previous installation steps. Make certain the wiring and component connections are
securely attached to the amp +BATT, remote and ground. If everything is in order, complete the
installation by reconnecting the battery ground to the vehicle battery.
4

WIRING DIAGRAM (CHARGING SYSTEM)
1 Farad
Stiffening
Capicitor

WIRING DIAGRAM (5.1 SURROUND SOUND EXAMPLE)
6

WIRING DIAGRAM (SINGLE 4-CHANNEL AMPLIFIER SYSTEM)

WIRING DIAGRAM (MULTI AMPLIFIER SYSTEM)
8

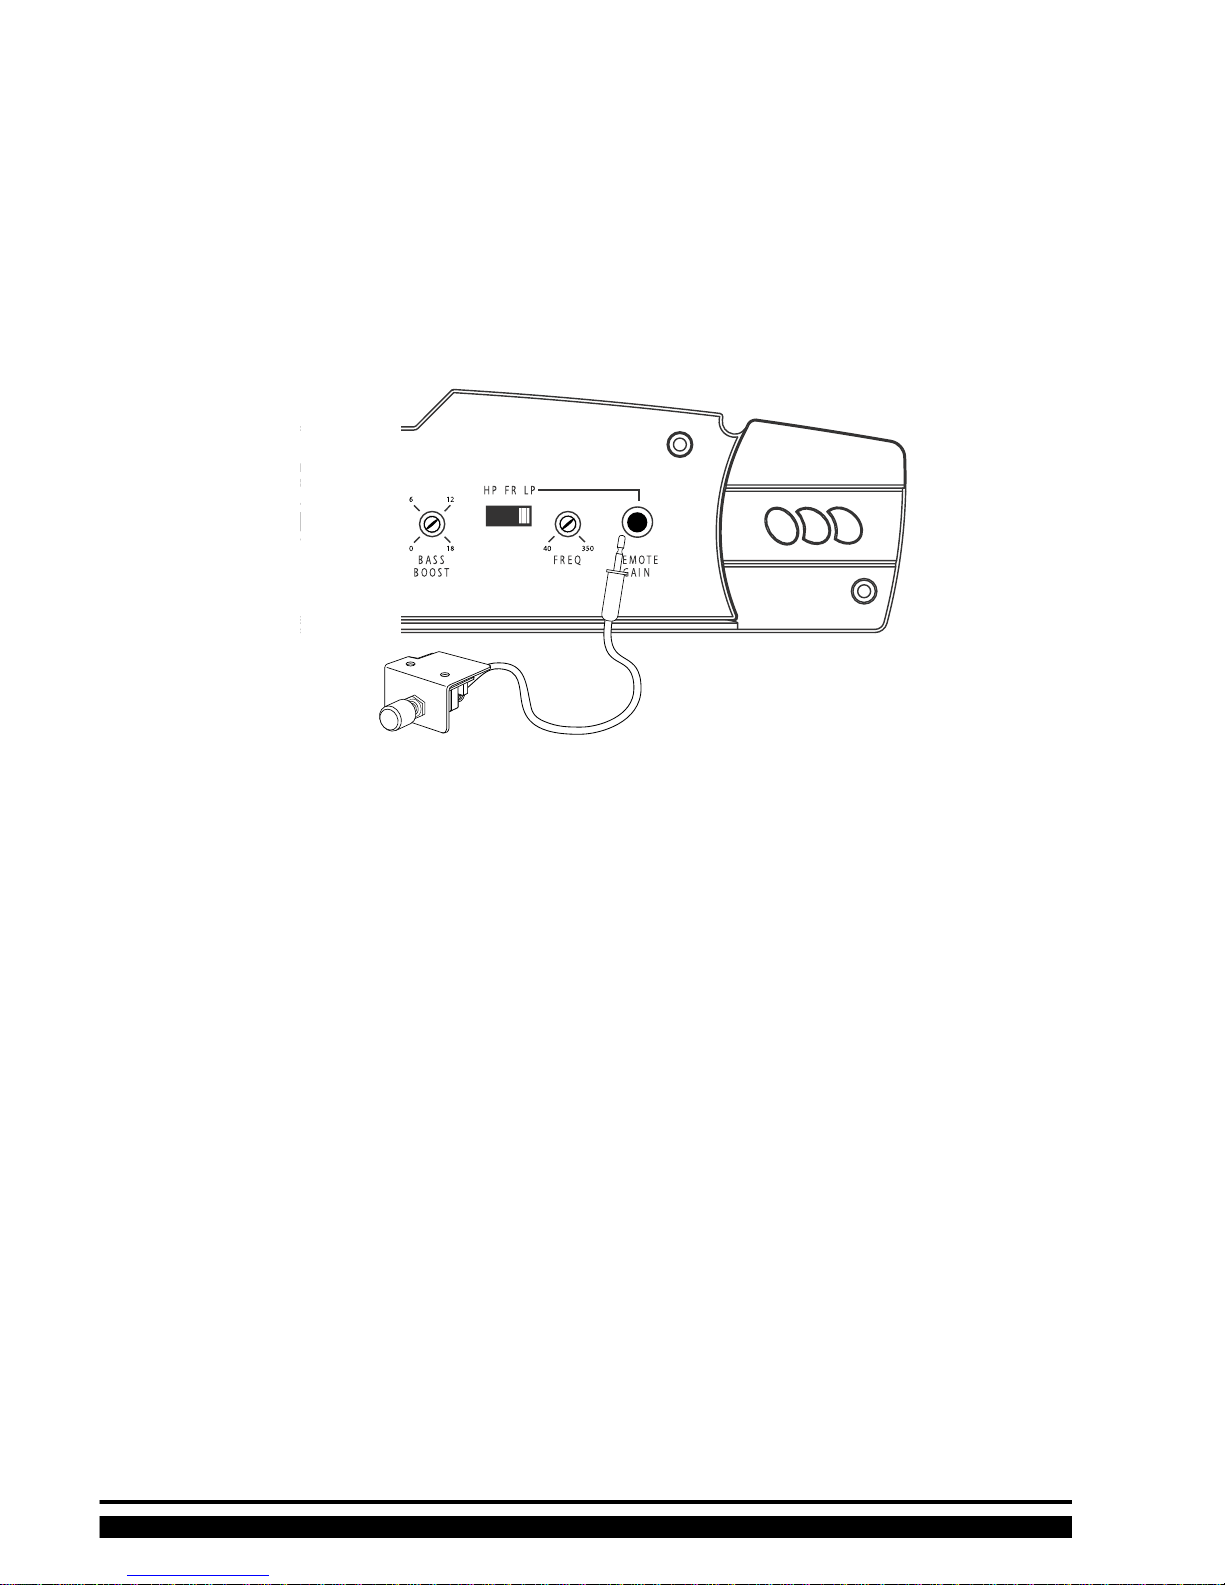
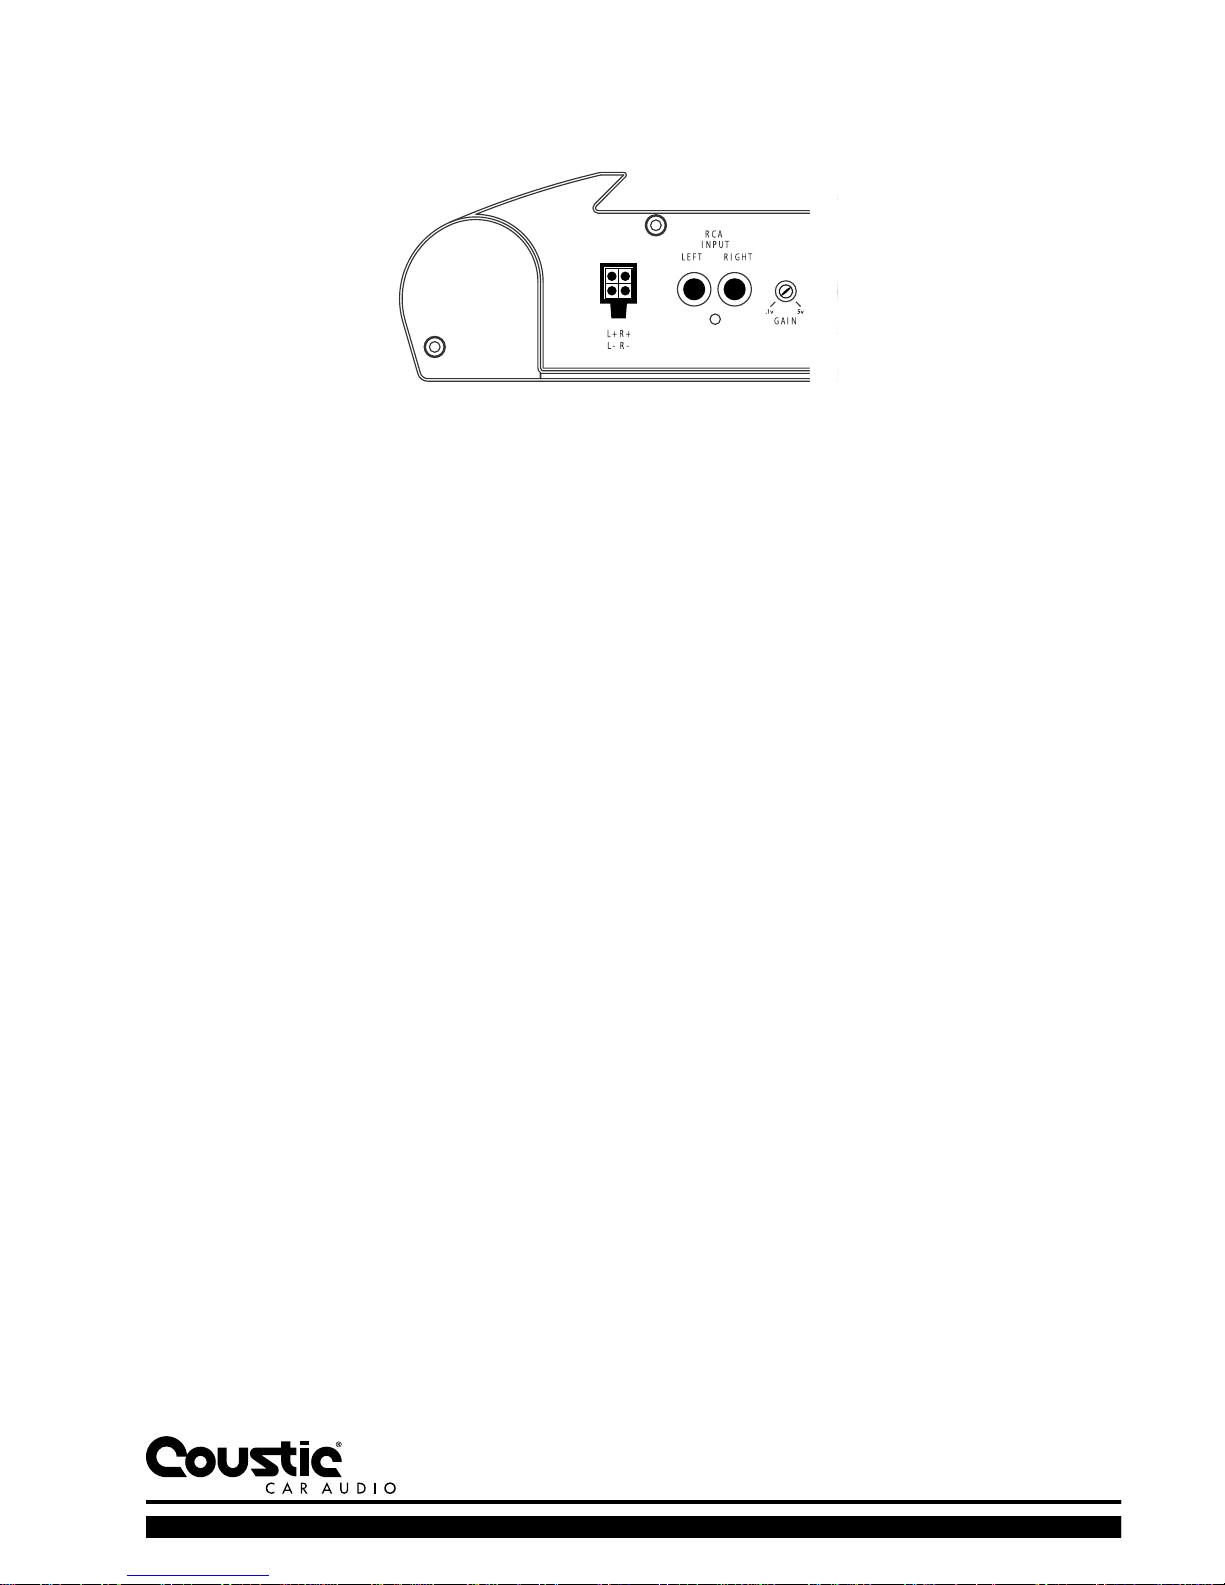
Located on the Input Panel, the objective of input GAIN adjustment is to match the output of the source
unit with the input of the amplifier. The output voltage of individual source units can vary. Some source
units have an output of 200 mV and others have 5 Volts or more. To cater to these variations, the ampli-
fier has an adjustable gain level that ranges from 100 mV to 5 volts. Adjusting this control
requires some experimenting. Basically, you want all the gain at the beginning of the system, NOT at the
end (amplifier). Turn your source unit up and keep your amplifier gains at the minimum lowest possible
setting (counter-clockwise) with maximum output. This will give you the best sound and signal-to-noise
ratio.
Besides better sonic reproduction, proper input gain also helps to prolong the reliability span of your
amplifier by eliminating excessive internal temperature generated by incompatible source unit output
and amplifier input.
Note : Turning the input gain up does not indicate more power. Just more noise. The input gain control
is not a power control.
If the Remote Gain is used, connect the plug of the Remote Gain to the port on the panel of the
amplifier.
1. Turn the input GAIN all the way down (counter clockwise).
2. Set the volume control of the source unit to approximately 3/4 of its maximum output.
3. Turn the balance control of the source unit to its center position (flat).
4. Leave the tone (bass/treble) controls at their usual position.
5. Play a CD or tape track with great dynamic range.
6. Use the Bass Boost Control on the amp to enhance the bass performance (if desired), not the bass
on the head unit.
7. To locate the optimum gain setting, ask the person assisting you to turn the input GAIN control
clockwise until audio distortion starts to develop. Turn the gain control backwards slightly to
minimize the distortion.
8. If you constantly switch between CD/tape and radio, you will need further adjustment since radio
output level differs from that of CD or tape. In this case, you need to locate a balanced gain setting
which is best for both the output level of radio and that of CD or tape.
SYSTEM TUNING (INPUT GAIN ADJUSTMENT)

Note: If you are using the Remote Gain, make sure to take this into account during set-up procedures
of the subwoofer amplifier. You should set the system up with the Remote Gain plugged in and with
the level knob turned all the way down (counter-clockwise). The Remote Gain only works when you’ve
selected the LPF (low-pass) crossover configuration.
Crossover Section
The amplifier has built-in high-pass/low-pass filters that can be bypassed by sliding the switch to
the (FR) position.
1. When the high-pass is selected (HP), the amplifier will be devoted to mid/tweeters.
2. When the low-pass is selected (LP), the amplifier will be used to drive woofers/subwoofers.
With this setting, the Remote Gain can directly control the amplifier playback level.
3. When the full range is selected (FR), the amplifier is used as a full range amplifier.
Crossover Frequency Selection (FREQ)
Both the high-pass and the low-pass section offer continuously adjustable crossover frequencies
between 40 and 350 Hz. Adjust the setting according to your speaker component specification or
to your particular preference.
Bass Boost Control (BASS BOOST)
Select a boost level between 0dB and +18dB @ 40Hz to enhance the bass performance for your sound
system. BASS BOOST is NOT free! Every 3dB of boost costs you twice as much in power. Make sure to set
the final gains after setting the Bass Boost to work best with your subwoofer/enclosure
combination. More is NOT always better!
SYSTEM TUNING (CROSSOVER ADJUSTMENT)
10

1. No power: Verify that the Ground, +BATT and remote are securely attached to the amp, the
connection at the + terminal of the battery is secure, the remote turn-on is securely fastened to the
source unit and that the in-line fuse at the battery is good as well as the fuse on the amp. If fuses are
blown, replace them and attempt to power the amp back on. If fuses continue to blow, please see an
authorized dealer. To confirm that the amp is getting power at the +BATT and remote, use a digital
multi-meter set to DC voltage, attach the negative terminal of the meter to the ground and the positive
to the +BATT and then check the remote. The remote and the +BATT should have 11-15volts. If the amp
has ground, +BATT and remote voltage and will not power on, please visit an authorized dealer or call the
technical support number listed below for further assistance.
2. Power light on, no output: Turn the audio system off (source unit and amplifier), check
output signal connections from the source unit and input signal connections at the amp. Remove speaker
wires and test for opens or shorts of speakers with a digital multi-meter set to the impedance setting.
Reconnect the speaker wires and test the system. If there is still no output, visit an authorized dealer or
call the technical support number listed below for further assistance.
3. Amp turns on and shuts off: Turn the audio system off (source unit and amplifier).
Remove the speaker wires and test for opens or shorts of speakers with a digital multi-meter set to the
impedance setting. Gently push on the speaker with your ear close to it. If it sounds scratchy then
replace the speaker or consult a local dealer. Carefully touch the amp for temperature. If it is
extremely hot then the amp is in thermal protection and needs to cool down. If thermal protection contin-
ues to be a problem, see an authorized dealer or call the technical support number below.
4. No sound from one side: Check the speaker connections, input connections, balance
control on the source unit, and then check the speakers for shorts with the digital multi-meter.
5. Low sound from both radio and CD: Check the radio’s fader control and the
amplifier’s input sensitivity.
6. Amplifier shuts down after long play times: If the light is turned off, then the
amp is probably in thermal protection due to poor ventilation. If the amp has good ventilation then check
the speaker impedance to verify that it is above the suggested load rating. With it running, verify that
you have more than 11volts at the +BATT portion of the amp and that you have 4 gauge power cable
and the proper fuse rating at the fuse holder near the vehicle battery.
TROUBLE SHOOTING

7. Amplifier shutting off and LED flashing off and on: This is an indication of
low or high voltage at the +BATT or the remote portion of the amp. Test the +BATT and the remote por-
tion of the amp with a digital multi-meter. If the voltage at either of these terminals is above 15volts or
below 11volts, consult an automotive electrical specialist. If voltage is consistently below 11volts, adding
a one-farad stiffening capacitor will solve the problem.
8. Whining noise that increases with acceleration: This is what is known as a
ground loop. To verify if the noise is being generated by a bad ground or the RCA cables, remove the RCA
cables from the amp (make sure they are shielded from touching the chassis) and turn the system back
on. If the noise persists, then the problem is ground related. If the noise stops, then it is being radiated
into the amp via the RCA cables. If the noise is being radiated by the RCA cables, simply re-route the
cables away from power cables–specifically the +BATT cable that is connected to the battery. If whining
noise is ground related then confirm that all ground cables are secure in the vehicle and free of corrosion.
Please see power and ground portion of this manual for correct system grounding instructions.
COUSTIC TECHNICAL SUPPORT 1.877.268.7842
COUSTIC amplifiers purchased in the USA from an authorized COUSTIC dealer are guaranteed against
defects in material and workmanship for the period of 1 year from the date purchased by the end user
if the product is installed by an authorized COUSTIC dealer, and 90 days if installed by the consumer.
Product found to be defective during that period will be repaired or replaced by COUSTIC at no charge.
This warranty is void if it is determined that unauthorized parties have attempted repairs or alterations
of any nature. Warranty does not extend to cosmetics or finish. Before presuming a defect is present in
the product, be certain that all related equipment and wiring is functioning properly. COUSTIC disclaims
any liability for other incurred damages resulting from product defects. Any expenses in the removal
and reinstallation of products are not covered by this warranty. COUSTIC’s total liability will not exceed
the purchase price of the product. If a defect is present, your authorized COUSTIC dealer may be able to
effect repairs.
• 1 Year Warranty against defects in materials and workmanship
(90 day Mitek Proof of Performance Pledge applies)
• 2 years if professionally installed by an authorized Coustic retailer.
Proof of purchase is required when requesting service, so please retain your sales receipt, and take a
moment to register your warranty on line @ www.Coustic.com.
LIMITED WARRANTY
12

• Fuente de alimentación y etapa de salida patentada con tecnología de punta
• Disipador térmico de aluminio extruído de alta masa para dar máximo control térmico y
confiabilidad a prueba de fallas.
• Crossover de pasabajas (Low-Pass, LP) y pasaaltas (High-Pass, HP) ajustable. De 40 Hz a 350 Hz y
12 dB/oct para dar máxima flexibilidad de diseño al sistema.
• Control de amplificación estereofónica para producir una correspondencia de precisión entre el
amplificador y la radio.
• Refuerzo de bajos totalmente ajustable. 40 Hz de 0 a +18 dB para mejorar las frecuencias bajas en
el vehículo.
• Control remoto de subwoofer que permite un ajuste preciso del bajo desde la posición del conductor
cuando cambia de estilo de música.
• Entrada de alto nivel con encendido automático Intelli-Sense™ patentado para facilitar la
instalación con radios de fábrica.
• Cumple con la norma CEA2006. No todos los valores nominales de potencia son iguales. La norma
CEA2006 garantiza que la potencia de este amplificador se mide de acuerdo a normas estrictas
dictadas por la Asociación de Aparatos Electrónicos para el Consumidor (Consumer Electronics
Association).
INSTALACIÓN
Desconecte el cable de conexión a tierra de la batería del automóvil antes de proceder.
1. Conecte el amplificador a la batería
Para obtener el máximo rendimiento del amplificador, sugerimos cable calibre 4 y un capacitor de
refuerzo de 1 faradio. Se requiere un interruptor automático o un fusible a una distancia máxima de 18
pulgadas de la batería para proteger la batería, el vehículo y, lo más importante, para protegerlo a usted
(consulte el cuadro que aparece abajo para ver los valores nominales de los fusibles). Se recomienda
enfáticamente que un distribuidor autorizado se haga cargo de la instalación.
2. Conecte el encendido a control remoto al amplificador
Conecte la terminal de entrada de control remoto del amplificador a la terminal de salida de control
remoto de la fuente de audio (sólo si está usando entradas RCA) para establecer el encendido a control
remoto del amplificador a través del interruptor de encendido de la fuente de audio. Si la fuente de
audio no tiene salida de control remoto, conecte a una fuente de potencia conmutada de 12 voltios; por
ejemplo, el encendido del automóvil.
CARACTERÍSTICAS
SPANISH

3. Conecte la conexión a tierra del amplificador al chasis del vehículo
Para obtener el máximo rendimiento del amplificador, sugerimos cable calibre 4. Localice una pieza de
metal sólida y raspe la pintura en el punto en el cual va a fijar la conexión a tierra (NO FIJE LA CONEX-
IÓN EN PERNOS DE FÁBRICA). Conecte el cable de conexión a tierra al amplificador en este punto.
- NOTA -
Para lograr una reproducción de sonido y rendimiento óptimos, prepare y fije correctamente la conexión
a tierra. Quite todo material de la superficie antes de fijar la conexión al chasis, asegurando que haya un
punto de conexión a tierra de metal a metal.
4. Control remoto de amplificación
Se incluye un control remoto de amplificación, que es un control de volumen que se activa cuando se
activa el filtro de pasabajas. Este control se debe montar cerca del conductor en un lugar de fácil acceso.
Esta no es una perilla de amplificación, es un control de nivel que atenúa el amplificador o aumenta su
salida hasta el nivel de amplificación establecido. Permite ajustar la salida de bajos entre las fuentes o
pistas de música (vea el dibujo que aparece abajo para localizar la conexión).
5. Conexión de los cables de señal al amplificador
Hay dos maneras de suministrar la señal a los amplificadores. Para obtener el rendimiento máximo,
sugerimos conectar cables RCA de alta calidad entre las salidas de la fuente de audio y las entradas
correspondientes del amplificador. Si la fuente de audio se está usando sin salidas RCA, use las entradas
de señal de alto nivel. Esto enciende el amplificador por medio de nuestro circuito Inteli-Sense™. (Los
amplificadores de 4 canales solamente se activan en las entradas de alto nivel frontales).
6. Conexión del cable de conexión a tierra de la batería a la batería
del vehículo
Revise dos veces todos los pasos de la instalación previa. Asegúrese de que el cableado y las conexiones
de los componentes estén firmemente asegurados a las terminales de batería (+BATT), de control remoto
y de conexión a tierra del amplificador. Si todo está en orden, complete la instalación conectando el cable
de conexión a tierra de la batería a la batería de vehículo.
14

El ajuste de amplificación de entrada (GAIN) se encuentra en el panel de entrada y su objetivo es hacer
corresponder la salida de la fuente de audio con la entrada del amplificador. El voltaje de salida de las
fuentes de audio puede variar. Algunas fuentes de audio tienen salidas de 200 milivoltios y otras tienen
5 voltios o más. Para adaptarse a estas variaciones, el amplificador tiene un nivel de amplificación
ajustable que va de 100 milivoltios a 5 voltios. El ajuste de este control requiere una cierta medida de
experimentación. Específicamente, deseamos que toda la amplificación se hace al principio del sistema, y
NO al final (amplificador). Suba el volumen de la fuente de audio y mantenga la amplificación al mínimo
posible con una salida máxima (gire la perilla contra las manecillas de reloj). Esto produce el mejor
sonido y la mejor relación de señal a ruido.
Además de mejorar la reproducción de sonido, la amplificación de entrada correcta también contribuye a
prolongar el intervalo de confiabilidad del amplificador al eliminar las temperaturas internas excesivas
generadas por una salida de fuente de audio incompatible con la entrada del amplificador.
Nota. Subir la amplificación de entrada no implica más potencia, simplemente más ruido. El control de
amplificación de entrada no es un control de potencia.
Si se usa el control remoto de amplificación, conecte el enchufe de amplificación a control remoto al
puerto del panel del amplificador.
1. Baje al mínimo la amplificación de entrada (GAIN) (contra las manecillas del reloj).
2. Fije el control de volumen de la fuente de audio aproximadamente a _ de su salida máxima.
3. Fije el control de balance de la fuente de audio en su posición central (de plano).
4. Deje los controles de tono (bajos y agudos) en sus posiciones normales.
5. Toque un CD o una cinta con alta gama dinámica.
6. Utilice el control de refuerzo de bajos del amplificador para mejorar el rendimiento de bajos (si así
lo desea), no el bajo de la fuente de audio.
7. Para ubicar el punto de amplificación óptimo, pídale a la persona que lo está ayudando que gire el
control de amplificación de entrada (GAIN) en el sentido de las manecillas de reloj hasta que
comience a producirse distorsión de audio. Gire el control de amplificación ligeramente en el otro
sentido para minimizar la distorsión.
8. Si usted pasa constantemente de CD y cintas a la radio, va a ser necesario que haga más ajustes
porque el nivel de salida de la radio es diferente del nivel de salida del CD o de la cinta. En tal caso,
debe localizar una configuración de amplificación equilibrada que sea ideal tanto para el nivel de
salida de la radio como para el del CD y la cinta.
SINTONIZACIÓN DEL SISTEMA (AJUSTE DE AMPLIFICACIÓN DE ENTRADA)

Nota. Si está usando el control remoto de amplificación, asegúrese de tomar esto en cuenta durante los
procedimientos de configuración del amplificador del subwoofer. Usted debe configurar el sistema con el
control remoto de amplificación enchufado y con la perilla de nivel al mínimo (contra las manecillas de
reloj). El control remoto de amplificación sólo funciona cuando se selecciona la configuración de crossover
LPF (pasabajas).
Sección de crossover
El amplificador tiene filtros incorporados de pasaaltas y pasabajas que se pueden pasar por alto desli-
zando el selector a la posición de gama completa (Full Range, FR).
1. Cuando se selecciona el filtro de pasaaltas (High Pass, HP) el amplificador queda dedicado a los
altavoces de frecuencias medias y a los tweeters.
2. Cuando se selecciona el filtro de pasabajas (Low Pass, LP) el amplificador se utiliza para activar
los woofers y subwoofers. Con esta configuración, el control remoto de amplificación puede
controlar directamente el nivel de reproducción del amplificador.
3. Cuando se selecciona el intervalo completo de frecuencias (FR), el amplificador se usa como
amplificador de gama completa de frecuencias.
Selección de la frecuencia de crossover (FREQ)
Tanto la sección de pasaaltas como la de pasabajas ofrecen frecuencias de crossover continuamente ajust-
ables entre 40 y 350 Hz. Ajuste la configuración de acuerdo a las especificaciones de los componentes de
altavoces o a su preferencia particular.
Control de refuerzo de bajos (BASS BOOST)
Seleccione un nivel de refuerzo entre 0 dB y +18 dB a 45 Hz para mejorar el rendimiento de bajos del
sistema de sonido. El refuerzo de bajos NO es gratis. Cada 3 dB de refuerzo cuesta el doble en potencia.
Asegúrese de fijar la amplificación final después de fijar el refuerzo de bajos que mejor funciona con su
combinación de subwoofer y caja. Más NO siempre implica mejor.
SINTONIZACIÓN DEL SISTEMA
16

1. No hay alimentación. Asegúrese de que los cables de conexión a tierra (Ground), al positivo
de la batería (+BATT) y al control remoto (Remote) estén firmemente conectados al amplificador, que la
conexión al positivo de la batería sea firme, que la conexión de encendido por control remoto esté firme-
mente unida a la fuente de audio y que el fusible en línea de la batería y el fusible del amplificador estén
en buenas condiciones. Si los fusibles están quemados, cámbielos e intente encender el amplificador otra
vez. Si los fusibles continúan quemándose, llame a un distribuidor autorizado. Para confirmar que está
llegando electricidad al amplificador por la terminal de batería (+BATT) y la terminal de control remoto,
use un multímetro digital configurado para medir voltaje de corriente continua. Coloque el cable negativo
del medidor en la conexión de tierra y el positivo en la conexión del positivo de la batería (+BATT). Luego
revise la conexión de control remoto. La conexión de control remoto y la conexión de la batería (+BATT)
deben tener de 11 a 15 voltios. Si el amplificador tiene voltaje en la conexión a tierra, la conexión al
positivo de la batería y la conexión de control remoto y aún así no se enciende, visite al distribuidor
autorizado o llame al número de apoyo técnico que aparece abajo para obtener más asistencia.
2. Luz de alimentación encendida; no hay salida. Apague el sistema de audio
(fuente de audio y amplificador), revise las conexiones de la señal de salida de la fuente de audio y las
conexiones de señal de entrada al amplificador. Quite los cables de altavoz y use un multímetro digital
configurado para medir impedancias para ver si los altavoces tienen cortocircuitos o circuitos abiertos.
Vuelva a conectar los cables del altavoz y pruebe el sistema. Si aún así no hay salida, visite a un distri-
buidor autorizado o llame al número de apoyo técnico que aparece abajo para obtener más asistencia.
3. El amplificador se enciende y se apaga. Apague el sistema de audio (fuente de
audio y amplificador). Quite los cables del altavoz y con un multímetro digital configurado para medir
impedancias determine si los altavoces tienen cortocircuitos o circuitos abiertos. Presione ligeramente el
altavoz con el oído cerca. Si cruje, cambie el altavoz o consulte al distribuidor local. Toque cuidadosa-
mente el amplificador para ver qué temperatura tiene. Si está extremadamente caliente, el amplificador
está en protección térmica y debe enfriarse. Si la protección térmica sigue siendo un problema, vea a un
distribuidor autorizado o llame al número de apoyo técnico que aparece abajo.
RESOLUCION DE PROBLEMAS

4. No hay sonido en uno de los dos lados. Revise las conexiones de altavoz, las
conexiones de entrada, el control de balance de la fuente de audio y luego vea con el multímetro digital
si hay cortocircuitos en los altavoces.
5. Sonido bajo de la radio y el CD
Vea el control de atenuación de la radio y la sensibilidad de entrada del amplificador.
6. El amplificador se apaga después de mucho tiempo de funciona-
miento. Si la luz se apaga, el amplificador probablemente está en protección térmica debido a mala
ventilación. Si el amplificador tiene buena ventilación, revise la impedancia del altavoz para comprobar
que esté por encima de la carga nominal sugerida. Mientras funcione, verifique que haya más de 11
voltios en la porción del positivo de la batería (+BATT) del amplificador y que tiene cable de alimentación
calibre 4 y un fusible con el valor nominal correcto en el portafusibles cerca de la batería del vehículo.
7. El amplificador se apaga y el indicador luminoso se enciende y se
apaga. Esto indica alto o bajo voltaje en la porción del positivo de la batería o del control remoto del
amplificador. Pruebe el positivo de la batería (+BATT) y la porción de control remoto del amplificador con
un multímetro digital. Si el voltaje en cualquiera de estas terminales es más de 15 voltios o menos de 11
voltios, consulte a un especialista en sistemas eléctricos de automóvil. Si el voltaje aparece continuamente
por debajo de 11 voltios, agregue un capacitor de refuerzo de 1 faradio para resolver este problema.
8. Silbido que aumenta con la aceleración. Esto se conoce como bucle de conexión
a tierra. Para ver si el ruido es generado por una mala conexión a tierra o por los cables RCA, quite los
cables RCA del amplificador (asegúrese de que estén protegidos para que no entren en contacto con el
chasis) y encienda el sistema otra vez. Si el sonido continúa, se trata de un problema de conexión a tier-
ra. Si no se produce más, el sonido está siendo radiado hacia el amplificador a través de los cables RCA.
Si el ruido es radiado por los cables RCA, encamínelos por otra parte lejos de los cables de alimentación,
específicamente el cable del positivo de la batería (+BATT). Si el silbido está relacionado con la conexión
a tierra, confirme que todos los cables de conexión a tierra estén firmemente ajustados en el vehículo y
que no estén oxidados. Vea la porción de alimentación y conexión a tierra de este manual para obtener
18

CARACTÉRISTIQUES
• Alimentation électrique et étage de sortie brevetés les plus sophistiqués
• Dissipateur thermique en aluminium extrudé massique pour une gestion thermique maximale et
une fiabilité à toute épreuve
• Filtre passif HP/LP réglable – 40 Hz-350 Hz, 12 dB/oct pour une flexibilité maximale de la
conception du système
• Contrôle du gain stéréo pour une correspondance de précision entre votre amplificateur et votre
radio
• Bass Boost entièrement réglable – 40 Hz, 0-18 dB pour une mise au point précise des basses
fréquences dans votre véhicule.
• Télécommande du niveau du subwoofer pour vous permettre de régler les basses tout en conduisant
lorsque vous passez d’un style de musique à un autre
• Entrée de niveau élevé avec mise en marche automatique Intelli-Sense™ brevetée pour un
branchement facile sur les radios installées en usine
• Conforme à la norme CEA 2006. Toutes les classifications de puissance ne sont pas identiques.
La certification à la norme CEA 2006 vous assure que la puissance de cet amplificateur est mesurée
conformément aux normes strictes dictées par la Consumer Electronics Association.
INSTALLATION
Débranchez la mise à la terre au niveau de la batterie du véhicule avant de procéder à
l’installation.
1. Branchez l’amplificateur sur la batterie
Pour une performance maximale de l’amplificateur, nous vous suggérons d’utiliser un fil de calibre 4
et un condensateur raidisseur de 1 Farad. Un fusible ou un coupe-circuit sont nécessaires à une distance
maximale de 45 cm (18 po.) de la batterie pour protéger la batterie, le véhicule et, plus important
encore, pour vous protéger (voir le tableau ci-dessous pour la classification appropriée des fusibles). Il est
vivement recommandé que l’installation soit effectuée par un revendeur agréé.
2. Branchez la mise en marche à distance de l’amplificateur
Branchez la borne d’entrée à distance de l’amplificateur sur la borne de sortie à distance de l’unité source
(seulement si vous utilisez des entrées RCA) afin d’établir la mise en marche / arrêt à distance par le
biais de la mise en marche / arrêt de l’unité source. Si l’unité source n’est pas équipée d’une sortie à dis-
tance, branchez le matériel sur une source commutée de 12 volts, par ex. un commutateur d’allumage.
FRENCH
This manual suits for next models
3
Table of contents
Languages:
Other Coustic Car Amplifier manuals