CPS COLOR COROB D300 User manual
Version 2.0 RF(2007)
COROBTM D300
Automatic dispensing machine
User manual

CPS Color Equipment Oy
COROBTM D300
User Manual
Version 2/07 RF
© COPYRIGHT 2007, CPS Color Equipment Oy
All rights reserved
Copying and editing this material in any way (e.g. saving and photographing it) is forbidden without explicit
written permission from CPS Color Equipment Oy.
All references to companies, names, dates and addresses on the display or in the examples are, unless
otherwise mentioned, entirely incidental and meant only to clarify how CPS Color Equipment Oy's products are
used.
We develop our products continuously. The information in these instructions do not bind CPS Color Equipment
Oy in any way. In unclear cases we ask you to contact the manufacturer or service provider.
Additional copies of these instructions or additional technical information is available from the following
address:
CPS Color Equipment Oy
Päivöläntie 5 • FIN-28400 Ulvila • FINLAND
Tel: +358 2 6777 700 • Fax: +358 2 6777 701 • E-mail: service_fi@cpscolor.com
www.cpscolor.com

- 1
Table of contents
1 QUICK GUIDE............................................................................................................. 2
2 TECHNICAL INFORMATION......................................................................................... 3
2.1 General ............................................................................................................. 3
2.2 Technical information .......................................................................................... 3
2.3 COROBTM D300’s parts......................................................................................... 4
2.4 Operating principles ............................................................................................ 6
2.5 Automatic dispensing machine and computer programmes ....................................... 6
3 DECLARATION OF CONFORMITY................................................................................. 7
4 MACHINE NOISE EMISSION ....................................................................................... 8
4.1 Data and method ................................................................................................ 8
4.2 Measuring results................................................................................................ 8
5 TRANSPORTATION, STORAGE AND DISPOSAL............................................................ 9
5.1 Contents of the basic package .............................................................................. 9
5.2 Dimensions and handling ..................................................................................... 9
5.3 Product disposal and recycling ............................................................................ 10
6 MACHINE INSTALLATION......................................................................................... 11
6.1 Installation site requirements ............................................................................. 11
6.2 Installation and implementation ......................................................................... 11
7 SAFETY INSTRUCTIONS............................................................................................ 12
7.1 Connecting and disconnecting the machine to the mains ........................................ 12
7.2 Danger caused by the stirring mechanism ............................................................ 12
7.3 Danger caused by punching device (optional) ...................................................... 13
7.4 Danger caused by chemicals............................................................................... 13
7.5 Explosion safety................................................................................................ 13
8 INSTRUCTIONS FOR USE.......................................................................................... 14
8.1 Starting up the machine..................................................................................... 14
8.2 Opening the upper cover.................................................................................... 15
8.3 Filling the colourant canisters.............................................................................. 16
8.4 Using the can table ........................................................................................... 17
8.5 Punching a hole in the base paint can’s lid (optional) ............................................. 17
8.6 Tinting............................................................................................................. 18
8.7 Daily attention.................................................................................................. 18
8.7.1 Moistening the nozzles ............................................................................. 18
8.7.2 Purging.................................................................................................. 19
8.7.3 Punching blade (optional)......................................................................... 19
8.7.4 Solvent borne colourants.......................................................................... 20
8.8 Automatic stirring ............................................................................................. 20
8.9 Switching off the machine .................................................................................. 21
8.10 Troubleshooting .............................................................................................. 21
9 THE COROBTM D300 WITH 24 CANISTERS................................................................. 22
10 GUARANTEE AND SERVICE ..................................................................................... 23
11 ELECTRICAL CHART................................................................................................ 24
12 GUIDELINES FOR USING VOC-FREE COLOURANTS.................................................. 25
12.1 Introduction ................................................................................................... 25
12.2 Using VOC-free colourants................................................................................ 25
12.2.1 Operating conditions .............................................................................. 25
12.2.2 Filling and refilling ................................................................................. 25
12.2.3 Daily cleaning ....................................................................................... 25
12.2.4 Humidifying cap / Nozzle washer ............................................................. 25
12.3 Used dispenser by solvent-free colourants .......................................................... 26
12.4 What to do in case of a microbial contamination?................................................. 26
Keep these instructions for future reference!

2 1 - Quick guide
COROBTM D300
1 QUICK GUIDE
Start the machine
by switching on the computer and the monitor.
Tinting:
1. Select a product to be tinted
2. Select a code for the desired tint.
3. Select the can size to be tinted.
4. Select number of cans to be tinted.
5. Remove the can’s lid if the COROBTM D300 does not have punching.
6. Place the base paint can onto the can table and lift up the table.
7. Punch a hole into the can’s lid if COROBTM D300 has punching,
see “Punching a hole in the base paint can’s lid (optional)” on page 17.
8. Begin tinting.
9. When tinting is finished, remove the paint can and close, if present, the punched
hole with a plug or put the lid back in place.
10. Write the tint code on the can's lid.
Every day:
• Check the colourant levels in the canisters and add colourant if needed.
“Filling the colourant canisters” on page 16.
• Check the water level in the water reservoir,
see “Daily attention” on page 18.
• Check the condition of the humidifier cap, fig. 8-17 on page 19.
After the last tinting of the day
turn off the computer and the monitor, but leave the COROBTM D300 on.
2 - Technical information 3
2 TECHNICAL INFORMATION
2.1 General
The COROBTM D300 is an automatic dispensing machine available with sixteen colourant canisters,
COROBTM D300-16C. The COROBTM D300 is meant for dispensing colourants and its main opera-
tional utilization is for all kinds of shops and other institutions. The COROBTM D300’s optional
equipment includes a punching mechanism, a label printer, and a spectrophotometer. The
COROBTM D300-16SR is meant for dispensing solvent resistant colourants.
The COROBTM D300 is also available with 24 colourant canisters, COROBTM D300-24. Read more
about this machine in section “The COROBTM D300 with 24 canisters” on page 22.
2.2 Technical information
Measurements, COROBTM D300-16/SR
Length 1040mm
Width 745mm
Height 1465mm
Space 1.1m3
Weight 174kg*
* includes PC
Electricity
Current 100 - 240V
Power 50 / 60Hz
Fuses 2 * 10A
Technical specifications
Number of canisters COROBTM D300-16/SR: max. 16
Canister capacity 4 or 6 l
Pump type Piston pump
Dosing Volumetric, max. 3 colorants simultaneously
Dosing capacity, average 0.35 l /min.
Diameter of the puncher (optional) 50mm
Hydraulic can table: can dimensions
max size 30l
max diameter 340mm
min. height 70mm
max height 450mm

4 2 - Technical information
COROBTM D300
2.3 COROBTM D300’s parts
NOTE!: Optional equipment is indicated by a dashed line.
Table 1. Parts of the dispensing machine
NOTE!: Some of the pictures in this manual were taken from prototypes; some details may differ
in machines in standard production.
1. Monitor 2. Keyboard
3. Water reservoir 4. Main switch
5. Hydraulic can table 6. Mouse
7. Punching handle 8. ON-OFF switch
9. Punching blade
1
3
5
7
6
Figure 2-1: COROBTM D300’s parts
2
8
49

2 - Technical information 5
COROBTM D300 has the following structural main assemblies:
The upper frame
The upper frame consists of following units:
1. Rack for canisters
2. Colourant canisters
3. Dispensing module
4. Valves
The rack for canisters is a frame for all sixteen
of the COROBTM D300 colourant canisters.
COROBTM D300 has sixteen canisters, at most, in
the colourant canister assembly. The
capacity of each canister is either four or six litres.
Normally there are eight four-litre canisters in front
and eight six-litre canisters at the back of the rack.
Every colourant canister has a stirring motor, which moves the impeller inside the canister in
the bottom section of the canister. The automatic, regular stirring of colourants is explained in the
section “Automatic stirring” on page 20.
The dispensing module is in front of the upper frame. The dispensing motor, power supply,
control boards, nozzle and cap for humidifying, pumps and valves are located in the dispensing
module.
Figure 2-2: COROBTM D300’s main
assemblies:
1. Foot
2. Upper frame
3. Can table
4. Puncher
2
1
4
3
1
2
4
3
Figure 2-3: Parts of the upper frame

6 2 - Technical information
COROBTM D300
2.4 Operating principles
Before dispensing, place a base paint can on the can table and lift up the table with the pedal. For
more information about the can table see “Using the can table” on page 17.
You can also get COROBTM D300 with a manual puncher to make a hole in the can’s lid. Normally
the puncher handle is in upper the position and the blade is out of sight on the right hand of the
nozzle. To make a 50mm hole in a can lid pull the handle forwards. The blade turns below the
nozzles and moves downwards to make a hole in the lid. Raise the handle and the blade rises up.
During dispensing the colourant flows from the bottom of the canister along a hose to a pump in
the dispensing module. There is a pump for every colourant. The dispensing motor draws an
amount of colourant from the pump that is calculated by the dispensing instructions coming from
the computer. COROBTM D300 dispenses simultaneously from three pumps at most.
From the pump the colourant flows along a hose to the nozzle assembly. The nozzle has sixteen
holes, one for each colourant.
The COROBTM D300 is equipped with a nozzle humidifier cap that keeps the nozzle clean and the
environment moist enough. This way the colourants don’t dry in the nozzle. The humidifier cap
automatically turns away from the nozzle during dispensing. Maintenance of the cap is explained in
the section “Daily attention” on page 18.
After dispensing, remove the paint can from the can table and place a plug into the hole or replace
the lid.
2.5 Automatic dispensing machine and computer
programmes
The automatic dispensing machine consists of a dispensing machine with a computer (PC), colour
monitor, keyboard and mouse. If the customer so wishes, the package may also include a label
printer or a colour indicator. The computer may be positioned on a separate table or in connection
with the dispensing machine. The computer is connected to COROBTM D300 by means of a serial
line cable.
The dispensing machine control system consists of three parts: 1) The user instructs the computer
as to which function or tint it should perform. 2) The computer searches its memory for the data
needed and forms performance instructions which are then sent to COROBTM D300. 3) COROBTM
D300's driver controls the dispensing machine's motors according to the sensor information and
instructions received from the computer.
The computer programmes can be used to tint according to predefined or customised
compositions. Command files are available for carrying out the daily cleaning operation.
The computer uses the Microsoft Windows user interface. The user can enter commands for the
desired function with the help of a formula management software and machine driver software.
Users must familiarise themselves with the dispensing machine's configuration and its
programmes before implementation, use, or the machine’s service.
The computer usually has the following programmes:
• a formula management programme, used to control tinting compositions and tinting
• a machine driver programme, used to perform machine commands and to ready command
files
These instructions refer in general to certain instructions for the above programmes, and give
instructions for use as well as service instructions from COROBTM D300's manufacturer.

3 - Declaration of conformity 7
3 DECLARATION OF CONFORMITY
COROBTM D300 complies with the essential requirements foreseen by the regulations: Machinery
Directive 98/37/EC, Low Voltage Directive 73/23/EEC, Electromagnetic Compatibility
Directive 89/336/EEC and EN 60204-1. The machine also respects the directives
2002/96/EC and 2003/108/EC on waste electrical and electronic equipment (WEEE).
XXXXXXXX
FACSIMILE

8 4 - Machine noise emission
COROBTM D300
4 MACHINE NOISE EMISSION
(Machine directive 1.7.4)
4.1 Data and method
Machine:
COROBTM D300
Measuring location:
Production hall
Measuring point:
In front of the machine, distance 1 m, height 1.6 m.
Measuring device:
Wärtsilä Type 7078
Measuring method:
An emphasised sound pressure equivalent level.
Measuring device settings:
•A
•Int
•Fast
•L
eg&Lmax
Noise at the machine's operating site was determined by measuring the equivalent level of sound
pressure from 1 m away when the machine was operating.
4.2 Measuring results
Machine noise emission is less than 70dB (A).

5 - Transportation, storage and disposal 9
5 TRANSPORTATION, STORAGE AND DISPOSAL
5.1 Contents of the basic package
Wooden crate
• Dispensing machine
• Equipment package including: order no
Mains cable 1 pcs V36509
User manual 1 pcs
Compliance notification 1 pcs
Installation report and warranty registration for CPS Color Equipment Oy’s products
+ return envelope 1 pcs
Serial line cable 1 pcs
CD including software 1 pcs
Optional equipment
•PC+monitor 1pcs
• Extension cable for keyboard/mouse
• Hydraulic can table 1 pcs
• Puncher 1 pcs
• Plug press, ¢ 50 mm 1 pcs V43609
• Plug box, 450 pcs 1 pcs V23505
•Labelprinter 1pcs
NOTE!: If any of the above equipment (including the optional equipment mentioned in the
purchase order) is missing, please contact your service centre.
5.2 Dimensions and handling
The COROBTM D300 and its equipment have been packed in a wooden crate for transportation,
which can be handled with a forklift and a pump-operated cart. The package must be handled and
stored upright according to the arrows on the package.
The transportation and storage temperature must be between -25 and +55°C, and the relative
humidity in the storage room from 30 to 95%. Protect the crate from rain. The 24-hour average
temperature in the storage room must be below +70°C.
In some cases, the machine is packed into special corrosion protection plastic. This plastic can be
disposed of like other PE plastics; taken to a dumping site or burned. We recommend recycling.
If the machine is protected by the plastic, there are corrosion protection capsules inside the
machine. Capsules do not impede the machine's operation and they can be removed after one
year (service life one year).
CAUTION / IMPORTANT Damaging, tilting or mishandling the transportation
package and dispensing machine may lead to malfunction when the machine is
first used. Special care and caution must be observed when handling the
COROBTM D300 and its transportation crate.

10 5 - Transportation, storage and disposal
COROBTM D300
* includes PC
5.3 Product disposal and recycling
The European Parliament Directive 2002/96/EC, also referred to as the "WEEE Directive", places
an obligation on EU-based manufacturers, distributors, retailers and importers of electrical and
electronic equipment to integrate the instructions of use of such equipment with information
concerning its disposal, re-use, recycling and/or further treatment.
As a main rule, the WEEE Directive requires that the electrical and electronic equipment is
disposed of at the end of its useful life in an environmentally responsible manner, so as to enable
the re-use or recycling of those parts and materials that have been identified for this purpose.
It is obligatory not to dispose of Waste Electrical and Electronic Equipment (WEEE) with
unsorted municipal waste, and to carry out separate collection.
Separate collection is the precondition to ensure specific treatment and recycling of the WEEE and
the crossed-out wheeled bin symbol on the equipment label - as repeated here below - indicates
this requirement.
Pursuant to the WEEE Directive, collection, treatment, recovery and environmentally sound
disposal of WEEE from users of products containing electrical and electronic equipment put on the
market after the 13th of August 2005, shall be carried out in compliance with the national
measures of each EU-Member State implementing the WEEE Directive.
For more information about proper disposal and recycling of your COROB™ product, please contact
info_fi@cpscolor.com.
If any colorants have been used on the machine that require special disposal procedures,
follow local regulations for the colorants remaining in the canisters and for those machine compo-
nents most soiled with colorant.
Table 2. Machine dimensions and packages:
COROBTM D300 Machine Package
with contents
Depth mm 1040 1310
Width mm 745 950
Height mm 1465 1550
Volume m31.1 1.9
Weight* kg 174 255
Figure 5-4: The
WEEE symbol

6 - Machine Installation 11
6 MACHINE INSTALLATION
6.1 Installation site requirements
The structural design of the COROBTM D300 is geared towards it being functional and user-friendly.
To ensure ease of use, take into account the following details when installing the machine:
1. The machine should be operated at room temperature, in a room with no harmful humidity or
drafts and adequate air conditioning.
2. The machine must be placed away from direct sunlight.
3. The operating site must have adequate lighting.
4. Place the mains plug in such a place that it can be unplugged without moving the machine.
5. Check that the floor is not slippery or uneven.
6. Electrical interface:
100 - 240 V
50/60 Hz / 10 A
Earthed wall socket.
7. Machine dimensions, see table 2, on previous page.
6.2 Installation and implementation
The service representative will install the machine and the programmes so that they are ready to
be used. In addition, he will give training on how to use the machine.
1. Carefully open the transport package.
2. Check that the dispensing machine and accompanying equipment have not been damaged
during transport.
3. Check that all the ordered items have been delivered, see the section “Contents of the basic
package” on page 9.
NOTE!: If the machine is damaged or the content does not correspond to the order, contact the
service centre or seller.
NOTE!: If the dispensing machine is brought in from a cold temperature, wait one day before
using the machine. The temperature difference may condense moisture on the machine's compo-
nents, which could damage the machine's electronics when the power is switched on.
CAUTION / IMPORTANT For indoor use only!
CAUTION / IMPORTANT When using colorants containing volatile solvents the room in
which the machine is installed must be spacious, with good ventilation (air exchange)
and no type of parts must be leant against or stocked close to the machine.
WARNING! Only a service representative authorised by the supplier may install the
machine.
WARNING! Neglecting safety instructions may result in an accident. Familiarise
yourself with the safety instructions and instructions for use before using the machine.

12 7 - Safety instructions
COROBTM D300
7 SAFETY INSTRUCTIONS
The COROBTM D300 dispensing machine has been designed to be functional, safe and easy to use.
Excellent design has removed several dangers posed by the machine. However, in order for the
machine to function properly, it still has points that could cause a dangerous situation. This is why
the machine has safety guards that help prevent accidents when used correctly.
7.1 Connecting and disconnecting the machine to the mains
Before connecting the mains cable:
• Ensure that starting up the machine will not cause any danger
Before service, repairs and cleaning:
• Unplug the machine from the mains socket.
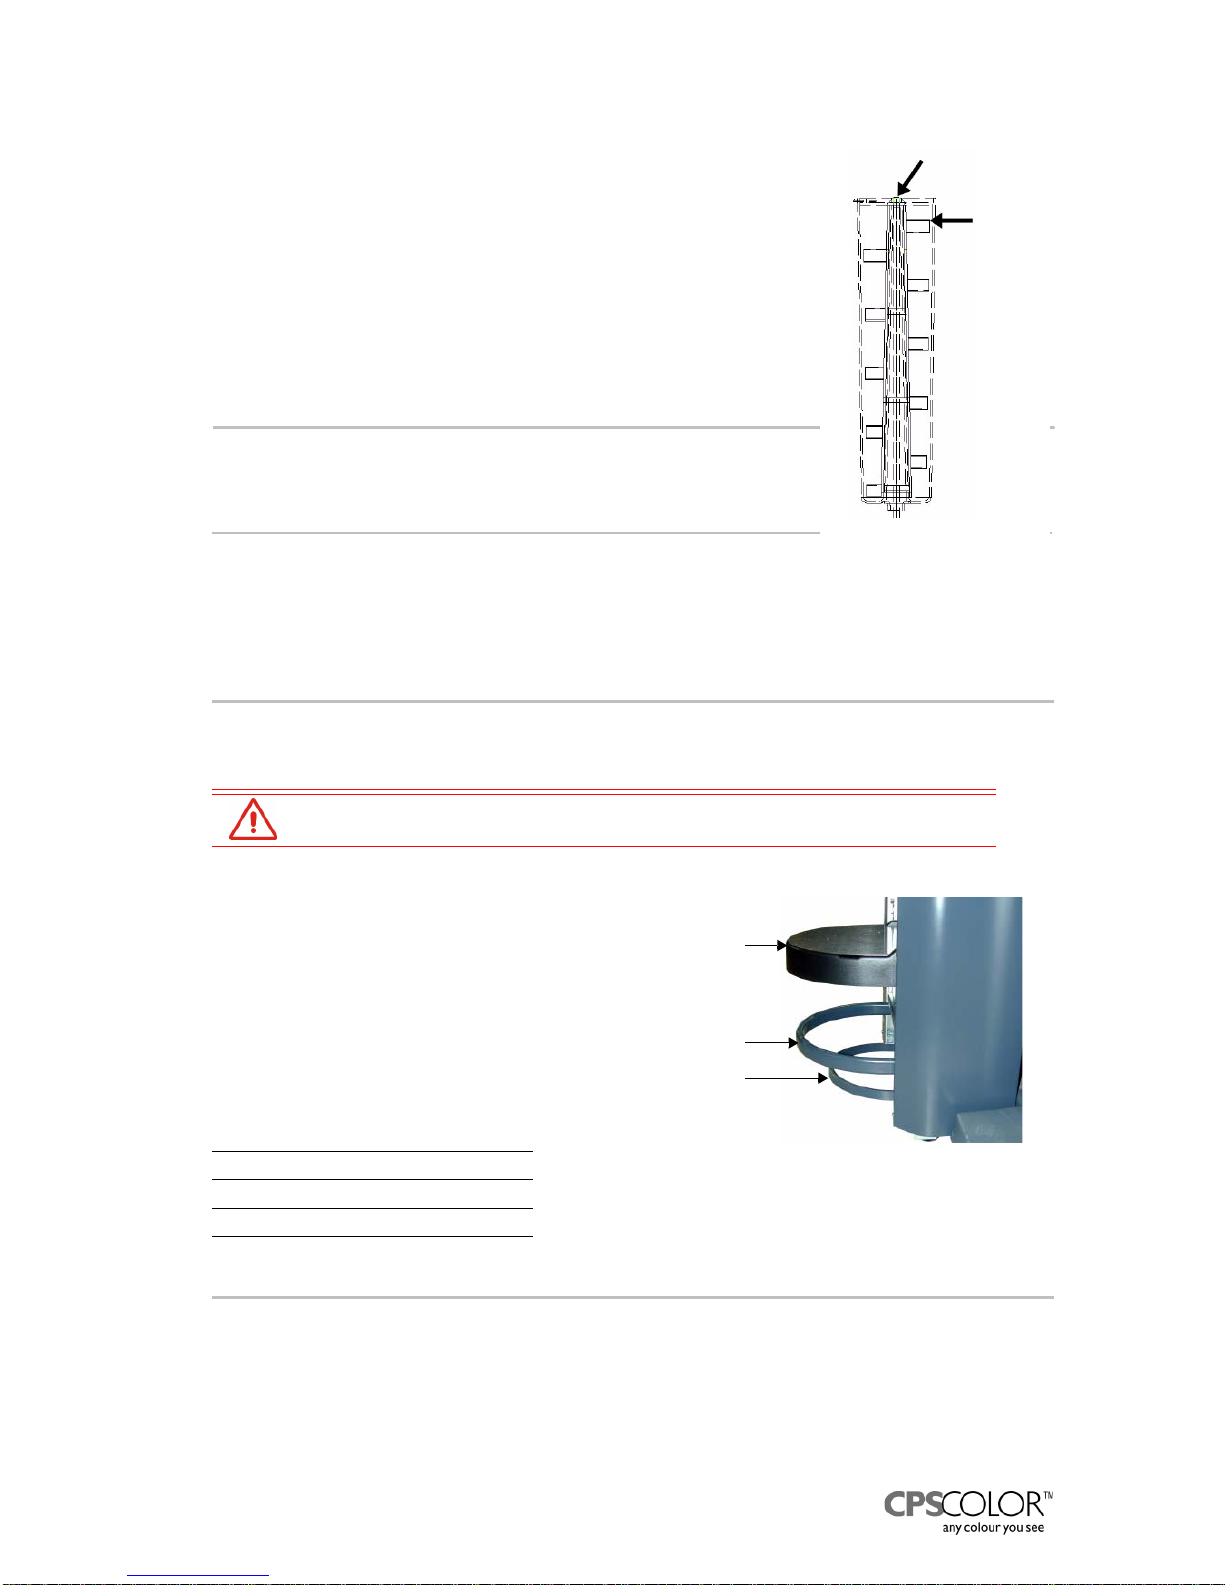
7.2 Danger caused by the stirring mechanism
The COROBTM D300 dispensing machine is equipped with a colourant stirring mechanism, see
figure 7-5. Stirring, and the act of the mechanism moving the colourant, create a danger of
crushing, cutting and entangling.
WARNING! This machine is meant for tinting paint. Any other use can cause a
safety risk.
WARNING! Neglecting to follow these safety instructions may lead to personal
injury or loss of life. Read these safety instructions before operating the machine.
Never operate contrary to the instructions.
CAUTION / IMPORTANT The dispensing machine may only be serviced by a
qualified service representative.
WARNING! Electrical shock or sudden start up of the machine may cause
personal injury or loss of life.
WARNING! The movement of the stirring mechanism may cause personal injury.
Figure 7-5: Colourant canister
stirring device.

7 - Safety instructions 13
7.3 Danger caused by punching device (optional)
The COROBTM D300 dispensing machine may be equipped with a paint can lid punching device
(optional equipment).
7.4 Danger caused by chemicals
Colourants, paints, solvents, detergents or lubricants that are hazardous to health may be used in
the machine.
7.5 Explosion safety
The COROBTM D300 is not designed to be used in spaces where there is a danger of explosion. An
explosive space is a room in which burning gas, vapours or mist from burning liquid or burning
dust are mixed with air or explosives, causing a danger of explosion.
WARNING! Punching blade may cause personal injury.
WARNING! Never press the punching device arm before ensuring that the blade's
movement will not cause danger.
CAUTION / IMPORTANT Handle, store, and dispose of all agents according to the
instructions supplied with them.
WARNING! When using colorants containing volatile solvents, do not use naked
flames, electrical tools or other types of devices that could cause sparks or fire
hazards close to the machine.
CAUTION / IMPORTANT COROBTM D300 must not be used in spaces which pose the
danger of an explosion.
punchingdevicearm
Figure 7-6: Paint can lid punching blade, in
the lower position.
14 8 - Instructions for use
COROBTM D300
8 INSTRUCTIONS FOR USE
8.1 Starting up the machine
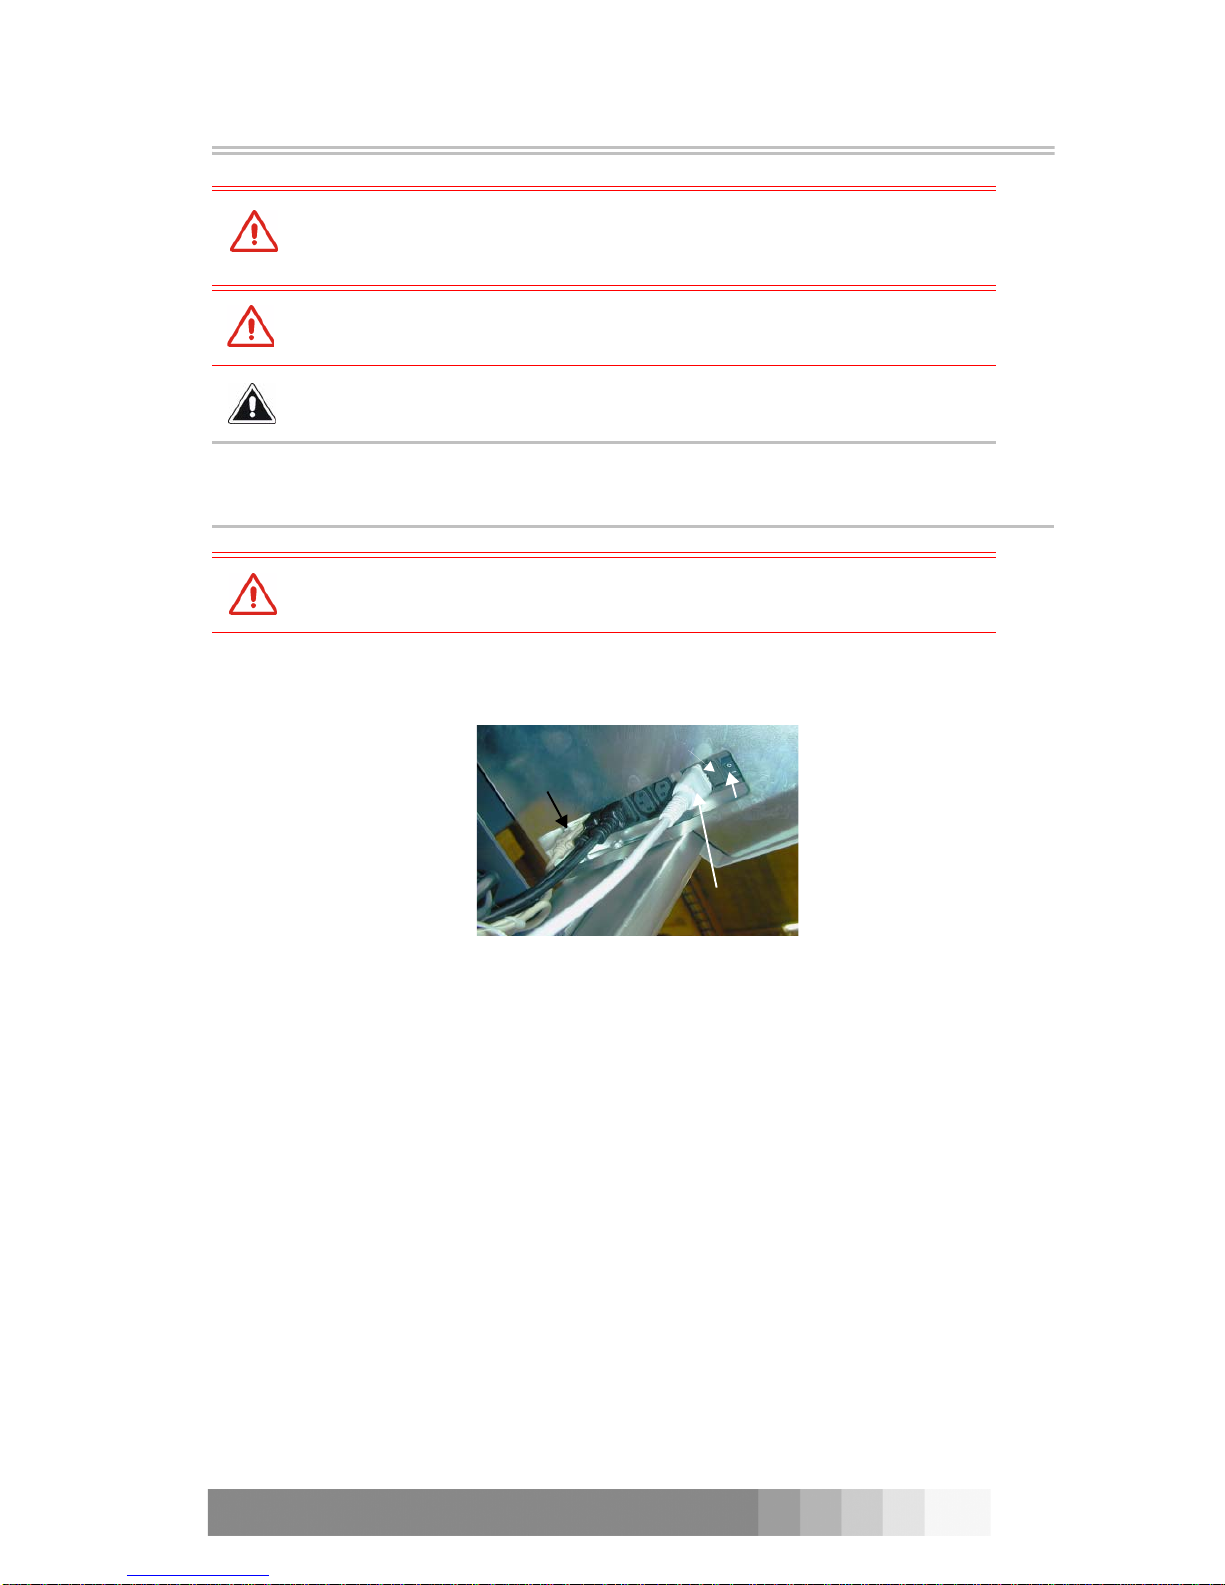
The mains connectors are located under the machine beside the left-hand guide, see figure 8-7.
The machine power switch is beside the connectors. This switch cuts off power from the
machine and other equipment.
The COROBTM D300 has a ON/OFF (I/0) power switch (fig. 8-8) in front of the machine. Use
this switch to interrupt processes, such as a faulty tinting. The power switch’s light illuminates
constantly when in normal use but the light flashes after each tinting. This shows that the
processor board has received a message to confirm that a tinting has been completed.
The main switch (fig. 8-9) is on the left side of the can table unit, see also fig. 2-1 on page 4.
The main switch cuts off the power from the COROBTM D300, but leaves the power on to the mains
connecting plate. This means that equipment that got their power through the COROBTM D300’s
connecting plate, like the monitor or computer, are not switched off.
WARNING! Neglecting to follow safety instructions may lead to personal injury
or loss of life. Read the safety instructions before operating the machine. Never
operate contrary to the instructions.
WARNING! Before starting up the machine, ensure that it will not cause
danger.
CAUTION / IMPORTANT The dispensing machine must only be operated by
trained personnel.
WARNING! The machine needs water! If you have not filled the water
reservoir, the colourants may dry in the nozzles and cause faulty tinting.
Guide
Mains
cable
Serial line
cable Machine
power
switch
Fuses
Figure 8-7: The connectors are under
the machine.

8 - Instructions for use 15
After primary installation or service, you can start up the machine by switching the power ON,
after you have made sure that
•theCOROB
TM D300 is connected to the mains and
•theCOROB
TM D300 is connected to the PC.
After a power failure, the dispensing machine, computer, and monitor restart automatically if the
power failure did not damage the equipment. The COROBTM D300 and the computer connect
automatically. However, the COROBTM D300 will not continue an interrupted operation. Refer to the
program manuals if there are any problems.
In normal use the computer and the monitor are switched off at the end of the day. Only
the COROBTM D300 is left switched on.
Whenever COROBTM D300 is already switched on, tinting can be started by switching on the
computer and the monitor.
NOTE!: The COROBTM D300 has an automatic colourant stirring feature, which stirs the colorants
when the machine does not tint. This function is always on, and stirs the colourants when the
machine is left in stand-by mode for a long time, that is overnight or over the weekend (see
“Automatic stirring” on page 20).
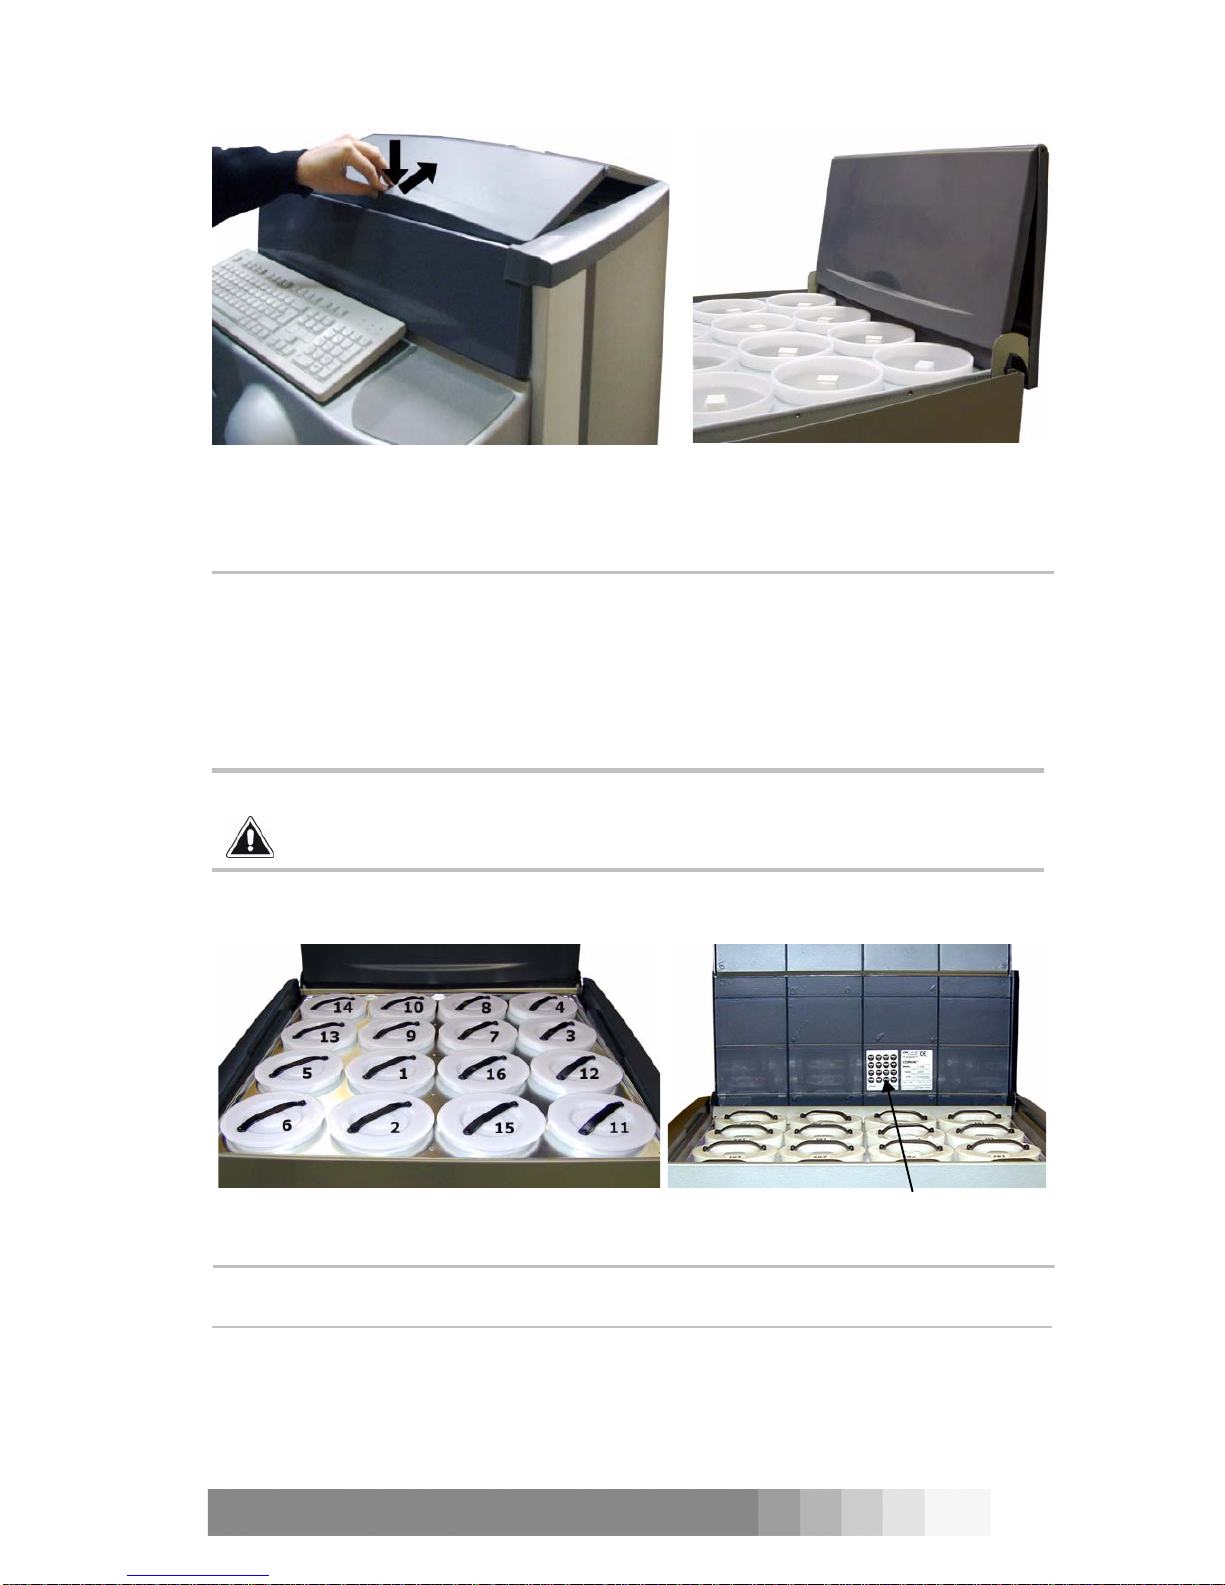
8.2 Opening the upper cover
Open the upper cover as follows:
1. Press down the front edge of the cover.
2. Push the cover backwards, see figure 8-10.
CAUTION / IMPORTANT Only qualified service personnel are allowed to service and
repair the COROBTM D300.
Figure 8-8: The ON/OFF switch is
in front of COROBTM D300. Figure 8-9: COROBTM D300’s main
switch
16 8 - Instructions for use
COROBTM D300
8.3 Filling the colourant canisters
COROBTM D300 has sixteen colourant canisters on top of the machine. Before you pour colourant
into the canisters, make sure that the machine is ready for use in that:
1. The moisture system is filled with water (the reservoir is attached to the front of the
machine).
2. The serial cable is connected to PC.
3. The COROBTM D300 is connected to the mains and the power is switched on.
You can see the numbering of the canisters in figure 8-12.
NOTE!: Pour the colourant without making the upper parts of the walls wet. The colourant may
dry on the canister’s walls.
CAUTION / IMPORTANT Do not put any agents or objects other than colourant meant
especially for this use into the canister. If this happens, the whole canister must be
emptied and cleaned and the colourant replaced with clean colourant.
Figure 8-10: Opening the cover: press down the
front edge and push backwards. Figure 8-11: The cover is open.
Figure 8-12: The numbering of the canisters
protective cover
Protective cover
Figure 8-13: The numbering order of the
canisters is also printed on a label.
8 - Instructions for use 17
The canisters are filled in the following manner:
1. Carefully turn the monitor aside from the top of the machine.
2. Press up the front of the protective cover and push it backwards.
3. Open the lid of the canister to be filled.
4. Ensure that you are pouring the right colourant into the canister.
5. Pour mixed colourant into the canister.
6. When finished, close the canister lid.
COROBTM D300’s machine driver programme has a colourant control
that checks before tinting that there is enough colourant to execute
the tinting. If this control is activated and if there is not enough
colourant, the user is asked to fill the canister.
NOTE!: If this control is activated, enter the added amount of
colourant for each canister to the machine driver programme’s
colourant levels menu
=> the colourant counter stays up to date.
When filling the canister, be careful not to pour colorant on the top of
the impeller (see figure 8-14). Also, leave the upper paddle of the
impeller free. The canisters must be filled often enough - at least daily - to the same level, so that
the colorant does not dry on the canister’s walls.
8.4 Using the can table
Before tinting, the can table lifts the paint can against the back stop for punching and tinting. This
ensures that the colourants enter the can accurately.
Hydraulic can table
The COROBTM D300's can table can be lifted and
lowered with pedals, figure 8-15. Lifting is achieved
with the upper pedal, located under the table. Lift the
table by repeatedly pressing the upper pedal so high
that the can touches the upper stop. When you
steadily depress the lower pedal, the can table lock
releases and the table descends to the lower position.
The maximum dimensions for cans that will fit into
the can table are given below.
8.5 Punching a hole in the base paint can’s lid (optional)
The COROBTM D300 may be equipped with a punching mechanism to make a hole in the can’s lid.
You can punch the lid in the following manner:
1. At the beginning:
You have placed the can on the can table and lifted up the table. The punching handle in front
of the machine is in the upper position.
WARNING! Movement of the can table may cause personal injury.
max size l 30
max diameter mm 340
min height mm 70
max height mm 450
D
o
no
t
pour
colourant here
Upper
limit
Figure 8-14: Colourant
canister
Figure 8-15: The can table (1) is
lifted with the upper pedal (2) and
lowered with the lower pedal (3).
1
2
3
18 8 - Instructions for use
COROBTM D300
2. When you lower the handle forwards the punching blade turns down from the right and
presses a hole in the can’s lid.
3. Raise the handle up and the blade turns to the side.
NOTE!: Take care of Maintain the cleanliness of the punching blade!
8.6 Tinting
The formula management programme used for tinting is automatically opened on the computer
screen. Tinting stages depend on the formula management programme; as a general
outline, tinting follows these steps:
1. Select a product to be tinted.
2. Select a code for the desired tint.
3. Select the can size to be tinted.
4. Select number of cans to be tinted.
5. Remove the can’s lid if the COROBTM D300 does not have punching.
6. Place base paint can on the can table and lift up the table.
7. Begin tinting.
8. When tinting is finished, remove the paint can and, if it is present, close the punched hole with
a plug or otherwise replace the lid.
9. Mark the tint code on the can's lid.
8.7 Daily attention
8.7.1 Moistening the nozzles
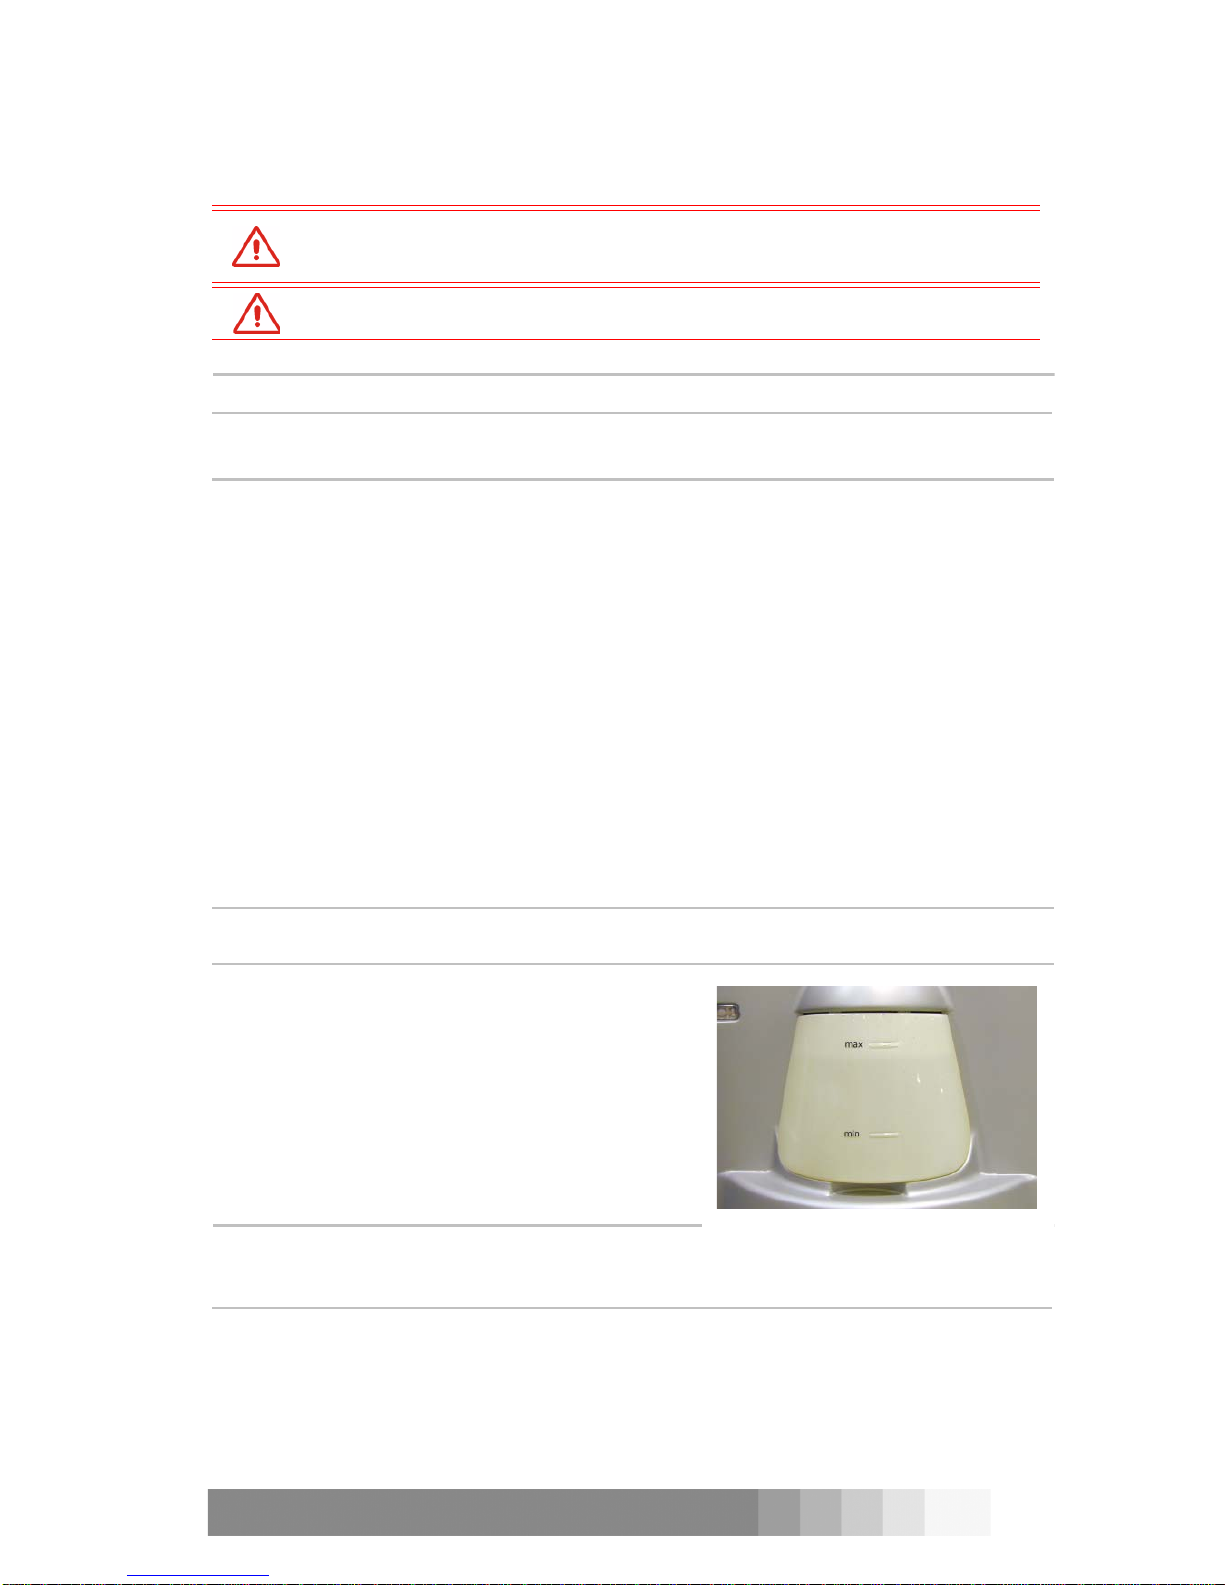
COROBTM D300 has a moisture system that keeps the
nozzles moist and clean. The system consists of a
water reservoir, hoses and a humidifier cap.
The aquarium pump pumps air to the bottom of the
water reservoir. A hose transfers moist air from the
upper part of the canister to the nozzle.
The water reservoir is in front of the machine. The
minimum and maximum levels are marked on the side
of the bottle.
NOTE!: You can only use water in the reservoir!
Check daily that the water level in the reservoir is
above the required minimum.
The humidifier cap is under the nozzles and prevents colourants from drying out into the nozzles.
The cap consist of a plastic frame and a plastic cap with a foam plastic sponge.
The cap is opened that is turned automatically away to the side for tinting. The programme also
closes the cap automatically after tinting. You can also manually open and close the cap.
WARNING! Keep the handle in upper position. The moving mechanism may cause
personal injury.
WARNING! Punching blade may cause personal injury.
min.
max
Figure 8-16: The water reservoir is in
front of the COROBTM D300.
Table of contents
Popular Beverage Dispenser manuals by other brands


Silver King
Silver King SKBD110P Technical manual and replacement parts list

Cornelius
Cornelius IDC215 Specifications

Cornelius
Cornelius VIPER 2 FLAVOR Service manual

Cornelius
Cornelius TRIAD-150 installation manual

Bunn
Bunn SRU/U3 Installation & operating guide

Vollrath
Vollrath VCBA118-37 Operator's manual