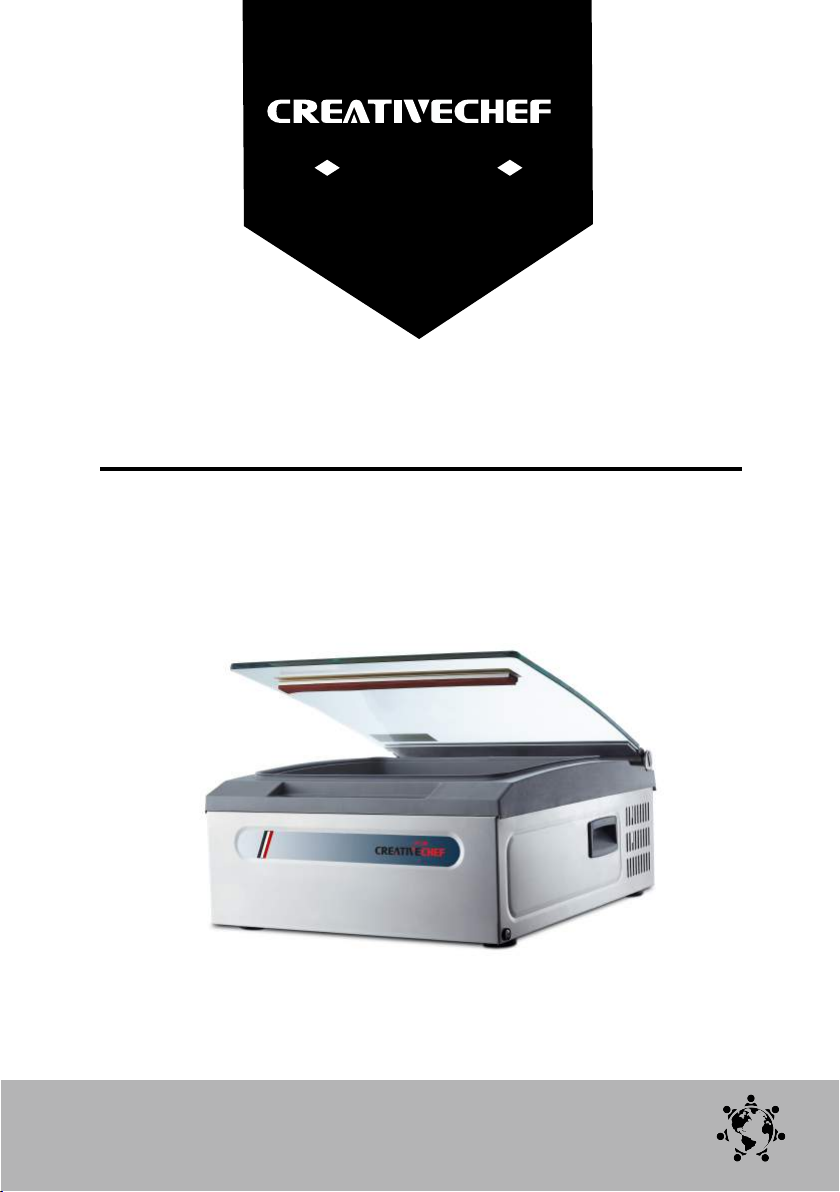
Creativechef VP160 User manual
From Spain
E-mail : fsandoval@astursouring.com
Arroes de arriba,11 33314 Villaviciosa
ASTURSOURCING,S.L.
®
Vacuum Packaging Machine
Use and Maintenance Manual
VP160/VP180
Preface
Preface
Dear user, pleaseread this manual carefully before using it, which is veryimportant for youto use
the equipment properly and thesecurity of the operator. The dangers which may cause in the
process of operation and maintenance of the equipment will bedescribed through symbols in
this manual. And thefollowing symbols are used in thetext for your reference.
English
Safety warning
Dear user, pleaseread this manual carefully before using it, which is veryimportant for youto use
the equipment properly and thesecurity of the operator. The dangers which may cause in the
process of operation and maintenance of the equipment will bedescribed through symbols in
this manual. And thefollowing symbols are used in thetext for your reference.
Notes
This symbolrepresents thebasic information of the equipment and methods ortechniques
used bythe user.
We reviewed the contents of this manual. And we can’t guarantee that the contents is exactly
the same as the actual situation due to the error. But we will review the information periodically
and make necessary corrections and update accordingly. If you haveany concern about the
performance or operation of the equipment after referring to this manual, please contact us
or the distributor before using it.
We are not responsible for any equipment malfunction or accident caused by
installation and use of failure to follow the contents of this manual. All the copyrights of this
manual areowned bythe company and arestrictly prohibited fromspreading, copying and
other infringing actions. In caseof any infringement, the company will retain theright to sue.
Precautions should betaken to prevent the equipment fromdamagewhen removing
packaging. Please check whether thedelivered equipment is consistent with the contact or
requirements, if thedelivery is incomplete or damaged, please notify the distributor.

Contents
English
C
ontents
1
. Safety__________________________________________
1
1.1 Installation_____________________________________________________________
1
1.2 Risks_________________________________________________________________
1
1.3 Equipment_____________________________________________________________
1
1.4 Maintenance___________________________________________________________
1
2
. Production parameters________________________________
2
2.1 Model and specifications__________________________________________________
2
2.2 Product dimensions_____________________________________________________
3
2.3 Electrical principle______________________________________________________
3
3
.Operation________________________________________
4
3.1Start-up preparation_____________________________________________________
4
3.2 Setting_______________________________________________________________
4
3.3 Operation method______________________________________________________
4
3.4 Use of external equipment_______________________________________________
5
3.5 Shutdown operation____________________________________________________
6
3.6 Oil replace____________________________________________________________
6
4
. Common failures and troubleshooting methods___________________
7
5
. Others_________________________________________
8
5.1 Warranty terms_______________________________________________________
8
5.2 Packing list__________________________________________________________
8
5.3 Spare parts__________________________________________________________
9

1、Safety
■ 1.1 Installation
When the equipment is installed, you should select a location that is not
accessible to The child or the person who is not operating the equipment.
Therefore, the children are prohibited from using the equipment!
• It is forbidden to work in outdoor environment of humidity, rain and snow.
• It is forbidden to spray liquid on the equipment.
• The presence of flammable gases or flammable vapors is prohibited around
the equipment.
• The equipment must be used in rugged, stable and flat ground.
• The power must be cut off before the equipment is transported, cleaned and
moved.
• Rollover should be prevented when the equipment is moved to void leakage
of the pump oil.
• Please note the safety symbols or notes pasted on the equipment.
-1-
English
■ 1.2 Risks
Do not contact the live parts when working. It may be fatal to contact with
live parts!
• When the equipment is connected to the power, it must be compatible with
the rated power, frequency and voltage of the equipment.
• Power outlet may be used to connect power of the equipment, but it must
match the circuit breaker and leakage circuit breaker as well as earthing.
• It is prohibited from using a cable with defective or insufficient cross-section.
■ 1.3 Equipment
When the equipment is installed, you should select a location that is not
accessible to The child or the person who is not operating the equipment.
Therefore, the children are prohibited from using the equipment!
• The oil level of vacuum is sufficient when leaving the factory, but the oil level
of the vacuum pump should be inspected regularly.
• If any damage or leakage is found before starting the equipment, it should not
start running.
2、Product dimensions
• To keep the heating wire clean, because the service life of the heating wire
will be shorten due to pollution. And Teflon paint cloth should be wiped clean
with a damp cloth constantly.
• The package may be damaged with long vacuum time. So correct vacuum
time should be set according to the package property.
• When packing the liquid, it should ensure that there is no leakage in the
process of packaging, or it may lead to damage of the vacuum pump.
-2-
English
■ 1.4 Maintenance
• Onlythe people who know or are familiar with the performance of the equipment
or professional maintenance personnel may conduct the maintenance.
• It should be ensured that the equipment is still and its power is cut off with
cover down when maintained.
• Onlythe original accessories can be used when maintained. Some standard parts
are allowed (e.g. screws, etc.).
• It is forbidden to use acid, alkali or other corrosive solutions to wipe the vacuum
cover glass surface and vacuum chamber fuselage.
• It is forbidden to use sharp hard objects to scrape or knock on the glass surface
of vacuum cover.
type VP 160 VP 180
Voltage 220V/50HZ
Power 0.25KW
Gas extraction rate 4m³/h ≧-0.09Mpa
Vacuum oil -5-10℃- ISOVG 32 10-40℃-ISOVG 100
Net weight ≈20KG ≈24KG
Vacuum chamber size 305X300X110mm 355X300X110mm
Vacuum chamber volume ≈7L ≈9L
Sealing dimension 260X6mm 310X6mm
Spacer dimension 260X180X20mm 310X180X20mm
Overall dimension 360X490X210mm 410X490X210mm
■2.1 Product parameters
2. Product parameters

2、Product dimensions
-3-
English
■ 2.2 Product dimensions
■ 2.3 Electrical principle
3. Operation
3.1 Start-up preparation
The following actions must be taken before test!
Note: if the pump has no oil before operation, it may cause engine damage!
3.1.1 Location selection
• The equipment must be installed in a solid and flat face.
• The ground should be non-slip to minimize the risks associated with the
movement of equipment.
• This machine cannot be installed in hazardous areas.
• Please refer to 1.1 for other installation instructions.
3.1.2. Oil level examination
•If necessary, please turn off the power.
• The flip fuselage must befixed to prevent the fuselagefromaccidentally falling down.
• To check theoil level position of the vacuum pump. The oil level is correct in the 2-3/4
position of the endoscope. (the excessive oil must bedischarged through thedrain hole).
• To add appropriate vacuum oil (ISO VG32 or ISO VG100) ,which depending on
operating temperature). Pleaserefer to 3.6 for oil change.
3.2 Setting
The incorrect setting methods may affect the performance of the machine
or the effect of the package.
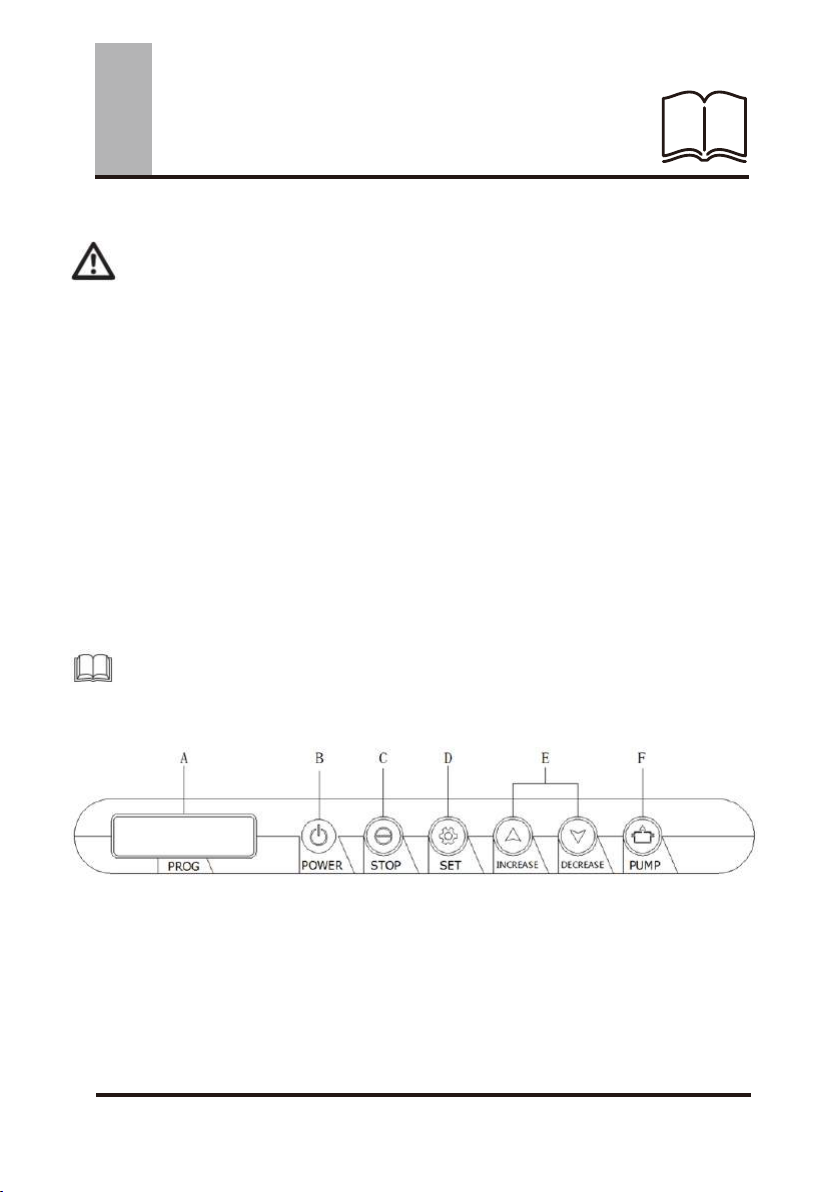
3.2.1 Control panel
· A program and work status display.
· B Power button, note: This button only opens and closes power supply of the control
panel, not cut off the total power supply of the equipment.
· C Stop button, to press it for return when setting, and press it for stop while working.
· D Setting button, to set all the functional parameters and confirm button.
· E Page up/down and replace the value.
· F Start up button for vacuum pump.
-4-
English

3.2.2 Setting methods
• Press setting button for standby, press page up/down to select program
film stall P0-P9, and press the setting button again to enter work parameter
settings.
• 1/4 vacuum time setting: press page up/down button to set the time of
0-99S. And press the setting button to save it and enter into next step.
• 2/4 charging time setting: press page up/down buttonto set the time of 0-9.9S.
And press the setting button to save it and enter into next step.
• 3/4 sealing time setting: press page up/downbutton to set thetime of 0-3.0S.
And press the setting button to save it and enter into next step.
• 4/4 cooling time setting: press page up/down button to set the time of 2-9.9S.
And press the setting button to save it and return.
• Set the time for 1-4 steps according to the principle from low to high.
• Press setting button for 3S for standby, to enter the functional setting.
• Pressure calibration: press page up/downbutton to calibratethepressure. And
press the setting button to save it and enter into next step.
• Screen protection: press page up/down button to turn onthestandby display.
And press the setting button and enter into next step.
• Button sound: press page up/downbutton to turn off buttonsound. And press
the setting button to save it and enter into next step.
• Language selection: press the page up/down button to select language. And
press the setting button to save it and return.
• Press stop button when setting, and return to standby display.
3.3 Operation methods
Incorrect or improper methods of operation may affect the effect of package.
• Turn onthepower switch, select the programstall and set the time parameters.
See 3.2.2.
• Select packing bags with appropriate size and material, put into thepackaging,
then put thepackage into the vacuum chamber flatly. Attention should betaken
when packing liquids.
• Put the sealing position of the packing bags onthesealing bar flatly, and press
the vacuum cover to start working.
• After the equipment starts working in accordance with the per -set time, the
upper cover bounces off and the work is completed.
-5-
English
3. Operation

3. Operation
3.4 Use of external equipment
• Select the program stall and set the time parameters.
• Open the upper cover, press the pump ① start button, the pump starts to work.
• A vacuum chamber suction nozzle is inserted at one end of the ② gas extraction
device.
• The other end of the ② gas extraction device is inserted into the ③fresh-keeping
tank suction nozzle.When reaching the setting time, it will stop automatically.
• And the work is completed.
• When this function is used,only the pump is working,
and other functions are turned off.
3.5 Shutdown operation
• Turn off power supply of the control panel,
• then turn off the equipment power.
• Please turn off the power when all the
work is completed.
• If it is not used for a long time, unplug the power plug and place it in a cool
and dry place.
3.6 Oil change
The quality of the oil will directly affect the performance and service life of the
vacuum pump. It is recommended to work full 150 hours for oil change for the
first time, later change oil after working for 500 hours. If the pump temperature
rises, and the exhaust outlet has lampblack, oil filter should be replaced.
• Rotate ③ oil drain hole screw and take it out,
thus the oil will be released through the oil hole.
• Install the ③ oil drain hole screw and fasten it.
• Rotate the ① refueling hole knob and take it out.
• Add the oil to the 2-3/4 position of the
② speculum through the ① refueling hole.
• Install the ① refueling hole knob and fasten it.
-6-
English

4. Common failures and troubleshooting methods
-7-
English
Fault
Reasons
troubleshooting methods
The equipment can’t
work
No connection or bad connection for the power
supply cable
Check the connection of power supply cable
Main power is not open or its switch is closed Check the switch
Fuse damaged Check the fuse or replace
Control panel damaged
Check the control panel or replace
The starting switch is not contacted
Adjust the switch to make it contact
No vacuum or low
degree of vacuum
Oil level of the vacuum pump is too low
Add vacuum oil to proper location
The ambient temperature is too low, and the vacuum
oil is frozen
Replace the vacuum oil with appropriate
viscosity
The vacuum pump is damaged
Replace vacuum pump
Leakage of vacuum pump and connecting pipes
Check pumps, connectors, connecting pipes or
replace
Leakage of solenoid valve
Check solenoid valve connector or replace
solenoid valve
The setting working time of vacuum pump is too low
Increase working time for pump properly
Pressure display inaccurate Set pressure calibration the menu
Vacuum chamber seal seam is not good or
damaged
Check or replace the seals
Sealing can’t be done
Heat seal temperature setting is too low Increase heat seal time appropriately
Bad contact or damage caused by sealing
transformer
Check the transformer wire or replace
The sealing heating wire is damaged or broken Check electric wire or replace
Bad contact of sealing power conductor Check the conductors or replace
Seal parts are not raised
Replace airbag solenoid valve
Bad effect of sealing
Heat seal temperature setting is too low or too high
Reduce or increase heat seal time
appropriately
Foreign substances on the surface of the seals
Wipe and clean foreign substances in the seals
Serious air leakage, heating blocks fit loosely
Check pumps, connectors, connecting pipes or
replace
Electric wire deformation or folding
Check electric wire or replace
Teflon paint cloth damaged
Replace Teflon paint cloth
Bad effect of packing
or air leakage
Vacuum pump time is too low or too high
Increase or decrease pump working time
appropriately
Sealing is not bonded which causes air leakage Adjust the sealing time
Sharp hard objects, packing bags are too thin Replace thicker packing bags
Packing small objects with big packing bags
Replace the appropriate packing bag
No gas discharge
after completion of
work
Air discharge solenoid valve not open or damaged
Check air discharge solenoid valve or replace
Control panel damaged Check control panel or replace

5. Others
5.1 Warranty terms
The warranty period for this equipment is at least 12 months after it is delivered
to the end user. Unless otherwise agreed by both parties.
5.1.1 Spare parts guarantee
The warranty period for the spare parts is 6 months when it is delivered to the
end user.
5.1.2 Warranty scope
• The equipment is delivered to the end user and the warranty will expires
automatically after 12 months of normal use.
•The parts can be repaired or replaced for free of charge are the ones caused by
maintenance, manufacturing or material defects of the manufacturer or authorized
dealer.
5.1.3 The following factors are not covered by the warranty.
• Do not comply with the instructions in this manual, and improper use.
• Being operated under prohibited ambient conditions, and overload operation.
• Normal consumption or abrasion.
• To change the equipment without authorization and conduct maintenance by
unauthorized personnel.
• Improper cleaning or maintenance, man-made damage to the equipment.
In addition, all vulnerable parts are excluded from warranty (e.g. washers,
silicone strips, Teflon paint cloth, heating wire, vacuum Oil, standard parts, etc.).
Small blemishes (scratches, discoloration) may occur, but they do not affect the
performance and use of the equipment, therefore, they are not covered by the
warranty.
-8-
English

5. Others
-9-
English
■ 5.2 Packing list
Name Model and specifications Quantity
Spacer
VP160 -260x180x20mm
VP180 -310x180x20mm
2 blocks
Power supply cable 3X0.75 1 pcs
External gas extraction device convention 1 set
Instruction manual convention 1 copy
■ 5.2 Packing list
Heating wire
VP160 -350X6X0.15mm
VP180 -400X6X0.15mm 1 article
Teflon Paint cloth
VP160 -260X60mm
VP180 -310X60mm 1 sheet
Vacuum oil 200ml 1 bottle

中文
前言
亲爱的用户,请在使用机器之前仔细阅读说明书,这对您正确使用机器和安全操作机器非常
重要。这份说明书系统地描述了在操作机器过程中和维护设备时可能产生的危险。请您参考文中使
用的以下符号。
安全警示
这个符号指示采取一些安全措施来消除设备故障,保护您的个人安全。
注意
这个符号表示使用者用到的设备基本信息和方法技术。
我们回顾了说明书的内容。而我们不能保证内容完全与错误实际情况相同。但是我们定期回顾
信息,进行必要的校对和相应的更新。如果您查阅说明书之后对设备的性能或者操作有任何顾虑,
请在使用机器之前联系我们或者经销商。
因未按照说明书内容进行安装和使用而导致的机器故障或者事故,我们不承担责任。这份
说明书的所有版权归公司所有,严格禁止传播,复制以及其它侵权行为。为防止任何侵权行为,本
公司保留提出诉讼的权利。
采取措施防止搬运过程中设备损坏。请核查运送的设备是否与联系和要求的一致,如果运
送的物品不完整或者有损坏,请通知经销商。

中文
1.安全__________________________________________1
1.1 安装_____________________________________________________________1
1.2 风险_________________________________________________________________1
1.3 设备_____________________________________________________________1
1.4 维护___________________________________________________________1
2 . 产品参数________________________________2
2. 1 型号和明细__________________________________________________2
2.2 产 品规 格_____________________________________________________3
2. 3 工作 原理 ______________________________________________________3
3. 操作________________________________________4
3.1 启动 准 备 _____________________________________________________4
3.2 设置_______________________________________________________________4
3. 3 操作方 法______________________________________________________4
3. 4 外 界 设 备 的 使 用 __ _ _ _ _ _ _ _ _ _ _ _ _ _ _ __ _ _ _ _ _ _ _ _ _ _ _ _ _ _ _ __ _ _ _ _ _ _ _ _ _ _ _ _ 5
3.5 关闭操作____________________________________________________ 6
3.6 更换油____________________________________________________________6
4 . 常见 故 障 及 故 障 处 理 方 法 ___________________7
5. 其它_________________________________________8
5.1 保用单条款___________________________________ ____ ________________ 8
5.2 包装清单__________________________________________________________ 8
5.3 机器备件__________________________________________________________9
目录
中文
1.1 安装
When 当安装机器时,应选择一个儿童或者非设备操作人员可以接近的地方的,这样,儿童禁止
使用设备。
•禁止在户外潮湿和雨雪的环境里使用机器。
•禁止将液体溅在机器上。
•禁止机器周围存放易燃气体或者易燃烟雾。
•必须在有垫子的稳固的平地面上使用机器。
•在运输,清洗和移动设备之前必须切断电源。
•在移动设备时防止设备侧翻,避免泵油泄露。
•请注意贴在设备上的安全符号或者注意事项。
1.2 风险
在机器工作时,不要连接零件。连接零件可能是致命的。
•当设备连接电源时,它必须符合设备的额定功率,频率和电压。
•可以使用电源插座连接设备的电源,但它必须匹配电路断路器和漏电断路器以及接地。
•禁止使用截面缺陷或不足的电线。
1.3 设备
•真空机的油位在出厂时很充足,但是真空泵的油位应该定期检查。
•在启动设备之前如果发现任何损坏或者泄露,应该不要启动机器。
•设备运行时必须有人看管!设备不用时必须断开电源。
•保持电热线清洁,因为污染,电热线的使用寿命会缩短。而且聚四氟乙烯漆布应该不断用湿布清
理干净。
•长时间抽真空可能损坏包装。所以应该根据包装特性设置正确的抽真空时间。
1、安全
-1-

中文
2、产品参数
-2-
•当包装液体时,包装过程中应该确保没有泄露,否则它会导致真空泵的损坏。
1.4 维护
•只有知道或者熟悉设备性能的人员或者专业维修人员可以进行维护机器。
•维修时,应该确保设备静止不动,电源断开,盖子盖好。
•维修时,只能使用原装配件,一些标准的零件也允许使用(如:螺丝)
•禁止使用酸,碱或者其它腐蚀性溶液擦拭真空机盖子的玻璃表面和真空室
•禁止使用尖锐的硬物刮或者敲击真空机盖子的玻璃表面。
2.
产品参数
2.1 产品规格
型号 VP160 VP180
电压 220 伏/50 赫
功率 0.25 千瓦
抽气率 4立方米/小时 ≧-0.09Mpa
真空油 -5-10℃- ISOVG 32 10-40℃- ISOVG 100
净重 ≈20 千克 ≈24 千克
真空室尺寸 305X300X110 毫米 355X300X110 毫米
真空室容积 ≈7升≈9升
封口尺寸 260X6 毫米 310X6 毫米
垫板尺寸 260X180X20 毫米 310X180X20 毫米
整体尺寸 360X490X210 毫米 410X490X210 毫米

2.2 产品尺寸
2.3 工作原理
中文
2、产品参数
-3-

中文
3、操作
-4-
3.1 启动准备
测试之前必须采取以下行动!
注意:操作之前如果泵没有油,它可能导致发动机损坏!
3.1.1 位置选择
•设备必须安装一个坚硬的平面上。
•平面应该是防滑的,降低机器移动的风险。
•机器不能安放在有危险的地方。
•关于其它安装说明,请查阅 1.1。
3.1.2. 油位检查 Oil level examination
•如果有必要,请关掉电源。
•翻转机身必须固定好,防止机身意外滑落。
•检查真空机泵的油位。油位适合在内腔的 2-3/4 位置。(过多的油必须通过排油孔排出。)
•添加合适的真空机的油 (ISO VG32 或者 ISO VG100),这有操作温度决定。请查阅 3.6 换油说
明。
3.2 设置
不正确的设置方法可能影响机器的性能或者包装效果。
3.2.1 控制面板
•A程序功能和工作情形显示。.
•B电源按钮,注意:这个按钮只供开启和关闭控制面板的电源,不断掉设备的整体电源供应。
•C停止按钮,进行设置时,按下它可以返回,正在工作时按下它可以停止工作。
程序和功能 电源 停止 设置 加 减 抽真空

中文
3、操作
-5-
5
•D设置按钮,设置所有功能指示和确认按钮。
•E上下翻页,更换数值。
•F抽真空启动按钮。
3.2.2 设置方法
•按设置按钮准备,按页码上/下键 选择程序 0-9,再次按设置按钮进入工作范围设置。
• 1/4 抽真空时间设置:按页码上/下键 设置时间 0-99 秒。按设置按钮储存并进入下一步。
• 2/4 充电时间设置:按页码上/下键 设置时间 0-9.9 秒。按设置按钮储存并进入下一步。
• 3/4 封口时间设置:按页码上/下键 设置时间 0-3.0 秒。按设置按钮储存并进入下一步。
• 4/4 冷却时间设置:按页码上/下键 设置时间 2-9.9 秒。按设置按钮储存并返回。
•根据从低到高的原则设置 1-4 步的时间
•按设置按钮 3秒准备,进入功能设置。
•压力校准:按页码上/下键 校准压力。按设置按钮储存并进入下一步。
•屏幕保护:按页码上/下键 打开准备显示。按设置按钮储存并进入下一步。
•声音按钮:按页码上/下键 关掉声音。按设置按钮储存并进入下一步。
•语言选择:按页码上/下键 选择语言。按设置按钮储存并返回。
•在设置时按停止按钮,并且返回准备显示。
3.3 Operation methods 操作方法
不正确或者不合适的操作方法可能影响包装效果。
•打开电源开关,选择程序并设置时间范围,参见 3.2.2.
•选择尺寸和材料合适的包装袋。放进需包装的物品,然后将将包装平放在真空机室。包装液体时
需更加注意。
•将包装袋的封口位置平放在封口条,按下真空盖开始封口工作。
•设备开始工作与预设时间一致后,上盖会弹起,并且工作完成。

中文
3、操作
-6-
5
3.4 使用外接设备
•选择程序并且设置时间范围。
•打开上盖,按抽真空 ① 开始按钮,开始抽真空工作。
•真空室吸管安在② 抽气设备的一端。
•② 抽气设备的一端安在 ③保鲜罐的管口。当达到设置时间时,它会自动停止。
•工作完成。
•当使用这一功能时,只能抽真空,并切关掉其它功能。
3.5 停止操作
•关掉控制面板的电源。
•然后关掉设备的电源。
•请在所有工作完成后再关掉电源。
•如果长时间不使用设备,拔掉电源插头,并且放置在凉爽干燥的地方。
3.6 更换油
油的质量将会直接影响真空机的性能和使用寿命。建议首次使用 150 小时后更换油。之后
使用 500 小时后更换油。如果泵的温度升高,出油口变黑,应该更换滤油器。
•旋转 ③ 滴油孔螺丝并且取出。这样油会通过油孔排出。
•安装 ③ 滴油孔螺丝并且拧紧。
•旋转 ①加油孔捏手并且取出。
•通过①加油孔添,加油至② 容器的 2-3/4 位置。
•安装①加油孔捏手并且拧紧。
This manual suits for next models
1
Table of contents


