Criterion 4535418 User manual

BEFORE USING YOUR PRODUCT: Please read this manual carefully & follow all safety rules
& operating instructions. Keep this manual for future reference.
Chest Freezer
5 cu. ft. (4535418) • 7 cu. ft. (4535419) • 10.6 cu. ft. (4535420)

GENERAL SAFETY RULES
WARNING: Read all of the instructions before using this appliance.
When using this appliance, always exercise basic
safety precautions, including the following:
NOTE: If the freezer has been placed in a horizontal or tilted position
for any period of time wait 24 hours before plugging the unit in.
1. Use this appliance only for its intended purpose as described in this use
and care guide.
2. This freezer must be properly installed in accordance with the installation
instructions before it is used. See grounding instructions in the installation
section.
3. Use 3 prong grounded plug provided on power cord.
4. Never unplug your freezer by pulling on the power cord. Always grasp the
plug firmly and pull straight out from the outlet.
5. Repair or replace immediately, all electric service cords that have become
frayed or otherwise damaged. Do not use a cord that shows cracks or
abrasion damage along its length, the plug or the connector end.
6. Unplug your freezer before cleaning or before making any repairs.
7. Do not use any electrical device or any sharp instrument in
defrosting your freezer.
8. If your old freezer is not being used, we recommend that you remove the
doors. This will reduce the possibility of danger to children.
WARNING: After your freezer is in operation, do not touch the
9. Do not refreeze foods, which have been thawed completely. The United
States Department of Agriculture recommends: “…You may safely refreeze
frozen foods that have thawed if they still contain ice crystals or if they are
still cold-below 40˚F”.
“…Thawed ground meats, poultry, or fish that have any off-odor or off-
color should not be refrozen and should not be eaten. Thawed ice cream
should be discarded. If the odor or color of any food is poor or
questionable, discard it. The food may be dangerous to eat.”
“…Even partial thawing and re-freezing reduce the consumption quality of
foods, particularly fruits, vegetables, and prepared foods. The consumption
quality of red meats is affected less than that of many other foods. Use
refrozen foods as soon as possible, to save as much of its eating quality as
you can.
2
cold surfaces in the freezer compartment, particularly
when hands are damp or wet. Skin may adhere to
these extremely cold surfaces.

10. Do not clean with flammable fluids. Do not store flammable liquids in
freezer.
11. This freezer should not be recessed or built-in an enclosed cabinet. It is
designed for freestanding installation only.
12. Do not operate your freezer in the presence of explosive fumes.
SAVE THESE INSTRUCTIONS
DANGER
Risk of child entrapment. Before you throw away your old
refrigerator or freezer, take off the doors.
Staple your receipt to your manual.
You will need it to obtain warranty service.
3
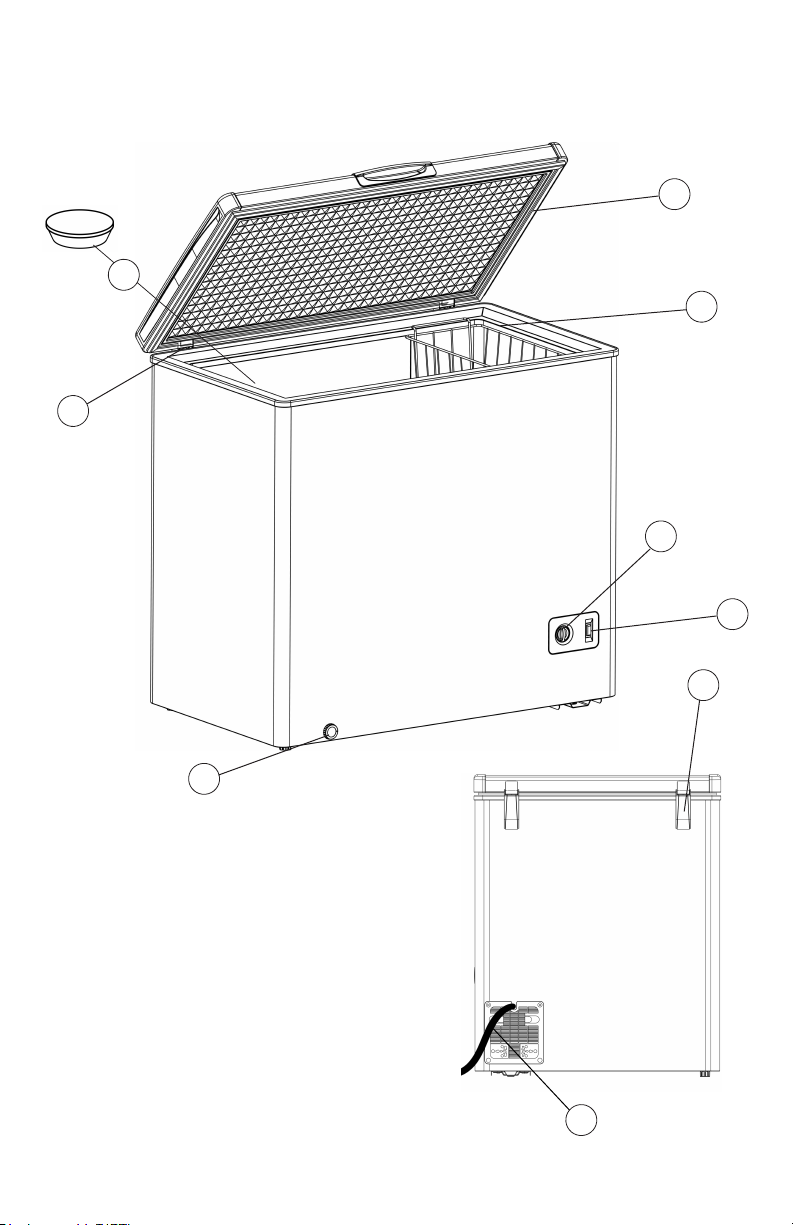
Parts And Features
6
2
3
1
5
4
7
1. Interior Drain Plug
2. Lid Hinge
3. Vinyl Coated Wire Basket
*10.6 cu ft includes 2 baskets
4. Temperature Control:
OFF, Temperature Settings
5. Exterior Drain Plug
6. Power On Indicator
7. Power Cord
8. Lid Gasket
4
2
7
8

1. Place the freezer on a floor strong enough to support it fully loaded.
2. Remove all packaging material. This includes the foam base and all
adhesive tape holding the freezer accessories inside and outside.
3. Inspect and remove any remains of packing, tape or printed materials
before powering on the freezer.
1. Your freezer is designed for freestanding installation only.
It should not be recessed or built-in.
2. When moving the freezer, never tilt it more than a 45-degree angle. This
could damage the compressor and the sealed system.
3. If the freezer is tilted let it stand in an upright position for at least 24 hours
prior to plugging in the unit. This is to allow the refrigerant to settle.
To assure your freezer works at the maximum efficiency it was designed
for, install in a location where there is proper air circulation, plumbing
and electrical connections.
The following are recommended clearances around the freezer:
Sides 4” (102mm)
Back 4” (102mm)
Top Do not block
Unpacking Your Freezer
Adjusting Your Freezer
Proper Air Circulation
Installing Your Freezer
5
1. Install on a level surface.
2. Allow 4 hours after installation before connecting to power source.
3. Allow unit to operate for 6–8 hours before placing food inside.
4. Clean interior with lukewarm water and mild detergent using sponge or
soft cloth. Be sure interior is dry before using.
Installing Your Freezer

1. Make sure there is a suitable power Outlet (115 volts, 15 amps outlet)
with proper grounding to power the freezer.
2. Avoid the use of three plug adapters or cutting off the third grounding in
order to accommodate a two plug outlet. This is a dangerous practice
since it provides no effective grounding for the freezer and may result in
shock hazard.
3. Use a surge protector if possible.
1. Avoid the use of an extension cord because of potential safety hazards
under certain conditions. If it is necessary to use an extension cord, use
only a 3-wire extension cord that has a 3-blade grounding plug and a 3-
slot outlet that will accept the plug. The marked rating of the extension
cord must be equal to or greater than the electrical rating of the
appliance.
2. DO NOT USE EXTENSION CORD LONGER THAN 12 FT.
1. Do not install your freezer in any location not properly insulated or
heated. Your freezer was not designed to operate in temperature
enviroments below 23˚ Fahrenheit.
2. Select a suitable location for the freezer on a hard even
surface away from direct sunlight or heat source e.g. radiators,
baseboard heaters, cooking appliances etc. Any floor unevenness
should be corrected.
Install Limitations
Use of Extension Cord
WARNING: ELECTRICAL REQUIREMENT - SHOCK HAZARD
Electrical Requirement
6
7
• Boiling water, gurgling sounds or slight vibrations that are the result of
the refrigerant circulating through the cooling coils.
•The thermostat control will click when it cycles on and off.
Normal Operating Sounds You May Hear
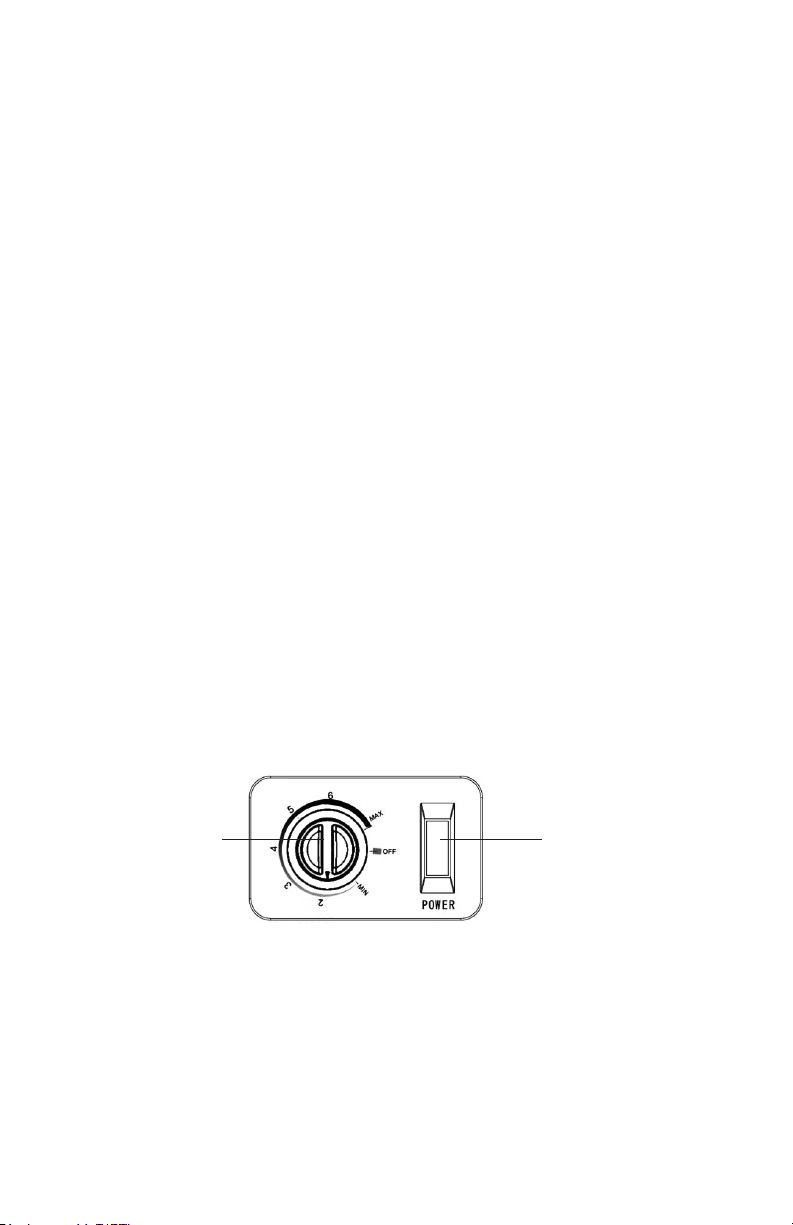
General Features
Adjustable temperature dial:
Your freezer will automatically
maintain the temperature level you
select. The temperature control dial
has 7 settings plus OFF. “MIN” is
cold “MAX” is coldest. Set the dial to
“4” and allow 24 hours to pass
before adjusting the temperature to
your needs.
For faster freezing capability:
The first time you turn the unit on,
turn the temperature control dial to
“MAX” and run for at least 2 hours,
then turn dial to “4”.
(Note: If the freezer has been
placed in a horizontal or tilted
position for any period of time
wait 24 hours before plugging the
unit in.)
•Once the freezer is in its proper place, plug it in an electrical outlet having
115 volts and 15 amps.
•Set the temperature, on the temperature control knob. “MIN” is cold and
“MAX” is coldest. Initially set the temperature on “4”. Place food inside the
freezer. After using the freezer for 24 hours set the freezer to your desired
setting.
• In case you unplug your freezer or experience an electrical outage, allow
5 minutes before plugging it back in.
Freezer Features and Use
Operating Your Freezer
(see fig. # 1)
fig. # 1
Power on
Indicator
Temporature
Control

• Your freezer has a basket. (10.6 cu ft includes 2 baskets) Removable
basket allows you to store food more accessibly or you can remove it
if not needed.
Power Run
0
1
2
3
4
5
6
7
Food Storage Basket
Defrosting and Draining
8
• For most efficient operation and minimum energy consumption, defrost
whenever the frost becomes 1/4” thick. Never use a sharp or metallic
instrument to remove the frost, as it may damage the cooling coils.
(A punctured coil will void the warranty). Do not use boiling water as it
may damage the unit. It is advisable to let ice and frost melt naturally.
•Remove frozen food from the freezer and place it in a cooler to protect
the food.
•Unplug the unit. Defrosting usually takes a few hours. To defrost faster
keep the freezer door open.
•For draining, place a tray beneath the outer drain plug. Unscrew and
remove drain plug. This will let the water flow out in the tray. When done,
screw on the drain plug in place.
Note: monitor the container under the drain to avoid overflow.
•When draining is complete, wipe the interior of the freezer with a soft
cloth. Plug in power cord back into the electrical outlet.
•Reset the temperature control to the desired setting.
•Return the food into the freezer.

Frozen Food:
•Wipe containers before storing to avoid needless spills.
• Hot food should be allowed to cool before storing in the freezer. This will
prevent unnecessary energy use.
• When storing meats, keep in the original
packaging or rewrap as necessary.
• Proper freezer storage requires correct packaging. All foods must be in
packages, which do not allow the flow of air or moisture in, or out.
Improper storage will result in odor and taste transfer and will result in
the drying out of the improperly packaged food.
•Follow package or container instructions for proper storage.
•Packaging Recommendations:
oPlastic containers with air tight lids
oHeavy duty aluminum foil
oPlastic wrap made from saran film
oSelf-sealing plastic bags
•Do not refreeze defrosted/thawed foods.
• It is recommended that the freezing date be marked on the packaging.
These are some suggestions for safe storage:
•TV Dinners 3 - 4 Months
•Fresh Shrimp, Scallops, Crawfish 3 - 6 Months
•Hamburgers, Stew Meats 3 - 4 Months
•Ground Turkey, veal, pork 4 - 6 Months
•Chops 4 - 6 Months
•Steaks 6 - 12 Months
•Chicken or Turkey, whole 1 - Year
For detailed storage chart visit FDA website: www.FDA.gov
Food Storage Information
9

WARNING:
CAUTION:
To avoid electric shock always unplug your freezer
before cleaning. Ignoring this warning may result in
death or injury.
Before using cleaning products, always read and follow
manufacturer’s instructions and warnings to avoid
personal injury or product damage.
General:
•Prepare a cleaning solution of 3-4 tablespoons of baking soda mixed
with warm water. Use sponge or soft cloth, dampened with the cleaning
solution, to wipe down your freezer.
•Rinse with clean warm water and dry with a soft cloth.
•Do not use harsh chemicals, abrasives, ammonia, chlorine
bleach,concentrated detergents, solvents or metal scouring pads. SOME
of these chemicals may dissolve, damage and/or discolor your freezer.
•Clean door gaskets every three months according to general
instructions. Gaskets must be kept clean and pliable to assure a proper
seal.
•Petroleum jelly applied lightly on the hinge side of gaskets will keep the
gasket pliable and assure a good seal.
Proper Freezer Care and Cleaning
Cleaning and Maintenance
Door Gaskets:
10

•Occasionally there may be power interruptions due to thunderstorms or
other causes. Remove the power cord from AC outlet when a power
outage occurs. When power has been restored, replug power cord to AC
outlet. If outage is for a prolonged period, inspect and discard spoiled or
thawed food in freezer. Clean freezer before reusing.
•For long vacations or absences, empty food from freezer, unplug the
unit and clean the door gaskets according to “General cleaning”
section. Prop doors open, so air can circulate inside. When moving
always move the freezer vertically. Do not move with the unit lying down.
Possible damage to the sealed system could occur.
Power Interruptions
Vacation and Moving Care
WARNING: IF OUTAGE IS FOR A PROLONGED PERIOD,
INSPECT AND DISCARD SPOILED OR THAWED
FOOD IN FREEZER. CLEAN FREEZER BEFORE
REUSING.
11

Freezer Does Not Operate:
•Check if freezer is plugged in.
• Check if there is power at the AC outlet, by checking the circuit breaker.
• Wait for 30-40 minutes to see whether freezer will start. Compressor cycle
must be complete to operate.
•Check Temperature Control.
Food temperature appears too warm:
•Frequent door openings.
•Check door to be sure it is closed properly.
• Allow time for recently added warm food to reach freezer temperature.
•Check gaskets for proper seal.
•Adjust temperature control to colder setting.
Too much frost build-up inside unit:
• Make sure temperature control is not set to “MAX” setting for
extended period of time.
Food temperature is too cold:
• If temperature control setting is too cold, adjust to a warmer setting and
allow several hours for temperature to adjust.
•Ice build-up on interior walls
Troubleshooting
12
Vibration:
• Make sure the unit is level.
•Check to be sure the unit is not touching the wall.
•Double check whether the unit has been properly installed.

Compressor runs too frequently:
•This may be normal to maintain constant temperature during high
temperature and humid days.
•Doors may have been opened frequently or for an extended period of
time.
•Check gasket for proper seal.
•Check to see if doors are completely closed.
• Check freezer compartment for blockage from frozen food packages,
containers, etc.
Freezer has an odor:
•Interior needs cleaning.
•Foods improperly wrapped or sealed are giving off odors.
13
One Year Limited Warranty
Manufacturer provides a limited warranty for each new chest freezer to be
free from defects in material and workmanship for a period of 1 year from
the date of purchase. Manufacturer agrees to remedy any such defective
inside accessory component such as door panels, door shelves, racks,
handles, casters, bins and drawers or to furnish a new unit if the unit proves
to have failed, at the company’s option, for one year from your original date
of purchase. Buyer must register unit at PlasticDevelopmentGroup.com/
applianceregistration. In the event the unit requires replacement or refund
under the terms of this limited warranty, the Buyer is responsible for all
transportation expenses to return the unit prior to receiving a replacement
unit or refund. A copy of the dated sales receipt/invoice is required to
receive benefits of this limited warranty.
See following page for full 1 Year Limited Warranty

One Year Limited Warranty
This limited warranty covers appliances in use within the continental United
States, Alaska, and Hawaii, and Puerto Rico. This limited warranty does not
cover the following:
•
14
1. Products with original serial numbers that have been removed, altered
or cannot be readily determined.
2. Products that have been transferred from its original owner to another
party or removed outside the USA.
3. Rust on the interior or exterior of the unit.
4. Damages due to shipping damage or improper installation.
5. Damages due to misuse or abuse.
6. Service calls, repairs, and labor expenses for any purpose.
7. Content losses and food spoilage due to failure of the unit.
8. Punctures to the evaporation system due to improper defrosting of the
unit.
9. Replacement or resetting of house fuses or circuit breakers.
10. Failure or defects of this product if used for other purposes than its
intended purpose or used other than in accordance with the provided
instructions.
11. Disposal costs for failed unit not returned to Manufacturer.
12. Any delivery/installation costs incurred as the result of a unit that fails
to perform as specified.
13. Expenses for travel and transportation for product if you are
exchanging or returning the unit.
14. Expenses related to the removal and re-installation of your unit or
for making the unit accessible, such as removal of trim, cupboards,
shelves, etc. or if not installed in accordance with the provided
installation instructions.
15. Damages to the finish of the unit or home incurred during installation,
including but not limited to floors, cabinets, walls, etc.
16. Damages caused by external causes such as abuse, misuse,
inadequate power supply, accidents, fires, or acts of God.
17. Refunds for returned products are limited to the price paid for the unit
per the sales receipt.

Disclaimer of Implied Warranties, Limitation of Remedies and Exclusions:
EXCEPT FOR THE EXPRESS WARRANTIES SET FORTH HEREIN,
MANUFACTURER MAKES NO WARRANTY WHATSOEVER (OR THE
SHORTEST PERIOD ALLOWED BY LAW) REGARDING THE GOODS,
INCLUDING ANY (1) WARRANTY OF MERCHANTABILITY; (2)
WARRANTY OF FITNESS FOR A PARTICULAR PURPOSE; (3) WARRANTY OF
TITLE; OR (4) WARRANTY AGAINST INFRINGEMENT OF INTELLECTUAL
PROPERTY RIGHTS OF A THIRD PARTY; WHETHER ARISING BY LAW,
COURSE OF DEALING, COURSE OF PERFORMANCE, USAGE OF TRADE, OR
OTHERWISE. BUYER ACKNOWLEDGES THAT IT HAS NOT RELIED ON ANY
REPRESENTATION OR WARRANTY MADE BY MANUFACTURER, OR ANY
OTHER PERSON ON MANUFACTURER’S BEHALF. REPLACEMENT OF UNIT
AND LISTED PARTS IN ACCORDANCE WITH THE TERMS HEREIN, IS YOUR
SOLE AND EXCLUSIVE REMEDY UNDER THIS LIMITED WARRANTY.
MANUFACTURER IS NOT LIABLE FOR INCIDENTAL OR CONSEQUENTIAL
DAMAGES AND NO REPRESENTATIVE OR PERSON IS AUTHORIZED TO
ASSUME FOR MANUFACTURER ANY OTHER LIABILITY IN CONNECTION
WITH THE SALE OF THIS PRODUCT. UNDER NO CIRCUMSTANCE IS THE
CONSUMER PERMITTED TO RETURN THE UNIT TO MANUFACTURER
WITHOUT THE PRIOR WRITTEN CONSENT OF MANUFACTURER.
Customer Service, (toll free: 833-953-1758) between the hours of 8:00 am and
4:00 pm CT
EMAIL: [email protected]
Product Registration: plasticdevelopmentgroup.com/applianceregistration
15

This manual suits for next models
2
Table of contents
Other Criterion Freezer manuals


