Cruisers Yachts DLS CRUISE CRPP-2.6 User manual

User manual
Seat / Skoda / VW
Declaration of conformity
Welcome to DLS!
Thank you for buying a DLS Cruise CRPP-2.6.For us, it’s all
about the sound experience. We care deeply about sound
and construction quality. In order for your experience to be
as optimal as possible, it is important that you fully read this
manual, preferably before you start your installation. Keep
the manual in a safe and accessible place for future
reference.
Your speakers must be installed correctly in order to work
as intended. Make sure you have all necessary tools nearby
before starting and that you are completely confident in how
to process. If you feel the slightest uncertainty; feel free to
take the help of an experienced installer or a car audio
dealer.
General
Some sound systems may vary in size of the door speaker.
Make sure that your vehicle has the same size as this kit,
before you start the assembly
This is a generic mounting instruction. The approach is
similar to all of the described car models. Some screws and
clips may be placed differently and depending, if the tweeter
is placed in the A-pillar or side mirror, the course of action
may vary.
DLS plug and play speakers for vehicles are manu-
factured in accordance with the EU directive EEC 95/54
(72/245/ EEC) and are marked with the approval
number. They are also marked in accordance with the
WEEE-directive 2012/19/EC. The products are also
produced in accordance with the EU RoHS directive
2015/863/EU.
Warranty
This component kit is covered by warranty, depending on
the conditions in the country where it is sold. If the speaker
is returned for service, please include the original dated
receipt with the product.
Winn Scandinavia AB
Elementvägen 15 - SE-702 27 Örebro - Sweden
www.dls.se
DLS speakers are engineered by DLS Sweden,
a part of:
Designed & Sound tuned in Sweden.
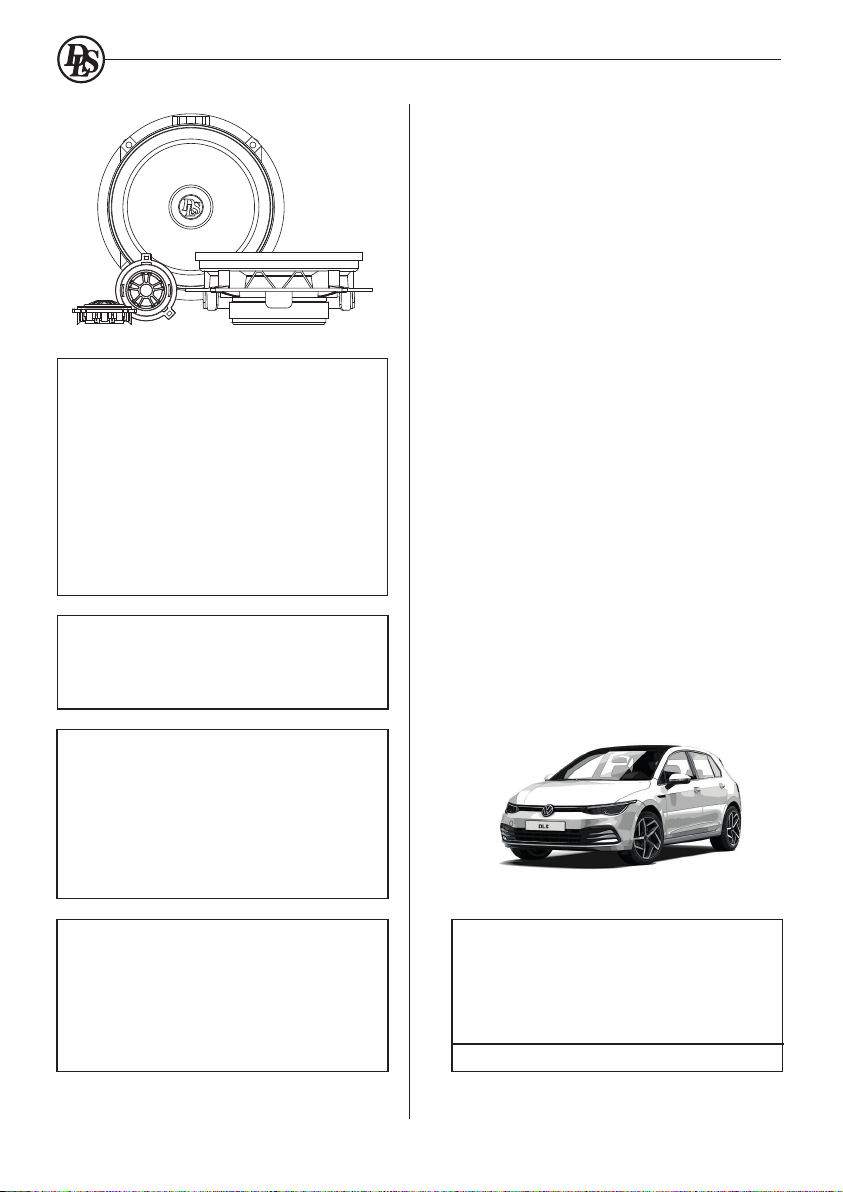
CRPP-2.6
DLS CRUISE
Content
Welcome
Pre installation
Dismounting door panel
Removing woofer
Changing woofer
Removing tweeter
Changing tweeter
Crossover
Running-in time
Specification woofer
Specification tweeter
Compatible car models
Product markings
Technical assistance
1
2
2-3
3
3
4-5
5
6
6
7
7
8-9
10
6

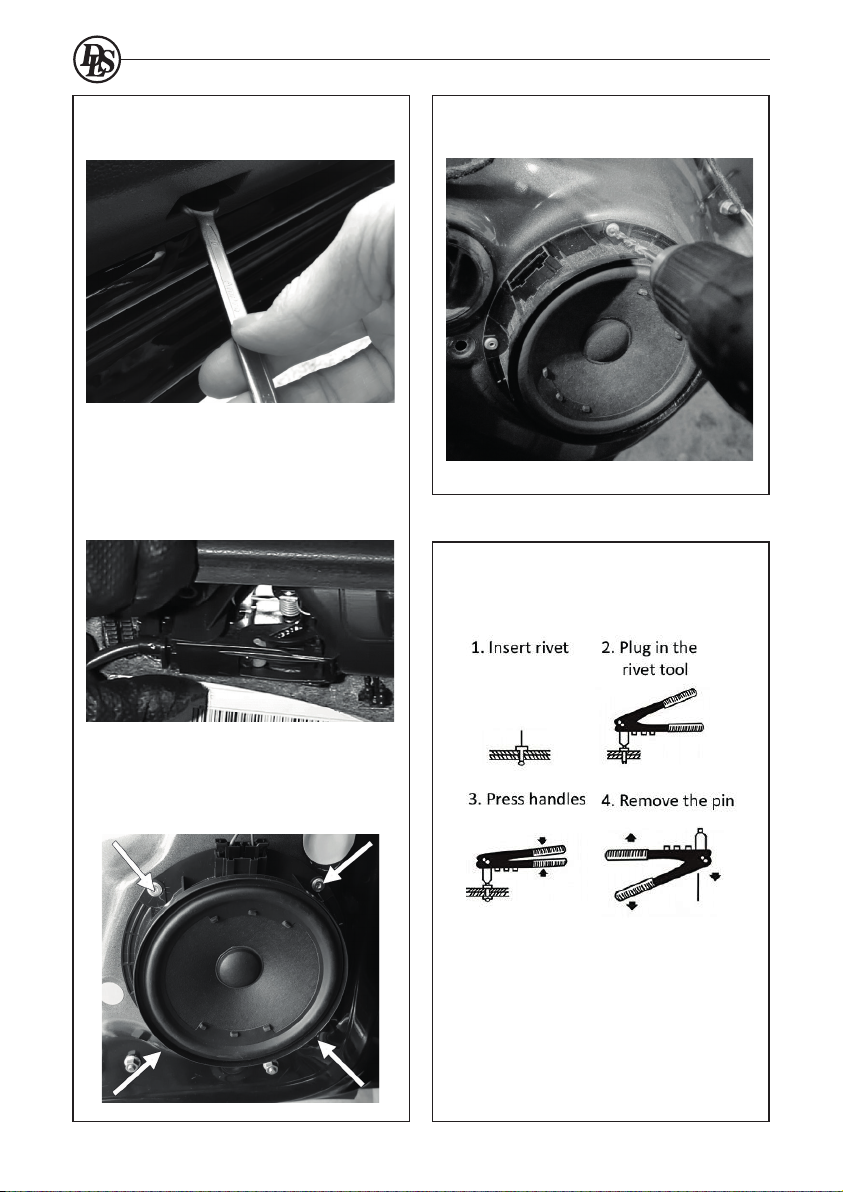
In most cases the screws used are Torx T30.
Unscrew them and store them in a safe position,
to re-use when re-mounting the door panel.
Usually the clips/screws are placed by the red
marks. It may be different in your vehicle.
Be careful when removing the panels and lids,
so there will be no marks.
Dismount the front door by removing the cover of
the door panel.
Hint: Use plastic PRY tools to avoid marks on
the panels and destroy the plastic clips.
Start the dismount
Installation
Pre installation
Disconnect Battery
Included products:
2pcs Woofer
2pcs Tweeter
2pcs Crossover
Included in box:
2pcs Tweeter connection
4pcs Adhesive foam for wrapping
4pcs Terminal crimp connectors
2pcs Four-leaf clover foam for tweeter
10pcs Blind rivet
1pcs Rivet Tool
1pcs Manual
Before you start the process
of replacing speakers,
disconnect and secure the
negative terminal from your
battery/power source. This
will prevent the risk of
damaging yourself or the
products.
Place the disconnected terminal in a secure and
isolated location away from any possible
connection belonging to the battery/power source
system.
Some sound systems may vary in size of the door
speaker. Make sure that your vehicle has the same
size as this kit, before you start the assembly
This is a generic mounting instruction. The
approach is similar to all of the described car
models. Some screws and clips may be placed
differently and depending, if the tweeter is placed
in the A-pillar or side mirror, the course of action
may vary.
General info
2
Disconnect the window control panel, cables for
lightning, speaker cable harness and any other
connections.
The door speakers are fixed with rivets.
3
Usually a wrench, size 10, will be needed. Norm-
ally the bolt is located at the underside of the door.
When the door panel is loose, start with softly
lifting it straight up, to remove the panel.
There are several electric and mechanical
connectors on the backside of the panel.
Release the door lock cable
Use a 4mm drill to remove the rivets. Make sure
all remains from the old rivets are removed from
the inside of the door.
Just drill enough to remove the top of the rivets
Mounting the DLS drivers
Place the new DLS driver in the hole for the
speaker. Use the included rivets and the rivet tool
to safely mount the driver.
(Step 3 might be done several times)
Connect the speaker harness.
Start the assembly of the door panel.
Reconnect all wires harness.
Connect all plugs to the door cover, reconnect the
unlocking device, place the door cover from the
top, by the window seal and push it gently down.
Make sure the clips are in place and can engage.
Give the door panel a push by the hand to attach
to the clips. Mount and fasten all screws to the
correct places.
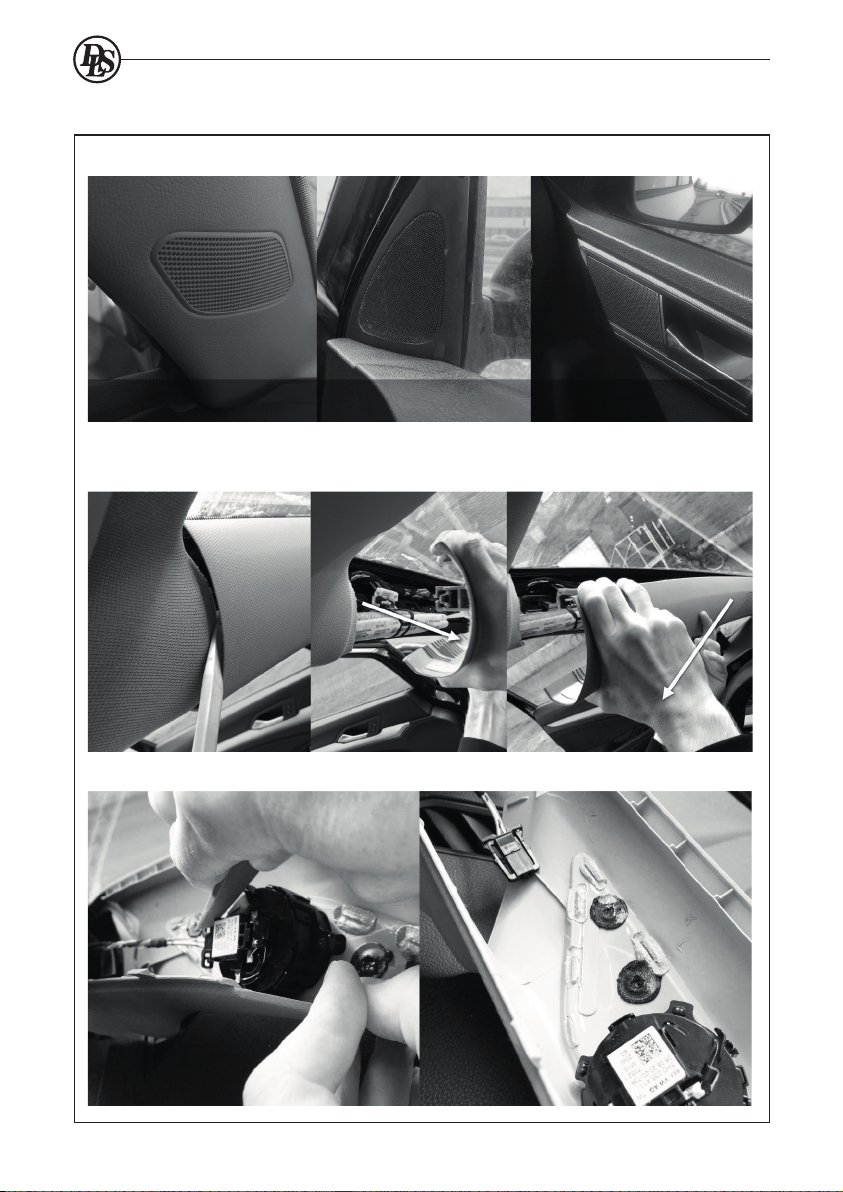
Change Tweeter
Dismount over and remove the covers. Use Plastic PRY tools and be careful, there can be air-bags behind
the A-pillar. The first clip can be really hard to remove. Take it easy and use minimal force.
(This shows how to unmount the A-pillar tweeter)
Locate the tweeter - Either in the A-pillar, by the side mirror or in same case in the door by the handle.
Un-clip the speaker connector from tweeter
A-Pillar Side mirror Door
4
Use a cutting nipper or a Snap-off blade knife to remove the top of the plastic pin that holds the tweeter.
Don’t remove the whole pin, just the top!
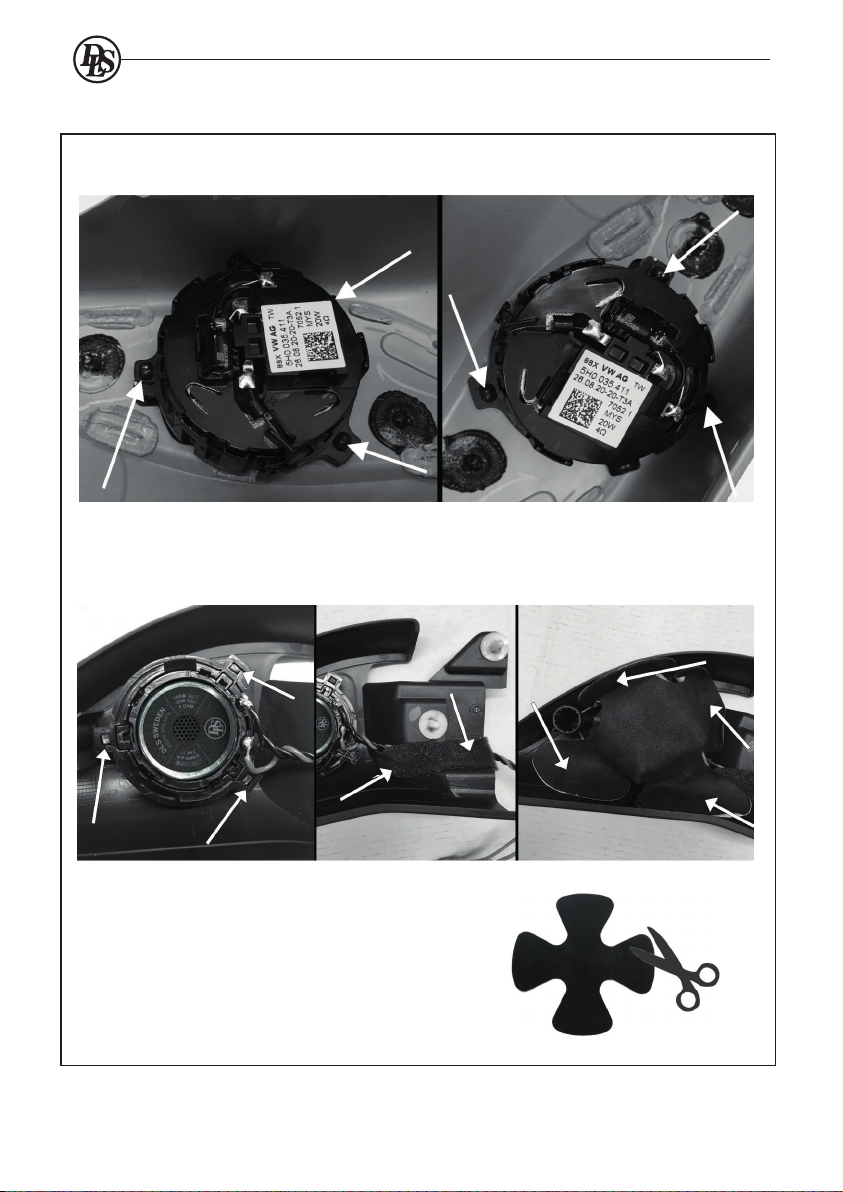
Change the tweeter, and place it where the OEM tweeter used to be. Make sure that the DLS tweeter is
properly fixed. Remove the protecting plastic sheet from the adhesive four-leaf clover and use it to hold the
new tweeter in place. Make sure the tweeter is fixed in a safe way.
For some models, the four-leaf clover needs to be
adapted. Use a sharp scissor to modify it.
5
Remove the old tweeter

Finally
Start assembling the covers again to finish the work. Make sure that no screws or clips are left over,
Reconnect the battery/power source terminal.
Finally, it´s time to play some good music and enjoy!
Running-in time
Allow the component kit to play for at least 15-20 hours in order to
perform at its possibly best. This run-in can be made with tone
sweep or with just music.
Start at a moderate volume and increase the volume step by step
during the running in period. After the 15-20 hour run in session the
performance and characteristics will be in the correct condition.
DLS Support
For technical assistance, ask your car audio dealer where the product was sold or the distributor in your country. You
can always contact the DLS Helpdesk in Sweden at e-mail: [email protected]. Information can also be found on our WEB-
site www.dls.se. We follow a policy of continuous advancement in development. For this reason, all or part of the
specifications and designs may be changed without prior notice.
Connect the crossover with the PnP connector. Use the other adhesive foam to secure the crossover and
cables
The yellow cables are a jumper for decreasing the tweeter level 4dB
6

Woofer 6.5” /165 mm with glass fiber cone
Tweeter 1” / 25 mm silk dome tweeter with accessories
RMS Power 100 W
MAX Power 200W
Impedance 3 Ohm
Sensitivity 90dB 1W/1M
Freq. range 55Hz-25kHz
Crossover 4.8kHz 12dB/Oct with Mundorf caps
Attenuation Tweeter -4db/0db
DLS DRIVE CRPP-2.6 Tweeter
Technical Specifiaction:
Size 1” /2.54 mm
RMS Power 50 W
MAX Power 100W
Voice Coil Material CCAW voice coil/ Aluminium former
Frame Glass Fiber Reinforced ABS
Magnet Neodymium/Copper shorting ring
Cone Natural silk dome
Impedance 4 ohm
Freq. range 2000Hz-25kHz
Electro-Acoustic Parameters:
Re 3.5 Ohm
Fs 1992 Hz
SPL 94 dB 1W/1M
30.5
18.1
18.5
∅
50.5
DLS DRIVE CRPP-2.6 Woofer
Technical Specifiaction
Size 6,5” /165 mm
RMS Power 100 W
MAX Power 200W
Voice Coil Size 1” /25mm
Voice Coil Material CCAW voice coil/ Kapton former
Basket Glass Fiber Reinforced ABS
Magnet Ferrite
Cone Glass Fiber
Suspension Rubber
Impedance 3 ohm
Freq. range 55Hz-5kHz
Electro-Acoustic Parameters
Re 2.4 Ohm
Fs 68.4 Hz
Mms 12.6 gr
Cms 0.427
Vas 11.6L
Qts 0.74
Qes 0.85
Qms 6.3
Bl 3.96 T.m
Spl 88.5 dB 1W/1M
Sd 132 cm²
Specifications
Art. no CK-CRPP-2.6
7
90
Ø
151
64.9
29.4
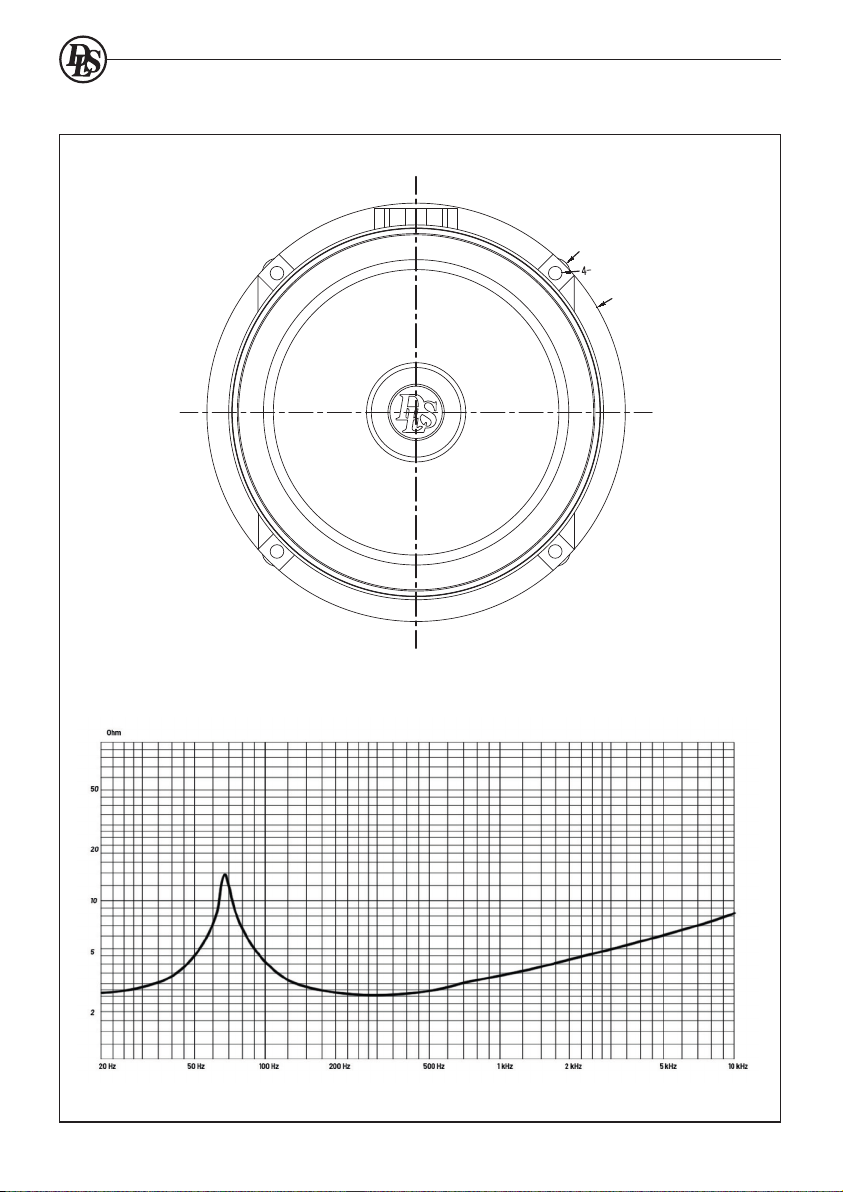
Impedance VS Frequency
8
168.5
R6
Ø5.5

DLS Cruise CRPP-2.6 compatible car models
Car Model Year Front kit Rear kit
VW AMAROK 2010-2021 CRPP-2.6 CRPP-2.6*
VW NEW BEETLE 1997-2011 CRPP-2.6
VW BORA 1998-2005 CRPP-2.6 CRPP-2.6*
VW BORA VARIANT 1999-2005 CRPP-2.6 CRPP-2.6*
VW C-Trec 2016-2021 CRPP-2.6 CRPP-2.6*
VW CADDY 2020-2021 CRPP-2.6
VW CRAFTER II 2017-2021 CRPP-2.6
VW GOLF IV 1997-2004 CRPP-2.6 CRPP-2.6*
VW GOLV VI 2008-2014 CRPP-2.6 CRPP-2.6*
VW GOLF VII 2012-2020 CRPP-2.6 CRPP-2.6*
VW GOLF VIII 2020-2021 CRPP-2.6 CRPP-2.6*
VW ID 3 2020- CRPP-2.6
VW ID 4 2021- CRPP-2.6
VW JETTA VII 2015-2021 CRPP-2.6 CRPP-2.6*
VW LAVIDA 2008-2018 CRPP-2.6 CRPP-2.6*
VW LAVIDA PLUS 2018-2021 CRPP-2.6 CRPP-2.6*
VW LUPO 1998-2005 CRPP-2.6
VW MOGOTAN 2013-2016 CRPP-2.6 CRPP-2.6*
VW NIVUS 2020-2021 CRPP-2.6
VW PASSAT 1996-2005 CRPP-2.6
VW PASSAT 2005-2015 CRPP-2.6
VW POLO IV 2001-2009 CRPP-2.6
VW POLO V 2009-2016 CRPP-2.6
VW POLO VI 2017-2021 CRPP-2.6
VW NEW SANTANA 2012-2021 CRPP-2.6
VW SCIROCCO 2008-2017 CRPP-2.6
VW T-CROSS 2019-2021 CRPP-2.6
VW T-ROC CAB 2020-2021 CRPP-2.6
VW T-ROC 2017-2021 CRPP-2.6
VW T6.1 MULTIVAN 2020-2021 CRPP-2.6
VW TAREK 2018-2021 CRPP-2.6
VW THARU 2018-2021 CRPP-2.6
VW TIGUAN 2007-2016 CRPP-2.6 CRPP-2.6*
VW TIGUAN II 2016-2021 CRPP-2.6 CRPP-2.6*
VW UP E-UP! 2011-2021 CRPP-2.6
VW VENTO 2010-2020 CRPP-2.6
SKODA FABIA I 1999-2007 CRPP-2.6
SKODA FABIA II 2007-2014 CRPP-2.6 CRPP-2.6*
SKODA FABIA III 2015-2021 CRPP-2.6 CRPP-2.6*
SKODA OCTAVIA I 1996-2004 CRPP-2.6
SKODA ROOMSTER 2006-2015 CRPP-2.6 CRPP-2.6*
SKODA YETI 2009-2017 CRPP-2.6 CRPP-2.6*
SKODA KAMIQ 2019-2021 CRPP-2.6
SKODA RAPID 2012-2021 CRPP-2.6
SEAT ALTEA 2004-2015 CRPP-2.6
SEAT ALTEA XL 2004-2015 CRPP-2.6
SEAT ARONA 2018-2021 CRPP-2.6
SEAT AROSA 1997-2004 CRPP-2.6
SEAT CORDOBA II 2002-2009 CRPP-2.6
SEAT IBIZA III 2001-2008 CRPP-2.6
SEAT IBIZA IV 2008-2017 CRPP-2.6
SEAT IBIZA V 2018-2021 CRPP-2.6 CRPP-2.6*
SEAT LEON 2000-2005 CRPP-2.6
SEAT LEON II 2006-2012 CRPP-2.6
SEAT MII 2012-2021 CRPP-2.6
SEAT TOLEDO II 1994-2004 CRPP-2.6
SEAT TOLEDO III 2004-2009 CRPP-2.6
SEAT TOLEDO IV 2012-2019 CRPP-2.6
*Disclaimer
DLS CRPP-2.6 is not compatible if your vehicle is with the original Premium Hi-fi system.
Component system fits in rear doors, if there is a location for tweeter.
9

The crossed-out wheelie bin symbol means that the product, literature and pac-
kaging included must be taken to separate collection at the end of their working
life. Do not dispose of these products as unsorted municipal waste: take them
for recycling. For info on your nearest recycling point, check with your local
waste authority.
This product has been granted with the CE certification mark to show that the
product follows the health, safety, and environmental protection standards for
products sold within the European Economic Area (EEA).
DLS products complies with the relevant provisions of the RoHS
Directive for the European Union. In common with all Electrical
and Electronic Equipment (EEE) the productshould not be
disposed of as household waste. Alternative arrangements may
apply in other jurisdictions.
aideMeliboMnaeporuEehtforentraplabolgasiSLD
Association, an organisation that focus on promoting the
custom made mobile media installations to consumers.
Product markings
We follow a policy of continuous advancement in development. For this reason all or part of
specifications & designs may be changed without prior notice. We reserve for possible typos,
factual or numeric errors that may have been printed on any products, package designs,
user manuals and/or other included accessories.
10

Table of contents


 manual")


