Crusader Walkabout User manual

owner’s manual
CRUSADER MANUFACTURING, INC.
2955 Lone Oak Circle #8 • Eagan, MN 55121
Walkabout

TABLE OF CONTENTS
INTRODUCTION
Inspection, Warnings, Motor, Electrical, Grounding Instructions
Commercial-Rated Units ..................................................................................1-2
SAFETY INSTRUCTIONS....................................................................................3
RECOMMENDED PREVENTIVE MAINTENANCE
Maintenance of the Crusader® Power Nozzle, Electrical Cord Care,
Proper Storage ...................................................................................................4
OPERATION
Troubleshooting, Proper Vacuuming Motion for Large Areas,
Backpack Ergonomics .........................................................................................5
Preparing for Operation...................................................................................... 6
Preparing for Use with a Power Nozzle, Preparing for
Use as a Canister ................................................................................................7
FILTRATION INFORMATION
Filter Maintenance.............................................................................................. 8
WARRANTY INFORMATION .............................................................................9
ASSEMBLY.......................................................................................................10
PARTS LIST......................................................................................................11
ESPAÑOL....................................................................................................12-23
E
N
G
L
I
S
H
E
S
P
A
~
N
O
L

INTRODUCTION
1
INSPECTION UPON RECEIPT
Carefully unpack and inspect your new Crusader vacuum for shipping damage. Each unit
is tested and thoroughly inspected before shipping. For instructions regarding any shipping
damage, contact Crusader immediately (800) 597-3336.
This operator’s manual has important information for the use and safe operation of the
vacuum cleaners detailed in this manual. Read this manual carefully before starting the
machine. Keep this manual available at all times and instruct all operators to read this
manual. If instructions are not followed, an injury may occur or equipment, furniture or
buildings may become damaged.
The contents of this manual are based on the latest product information available at the
time of publication. Crusader reserves the right to make changes or improvements to its
machines or components without notice. The products that are covered by this instruction
manual are intended for commercial use.
WARNINGS
uUSE ONLY genuine Crusader replacement filters to ensure optimal performance,
improved indoor air quality and maintain a valid vacuum warranty.
uDO NOT vacuum with a frayed, worn, or damaged cord.
uDO NOT vacuum liquids or expose the vacuum to rain or water.
uDO NOT vacuum hazardous or toxic materials.
uDO NOT use vacuums to pick up flammable or combustible materials and do not
store them in the filter bay.
MOTOR
Electric thru-flow vacuum motors must never be used in applications in which wet or moist
conditions are involved, where dry chemicals or other volatile materials are present, or
where airflow may be restricted or blocked. Such motors are designed to permit the vacu-
umed air to pass over the electrical wiring to cool it. Therefore, any liquid (including water),
dry
chemical, or other foreign substance which would come in contact with electrical
conductors could cause combustion (depending on volatility) or electrical shock. Failure
to observe these precautions could result in property damage and severe personal injury,
including death in extreme cases.
ELECTRICAL
All backpack models are available in 120 volt/60 Hz. Some Crusader models are available in
220 volt/50 Hz, call Crusader for availability of 220 volt/50 Hz vacuums. This document only
applies to 120 volt/60 Hz, or 120 volt/400 Hz models. Severe changes in voltage, high or
low, can cause damage to the motor and cause premature motor failure. Model numbers
and specifications can be obtained by calling Crusader.
The vacuum cleaners described in this manual are equipped with a thermal protection
device. The integrated thermal switch will remove power from the vacuum motor in the
event excessively high operating temperatures are detected. This condition is normally the
result of a blocked vacuum passage, clogged or full filters.
Should a thermal trip take place, immediately turn off the vacuum and inspect for a
blockage and verify the condition of the filter bag and change or empty as required.
The vacuum will require several minutes to cool down to a safe operating temperature.
When this temperature is attained, the thermal switch will reset and the vacuum will be
able to be used in a normal manner.
INTRODUCTION
GROUNDING INSTRUCTIONS—COMMERCIAL-RATED UNITS
THESE VACUUMS MUST BE GROUNDED. If a vacuum should malfunction or stop working,
grounding provides a path of least resistance for electrical current, thereby reducing the risk
of electrical shock. This unit is equipped with a cord that has an equipment-grounding
conductor and grounding plug. The plug must be inserted in an appropriate outlet that is
properly installed and grounded inaccordance with all local codes and ordinances. Cutting
off the ground wire or using a cord that is not equipped with a ground plug will void the
warranty on the unit, and Crusader will accept NO liability associated with the unit.
WARNING – Improper connection of the equipment-grounding connector conductor can
result in a risk of electrical shock. Check with a qualified electrician or service person if you
doubt that the outlet is properly grounded. Do not modify the plug provided with the
vacuum. If it will not fit the outlet, have a proper outlet installed by a qualified electrician.
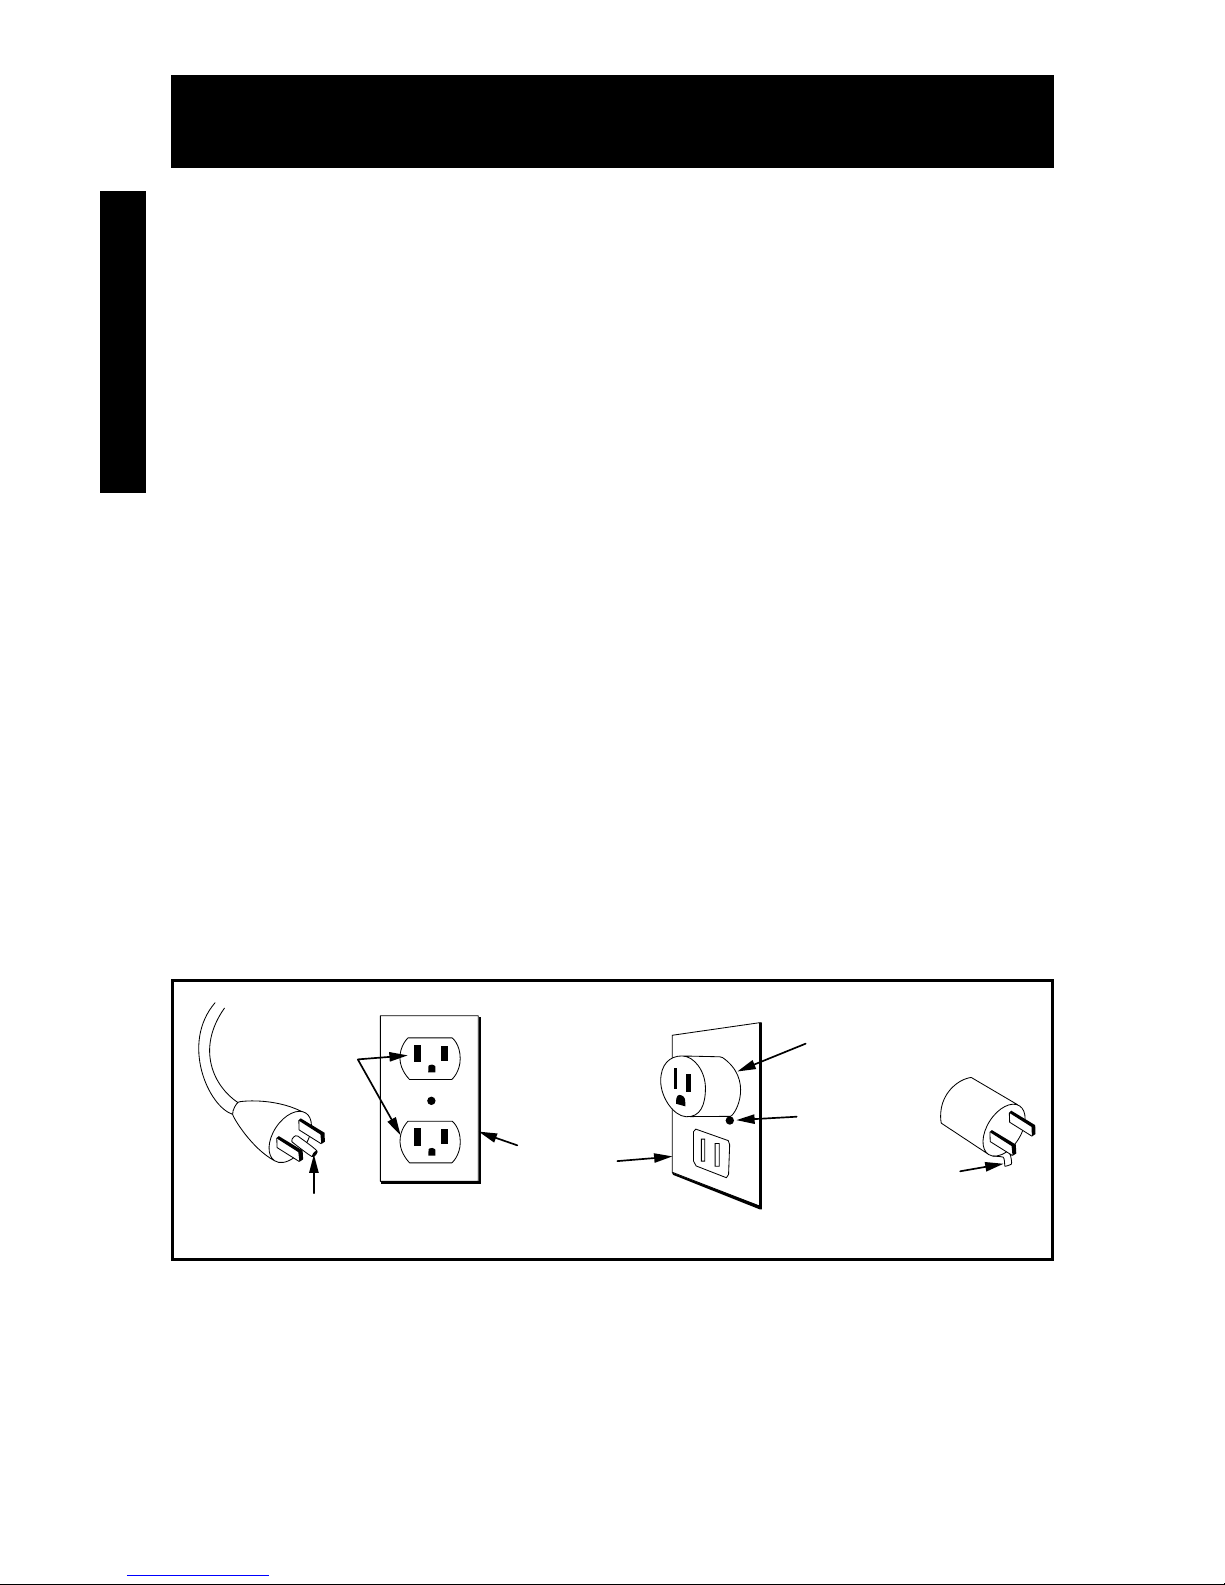
The vacuum cleaners in this manual are for use on a nominal 120-volt circuit, and has a
grounded plug that looks like the plug illustrated in sketch A in Figure AA. A temporary
adaptor that looks like the adaptor illustrated in sketches B and C may be used to connect
this plug to a 2-pole receptacle as shown in sketch B if a properly grounded outlet is not
available. The temporary adaptor should be used only until a properly grounded outlet
(sketch A) can be installed by a qualified electrician. The green colored rigid ear, lug, or the
like extending from the adaptor must be connected to a permanent ground such as
a properly grounded outlet box cover. Whenever the adaptor is used, it must be held in
place by a metal screw.
Note: In Canada, the use of a temporary adaptor is not permitted by the Canadian
Electrical Code.
For Canada – This appliance is for use on a nominal 120-volt circuit and has a grounded
attachment plug that looks like the plug illustrated in sketch A in Figure AA. Make sure that
the vacuums are connected to an outlet having the same configuration as the plug. No
adaptor should be used with the vacuums detailed in this manual.
Figure AA
GROUNDED
OUTLET
GROUNDING
PIN
GROUNDED
OUTLET BOX
(A) (B)
ADAPTER
METAL
SCREW
TAB FOR
GROUNDING SCREW
(C)
2

3
SAFETY INSTRUCTIONS
WARNING
READ ALL INSTRUCTIONS BEFORE USING.
To reduce the risk of fire, electric shock or injury, read the following:
1. DO NOT leave any Crusader vacuum plugged in when not in use. Unplug unit
from the outlet before servicing.
2. DO NOT use outdoors or on wet surfaces.
3. DO NOT try to recover any liquid with this vacuum. This vacuum is for DRY
RECOVERY only.
4. Use only as described in this manual. Use only manufacturer’s recommended
attachments and replacement parts.
5. To prevent electrical damage, use the recommended 50-foot/16-gauge extension
cord provided. If you need to use a 100-foot cord, it must be14-gauge or better.
DO NOT use cords longer than 100 feet.
6. DO NOT USE A DAMAGED CORD OR PLUG. If the unit is not working as it should,
or if it has been dropped, damaged, left outdoors, or exposed to water, return it to
an authorized Crusader Warranty Station for inspection (800) 597-3336.
7. DO NOT pull or carry the vacuum by the cord or use the cord as a handle. Do not
close a door on the cord or pull the cord around sharp edges or corners. Do not run
over the cord. Keep the cord away from heated surfaces.
8. DO NOT pull on the cord to unplug. Grasp the plug at the outlet and pull.
9. DO NOT handle the plug or vacuum with wet hands.
10. DO NOT put any objects into openings. Keep hair, loose clothing, fingers, and all
parts of the body away from openings and moving parts. Long hair should not hang
over or near the unit.
11. DO NOT vacuum flammable or combustible materials or anything that is burning or
smoking, such as cigarettes, matches, or hot ashes.
12. Empty the Intercept Micro Filter® after every use and before storage. Some types of
wood dust and debris may catch on fire.
13. Turn off the unit before unplugging.
14. Connect to a properly grounded outlet only. See Grounding Instructions.
15. Use with care when cleaning stairs.
16. DO NOT allow the vacuum to be used as a toy. Pay close attention when using
the vacuum near children.
17. When using the vacuum models with a power nozzle ~ Always turn off the vacuum
and power nozzle before connecting or disconnecting either the hose or power
nozzle. Depending on your vacuum model the hose may contain electrical wires.
Do not use when damaged, cut, or punctured. Avoid picking up sharp objects.
18. DO NOT use without filters in place.
SAVE THESE INSTRUCTIONS
Violation of any of these instructions may void any and all warranties.

4
RECOMMENDED PREVENTIVE MAINTENANCE
WARNING: The following information is for use by qualified service personnel only
and provides guidance for troubleshooting and maintenance under normal
working conditions.
nUNPLUG the vacuum when working on the motor or any electrical part.
nCHECK the condition of all electrical cords before each use.
nDO NOT lubricate the motor; it is equipped with sealed bearings.
UPON RECEIPT
Check unit for any defects, missing or broken parts. Call Crusader with this information
along with any questions you may have.
DAILY/AFTER EACH USE
Check Intercept Micro Filter. Empty/remove if full. All Crusader vacuums must use genuine
Intercept Micro Filters to maintain valid vacuum warranty. Check Micro Cloth Filter. If dirty,
rinse out and air dry before replacing back into vacuum. All filters must be in place to
operate vacuum. This will keep airflow up and prevent the motor from laboring. Check
powerhead. Remove hair, string, lint, etc. wrapped around roller with box cutter or razor
blade. Be careful not to damage the brush strips on the brush roller.
PERIODICALLY
Check powerhead belt, replace as needed. Check harness for fit and comfort. Replace lost or
damaged pieces. Replace motor carbon brushes. Brushes should be replaced with new ones.
Old ones should be thrown away.
1. Carbon brushes on the vacuum motor replaced after the first 800 hours of
operation by a Crusader authorized service or warranty center.
2. Carbon brushes replaced again after the next 400 hours of operation by a
Crusader authorized service or warranty center.
3. Carbon brushes replaced again after the next 200 hours of operation by a
Crusader authorized service or warranty center.
MAINTENANCE OF THE CRUSADER POWER NOZZLE
• DO NOT OIL. The motor in your power nozzle is permanently lubricated and sealed.
Do not oil the motor at any time.
• For maintenance of the power nozzle, including instructions for the brush roll, belt,
and brush strips, consult the instructions packaged with the power nozzle.
• Maintenance instructions for the power nozzle are for use by qualified service
personnel only.
ELECTRICAL CORD CARE
NEVER stretch the cord tightly between the vacuum and the outlet.
A cord that is stretched or pulled will not function properly and creates
a danger. After vacuuming, unplug the extension cord at both ends and
wind it up loosely (Figure BB). DO NOT wind the cord up by wrapping
it around your hand and elbow. Use only Crusader replacement
extension cord, or one that is properly sized for your application.
Reference Important Safety Instructions item number 5. Extension
cord jacket type should be SJTW or better.
PROPER STORAGE
When the vacuum is not in use, the vacuum and extension cord should be
stored indoors and in a dry place.
Figure BB

5
OPERATION
TROUBLESHOOTING
1. If the vacuum will not operate, check the following:
a. The power supply cord at the wall outlet.
b. The power supply cord at the vacuum.
c. That the switch is in the “on” position and functioning properly.
2. If the pigtail (18" power cord) is getting warm, check to see that the extension cord
does not exceed a length of 50 feet at 16 gauge or 100 feet at 14 gauge. Longer cords
will overheat and damage the vacuum.
3. If the exhaust that comes out of the bottom of the vacuum is warmer than usual,
check, clean or replace all four filters.
4. If the power switch fails, check the circuit breaker. If that is not the problem,
see a Crusader Warranty Station.
5. If loss of suction occurs, check the following:
a. Check that debris is not plugging the hose, wand, and/or floor tool.
b. Check, clean or replace both Intercept Micro and Micro Cloth filters.
c. Check that the hose cuffs are fitting tightly on the hose and are not cracked.
d. Check that the cap is properly attached to the vacuum body.
PROPER VACUUMING MOTION FOR
LARGE AREAS
1. Begin with the wand parallel to your body.
2. Draw the top of the wand in toward your waist and
twist at the waist walking backward or forward
(a side-to-side motion) (Figure CC).
3. The motion is similar to mopping and keeps the upper body
and arms from tiring.
BACKPACK ERGONOMICS
n The weight of the vacuum should be carried on the operator’s
hips and be evenly distributed.
The padded waist belt or waist and shoulder straps are
adjustable for a custom fit.
n The ventilated backplate helps keep the operator cool.
n The on/off switch is conveniently placed for easy access on the waist belt of the
backpack vacuums. On the Crusader Power Nozzle, the on/off switch is on the handle
of the electrified hose.
n Use the proper attachments for the job. Crusader has attachments to perform most
jobs without requiring that the operator bend over or get into difficult positions.
Figure CC
6
Figure D
Figure E
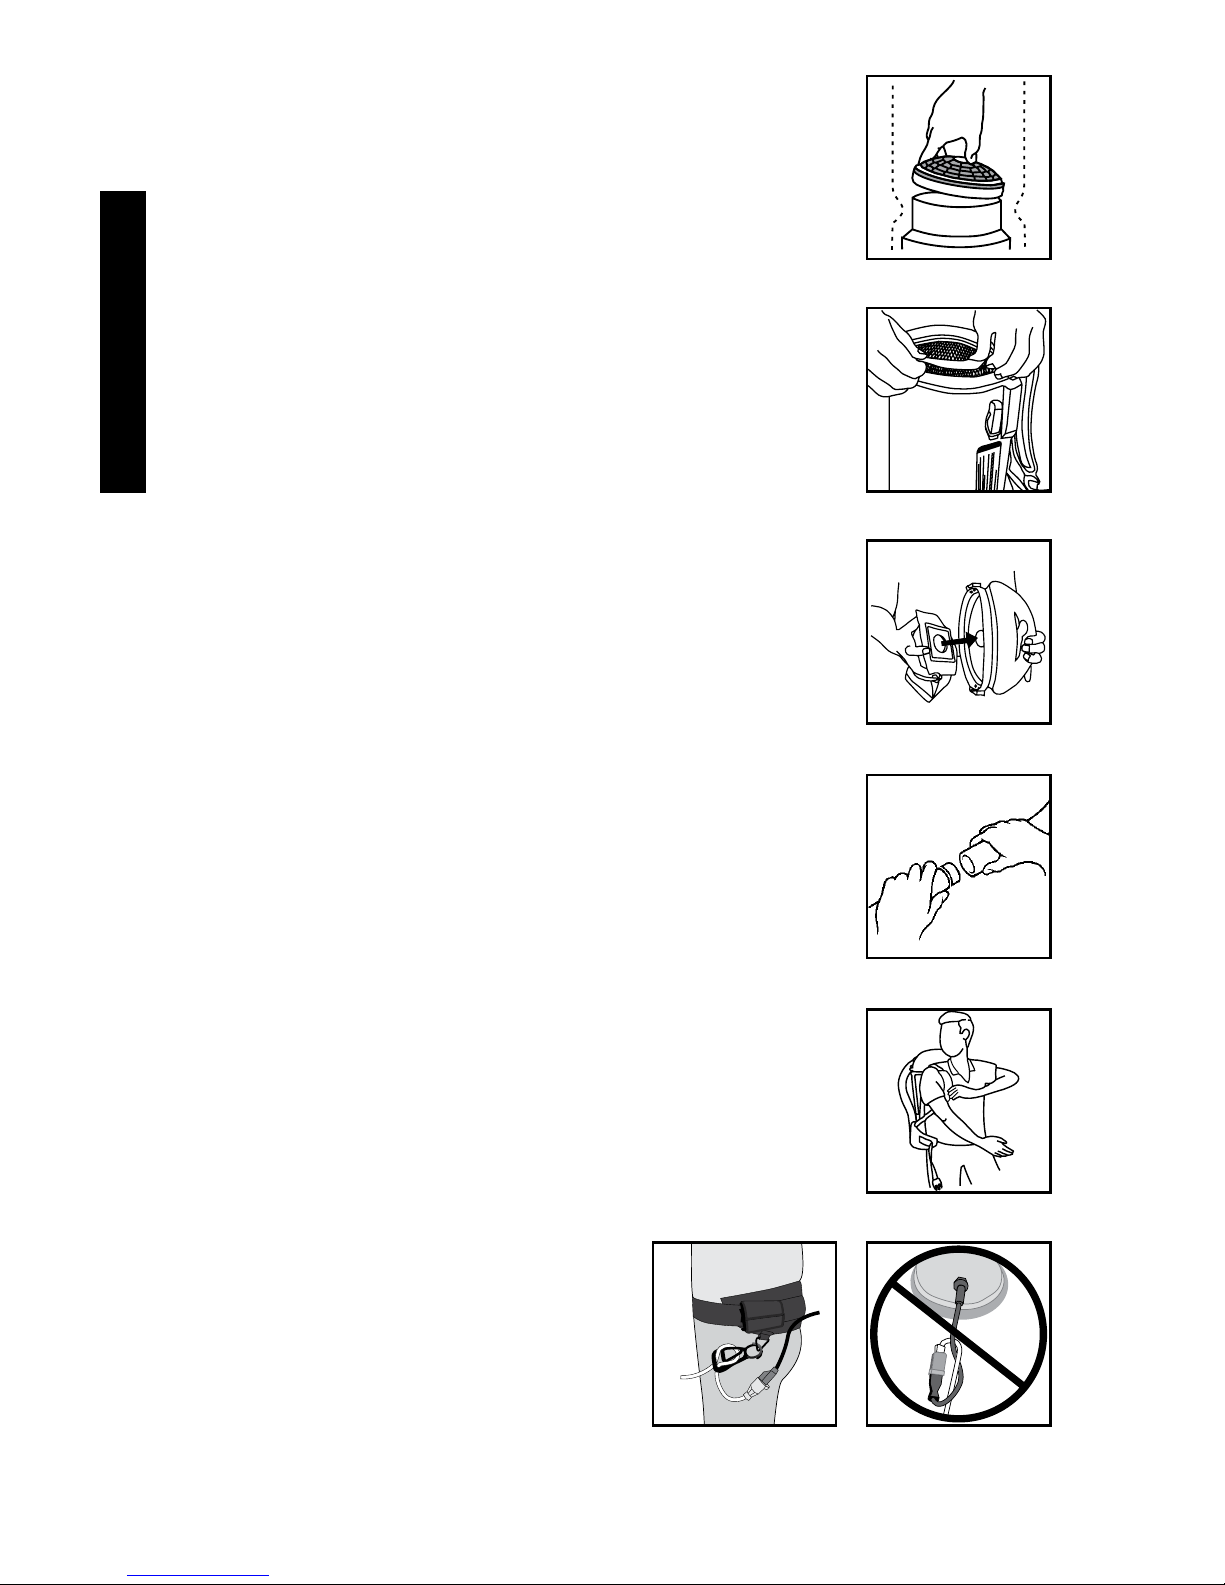
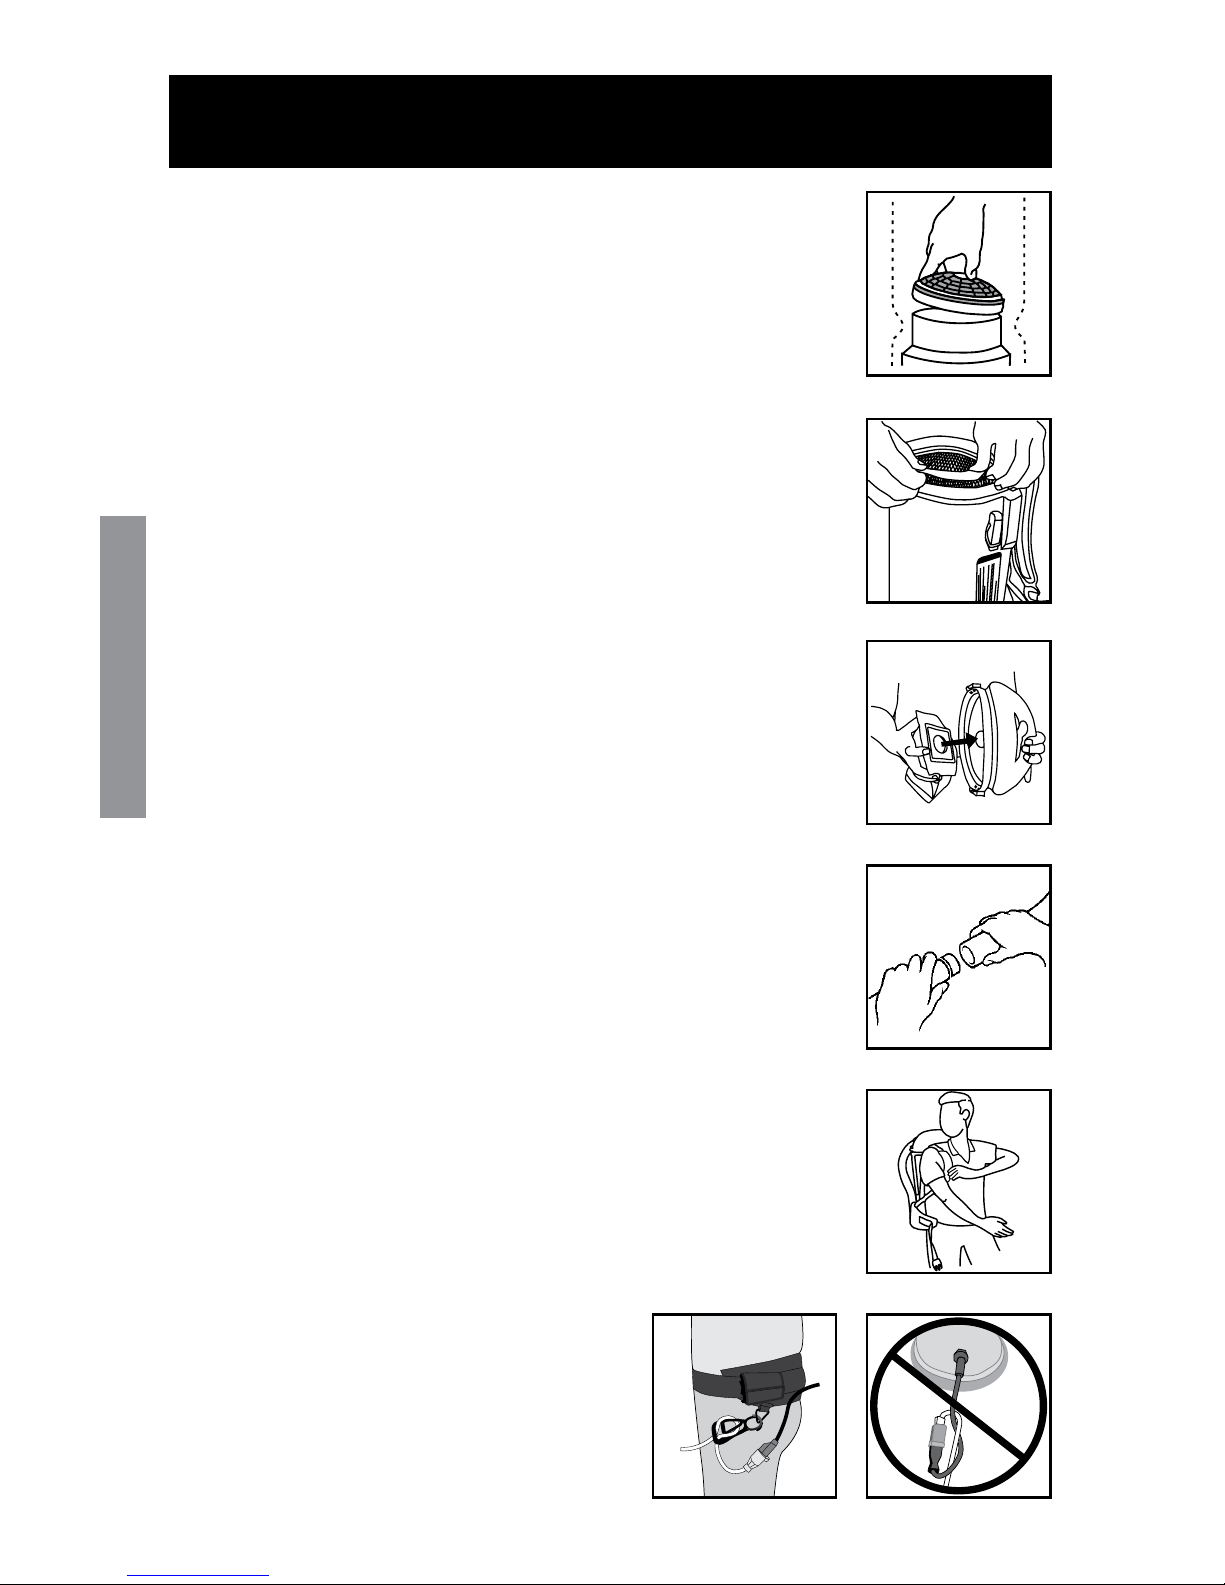
PREPARING FOR OPERATION
1. Unlatch and remove the top cap and pull out the
Micro Cloth filter. Check to see that the dome filter
has not shifted during shipping (Figure A). Reinstall the
Micro Cloth filter, making sure that the lip of the filter
completely covers the rim of the vacuum (Figure B).
2. Install an Intercept Micro Filter (if there is not one
already installed) by sliding the gasket of the Micro
Filter over the inlet on the inside of the top cap (Figure C).
At the beginning of each shift, the filters should be checked.
Empty or replace as necessary.
NOTE: Never use an Intercept Micro Filter without
the Micro Cloth filter. (The Micro Cloth filter’s
rubber gasket provides the seal.)
3. Replace the cap, making sure that the latches catch
correctly. Push the hose into the cap opening.
4. Twist the aluminum wand into the hose (Figure D).
Check hose cuffs at both ends to make sure that they
are tight.
5. Loosen the shoulder straps and waist belt. In an open
area, lift the vacuum by one shoulder strap and slide
your free arm into the other strap (Figure E).
6. Fasten the waist belt snugly and make sure the
weight is resting comfortably on your hips (Figure F).
7. Thread the extension cord through the Schulte Cord
Holder on the waistbelt (Figure F). DO NOT tie
extension cord and power cord together. Doing so
will result in damage to both cords and will not be
covered under warranty (Figure G).
8. To attach tools to a 11/2" aluminum wand, LOOSEN
the plastic nut at the end of the wand, insert the tool,
and retighten the nut. To ensure the copper ring stays
in place, NEVER remove the nut.
Figure A
Figure B
Figure C
Figure F Figure G
OPERATION
7
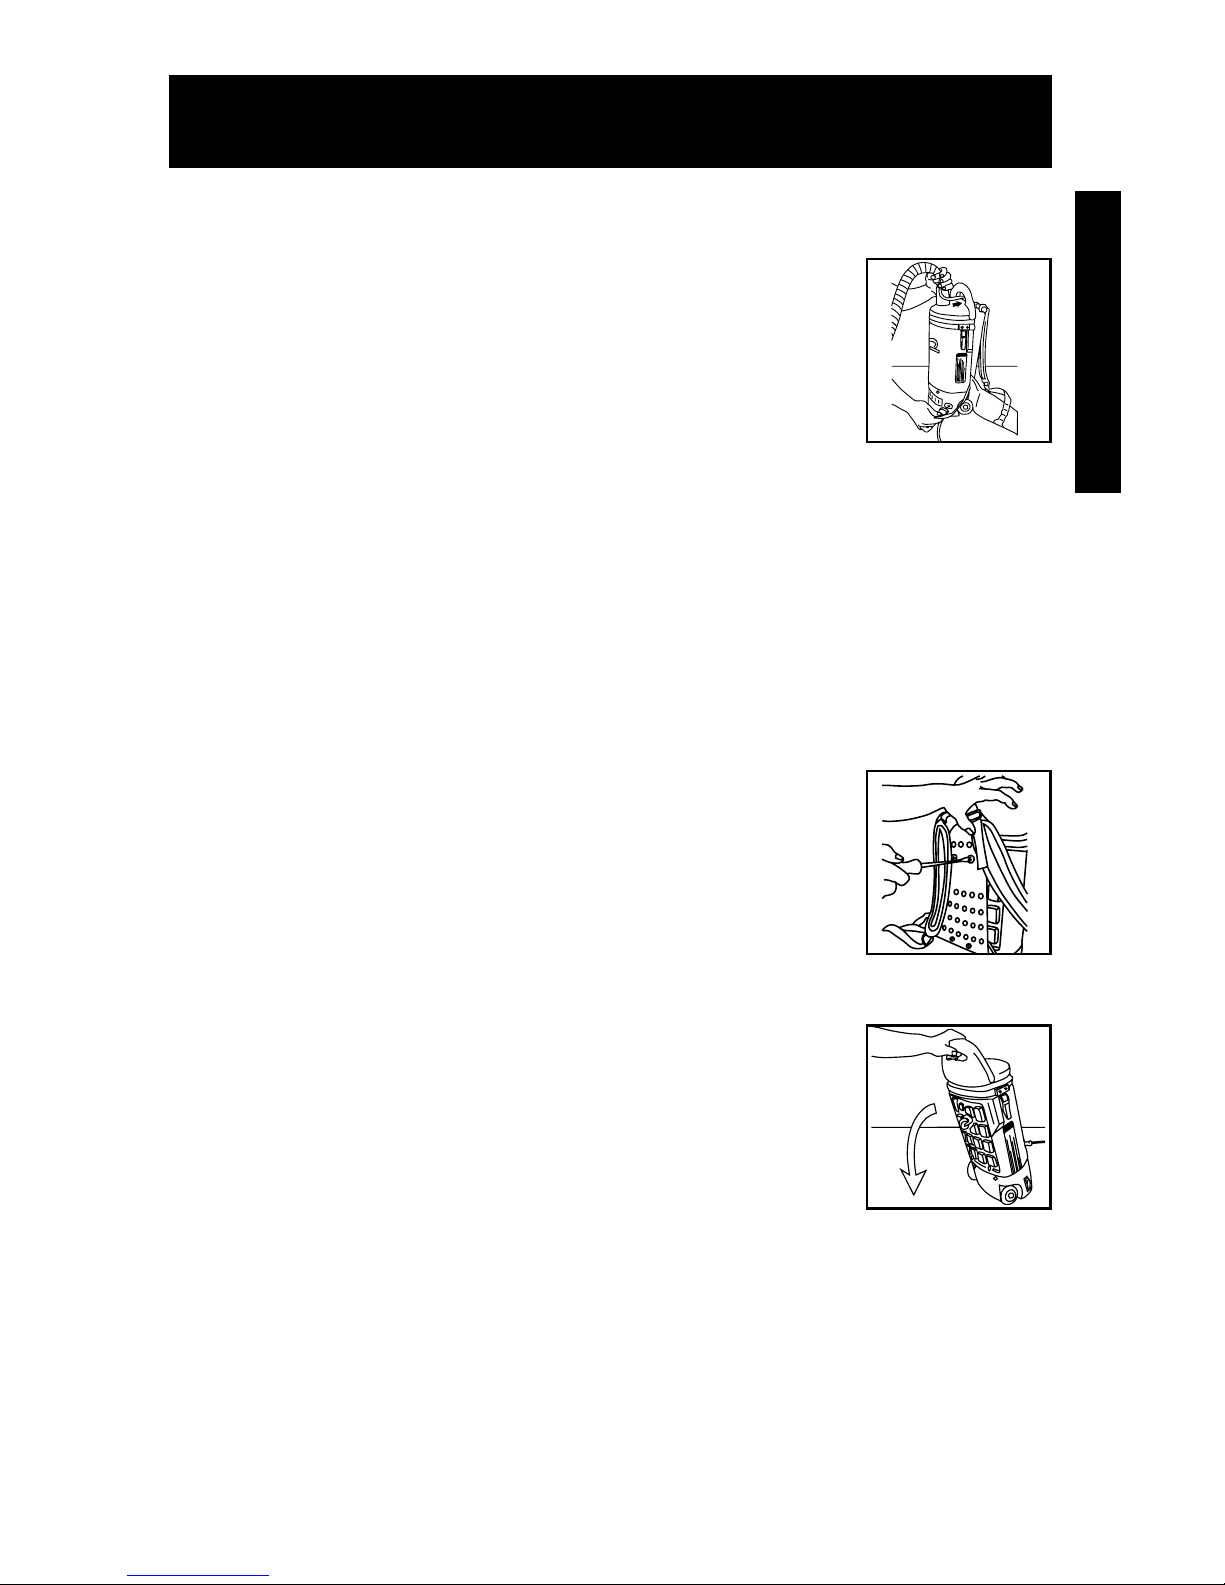
PREPARING FOR USE WITH A POWER NOZZLE
1. A commercial-rated power nozzle with a three-pronged
plug must be used with a commercial-rated vacuum.
2. Push the hose cuff of the electrified hose into the cap
opening.
3. Feed the cord attached to the hose under the handle of
the top cap and behind the vacuum for easier cord
management. Then plug it into the receptacle on the
base of the vacuum (Figure H).
4. The rotating brush roll could cause damage to bare floors.
Be sure the brush roll is stationary for bare floors and rotating for carpet.
5. Read the additional instructions included with the power nozzle.
PREPARING FOR USE AS A CANISTER
1. With a screwdriver, remove the two upper and lower
mounting screws (Figure I).
2. Pull the backplate and spacers off and lay the vacuum
down on the back swivel wheel (Figure J). Store the
spacers, screws and backplate together where they will
not be lost.
3. To put in backpack mode again, reverse the steps. Figure I
Figure H
Figure J
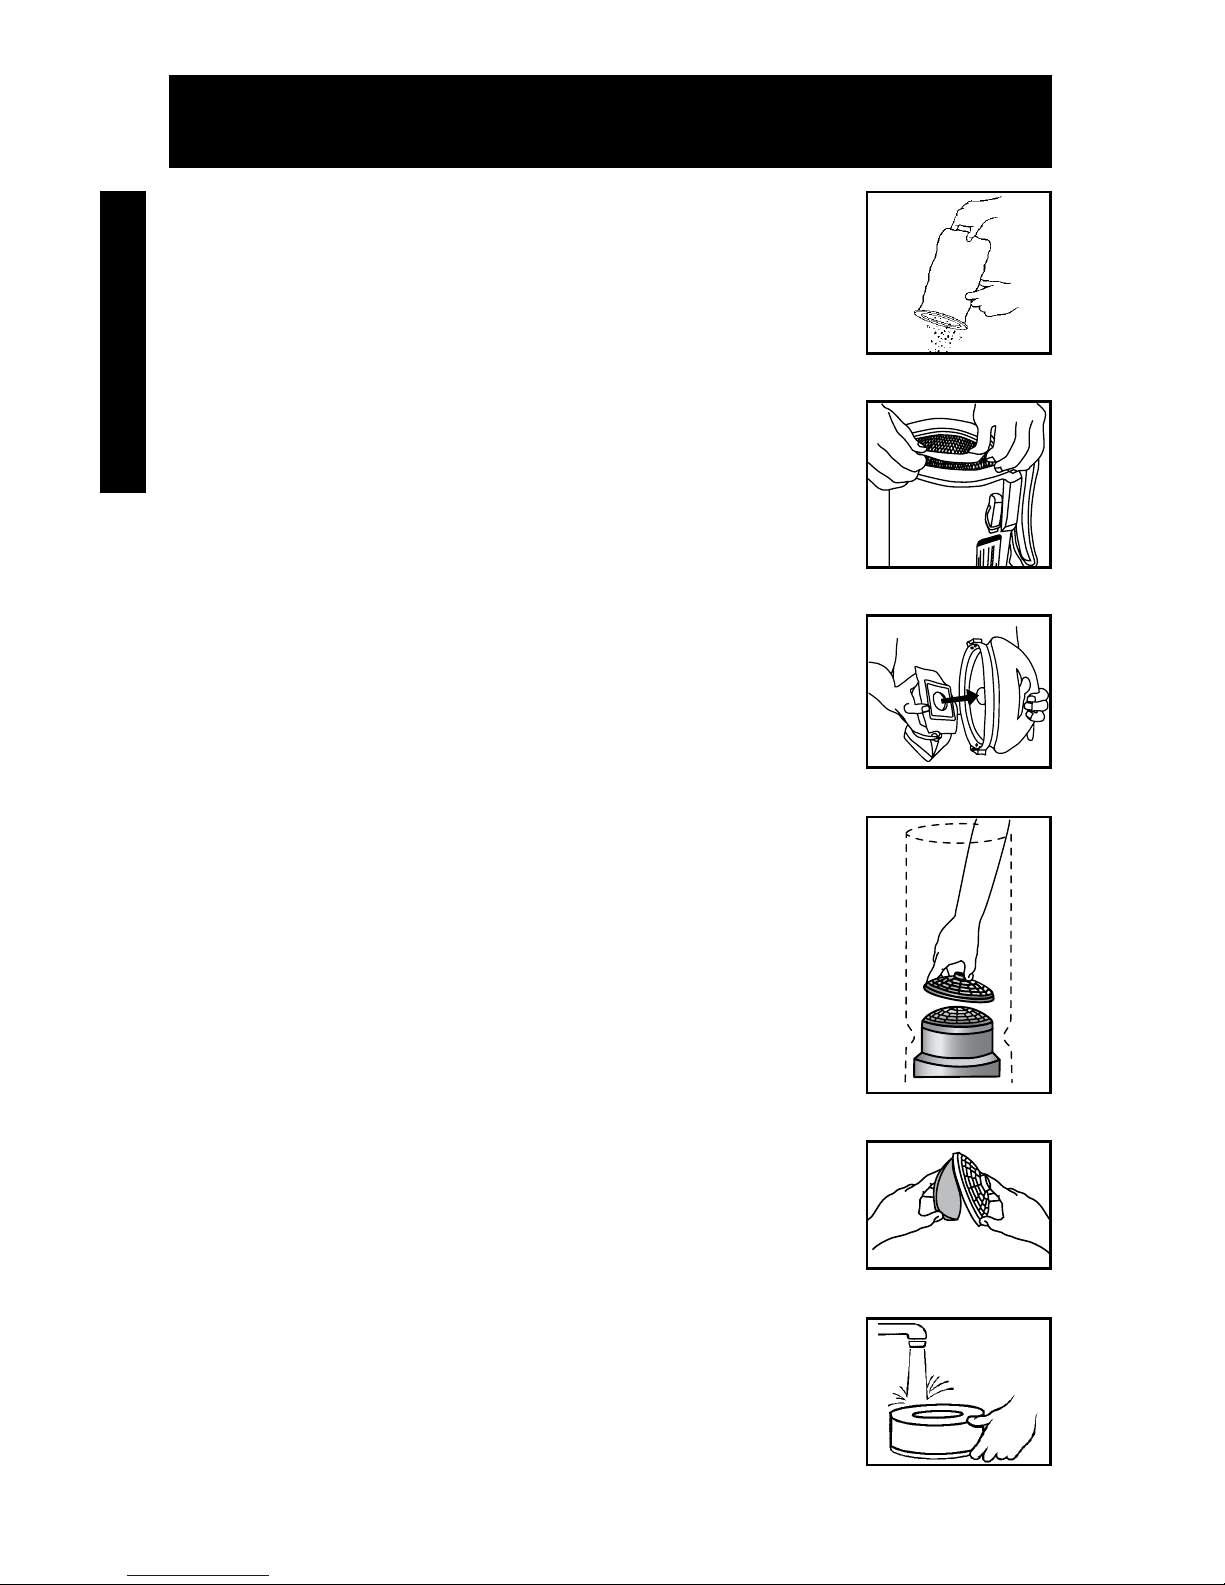
FILTER MAINTENANCE
8
1. Check the Intercept Micro Filter EACH and EVERY time you start
and finish vacuuming. A clogged and dirty filter restricts airflow,
resulting in reduced suction, overheating and possible damage
to the vacuum.
2. While vacuuming throughout a building, stop every two hours
or as needed to shake out the Intercept Micro Filter (Figure A).
Replace with a new Intercept Micro Filter when necessary.
NOTE: Lift both Intercept Micro Filter and Micro Cloth Filter out
at the same time to avoid ripping the Intercept Micro Filter,
especially if it is full (Figure B).
Install an Intercept Micro Filter inside the Micro Cloth Filter.
To install an Intercept Micro Filter, slide the gasket
of the Micro Filter over the inlet on the inside of the top cap,
then replace the cap (Figure C).
3. Once a month (or more often if necessary) hand or machine
wash the Micro Cloth filter and let it AIR DRY. (Do not put it
in the dryer.)
4. Once a week (or more often if needed) clean the Dome Filter,
located inside the vacuum underneath the Intercept Micro and
Cloth filters (Figures D).
a. Pull the top piece of the Dome Filter off and remove the foam
media (Figure E). Shake it out, rinse it, and let it air dry
thoroughly.
b. Before the next use, return the foam media to the Dome Filter.
Replace with new foam media if necessary.
c. Firmly snap the top piece of the dome filter into place.
NOTE: If using a high filtration disc in place of the foam media,
check it every two to three weeks. When the disc becomes
discolored, replace with new disc. The life of the high filtration
disc will depend greatly on the use and care of the Intercept
Micro Filter and Micro Cloth filter.
HEPA MODELS: For best results replace pleated dome filter
every 6 months (or more often if necessary) (Figure D).
5. For backpack models, each week rinse, air dry, and return the
foam filter/diffuser at the bottom of the vacuum below the
motor (Figure F).
Figure A
Figure D
Figure B
Figure C
Figure F
Figure E

All Crusader products are manufactured, tested and inspected in accordance with
strict engineering requirements and are warranted to be free from defects in materials
and workmanship.
THIS WARRANTY IS SUBJECT TO THE FOLLOWING CONDITIONS AND LIMITATIONS:
WARRANTY DURATION
This warranty extends for a period of three years from the date of the original purchase of
the equipment when the original purchase is an end user. The warranty is 180 days when
the purchaser is using the equipment to perform commercial service.
PARTS NOT COVERED BY THE WARRANTY
Parts requiring replacement due to normal wear are not covered under the warranty.
These include belts, hoses, cords, gaskets, carbon brushes, cleaning tools, spray nozzles,
filters, bearings, flexible shafts, batteries, seals, grips, switches, etc.
WARRANTY EXCEPTIONS AND EXCLUSIONS
Crusader electric equipment must be used on electric current as specified on the
equipment nameplate. Failure or other equipment damage caused by operating on
current not as indicated is exempt and excluded from this warranty.
Failure or other equipment damage resulting from improper or negligent use or abuse
by the purchaser is exempt and excluded from this warranty.
Repairs performed by anyone other than those designated by Crusader may void
the warranty.
TO OBTAIN WARRANTY SERVICE
Warranted equipment or parts together with proof of purchase date must be shipped
prepaid to:
Crusader Manufacturing, Inc.
2955 Lone Oak Circle #8
Eagan, MN 55121
All warranted defects will be repaired at no additional cost to the customer, and the
product will be returned to the customer freight prepaid.
REPLACEMENT
Crusader may elect, at its own expense, to replace the equipment or warranted part with
another new identical or reasonable equivalent model or part in lieu of repairing the defect.
REFUNDS
Under warranty policy, Crusader will not refund the customer’s purchase price.
LIMITED WARRANTY
9
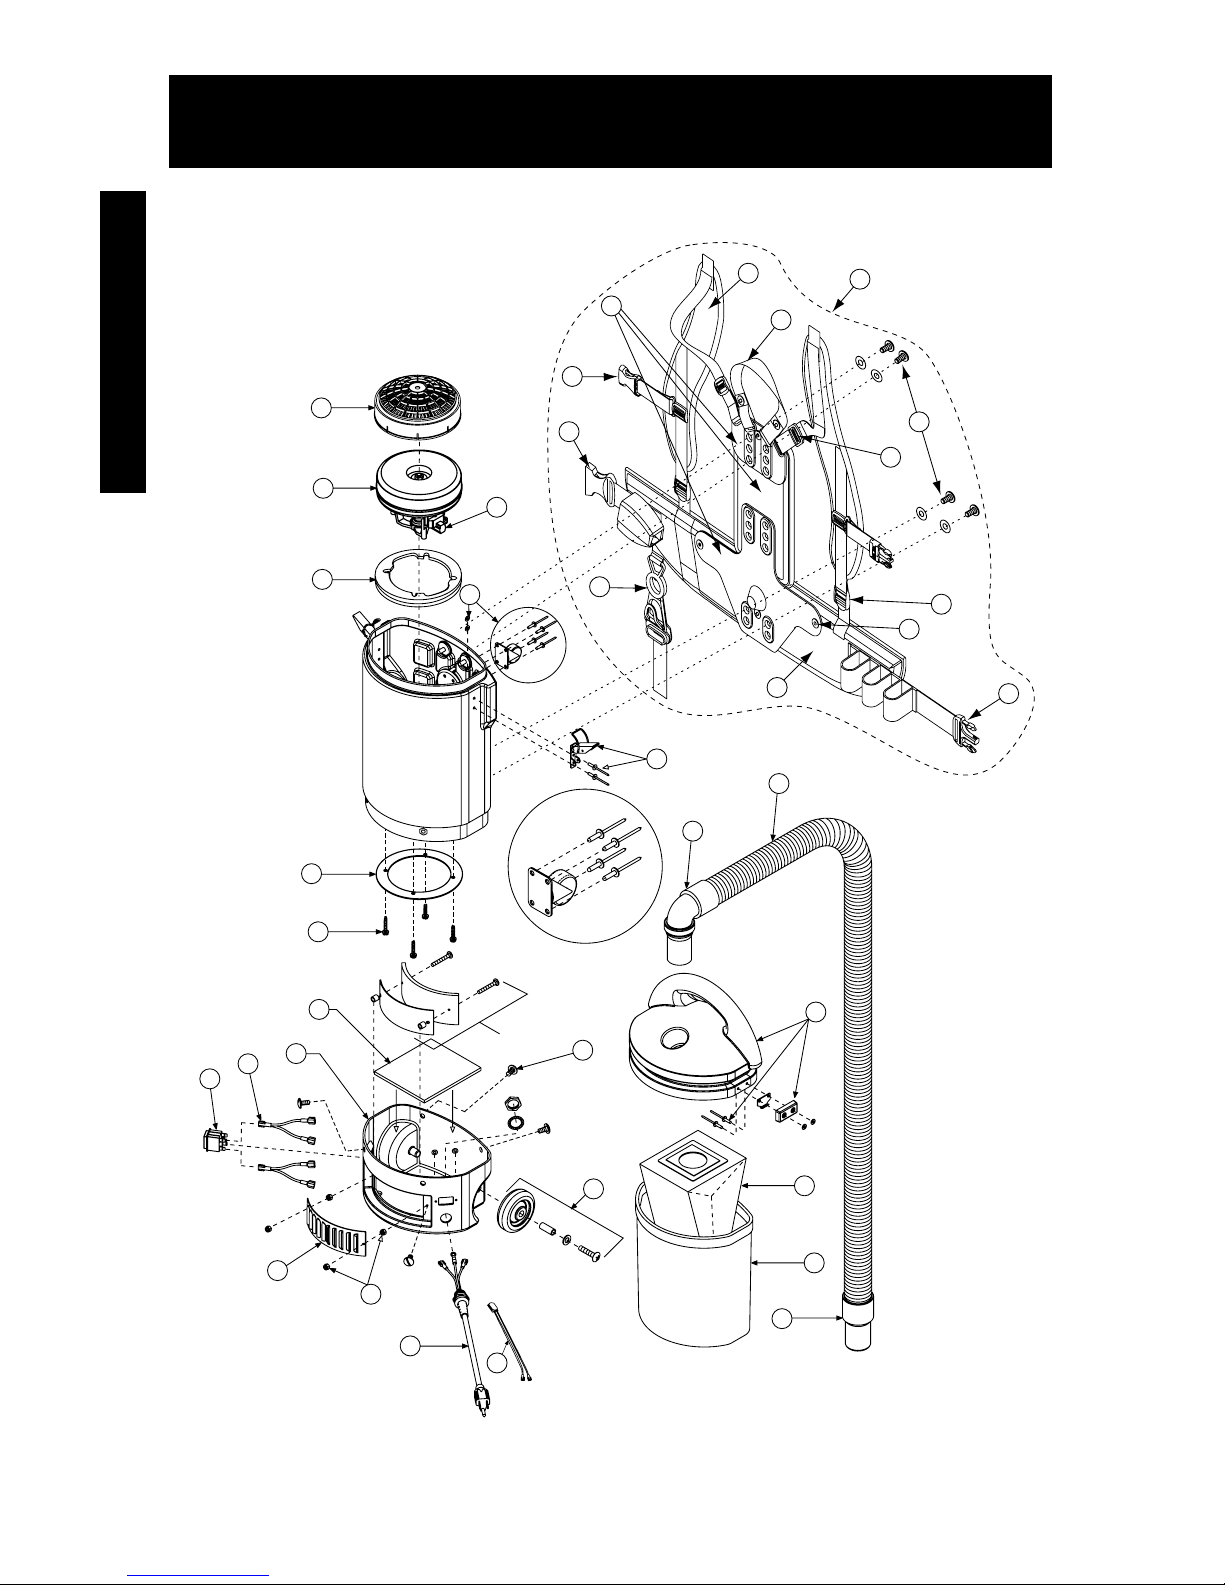
ASSEMBLY
10
1
2
3
5
4
6
7
8
9
10
12
13
14
15
16
17
18
19
20
21
22
23
24
25
26
27
10b
10c
10d
10e
10f
10g
16a
12
11
10a
10h

PARTS LIST
11
ITEM # DESCRIPTION QTY
1 2216 Lid Assembly: 1 Lid, 2 Latch Strikes, 2 Bumpers, 4 Pop Rivets,
4 Washers 1 set
2 4060 454 sq. in. Intercept Micro Filter 10/pk
3 4062 Micro Cloth Filter 1 each
4 4065 Dome Filter w/Foam Media 1 set
5 Foam Filter for Dome Filter 1 each
4061 High Filtration Disc (Optional) 2/pk
6 2231 Motor/Fan w/Crimps 1 each
7 Carbon Brush Set for Motor (Domel) 1 set
8 2232 Motor Seal 1 each
9 Draw Latch Assembly: 1 Latch, 2 Rivets, 2 Washers 1 set
10 4066 Swivel Caster Assembly: 1 Caster, 4 Rivets, 4 Washers 1 set
11 2230 Two-Piece Backplate System Complete (Includes: 11a,11b,11c,11d,11e) 1 set
11a Carry Handle w/Rivet & Washer Set 1 set
11b Shoulder Strap Assembly (Includes: 11d,11c,11g) 1 set
11c Shoulder Strap Plastic Adjustment Buckle (Top) 1 each
11d Shoulder Strap Plastic Adjustment Buckle (Bottom) 1 each
11e Waist Belt 1 each
11f Barrel Nut Connection Set (Replacement) 1 set
11g Sternum Strap Buckles (Latch and Keeper) 1 set
11h Backplate (Includes: 11f) 1 set
12 Backplate Connection Set: 4 Screws (2 Long/2 Short), 4 Washers 1 set
13 Waist Belt Keeper and Latch 1 each
14 Shulte Cord Holder 1 each
15 Motor Plate 1 each
16 Motor Plate Connection Screw Set: 4 Screws 1 set
17 2550 Double Pole On/Off Switch 1 each
17a Wire Splitter 1 each
18 2228 Power Cord (18" 16/3) Assembly Complete w/Strain Relief
w/Locknut and Washer 1 set
19 Powerhead Receptacle Assembly: 1 Three-wire Receptacle,
2 Rivets, 2 Washers 1 each
20 2226 Exhaust Louver 1 each
21 2227 Sound/Exhaust Assembly: 2 Nylock Nuts, 2 Hex Nuts
w/Washers, 2 Screws, 1 Small Acoustic Insulator,
1 Exhaust Bracket, 2 Nylon Spacers 1 set
22 Acoustic Insulator, Large 1 each
23 Bottom Cap Screw Kit: 4 Screws 1 set
24 Bottom Cap (Black) w/Wheel Wells 1 each
25 4066 Rear Wheel Assembly: 2 Wheels, 2 Axle Sleeves, 2 Axle Washers,
2 Axle Screws 1 set
26 4069A Static Dissipating Hose w/Cuffs (Black) 11/4" 1 each
27 4064A Replacement Cuff w/Swivel Elbow (Black) 11/4" 1 each
28 4071 Replacement Swivel Cuff (Black) 11/4" 1 each
29 2223 Thermal Protector 1 each
2221 50’ Extension Cord (Not shown) 1 each

12
INDICE
E
S
P
A
~
N
O
L
INTRODUCCIÓN
Inspección, advertencias, motor, especificaciones eléctricas, instrucciones
de conexión a tierra—Unidades de valor comercial.......................................... 13-14
INSTRUCCIONES DE SEGURIDAD........................................................................15
MANTENIMIENTO PREVENTIVO
Mantenimiento del modelo Crusader Power Nozzle, Cuidado del cable
eléctrico, almacenamiento adecuado .....................................................................16
OPERACION
Solución de problemas, Cómo hacer que la aspiradora funcione
adecuadamente en áreas extensas, Ergonomía ......................................................17
Preparación para su funcionamiento ......................................................................18
Preparación para ser usada con Power Nozzle, Preparacion
Para Utilizar omo Contenedor (Canister)................................................................19
FILTROS
Mantenimiento del filtro.........................................................................................20
INFORMACIÓN DE LA GARANTÍA .......................................................................21
ENSABLAJE.............................................................................................................22
LISTA DE PARTES ..................................................................................................23

13
INTRODUCCIÓN
REVISIÓN
Cuidadosamente desempaque y revise su nueva aspiradora Crusader para ver que no haya
daños por el transporte. Cada unidad se prueba y revisa completamente antes de enviarse.
Para recibir instrucciones respecto a cualquier daño por transporte, contacte de inmediato a
Crusader al (800) 597-3336. Todas las devoluciones deben tener un Número de autorización de
devolución (sigla en inglés RAN). Los productos que incluyen este manual de instrucciones son
para uso comercial.
Este manual del usuario contiene información importante para el uso y funcionamiento seguro
de las aspiradoras detalladas en este manual. Lea este manual cuidadosamente antes de
encender la aspiradora. Guarde el manual en un lugar disponible y haga que todas las
personas que manejan la aspiradora lean este manual. Si no se siguen las instrucciones, podría
ocurrir una lesión o problema o se podría dañar el equipo, los muebles o los edificios.
El contenido de este manual se basa en la información actualizada del producto disponible en
el momento de la publicación. Crusader se reserva el derecho de hacer cambios o mejoras a sus
máquinas o componentes sin previo aviso.
ADVERTENCIAS
uUSE ÚNICAMENTE filtros de repuesto originales Crusader para asegurar un óptimo
desempeño, una mejor calidad de aire en interiores y para mantener válida la garantía
de la aspiradora.
uNO aspire con un cable desgastado, deteriorado o dañado.
uNO aspire líquidos ni exponga la aspiradora a la lluvia o al agua.
uNO aspire materiales tóxicos o peligrosos.
uNO use las aspiradoras para recoger materiales inflamables o combustibles y no los
guarde en el compartimiento de filtros.
MOTOR
Los motores eléctricos de las aspiradoras de flujo nunca se deben usar en aplicaciones que incluy-
an condiciones de lluvia o humedad en las que estén presentes materiales químicos secos u otros
materiales volátiles, o en donde el flujo de aire pueda ser restringido o bloqueado. Estos motores
están diseñados para permitir que el aire aspirado pase sobre el cableado eléctrico para enfriarlo.
Por lo tanto, cualquier líquido (incluyendo el agua), químicos secos u otra sustancia extraña que
pudiera entrar en contacto con conductores eléctricos podría causar combustión (dependiendo
de la volatilidad) o descarga eléctrica. El no tener en cuenta estas precauciones podría resultar en
daño a la propiedad y lesiones personales severas, incluyendo la muerte en casos extremos.
ELÉCTRICO
Todos los modelos de espalda están disponibles en 120 volt/60Hz. Algunos modelos Crusader
están disponibles en 220 volt/50Hz. Llame a Crusader para conocer la disponibilidad de
aspiradoras de 220 volt/50Hz. Los cambios bruscos en el voltaje, altos o bajos, pueden causar
daños al motor y causar fallas prematuras del motor. Los números y especificaciones del
modelo se pueden obtener al llamar a Crusader.
Las aspiradoras descritas en este manual están equipadas con protección térmica. El interruptor
térmico integrado disipará la energía del motor de la aspiradora en caso de que se detecte una
temperatura de funcionamiento excesivamente alta. Esta condición es normalmente el resultado
de que una parte de la aspiradora esté bloqueada o atascada o que la bolsa del filtro está llena.
Si hubiera un disparo térmico, apague de inmediato la aspiradora, revise si hay un bloqueo
y verifique el estado de la bolsa del filtro. La aspiradora requerirá varios minutos para enfriarse y
llegar a una temperatura segura para funcionar. Cuando se alcanza dicha temperatura, la
aspiradora funcionará automáticamente de manera adecuada.

14
INTRODUCCIÓN
INSTRUCCIONES DE CONEXIÓN A TIERRA
ESTAS ASPIRADORAS DEBEN SER CONECTADAS A TIERRA. Si la aspiradora no funcionara bien o
dejara de funcionar, la conexión a tierra le proporciona un camino de menos resistencia para la
corriente eléctrica, por lo tanto se reduce el riesgo de descarga eléctrica. Esta unidad está equi-
pada con un cable que tiene un conductor con equipo a tierra y un enchufe a tierra. El enchufe
se debe insertar en un toma corriente adecuado que esté bien instalado y conectado a tierra de
acuerdo con los códigos y ordenanzas locales. Cortar el cable a tierra o usar un cable que no esté
equipado con un enchufe a tierra anulará la garantía de la unidad y Crusader NO aceptará nin-
guna
responsabilidad asociada con la unidad.
ADVERTENCIA: La conexión inadecuada del conductor conector con equipo a tierra puede
resultar en un riesgo de descarga eléctrica. Consulte con un electricista certificado o con una
persona de mantenimiento si tiene dudas acerca de si el toma corriente está conectado a tierra
de manera adecuada. No modifique el enchufe que viene con la aspiradora. Si no se ajusta al
toma corriente, haga que un electricista certificado le instale un toma corriente adecuado.
Esta aspiradora se debe usar en un circuito nominal de 120 voltios y tiene un enchufe de conexión
a tierra que se ve como el que aparece en la ilustración A figura AA. Un adaptador temporal que
se ve como el que aparece en las imágenes B y C se puede usar para conectar el enchufe en un
tomacorriente de 2 polos como se muestra en la imagen B si no se tiene disponible un
tomacorriente adecuadamente instalado a tierra. El adaptador temporal se debe usar únicamente
hasta que un electricista certificado instale un tomacorriente instalado a tierra de manera adecua-
da (imagen A). El reborde rígido de color verde, terminal o similar que sale del adaptador se debe
conectar a tierra como por ejemplo a una cubierta de toma corriente conectada a tierra de mane-
ra adecuada. Cuando se use el adaptador, se debe mantener en su lugar con un tornillo metálico.
Nota: en Canadá, el uso de un adaptador temporal no está permitido según el Código Eléctrico
Canadiense.
Para Canadá – Esta aspiradora se debe usar en un circuito nominal de 120 voltios y tiene un
enchufe a tierra que se ve como el que aparece en la ilustración A figura AA. Asegúrese de
conectar la aspiradora en un tomacorriente que tenga la misma configuración del enchufe.
No se debe usar ningún adaptador con la aspiradora.
Figura AA
GROUNDED
OUTLET
GROUNDING
PIN
GROUNDED
OUTLET BOX
(A) (B)
ADAPTER
METAL
SCREW
TAB FOR
GROUNDING SCREW
(C)

15
INSTRUCCIONES DE SEGURIDAD
ADVERTENCIA
Para reducir el riesgo de incendio, descarga eléctrica o lesiones, LEA TODAS
LASINSTRUCCIONES ANTES DE SU USO.
El incumplimiento de las siguientes instrucciones puede resultar en lesiones
personaleso incendio.
1. NO deje ninguna aspiradora Crusader conectada cuando no la esté usando. Desconecte la
unidad del tomacorriente antes de hacerle mantenimiento.
2. NO use la aspiradora en exteriores o sobre superficies mojadas.
3. NO trate de recoger ningún tipo de líquido con esta aspiradora. Esta aspiradora es sólo para
aspirar EN SECO.
4. De únicamente el uso que se describe en este manual. Use sólo los accesorios y partes de
repuestos recomendadas por el fabricante.
5. Para prevenir daños eléctricos, use el cable de extensión recomendado que se proporciona de
50 – pies / calibre 16. Si necesita usar un cable de 100 pies, debe ser calibre 14 o mejor. NO
use cables más largos de 100 pies.
6. NO USE NI CONECTE UN CABLE DAÑADO. Si la unidad no está funcionando como debería
ser, o si se ha dejado caer, dañar, en exteriores o expuesta al agua, llévela a una estación
autorizada de garantía Crusader para que se la revisen (800) 597-3336.
7. NO hale o transporte la aspiradora por el cable ni use el cable como manija. No cierre una
puerta sobre el cable ni hale el cable alrededor de bordes o esquinas afiladas. No corra sobre
el cable. Mantenga el cable lejos de superficies calientes.
8. NO hale el cable para desconectarlo. Agarre el enchufe desde el tomacorriente y hale.
9. NO manipule el enchufe o la aspiradora con las manos mojadas.
10. NO coloque ningún objeto en los orificios o aberturas. Mantenga el cabello, las prendas de
vestir holgadas, los dedos y todas las partes del cuerpo lejos de los orificios y partes en funcio-
namiento. El cabello largo no debe colgar sobre o cerca de la unidad.
11. NO aspire materiales inflamables o combustibles ni nada que esté ardiendo o humeando,
como cigarrillos, cerillos o fósforos, o cenizas calientes.
12. Vacíe el Micro Filtro Intercept® después de cada uso y antes de guardar la aspiradora.
13. Apague la unidad antes de desconectarla.
14. Conecte únicamente a un tomacorriente conectado a tierra de manera adecuada. Consulte las
"instrucciones de conexión a tierra".
15. Use con precaución al limpiar escaleras.
16. NO permita que la aspiradora se use como juguete. Ponga mucha atención cuando use la
aspiradora cerca de niños.
17. Al usar modelos de aspiradora con boquilla ancha (power nozzle): Apague siempre el aparato
antes de conectar o desconectar cualquier manguera o boquilla motorizada. Dependiendo del
modelo de su aspiradora, la manguera puede contener cables eléctricos. No use cuando estén
dañados, cortados o perforados. Evite recoger objetos afilados.
18. NO use la aspiradora sin que los filtros estén en su lugar.
SIGA ESTAS INSTRUCCIONES – La violación de cualquiera de estas
instrucciones puede anular cualquiera o todas las garantías.

16
MANTENIMIENTO PREVENTIVO
PRECAUCIÓN: La siguiente información es únicamente para ser utilizada por personal de
servicio calificado y proporciona orientaciones para problemas y mantenimiento bajo
condiciones de trabajo normales.
n DESCONECTE la aspiradora al trabajar en el motor o en cualquier parte eléctrica.
n REVISE en qué estado están todos los cables eléctricos antes de cada uso.
n NO lubrique el motor; está equipado con soportes sellados.
AL RECIBIRLA
Revise la unidad para ver si tiene algún defecto o partes dañadas (interruptores, etc.). Llame a
Crusader para informárselo y para cualquier pregunta que pueda tener.
DIARIAMENTE/DESPUES DE CADA USO
Revise el Micro Filtro Intercept. Vacíelo/sáquelo si está lleno. Todas las aspiradoras Crusader deben
utilizar Micro Filtros Intercept Crusader originales para mantener válida la garantía de la aspira-
dora. Revise el Micro Filtro de tela. Si está sucio, lávelo y déjelo secar al aire antes de volver a colo-
carlo en la aspiradora. Todos los filtros deben estar en su lugar para operar la aspiradora. Esto
mantendrá continuo el flujo de aire y evitará que el motor se sobreesfuerce. Revise el cabezal.
Retire cabellos, hilos, pelusas, etc. enredados alrededor del rodillo con una cuchilla u hoja de
afeitar. Tenga cuidado de no dañar las franjas de cepillo en el cepillo de rodillo.
PERIÓDICAMENTE
Revise la correa del cabezal y reemplácela cuando sea necesario. Ajuste las correas o arnés
adecuadamente para su comodidad. Reemplace las piezas perdidas o dañadas. Reemplace los
cepillos de carbono del motor. Los cepillos se deben reemplazar por nuevos cepillos. Los viejos se
deben desechar.
1. Los cepillos de carbono del motor de la aspiradora se deben reemplazar después
de las primeras 800 horas de funcionamiento por una persona de servicio autorizado de
Crusader o en un centro de garantía.
2. Los cepillos de carbono se deben reemplazar de nuevo después de las siguientes
400 horas de funcionamiento por una persona de servicio autorizado de Crusader o
en un centro de garantía.
3. Los cepillos de carbono se deben reemplazar de nuevo después de 200 horas de funciona-
miento por una persona de servicio autorizado de Crusader o en un centro de garantía.
MANTENIMIENTO DEL POWER NOZZLE (BOQUILLA DE SUCCIÓN) de Crusader
nNO LO ENGRASE. El motor de su power nozzle (boquilla de succión) permanece lubricado y
sellado. Nunca engrase el motor.
nPara mantenimiento del power nozzle (boquilla de succión), incluyendo las instrucciones para
el cepillo de rodillo, correa y franjas de cepillo, consulte las instrucciones que vienen con el
power nozzle (boquilla de succión).
nLas instrucciones de mantenimiento del power nozzle (boquilla de succión) son para ser
tilizadas únicamente por personal de servicio calificado.
CUIDADO DEL CABLE ELÉCTRICO
NUNCA estire el cable demasiado entre la aspiradora y el tomacorriente. Un
cable que se estira o hala no funcionará de manera adecuada y causa riesgos.
Después de aspirar, desconecte el cable de extensión de los dos extremos y
enróllelo sin apretar (Figura BB). NO enrolle el cable envolviéndolo en su
mano y codo.
Sólo se debe usar un cable de extensión de repuesto Crusader, o uno con
el largo adecuado para su aplicación, consulte las instrucciones importantes
de seguridad, numeral 5. El tipo de cable de extensión debe ser SJTW.
ALMACENAMIENTO ADECUADO
La aspiradora y el cable de extensión se deben guardar bajo techo y en un lugar seco.
Figura BB

17
OPERACIÓN
SOLUCIÓN DE PROBLEMAS
1. Si la aspiradora no funciona, revise:
a. El cable de energía en el tomacorriente de la pared.
b. El cable de energía en la aspiradora.
c. Que el interruptor esté en la posición de “encendido” y funcionando adecuadamente.
2. Si el cable flexible de conexión (cable de 18") comienza a calentarse, revise que el cable
de extensión calibre 16 no exceda los 50 pies o si es calibre 14, que no exceda los 100
pies. Los cables más largos recalentarán y dañarán la aspiradora.
3. Si el tubo de escape que sale de la parte inferior de la aspiradora está más caliente de lo
normal, revise, limpie o vuelva a reemplazar los 4 filtros.
4. Si el interruptor de energía falla, revise el interruptor automático del circuito. Si ese no es
el problema, diríjase a una estación de garantía Crusader®.
5. Si hay pérdida de succión:
a. Revise que no haya escombros o basuras tapando la manguera, el tubo y o el
aditamento de piso.
b. Revise, limpie o reemplace los dos filtros: el Micro Filtro y el filtro de tela.
c. Revise que las piezas de unión de la manguera se ajusten bien a la manguera y que
no estén agrietadas.
d. Revise que la tapa esté bien colocada al cuerpo de la aspiradora.
CÓMO HACER QUE LA ASPIRADORA FUNCIONE
ADECUADAMENTE EN ÁREAS EXTENSAS
1. Comience con el tubo paralelo a su cuerpo.
2. Acerque la parte superior del tubo hacia su cintura y gire la
cintura caminando hacia adelante o hacia atrás (en un
movimiento de lado a lado) (Figura U).
3. El movimiento es similar al que se hace cuando se trapea y así la
parte superior del cuerpo y los brazos no se cansan.
ERGONOMÍA
n El peso de la aspiradora debe recaer sobre as
caderas del operario y ser distribuido equitativamente. La correa
para la cintura acolchada y las correas para los hombros son ajustables
para cada persona.
n Las aspiradoras tienen la placa base (backplate) ventilado que ayuda a que el operario se
mantenga fresco.
n El interruptor de encendido y apagado está colocado convenientemente para que sea de
fácil acceso en el cinturón o correa para la cintura de las aspiradoras para la espalda, en
el lado izquierdo del cuerpo, y en la parte superior del contendor. En la Crusader Power
Nozzle, el interruptor de encendido y apagado está en la manija de la manguera eléctrica.
n Utilice los aditamentos adecuados para cada trabajo. Crusader cuenta con aditamentos para
realizar la mayoría de los trabajos sin que el operario tenga que agacharse o estar en una
posición difícil.
Figura U
OPERACIÓN
18
PREPARACIÓN PARA SU FUNCIONAMIENTO
1. Abra y retire la tapa y saque el filtro de tela. Revise que el filtro
de domo no se haya movido durante el envío o transporte
(Figura A). Vuelva a colocar el filtro de tela asegurándose que
el borde del filtro cubra completamente el reborde o contorno
de la aspiradora. (Figura B).
2. Instale un Micro Filtro dentro del filtro de tela (si no hay uno
instalado). Deslice la arandela del Micro Filtro sobre la entrada
en el interior de la tapa (Figura C). Se deben revisar los filtros
antes de comenzar cada aspirada. Desocupe o cambie los filtros
cuando sea necesaria.
NOTA: Nunca utilice un Micro Filtro sin el filtro de tela.
(El empaque de caucho del filtro de tela proporciona el
cierre o sello.)
3. Vuelva a colocar la tapa, asegúrese de que los seguros o
cerrojos encajen correctamente. Presione la manguera dentro
de la apertura de la tapa.
4. Gire el tubo de aluminio dentro de la manguera (Figura D).
Revise que las piezas de unión de la manguera en ambos
extremos estén ajustadas.
5. Afloje las correas de los hombros y las correas de la cintura. En
un área abierta, levante la aspiradora de una correa para los
hombros y deslice el brazo libre por la otra correa (Figura E).
6. Apriete las correas de la cintura hasta un punto cómodo para
usted y asegúrese que el peso recaiga confortablemente sobre
sus caderas (Figura F).
7. Sujete el portable (que tiene el cable de extensión enrollado)
al lazo triangular en la correa de la cintura (Figura F). No
amarre el cable de extensión junto con el de alimentación.
Esto puede dañar ambos cables y no contará con la cobertura
de la garantía (Figura G).
8. Para colocar los aditamentos a un tubo de aluminio de 11/2",
AFLOJE la tuerca plástica que se encuentra al final del tubo,
inserte el aditamento y vuelva a apretar la tuerca. Para
asegurarse de que el aro de cobre permanezca en su lugar,
NUNCA retire la tuerca.
Figure D
Figure E
Figure A
Figure C
Figure F Figure G
Figure B
Table of contents
Languages:
Other Crusader Vacuum Cleaner manuals


