CT Lab Impedo DUO User manual

Impedo DUO®
Power Quality Recorder
User Manual
Version 2.4
CT LAB
(Pty) Ltd
PO Box 897, Stellenbosch, 7599, South Africa
15 Termo Lane, Techno Park, Stellenbosch, 7600, South Africa
Tel:
+27 21 880 9915
Fax: +27 21 880 1088
Email: info@ctlab.co.za
Web: www.ctlab.com
© CT LAB (2015)

Impedo DUO User Guide
2
Table of Contents
1 Safety Instructions 7
1.1 Symbols......................................................................................................... 7
1.2 Safety Standards Compliance ................................................................. 7
1.3 General Safety Information ..................................................................... 8
1.4 Statements and Notices ............................................................................ 9
1.4.1 Statement of reliability .................................................................................. 9
1.4.2 Proprietary rights ............................................................................................ 9
1.4.3 Copyright ............................................................................................................ 9
1.4.4 Trademarks ....................................................................................................... 9
1.4.5 Validity and applicability of this document ............................................ 9
2 Introduction to the Impedo Duo 10
2.1 Impedo Duo Product Description ........................................................10
2.2 Receiving your Impedo Duo ..................................................................11
2.2.1 Receiving your shipment ............................................................................ 12
2.2.2 Unpacking the goods .................................................................................... 13
2.2.3 Return shipment ............................................................................................ 13
2.3 Instrument Overview ..............................................................................14
2.3.1 Key Features .................................................................................................... 14
2.3.2 Impedo DUO External Interfaces.............................................................. 16
2.3.3 Power sources ................................................................................................ 17
2.3.4 Communication .............................................................................................. 17
2.3.5 Osprey Pro (Enterprise Support) ............................................................. 18
2.3.6 Sampling Rate ................................................................................................. 18
2.3.7 The 1/6th Sense .............................................................................................. 18

Impedo DUO User Guide
3
2.3.8 Event Recording ............................................................................................. 19
2.3.9 10/12-Cycle Block Recording.................................................................... 19
2.3.10 Variable time interval trends..................................................................... 20
2.3.11 Synchrophasors.............................................................................................. 20
2.3.12 Measured parameters .................................................................................. 21
2.3.13 Technical Specification ................................................................................ 24
2.4 Impedo Duo External Interfaces ..........................................................27
2.4.1 Physical Appearance .................................................................................... 27
2.4.2 Power Supply .................................................................................................. 29
2.4.3 Voltage Inputs ................................................................................................. 32
2.4.4 Current Sensor Inputs .................................................................................. 34
2.4.5 Current Transducer Inputs ........................................................................ 36
2.4.6 Relay Outputs.................................................................................................. 37
2.4.7 GPS ...................................................................................................................... 38
2.4.8 Ethernet Ports................................................................................................. 39
2.4.9 USB Peripheral Ports .................................................................................... 40
2.4.10 OLED Display .................................................................................................. 40
2.4.11 Multi-Touch Display ..................................................................................... 41
2.5 Firmware ....................................................................................................41
2.5.1 Upgrading ......................................................................................................... 41
3 Operating Instructions 42
3.1 Precautions when first using the device............................................42
3.2 Checking the Battery Level ....................................................................43
3.3 Powering up the Impedo Duo ...............................................................44
3.4 Impedo Duo Unlock Screen ...................................................................45
3.5 Shutting down ...........................................................................................46
3.6 Power Cycling with the Reset Switch ..................................................47

Impedo DUO User Guide
4
4 OLED Information Display 48
4.1 Meter points ..............................................................................................48
4.2 Serial Number ...........................................................................................49
4.3 IP Address ..................................................................................................49
4.4 Firmware Version ....................................................................................49
4.5 Temperature .............................................................................................49
4.6 Battery Status............................................................................................49
4.7 On-Board Storage Usage ........................................................................50
4.8 Time source ...............................................................................................50
4.9 Connection to server ...............................................................................51
4.10 Ethernet connectivity .............................................................................51
4.11 Time of Day and Date ..............................................................................51
4.12 Device in error state ...............................................................................51
5 Embedded Operating Software (EOS) 52
5.1 EOS Subsystems ........................................................................................52
5.1.1 Meter Gateway................................................................................................ 52
5.1.2 Storer ................................................................................................................. 53
5.2 Communicating with the Impedo Duo ...............................................53
5.3 Data Recording .........................................................................................54
5.3.1 Meter points .................................................................................................... 54
5.3.2 Time ................................................................................................................... 55
5.4 How to navigate within EOS ..................................................................57
5.5 Application Selection Screen ................................................................58
5.6 Registration ...............................................................................................59
5.6.1 Account ............................................................................................................. 59
5.6.2 Standalone ....................................................................................................... 59
5.6.3 Osprey Pro (Enterprise) .............................................................................. 59

Impedo DUO User Guide
5
5.7 Preferences ................................................................................................60
5.7.1 Ethernet ............................................................................................................ 61
5.7.2 Manage Instrument ....................................................................................... 63
5.7.3 Miscellaneous ................................................................................................. 64
5.7.4 Time Zone ........................................................................................................ 67
5.8 Meter Config ..............................................................................................68
5.8.1 Creating a New Meter Point ....................................................................... 68
5.8.2 Detaching a Meter Point .............................................................................. 73
5.8.3 Editing a Meter Point.................................................................................... 73
5.8.4 Attaching a Previously Created and Configured Meter Point ......... 74
5.8.5 Configuring a Meter Point........................................................................... 74
5.9 Realtime View ...........................................................................................78
5.9.1 Fundamentals ................................................................................................. 78
5.9.2 Power................................................................................................................. 79
5.9.3 Harmonics ........................................................................................................ 80
5.10 PQ Events....................................................................................................81
5.11 Log Viewer .................................................................................................82
5.12 Timed Recording ......................................................................................83
5.13 Export ..........................................................................................................84
5.14 Manage Data .............................................................................................86
6 Impedo Duo Installation 88
6.1 Mounting the Impedo Duo .....................................................................88
6.1.1 Panel Mounting Installation ....................................................................... 88
6.1.2 19” Rack Mounting Installation ................................................................ 90
6.1.3 Portable version ............................................................................................. 91
6.2 Connections ...............................................................................................92
6.2.1 AC Power .......................................................................................................... 92

Impedo DUO User Guide
6
6.2.2 Power Over Ethernet (PoE) ....................................................................... 93
6.2.3 Instrument Activation .................................................................................. 93
6.2.4 Voltage connections ...................................................................................... 94
6.2.5 Current connections ..................................................................................... 99
6.2.6 Ethernet Based Communication ............................................................ 103
6.2.7 GPS ................................................................................................................... 103
6.2.8 3G / GPRS Modem ...................................................................................... 103
7 Maintenance 104
7.1 Battery ..................................................................................................... 104
7.2 Display ..................................................................................................... 104
7.3 Transport ................................................................................................ 104
7.4 Storage ..................................................................................................... 104
7.5 Warrantee and Repair ......................................................................... 105
7.5.1 Warrantee Statement ................................................................................ 105
7.5.2 Technical Support ...................................................................................... 106
7.5.3 Sales Assistance........................................................................................... 106
7.5.4 Repair and Calibration .............................................................................. 107
7.5.1 Disposal.......................................................................................................... 108
Appendices 109
8 Impedo DUO dimensions 109
8.1 Panel mounting plates ......................................................................... 110
8.2 19” installation plate ........................................................................... 110
9 Impedo DUO wiring diagram 111
10 Impedo DUO rating plate (Back plat) 112
11 Portable ImpedoDUO 113
12 Accessories and Options 114

Impedo DUO User Guide
7
13 Glossary 118
14 Symbols and Abbreviations 119
1 Safety Instructions
This section provides information on safe handling, installation and commissioning
of the Impedo DUO. Before carrying out any work on the equipment the user should
be familiar with the contents of this document.
Reference should be made to the instrument’s wiring diagram and the ratings
before any installation can commence.
1.1 Symbols
1. Notice Used to call attention to important information.
Caution
Used to indicate operating or maintenance procedures to
be respected in order to prevent damage or destruction
of equipment.
2. Warning
Used to call attention to potential dangerous situations or
danger in general, that requires specific procedures to be
respected in order to prevent personal injury.
1.2 Safety Standards Compliance
The instrument complies with the IEC61010-1 safety standard:
Pollution: Degree 2
Over-voltage category: CAT III
Measurement category: CAT III

Impedo DUO User Guide
8
The instrument complies with the IEC60529 protection standard:
Penetration of dust & water: Class I
IP Rating: IP52
Inadvertent contact
1.3 General Safety Information
Installation and maintenance of the instrument should only be performed by a
qualified and certified electrician/technician with appropriate training and
experience with high voltage and current devices.
The instrument must be installed in accordance with the approved national electrical
codes.
If the instrument is used in a manner not specified by the manufacturer, protection
from electric shock, fire, etc. provided by this equipment may be compromised.
When the instrument is in operation, dangerous voltages will be present in certain
parts of the equipment. Failure to observe warning notices, incorrect use, or
improper use may endanger personnel and the instrument and also cause personal
injury or physical damage. The standard safety precautions must be followed while
performing both the installation and service work.
The terminals exposed during installation, commissioning and maintenance may
present a hazardous voltage unless the equipment is electrically isolated. Failure to
properly isolate the instrument can create a risk of electric shock, injury or death.
Failure to earth the instrument will compromise the correct functioning of the
internal protection circuitry of the instrument.
The user must inspect the instrument and all accessories before use; attention must
be placed on inspecting:
Damage to instrument and accessories – do not use any damaged
equipment.
The rating of the input terminals – Do not apply input voltages above the
rating of the Instrument.
Do not expose the instrument to extreme moisture and or rain. Avoid use should the
instrument be exposed to moisture/rain.
The digital output of the instrument must not be used for primary protection

Impedo DUO User Guide
9
functions. The digital outputs can however be used for secondary protection
functions.
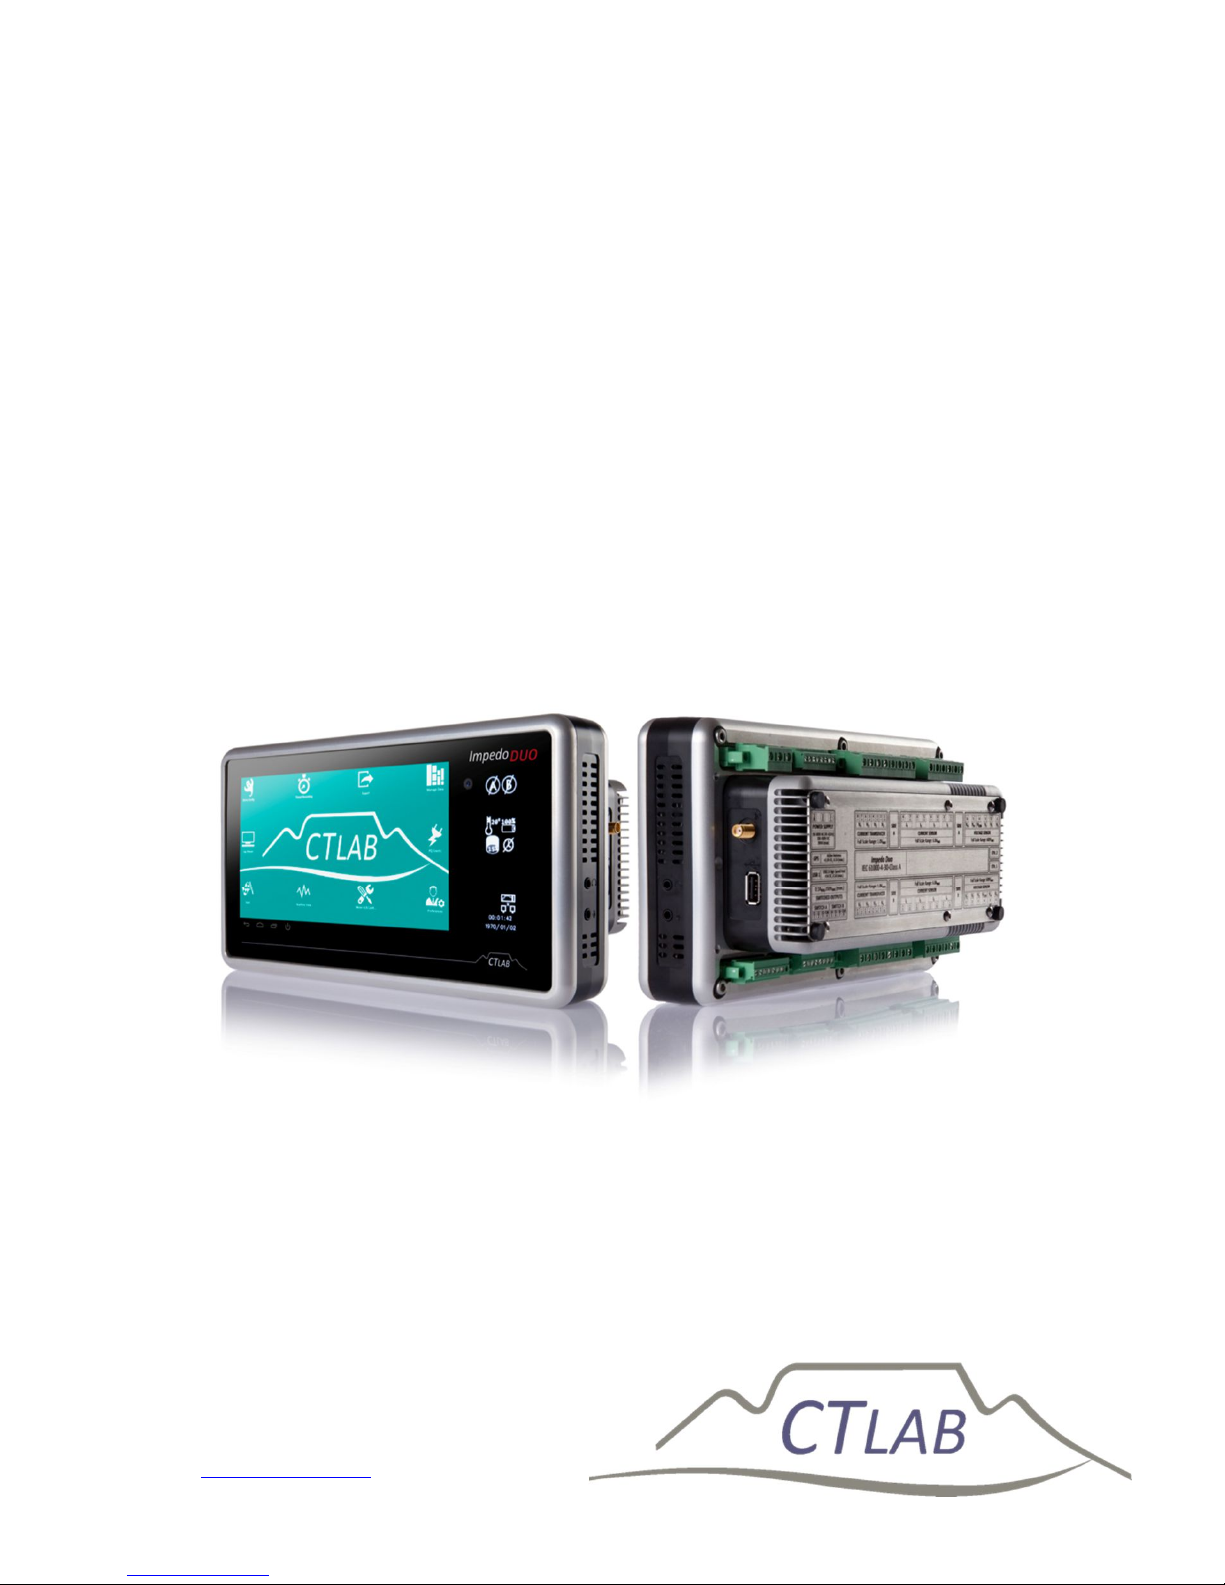
Impedo DUO is intended for indoor installation and use only. If it is required for use
in an outdoor environment then it must be mounted in a specific cabinet or housing
which will enable it to meet the requirements of IEC 60529 with the classification of
degree of protection IP54 (dust and splashing water protected).
Do not use the instrument in situations where failure of the instrument can cause
injury or death, or cause sufficient energy to be released that can start a fire.
1.4 Statements and Notices
1.4.1 Statement of reliability
The information in this manual has been reviewed and is believed to be entirely
reliable, however, no responsibility is assumed for any inaccuracies. All material is for
informational purposes only and is subject to change without prior notice. Please see
www.ctlab.com for the latest copy of this document.
1.4.2 Proprietary rights
This publication contains information proprietary to CT Lab (Pty.) Ltd. By accepting
and using this manual, you agree that the information contained herein will be used
solely for the purpose of operating equipment of CT Lab (Pty.) Ltd.
1.4.3 Copyright
No part of this publication may be reproduced, transmitted, transcribed, stored in a
retrieval system, or translated into any language or computer language, in any form,
by any means, electronic, mechanical, magnetic, optical, chemical, manual, or
otherwise, without the prior written consent of CT Lab (Pty.) Ltd., 15 Termo Lane,
Techno Park, Stellenbosch
1.4.4 Trademarks
Impedo DUO, Vecto II, Osprey Lite, Osprey Pro, Xross-Trigger, Snapshot and 6th-
sense are registered trademarks of CT Lab (Pty.) Ltd.
1.4.5 Validity and applicability of this document
This document is applicable to Impedo DUO V1.7.8. It will only be partially applicable
to other firmware versions.

Impedo DUO User Guide
10
2 Introduction to the Impedo Duo
This chapter provides a quick introduction to the Impedo Duo®. The latest version of
this document is shipped with the instrument but all new releases are available at
www.ctlab.com.
2.1 Impedo Duo Product Description
The Impedo Duo is a comprehensive dual feeder multi-function power monitor and
recorder with GPS locked time synchronisation. The instrument contains two
independent time synchronised meters – each with 4 x voltage and 4 x current
inputs. It has a rugged machined aluminium enclosure and features an on-board GPS,
high-resolution LED Display, multi-touch man-machine interface, 2 x Gigabyte
Ethernet ports and 2 x USB2.0 (HS) ports. All communication is secure and the
instrument is password protected.

Impedo DUO User Guide
11
2.2 Receiving your Impedo Duo
The Impedo DUO packaging is shown Figure 1 with the high-density foam cavity for
the Impedo DUO and the accessories supplied with the instrument. Figure 2 shows
the sealed ImpedoDUO box that is shipped.
Figure 1: Inside of the Impedo DUO box
Figure 2: Closed and strapped Impedo DUO box
The Impedo DUO may be ordered with an optional GPS antenna with an extension
cable as shown in Figure 3. Please contact CT Lab for more information regarding a
GPS antenna-mounting bracket if required.

Impedo DUO User Guide
12
Figure 3: Optional GPS antenna and extension cable
2.2.1 Receiving your shipment
Upon receiving your Impedo DUO shipment, check the following:
Outside
o Box is seal
o Box is not damaged
o Box has no water damage
Inside
o Impedo DUO in a plastic enclosure
o Impedo DUO has no water damage or damp in the plastic enclosure
o Impedo DUO screen is intact and has no cracks
o Ethernet cable, Flash drive and the screw driver is included in the
box
If the shipment is damaged or not in a working condition, please take pictures of the
damage and send the pictures to info@ctlab.com as soon as possible. Please also
phone CT Lab on +27 (21) 880 9915 to handle the problem as soon as possible.

Impedo DUO User Guide
13
2.2.2 Unpacking the goods
Step
Action
1
Remove all literature inside the box on top of the high
-
density foam
2
Remove the
accessories in the accessories cavity
on the
right side of the box. Check that the standard
accessories (see Section 2.2.1) are included.
3
Carefully remove the lid of the high
-
density foam
enclosure
4
Remove the Impedo DUO from the cavity and inspect
for damage
2.2.3 Return shipment
Should the instrument be returned to CT Lab due to damage during
shipment or instrument failure, please follow these instructions:
1. Insert the instrument into a plastic bag to prevent water damage
during shipment transit; and
2. Protect the instrument properly and also put it inside a padded box
to prevent mechanical damage during transit.
3. Complete the fault report and sent it and the instrument to CT Lab.
o Notify info@ctlab.com, provide details on the instrument
and how it was shipped and how it can be tracked and with
a copy of the fault report.
If an instrument is returned to CT Lab due to damage during shipment
please take picture of the box and the instrument before returning the
instrument in the packaging supplied with the instrument.
The package and instrument remain the responsibility of the
client until delivered to CT Lab.

Impedo DUO User Guide
14
2.3 Instrument Overview
2.3.1 Key Features
The Impedo DUO has two independent IEC 61000-4-30 Class A meters in one
instrument with both voltages and currents for two 3-phase feeders.
1. Voltage inputs x 2:
Class A performance over all of the input range inclusive of 63.5 V (if L-
N measurements are done in a 110 V line-line VT circuit)
6 terminals are used for 4 voltage input channels with maximum input
ratings of 600 V.
o The first 4 terminals connect 3 different phase voltages such as in a
3-phase system.
o Input channel 1-3 is referenced to a neutral (4th terminal)
connection. This 4th terminal acts as a reference channel and can be
any phase voltage if a 3-phase line-line voltage circuit is measured.
o If it is a 3-phase line-neutral voltage circuit, then the 4th terminal
will be connected to the neutral voltage.
o The 5th and 6th terminal is the 4th channel and a fully differential (2
terminal) input channel.
2. Current inputs x 2:
4 X 1/5 A CT inputs; and
4 X 1 Vrms differential current transducer inputs
3. Digital Outputs two sets:
3 X Switched outputs with 1 common
4. Digitisation of input signals
500 kHz sampling of primary input signals.
50 kHz is digitally retained and subjected to the IEC 61000-4-30 Class A
signal processing requirements.
5. Power supply
PoE and/or a 90-300 V AC/DC power factor corrected power supply.

Impedo DUO User Guide
15
20 minutes power failure ride-through via an internal LiFePO4 battery.
6. Data storage
4 GB on-board storage providing data storage of all IEC 61000-4-30
voltage and current values of 10-minute and/or variable trended data
up to the 64th harmonic component.
The ImpedoDUO utilise the first in first out principle on default but the
instrument can also be configured to stop when the memory is full. The
instrument can however record more than 6 years of 10 min trended
parameters (including the harmonics and inter-harmonics) and more
than 3 weeks of 3 sec data (harmonics and inter-harmonics).
The use of a SD card for data storage enhances the capability of
the instrument not to lose data, configuration or firmware if
without power for more than 1 year.
7. Time stamping
GPS time synchronization resulting in a time-stamping certainty better
than 100 ns.
NTP time synchronization as an option.
8. Communication
Communication is via Ethernet.
Modbus over Ethernet.
DNP3 over Ethernet.
IEC 61850 – optional.
9. Advanced triggering
User-configurable triggering between different instruments: the
patented Xross-Trigger feature (Described in the Osprey Lite user
manual)
10. Configuration of instrument
Multi-touch user-interface provides configuration and real-time
information display; or

Impedo DUO User Guide
16
By means of an Ethernet connection to a local laptop with Osprey Lite
installed.
11. Data analysis and reporting
Osprey Lite is supplied free of charge and continuously updated.
Download from www.ctlab.com.
It generates both NRS 048 and EN 50160 PQ reports.
It allows basic and advanced analysis of PQ waveform events and
trends.
Data can be exported to in .csv and PQDIF format for additional analysis
in third party software packages.
Data downloading can be automated by configuration of the Impedo DUO with
Osprey Lite.
All measurable PQ parameters can be recordable
simultaneously.
2.3.2 Impedo DUO External Interfaces
2.3.2.1 Voltages
The two 3-phase voltage inputs to the Impedo DUO interfaces directly to 110 V VT
circuits or directly to mains connections, which has to be less than 600 V line-to-
neutral.
Voltage measurements are differential.
6 voltage input terminals are used for each meter.
Input channel 1-3 is referenced to a neutral (4th terminal) connection. This
4th terminal acts as a reference channel and can be connected to any phase
voltage or neutral point if a 3-phase line-line voltage circuit is measured.
If it is a 3-phase line-neutral voltage circuit, then the 4th terminal will be
connected to the neutral voltage.
The 5th and 6th terminal is the 4th differential channel.

Impedo DUO User Guide
17
o It can be used to for example, to measure the difference between
neutral and earth.
2.3.2.2 Currents
Permanently installed 1 A or 5 A CT’s, or clamp-on CT’s interface directly to the
galvanically isolated current inputs.
The instrument calculates the “missing current” by assuming the sum of all currents
is zero. (Please refer to Section 2.4.4 for more info)
Alternatively, 1 VRMS voltage output current transducers can be used to measure
current.
Current to voltage transducers can interface directly to 4 low voltage differential
inputs. (Please refer to Section 2.4.5 for more info)
2.3.3 Power sources
The instrument is powered from a power factor corrected AC supply input (90–300 V
AC/DC).
It can also be powered from an IEEE 802.3-2008 compliant PoE Plus (< 12 W) source.
The internal LiFePO4 battery powers the instrument in the absence of power. This
battery guarantees 2,000 charge/discharge cycles. If cycled once per day, it translates
to at least a 5-year useful life.
Please refer to Section 2.4.2 for more detail.
2.3.4 Communication
Two (2) Gigabyte Ethernet ports facilitate local and networked external
communication. One port is used to interface with corporate networks (DHCP or
fixed IP support). The second Ethernet port is used to create a local network by
means of being a local DHCP server. Please refer to Section 0 for more detail.
The remote support software supports automatic service discovery protocols.
Laptops, when connected to the Impedo DUO, will receive an IP from the instrument.
The remote support software can automatically discover which instruments are
connected to the local network.
Please refer to the Osprey LiteTM user manual for more information.

Impedo DUO User Guide
18
2.3.5 Osprey Pro (Enterprise Support)
When connected, each instrument automatically establishes a permanent secure
communication link to a corporate server (local or internet based). An instrument
management system (IMS) keeps track of each instrument’s location, configuration,
health (telemetry) and PQ data recorded.
Downloading of data is automated and recorded data can be accessed via the
Internet in graphical, tabled and report form as and when it becomes available. Raw
data can be analysed in Osprey ProTM or exported for further analysis in for example
Microsoft ExcelTM or MatlabTM.
Osprey ProTM simplify the analysis of waveform events such as dips and swells by the
time-aggregation of multiple waveform events to single network incidents.
Osprey ProTM classify and report on recorded data according to industry standards
such as NRS048, EN50160 and IEE1158. All communications are encrypted and each
instrument is password protected. More information can please contact CT LAB.
2.3.6 Sampling Rate
The instrument samples all analog input signals at a rate of 500 kHz (10 000 samples
per cycle) and then digitally down-sample the data to 50 kHz (1000 samples per
cycle). All IEC 610000-4-30 parameters are calculated based on this 50 kHz resolution
for both voltage and current.
Waveform and other events are triggered from the 500 kHz digitised waveforms.
These waveforms are locked to the fundamental frequency to prevent multiple zero
crosses.
Captured waveform data can be further subsampled to reduce stored data size. The
user can configure the waveform-sampling rate from 1 kHz to 50 kHz.
Please refer to the Osprey LiteTM user manual for more information on selecting the
down-sampling rate.
2.3.7 The 1/6th Sense
The Impedo DUO calculates a complete set of 1-cycle sliding RMS and fundamental
phasor parameters on each of the 3 voltage phases resulting in a resolution of 6
values per cycle per phase. The IEC 61000-4-30 Class A requirements are based on a
½ cycle sliding approach. This higher resolution data improves the detail of the event
profile and enable more accurate depth/duration calculations.

Impedo DUO User Guide
19
Please refer to the Osprey LiteTM user manual for more information on 1/6th cycle
data.
2.3.8 Event Recording
Users can customise the recording of an event. The IEC 610000-4-30 definition of for
example a dip event, can be changed to improve the understanding of phenomena of
concern.
Upper and/or lower thresholds to define an event can be set by the user based on
waveform, 1/6th sense, 10/12-cycle block and aggregated parameters.
Single-phase and multiple-phase triggers can be defined.
When a threshold is exceeded, the Impedo DUO will retain pre- and post-diagnostic
information of the event.
Please refer to the Osprey LiteTM user manual for more information on event
recordings.
2.3.9 10/12-Cycle Block Recording
The Impedo DUO records all RMS and harmonic data from each 10/12-cycle block
(≈200ms block) for both voltage and current as prescribed by the Class A
performance requirements of the IEC 61000-4-30, edition 3.
These block values contain both amplitude and angle information of all voltage and
current harmonic components up to the 64th harmonic order.
Each block is time-stamped with a 1 s time resolution and within a 100 ns time
uncertainty1.
The user can average N x blocks to reduce the sampling rate for the number of blocks
up to 299 blocks2.
Please refer to the Osprey LiteTM user manual for more information on 10/12 cycle
block intervals and down sampling.
1 When GPS synchronized
2 Averaged block harmonic and unbalance phasors do not contain angle information.

Impedo DUO User Guide
20
2.3.10 Variable time interval trends
10/12-Cycle block RMS and harmonic parameters are aggregated according to IEC
61000-4-30 requirements over a user-defined time interval (1 to 30 minutes).
Clock synchronised parameters are time-stamped with a 1 second time resolution.
2.3.11 Synchrophasors
The Impedo DUO is also a Phasor Measurement Recorder (PMU). Recording of 50 Hz
(or 60 Hz) synchrophasors can be activated in the configuration setup. Please refer to
the Osprey LiteTM user manual for more information.
Note that this can generate large amounts of data. Contact CT LAB for support if
interested in a PMU application.
Table of contents