D-MAX 27X User manual

AUTO FOCUS, DAY&NIGHT
ZOOM COLOR CAMERA
사용 설명서
용서
27X/33X/37X
USER MANUAL

2
1. Precautions 3
2. Features 4
3. Products Components 5
4. Name and Functions of Each Parts 6
1) Front
2) Back
5. Connection 9
1) Connecting to Monitor
2) Connecting to Connection
6. Operating Your Camera 11
1) Menu Configuration
2) Menu Setup
7. Trouble Shooting 35
8. Specifications 36
Contents

3
Cautions
This information is provided to ensure your safety and to prevent any loss, financial,
Please read it carefully and use the products accordingly.
- Warning -
Installation of this product by unqualified personnel is strictly prohibited, Please
consult an experienced installer or authorized retailer for proper installation to avoid
possible fire or electric shock.
If the camera overheats or smoke is noticed, turn off immediately. It may cause
fire
Do not install the product in an area of high humidity or near flammable materials
(e.g oil or gas)
Install the product in an incorrect environment may cause fire, electric shock
damage to the product
Do not install correct installation place, to prevent possible fall to product.
Do not handle power plug with wet hand, it might cause electric shock.
Do not insert foreign objects into the product or disassemble the products. It may
cause ire or damage the product.
- Cautions -
Use only under temperature condition (+50°C~-10°C).
Severe light changes or flickering may hinder normal camera operation.
Fall or strong shock, it may cause malfunction.
Do not exposure direct sunshine or strong light the camera.
Avoid touching the camera lens with finger.
1. Precautions

4
High Magnification Zoom Lens
High 432 x zoom function. (x27 Optical zoom, x16 Digital zoom)
High 528 x zoom function. (x33 Optical zoom, x16 Digital zoom)
High 592 x zoom function. (x37 Optical zoom, x16 Digital zoom)
High resolution 600TVL
Color : more than 600TVL, B/W : more than 700 TVL.
SSNR3 Function
Low illumination noise has been significantly reduced and resulting in a clear and sharp
image display in the dark.
Low illumination, Day Night
The camera automatically determines whether it is night time or day time, selecting
operating mode automatically.
Change B/W mode (0.02Lux) building in ICR DAY & NIGHT in the dark.
DIS Function
Compensate for vibration of camera under the shaking condition.
Motion detection
Once motion is detected, the camera sends an alert signal to the processing unit without
separate sensor (Output MD of External signal)
Miscellaneous Functions
Preset, Privacy Zone Masking, Digital zoom. Image Pause, Mirror Effect, Up Down
reversion etc.
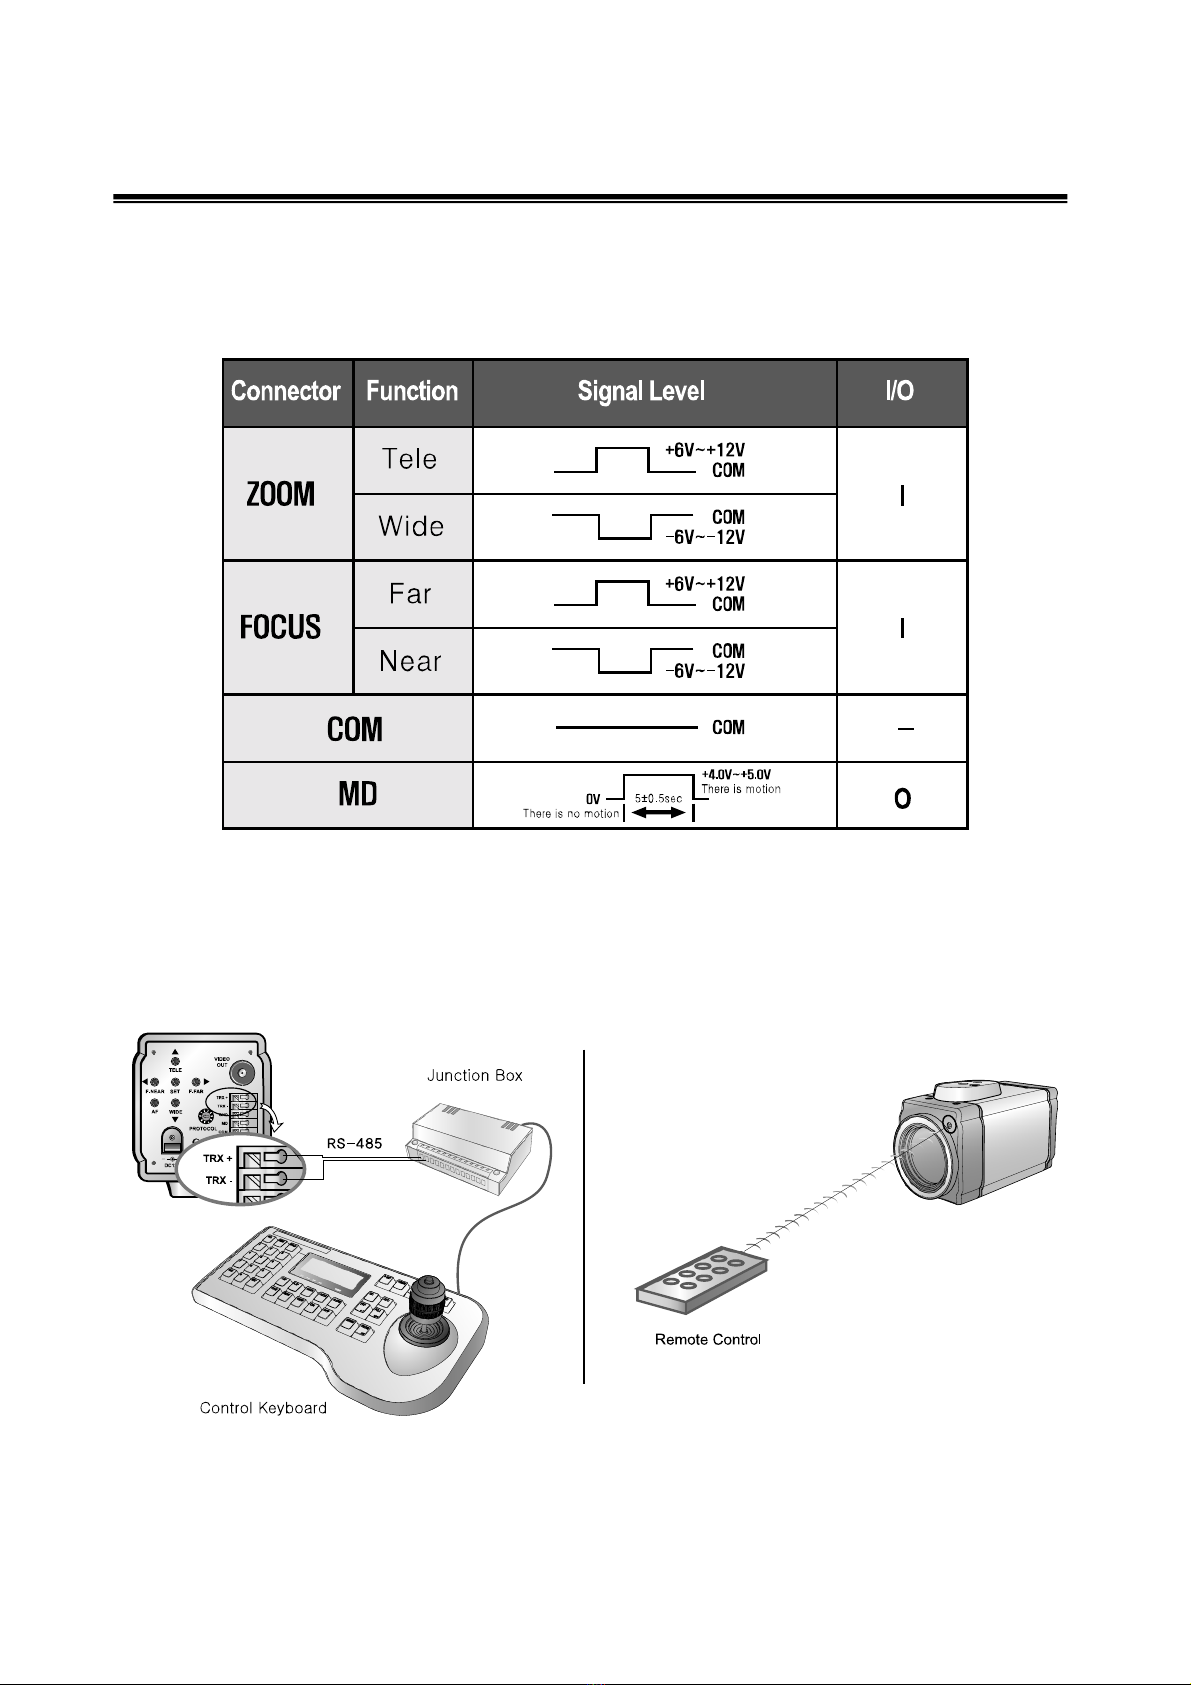
Control via OSD menu and RS-485
The OSD menu and RS-485 pins allow for remote control for the camera, the user can
control the lens using external control connection.
Multi Protocol
Various Protocols available by using Multi Protocol function.
2. Features

5
구성물
1. Color zoom camera
2. Instruction Manual
3. Products Components

6
1) Front
①Tripod Mounting Bracket Screw Hole
Used to fix tripod mounting bracket on top of the
camera.
Tripod mounting is attached on bottom of the
camera but it can install the mounting in the top of
camera when the user need.
* The measurement of suitable screw for the
holes→
②Remote receive
Zoom and focus functions can be controlled by using external controllers
☞ This function is optional
4. Name and Functions of Each Part

7
2) BACK
①Key Buttons
▪UP (TELE button): To move the arrow indicator to up
- To close in on a far object. (ZOOM IN)
▪DOWN (WIDE button): To move the arrow indicator to down
- To widen the view. (ZOOM OUT)
▪SET: To access the main setup menu.
▪LEFT (F-NEAR button): To move the arrow indicator to left
- To see a near object clearly
▪RIGHT (F-FAR button): To move the arrow indicator to right
-Toseeafarobjectclearly
▪AF button: To activate auto focus just once
②Power Input Terminal
- Power supply terminal (DC12V±10%).

8
☞Notes
• If the Adaptor Power Line is extended improperly, it may cause malfunctions since the
camera is affected by unstable voltage condition.
• Ensure Power Supply Source: DC 12V ± 10%, 500㎃
• The wire is polarized. Match “+” and “-“terminals properly
③Video Output Jack
- Used to connect an external video monitor in jack.
④External Control Connector
- Zoom and focus functions can be controlled by using external signal, RS-485
communication.
⑤Power LED
- Illuminates when power is supplied.
⑥Tripod Mount Pole
- Used to install the camera on an optional Tripod or Bracket.

9
1) Connecting to Monitor
Connect Video Out Jack to the monitor's Video In jack as shown below.
• Connect cables with the unit powered down.
2) Connecting to connection
▪External Control Connector
5. Connection

10
Focus and Zoom functions can be controlled by using external signals.
* It can be broken by using Overvoltage.
* MD (Motion Detection) Output Signal Level (less than 10mA)
▪Communication Control Connector

11
1) Menu Configuration
MAIN SETUP MENU
SSNR ▪OFF ▪ON
WHITE BALANCE ▪ATW ▪MANUAL ▪AWC →SET
▪OUTDOOR ▪INDOOR
BACKLIGHT ▪OFF ▪BLC ▪HLC
MOTION DET ▪OFF ▪ON
FOCUS ▪MODE ▪ZOOM TRK ▪ZOOM SPEED ▪D-ZOOM
▪ZOOM POS INIT ▪USER PRESET ▪LENS INIT ▪RET
EXPOSURE ▪BRIGHTNESS ▪IRIS ▪SHUTTER ▪AGC
▪SSNR3 ▪SENS-UP ▪END
SPECIAL ▪PRIVACY ▪DAY / NIGHT ▪DIS ▪SYNC
▪COMM ADJ ▪IMAGE ADJ ▪MONITOR ▪DISPLAY ▪RET
RESET
EXIT
2) Menu Setup
Use the six buttons on back of the camera.
6. Operating Your Camera

12
1. Press the SET button for 2 seconds to access the main setup mode.
• Main setup menu is displayed on the monitor screen.
2. Select the desired feature by using the UP or DOWN button.
3. Change the status of the selected feature by using the LEFT or RIGHT button.
4. When completed, move the arrow indicator to 'EXIT' and press the SET button.
☞Notes
• Features marked with a ‘↙’ have an accessible submenu.
• Some features marked with a ‘---‘ are not available according to the status of setting
option.
Select feature by using
The UP or DOWN
button.
Change the status
by using the LEFT or
RIGHT button.
MAIN SETUP
SSDR ON↙
WHITEBAL ATW
BACKLIGHT OFF
MOTIONDET OFF
FOCUS ↙
EXPOSURE ↙
SPECIAL ↙
RESET
EXIT
MAIN SETUP
SSDR ON↙
WHITEBAL ATW
BACKLIGHT OFF
MOTIONDET OFF
FOCUS ↙
EXPOSURE ↙
SPECIAL ↙
RESET
EXIT

13
SSDR(Super Dynamic Range)
SSDR illuminates darker spots of an image while retaining the same light level for brighter
spots to even out the overall brightness of images with high contrast between bright and
dark spots.
1. When the SETUP menu screen is displayed, select ‘SSDR’ by using the button so that
the arrow indicates ‘SSDR’.
2. Use the button to change the SSDR level according to the contrast between bright and
dark areas.
WHITE BAL
Your camera provides three 'WHITE BAL' control modes for your choosing in adjusting the
white balance.
1. Press the SET button to access the main setup menu and move the indicator to 'WHITE
BAL' using the UP or DOWN button.
2. Set 'WHITE BAL' using the LEFT or RIGHT button.
MAIN SETUP
SSDR ON↙
WHITEBAL ATW
BACKLIGHT OFF
MOTIONDET OFF
FOCUS ↙
EXPOSURE ↙
SPECIAL ↙
RESET
EXIT
MAIN SETUP
SSDR ON↙
WHITEBAL ATW
BACKLIGHT OFF
MOTIONDET OFF
FOCUS ↙
EXPOSURE ↙
SPECIAL ↙
RESET
EXIT

14
※The five white balance control modes are as follows.
▶ATW (Auto Tracking White Balance):
Select This when the color temperature is between 1800°K and 10500°K
▶AWC→SET (Auto White balance Control):
To find the optimal setting for the current luminance environment in this mode, set the
point the camera towards a sheet of white paper and press the SET button. If the
environment changes, readjust it.
▶OUTDOOR:
Select this when the color temperature is between 1800°K and 10500°K. (sodium light
inclusion)
▶INDOOR:
Select this when the color temperature is between 4500°K and 8500°K.
▶Manual:
To fine adjust, select the Manual mode. You can increase or decrease the red or blue
factor while monitoring the difference on the screen. Set to 'MANUAL'mode and press
the SET button. Increase or decrease the value for red(R-Gain) and blue(B-Gain),
watching the color of the picture, and press the SET button when you obtain the best
color.
☞Notes
• Proper White Balance may not be obtained under the following conditions.
①When the scene contains mostly high color temperature object, such as a blue
sky or sunset.
②When the scene is dim.
③If your camera directly faces a fluorescent lamp or is used in an environment of
varying lighting conditions.
WHITE BAL MANUAL SETUP
▶RED 117 |||||||||||||||
BLUE 93 |||||||||||||||
END
Press SET to return

15
BACKLIGHT
When there is a strong backlight behind the object, clear images of the
Background as well as the object can still be obtained by using the
BACKLIGHT function.
1. Please position the arrow to point to 'BACKLIGHT' on the SETUP menu by using the UP
and DOWN buttons.
2. Please select the mode you wish to operate by pressing the LEFT or RIGHT button.
▶BLC: Enables a user to directly select a desired area from a picture, and to view the
area more clearly.
▶HLC (High Light Compensation) : If the scene contains extremely bright light areas
such as, from car headlight, the light can mask out much of the on-screen detail.
▶OFF: Deactivates the BACKLIGHT function.
3. Select a desired mode using the Left and Right button and press the SET button.
zSelect ‘BLC’ to adjust the area to be enhanced and
MAIN SETUP
SSDR ON↙
WHITEBAL ATW
BACKLIGHT OFF
MOTIONDET OFF
FOCUS ↙
EXPOSURE ↙
SPECIAL ↙
RESET
EXIT

16
Enhancement level.
zSelect ‘HLC’ to adjust the HLC MASK TONE and LEVEL.
☞Notes
MOTION DET.
This product has a feature that allows you to observe movements of objects in 8 different
areas on the screen, and the words ‘MOTION DETECTED’ appear on the screen when
movement is detected; hence a single individual can conduct supervision efficiently. The
camera detects an object’s movement by sensing disparity of outline, and level of
brightness and color. The camera receives detection signal from MD output terminal.
1. Please position the arrow to point to ‘MOTION DET’ on the SETUP menu. Using the UP
and DOWN buttons.
zSince the following symptoms may occur according to the ambient illumination when BLC is
selected, set it to OFF.
○
1 Color or screen changes unnaturally.
○
2 Noise appears in the bright part of the screen.
zSince the performance of the BLC function may be affected by the area of the bright part of the
screen, optimize the installation angle for the best BLC performance.
zIf you increase LIMIT, the screen display may be distorted.
zFor high performance of BLC function, We recommend that you set IRIS to AUTO in the EXPOSURE
setup.
zActivating BLC may cause the camera to repeat the Auto Focus operation depending on lighting
conditions. It is recommended that you use Focus Setup menu in One-Push or manual mode.
zSmart Zoom and BLC cannot be used in conjunction with each other.
zSetting up BLC and then Smart Zoom automatically cancels BLC.
zSetting up Smart Zoom and then BLC automatically cancels Smart Zoom.

17
2. Please select the mode you wish to operate by pressing the LEFT or RIGHT button.
①Please press the SETUP button.
- OFF : MOTION DETECTION mode is cancelled.
- ON : Any motion in the selected areas is observed.
▶AREA SEL : Select the area user wants to observe in the 8 areas
▶AREA MODE : Select to appear the word “ MOTION DETECTED” on the screen.
▶SENSITIVITY: You can select up to 8 MD areas.
When SENSITIVITY number is high, motion detection sensitivity is increased to recognize
even small movement.
▶SMART ZOOM : Smart Zoom is operated in connection with MOTION DETECTION.
When the SMART ZOOM function is ‘ON’ while the MOTION DETECTION mode is ‘ON’,
the zoom goes to the TARGET ZOOM position once motion is detected. Once the zoom
action is finished and ‘DWELL TIME’ has passed the zoom to the ‘START ZOOM’
position.
MAIN SETUP
SSDR ON↙
WHITEBAL ATW
BACKLIGHT OFF
MOTIONDET OFF
FOCUS ↙
EXPOSURE ↙
SPECIAL ↙
RESET
EXIT

18
•START ZOOM : Use the left or right button in the ‘START ZOOM’ item to select the zoom
position from 1x to 27x (or 33x) to be returned after the ‘SMART ZOOM’ action is over.
•TARGET ZOOM : Use the left or right button in the ’TARGET ZOOM’ item to select the
zoom position from 1x to 27x (or 33x) to be used during motion detection.
•DWELL TIME : Use the left or right button in the ‘DWELL TIME’ item to select a time
between 5 and 60 seconds for the dwell time before the zoom is returned to the ‘START
ZOOM’ position. (5, 7, 10, 15, 20, 30, 40, 60 sec)
•TOP, BOTTOM, LEFT, RIGHT buttons : You can adjust the size of the area.
☞Notes
Tips on Using the Motion Detection Feature
• The feature may not function properly under flickering light conditions.
• The camera interprets sudden changes in lighting and subsequent change in brightness
of an object as motion.
• With the feature enabled, other algorithms may require additional time to operatethan
usual.
• This system does not guarantee prevention of fire or theft. The manufacturer shall not be
held responsible for any accident or damage incurred.
• Connect an external alarm device to MD Out on back of the camera.
• Be careful of that MD Out can be appeared according to the moving of zoom.
FOCUS
1. Press the SET button to access the main setup manu and then position the indicator
over FOCUS using the UP or DOWN button.
2. Press the SET button.
▶MODE : You can select the most suitable zoom mode. Move the arrow indicator to
‘MODE’ by using UP or DOWN button. Digital zoom is operated after optical zoom (x27,
x33, x37) is finished.
MAIN SETUP
SSDR ON↙
WHITEBAL ATW
BACKLIGHT OFF
MOTIONDET OFF
FOCUS ↙
EXPOSURE ↙
SPECIAL ↙
RESET
EXIT

19
•MANUAL :
Select 'MANUAL' and press the SET button to
confirm. Increase or decrease optical zoom
(ZOOM) or digital zoom (D-ZOOM) positions by
using the directional buttons while verifying the
changes on screen. Press the SET button once
desired image quality is obtained. Focus can be
manually adjusted, independent of moving zoom.
▶ZOOM TRACK: Select ‘ON’ for the ‘SMART ZOOM’ item in the motion detection menu
and press SET button to change the settings for the ‘SMART ZOOM’ funtion.
Use the left or right button in the ‘ZOOM’ item to select ‘AUTOTRACK’ or ‘TRACK’ and
press SET button to activate the zoom action focus function.
•ONE PUSH :
Focus is automatically adjusted just once, after
zoom position is changed. Select 'ONE PUSH'
and press the SET button to confirm. Increase or
decrease optical zoom (ZOOM) or digital zoom
(D-ZOOM) positions by using the directional
buttons while verifying the changes on screen.
Press the SET button once desired image quality
is obtained.
•AUTO :
Select AUTO and press the SET button to
confirm. Increase or decrease optical zoom
(ZOOM) or digital zoom (D-ZOOM) positions by
using the UP or DOWN button while verifying the
changes on screen. Enabling D-ZOOM (ON)
means that digital zoom will activate once optical
zoom ends. Focus is automatically adjusted with
moving zoom.

20
• AUTOTRACK: Zooming in while deciding or adjusting the status of the focus.
• TRACK: Zooming in with no relevance to the focus.
• OFF: Only the zoom lens moves.
▶ZOOM SPEED : Configure zoom tracing speed by using this feature. Position the
indicator over 'ZOOM SPEED' by using the UP or DOWN button and
then set todesired mode by using the LEFT or RIGHT button.
zFAST : To move zoom fast.
zMEDIUM : To move zoom at medium speed.
zSLOW : To move zoom slowly.
☞Notes
zThe ‘ZOOM SPEED’ mode cannot be used if ‘MODE’ is set to ‘AUTO’ and ‘ZOOM
TRAKck’ is ‘ON’.
▶D-ZOOM : Configure magnification limit from x2~x16 using this feature. Position the
indicator over 'D-ZOOM' by using the UP or DOWN button. Set 'D-
ZOOM' to'ON' and press the SET button to confirm.
zSet ‘ZOOM LIMIT’ to the desired level Using the LEFT or RIGHT button.
This manual suits for next models
2
Table of contents