Daewoo DW-444PA User manual

INSTALLATION
Electrical Connection
In case of 3-core cord: The power plug must be connected to an earthed 3-pin power point
within reach of the power cord.
In case of 2 conductor power cord: Connect the grounding wire to a water faucet etc. Make sure
that the power cord is unplugged during ground work.
Connection of Hoses
Attach the drain hose to the drain outlet at the left side of
the under base and secure with the clamp provided.
Hang the "U" Shaped outlet of the drain hose on the
edge of a sink.
Place of installation
Choose a place on a horizontal solid floor. If the machine is installed on an unstable floor, heavy
vibration will result during spin.
Attach the water inlet hose to the water inlet located at
the left-hand side of the control panel. Press fit the other
end of the hose to either a hot or cold water tap as
required (Fig. 1).
WATER INLET PORT
1
PARTS IDENTIFICATION
Figure 1.
Drain Hose Assembly (PUMP)
Safety Cover
Accessories
Lint Filter
Water Inlet Port
Agitator (with Lint-filter)
Wash Tub
Wash-Tub Lid
Wash Action Selector
Drain Strainer
Overflow Strainer Spin Timer Switch (5 min. timer)
Power Cord
Spin Tub
Power Cord Rack
Panel Front
Drain Hose Assembly
(NON-PUMP)
Inner Lid of Spin-dry Tub
Prevent your hands, etc.,
from touching the spin-dry
basket in rotation
Spin-tub Lid
When this lid is opened, the spin dryer
immediatelystops operating
Drain Selector (Pump Control Switch)
Rub-Wash Section
Wash Timer Switch
(15 min. timer)
DW-444PA 00.4.26 11:8 AM

2
OPERATING INSTRUCTIONS
Preparing the Wash
Use a 3-pronged
plug
Sort the clothes into groups-whites, colourfast, non-colourfast, delicates, lint free, lint producers,
etc., and wash according to the Washing Guide below.
Clothes with worn patches or tears should first be mended. Empty out all
pockets and close all slide fasteners. Treat bad stains prior to washing.
Prior to Washing
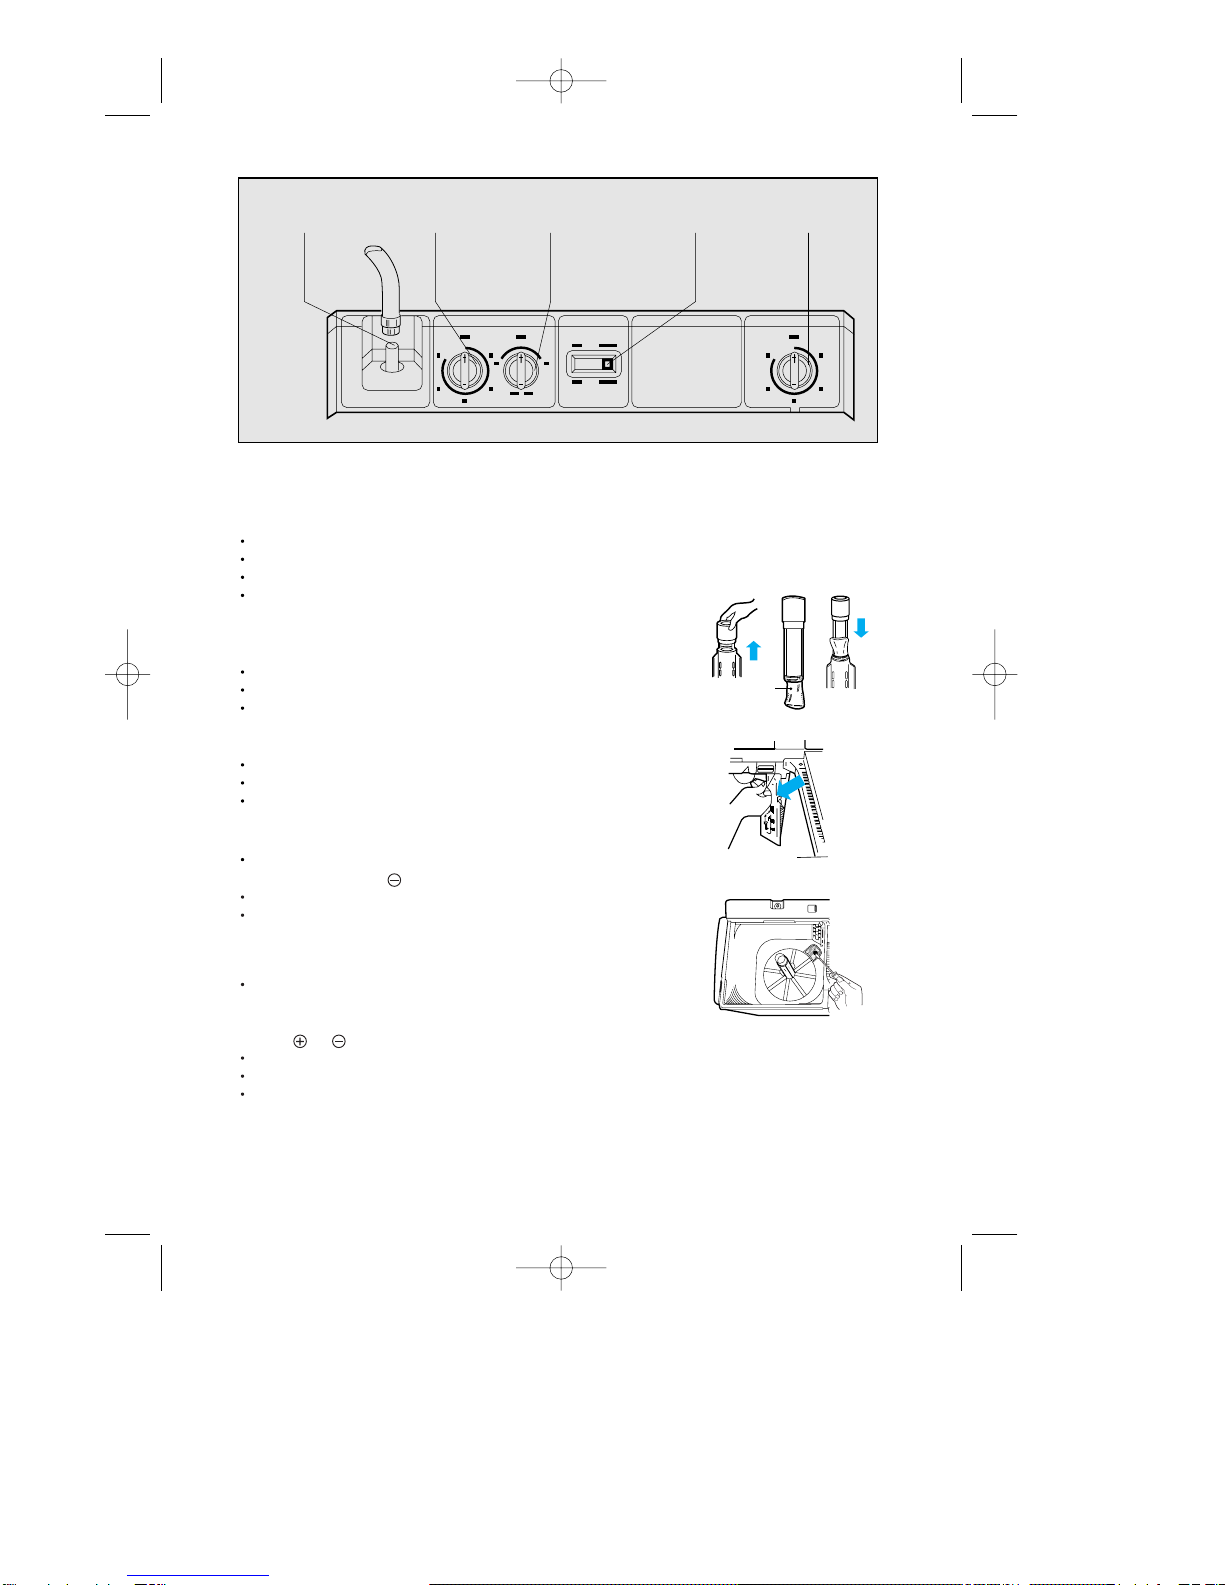
Remove the plastic spin mat from the spin bowl.
Check that the wash timer knob is set to position "0" and that the drain selector is set to "wash
rinse".
Also check that the lint filter is correctly positioned.
Ensure the drain hose is in its correct position (see lnstallation).
Insert the power plug into the power point and switch on.
To Wash
Place the wash load and detergent in the wash tub. Refer to "Preparing the Wash" and "Points to
Remember"
Set the drain selector to "wash-rinse"
Turn the water tap on and fill the tub of your washing machine to the level recommended in
the Washing Guide.
Set the selector switch to the position recommended in the Washing Guide.
DRAIN HOSE SETTING
(1) Connect the drain hose to the drain outlet at the rear side of
your washer, and then fasten it tightly with the hose clamp.
(2) The other end of the drain hose should be set toward the
bath or sinkhole.
(3) Install the drain hose about 85cm from the ground.
(In case of drain pump model)
OPERATING INSTRUCTIONS
Set the wash timer to the wash period recommended in the Washing Guide.
Your machine will now wash for the period selected.
When the wash period expires, set the drain selector to the drain position to discharge the water.
to discharge the water.
Note:Before rinsing, the wash load may be transferred to the spin bowl to spin dry for 1
minute (approx.) to remove excess suds (see Spin Drying). On completion, transfer the
wash load to the wash tub for rinsing.
Hose Clamp
Drain Outlet
Drain hose
A
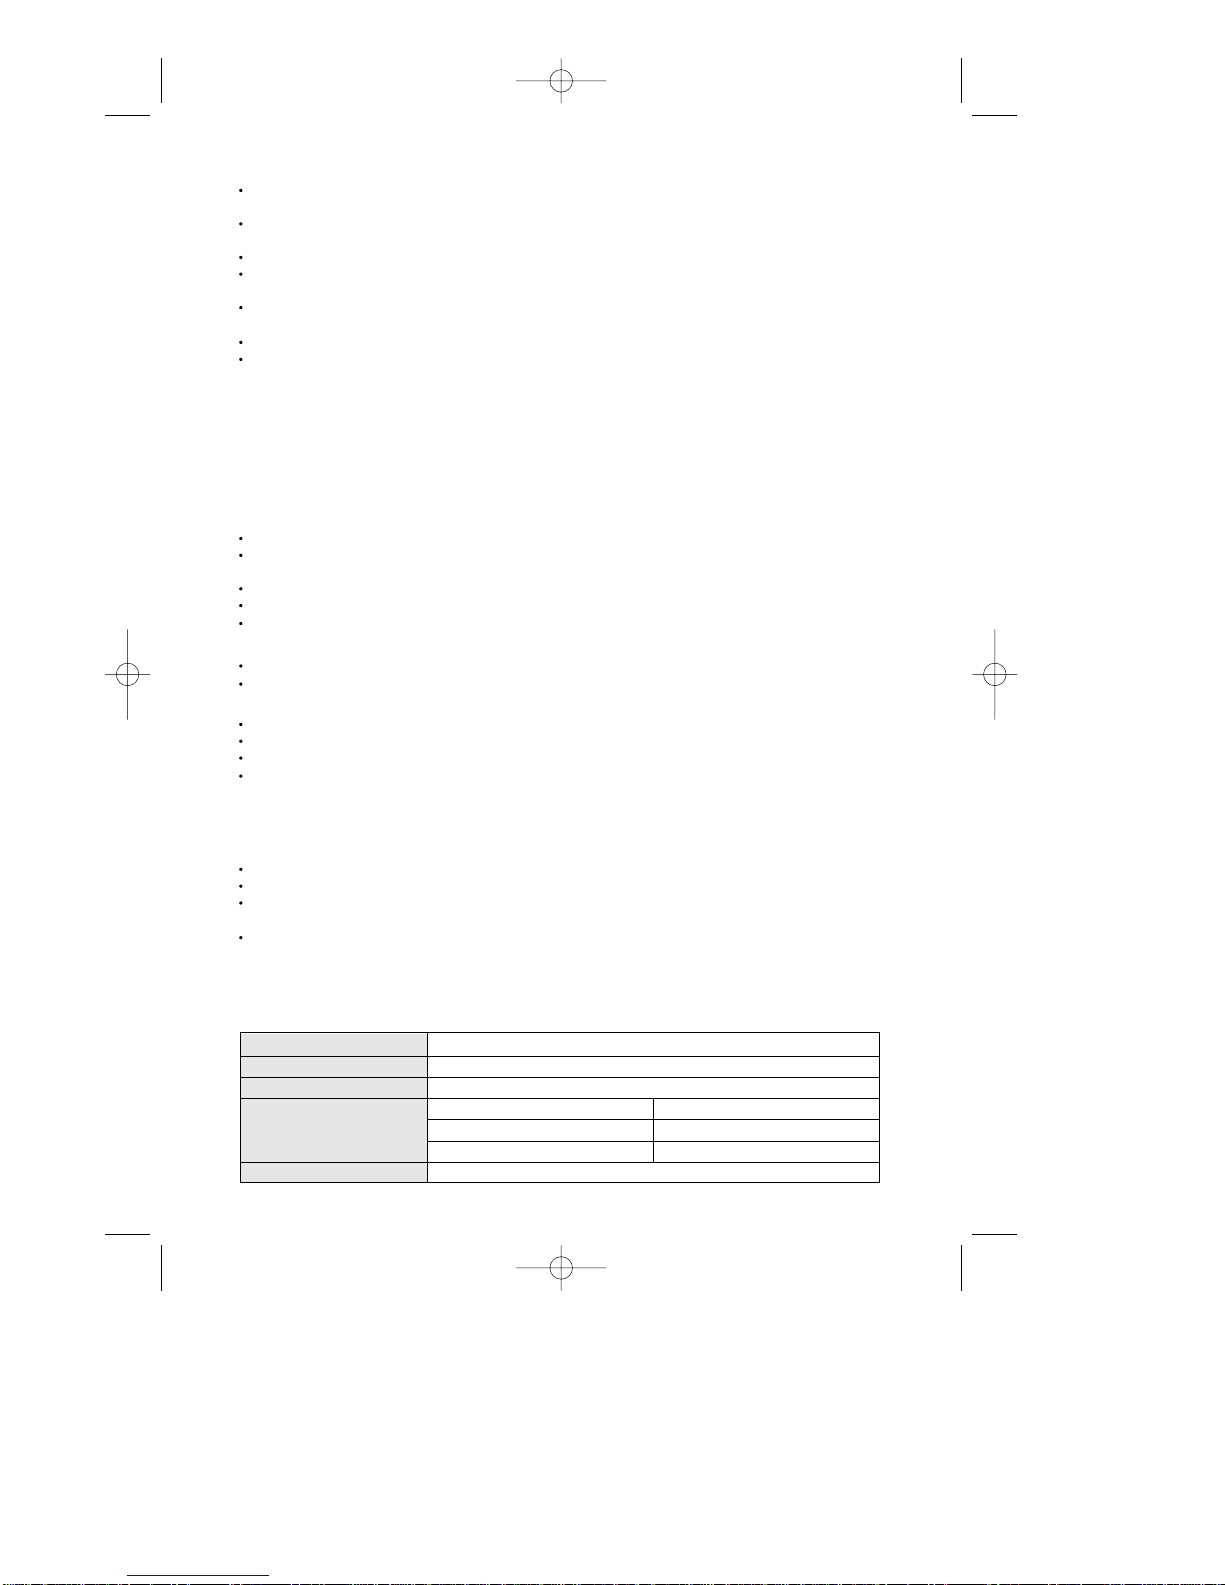
GROUNDING INSTRUCTION
Warning: Improper use of the grounding plug can result
in a risk of electric shock. Consult a qualified
electrician or serviceperson if the grounding
instructions are not completely understood, or
if doubt exists as to whether the appliance is
properly grounded.
If it is necessary to use an extension cord, use
only a three wire extension cord that has a three
blade grounding plug, and a three slot receptacle
that will accept the plug on the appliance. The
marked rating of the extension cord should be
equal to or greater than the electrical rating of
the appliance.
This appliance must be grounded. In the event of an electrical short circuit, grounding
reduces the risk of electric shock by providing an escape wire for the electric current.
This appliance is equipped with a cord having a grounding wire with a grounding plug.
The plug must be plugged into an outlet that is properly installed and grounded.
3-pronged plug
3 pronged
Receptacle
Receptacle
Box Cover
DW-444PA 00.4.26 11:8 AM ˘`2

Spin Drying
To open the inner safety lid of the spin bowl, lift up the outer lid, then pull the catch forward
and lift upward.
Transfer either the full wash load or portion to the spin bowl commencing with small articles.
Ensure that the clothes are evenly distributed.
Place the removable spin mat over the load to be dried and push lightly downward. (To con-
tain delicated articles within the spin bowl.)
Close the inner safety lid, then the outer lid.
Set the spin timer to the time recommended in the Washing Guide. The spin bowl will spin for
If there is any abnormal vibration during spining, open the lids to stop the spin-tub and
rearrange the clothes to be in good balance.
the time selected, then stop (at position "0").
Caution:Ensure that the spin bowl completely stops before opening the inner lid.
If the drainage from the wash-tub and spin-tub occurs simultaneously, the drainage from
spin-tub will be obstructed and there may be a malfunction. Therefore, if you need to drain the
wash-tub while spinning, be sure to drain the wash-tub after at least one minute’s spinning.
Note:The pump motor will operate when the spin dry timer is set,
irrespective of whether the outer lid is closed or opened.
OPERATING INSTRUCTIONS
Simultaneous Washing and Spin Drying
Three motors ate fitted to cover washing, spin drying and drainage.
This arrangement enables spin drying of a previous wash load and washing of a new wash
load to be simultaneously effected.
To do this, set the controls for both "wash" and "spin" modes
(see "to wash" and "spin drying").
Washing Guide
Size of Degree Wash Water
Type of Wash Water of Selection Temperature Wash Spin
Fabric Load Level Soiling Switch Wash Cycle Period Period
Fast Full High Heavy Heavy
Coloured 5-10 mins. 3-5 mins.
Cotton and Half & Medium Normal Normal
Linens Less Light
Nylon Full High Normal Normal 4-5 mins. 2 mins.
and P.P Half & Medium Light Soft 2-3 mins.
Less or Low
Delicates Half & High Normal Soft 2-3 mins. 1-2 min..
Less to Light
3
To Rinse in the Wash Tub
Set the drain selector to the "wash-rinse" position.
Open the water tap and fill the tub to a suitable water level for the laundry.
Set the drain selector to the drain position to discharge the water.
Repeat proceses 1 to 4 twice or three time according to the condition of the washed laundry.
DW-444PA 00.4.26 11:8 AM ˘`3

4
Water Inlet Wash Timer Wash Selector Spin Timer
Drain Selector
(Pump control)
Control Panel
OPERATING INSTRUCTIONS
Emptying
Set the valve selector knob to "drain" and the wash timer to 3-5 minutes.
The machine will now empty.
Set the drain selector knob to "wash-rinse".
Switch off the electricity at the
power point.
Lint Filter
Remove the filter frame by pulling it upward (Fig. 2-(1)).
Turn the filter inside out and wash the lint off with water (Fig. 2-(2)).
Insert the filter frame into the agitator hole as it was (Fig. 2-(3)).
Over flow Strainer
Remove the strainer by pulling it forward (Fig. 3).
Wash off the lint stuck in the stra-iner during overflowing.
Re-install the strainer.
Drain Strainer
Remove the drain strainer from the bottom of the tub using
a sharp tool such as driver (Fig. 4).
Wash off the lint stuck in the strainer.
Re-install the strainer.
Agitator
Should it be necessary to remove the agitator, say to free an
obstruction, first remove the filter frame by pulling it upward,
and remove the screw securing the agitator to the motor shaft
using or driver.
Remove the agitator by pulling it upward.
Free the obstruction and refit the agitator. Ensure that the screw is securely tightened.
Insert the filter frame into the agitator hole.
Figure 2.
Figure 3.
Figure 4.
LINT
(1) (3)
DW-444PA 00.4.26 11:8 AM ˘`4

POINTS TO REMEMBER
Avoid using excessive amounts of bleach, soap powder or detergent, Use the amount rec-
ommended by the respective manufactures.
If the machine is installed in areas subject to freezing temperatures, ensure that it is com -
pletely drained after use.
To reset to the OFF position ("0"), turn anticlockwise.
When washing delicates e.g., silks, fine nylons, lace, etc., it is advisable to place them in a
mesh bag to prevent the possibility of damage.
Do not wash lint attracting fabrics with lint producers, e.g., black socks or dark coloured
Put the safety cover on the wet laundry before spinning to secure safety.
jumpers with white fluffy towels, napkins, etc.
Avoid placing a wet wash load on the control panel.
BEFORE YOU CALL FOR SERVICE
There may be times when you suspect your washing machine requires maintenance.
Before calling for a service engineer, please check the
following points, to save unnecessary cost. You may be pleasantly surprised that an
apparent malfunction can be easily rectified by following the chart below.
If your washing machine will not start, check whether:
The house circuit breaker is tripped or a fuse is blown.
The plug is firmly connected to the power point or the power point is not switched on.(Check
with a small table lamp or toaster, etc.)
Something is preventing the agitator from rotating.
The wash timer is set.
The drain selector switch is set to "wash-rinse".
If the spin dryer will not operate, check whether:
The inner and outer spin bowl-lids are closed.
The spin dry timer is set.
If there is excessive noise, check whether:
Something is touching the agitator as it rotates.
The machine is placed on a level surface.
The wash load in the spin bowl is excessively unbalanced during the spin cycle.
An article is lodged between the spin bowl and tub.
MAINTENANCE AFTER USE
Wash Day Maintenance At the end of each wash day:
Switch off the electricity at the power point.
Check that both timers are set to the OFF position ("0").
Wipe off spillage from wash powder, etc., and generally wipe over the cabinet with a clean
damp cloth.
Remove the hose from water tap.
* Design and specifications subject to change without notice.
5
SPECIFICATIONS
Dimension 749mm X 464mm X 870mm (W X D X H)
Machine Weight 32 kg
Power Source 120V/60Hz
High 50 L
Water Level Medium 43 L
Low 36 L
Power Consumption 480W
DW-444PA 00.4.26 11:8 AM ˘`5

WASHER-SPINDRYER
INSTRUCTION MANUAL
Model No.: DW-444PA
• Thank you for selecting this washer-spindryer.
• Before operating this unit, please read these instructions completely.
DW-444PA 00.4.26 11:8 AM ˘`6
Table of contents
Other Daewoo Washer Dryer manuals