Daktronics All Sport 5000 User manual

All Sport 5000 Series Console Quick Guide
DD2077845
Rev 03
01 August 2018
201 Daktronics Drive
Brookings, SD 57006-5128
www.daktronics.com/support
800.325.8766
Page 1 of 4
LCD
This screen displays current game information and menu choices.
Number Keypad
• 0-9 – Use these keys to enter scoring and statistical values.
• ENTER * YES – This key has two functions:
• Press to complete an action.
• Press to answer “YES” for input prompts (Y).
• CLEAR / NO – This key has two functions:
• Press to clear the LCD of numerical information.
• Press to answer “NO” for input prompts (N).
Menu Navigation
• MENU – Press to select general and sport-specic options.
• Use ▲ and ▼ to scroll through the menus.
• Use ◄ and ► to enter and exit submenu lists.
Refer to the Operations Manual for the menu settings of each sport.
• EDIT – Press this key followed by one of the sport-specic scoring
keys to modify the current value. Simply enter the new value
using the number keypad and then press ENTER.
Clock Control
• START – Press to start the main clock. A green LED on the key
illuminates while the main clock is running.
• STOP – Press to stop the main clock.
• SET MAIN CLOCK – After the main clock has been stopped, press
this key to display the current time of the main clock.
• Enter the desired time using the number keypad and then
press ENTER to set the clock.
• Press CLEAR twice to cancel and return to the game.
• COUNT UP/DOWN – After the main clock has been stopped, press
this key to set the direction of the clock.
• Press 1or 2to select UP or DOWN (default).
• The current direction of the main clock is shown on the top
line of the LCD with an ↓ or ↑.
Horn Control
• AUTO HORN – Press this key to enable/disable the automatic horn.
• Press 1or 2to select ON (default) or OFF. An amber LED on
the HORN key illuminates when the Auto Horn is enabled.
• If the Auto Horn LED is ON, the horn will automatically go off
when the clock reaches “00:00”.
• HORN – Press to sound the main horn, if the scoreboard is
equipped with one. The horn sounds as long as the key is held.
Sport-Specic Insert
This shows keys specic to a sport. See Page 3 for more information.
This guide will assist with starting up and operating an All Sport 5000 series scoreboard controller. For more detailed console conguration,
refer to the All Sport 5000 Series Control Console Operations Manual (ED-11976), available online at www.daktronics.com/allsportsupport.
Horn
Control
Menu
Navigation
Clock
Control
Number
Sport-Specific Insert
Keypad
LCD
LCD
Horn
Control
Menu
Navigation
Clock
Control
Number
Keypad
LCD
Sport-Specific Insert
Sport-
Specific
Insert
LCD

All Sport 5000 Series Console Quick Guide
DD2077845
Rev 03
01 August 2018
201 Daktronics Drive
Brookings, SD 57006-5128
www.daktronics.com/support
800.325.8766
Page 2 of 4
Start Up
1. Plug power cord into standard wall outlet or battery pack.
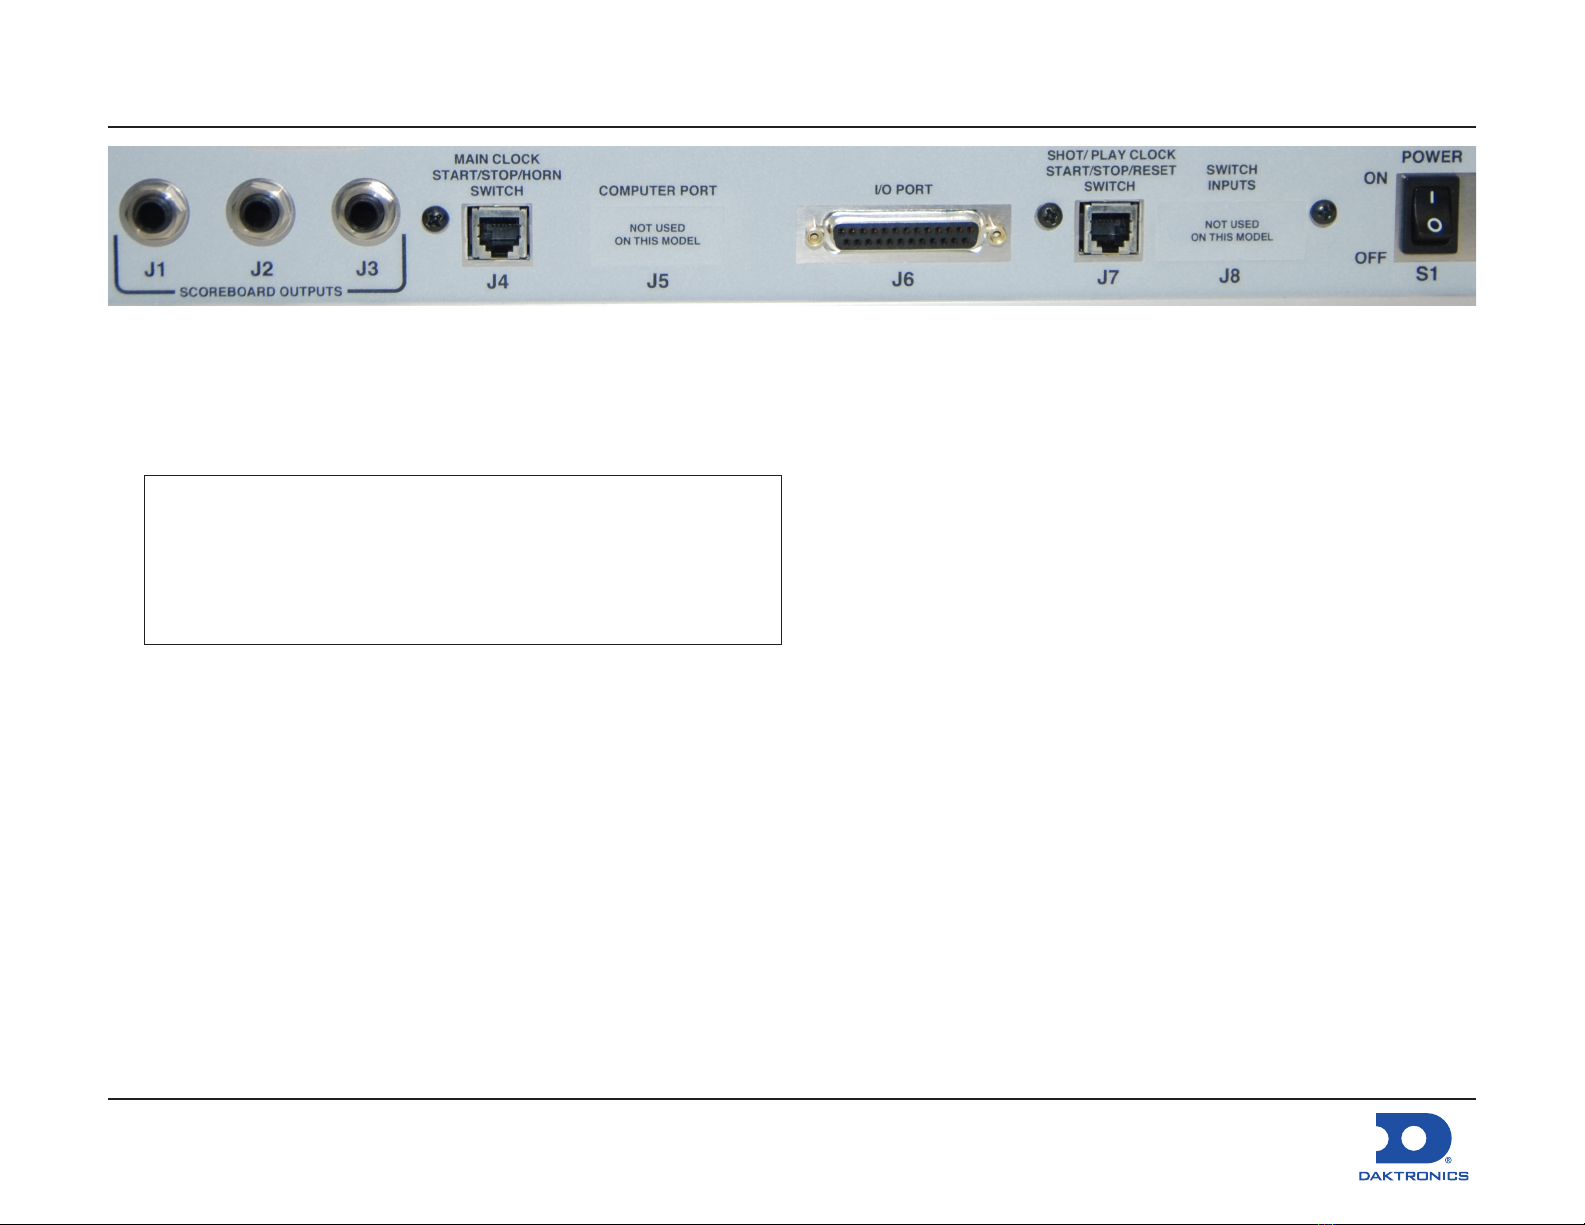
2. Connect all signal cables to their appropriate jacks, if they are
not already connected. Wireless radio systems may not require
these signal connections. Refer to scoreboard installation
manuals and/or site-specic Riser Diagrams for more information.
3. Slide a sport insert into the sleeve over the keypad (see Page 3).
4. Flip the POWER switch on rear of console to the ON position.
5. The console will perform a self-test when it is powered on. During
the self-test, a message will display the version of the standard
software loaded in the console.
6. When the self-test completes, a prompt displays the code
number for the last game played. This is useful when power to the
console is lost during a game.
• Press YES to resume the last game stored in memory.
The console is now ready for game operation.
• Press NO to start a new game or change sports. The console
will prompt for a new code number as shown below.
Use the number keypad to enter the new sport code, and then
press ENTER. Sport codes can be found on the sport-specic insert
and in the Operations Manual. Refer also to Page 3.
AS-5000 VX.X.X
ED-11544
V = version and revision number
ED = standard software number
PREV CODE NNNN
RESUME GAME? NNNN = last code selected
SELECT CODE
CODE NNNN NNNN = current code entered
Radio Settings
If the radio option is installed, the console will also prompt for the
radio settings after changing the sport code. Press ENTER to accept
the current settings or press CLEAR to modify them.
The radio settings in the console (transmitter) must match the
scoreboard (receiver) radio. By default, both are set to Broadcast
Group 1, Channel 01.
To determine the settings of a scoreboard, rst power it down and
shut off any radio-equipped consoles in the area. Next, power the
scoreboard back up and watch for the radio settings. The settings will
appear as “bX CY” where Xis the current broadcast group and Yis
the current channel:
The settings are typically displayed in the clock digits or Home and
Guest score digits, depending on the scoreboard model.
Refer to the Operations Manual for more radio settings.
RADIO SETTINGS
BCAST X CHAN YY
X = current broadcast group
YY = current radio channel
Radio Settings in Clock Digits
daktronics
PERIOD GUESTHOME

All Sport 5000 Series Console Quick Guide
DD2077845
Rev 03
01 August 2018
201 Daktronics Drive
Brookings, SD 57006-5128
www.daktronics.com/support
800.325.8766
Page 3 of 4
Sport Codes & Sport Inserts
• The Sport Code is used to set the console’s scoring mode.
• The Sport Insert is an interchangeable keypad overlay that
identies the keys required for operation of a specic sport.
Each sport insert has a list of applicable sport codes on the left side.
Appendix B of the Operations Manual contains scale drawings of
every sport insert. If an insert is lost or damaged, you can print the
drawing on 8.5" x 11" paper, and cut out the insert to use until a
replacement arrives.
Below is a table of the most common codes for each sport, along
with the sport insert used to score it:
Sport Sport Code(s) Sport Insert (Drawing #)
Baseball 5501 LL-2438 (DWG-125061)
Basketball 1101 (PLY/FLS)
1105 (PLY/FL/PTS) LL-2433 (DWG-120121)
Football 6601 LL-2437 (DWG-122652)
Hockey/Handball/
Lacrosse
4401 (without SOG)
4402 (with SOG) LL-2436 (DWG-124218)
Pitch & Speed 5500 LL-2438* (DWG-130895)
Soccer 7701 LL-2440 (DWG-125215)
Track 8601 (manual timing) LL-2439 (DWG-125094)
Volleyball 2101 LL-2434 (DWG-125055)
Wrestling 3101 LL-2435 (DWG-124701)
*Pitch & Speed insert is printed on back of Baseball insert.
Note that many scoreboards are capable of scoring multiple sports.
Refer to Appendix C of the Operations Manual for a complete listing
of sport codes for each scoreboard model.
When ordering replacement inserts for any of the sports shown
above, you will receive the All Sport 5000 Insert Kit (part # LL-2776).
Inserts for sports not shown above may be ordered individually.
Sport Codes
Sport Insert
Code Sheet Label
Use the label sheet (part # LL-2458)
provided with the console to afx the
correct sport code for a particular
scoreboard onto the sport insert at
the suggested location.

All Sport 5000 Series Console Quick Guide
DD2077845
Rev 03
01 August 2018
201 Daktronics Drive
Brookings, SD 57006-5128
www.daktronics.com/support
800.325.8766
Page 4 of 4
Jacks & Switches
• J1, J2, J3 (SCOREBOARD OUTPUTS) – These 1/4" stereo jacks
connect directly to xed-digit scoreboards, clocks, and statistic
displays. All 3 jacks send out the same scoreboard control signal.
Note: These jacks may not be needed for wireless systems.
Wireless consoles sold after May 2016 feature a radio
antenna in a protective shell on the side of the console.
Wireless consoles sold before May 2016 have a radio
antenna connected to the rear of the console;
ensure antenna is pointed straight up during operation.
• J4 (MAIN CLOCK START/STOP/HORN SWITCH) – Connect a main
clock handheld start/stop switch here. J4 may also be used for
external Precision Time console (for basketball).
• J5 (COMPUTER PORT) – Not used on this model
• J6 (I/O PORT) – This jack is the main input and output port used
to send data to multiple displays (scoreboard, play clock, and
locker room clocks), communicate with other All Sport consoles,
and send Real-Time Data (RTD) to Daktronics display controllers.
• J7 (PLAY CLOCK START/STOP/RESET SWITCH) – Connect a play
clock handheld start/stop/reset switch here.
• J8 (SWITCH INPUTS) – Not used on this model
• S1 (POWER) – Power the console ON/OFF.
Important Safeguards
• Always turn off and/or unplug the control equipment when it is
not in use. Never yank the power cord to pull the plug from the
outlet. Grasp the plug and pull to disconnect.
• Do not drop the control console or allow it to get wet.
• Do not let the power cord touch hot surfaces or hang over the
edge of a table that would damage or cut the cord.
• If an extension cord is necessary, use a three-pronged, polarized
cord. Arrange the cord with care so that it will not be tripped
over or pulled out.
• Before using an extension cord, inspect the cable thoroughly and
verify its compliance with local electric codes.
• Do not disassemble control equipment or electronic controls of
the display; failure to follow this safeguard will make the warranty
null and void.
• Inspect console for shipping damage such as rattles and dents,
and verify that all equipment is included as itemized on the
packing slip. Immediately report any problems to Daktronics; save
all packing materials if exchange is necessary.
Other manuals for All Sport 5000
8
Other Daktronics Music Mixer manuals

Daktronics
Daktronics All Sport 5000 User manual

Daktronics
Daktronics All Sport 5000 User manual

Daktronics
Daktronics ALL SPORT 5500 SERIES User manual

Daktronics
Daktronics All Sport 5000 User manual

Daktronics
Daktronics All Sport 5000 User manual

Daktronics
Daktronics OMNISPORT 2000 User manual

Daktronics
Daktronics All Sport 5000 User manual