DARTY ProLine DVDP771 User manual

DVDP771
Downloaded from www.vandenborre.be

CONTENT
Important Safety Instructions..............................................1
Panel Illustration................................................................. 2
Connecting to the USB....................................................... 3
Remote Control...................................................................4
Connecting to a TV set ...................................................... 6
MP3/WMA/MPEG4 playing.................................................7
PICTURE CD PLAYBACK..................................................8
SYSTEM SETUP................................................................8
Trouble-shooting.................................................................11
Specifications......................................................................12
Downloaded from www.vandenborre.be

IMPORTANT SAFETY INSTRUCTIONS
Safe use and care of your equipment
We have designed and made this product to meet European Safety Standards, but as with any
electrical equipment you must take care to stay safe and get the best results. Here is some good
advice to help you do this. Read these instructions carefully before you use your equipment for the
first time.
Do not store this product in cold areas. When the product warms up to room temperature
moisture can form inside which may damage the electronic circuits.
To prevent electric shock do not remove any cover.
If anything goes wrong do not try to fix it yourself, get a qualified service agent to look at it.
Do not continue to use this equipment if you have spilt liquids in it, if it is damaged in any way
or if it does not work as it should, immediately unplug the equipment and get expert advice.
Do not drop or knock the product, rough handling may damage the internal components.
The mains plug shall be the main disconnect device and should be accessible at all times.
WARNINGS:
This appliance is intended for domestic household use only and should not be used for any
other purpose or in any other application, such as for non-domestic use or in a commercial
environment.
The external flexible cable or cord of this transformer cannot be replaced; if the cord is
damaged, the transformer must be scrapped.
The apparatus shall not be exposed to dripping or splashing and that no objects filled with
liquids, such as vases shall be place on the apparatus.
No naked flame sources, such as candles should be placed on the apparatus.
The ventilation should not be impeded by covering the ventilation openings with items, such as
newspapers, table-cloths, curtains etc.
Ventilation
Place the product on a hard flat surface away from direct sunlight and heat sources. Do not obstruct
the ventilation slots, including those underneath with soft furnishings.
At full power, prolonged listening to the player can damage the ear of the user
WARNING: To protect your hearing
It is important that any headphones or earphones used in conjunction with this product
are compliant with French Decree of 8 November 2005 implementing Article L.5232-1
This ensures that the sound level does not exceed 100 dB SPL. The prolonged listening
at high volume for more than five hours a week can damage your hearing.
- 1 -
Downloaded from www.vandenborre.be

Panel Illustration
Goes to the previous file on the list.
Goes to the next file on the list.
In Playing Mode: LEFT / VOL-
In Directory Mode: goes back to the chosen file/folder
In Playing Mode: RIGHT / VOL +
In Directory Mode: goes to the chosen file's setting or properties.
OK
POWER ( ON/OFF)
DC 12V INPUT JACK(power supply)
LCD DISPLAY
SPEAKER
DISC TOP
OPEN DISC TOP
SOURCE(Disc/USB)
PHONE JACK(Maximum output voltage 150mV)
AV OUT
USB
OK
STOP
IR/CHG Indicator
- 2 -
Downloaded from www.vandenborre.be
- 2 -

Connect to the USB
Press the SOURCE key on the remote control or SOURCE button on the unit to enable
USB mode.
NOTE: The CD door must be closed in order to initialise USB mode.
USB interface
This unit has a USB IN port to play the MP3 music, JPEG files or
other files. Press the <SOURCE> button to choose USB IN mode.
All the functions are the same to play a disc.
Note: The USB IN port is compatible with flash memories, it does not
warrant the compatibility with MP3 players using owner software.
NOTE:
When using USB function. Please do not insert in the wrong direction
or force in the USB it will be corrupt the stored data files.
Warning: The USB memory stick should be plugged into the unit directly.
USB extension cable should not be used to avoid failure of data
transference and interference caused.
- 3 -
USB
Downloaded from www.vandenborre.be

Remote Control
1. A-BREPEAT: Press once at the beginning of the chosen scene to set point A;
press again at the end of the chosen scene to set point B, The whole
selected scene automatically plays. Press A-B repeat again to disable function.
2. REPEAT/PROG: Press once to go to the Repeat Chapter,
press again go to the Repeat Title, pressing a third time to go
to Repeat OFF. Press and hold to access the Prog to input with number
keys the Title & Chapter.
3. 0-9 NUMBER KEYS: Used to select channel numbers or input
numbers in menus.
4. SETUP: Goes to the Setup menu.
5. GOTO: Goes to a specific time index/title/chapter
6. NEXT: Goes to the next chapter or file
7. PREVIOUS: Goes to previous chapter or file
8. FAST FORWARD: Skips forward, using consecutive short presses to use
5 speed levels (X2->X4->X8->X16 ->PLAY).
9. FAST REWIND: Skips backwards, using consecutive short presses to use
5 speed levels (X2->X4->X8->X16 ->PLAY).
10. POWER: Will switch on or switch the unit to standby mode.
11. DISPLAY: Displays detailed information of the current file or disc.
Press once for DVD file info, press again for Audio file info.
12. AUDIO/ANGLE: Short press: Changes the audio mode selection
(if different modes are available),Press and hold: Changes the viewing
angle (if different modes are available).
13. SUBTITLE/TITLE: Short press: Changes subtitle mode (if choices
of subtitles are available), Press and hold: DVD Title menu.
14. MENU / ZOOM: Short press to access the Menu; press and hold to use
the Zoom Function. Holding the pressed button will select the Zoom
level: Q1, Q2 Q3,
- 4 -
7
11
12
1
2
3
4
5
6
13
14
15
16
17
8
20 9
10
18
19
Downloaded from www.vandenborre.be

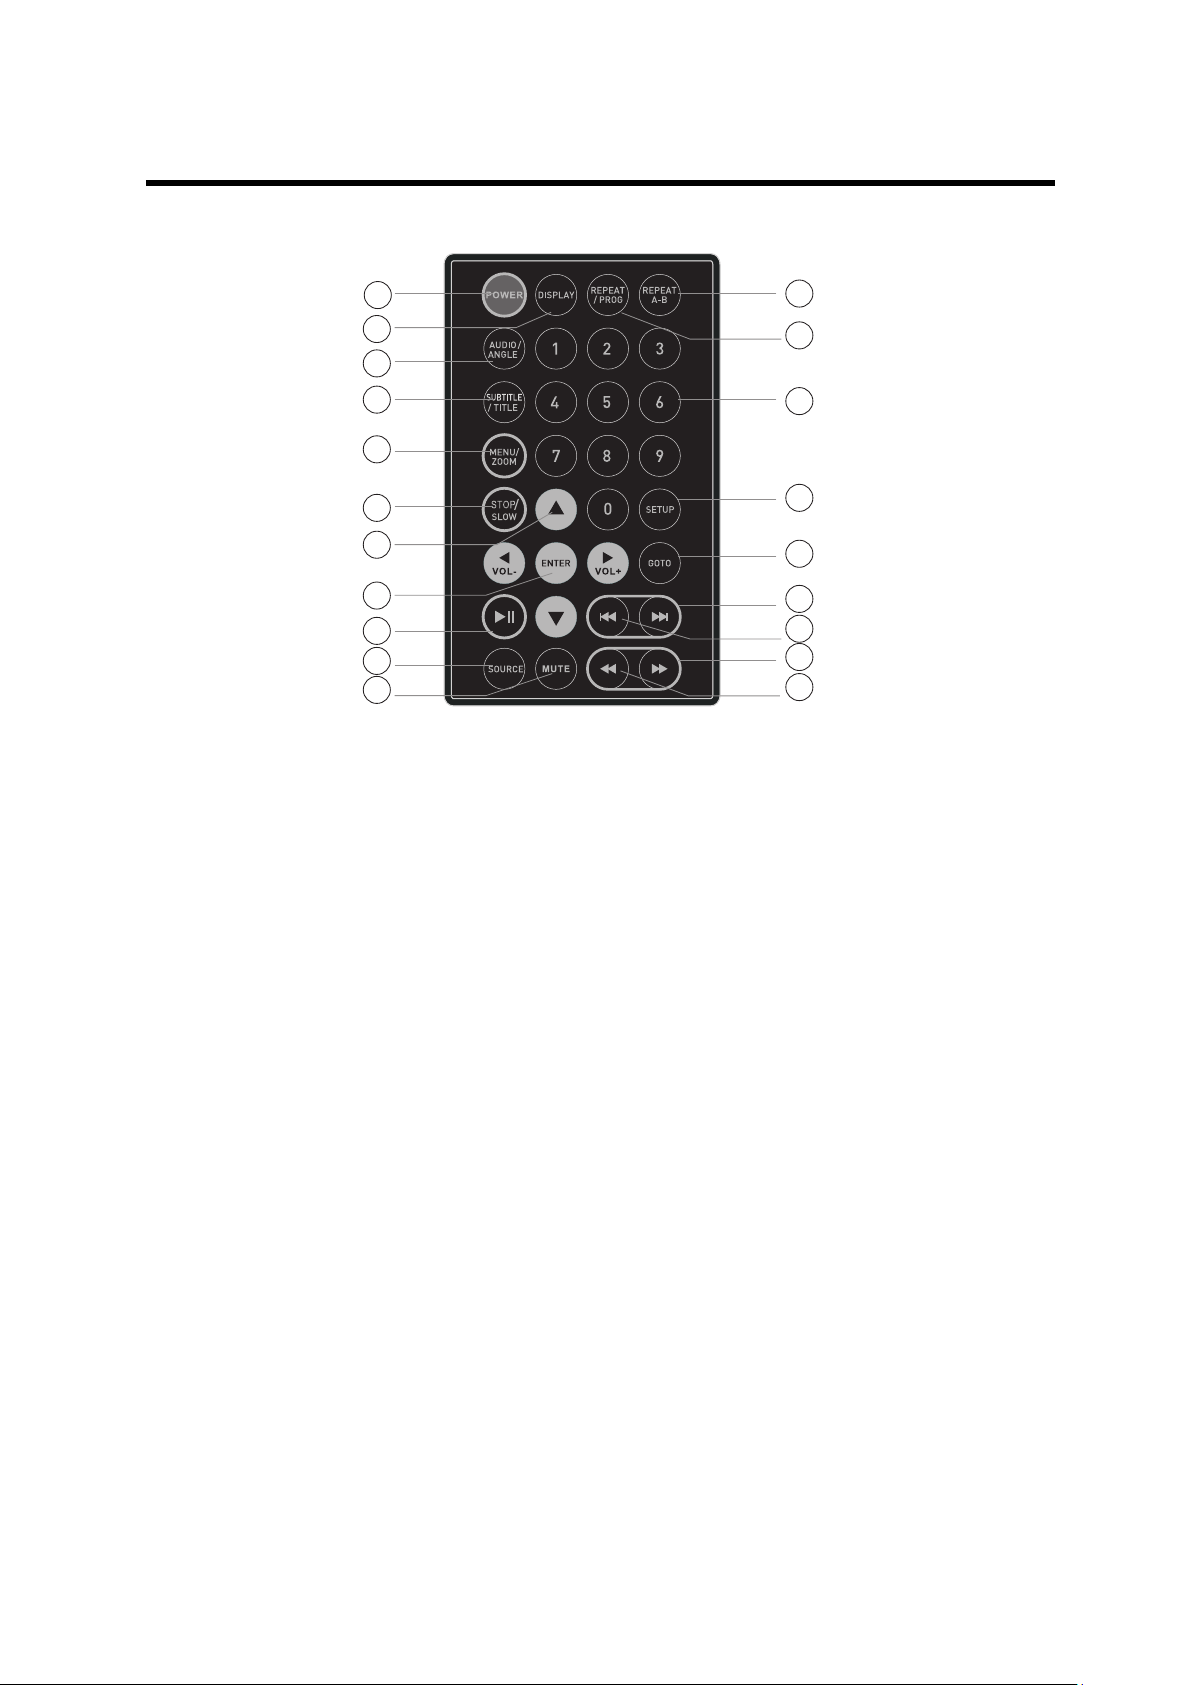
15. STOP / SLOW: Short press: to Stop; Long press: for Slow motion.
First long press to go to 1/2 speed; 2nd long press for 1/4 speed;
third long press for 1/6 speed; fourth long press for 1/8 speed; fifth
long press to go back to normal speed, 'PLAY'.
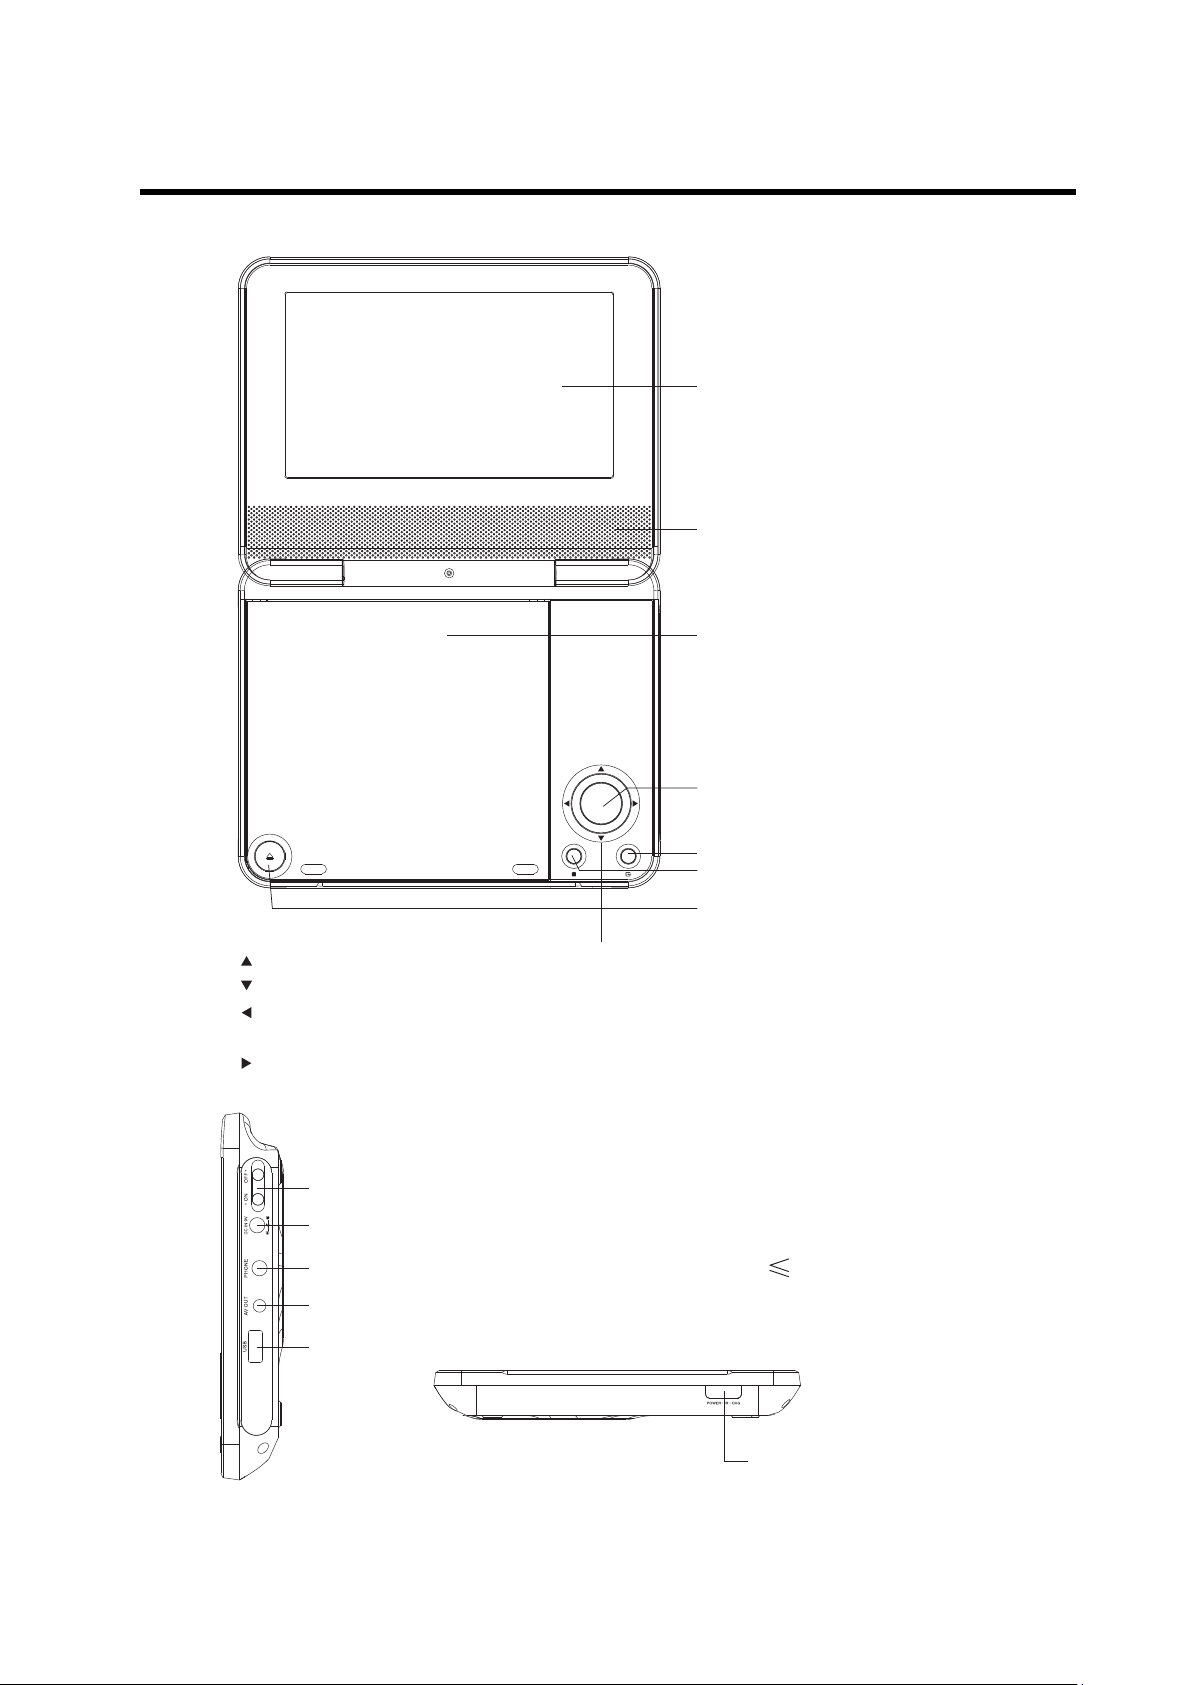
16. Direction keys:
Navigates (Up/Down) the menu screens to select the file.
Increases the volume.
Decreases the volume.
17. ENTER: Confirms and enters options or to play files.
18. PLAY / PAUSE: Starts or resumes media play.
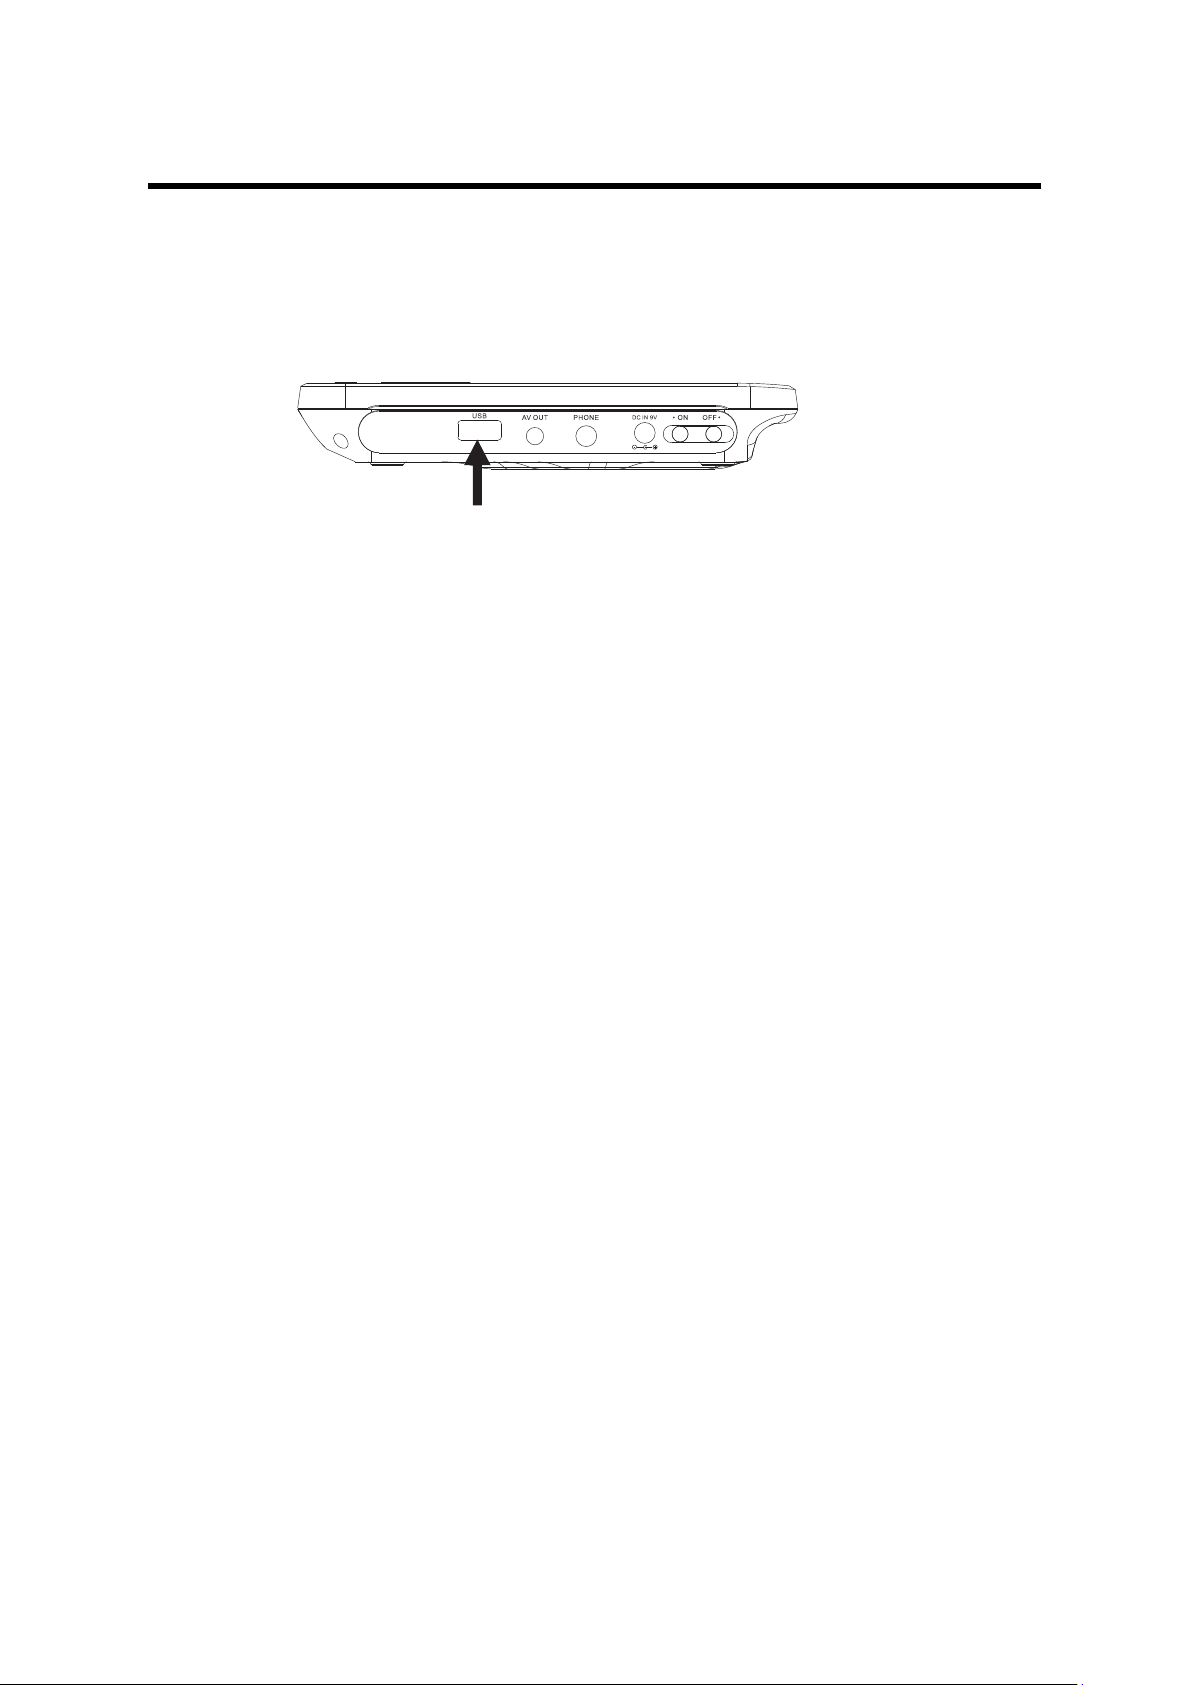
19. SOURCE: Press to switch between Disc and USB.
20. MUTE: Disables Audio output.
Note: Press approximately 2 seconds for functions requiring secondary functions.
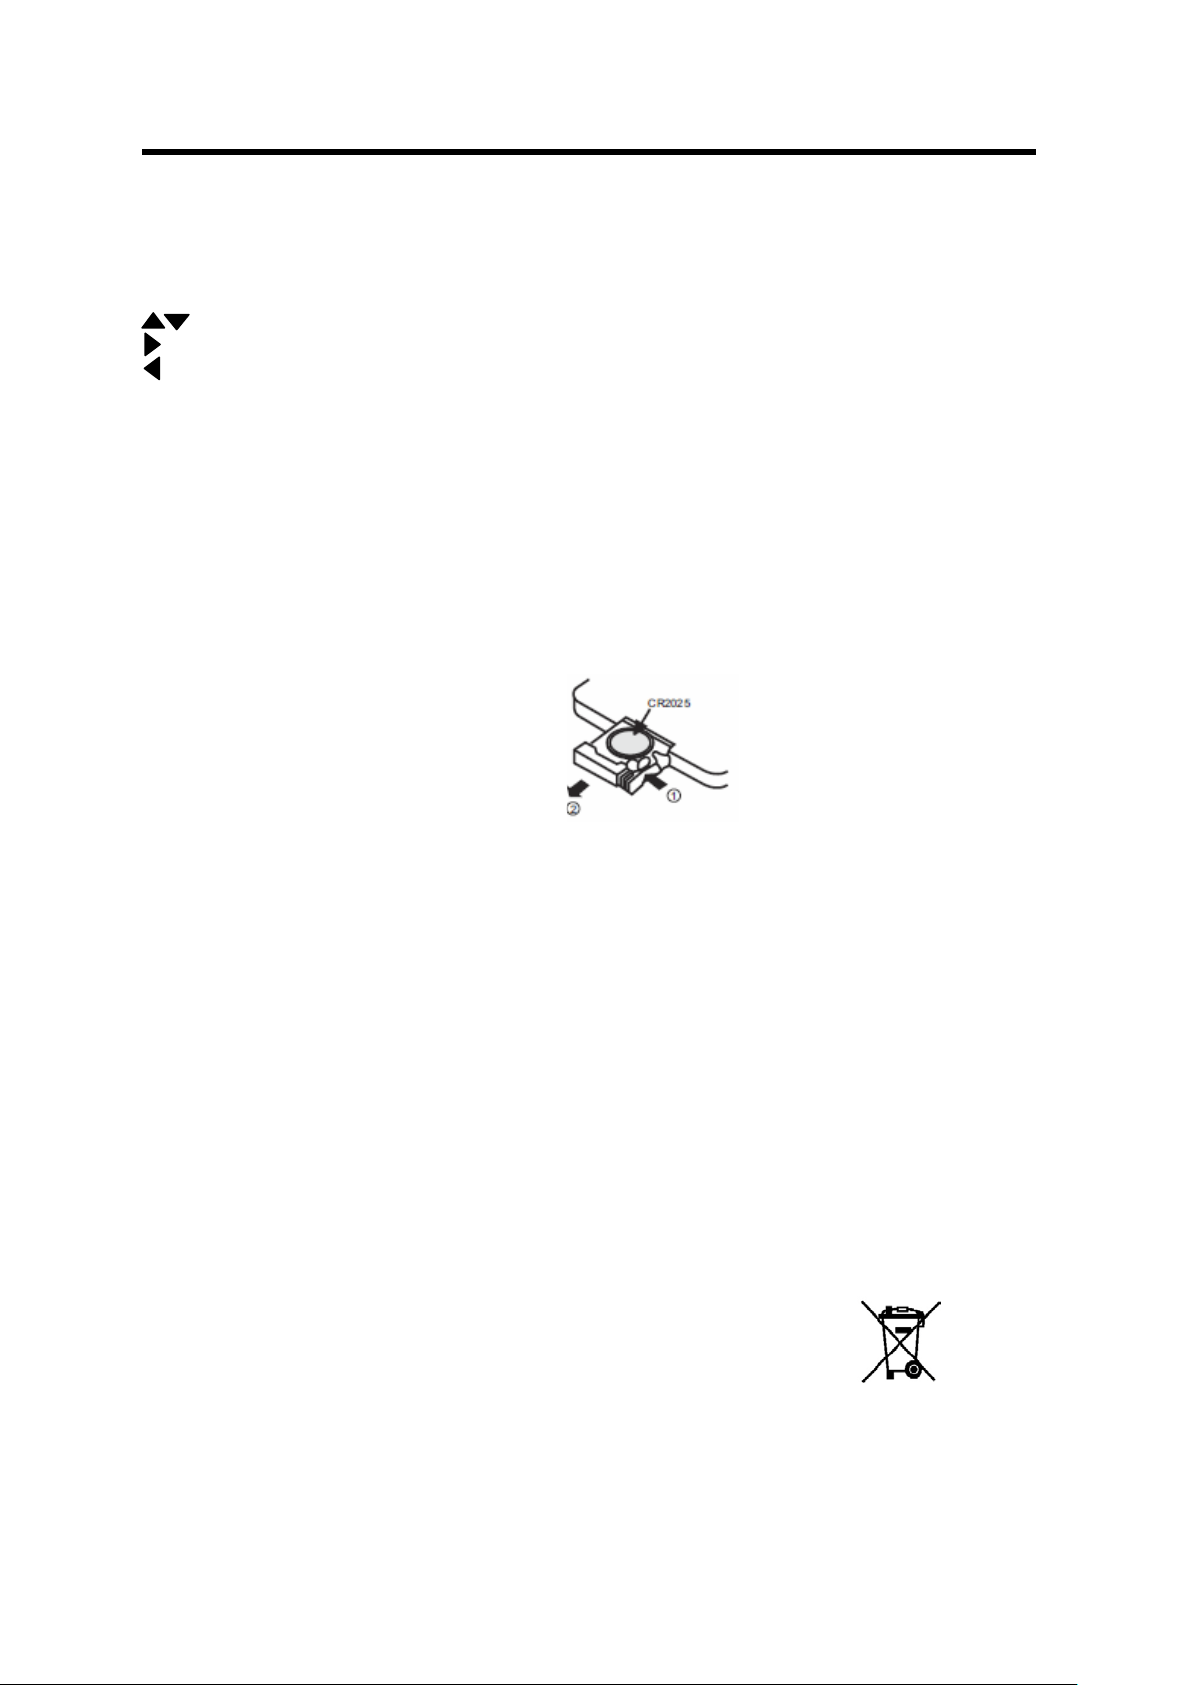
Preparation of the Remote Control
Place the remote control on an even surface and insert the supplied
button cell into the remote control as follows.
1. Push the button towards left.
2. Pull the battery loader out.
3. Insert the battery into the receptacle making sure the polarity matches
the marks inside the component.
4. Insert the receptacle into the remote control.
Cell data
Battery type: 1x CR2025, 3 V
Service life: approximately 1 year (for normal use and room temperature).
Using Of Remote Control
Point the remote control towards the main unit when operating.
The remote control works best at a distance less than 5 m and at an angle
of up to 30 to the front of the unit. No obstacles may stand in the way
between remote control and infrared sensor and do not place the remote
control in direct sunlight. If the remote control unit fails to work even
when it is operated near the player, replace the battery.
Notes on batteries
If the remote control is not used for a long period of time, please remove
the battery from the compartment.
Do not heat batteries or dispose of them in fires.
Do not dismantle, deform or modify batteries.
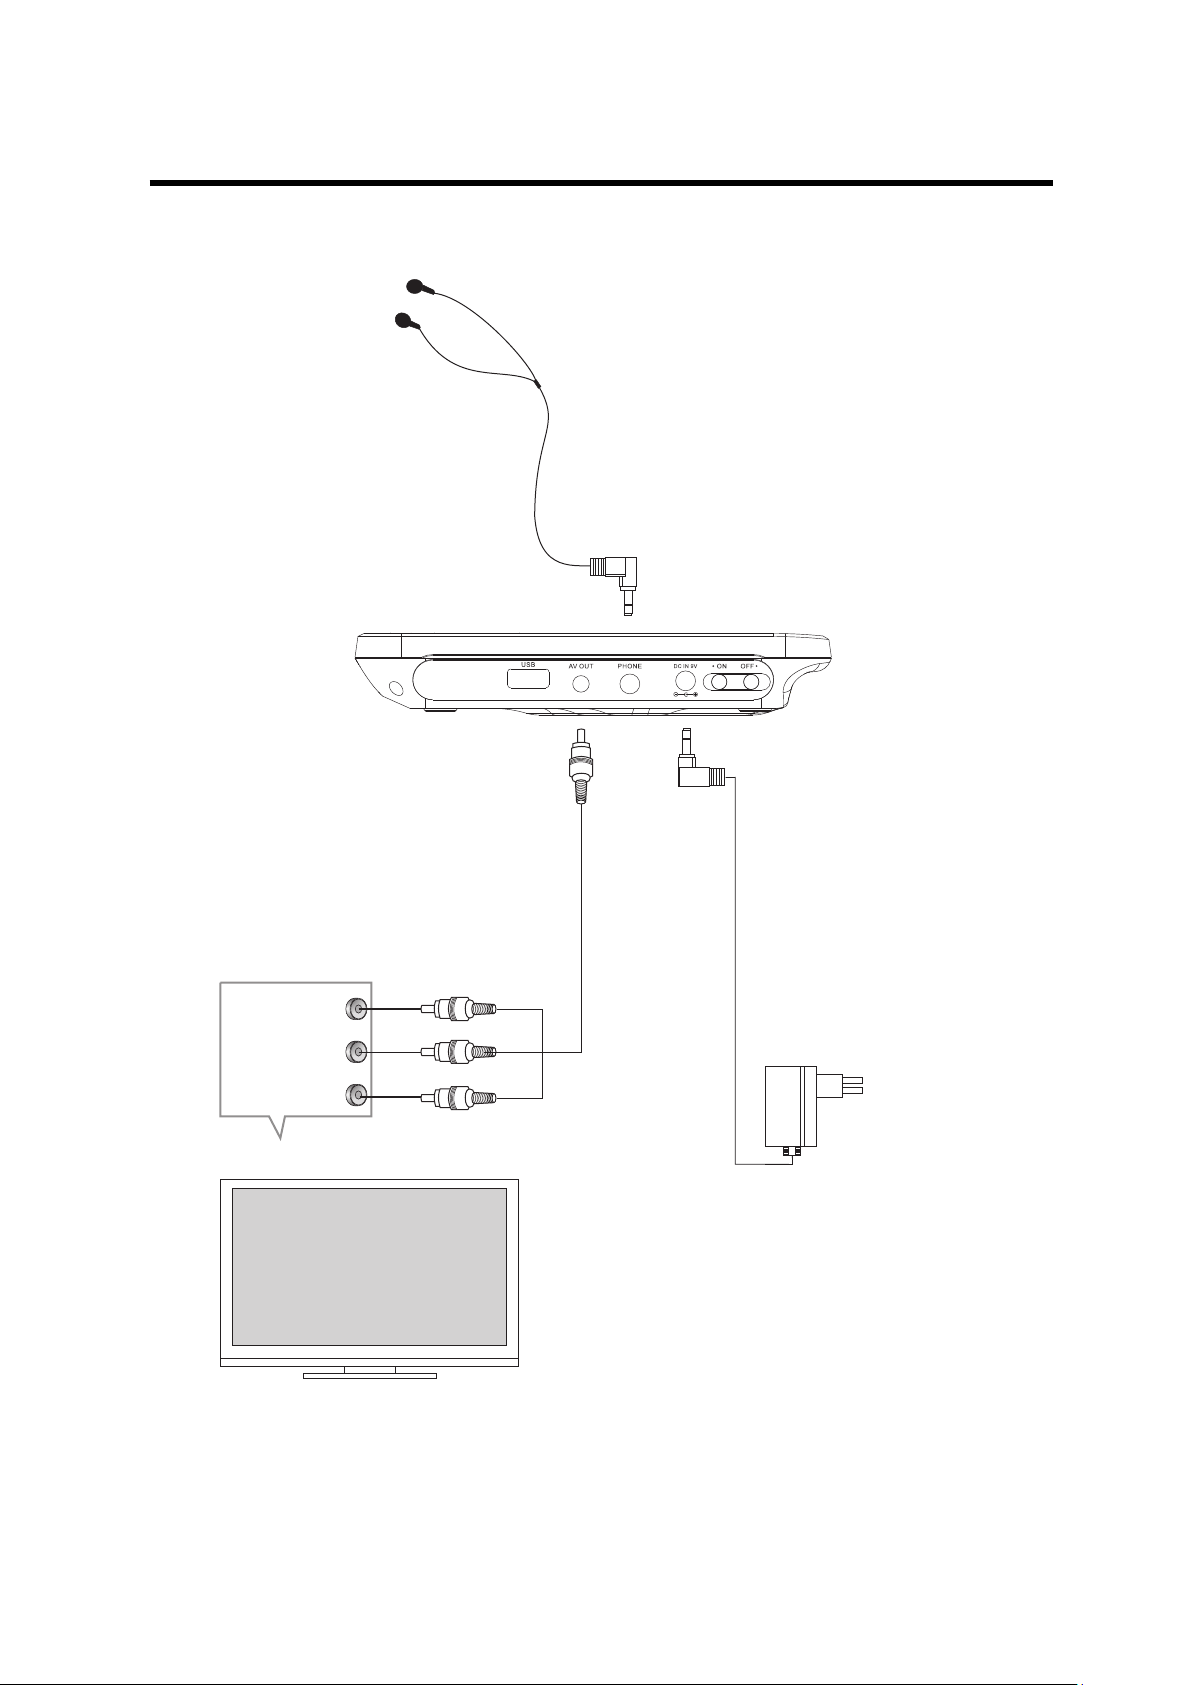
Battery Disposal (Remote control)
• Please ensure batteries are disposed of safely.
• Never dispose of batteries in a fire or with other household waste.
• Dispose of used batteries according to the manufacturer’s instructions.
CAUTION : Danger of explosion if batteries are incorrectly replaced. Replace only with
the same or equivalent type.
Unit Battery
The battery in this unit is not accessible.
You must dispose of this product according to local laws and regulations.
Because this product contains electronic components and batteries, the product
must be disposed of separately from household waste when the product reaches its end of life.
the product should be taken to your local collection point for collection.
Some collection points accept products free of charge.
- 5 -
Downloaded from www.vandenborre.be

Connecting to a TV set
L
R
CVBS
Red
White
Yellow
VIDEO IN
AUDIO IN
TV
EARPHONE
ADAPTOR
Downloaded from www.vandenborre.be
- 6 -

MP3/WMA/MPEG4 PLAYING
The MP3/WMA/MPEG4 disc has such a directory structure as shown in picture above.
Press Direction key to choose the root directory and then press the ENTER button to enter into the
sub directory.
Press Direction key to choose the desired track and then press ENTER or PLAY to enjoy the music
or movie.
If you want to return to the upper menu, press Direction key to choose the icon and press the
ENTER button.
Filter: Allows selecting the categories of files displayed in the browser list.
This selection is done among the 3 categories: Audio, Photo and Video.
Repeat: To switch different repeat playing mode.
Mode: Select different playing mode.
NOTE: Filter/mode and editing can only be used in stop mode. Use / VOL+ key to highlight
the desired function, then press enter. Press enter again to select or de-select mode.
Use /VOL- key to go to previous mode.
Normal: Shuffle mode is cancelled.
Shuffle: Shuffle mode enabled. When playback reaches the end of the current track/chapter, playback
jumps to a random track/chapter.
As the end of each track/chapter is reached, another random track/chapter will be played until all
tracks/chapters have been played or the Shuffle mode is cancelled by toggling to a different Mode
Option.
Music Intro: In this mode, the media will play 10 seconds then skip to next media Edit Mode: To
enable programmed playback mode.
When you select the mode, press LEFT Direction key to directory and press ENTER to choose the
desired track and press Add to program to
Program view: Display program track.
Brower view: Display track directory.
Add to program: Select the desired track and press Add to program to add the track of the program
play directory.
Clear program: In the complete stop state (press the STOP button twice), choose the track press
Clear program to delete the track of the program play directory, add in programmed play back
directory
- 7 -
Downloaded from www.vandenborre.be

PICTURE CD PLAYBACK
The PICTURE CD disc has such a directory structure as shown in the following picture.
Press Direction key to choose the root directory and then press ENTER
button to enter into the sub directory.
Press Direction key to choose the desired picture and then press
ENTER or PLAY to enjoy the picture.
If you want to return to the upper menu, press Direction key to
choose the icon and press ENTER button.
Image rotation
In picture play state, press Direction key to rotate the picture (90⁰, 180⁰, 270⁰, no rotation).
Press the ANGLE button to change the picture scan mode (transition effects).
- 8 -
SYSTEM SETUP
MENU OPERATION
Press the SETUP button on the remote control, the SETUP MENU (main) will be
displayed. After accessing the setup menu, press the direction buttons for up
and down movement to select an item desired, then press the ENTER button to
confirm. Press the LEFT or RIGHT direction button to return to the previous menu.
To exit the setup, press the SETUP button again. In the SETUP MENU, you may
choose any of the following options.
LANGUAGE SETUP
Select Language in the setup menu, and display the Language submenu:
Downloaded from www.vandenborre.be

SYSTEM SETUP
NOTE: Use / VOL+ to highlight the item to be adjusted.
OSD Language
Use this item to select the language of the setup menu and screen display.
Subtitle
This option provides the preset subtitle language.
Follow the operating instructions stated in DVD MENU SETUP In
combination with the desired option.
.
MPEG4 Subtitle
Select a different MPEG4 subtitle encoding option.
Audio
Follow the operating instructions stated in DVD MENU SETUP in combination with the desired option.
This option provides the built-in disc dubbing language options.
DVD Menu
This option provides the films menu language options.
Follow the operating instructions stated in DVD MENU SETUP
in combination with the desired option.
- 9 -
VIDEO SETUP
Select Video in the setup menu, and display the Video submenu:
Aspect Ratio
The image display ratio is related to the recorded disc format. Some discs cannot display images in
the aspect ratio you choose.
If you play a disc recorded in 4:3 format on a widescreen TV, black bars will appear on the left and
right side of the screen.
You must adjust the screen setting depending on the type of the television you have.
TV System
This product supports output of various systems, including NTSC, PAL.
If your TV set has only NTSC or PAL system, the screen will blink and become colourless when an
incorrect system is selected.
Note: For more information of output format, refer to the instructions for your TV set.
Downloaded from www.vandenborre.be

Smart picture
Adjust display effect for video output:
Standard: default effect.
Bright: internal setting for bright view effect.
Soft: internal setting for soft view effect.
Dynamic: user adjust brightness, contrast, colour etc.
To adjust smart picture settings:
Press SETUP on the remote control; use the key to select video.
Press /VOL+ key and then key to select Smart Picture then press ENTER.
Highlight a selection by using the up and down keys and press ENTER again.
In Dynamic mode select brightness, contrast or colour value, by using or to adjust.
To exit/close mode, press ENTER.
- 10 -
RATING SETUP
Select Rating in the setup menu, and display the Rating submenu:
Note: Not all DVD’s support the ratings option.
Parental Control
Selecting a Rating allows the user to set the parental control feature of the player.
Select Parental Control, and press ENTER to change the different levels.
Note: Unlock the password before setting Parental Control.
Set Password
Use the 0-9 keys to input four digits (password), then press ENTER to confirm.
Note: If you forget your password, please use the universal password 6666 to unlock.
MISC SETUP
Select MISC in the setup menu, and display the submenu below:
* Use Default Settings Reset setup data to factory default and re-load disc.
Downloaded from www.vandenborre.be

Trouble-shooting
Carry out the problem-solving measures described in the following section before contacting
Customer Support.
Turn off the DVD player immediately as soon as you suspect a malfunction.
Unplug the power plug and check whether the DVD player is unusually warm or whether smoke is
rising from it.
- 11 -
Problem Possible cause Remedy
Disc cover not closed Close disc cover
No disc inserted Insert disc
Disc inserted the wrong way Insert disc with label facing up
Disc dirty or deformed Clean disc, or insert other disc
Regional code of the player does not
match the regional code of the DVD
Purchase DVD with corresponding
regional code
The DVD player
does not work
Moisture on lens Remove disc and turn off
DVD player for at
least two hours
Device not properly connected
Check connections and
connect device inthe correct way
Headphones connected
(loudspeaker off) Pull out the headphones
DVD sound settings incorrect
Check sound settings and set sound
correctly
No audio
Disc dirty or deformed Clean disc, or insert other disc
TV screen is off or in the incorrect
video mode
Turn on LCD screen and/or set correct
video mode
No video
Device not properly connected
Check conn
ections and connect device in
the correct way
Poor video and/or
audio quality
Disc dirty or deformed Clean disc, or insert other disc
Loop mode is switched on Exit the loop mode
Repeated
playback of a
section Disc dirty or deformed Clean disc, or insert other disc
Obstacle between remote control
and DVD player
Remove obstacle
Remote control not pointed at DVD
player
Point remote control directly at DVD player
Remote control battery inserted the
wrong way
Check the battery's polarity and, if
necessary, insert battery correctly
Remote control
does not work
Battery too low or completely
discharged
Insert new battery
Downloaded from www.vandenborre.be

Specifications
Kesa Electricals© UK: EC1N 6TE
Specifications are subject to change without notice.
Play mode
Disc mode
Video S/N ratio
Resolution
Frequency response
Audio S/N ratio
Dynamic range
Distortion
D/A Converter
NTSC/PAL
DVD,VCD, CD, MP3, CD-R, CD-RW, JPEG,
DVD+ -R/W, MPEG4
65dB.
500 lines.
fs 96KHz: 20Hz-20KHz:+/-1dBI
90dB
80dB
< 0.01%
96KHz/24bit
Output characteristic
Display Device
Screen Size
Video output
Audio output
Power Voltage
Power consumption
Color TFT-LCD
7 inches
1Vp-p(75 )
2CH
DC IN 12V
12W
- 12 -
Downloaded from www.vandenborre.be

TABLEDESMATIÈRES
Instructionsimportantesdesécurité.............................................1
Illustrationdupanneauprincipal..................................................2
Connexiond’unpériphériqueUSB.................................................3
Télécommande.............................................................................3
Connexionàuntéléviseur.............................................................6
LectureMP3/WMA/MPEG4..........................................................7
LECTURED’UNDISQUECDPHOTO................................................
RÉGLAGESDUSYSTÈME...............................................................9
Guidededépannage....................................................................12
Spécifications..............................................................................13
8
Downloaded from www.vandenborre.be

‐1‐
INSTRUCTIONSIMPORTANTESDESÉCURITÉ
Consignesd'utilisationetd'entretiensécurisés
Nousavonsconçuetfabriquéceproduitconformémentauxnormesdesécuritéeuropéennes,
néanmoins,commepourtoutéquipementélectrique,vousdevezenprendresoinafindegarantirune
utilisationnondangereuseetoptimale.Voiciquelquesconseilspourvousyaider.Lisezattentivementces
instructionsavantd'utiliservotreappareilpourlapremièrefois.
•Nerangezpasceproduitdansunendroitfroid.Carlorsqueleproduitseréchauffeàla
températureambiante,delabuéepeutseformeràl'intérieuretendommagersescircuits
électroniques.
•Afindevousprémunircontreleschocsélectriques,nedémontezaucunepartieduboîtier.
•Encasdepanne,n'essayezpasderéparerl'appareilparvous‐même,faitesréviserl'appareil
•Arrêtezd'utiliserl'appareils'ilnefonctionnepasnormalement,siunliquideapénétréà
l'intérieurous'ilaétéendommagédequelquemanièrequecesoit,etdébranchez‐le
immédiatementdelapriseélectrique,puisdemandezconseilàunspécialiste.
•Nefaitespastomberleproduitetveillezàcequ'ilnesubisseaucunchoc.Lesmanipulations
brutalesduproduitpeuventendommagersescomposantsinternes.
•Lapriseducâbled'alimentationsertdedispositifdedéconnexiondel'appareildusecteur,elle
doitdonctoujoursresteraccessible:
AVERTISSEMENTS :
•Cet appareil est destiné à un usage domestique uniquement. Toute utilisation autre que celle
prévue pour cet appareil, ou pour une autre application que celle prévue, par exemple une
application commerciale, est interdite.
•Le câble souple externe de ce transformateur ne peut pas être remplacé; en cas
d'endommagement du cordon, il convient de mettre le transformateur au rebut.
•L’appareil ne doit pas être exposé á des égouttements d'eau ou des éclaboussures et de plus
qu'aucun objet rempli de liquide tel que des vases ne doit être placé sur l’ appareil.
•Il convient de ne pas placer sur l’appareil de sources de flammes nues, telles que des bougies
allumées.
•Il convient que l’aération ne soit pas gênee par l’obstruction des ouvertures d’aération par des
objets tels que journaux, nappes, rideaux, etc.
Ventilation
Placezl'appareilsurunesurfaceplaneetdure,nonexposéeàlalumièredusoleiletàl'écartdetoute
sourcedechaleur.Veillezàcequelesouïesdeventilation,ycompriscellesprésentessousl'appareil,ne
soientpasobstruéespardespiècesd'ameublementmolles.
ATTENTION:RISQUEDECHOCÉLECTRIQUENEPASOUVRIR
Uneécouteprolongéedulecteuravecunniveaudevolumemaximumpeutendommagerl'auditionde
l'utilisateur.
AVERTISSEMENT:Pourprotégervoscapacitésauditives
Ilestprimordialquelecasqueoulesécouteursutilisésavecceproduitsoientconformesàl’arrêtédu8
novembre2005delaRépubliqueFrançaiseportantapplicationdel'articleL.5232‐1.Celagarantitque
l'intensitéacoustiquen'excèdepas100dBSPL.L’écouteprolongéeàunvolumeélevépendantplusde
cinqheuresparsemainepeutléservoscapacitésauditives.
Downloaded from www.vandenborre.be

‐2‐
Illustrationdupanneauprincipal
Vue
avant
AFFICHAGE LCD
HAUT-PARLEUR
CHARGEMENT SUPÉRIEUR CD
SOURCE (DISQUE/USB)
ARRÊT
BOUTON D'OUVERTURE CD
OK OK
Pour accéder au fichierprécédent de la liste.
Pour accéder au fichiersuivant de la liste.
En mode de lecture: GAUCHE/VOL-
En Mode Répertoire: Pouraccéder au fichier /dossier désiré.
En mode de lecture: DROITE/VOL+
En Mode Répertoire: Pouraccéder aux réglages oupropriétés du fichier désiré
ALIMENTATION(MARCHE/ARRÊT)
PRISE D'ENTRÉE CC 12V(Alimentation)
PRISE DE CASQUE (Tension maximale de sortie<=150mv)
SORTIE AV
USB
Indicateur IR/CHG
Downloaded from www.vandenborre.be

‐3‐
Connexiond’unpériphériqueUSB
AppuyezsurlatoucheSOURCEdelatélécommandejusqu’àatteindrelemodeUSB.
REMARQUE:LeclapetCDdoitêtreferméafind'initialiserlemodeUSB.
InterfaceUSB
Cetteunitéestpourvued’unportUSBpourmettreenlecturedesfichiersdemusiqueMP3,desfichiers
JPEGetd'autresfichiers.Appuyezsurlatouche<SOURCE>poursélectionnerlemode«USB».Toutesles
fonctionssontlesmêmesquepourlalectured’undisque.
Remarque:Le port d’entrée USB est compatible avec les mémoires flash mais il ne garantit pas
la compatibilité avec les lecteurs MP3 utilisant le logiciel de l’utilisateur.
REMARQUE:LorsquevousutilisezunpériphériqueUSB,veuilleznepasl’insérerdanslesensincorrectou
forcersurlaclécarcelapourraitcorromprelesdonnéesstockées.
Avertissement:LaclémémoireUSBdoitêtredirectementbranchéedansl'unité.N’utilisezpasdecâble
d'extensionUSBpouréviterunéchecdetransfertdesdonnéesetlapossibilitéd’interférences.
Télécommande
1.RÉPÉTITIONA‐B:AppuyezunefoisaudébutdelascènedésiréepourréglerlepointA;appuyezde
nouveauàlafindelascènechoisiepourréglerlepointB.Toutelascènesélectionnéesemettra
automatiquementenlecture.AppuyezànouveausurlatoucheA‐Bpourdésactivercettefonction.
2.REPEAT/PROG(RÉPÉTITION/PROGRAMMATION):AppuyezunefoispouraccéderàlaRépétitionde
chapitre,appuyezdenouveaupouraccéderàlaRépétitiondutitre,appuyezunetroisièmefoispour
accéderàlaDésactivationdelarépétition.Appuyezetmaintenezcettetouchepouraccéderàla
programmationetentrerletitreetlechapitreaveclestouchesnumériques.
3.TOUCHESNUMÉRIQUES0à9:Utiliséespoursélectionnerlesnumérosdesplagesoupourentrerles
numérosdanslesmenus.
4.RÉGLAGES:Pouraccéderaumenudesréglages.
5.GOTO(ALLERÀ):Pouralleràuntemps/untitre/unchapitrespécifique.
6.SUIVANT:Pouraccéderauchapitreouaufichiersuivant
USB
7
11
12
1
2
3
4
5
6
13
14
15
16
17
8
20 9
10
18
19
Downloaded from www.vandenborre.be

‐4‐
7.PRÉCÉDENT:Pourretournerauchapitreouaufichierprécédent.
8.AVANCERAPIDE:Pouravancerrapidementlalecture,appuyezbrièvementplusieursfoissurcette
touchepourfairedéfilerles5niveauxdevitesse(X2‐>X4‐>X8‐>X16‐>LECTURE).
9.REMBOBINAGERAPIDE:Pourrembobinerrapidementlalecture,appuyezbrièvementplusieursfoissur
cettetouchepourfairedéfilerles5niveauxdevitesse(X2‐>X4‐>X8‐>X16‐>LECTURE).
10.ALIMENTATION:Pourmettrel’unitéenmarcheoulamettreenmodedeveille.
11.AFFICHAGE:Pourafficherlesinformationsdétailléesdufichieroududisqueencours.Appuyezune
foispourafficherlesinformationssurunfichierDVD,appuyezdenouveaupourafficherlesinformations
surunfichieraudio.
12.AUDIO/ANGLE:Appuyezbrièvement:Pourchangerlasélectiondumodeaudio(sidifférentsmodes
sontdisponibles).Appuyezetmaintenez:Pourchangerl’angledevisionnage(sidifférentsmodessont
disponibles).
13.SOUS‐TITRE/TITRE:Appuyezbrièvement:Pourchangerlalanguedesous‐titrage(sidifférentes
languesdesous‐titragesontdisponibles).Appuyezetmaintenez:MenudestitresduDVD.
14.MENU/ZOOM:AppuyezbrièvementpouraccéderauMenu;appuyezetmaintenezpourutiliserla
fonctionZoom.Maintenezleboutonpressépoursélectionnerleniveaudezoom:Q1,Q2Q3.
15.STOP/SLOW(ARRÊT/RALENTI):Appuyezbrièvement:pourarrêter;Appuyezlonguement:pour
mettrelalectureauralenti.
Appuyezunefoislonguementpourralentirlavitessed’1/2;Appuyezunedeuxièmefoislonguement
pourralentirlavitessed’1/4;Appuyezunetroisièmefoislonguementpourralentirlavitessed’1/6;
Appuyezunequatrièmefoislonguementpourralentirlavitessed’1/8;Appuyezunecinquièmefois
longuementpourretourneràlavitessenormaledeLECTURE.
16.Touchesdirectionnelles:
Permetdenaviguer(Haut/Bas)surlesécransdesmenuspoursélectionnerlefichierdésiré.
Pouraugmenterleniveauduvolume.
Pourdiminuerleniveauduvolume.
17.ENTRER:Pourconfirmeretaccéderauxoptionsoupourmettrelesfichiersenlecture.
18.PLAY/PAUSE(LECTURE/PAUSE)Pourdémarreroureprendrelalectured’unmédia.
19.SOURCE:AppuyezpourpermuterentrelemodeDisqueetlemodeUSB.
20.MUTE(SOURDINE):Pourdésactiverlasortieaudio.
Remarque:Appuyezdurantenviron2secondespourlesfonctionsnécessitantdesfonctionssecondaires.
Préparationsdelatélécommande
Placezlatélécommandesurunesurfaceplaneetinsérezlapilecellulairefourniedanslatélécommande
commesuit.
1.Poussezleboutonverslagauche.
2.Tirezlecompartimentàpilepourlesortir.
3.Insérezlapiledanslecompartimentenvousassurantquelespolaritéscorrespondentauxmarques
indiquéesdanslecompartiment.
4.Insérezlecompartimentàpiledanslatélécommande.
Donnéesdelapilecellulaire
Typedepile:1xCR2025,3V
Downloaded from www.vandenborre.be

‐5‐
Duréedevie:environ1an(pourunefréquenced’utilisationmoyenneettempératureambiantenormale).
Utilisationdelatélécommande
Pointezlatélécommandeversl'unitéprincipalelorsdel'utilisation.
Latélécommandefonctionnesurunedistanced'environ5mètresautourducapteuretsurunangle
d'environ30degrésducôtégaucheetducôtédroit.Aucunobstaclenedoitêtreprésententrela
télécommandeetlecapteurinfrarougeetneplacezpaslatélécommandesouslalumièredirectedu
soleil.Lapiledoitêtrechangéesilatélécommandenefonctionneplusnormalementousisaportée
diminue.
Remarquesconcernantlapile
Silatélécommanden'estpasutiliséependantunelonguepériode,veuillezretirerlapiledeson
compartiment.
Nechauffezpaslapileetnelajetezpasdansunfeu.
N'essayezenaucuncasdedémonter,déformeroumodifierlapile.
Miseaurebutdelapile(delatélécommande)
•Veuillezvousassurerdejeterlapiledansunendroitadapté.
•Nejetezjamaislapiledansunfeuouaveclesautresdéchetsménagers.
•Mettezlapileusagéeaurebutenrespectantlesinstructionsdufabricant.
ATTENTION:Unrisqued'explosionexistesilapilen'estpasinséréedanslesenscorrect.Lapiledoit
toujoursêtreremplacéeparunepiledumêmetypeoud'untypeéquivalent.
Batteriedel'unité
Labatteriedecetappareiln’estpasaccessible.Mettezceproduitaurebutenrespectantles
réglementationsetlégislationslocales.Ceproduitcontientunebatterieetdescomposantsélectroniques,
c'estpourquoileproduitenfindevienedoitpasêtrejetéaveclesdéchetsménagers,maismisaurebut
séparément.Apportezl'appareilàuncentrelocalderécupérationpourqu'ilsoitrecyclé.Certainscentres
acceptentlesproduitsgratuitement.
Downloaded from www.vandenborre.be
Table of contents
Languages: