Dashan DS-350 User manual

DASHAN
Strong Ventilantion Open
Kerosene Heater
Instructions
Model
DS-350
Be Sure To Read Before Use
Efcient
Environmentally-friendly
Energy-saving
Contents Pages
Be Sure
to Read Preparations Use Maintain and
Others
Safety Instruction
Danger·Warning
Vital Contents for Safe
2
2
Names Of Parts
●Exterior Appearance
●Button
●Panel
●LCD Part
Preparation
●Preparation
●Best Effects
●Fuels
●Fueling method
●Kerosene 0HWHU
●Clock Setting
Ready for Use
●Fire
●State of Firing
●Temperature Setting
●Turning Off the Heater
●Timing
4
●Daily Maintenace
●Problems &KHFNLQJ
6
5
4
7
8
9
8
8
10
12
17
14
16
15
14
14
13
18
19
®

Safety Notice
The purpose of this Safety Notice is
for the proper and safe use of the
product and the prevent of personal
injury or property damage. Please
be sure to follow
WARNING
Meanings of some symbols
This symbol means what you
can‘t do or what is forbidden
This symbol means what you
must do or what is required
This symbol means you
should cut off the power
DANGER
●use of gasoline
Prohibited !
Kerosene only
●Off the sealed
container
'RQRWSODFHDVHDOHG
JDVFRQWDLQHU
DQGWKLQJVDOLNHQHDU
WKHH[LW
●Necessary airow
'RQRWXVHLQDQ
HQFORVHGURRPVXFK
DVWKHEDVHPHQW
aWLPHVSHUKRXUaPLQXWHVIRU
HDFKWLPH
●Avoid blocking out the outlet
Avoid blocking out the
outlet with objects .
●Touching the outlet prohibited
7DNHFDUH
●Being Close to
combustible materials is
strictly prohibited
'RQRWXVHWKHKHDWHU
QHDUEXUQLQJREMHFWV
●Disassembling or
assembling the heater
without permission is
prohibited . Or your heater
will be damaged .
WARNING
●Do not use it when an
exception occur
Turn off it when
going to bed or
going out


Names of its Parts
Exterior appearance
Eurya +DQG
Fuel Gauge
2LO7DQN
Fuel
,QOHW
)LOWHU
Fuel Tank
Cap
Display&
Keyboard
Fire Viewing
:LQGRZ
Air
2XWOHW
3DQHO
&KDVVLV
Fan Cover
(Air Inlet)
0RWRU
7HPSHUDWXUH3UREH
Plug
)LOWHU

Operating parts
SET
SLEEP
RUN
ON\OFF
TIMER\
TEMP
CHILD
LOCK
CLOCK
MORNING
TIMER/AUTO
DS-350
AIR
CHANGE
7HPSHUDWXUH&ORFN
5XQQLQJ%XWWRQ
7XUQLQJRQ7XUQLQJRIIKHDWHU
,QGLFDWRU)ODVKHV)LULQJ
,QGLFDWRU215XQ0RGH
Setting Button \ Timer Button
Pressing this button means conrmation while
in the mode of adjusting time and enters next
mode of adjusting time
3UHVVLQJWKHEXWWRQZKLOHZRUNLQJPHDQV
WKHHQWUDQFHLQWKHWLPHUVHWWLQJPRGH
,QGLFDWRU21WKHVWDWHRI
timingVHWWLQJ
,QGLFDWRU)ODVKHVtimingLVVHWWHG
FORFNEXWWRQ
/RQJVWDQGE\WLPHE\VHFRQGVWR
HQWHUVHWWLQJPRGH
FKLOGORFN:RUNLQJ
3UHVVLQJLWIRUWKUHHVHFRQGVLQWKH
SKDVHRIXQORFNLQJPHDQVWKH
IDLOXUHRIDOOEXWWRQV
3UHVVLQJLWIRUWKUHHVHFRQGVZKLOH
LQWKHSKDVHRIORFNLQJPHDQVWKH
UHWULHYDORIDOOEXWWRQV
Shift Button
In the standby mode means the
switch in time from date to week
or week to date
In the working mode means the
switch in Temperature to Time
Temperature SET
Time SET
Temperature
decrease
Temperature
increase
time
decrease
time
increase
Timing SET
Timing
decrease
Timing
increase
Automatic timer switch per day
or per week
This Function in Next Model
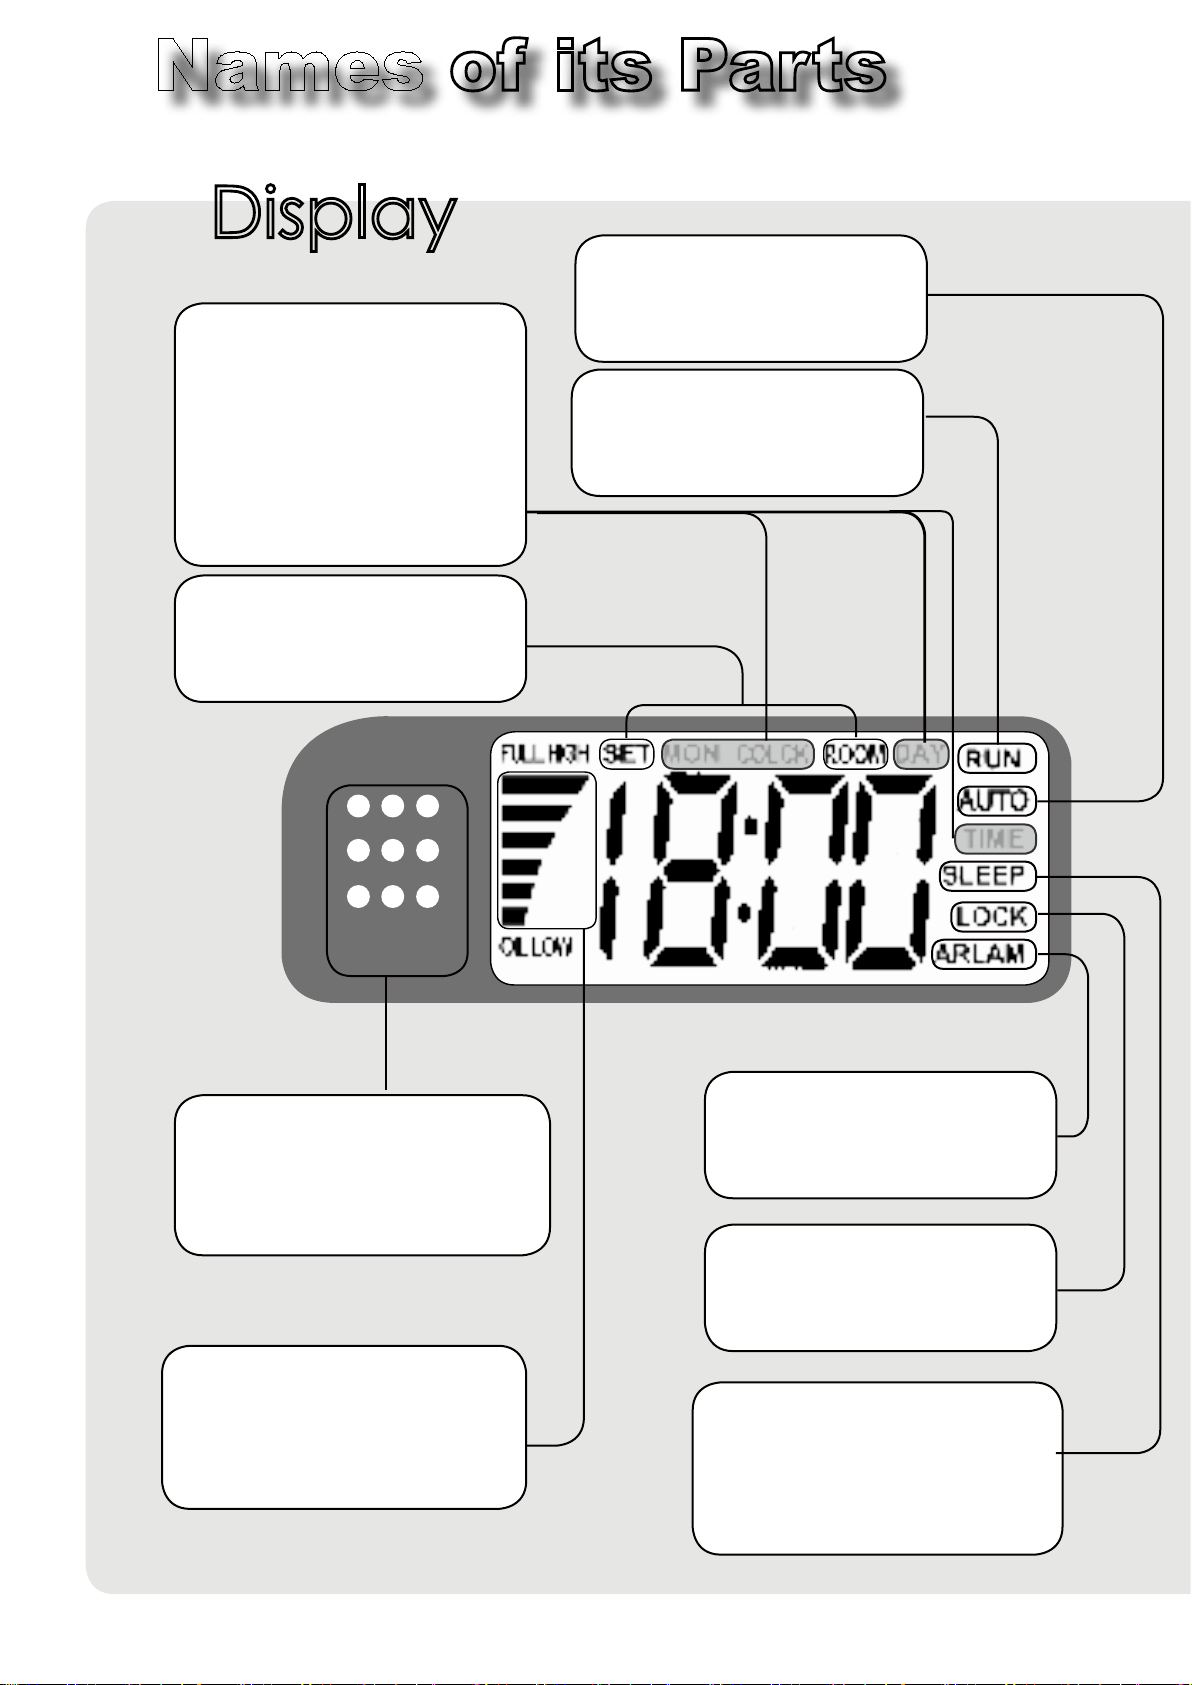
'LVSOD\
DS-350
AIR
CHANGE
PHWHULQGLFDWRU
,WVKRZVWKHOHIWDPRXQWRI
NHURVHQHDQGWHOOVWKHXVHUWR
DGGPRUHEHIRUHUXQQLQJRXW
Indicator of changing air
)ODVKHVVKRXOGRSHQWKH
ZLQGRZDQGDOORZPRUHDLU
Temperature
Set-------Set Temperature
Room----Room Temperature
7LPH
0RQWK
GD\
7LPH
:RUN6WDWH
581,Q:RUNLQJ
VOHHSLQJ
6/((3KHKHDWHULVLQD
VOHHSLQJPRGHDQGZLOOEHRII
DXWRPDWLFDOO]DFFRUGLQJWR
WKHVHWWLPH
$XWR
$XWR$XWR2SHQKHDWHU
ORFNLQJ
/2&.WKHNH\ERDUGLV
ORFNHG
$5/$0
$5/$0WKHKHDWHUKDV
ZURQJ
Names of its Parts
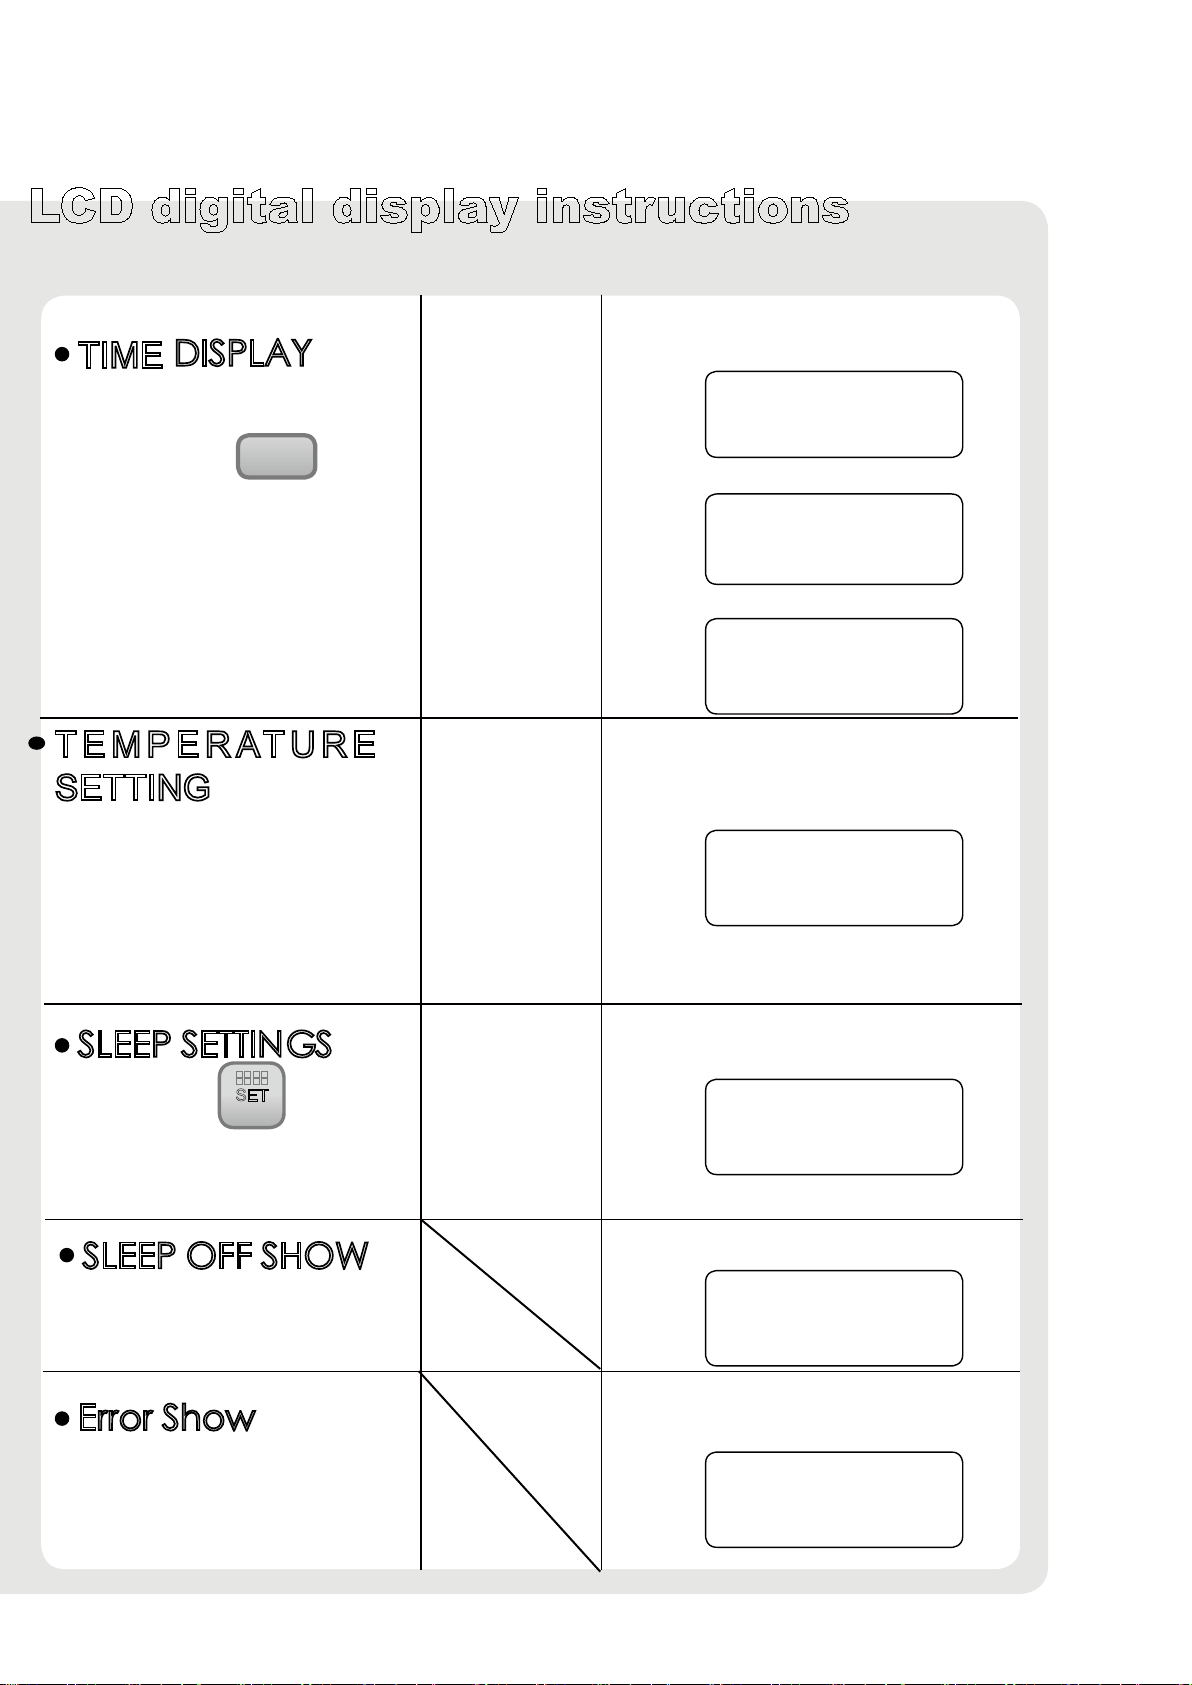
LCD digital display instructions
TIME ',63/$<
Using a 24-hour time system
Pressing the TIMER\
TEMP
Button you can switch back
and forth the date and the
week .
COLCK--Time
MON---Month
DAY --Day
6DPSOH30
6DPSOH-XQHWK
The room temperature display
ranges from 9 to 35 . Below 9 , it
shows “lo” while above 35, it shows
“hi ”
The set temperature is marked by
such symbols as [Lo] [9]~[30][Hi]
SET ROOM
6DPSOH6HW7HPSHUDWXUHᲄ&
5RRP7HPSHUDWXUHᲄ&
6/((36(77,1*6
(UURU6KRZ
T E M P E R AT U R E
SETTING
SLEEP
SET
SLEEP
3UHVVLQJWKH ZKLOLQJ
The heater is equipped with
self-diagnosis,the error code
will display while error occurs
6/((32))6+2:
The set sleep reads SLOF when
turning off automatically
6DPSOH7KHKHDWHULVVHWWRWXUQ
RIIWHQPLQXWHVODWHU
6DPSOH1R2LO7DQN
18:30
CLOLCK
TIME
06 08
MON DAY
MON
22 12
SET ROOM RUN
10 RUN
SLEEP
SLOF
E01ARLAM
6DPSOH0RQGD\
WKHKHDWHULVZRUNLQJWKH
KHDWHULVLQWKHPRGHRIVOHHS
VHWWLQJ

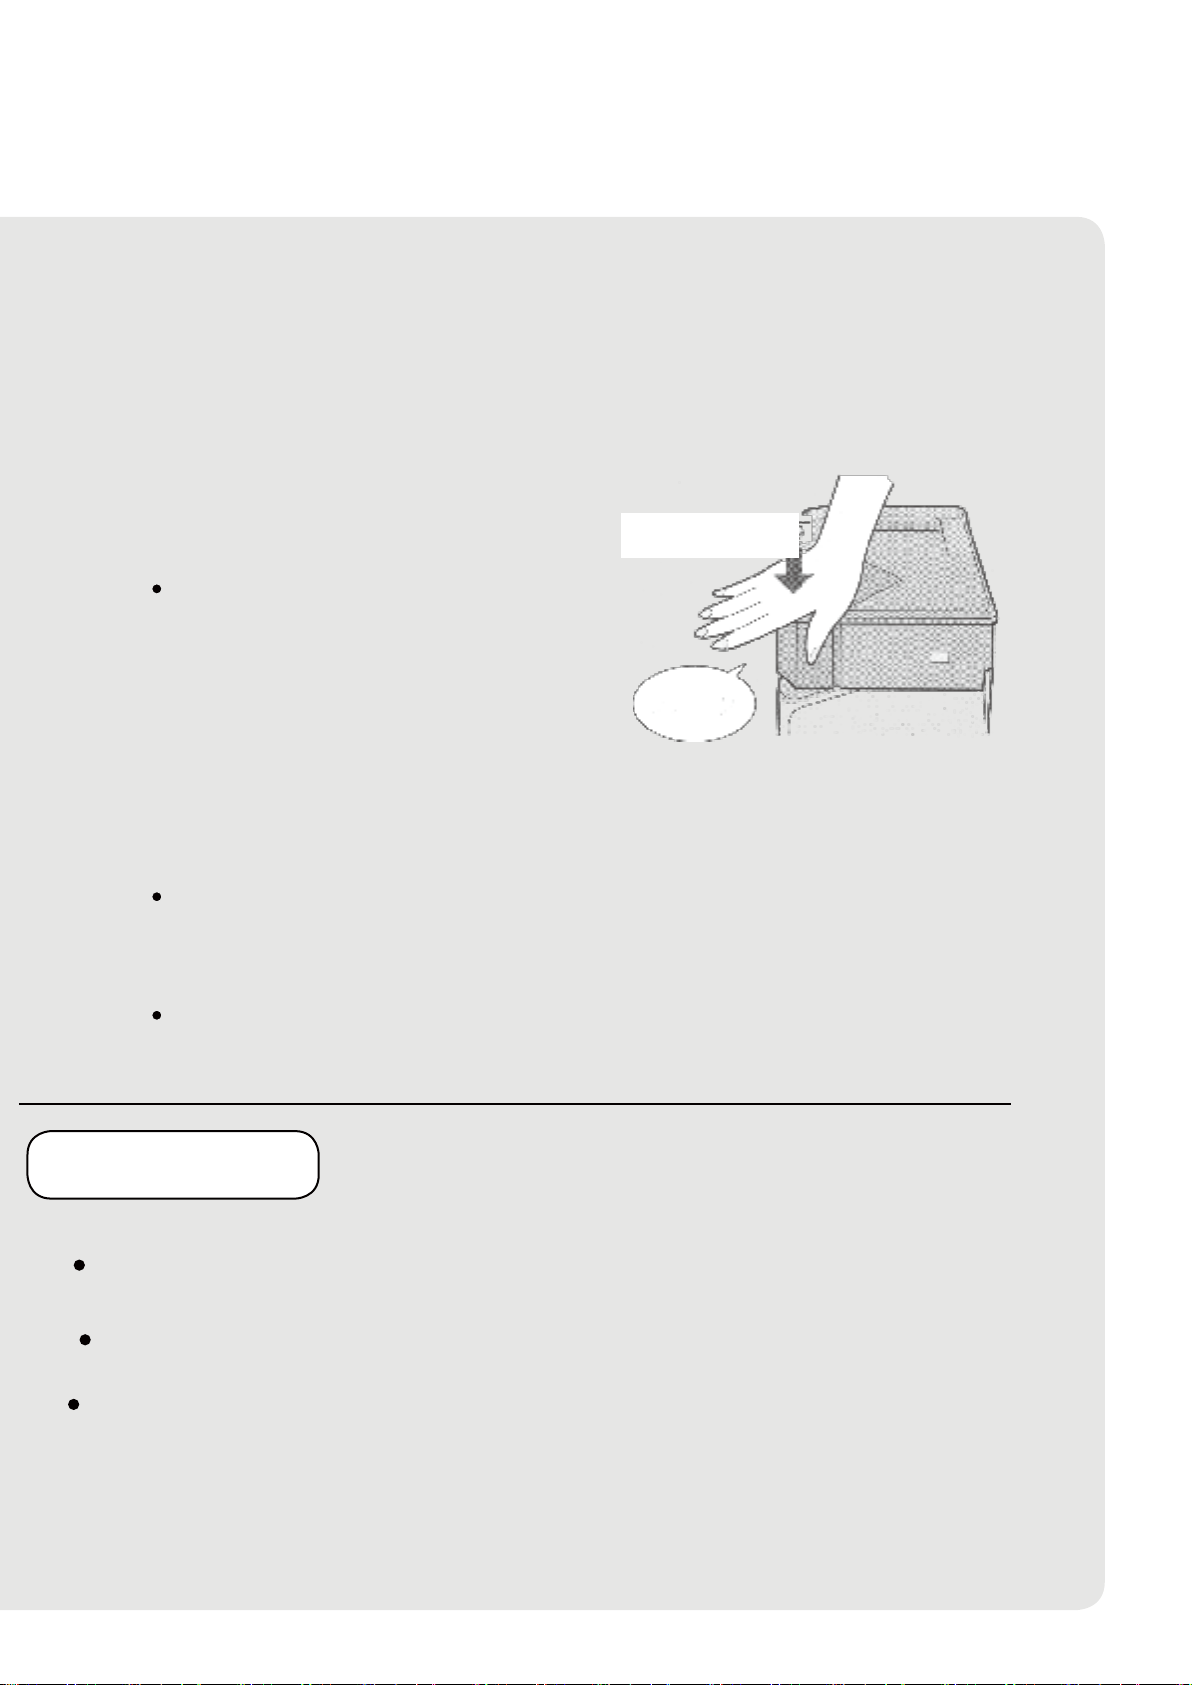
PREPARATIONS
3UHSDUDWLRQ
FOR BETTER EFFECTS
1 Open the package and take the heater out
7KHVPHOORINHURVHQHZKHQRSHQLQJWKHSDFNDJHLVDQRUPDO
SKHQRPHQRQDQGLWLVGXHWRWKHFRPEXVWLRQWHVW3OHDVHIHHO
DWHDVHWRXVH
$&9a9
2 plug into the socket
/&'VFUHHQZLOOGLVSOD\WKHFXUUHQWWLPH
Window Windoow
Heater Heater
place the heater against the
window
Please do not put out the draft articles
whichwill prevent warm air circulation .

使用前准备
)XHOV
Use pure kerosene
Use of gasoline Prohibited
Distinction between
kerosene and gasoline
STOCK AND MANAGE KEROSENE
Kerosene should kept in special
containers , which are put in
a clean , dry ,cool andfire-free
room and avoid
direct sunshine
exposure
Kerosene Gasoline
:(7 '5<
8VH,PSXUHNHURVHQH
The consequences of using kerosene
mixed with water will lead to the failure of
burning , and the heater displays error
button[ER05]
7KHFRQVHTXHQFHVRI
XVLQJJDVROLQHZLOOOHDGWR
ÁUHGLVDVWHU
How to purify
kerosene
Please pull out the
oils in the tank and
wash it with pure
kerosene two or three
times and then add
pure kerosene into
the tank .

PREPARATIONS
Refueling
Please refuel after powering off
Turn it off untill the heater
stops .
Turn off the power and then
pull the fuel tank out .
1
Open the fuel tank
Pull the fuel tank out of the
heater after opening the cap
Fueling
Put the fuel pump into the
bottom of the oil lter
Please note to prevent
fuel tank trun off
during fueling.
Fuel meter:The part of
black means Current oil
Silver
Black
Tank Cap
Press the Button
PULL
Fuel
Gauge
Close the fuel tank
Push the fuel tank cap, until you
hear a carbazole sound .
&DUED]ROH
'HSUHVVHG
Put it in the heater .
Check the bottom of the fuel tank and see if there is debris or
waterdrop . Clean the tank with a piece of dry cloth .
Put the fuel tank in the heater and be sure there is no 【Er01【on the
display when powering . This signal shows you havenot put the tank
in or you have not made it at .
$WWHQWLRQ
'RQRWIXHOQHDUVQRZVDQGRUUXEELVKEHFDXVHWKHUHLVDVHQVRUDWWKH
ERWWRPRIWKHIXHOWDQN,IWKHIXHOWDQNLVFRYHUHGZLWKVQRZVDQGRU
UXEELVKSOHDVHFOHDUWKHPRII
'RQRWWLOWWKHIXHOWDQNZKHQIXHOLQJ
$IWHUIXHOLQJWKHNHURVHQHZLOOOHDNLI\RXFDUU\WKHIXHOWDQNKRUL]RQWDOO\

Oil Show
Operation State
Fuel state Left Working Hour
RUN
ON\OFF
Light ON
Working Mode
Above 1 hour
About 1 hour
Ten minutes
Flashing
RUN
ON\OFF
Light off
Standby Mode
About 10 minutes
$WWHQWLRQ
:KHQWKHRLODPRXQWLVLQWKHVWDWHRI%X]]HUZLOOLVVXHEHHS
VRXQGWRDOHUWXVHUVWRUHIXHO
According to the state of burning ,big re or small re ,the remaining oil will
KDYHDFHUWDLQUXQWLPHHUURU
PREPARATIONS
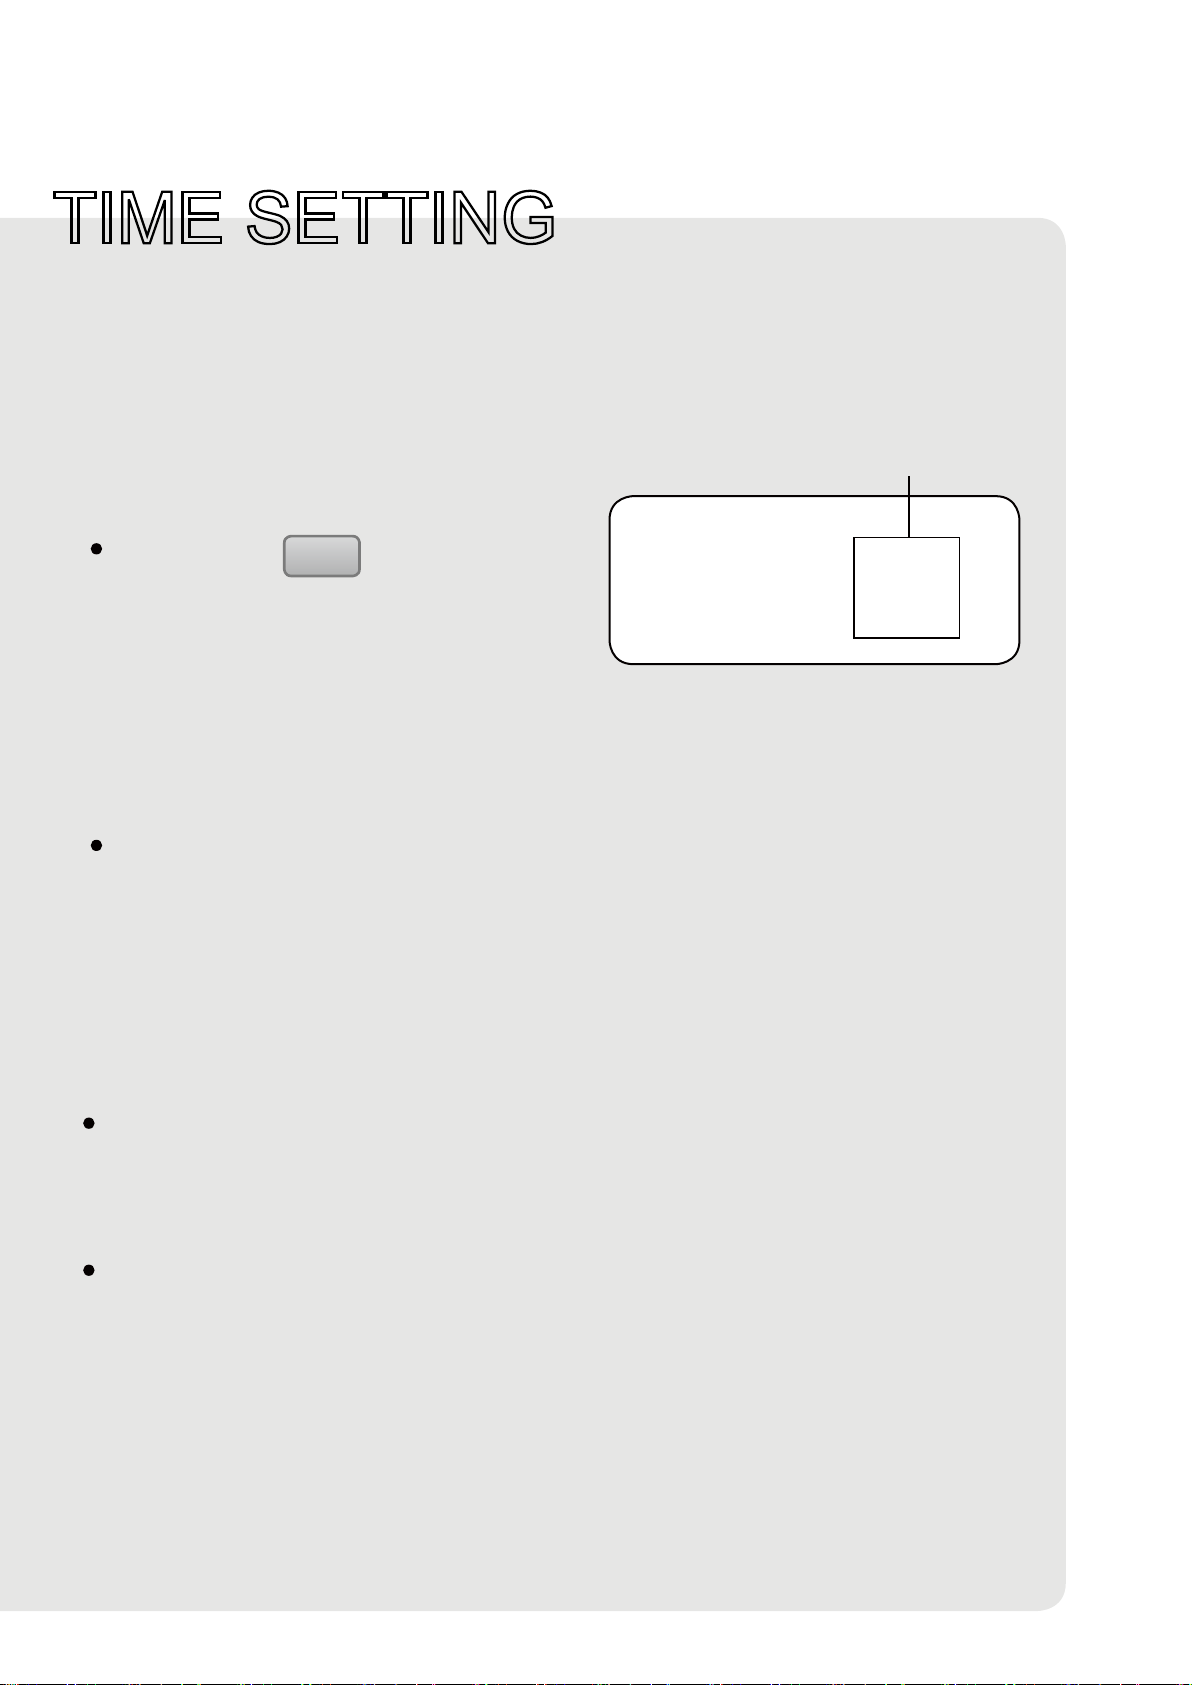
TIME SETTING
,QWKH6WDQGE\PRGH/&'VFUHHQGLVSOD\VWKHFXUUHQWWLPH3UHVV
WLPH?WHPSWRVZLWFKWRWLPHLQWKHPRGHRIZRUNLQJ*HQHUDOO\
VSHDNLQJLWLVQRWQHFHVVDU\WRDGMXVWWKHFORFNVLQFHWKHKHDWHUKDV
DQLQEXLOWFKLSFORFNZKLFKKDVEHHQVHWWKHULJKWWLPHSOHDVHIROORZ
WKHWLSVLI\RXZDQWWRDGMXVWWKHFORFN
1
Hold down CLOCK button,$IWHU
VHFRQGV\RXKHDU᱑EHHS᱒DQG
WKH/&'VFUHHQGLVSOD\VXFKDVDW
ULJKW(QWHU᱑<HDU᱒VHWWLQJ
Enter time setting mode
20 09
Flashing
2Time Adjustment
Press the “+” key to increase the time value, press the ” – “key to
reduce the current time value.
6DYH7LPH
3UHVVWKH᱒VHW᱒EXWWRQVDYHWKHFXUUHQWVHWWLQJVDQGVHWWKH
QH[WPRGH%XWZKHQÁQLVKLQJᱟPLQXWHᱠVHWWLQJSUHVVLQJWKH
NH\LVWRH[LWVHWWLQJPRGH
7LPHVHWWLQJRUGHU\HDUPRQWK'DWHKRXUPLQXWH

Check the re from the window of
observation. Please stop the heater when you nd abnormal combustion .
Start to use
Start to power
1
Press RUN
ON\OFF
Button
Lights start ashing
The Display screen shows
the set temperature and room
temperature . $ERXW 3~4 minutes start re
A bang sound is heard , the heater begins to re .
22 10
SET ROOM
Set 7HPS 5RRP7HPS
Attention
It is a normal phenomenon When the first time use gives off
smoke and odor .They are caused by rust oil and heat-resistant
coatings .Please open the window for more wind and air .
It is a normal sound when you hear Ta Ta sound
It is a normal sound when you hear Chi Chi sound . They are
from vaporization of the burning kerosene .
Fire Condition
Normal
Blue Flame
Burning Net
The following
phenomena are normal
7he blue flame mixed
with yellowones are
QRUPDO
<HOORZIODPHLVIURP
WKHEXUQLQJQHWZKHQ
WKHÁUHLVVPDOO
Check the re from the window of
observation. Please stop the heater when you nd abnormal combustion .
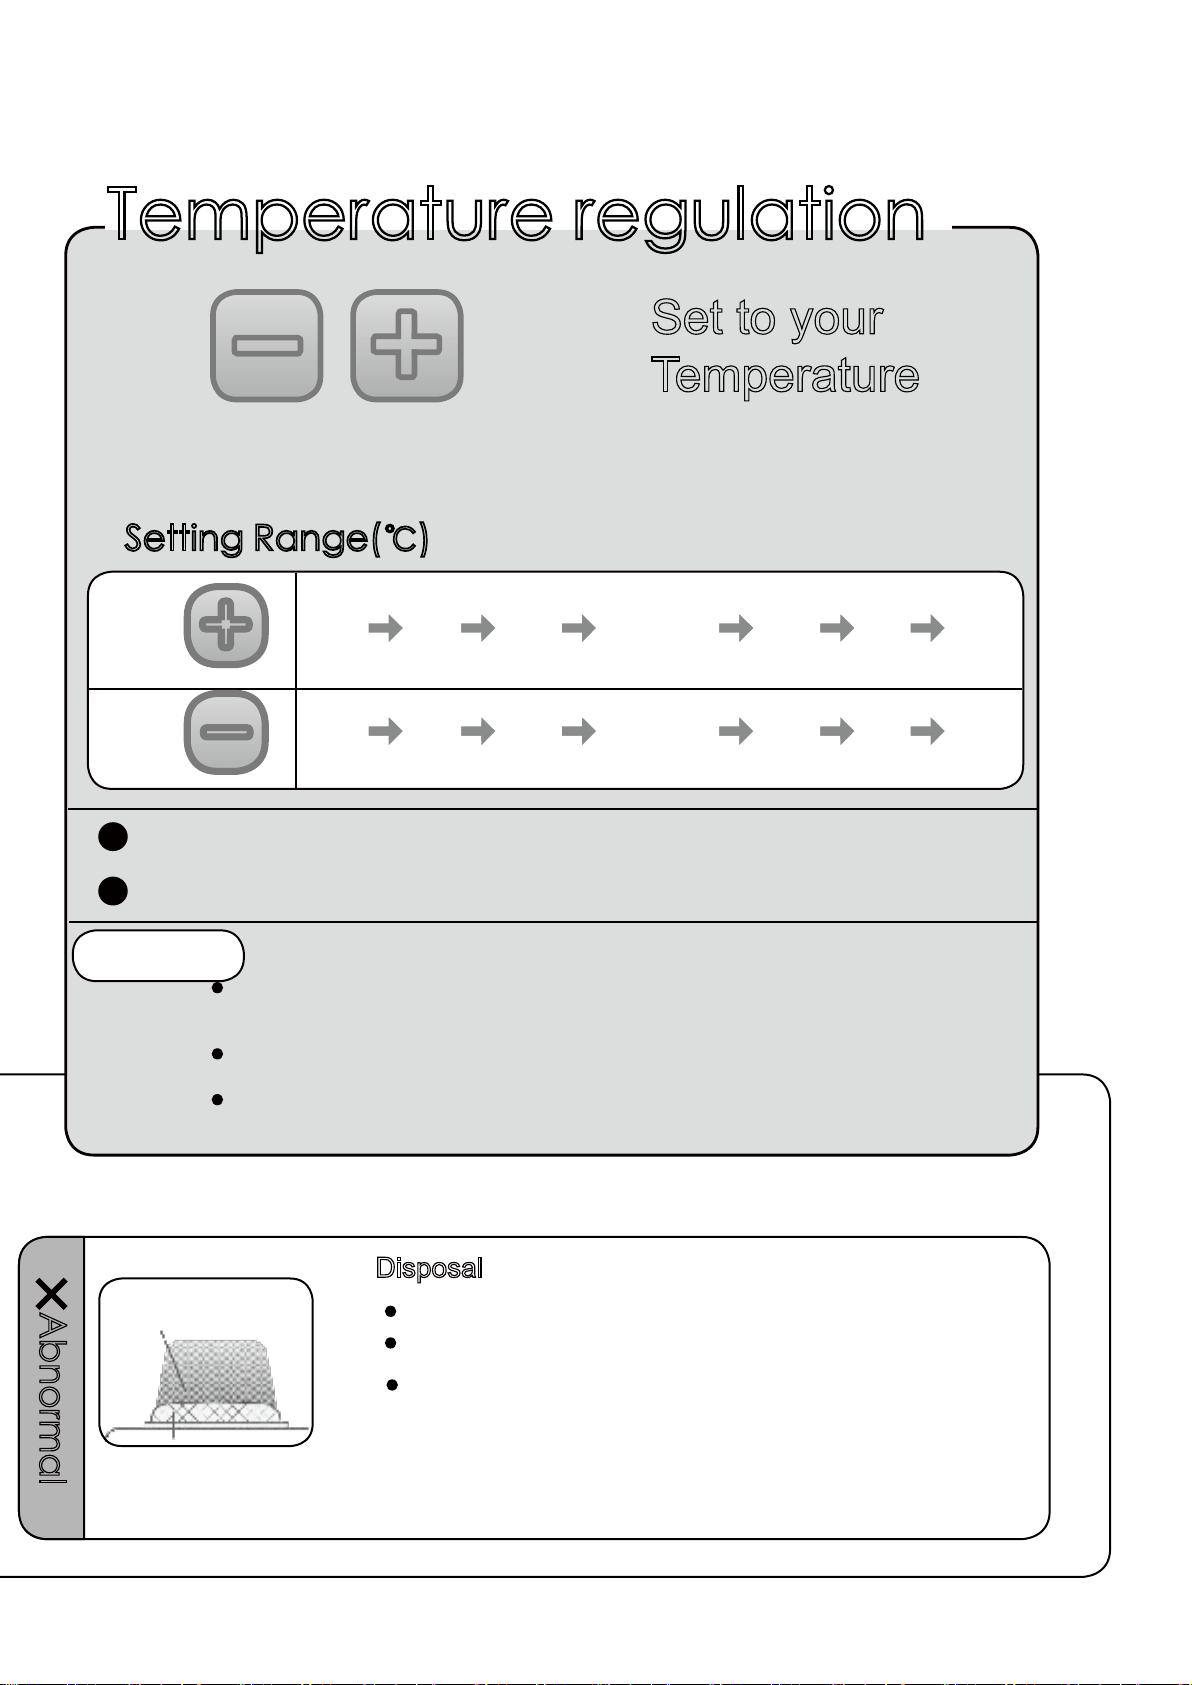
7HPSHUDWXUHUHJXODWLRQ
The button
is for WHPSHUDWXUH
Set to your
Temperature
If you press the button
continousely ,the gure will
change accordingly .
6HWWLQJ5DQJHᲇ
Press Lo 9 10 ᲒᲒᲒᲒ 30 31 HI
$EQRUPDO
Yellow Flame
Disposal
If the above disposal methods can not solve the
problem, please contact our Local dealers.
Press HI 31 30 ᲒᲒᲒᲒ 10 9 Lo
The signal “Lo “ means that the heater is always in the state of small re
The signal “HI“ means that the heater is always in the state of big re .
AttentionThe temperature sensors may have different shows from the
room thermometer because of their different accuracy.
Warming speeds may be different because of different room
sizes and placements of the machine
If remain in the moderate re state after ring about 2 minutes,
it has nothing to do with the room temperature
Outside of the normal
Ventilate
Clear dust in air inlet, outlet, and the fuel tank lter

Set Sleep Mode
13UHVV SET
SLEEP
SLEEP lamp is always bright
Enter the timing mode when the
Display shows [00]
00 SLEEP
Timing
RUN
28VH EXWWRQWRVHWWLPH
3 After nish setting press SET
SLEEP
Setting range:aPLQXWHV
SLEEP light often twinking
Back to the temperature setting interface
Start Sleeping mode
,QWKHVOHHSPRGHVHWWLQJVWDWHLIWKHUHLVQRDFWLRQZLWKLQ
VHFRQGVWKHV\VWHPZLOODXWRPDWLFDOO\UHWXUQWRWKH
WHPSHUDWXUHVHWWLQJ,QWHUIDFHDQGVWDUWWKHVOHHSPRGH
4After the setting time, the system
will shut down automatically and
the Display shows[SLOF], such as
at right.
SLOF
7RHQWHUWKHVOHHSPRGHRQO\DIWHUWKHPDFKLQHVWDUWV
Use RUN
ON\OFF
to back to the Time Display
interface
Start to use
Attention
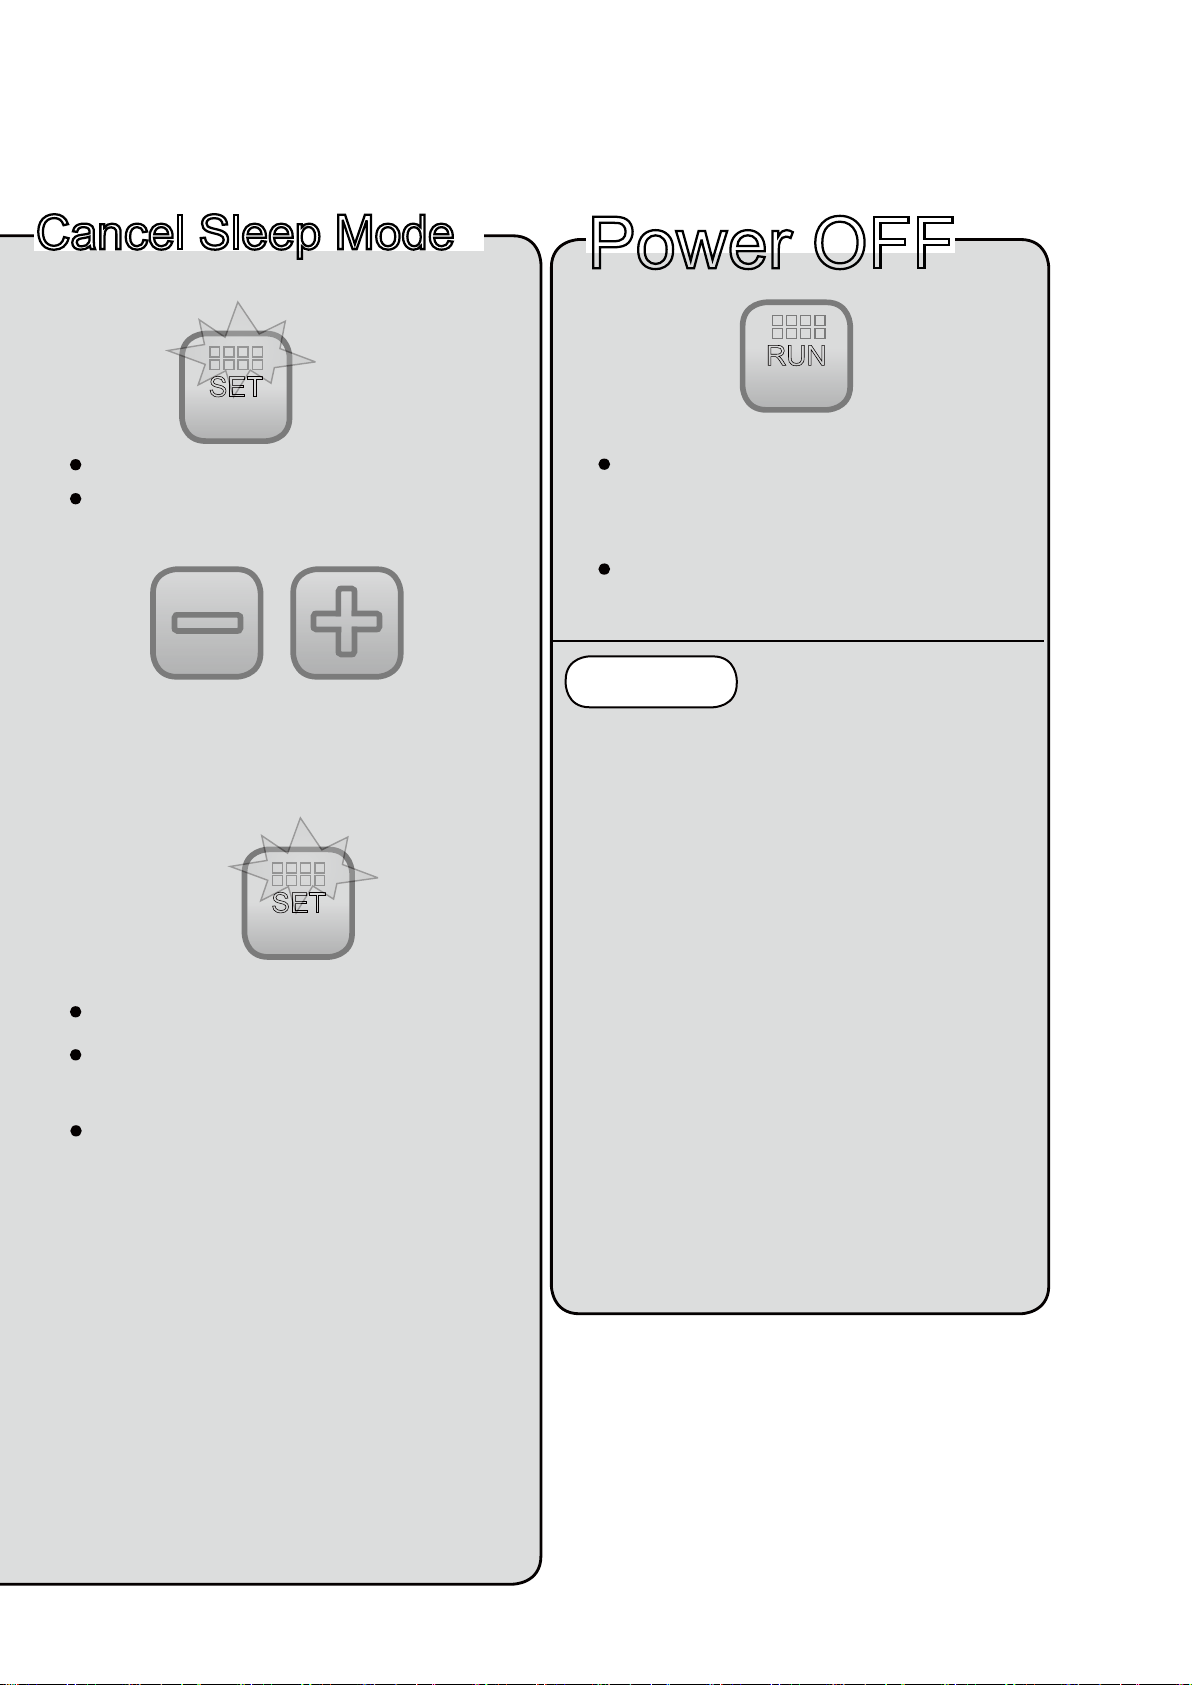
Cancel Sleep Mode
1Press SET
SLEEP
SLEEP lamp is always bright
The display shows the remaining
setting time
2Use
Adjust the timing toᱟ00ᱠ
35HSUHVV SET
SLEEP
SLEEP light always off
Back to the temperature setting
interface
Cancel Sleep mode
Power OFF
5XQQLQJOLJKWVRIIDQGWKHUH
LVWKHYRLFHᱟGDᱠ
13UHVV RUN
ON\OFF
&RQÁUPWKDWWKHÁUHKDG
EHHQH[WLQJXLVKHGIURPWKH
ÁUHZLQGRZ
●After the machine is turned off,
the fan will run 3 minutes to cool
the furnace core
To ensure the fan is running, please
do not do the following actions
● Do not unplug the power
● Do not pull out the fuel tank
● Do not press the Run button
● If you do not use the machine a
long time, please unplug the power
● Please do not switch the machine
frequently. Or it will cause odor
Attention
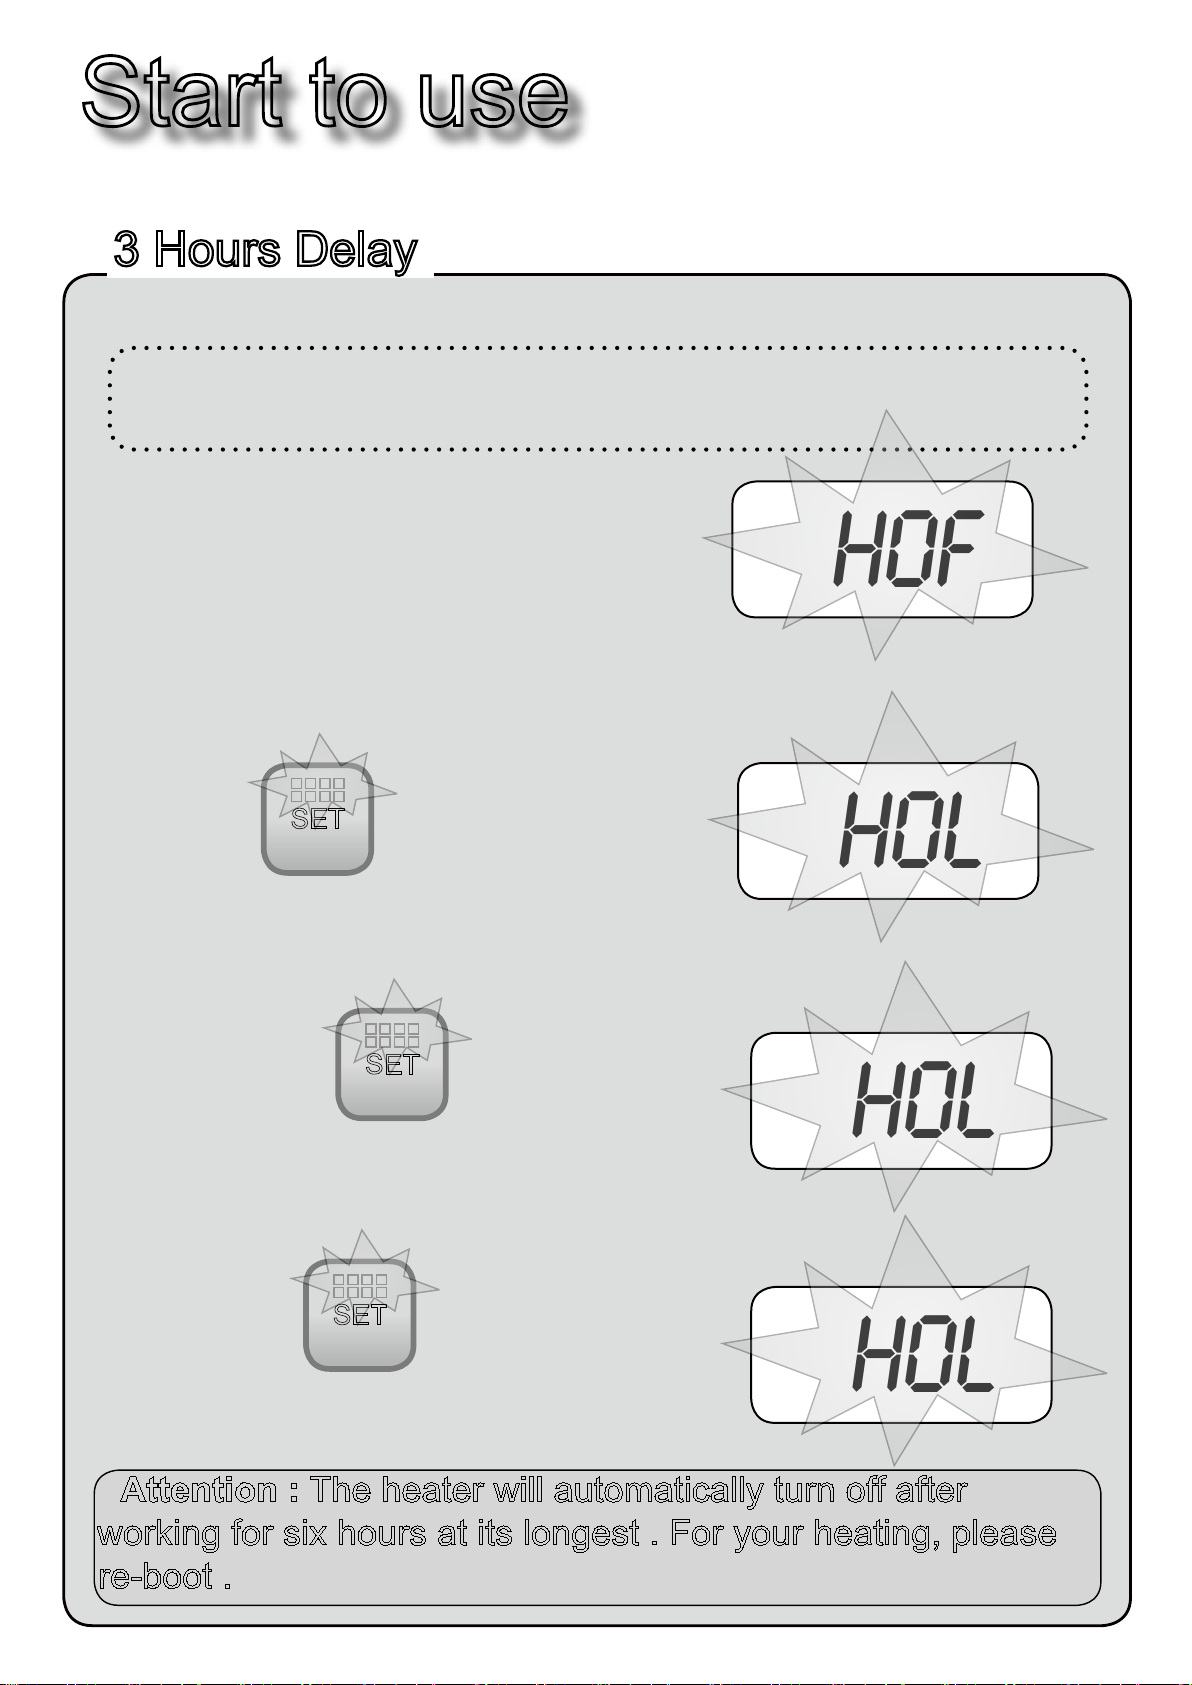
3 Hours Delay
In order to prevent the accident caused by forgetting turning
off, the machine will turn off automatically three hours later.
After the machine runs 2 hours and 58 minutes,
the display backlight will blink,indicating
[3HOF], and there will be [drip ~ drip ~]alarm
sounds, such as at right.
If no action is taken at the time, the machine
will automatically turn off after 2 minutes
3HOF
3UHVV SET
SLEEP
The display
shows [3HdL] and the system
will continue to run KRXUV
Press the SET
SLEEP
twice the display
shows [2HdL] and the system will
continue to run 2 hours
Press SET
SLEEP
three times the
display shows [1HdL] and the
system will continue to run 1 hours
3HOl
2HOl
1HOl
Attention : The heater will automatically turn off after
working for six hours at its longest . For your heating, please
re-boot .
Start to use

Once a week Once a Month
● Fan cap maintenance
3OHDVHXVHWKHYDFXXPFOHDQHU
DQGEUXVKWRUHPRYHGXVWIURPIDQ
FRYHU
● Heater maintenance
By using soft, dry cloth, you can
clean the fuselage .
Please use the vacuum
cleaner for draft
maintenance
Draft
● Filter tank Cleaning
&KHFNZKHWKHUWKHILOWHULVGLUW\RU
QRWLILWLVGLUW\FOHDQWKHÁOWHUZLWK
SXUHNHURVHQH
Filter
Glove
pure kerosene
7DNHRXWRIWKHÁOWHU
Rotate the lter illustrated
and take it out
Install the lter
Install the Filters and
then rotate in the
opposite direction
● Vibration switch checking
In the state of
normal burning,
shake around the
fuselage.If you hear
[ER02] false alarm
and the heater
automatically turn
off, this indicates
that the vibration
switch is good
Routine Maintenance
Problems checking and Electrical
performance
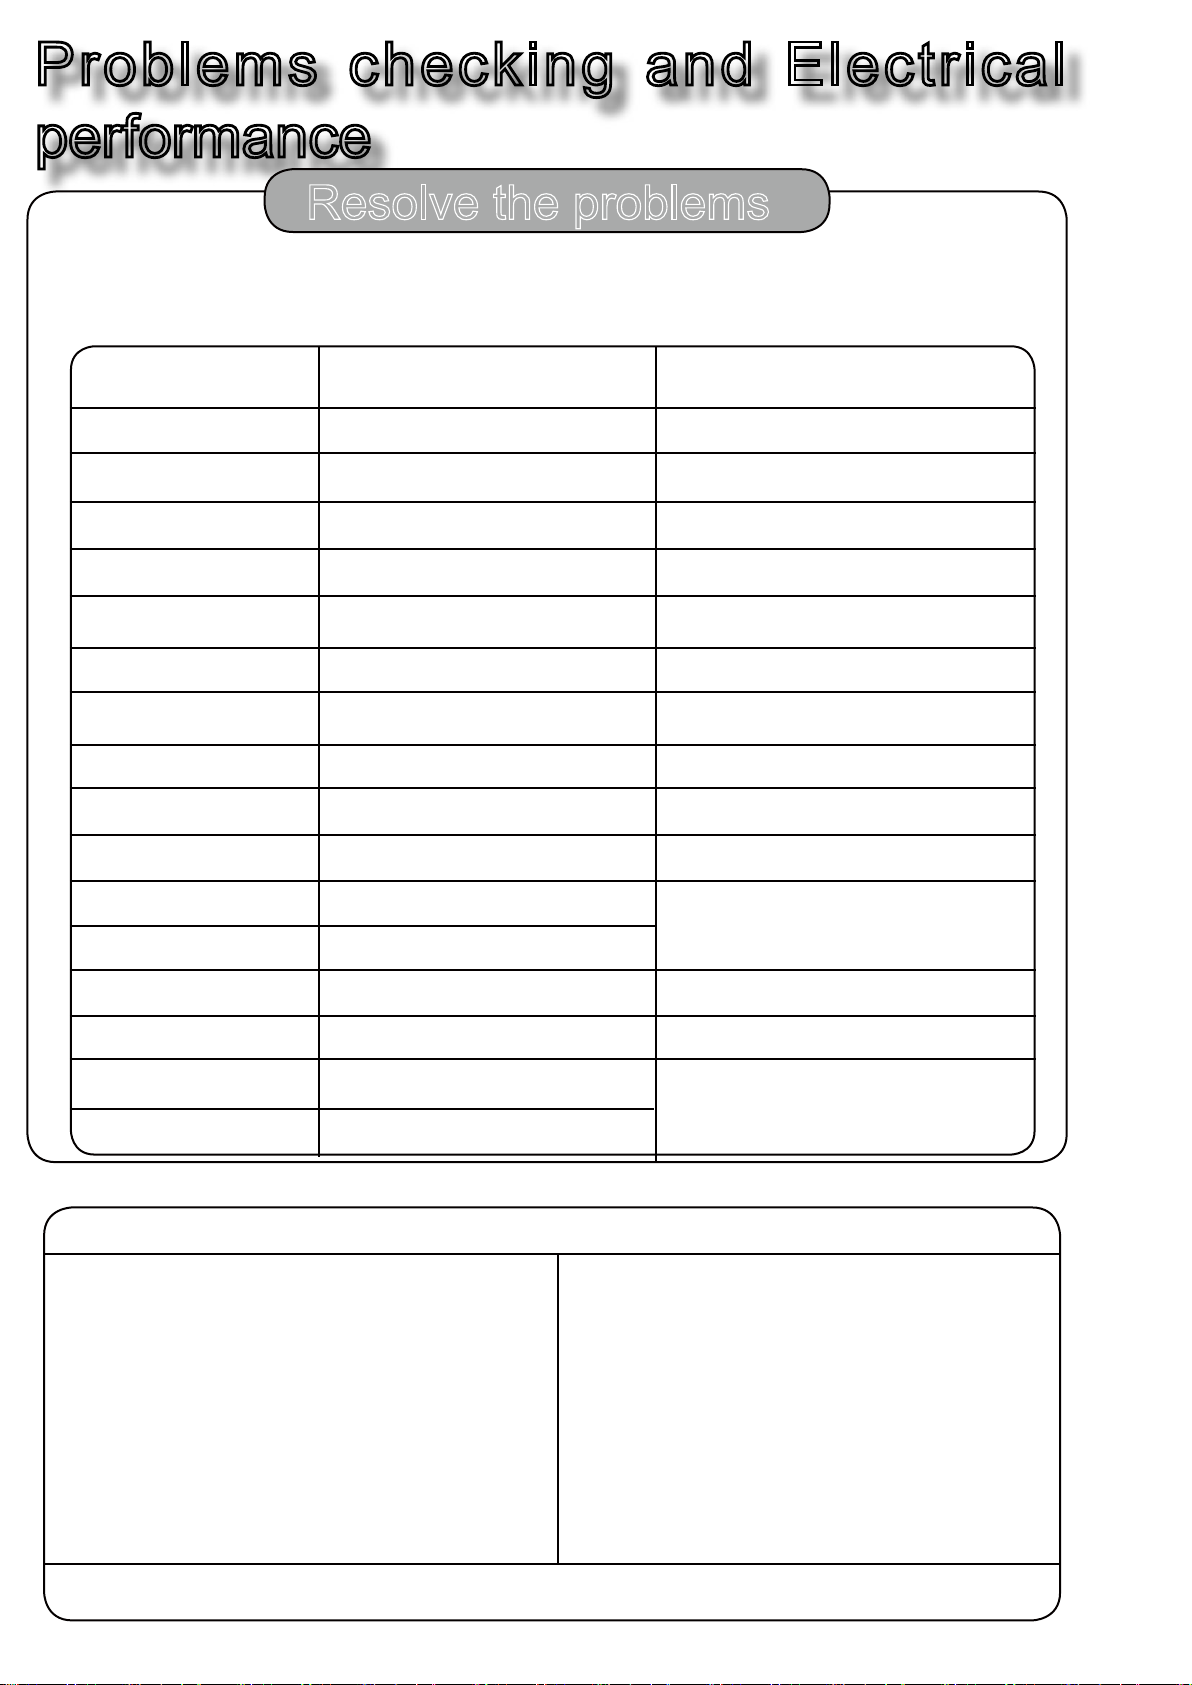
Resolve the problems
The error code will be displayed on the screen if the heater dose not work
.After the problem is resolved , reset the Run button
'LVSOD\ 5HDVRQ $SSURDFK
No Display ●No power / power plug out ●Check the power plug
ER01
ER02
ER03
●No tank or not placed atly ●Place the fuel tank again .
● Make sure the heater is placed vertically
●The heater is tilted or hitted
●Not red after working for 5 minutes
ER05
ER06
ER07
ER08
ER09
ROF
●Set re fail
● Detect the flame ignition voltage
when the heater is not red .
ROP
KOF
FLOF
KSOF ●The chimney probe is short circuit
KSOP
ER14
●The cooling time is more than 3
minutes .
●Abnormal combustion of kerosene
●The chimney temperature is too
high
●The core temperature is not
measured when the heater works .
●The room temperature probe is short
circuit
●The room temperature probe opens
circuit .
●The oven temperature is short
circuit
● The ame probe is short circuit .
●Check whether the ignition furnace core is heat
●Check the fuel tank if water on it or not
●Please Check ame probe whether there is dirts .
● If the chimney probe has dirts .
●check whether the kerosene is pure or
not.
●Check whether the furnace core probe
works or not .
●Check whether the room temperature
probe works or not .
●Check whether the oven temperature
works or not
●Check whether the ame probe is dirty or
not
●Check whether the room temperature
probe works or not .
Specication:Forced ventilation, open-end
Category: vaporization-type ,forced
convection
Fuelslamp oil or kerosene
Fuel Consumption: 0.08~0.33L/H
Heat: 3.2 or 3.5KW
Fuel tank capacity: /
Rated Voltage AC220~240V
Frequency: 50~60Hz
Consumption power:
Igniting state:300W
Working state:28W
0DGHLQ&KLQD
Electrical performance of DS-350ER
SHANGHAI DASHAN ,1'8675,(6&2/7'
The chimney probe is open circuit
●Check whether the chimney probe is
dirty or not
Popular Heater manuals by other brands

pureHeat
pureHeat ODYSSEY eco OE Series installation instructions

Russell Hobbs
Russell Hobbs RHFH20 Instructions and warranty

Infrared Dynamics
Infrared Dynamics Sunpak S25 Installation, operation & maintenance manual

Frico
Frico Panther SE 06 manual

Dimplex
Dimplex Studio G DXSTG25 Installation and operating instructions

Presto
Presto HeatDish+Tilt instructions


