DBK Drymatic Boost Bar FGPH102 User manual

INSTRUCTION MANUAL
WARNING!
Ensure that you have read and understand this manual before operang the machine.
Do not overload sockets or extension cords. Check power rangs before use.
Risk of electric shock. Do not open the unit or try to reach through the grills.
Ensure a suitably sized air mover is used that matches the size of the Drymac Boost grill.
Minimum recommended airow required: 1100m³/Hr (650 cfm). Do not posion air mover
more than 50cm (19”) away from the Drymac Boost Bar inlet.
Adaptable Heat Drying System
Models: FGPH102; FGPH103; FGPH104; FGPH105;
FGPH106; FGPH107; FGPH108; FGPH109; FGPH110
Manufactured in the UK by DBK Technitherm LTD
All worldwide design rights and copyright reserved

1
Congratulaons on Your Purchase!
Congratulaons and thank you for your purchase of a Drymac product! In order to get the most out of
your Drymac Boost Bar please take the me to read this user guide and familiarize yourself with the
machines operaon and features.
The following pages contain important warranty and warning informaon. You must take the me to
read them before operang your product.
Contents:
Warranty: 1
Safety and warnings: 2
Introducon: 3
Component Idencaon: 3
Storage and Transport: 4
Drymatic Limited Warranty Card
Drymac Model Number FGPH Serial Number
Date of Purchase / / Purchased From
Title First Name Surname
Address
Phone ( ) Email
Signature Date / /
Warranty Informaon:
Please complete and mail, fax or email your warranty registraon card complete with bill of sale/receipt
to acvate your warranty. DBK Technitherm oers a standard two year comprehensive warranty from the
date of purchase on Drymac Boost Bar. Contact details can be found on the reverse of this instrucon
manual. Please see the component idencaon secon to locate your model and serial number.
Set up Guide: 5
Troubleshoong: 7
User Maintenance: 8
Notes: 9
2
Do not alter or modify your Drymac Boost Bar in any way. Use only replacement parts
approved by DBK, modicaons/repairs not covered in the maintenance secon of this
manual and the use of unapproved parts will void any remaining warranty.
Do not remove adhesive labels.
Only use Drying Mats/accessories branded by Drymac or DBK. Ensure air movers match
the Boost Bar inlet size- recommend airow is 1100m³/ Hr (650 cfm) (Manufacturers
recommended airow)
Handle the unit carefully. Always operate the unit on a at stable surface. Do not drop,
throw or place the unit on a surface from which it could fall o. Rough handling may
damage the unit, create dangerous operang condions and will void the warranty.
Never pull or li the product via the power cord.
Children should be supervised to ensure they do not play with the appliance.
Children of less than 3 years should be kept away unless connuously supervised
Children aged from 3 years and less than 8 years shall only switch on/o the appliance
provided that it has been placed or installed in its intended normal operang posion
and they have been given supervision or instrucon concerning use of the appliance in a
safe way and understand the hazards involved. Children aged from 3 years and less than
8 years shall not plug in, regulate and clean the appliance or perform user maintenance.
The appliance is not intended for use by persons (including children) with reduced
physical, sensory and mental capabilies or lack of experience or knowledge, unless they
are supervised by an adult.
CAUTION — Some parts of this product can become very hot and cause burns. Parcular
aenon has to be given where children and vulnerable people are present.
If the supply cord is damaged, it must be replaced by the manufacturer, its service agent
or similarly qualied persons in order to avoid a hazard. Always grasp the plug (not the
cord) to unplug and avoid pulling or liing the product via the mains cord.
Do not use with worn electrical sockets as the plug will become excessively hot. The
heater shall not be located immediately below a socket outlet.
Do not use this heater in small rooms when they are occupied by persons not capable of
leaving the room on their own, unless constant supervision is provided.
Do not overload sockets or extension leads - Check power rangs and condion before
use. Always fully unwind extension leads.
RISK OF BURNS!
HANDLE WITH CARE!
RISK OF ELECTRIC SHOCK!
KEEP AWAY FROM CHILDREN!
IMPORTANT SAFETY INFORMATION:

3
It is recommended to run the unit on a 230V or 120V supply circuit protected by a
Ground Fault Circuit Interrupter (GFCI) or a RCD. It is also recommended to regularly PAT
(Portable Appliance Test) the machine. Only replace fuse with a 15A, 250/500V ceramic
type as marked on the unit.
In order to avoid overheang, do not cover the enre unit. Ensure that when mats
deate they don’t cover any equipment/sockets causing a hazard.
When replacing the plug fuse in UK models the replacement fuse must be rated 13A.
Do not use in the immediate vicinity of a bath, shower or swimming pool. Avoid standing
water or locaons where water can run or drip on to the unit.
Keep away from open ames and heat sources or where vapors from gasoline, solvents,
thinners or any other ammable materials may be present.
Do not block either outlet/inlets. This could cause the unit to overheat and limit airow.
For commercial use only, not for use on building sites.
Do not dispose of in municipal solid waste.
Stacking is for storage purposes only, do not use units when stacked or stack other
equipment on top.
In order to avoid overheang, do not cover the heater.
RISK OF BURNS!
HANDLE WITH CARE!
RISK OF ELECTRIC SHOCK!
KEEP AWAY FROM CHILDREN!
IMPORTANT SAFETY INFORMATION:
4
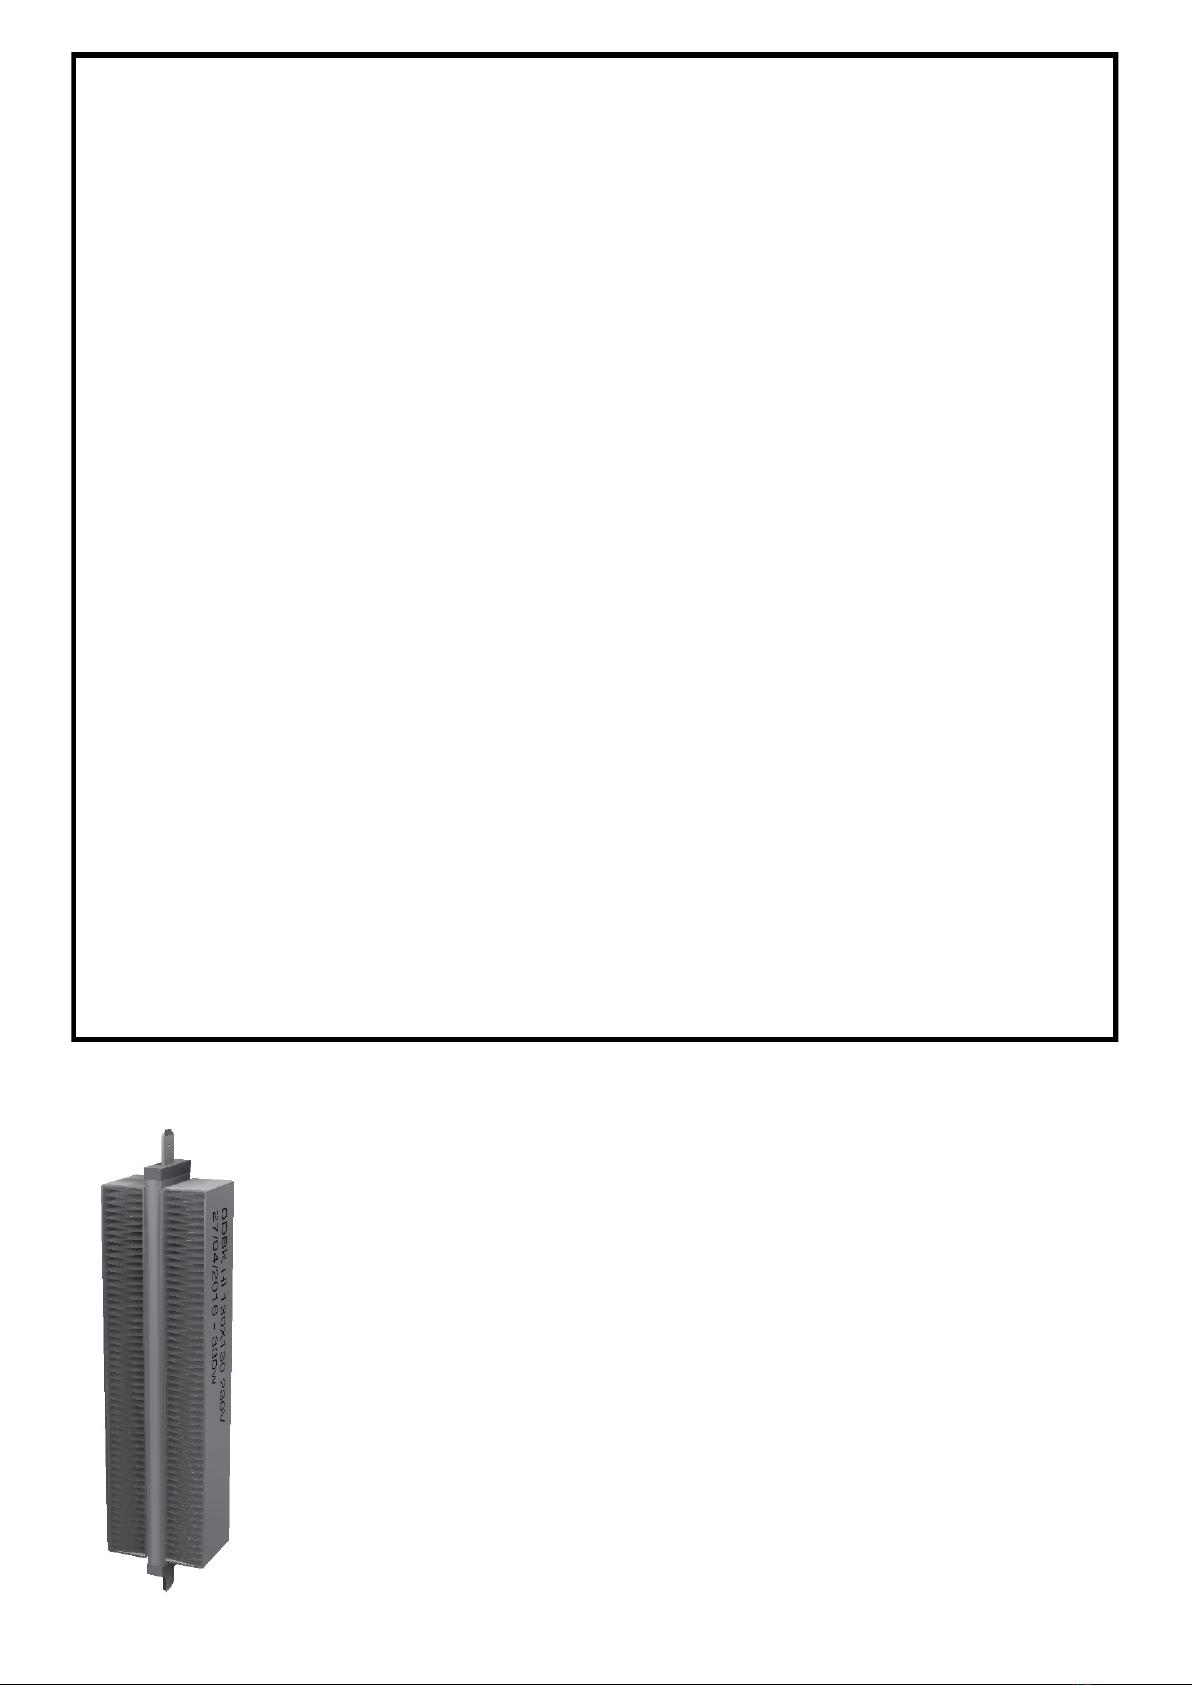
About the Heang Elements:
Stacking Fins
Introducon:
Drymac Boost Bar is an Adaptable Heat Drying System designed to reduce drying mes. The machine is placed in front of an
air mover to heat airow in a drying environment and can also be used with Drymac Wall & Floor Systems to eecvely
target dry specic areas of water damage. The addion of controlled heat increases drying performance in a water damage
project; it also helps to enhance the performance of convenonal drying equipment, such as refrigerant dehumidiers, where
temperatures are oen below opmum operang condions.
How it works:
Raising the temperature of the water damaged materials increases their vapour pressure and subsequently gives the material
more potenal for evaporaon, resulng in more ecient drying. The DBK Drymac Boost Bar has an intelligent control
system that regulates its output to ensure that the temperature stays within the dialled-in range by varying the power of the
heang device.
The Drymac Boost Bar, when combined with a Drymac Wall & Floor Accessory System or Drymac Boost Bar Aachments,
becomes an extremely eecve target drying soluon. Target drying focuses the heat energy on a specic area of water
damage, allowing the technician to remain in full control over what materials are dried and to what temperatures they are
exposed. In many cases a restoraon project will include a variety of dierent materials that need to be dried in dierent
ways; target drying enables the controlled applicaon of heat and airow which results in vastly improved drying mes.
Features:
Adds up to 2.2kW (1.8kW for Australian or Scandinavian Models, 1.4kW/4,780 BTUs for USA models) of heat energy
into the room to reduce drying me.
Three intelligently controlled self regulang PTC heater banks that raise room temperature up to a maximum of 50°
C (122°F).
Touch screen controller which displays incoming and outgoing temperature, kWh and hours run.
Airow detecon and power regulaon to ensure safe operaon whilst adding maximum power in any event - CE/
UL Approved. (See about PTC Elements Page)
Bi-direconal design can be operated with any standard styled air mover with the machine either at or on its side.
Allows users to aach a huge range of Drymac Wall and Floor System mats and accessories to quickly and
eciently dry small areas.
Compact, lightweight and rugged construcon which is stackable for easy transportaon and storage.
Fixed cord with built in cord wrap for plug in and go operaon.
Drymac Boost Bar uses PTC heang elements to provide ecient and controllable heat. These
elements self-regulate their power output depending on the volume of airow passed over them
and also the elements operang temperature. This means that if airow is restricted the heater will
connue to funcon but with reduced power; protecng both the Boost Bar and the material being
targeted. In the event that airow is completely lost the system will shut the elements down.
The 6 elements you see through the grill (5 for Australian/Scandinavian models) are divided into 3
banks of elements which the soware ramps up and down in order to 1) Gradually increase the
heat and 2) Control the temperature of the room.
The elements are electrically insulated and safe to use in humid/dusty condions however they can
get hot and should never be touched. If the display is showing all three banks running but the pow-
er output is less than expected check for any restricons in airow or move the air mover closer to
ensure that full power can be reached.
WARNING! - NEVER TRY TO REACH THROUGH THE GRILLS OR TOUCH THE ELEMENTS
5
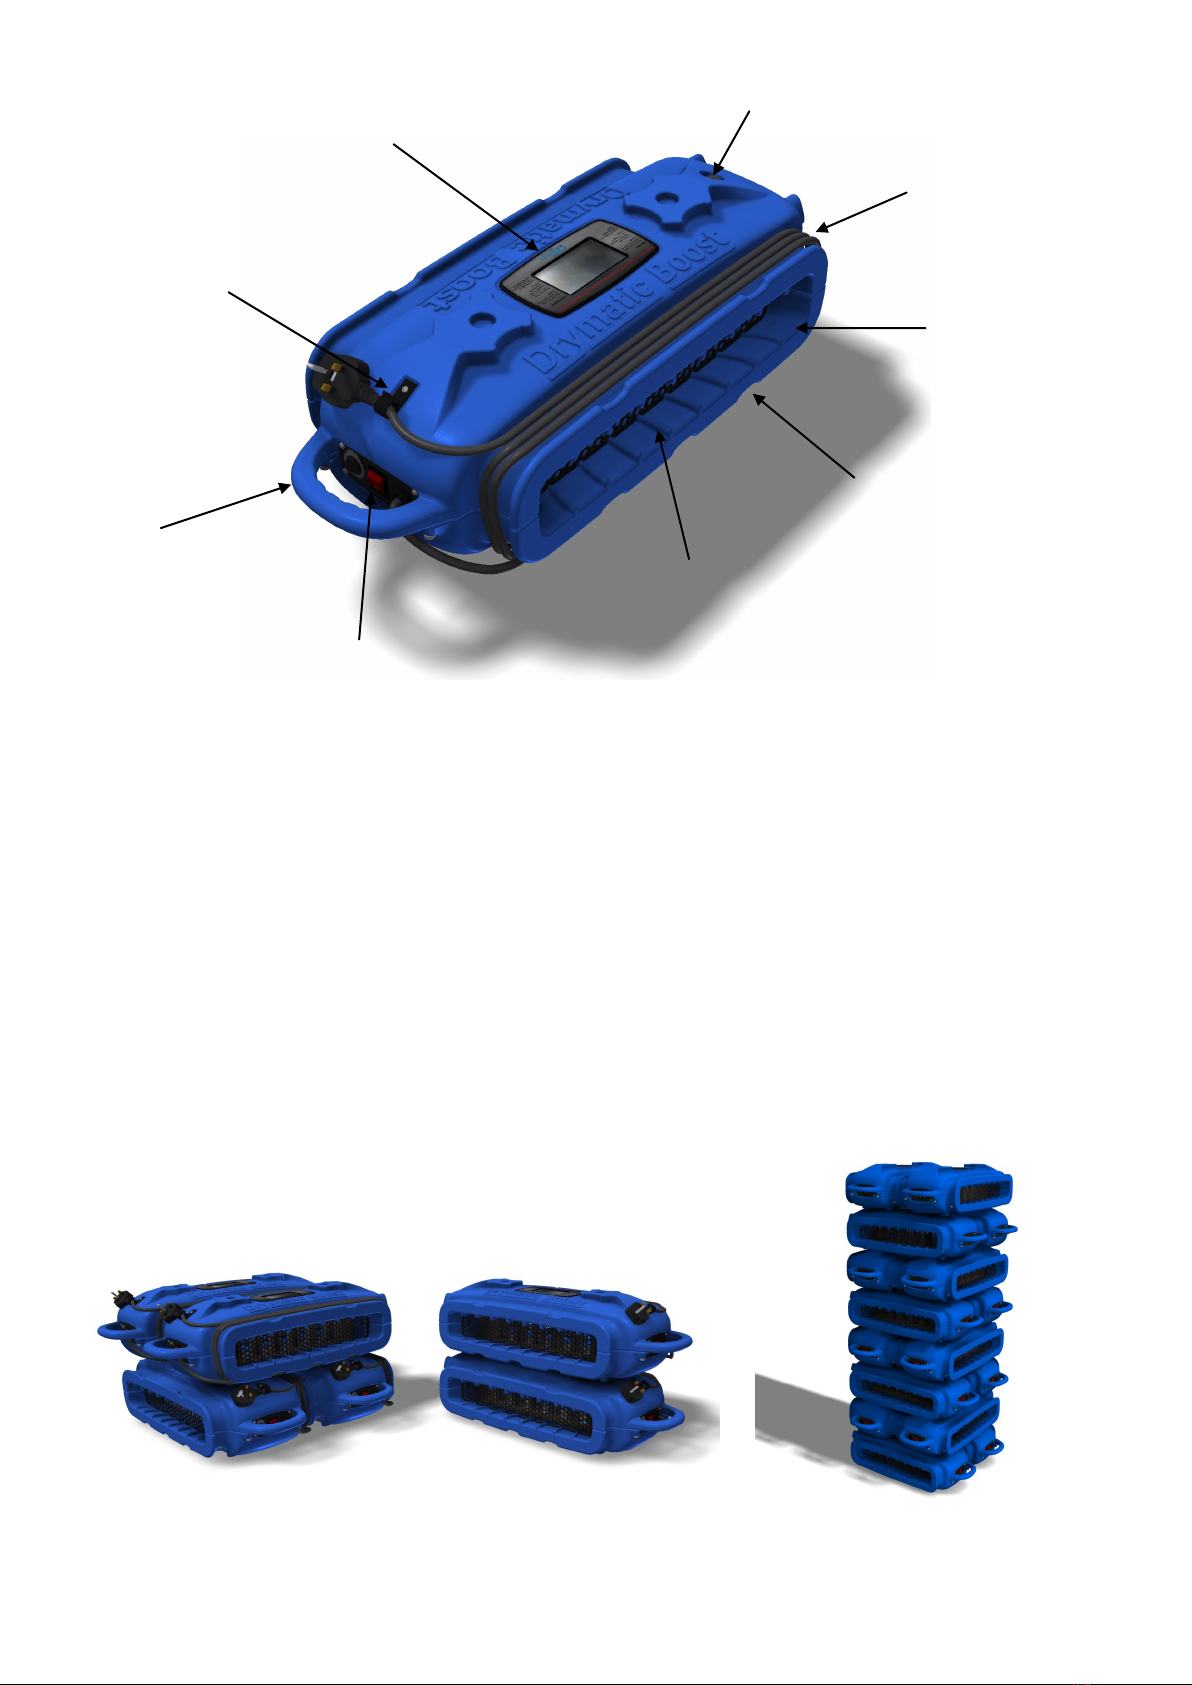
When nished with the machine the xed mains cord can be wrapped around one of the inlets/
outlets and the plug can be clipped into cord retainer as shown. The cord can be wrapped in either
direcon.
Units can be carried by the handle on the top allowing an operator to carry two at a me with ease.
Units can be stacked in pairs to form a 8 unit high tower (16 units in total ~1.6m)
Note: Units should not be operated when stacked and the cord should always be fully unwound when in
use. They should be fully secured when in transit to prevent causing harm or damage.
Storage and Transport
4 units stacked in pairs
(max 16 in this orientaon)
Two units stacked directly
(max in this orientaon)
Maximum Stack of 16 Units
*Only replace fuse with a 15A, 250/500V ceramic type fuse as marked on the unit. (DBK part number: EC308)
Air Channels for Drying
Underneath
Air Guides
4m Mains Cord can be
Wrapped Around
Mouth
Firmware Update Port
Touch Screen Display
Switch Plate with Fuse and
Power Switch
Moulded Handle
Cord Clamp
Product Outline:
Inlet/Outlet

6
Drymac Boost Bar will always require airow to funcon. The machine has sensors to detect the presence and temperature
of the input air and will control the heater accordingly. If no airow is detected or if it is removed a no airow symbol will
appear on the display to indicate this. When an air mover is added the machine will analyse the airow for approximately one
minute to conrm that it is stable before heang up.
Set up Guide
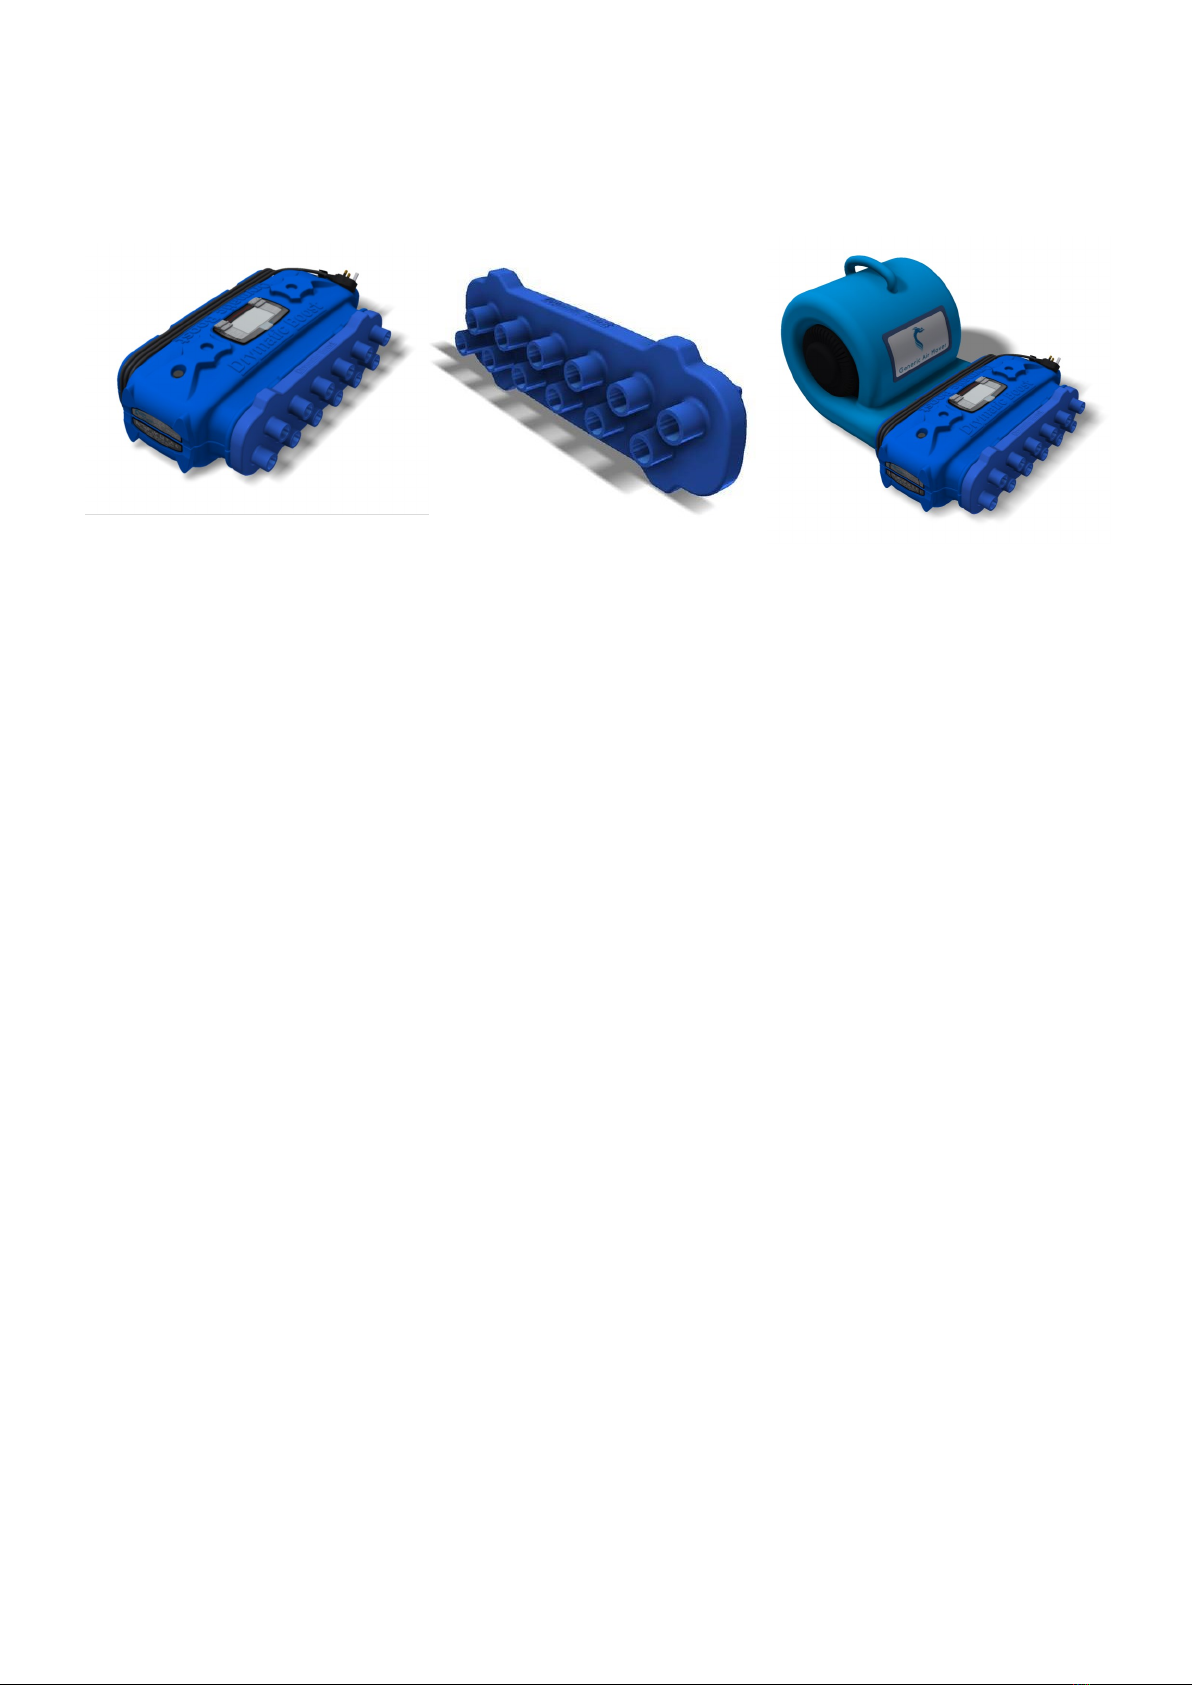
The Drymac Boost should be set up using the following procedure:
1. Place Drymac Boost Bar either at or vercal on the oor with an air mover directed at one of the grills. A Fan to Boost
connector can be used to maximise airow through the unit.
2. Oponal - Connect any Drymac Wall and Floor Systems or any accessories you may wish to use.
3. Plug the machine in and power on the air mover followed by the Drymac Boost Bar.
4. Reset the kWh and Hours Run meters, set your maximum temperature and press Play.
1. Posion Drymac Boost with an air mover
Place the Drymac Boost Bar in the area/room you wish to dry either at on the oor or vercal as shown in the pictures be-
low. Posion an air mover so that the outlet lines up with the Boost Bar.
Note - The air mover outlet should be approximately the same size as the Drymac Boost intake and should be posioned a
maximum of 50cm (19”) away from the grill. Ideally the air mover outlet should be as close as possible to the Drymac Boost
inlet. We recommend that the air mover be rated for at least 1100m³/Hr (650 cfm). Failure to meet these requirements could
cause the machine to limit its power output or potenally cut the elements completely unl airow is improved .
2.1 Oponal - Connect Drymac Wall and Floor System
If you wish to target dry an area you may wish to use a Drymac Wall and Floor System (sold separately).
To connect a Wall and Floor System you will need to rst put the Velcro adaptor around the outlet of the Drymac Boost
Bar with the hook side up. Posion the Wall and Floor System with the side with the holes facing down (logo on top) and
open it where you wish to connect the Drymac Boost Bar.
Place the system around the Drymac Boost Bar outlet and close the Velcro ensuring that a good seal is maintained. Once
the air mover is turned on the system will inate and airow will begin leaving the made through the small holes in the
boom of the system.
Many systems are available and they can all be connected and extended via Drymac Wall and Floor System connectors -
please contact your local Drymac representave for more informaon. Once the system is connected the machine
should be set to the appropriate seng for the material being dried, see step four for informaon on the modes.

7
2.2 Oponal - Connect Drymac Boost Bar Adaptors
Drymac Boost Bar has been designed to work with a series of adaptors that allow you to target the heated airow in to
areas that may otherwise be dicult to access such as Crawlspaces, Ceiling Voids, Cavity Walls and Tented Areas.
The Boost Bar is supported by the following adaptors:
4-Port Adaptor (4 x 100mm Connecons)
This gives you the ability to split the heated airow in to four separate channels. You can now heat four separate
areas at the same me. The connector accepts both PVC hoses and Lay Flat Ducng
12-Port Adaptor (12 x 38mm Connecons)
This gives you the ability to split the heated airow in to 12 separate channels. You can now use these outlets to
heat up dicult to reach locaons such as wall cavies, ceiling voids, kitchen cabinetry and suboor areas.
90Deg Adaptor
This gives you the ability to angle the airow downwards in to a crawlspace or suboor area. Alternavely the
connect or can be rotated and the airow can be angled upwards in to the ambient air, keeping the warm dry air
away from sensive oorings materials etc.
Lay Flat Ducng can be aached to the outlet of this adaptor to take heated airow up to ceiling level if required.
See overleaf for ng instrucons.

8
Set up Guide— 4-Port Adaptor (100mm)
The Drymac Boost 4-Port Adaptor is designed to split the heated airow in to 4 separate channels; these can then be di-
verted in to other rooms within a property or in to separate drying chambers, voids or cavies.
Step 1— Connect Adaptor
Take the adaptor and slide it in to either side of the Drymac Boost Bar. The adaptor will locate itself between the ribbed
features in the outlet of the Boost Bar.
Step 2— Connect Hoses or Lay Flat Ducng
100mm Hoses
Either 4 x 100mm Hoses or 4 lengths of 100mm diameter lay-at ducng can be ed to the outlets of the adaptor. When
using hoses slide the end of the hose over each of the 4 ports and x in place with a jubilee clip or cable e.
When using lay at ducng, cut the ducng to the required length and aach one end to the adaptor. The other end can be
taken to a tented drying chamber and can be secured in place using adhesive tape.
100mm Lay Flat Ducng
Alternavely, the lay-at ducng can be ed o at the end of each run and the length of lay-at can be perforated to create
small jets of airow along the duct. This duct can then be placed up against the base of a wall/cabinet to focus warm dry air
directly on to the aected material or alternavely the duct can be placed in a suboor space to feed dry air under the oor
space.
Step 3— Power the Boost Bar
Switch on the Air Mover and then switch on the Boost Bar.
Press the ‘Sengs’ buon and press the ‘Reset’ buon to clear the kWh and Hours Run from the previous job
Enter the desired maximum Air O Temperature and Current Limit (if applicable)
Press the ‘Green Tick’ icon to accept changes. The machine will return to the Home screen
Press the ‘Green Play’ icon to start the Boost Bar.
The unit will now begin heang the airow passing through the Boost Bar
9
Set up Guide— 2-Port Adaptor (38mm)
The Drymac Boost 12-Port Adaptor is designed to split the heated airow in to 12 separate channels; these can then be
diverted in to dicult to reach areas such as kitchen cabinetry, wall and ceiling voids and suboor spaces.
Step 1— Connect Adaptor
Take the adaptor and slide it in to either side of the Drymac Boost Bar. The adaptor will locate itself between the ribbed
features in the outlet of the Boost Bar.
Step 2— Connect Hoses or Lay Flat Ducng
38mm Pipes and Plasc Cus
Each port is 38mm and we recommend that users only t the aachments supplied by DBK for the device.
The adaptor is supplied with a kit containing black plasc cus, 38mm plasc hose and rubber bungs to seal o the end of
each pipe if required.
Take one Plasc Cu and connect it to the end of the Black 38mm pipe provided. The plasc cu will then slide over the
38mm outlets of the Boost Bar adaptor, no addional xing is required. Connect each hose to the machine following the
same method.
Using a 44mm hole cuer aachment drill a hole in the material that needs to be dried, such as the base of a kitchen cabi-
net. Connect a black plasc cu to the end of the 38mm hose and insert it into the hole created. It is recommended that an
addional hole(s) be created to allow the warm, wet air to escape the void/cavity
38mm Lay Flat Ducng
The unit is designed to accept lay-at ducng and this can be aached to the unit using cable es or another appropriate
form of xing. The lay-at ducng should be cut to the required length and either be fed in to the tented chamber/area
that is being targeted or ed o at its end and perforated to allow air to escape along the length of the duct.
Step 3— Power the Boost Bar
Switch on the Air Mover and then switch on the Boost Bar.
Press the ‘Sengs’ buon and press the ‘Reset’ buon to clear the kWh and Hours Run from the previous job
Enter the desired maximum Air O Temperature and Current Limit (if applicable)
Press the ‘Green Tick’ icon to accept changes. The machine will return to the Home screen
Press the ‘Green Play’ icon to start the Boost Bar.
The unit will now begin heang the airow passing through the Boost Bar
10
Set up Guide— 90Deg Adaptor
The Drymac Boost 90Deg Adaptor is designed to divert the heated airow in one of two dierent ways:
1. Upwards—This could be used to simply heat the ambient air in a room or a ceiling void in combinaon with Lay Flat
Ducng.
2. Downwards—This conguraon is to be used when heang up a suboor/crawlspace area.
Step 1— Connect Adaptor
Take the adaptor and slide it in to either side of the Drymac Boost Bar. The adaptor will locate itself between the ribbed
features in the outlet of the Boost Bar. The outlet should be placed in the desired orientaon by the technician.
Step 2— Connect Lay Flat Ducng (Oponal)
Cut the Lay Flat Ducng to the required length and aach to the outlet of the 90Deg Adaptor using adhesive tape.
Take the end of the ducng and feed it in to a tented chamber or directly in to the void/cavity that is being targeted.
Step 3— Power the Boost Bar
Switch on the Air Mover and then switch on the Boost Bar.
Press the ‘Sengs’ buon and press the ‘Reset’ buon to clear the kWh and Hours Run from the previous job
Enter the desired maximum Air O Temperature and Current Limit (if applicable)
Press the ‘Green Tick’ icon to accept changes. The machine will return to the Home screen
Press the ‘Green Play’ icon to start the Boost Bar.
The unit will now begin heang the airow passing through the Boost Bar
Please Note:
When using Lay Flat Ducng, ed o at the ends to create a pressure vessel, there will be an increased amount of back
pressure placed on the Boost Bar. In this situaon the Boost Bar will ramp down heater power and will no longer deliver
maximum power.
The Air-O temperature of the Boost Bar is limited to 50degC. It is recommended that the Lay Flat Ducng used is rated for
temperatures greater than 60degC.
11
3. Power up the machines
Plug the air mover and the Drymac Boost into an appropriately rated power outlet. Switch the air mover on rst then use the
red power switch next to the cord to power up the Drymac Boost Bar. It is good pracce to switch on the air mover rst but
not essenal.
4. Set the desired temperature and start the machine
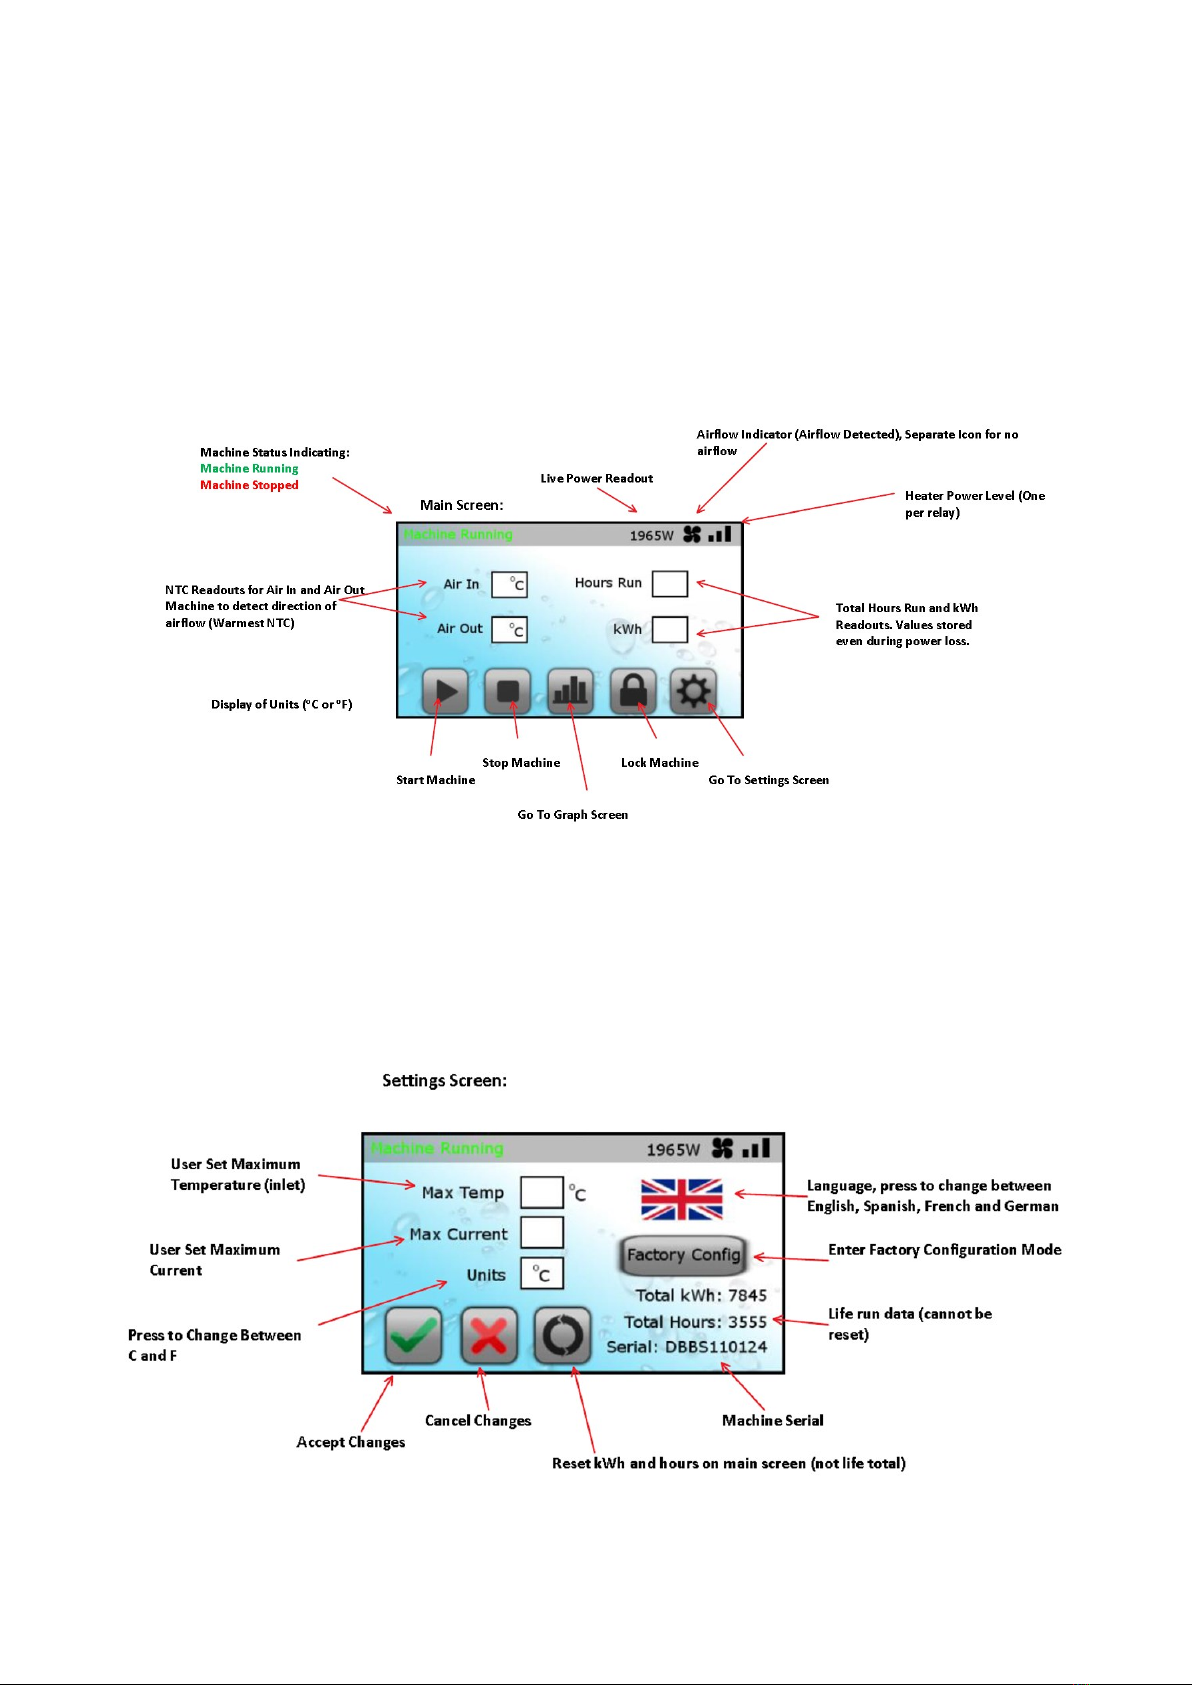
The main screen on the Drymac Boost control panel can be used to operate the machine (Start/Stop), view the current
operang condions and graphed date. The sengs buon on the boom right of the display allows the user to set the
maximum temperature limit, maximum current limiter, change the language and reset the unit ready for the next job:
Drymac Boost Bar has ve control buons along the boom of the screen, Play, Stop, Graphical Data, Pin Lock and Sengs.
The top ribbon shows the machine status, in any situaon where the machine is stopped the play buon will restart it from
where it previously le o. Similarly the stop buon will put the machine on hold without the need to power it down. In order
to correctly understand how the reset buon funcons please see ’About the Memory’ below. The sengs buon on the
boom right of the display takes the user to a new screen and allows them to set the maximum temperature, maximum cur-
rent limit, reset the device and change the language and units. This sengs screen and descripon of each funcon is shown
12
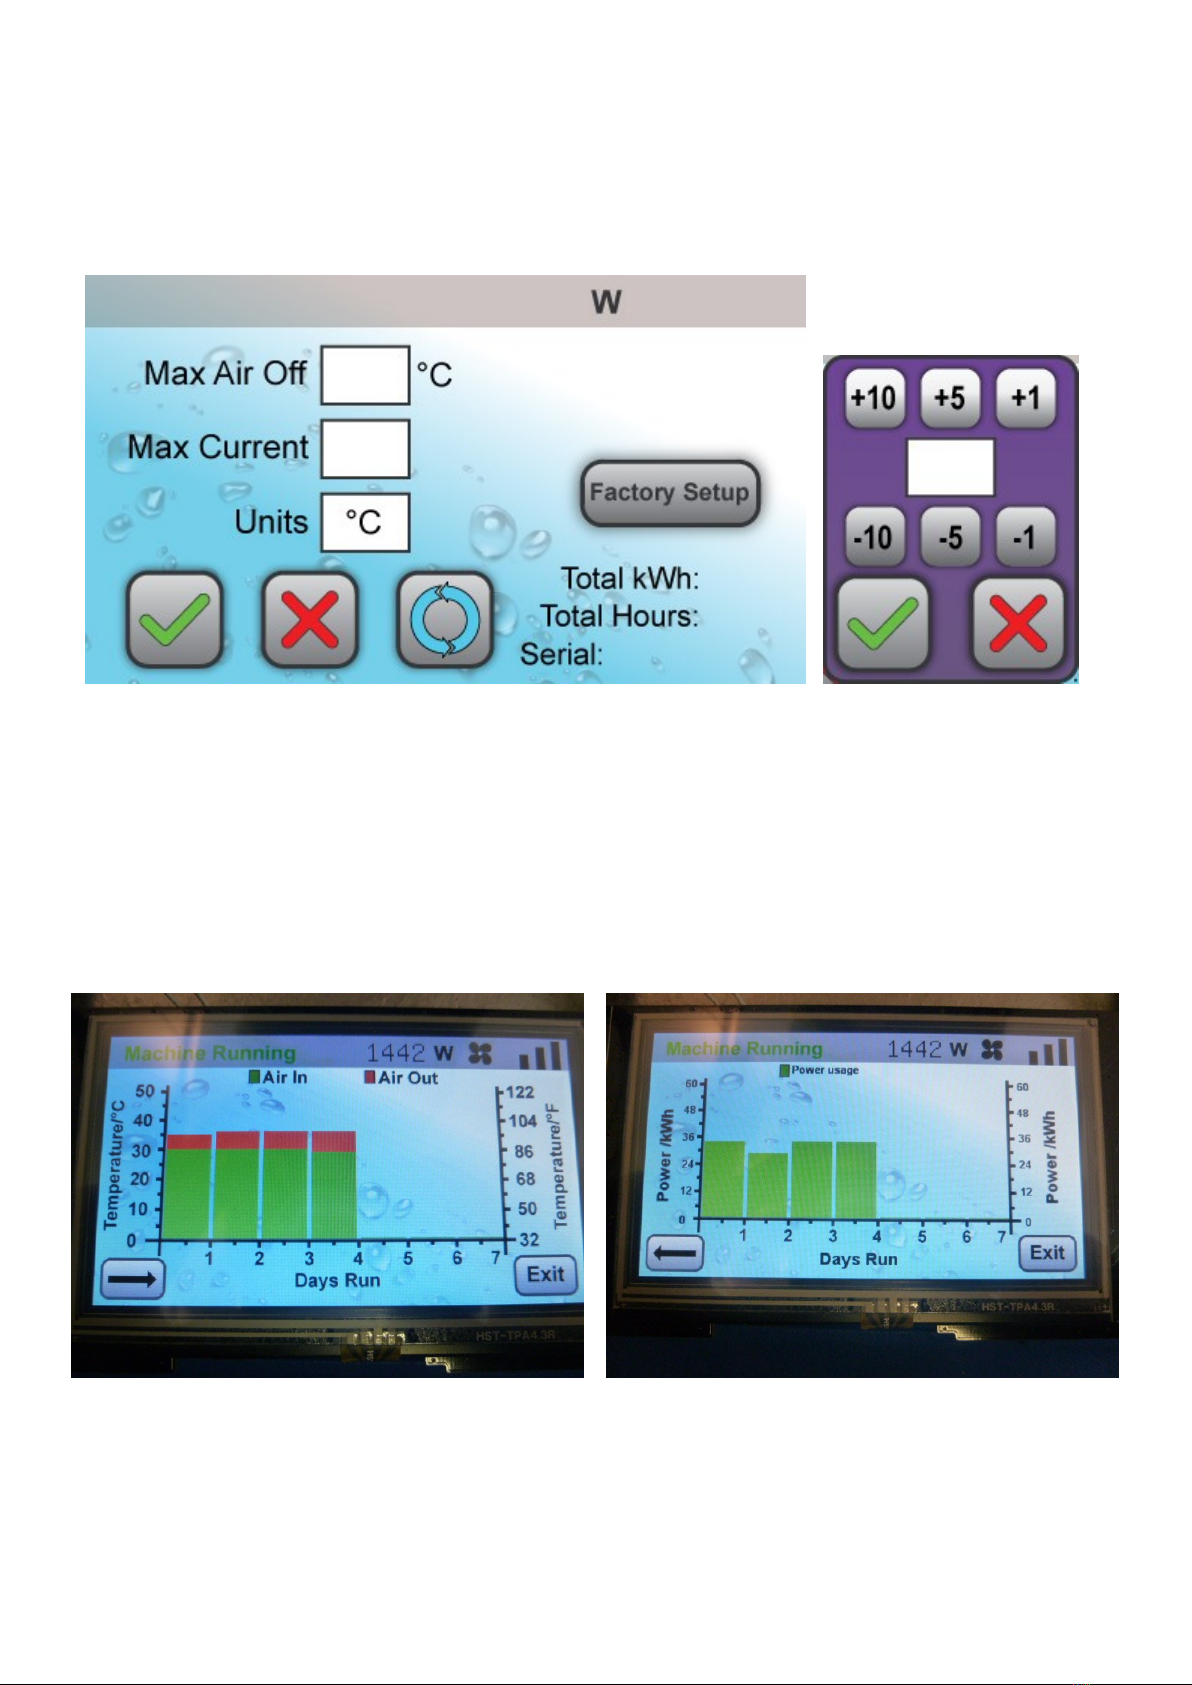
5. Current Limiter
The Boost Bar has an oponal Current Liming feature that allows the technician to de-rate the heater in the event of
limited power availability on site. The user can select the maximum current available on the circuit and the on-board
electronics will then monitor power usage and regulate the heater power based on current draw.
To set the limiter, simply press the value next to ‘Max Current’ and adjust the value upwards or downwards accordingly.
The user should reset the unit at the start of every job to clear any pre-exisng sengs from previous use.
6. Graphing Feature
The Boost Bar has a built-in data-logging feature that illustrates Temperature Dierenal and Power Consumpon over a
7 day period. This informaon is useful as it allows a technician to track whether the unit has run at maximum power
throughout the claim or whether it has self-regulated and saved energy.
To toggle between the graphs simply press the ‘Arrow’ symbol.

13
Note - The Maximum Temperature seng will come in to eect when the Air Outlet temperature exceeds the temperature
selected by the user. The Boost Bar will ramp down heater power to keep the Air O temperature below the desired level.
About the Memory - Drymac Boost Bar has a built in memory allowing it to connue and restart jobs even if power is lost
or removed. This ensures that the machine doesn’t forget kWh and hours data and connues on with the same sengs that
were programmed by the technician.
Job Memory - Keeps track of all kWh/hours data and also the machine sengs that were programmed by the technician.
This data should be reset at either the start of the new job or end of the previous job to ensure that the next jobs starts
fresh. This can be reset from the main display, failure to do so could cause confusion with data.
Machine Running Machine running as normal. Full Heater Power
Machine Stopped Machine on hold, press play to re-
sume.
66% Heater Power (80% for
Aus/Scan models)
33% Heater Power (40% for
Aus/Scan models)
Heater O
Machine Status Ribbon
The machine status ribbon shows the machines current operang state, operang mode and the heater power level. This
table shows all possible situaons.
Machine Status: Descripon: Heater Level: Descripon:
User Maintenance:
WARNING: The unit must be unplugged before performing any form of maintenance or cleaning.
Before each use:
Inspect the power cord for any sign of damage. If the cord looks broken, frayed or worn do not use the product and seek a
replacement. Cords should only be replaced by the manufacturer, if cord is damaged please contact your local Drymac
representave.
Cleaning:
The housing can be cleaned with a mild detergent and warm water. Do not use liquids on the grills and metal plates, these can
be cleaned with a so cloth. Never use a hose to clean the unit and ensure that it is completely dry before use.
Replacing the Fuse:
The on board fuse can be changed by: 1) Isolang the unit from the mains supply. 2)Using a at head screwdriver to open the
fuse holder. 3) Remove the old fuse and replace with new one. 4) Close the fuse holder with screwdriver. Replacement fuses
must be 15A, 250V or 500V fast blow ceramic types (DBK part number: EC308).
In the event of damage, repairs or any other maintenance requirements please contact your local Drymac representave.
No aermarket repair on this product should be carried out by the user.

14
Trouble Shoong:
In the event of a fault the rst thing to try is powering down the machine, turning o the power at the mains and then waing
ten seconds. You can then power it up again and see if there are any improvements. If not please refer to this troubleshoong
table for causes and soluons.
Fault Cause Soluon
No power, red power switch is not
illuminated when in on posion.
1) Plug fuse blown. Check plug fuse, if plug type doesn’t
have a fuse contact service.
2) Fault with mains outlet or cord. Check supply output and check cord for
any damage, breaks or cuts. If cord is
damaged seek replacement.
No display, red power switch
illuminates when in on posion.
1) Internal fuse blown. Check Internal fuse, it is located on the
switch panel next to the red power
switch. Replace if necessary.
Unit not producing warm airow. Fan
symbol is marked with a X
1) Insucient airow Try posioning the air mover closer to
the Drymac Boost Bar or use a higher
speed seng. Check that the air mover
meets the minimum requirements.
Unit not producing hot air. No Rotang
graphic is shown in hours display.
1) Machine has not had sucient me
to heat up.
The machine will check for stable
airow before gradually ramping up
power. This can take up to ve
minutes.
2) Temperature seng is lower than
room ambient.
Increase the temperature seng, it
may be that the room is hoer than
the temperature limit set.
Drymac Wall and Floor System not
inang
1) Insucient airow Try posioning the air mover closer to
the Drymac Boost Bar or use a higher
speed seng. Check that the mat is
well sealed around the Drymac Boost
Bar and free to inate. The minimum
recommended airow of 1100m³/Hr
(650 cfm) is the requirement for the
Drymac Boost Bar to funcon
correctly. Inang mats, depending on
conguraon, may require signicantly
In the event that this list does not cover your parcular issue or the soluon does not solve the problem
please contact your local Drymac representave.
15
Technical Specicaon
*Max temperature Drymac Boost can be used in, it can then maintain this temperature of 50°C (122°F) if needed.
**Depending on airow and mode selected. Maximum air o will be found when on the highest temperature seng with
the lowest recommended operaonal airow 1100m³/Hr (650 cfm) and restricons (such as a small mat).
Model Standard Models
(DBBSXXXXXXXX)
10A Limited Models
(DBBLXXXXXXXX)
Power Input 230VAC (50Hz) 230VAC (50Hz)
Power Draw 2.2kW @ 20°C 1.8kW @ 20°C
Fixed Power Cord Length 3.95m (13’) 3.95m (13’)
Approvals CE CE (Aus/NZ)
Electrical Protection Class I
Ingress Protection (EN60529) IP20
Storage Temperature -20° to 50°C (-4° to 122°F)
Ambient Operating Temperature -10° to 50°C (14° to 122°F)*
Power Factor 1
Internal Electronic Components 3.3/5VDC
Control System Electronic
Display 4.3” LCD Touch Screen
Max Air Temperature at Outlet 50°C (°122F)**
Duct Size 470x80mm (19x3”)
Housing Polyethylene
Dimensions 689 x 300 x 201mm (27 x 12 x 8)
Weight 7.6KG (16.8lbs)
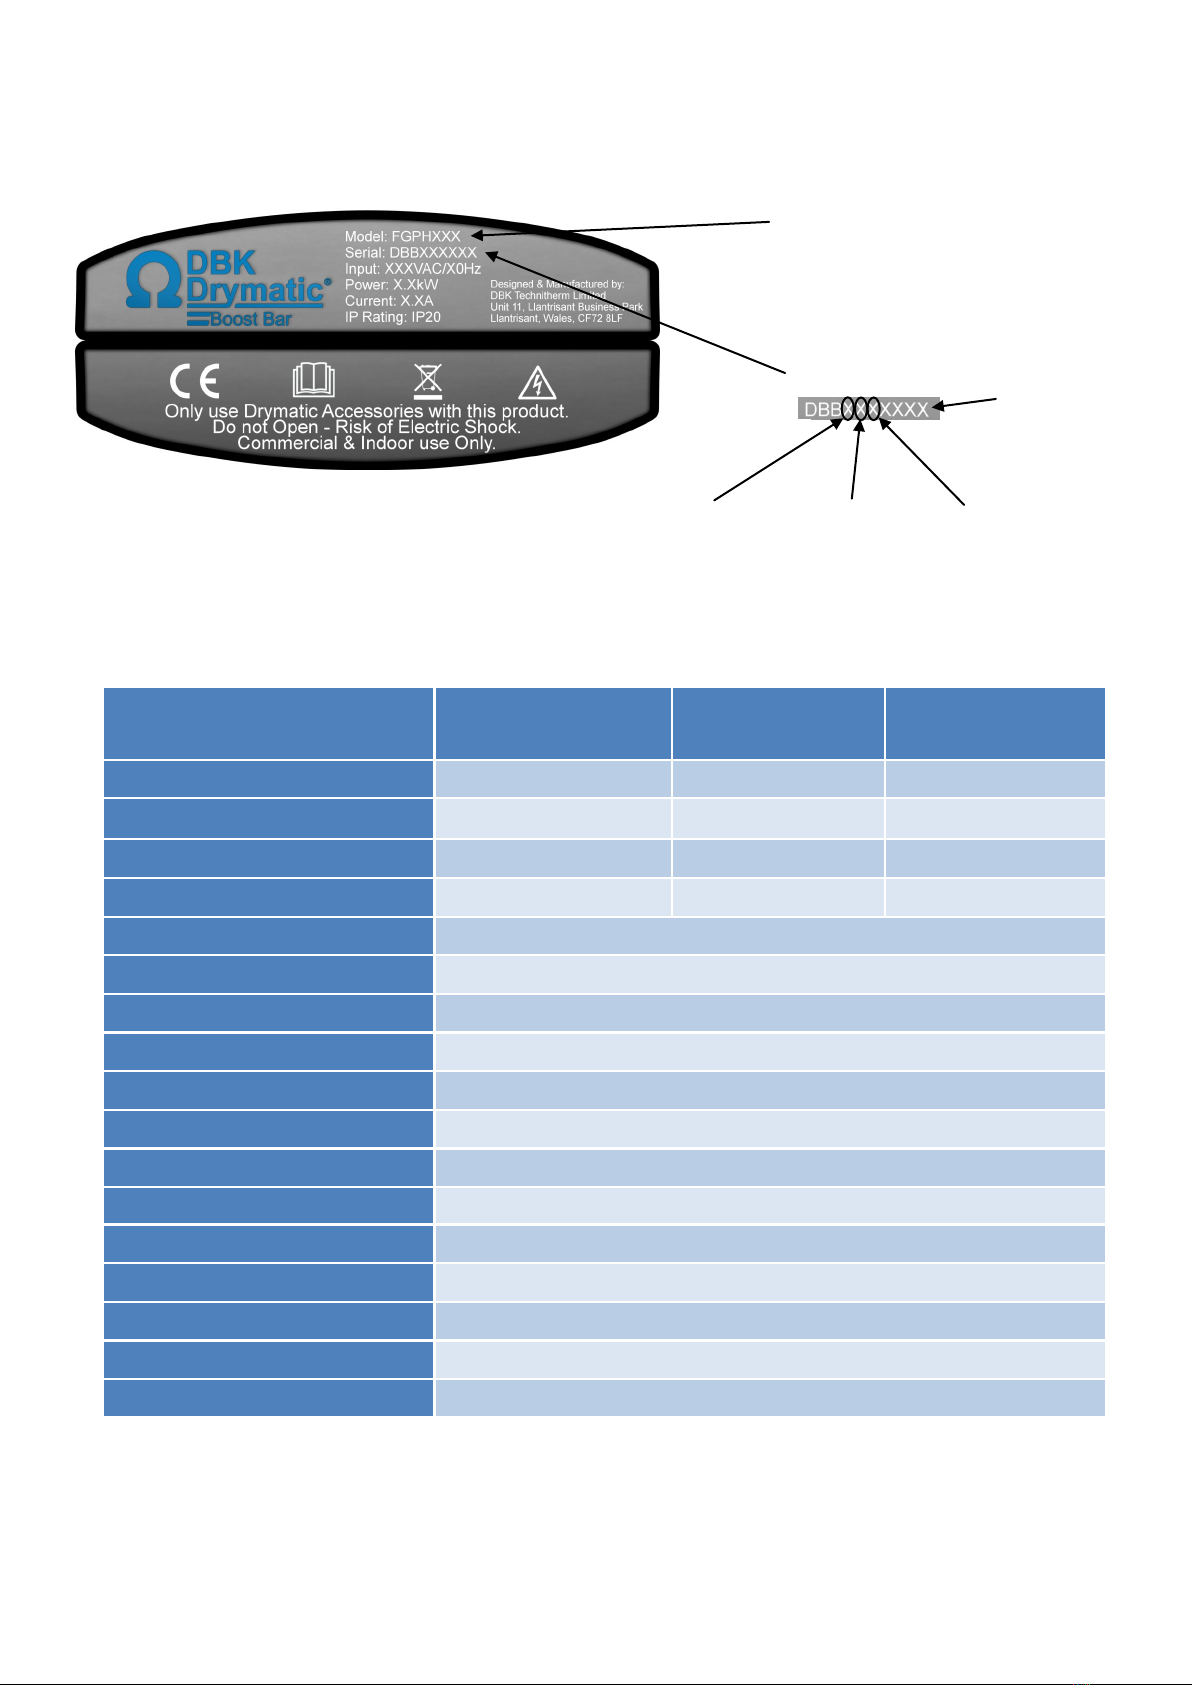
Model Idencaon:
The model number and serial number on your machine can be used to idenfy your products type and more detailed power
rangs from the specicaon table. This serial number can be found on the scker above the handle on your machine.
Model Number
Serial Number:
Heater Power:
S = 230V Standard
L = 230V 10A Limited
A = 120V Standard
Plug Type:
1 = UK
2 = EU
3 = Australia
4 = USA (NEMA 5-15)
5 = USA (NEMA 6-15)
Language:
1 = English
2 = German
3 = Spanish
4 = Dual (Eng/French)
5 = Scandinavian
Unique 4 digit
idencaon
number
16
INSTRUCTION MANUAL
Models: FGPH102; FGPH103; FGPH104; FGPH105; FGPH106; FGPH107; FGPH108; FGPH109; FGPH110
DBK Technitherm Limited
Unit 11, Llantrisant Business Park, Llantrisant, CF72 8LF, Wales, United Kingdom
Tel: +44 (0) 1443-23-79-27 Fax: +44 (0) 1443-23-78-67 Email: info-uk@dbk-group.com Web: hp://drymac.com
All worldwide design rights and copyright reserved.
LA0281 Issue 02
An electronic version of this instrucon manual is also available online via this QR code or by vising:
hp://www.drymac.com/
Adaptable Heat Drying System
Housing Only
9
cULus/FCC only applies to models: FGPH104, FGPH107, FGPH109 & FGPH110
CE only applies to models: FGPH102, FGPH103, FGPH106, FGPH108
Manufactured by DBK Technitherm LTD.
This manual suits for next models
8
Table of contents
Other DBK Dryer manuals

Popular Dryer manuals by other brands


LG
LG DLEC855W Service manual

Whirlpool
Whirlpool W10061470 Warranty

Bosch
Bosch WTN83201GB Installation and operating instructions

Gardner Denver
Gardner Denver VSS Series operation & maintenance

Speed Queen
Speed Queen Dryer user guide

Alliance Laundry Systems
Alliance Laundry Systems 120 Pound Capacity operating & maintenance manual