Dean Forge Dartmoor W5 User manual

1
Dean Stoves
Dean Forge Fabrication Ltd. Dean Prior, Buckfastleigh, Devon TQ11 0LS
T e l: 0 1 3 6 4 6 4 3 5 7 4
w w w.d e a n–f o r g e.c o.u k e m a i l: s t o v e s @ d e a n-f o r g e.c o.u k
Operating Instructions for The Dean Forge Dartmoor W5/W5SE Stoves
Including Huccaby
DMW5 issue 1. 2nd July 2013
All stoves meet the essential type test requirement BS EN13240:2001 +
A 2:2004
The Clean Air Act 1993 and Smoke Control Areas
Under the Clean Air Act local authorities may declare the whole or part of the district of the authority
to be a smoke control area. It is an offence to emit smoke from a chimney of a building, from a
furnace or from any fixed boiler if located in a designated smoke control area. It is also an offence to
acquire an “unauthorised fuel”for use within a smoke control area unless it is used in an “exempt”
appliance (“exempted”from the controls which generally apply in the smoke control area).
The Secretary of State for Environment, Food and Rural Affairs has powers under the Act to
authorise smokeless fuels or exempt appliances for use in smoke control areas in England. In
Scotland and Wales this power rests with Ministers in the devolved administrations for those
countries. Separate legislation, the Clean Air (Northern Ireland) Order 1981, applies in Northern
Ireland. Therefore it is a requirement that fuels burnt or obtained for use in smoke control areas have
been “authorised”in Regulations and that appliances used to burn solid fuel in those areas (other
than “authorised”fuels) have been exempted by an Order made and signed by the Secretary of State
or Minister in the devolved administrations.
The Dean Stoves, Dartmoor W5 SE has been recommended as suitable for use in smoke control
areas when burning wood logs.
When using the Dartmoor W5 SE in a smoke control areas the Smoke control kit must be fitted to the
stove.
Further information on the requirements of the Clean Air Act can be found here:
http://smokecontrol.defra.gov.uk/
Your local authority is responsible for implementing the Clean Air Act 1993 including designation and
supervision of smoke control areas and you can contact them for details of Clean Air Act
requirements
Safety Note
Warning- The external parts of the appliance will get very hot to the touch and due care will be needed
when operating.
All stoves before being operated must be checked that the installation complies with all local, national
and European standards.

2
Before the stove is first used or when fitting other appliances into the room, please check that adequate
air vents are in place to cover the requirements of such appliances.
Extractor fans. When operating an extractor fan in the same room or space as the appliance the
extractor fan could cause the stove not to function properly and pull dangerous fumes into the room.
This must be checked by a trained qualified engineer before using the stove.
Wood & Suitable fuels
Dry wood, 18% moisture content or below must be used or the stove and flue will tar up and the
door won’t stay clean.
Wood is best seasoned by splitting it into a log and drying it out for 2 years in a covered area so the air
can pass through to dry it out. Peat can also be used but must be dry.
When used as a Multi Fuel use only smokeless fuels recommended for enclosed appliances.
Please Note: Appliances should not be used as general incinerators or with non-recommended fuels.
At no time should liquid accelerants I.e.: Paraffin, Petrol, BBQ lighting liquid Etc be used.
Door Operation & controls
The door handle can become very hot so use the glove provided. A tool is provided to control the spin
wheel and air wash lever.
Controlling the stove
Primary air controls –A spin wheel on the door
The primary air control is a spin wheel on the door
This control is used for lighting the fire or boosting
the fire
This is the main control when burning Solid Fuel.
Secondary air- B control leaver is situated on the
right hand side near the top of the stove.
This lever controls the air wash and is used as the
main air control, when burning wood, once the fire is
established
Control lever B works as follows:-
For maximum air flow into the stove push the lever down to open and up to close.
The stove is at its maximum efficiency when the lever is approximately two thirds the way down.
Maximum Log Length
Maximum Log Diameter
400mm
100mm

3
Dampers Left Open
Operation with the air controls or appliance dampers open can cause excess smoke. The appliance
must not be operated with the air controls, appliance dampers or door left open except as directed in
the instructions.
Lighting the Stove with Wood
Lay a fire of sticks and paper. Firelighters can be used if necessary. Check the secondary air lever is
fully open and the primary air spin wheel is partially open. Light the fire and as the fire catches the
paper you may then fully open the primary air.
When the fire has fully established and the logs are burning well shut the primary air spin wheel in the
door and control the fire with the secondary air wash lever (if you are unable to sustain the fire with
secondary control it is very likely that your logs have a high moisture content).
When refuelling the fire, to ensure clean burning, the primary air control should be opened for a
couple of minutes so that flames are established on the newly fuelled logs. The primary air should be
closed once these flames are fully established and the logs have become blackened.
After refuelling, it is recommended that you do not leave the appliance unattended until it is certain
that the logs are burning well with a sustained flame.
The appliance works best by refuelling with two medium sized logs. Typically, the logs should burn
well for about 1 hour.
Please Note: For long periods of burning you will need to use seasoned hard wood. Longer periods of
burning may cause the door glass to blacken, but this can be cleared when you get the fire back up to
temperature and providing the secondary air control is kept slightly open the glass should then stay
clear.
When loading the fire be careful not to leave logs projecting over the log retainer as you may crack the
glass when closing the door.
When the stove is use in the winter season we suggest 25mm (1”) of ash is left in the bottom when
cleaning, as a wood fire burns more efficiently on a bed of ash.
De-ashing the stove is achieved by removing the log retainer and shovelling the ash out into a non-
flammable container, or we suggest using an ash clean attachment which can be plugged into your
vacuum cleaner.
Please note:
If there is insufficient burning material in the fire bed to light a new fuel charge, excessive smoke
emission can occur. Refuelling must be carried out onto a sufficient quantity of glowing embers and
ash that the new fuel charge will ignite in a reasonable period. If there are too few embers in the fire
bed, add suitable kindling to prevent excessive smoke
The maximum amount of fuel specified in this manual should not be exceeded, overloading can cause
excess smoke.

4
Lighting the stove with Solid Fuel and Multi-fuel kit fitted
Lay a fire of sticks and paper, establish fire and then add the appropriate smokeless fuel, use the
primary air control as the main control. When using a mixture of wood and coal balance the primary
and secondary control to achieve the desired flame picture.
When using solid fuel in this stove you must only use fuels recommended for enclosed appliances, Oil
derivative fuels must not be used as this will shorten the life of the grate.
The Ash pan will need emptying once a day.
When burning solid fuel the stove will work at its best using the primary air control only (door Spin
wheel), it is unlikely you will need to use the secondary air control which will only need to be opened
slightly to keep the glass clear.
In the summer or when the stove is not being used for a long period of time, clear all the ash out and
leave primary and secondary air vents open to prevent condensation.
Please Note:
On lighting the stove for the first time from new the paint on the stove will cure and give off a metallic
smell. It is advisable to ventilate the room i.e. open the windows. This will subside fairly quickly
after the stove has been burning hot for at least 2 hours.
The appliances have been assessed and are suitable for intermittent burning.
Operation with the door open can cause excess smoke. The appliance must not be operated with the
appliance door left open except as directed in the instructions.
Pre-Season Check:
The chimney needs to be swept at least once a year.
The chimney must be checked at this stage for blockages before lighting i.e.: bird’s nests
This is probably the time to have the chimney swept before the beginning of the seasons.
Before lighting at the beginning of the season or after prolonged shutdown periods, check the door
seals are in good condition; the steel insulating plates are in good condition and baffle plate is in
position.
If the stove has been used for a long period of time we suggest the chimney be swept twice a year.
Air vents
Check periodically that the exterior ventilation grill is clear.
Servicing
All servicing must to be carried out by a qualified competent engineer on a regular basis.
No unauthorised modifications of the appliance should be carried out.
Use only replacement parts recommended by the manufacturer.
Notes
Down draughts
In adverse weather conditions a down draught may occur and will make the stove smoke, if this should
happen shut all the stove air controls.
If this occurs on a regular basis call in your engineer.
It is possible a chimney cowl could cure this problem.

5
Refuelling
When refuelling the fire, to ensure clean burning, the primary air control should be opened for a
couple of minutes so that flames are established on the newly fuelled logs. The primary air should
then be closed and the secondary air adjusted to create the desired flame pattern once these flames are
established and the logs have become blackened.
After refuelling, it is recommended that you do not leave the appliance unattended until it is certain
that the logs are burning well with a sustained flame.
Do not load the fuel above the log retainer.
Faultfinding
If the stove starts emitting fumes into the room:-
(1) Check there is no blockage or restriction in the flue.
(2) Check the external air vent is not blocked.
(3) Check the baffle plate has not dislodged itself from the stove.
(4) Call an engineer.
If the stove does not perform properly this could be due to unseasoned wood or too much ash in the
firebox.
In the case of the stove malfunctioning shut all vents, open the windows and let the residual fuel in
stove burn out.
In the event of a chimney fire
•Call the fire brigade
•Raise the alarm to let others in the house know
•Close down all the air controls of the stove, but be careful they could be very hot
•Move furniture, rugs and other objects away from the stove
•Check the chimney breast in other rooms for signs of excessive heat and move objects away if
necessary
•At all times consider the safety of yourself and others in taking the above action
Fitting Instructions for The Dean Forge Dartmoor W5
Stove
These fitting and operating instructions cover the Dartmoor W5 Stove.
Introduction
The Dean Forge range of stoves has been continuously updated for the last 37 years. These stoves
have a robust fully welded carcass with a cast iron door. This stove has sacrificial insulated steel
plates, incorporating an air wash system with 3 outlet options- Top, Rear or Vertical Back box outlets
of 125mm (5”).
Unpacking Stove
Check all the fire bricks and baffle plate are in place and have not moved or been damaged in transit.
Inside the stove packed with these instructions will be gauntlet and a universal air vent- ash pan tool.

6
Before lighting the stove you must check that the installation has been carried out as per instructions
and complies with current building regulations.
Health and Safety Precautions
All work must be carried out to the required Health and Safety at Work Act 1974.
There must not be an extractor fan fitted in the room.
There must be an air vent for all stoves of 5 kilowatt and over or meet current building regulations.
Stoves must be fitted to BS8303, BS6461 PT1-2 1984 building regulations.
All local regulations, including those referring to national and European standards need to be complied
with when installing the appliance.
Flue Connections and Outlets
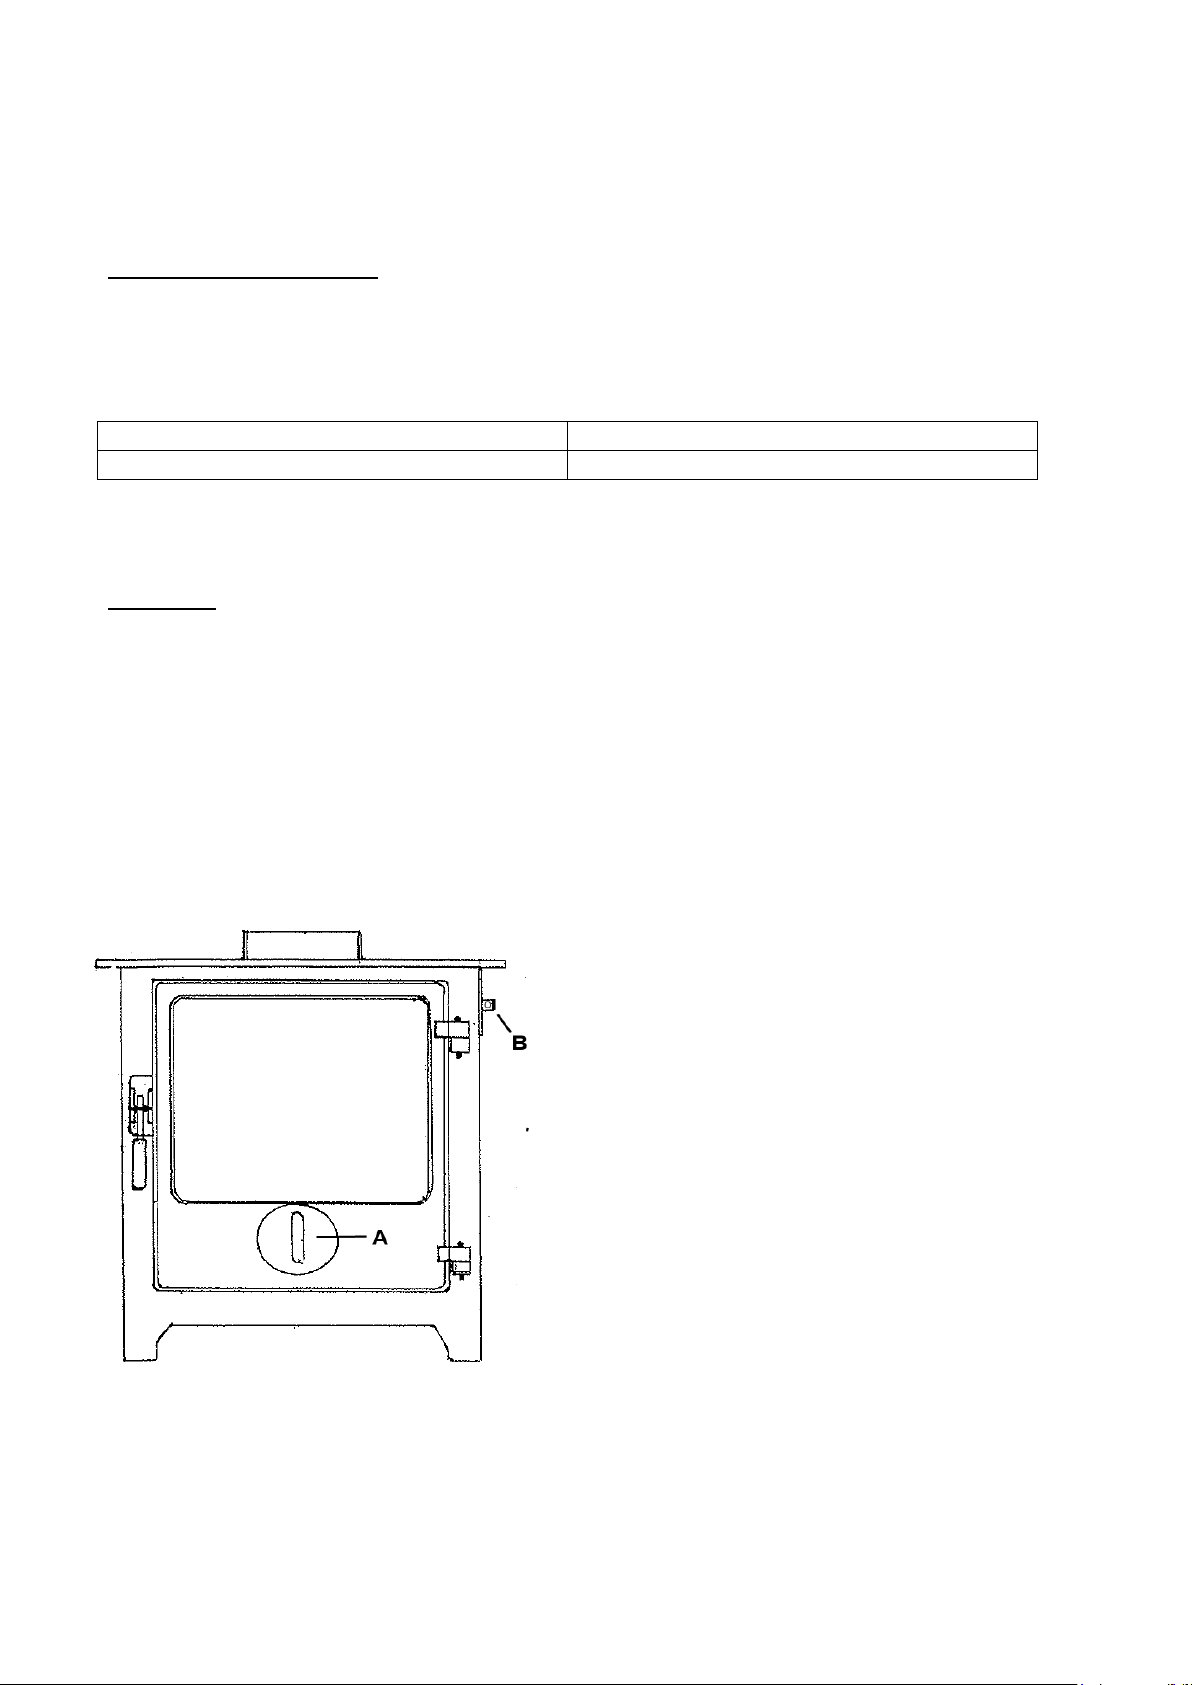
Dartmoor W5 stoves have the option of taking the flue from the top or the back or using a vertical
back box. Horizontal flue from back of stove should not exceed 150mm.
All flue connections must be sealed with fire cement. Doors in the register plate must be present or a
soot box fitted in the back or side of the fireplace to enable access to clean the chimney when the stove
is installed without a liner.
If the chimney has been lined and cannot be swept through the stove an access door on the first length
of flue must be installed for cleaning access.
The Dartmoor W5 model requires a 125mm (5”) first length of flue then stepping up into a minimum
of 150mm (6”) liner. When using this stove with the smoke exempt air stop fitted the flue liner can be
reduced to 125mm (5”). We strongly advise a minimum diameter of 150mm (6”) flue liner be fitted
when possible. The installation of a flue liner is recommended.
N.B
All stoves must but installed by a suitably qualified person, such as a HETAS engineer or with the
supervision of building control.
As with all stoves fireguards must be installed when young children are present.
Stove Performance
Dean Forge Dartmoor W5 Wood Burning 5kW nominal 80.6% Net Efficiency
Dean Forge Dartmoor W5 Solid Fuel (Ancit) 5kW nominal 76.0% Net Efficiency
Dean Forge Dartmoor W5 SE Wood Burning 5kW nominal 80.6% Net Efficiency
Dean Forge Dartmoor W5 SE Solid Fuel (Ancit) 5kW nominal 73% Net Efficiency
All stoves are tested to nominal outputs and will often well exceed these kilowatt ratings.
Chimney
The Dartmoor stoves must have a minimum chimney height of 4m measuring from the stove outlet,
the chimney must not be less than 150mm (6”) internal diameter.
These stoves are not suitable to be used in a flue-shared situation.
If the chimney draw is too high a flue stabilizer will have to be installed. When the chimney is warm
the draw should not be lower than 0.10 water gauge.
All appliances have been tested at 12 PA with the doors closed.

7
It is recommended that this stove is fitted with a flue liner, the baffle plate can be removed to facilitate
cleaning through the stove.
Hearth, Surround and Register Plate
The stove must stand on non-flammable material at least 12mm thick (1/2”). The hearth must extend at
least 225mm in front of the firebox and 150mm to the sides.
The appliance must be installed on a floor with an adequate low bearing capacity.
If the construction doesn’t meet the existing prerequisite the floor must be reinforced and a load
distributing plate could be fitted.
Optional Rear Heat Sheild
When the stove is fitted with a rear heat shield the distance from combustibles to the rear of the stove
can be reduced to 475mm.
If fitted without a rear heat shield the distance to combustibles from the rear of the stove must be a
minimum of 900mm.
Distances from the sides of the stove to combustibles must be a minimum of 600mm.
Flue Connections and Outlets
Please Note: All profile top stoves use the 6mm black rope seal supplied under the flue spigot to bring
the flue spigot flush with the top of the stove
Diagram of flue outlet
(A) = Flue outlet 125mm (5”)

8
Table of mean flue temperatures with closed doors
Stove Type
Flue gas temp down stream of
spigot, closed doors.
Dean Forge Dartmoor W5 &W5 SE (Wood)
210 C
Dean Forge Dartmoor W5 Solid Fuel (Ancit)
170 C
Dean Forge Dartmoor W5 SE Solid Fuel (Ancit)
239 C
Flue Gas Mass Flow
Stove Types
Flue gas mass flow (gs)
Dean Forge Dartmoor W5 & W5 SE Wood Burning
4.8
Dean Forge Dartmoor W5 Solid Fuel (Ancit)
3.6
Dean Forge Dartmoor W5 SE Solid Fuel (Ancit)
5.5
Pre –Lighting Check and Commissioning
Check all Building Regulations have been adhered to.
The baffle plate is in the right position.
A smoke test has been done to check the chimney is clear.
Data Plate
All stoves are numbered and performance marked on a data plate which is found on a swinging arm
located at the base of the stove.
Air Vent
Under part J of building regulations an air vent of the appropriate size must be fitted for all stoves with
a kw rating of over 5kw.
In very air tight properties designed with air permeability less than or equal to 5.0 m3/ (h.m2) per
hour, an air vent will need to be fitted for all kilowatts.
When fitting air vents any other appliance fitted within the room must be taken into account.
Please Note: Extractor fans when operating in the same room or space as the appliance may cause
problems.
Air vent inlet grills must not be inadvertently blocked.
Air vents must not be fitted in positions where they can be inadvertently covered up.
As from the 1st October 2010 a compliant Carbon Monoxide Alarm must be fitted

9
Operation with the door open can cause excess smoke. The appliance must not be operated with the
appliance door left open except as directed in the instructions.
Multi fuel kit fitting instructions
Fitting of M/F kit for Dean Forge Dartmoor W5
Dean Forge Dartmoor W5 Multi Fuel Parts
This M/F kit consists of Three parts
A. Main Grate
B. MF fuel retainer
C. Ash pan
Dean Forge Dartmoor W5 Multi Fuel kit Assembled
To fit:
Place the MF grate (A) on the supports which are either side of the inside of the fire box with the
wedge on the MF grate (A) facing up and forward.
Refit the Fuel retainer (B) remembering the lugs face towards the front of the stove and the cut out
faces down. Leave out the ash retainer that was supplied with the stove. Slide the ash pan (B) under
the grate Note: The Multi tool supplied with the stove is also used to remove the ash pan.

10
EC Declaration Of Conformity
The Undersigned, representing the following:
Manufacturer
Dean Forge Ltd
Dean Prior, Buckfastleigh, Devon, TQ11 0LS
Herewith declare that the products:
Description
Product Code
Dartmoor 5
STDFDA5, STDFFOH
STDFFOL
Dartmoor W5
STDFDAW5, STDFHU
Dartmoor 6
STDFDA6
Dartmoor 8
STDFDA8
Dartmoor 5 Inset
STDFDA5I
Description of product:
Dartmoor wood and multifuel heating stove product range.
Steel bodied stove fitted with cast iron doors. Supplied in various sizes to give a range
of heat output options.
Are in conformity with the provisions of the following EC Directive (S) when installed
in accordance with the installation instructions in the product documentation:
98/106/EEC- 305/2011 Construction Products Directive
And the standards referenced below have been applied:
EN 13240: 2001 + Amendment A2: 2004 & inset BS EN13229:2001 + A1: 2003 + A2:
2004

11
Provisions to which the product conforms:
Product: Roomheater fired by solid fuel as covered under the scope of the standards listed.
Intended use: Space heating in residential building.
Characteristic
Performance
Report
Fire Safety
Satisfies
Emission of combustible
products and Thermal
output/Efficiency
Dartmoor 5 Inset- STDFDA5I
Co @ 13% 0² Wood 0.35% Ancit 0.40%
5Kw @ 83.3% Wood –4.7Kw @ 73.2% Ancit
6700/1
Dartmoor 5- STDFDA5/ STDFFOH/ STDFFOL
Co @ 13% 0² Wood 0.38% Ancit 0.40%
5Kw @ 81.9% Wood -5Kw @ 70.7% Ancit
6931-1
Dartmoor W5- STDFDAW/ STDFHU
co@ 13% 0² Wood 0.38% Ancit 0.46%
5Kw @ 80.6% Wood -5Kw @ 76.0% Ancit
60020/4- SE
Dartmoor 6- STDFDA6
Co @ 13% 0² Wood 0.38% Ancit 0.46%
6Kw @ 77.8% Wood - 6Kw @ 73.6% Ancit
60020-3
Dartmoor 8- STDFDA8
Co@ 13% 0² Wood 0.17% Ancit 0.18%
8Kw @ 74.9% Wood –73.6% Ancit
60020/1
Release of dangerous
substances
None
Surface temperature
Satisfies
Mechanical resistance (to
carry a chimney/flue)
Maximum weight to be supported 30Kg
Test laboratory: 0692
Name: M.P Chew Signature:
Position: Technical Director (s) Date: 24th September 2012

12
A+
5.0
n/a
70.6
80.6
Product Fiche according to Commission Delegated Regulation
Huccaby
Nominal Heat Output to Room (KW)
Nominal Heat Output to Water (KW)
Dean Stoves
(EU)2015/1187
Seasonal Space Efficiency (%)
Net Efficiency (%)
Supplier's Name
Model
Energy Efficiency Class
Energy Labelling of Local Space Heaters
A+
5.0
n/a
70.6
80.6
Product Fiche according to Commission Delegated Regulation
Dartmoor W5
Nominal Heat Output to Room (KW)
Nominal Heat Output to Water (KW)
Dean Stoves
(EU)2015/1187
Seasonal Space Efficiency (%)
Net Efficiency (%)
Supplier's Name
Model
Energy Efficiency Class
Energy Labelling of Local Space Heaters

13
.
DMW5 issue 1. 2nd July 2013
THE DEAN FORGE FABRICATION LTD STOVES GUARANTEE
Dean Forge Fabrication Ltd offers a five year guarantee which covers the main body of the
stove for manufacturing defects.
In the event of any failure we will replace any defective part free of charge, labour cost
excluded.
This guarantee is invalid if the stove is not assembled, installed or operated as per these
instructions or properly maintained or does not comply with current building regulations and
any regional legislation in force at the time.
Dean Forge Fabrication Ltd does not guarantee the onsite assembly, installation or
operation of the stove. Please seek advice from your supplier / installer for any relevant
guarantees applicable to the installation.
Dean Forge Fabrication Ltd will not be held liable for any consequential or incidental loss,
damage or injury, however caused.
Claims under this guarantee should be first made through your retailer.
This guarantee is only applicable in the UK.
Nothing in this guarantee shall affect your statutory rights.
Exclusions
The following consumable parts are not covered by this guarantee:-
Fire grate, log retainer, baffle plate, fire bricks, glass panels and door seals.
Paint is also excluded from the guarantee as it will eventually deteriorate due to the normal
working of the stove.
Your assistance is requested by filling in and returning the product Registration and
Guarantee Form. This will help maintain our records and assist us in identifying your stove
in the unlikely event of any problem occurring and also when you need to order any spare
parts.

14

15
Dean Forge Fabrications Ltd
Dean Prior
Buckfastleigh
Devon
TQ11 0LS
PRODUCT REGISTRATION
Name ..............................................................................................................
Address ..........................................................................................................
.......................................................................................................................
.......................................................................................................................
...............................................Phone Number: .................................................
Suppliers Details:
Name ..............................................................................................................
Address ..........................................................................................................
.......................................................................................................................
.......................................................................................................................
...............................................Phone Number: .................................................
Installers Details:
Name ..............................................................................................................
Address ..........................................................................................................
.......................................................................................................................
.......................................................................................................................
...............................................Phone Number: .................................................
Date of Purchase: ....................................... Date of Installation:...................................
Stove Serial No: ....................................... Model …………………………………………
This manual suits for next models
1
Table of contents
Other Dean Forge Stove manuals
Popular Stove manuals by other brands

Jøtul
Jøtul F 500 Oslo Installation and operating instructions

CASATELLI
CASATELLI LEONARDO 8ET GENERAL INFORMATION - WARNINGS - INSTALLATION - MAINTENANCE

MBS
MBS Thermo IN Instructions for installation and manual

Coleman
Coleman 5430F Series Instructions for use

deville
deville C07910-A INSTALLATION AND UTILISATION MANUAL

Aloha breeze
Aloha breeze Kodiak Cove 04152 instruction manual