Dean Forge Croft Clearburn Junior User manual

1
Dean Stoves
Dean Forge Fabrication Ltd. Dean Prior, Buckfastleigh, Devon TQ11 0LS
T e l: 0 1 3 6 4 6 4 3 5 7 4
w w w.d e a n–f o r g e.c o.u k e m a i l: s t o v e s @ d e a n-f o r g e.c o.u k
Operating Instructions for the Dean Forge Clearburn Range
(Excluding Junior and Junior SE)
All stoves meet the essential type test requirement BS
EN13240:2001 + Amd 2:2004, CE marked
Unpacking Stove
The baffle plate will be found on the base of the stove and will need to be positioned as per
diagram. Check position of bricks. The secondary air control knob will be found inside the
stove stored with a glove and these instructions and will need screwing on.
Safety Note
Warning- The external parts of the appliance will get very hot to the touch and due care will
be needed when operating.
All stoves before being operated must be checked that the installation complies with all local,
national and European standards.
Before the stove is first used or when fitting other appliances into the room, please check that
adequate air vents are in place to cover the requirements of such appliances.
Extractor Fans. When operating an extractor fan in the same room or space as the appliance
the extractor fan could cause the stove not to function properly and pull dangerous fume into
the room. This must be checked by a trained qualified engineer before using the stove
Wood & Suitable fuels
Dry wood, 18% moisture content or below must be used or the stove and flue will tar up
and the door won’t stay clean.
Wood is best seasoned by splitting it into a log and dried for 2 years in a covered area allowing
air to pass through. Peat can also be used but must be dry.

2
When used as a Multi Fuel, use only smokeless fuels recommended for enclosed
appliances.
Please Note: Appliances should not be used as general incinerators or with non-recommended
fuels.
At no time should liquid accelerants I.e: Paraffin, Petrol, BBQ lighting liquid Etc be used.
The chimney needs to be swept at least once a year.
Door Operation
The door handle can become very hot so use the glove provided.
Cage Handle: When closed the door handle will be at approximately 45away from the door,
about ¼ of a turn anti- clockwise to open.
Bar Handle; When closed the door handle will be pointing down and straight with the door
about ¼ of a turn anti –clockwise to open the door.
Controlling the stove
Diagram A:
Primary air controls on front of door.
Secondary air control knob between front stove legs
The primary air control slides are on the door. This control is used for lighting the fire or
boosting the fire. This is also the main control when burning solid fuel
The secondary air wash control lever situated under the ash catch lip controls the preheated air
wash and once the fire in the stove is established this is the control that should be used to
control the fire when burning wood.
This secondary air control knob works as follows:
Push fully in for maximum air flow into the stove and fully pull out for airflow to be shutdown.
The stove is at its maximum efficiency when the lever is approximately half way.

3
Lighting The Stove when using Wood
Lay a fire of sticks and paper. Firelighters can be used if necessary. Check the secondary air
lever is fully open and the primary air vents partially open. Light the fire and as the fire
catches the paper you may then fully open the primary air vents.
When the fire has fully established and the logs are burning well shut the primary air vents in
the door and control the fire with the secondary air wash lever (if you are unable to sustain the
fire with secondary control it is very likely that your logs have a high moisture content).
When refuelling the fire, to ensure clean burning, the primary air control should be opened for
a couple of minutes so that flames are established on the newly fuelled logs. The primary air
should be closed once these flames are fully established and the logs have become blackened.
After refuelling, it is recommended that you do not leave the appliance unattended until it is
certain that the logs are burning well with a sustained flame.
The appliance works best by refuelling with two medium sized logs. With the secondary air
about 50% open, the logs should burn well for about 1 hour.
Please Note: For long periods of burning you will need to use seasoned hard wood. Longer
periods of burning may cause the door glass to blacken, but this can be cleared when you get
the fire back up to temperature and providing the secondary air control is slightly open this will
then stay clear.
When loading the fire be careful not to leave logs projecting over the log retainer as you may
crack the glass when closing the door.
When the stove is in use in the winter season we suggest 25mm (1”) of ash is left in the bottom
when cleaning, as a wood fire burns more efficiently on a bed of ash.
If in continuous use the stove will most probably only need de-ashing every 3-4 Weeks. This
is achieved by removing the log retainer and the plate under the door and shovelling the ash out
into a non-flammable container, or we suggest using an ash clean attachment which can be
plugged into your vacuum cleaner.
Warning: Do not use your vacuum without this attachment.
Please note:
If there is insufficient burning material in the fire bed to light a new fuel charge, excessive
smoke emission can occur. Refuelling must be carried out onto a sufficient quantity of glowing
embers and ash that the new fuel charge will ignite in a reasonable period. If there are too few
embers in the fire bed, add suitable kindling to prevent excessive smoke
.

4
Lighting The Stove When using Solid Fuel
Lay a fire of sticks and paper, establish fire and then add the appropriate smokeless fuel and
use the primary air control as the main control. If using a mixture of wood and coal, balance
the primary and secondary control to achieve the desired fire.
When using solid fuel in this stove you must only use fuels recommended for enclosed
appliances, Oil derivative fuels must not be used as this will shorten the life of the grate.
The Ash pan will need emptying once a day.
The stove will work best using the primary air control. It is unlikely you will need to use the
secondary air control which will only need to be opened slightly to keep the glass clear. With
suitable adjustment of the primary air control, a bed of smokeless fuel charged to the level of
the fire retaining bars smokeless should burn well for about 1.5 - 2 hours before the need to
riddle the fire.
.
In the summer or when the stove is not being used for a long period of time, clear all the ash
out and leave primary and secondary air vents open to prevent condensation.
Please Note:
On lighting the paint on the stove will cure and give off a metallic smell. It is advisable to
ventilate the room ie. open the windows. This will subside fairly quickly after the stove has
been burning hot for at least 2 hours.
The appliances have been assessed and are suitable for intermittent burning.
Operation with the door open can cause excess smoke. The appliance must not be operated with
the appliance door left open except as directed in the instructions.
Refuelling
When refuelling, the primary air control should be opened for a couple of minutes so that flames are
established on the newly fuelled logs. The primary air should be closed once these flames are fully
established and the logs have become blackened.
After refuelling, do not leave the appliance unattended until it is certain that the logs are burning well
with a sustained flame
Pre-Season Check:
The chimney needs to be swept at least once a year.
The chimney must be checked at this stage for blockages before lighting i.e.: bird’s nests
This is probably the time to have the chimney swept before the beginning of the seasons.
Before lighting at the beginning of the season or after prolonged shutdown periods, check the
door seals are in good condition; fire bricks are in good condition and baffle plate is in
position.
If the stove has been used for a long period of time we suggest the chimney be swept twice a
year.

5
Notes
Down draughts
In adverse weather conditions down a draught may occur this could make the stove smoke, if
this should happen shut all the stove air controls.
If this occurs on a regular basis call in your engineer.
It is possible a chimney cowl could cure this problem.
Air vents
Check periodically that the exterior ventilation grill is clear.
Servicing
All servicing must to be carried out by a qualified competent engineer on a regular basis.
No unauthorised modifications of the appliance should be carried out.
Use only replacement parts recommended by the manufacturer.
Doors should always be closed in between refuelling to prevent fumes and spillage from the
firebox.
Faultfinding
If the stove starts to emit fumes into the room:-
(1) Check there is no blockage or restriction in the flue.
(2) Check the external air vent is not blocked.
(3) Check the baffle plate has not dislodged itself from the stove.
(4) Call an engineer.
If the stove does not perform properly this could be due to unseasoned/wet wood or too much
ash in the firebox.
In the case of the stove malfunctioning shut all vents, open the windows and let the residual
fuel in the stove burn out.
In the event of a chimney fire
•Call the fire brigade
•Raise the alarm to let others in the house know
•Close down all the air controls of the stove, but be careful they could be very hot
•Move furniture, rugs and other objects away from the stove
•Check the chimney breast in other rooms for signs of excessive heat and move objects
away if necessary
•At all times consider the safety of yourself and others in taking the above action

6
Fitting Instructions for the Dean Forge Clearburn Range of
Stoves
Introduction
The Dean Forge Clearburn range of stoves has evolved and has been continuously updated for
the last 37 years. These stoves have a robust fully welded carcass with a cast iron double
glazed door. These stoves have a ceramic brick lining incorporating a preheated air wash
system with 3 outlet options- top, back and back box.
Before lighting the stove check that all installation instructions have been carried out.
Health And Safety Precautions
All work must be carried out to the requirements Health and Safety at Work Act 1974.
There must not be an extractor fan fitted in the room.
There must be an air vent for all stoves of 5 kilowatt and over or meet current building
regulations.
Stoves must be fitted to BS8303, BS6461 PT1-2 1984 building regulations.
All local regulations, including those referring to national and European standards need to be
complied with when installing the appliance.
N.B
A suitably qualified person, such as a HETAS engineer or with the supervision of building
control, must fit stove.
As with all stoves fireguards must be installed when young children are present.

7
Chimney
All croft clearburn stoves must have a minimum chimney height of 4m measuring from the
stove outlet, the chimney must not be less than 150mm (6”) internal diameter.
These stoves are not suitable to be used in a flue-shared situation.
The chimney must be sound and of not too large a section. If not sound or too large, a liner
will have to be fitted; s/s or ceramic suitable for solid fuel.
If the chimney draw is too high a flue stabilizer will have to be installed. When the chimney is
warm the draw should not be lower than 0.10 water gauge.
All appliances have been tested at 12 PA with the doors closed.
If the flue is connected directly into a existing chimney without a liner the register plate must
be fitted with removable doors to facilitate cleaning.
If its not possible to fit doors in the register plate then a cleaning door will need to be fitted as
near as possible to the connecting length of flue in the front, side or back of the chimney
breast.
Hearth, Surround and Register Plate
The stove must stand on non-flammable material at least 12mm thick (1/2”). The hearth must
extend at least 225mm in front of the firebox and 150mm to the sides.
If the stove is in a fire opening made of non-combustible materials, we recommend a 150mm
gap to the sides and 300mm above from non-combustible materials.
The appliance must be installed on a floor with an adequate low bearing capacity.
If the construction doesn’t meet the existing prerequisite the floor must be reinforced and a
load distributing plate could be fitted.

8
Table of distances from combustibles
Stove Type
Minimum from back of
appliance to combustibles
Minimum from side of
appliance to combustibles
Croft Clearburn Slimline
850mm
700mm
Croft Clearburn Small
850mm
700mm
Croft Clearburn Medium
1000mm
700mm
Croft Clearburn Large
1200mm
800mm
Croft Clearburn Small
with Log store
850mm
700mm
It may be necessary to shield the beam or mantle piece from the heat. The single wall flue
from the top of the stove must be at least 3 times its diameter from combustible materials i.e.
150 (6”) flue 450 (18”) distance.
Be careful not to place furniture or other combustible material too close to the stove.
Register plates
Register plates, which have not got a continuous flue to the top, must be made of 1.5mm steel
treated to prevent corrosion (BS8303 part 3 9.5)
Register plates made of fireboard may only be used if a liner or flue runs from the top of the
stove to the top of the chimney without a break.
9
Flue Connections and Outlets
Dean Croft Clearburn stoves can be flued from the top and the back, or with a vertical back
box. Horizontal flue from back of stove should not exceed 150mm.
All flue connections must be sealed with fire cement. Doors in the register plate must be
present or a soot box fitted in the back or side of the fireplace to enable access to clean the
chimney when the stove is installed without a liner.
If the chimney has been lined and cannot be swept through the stove an access door on the first
length of flue must be installed for cleaning access.
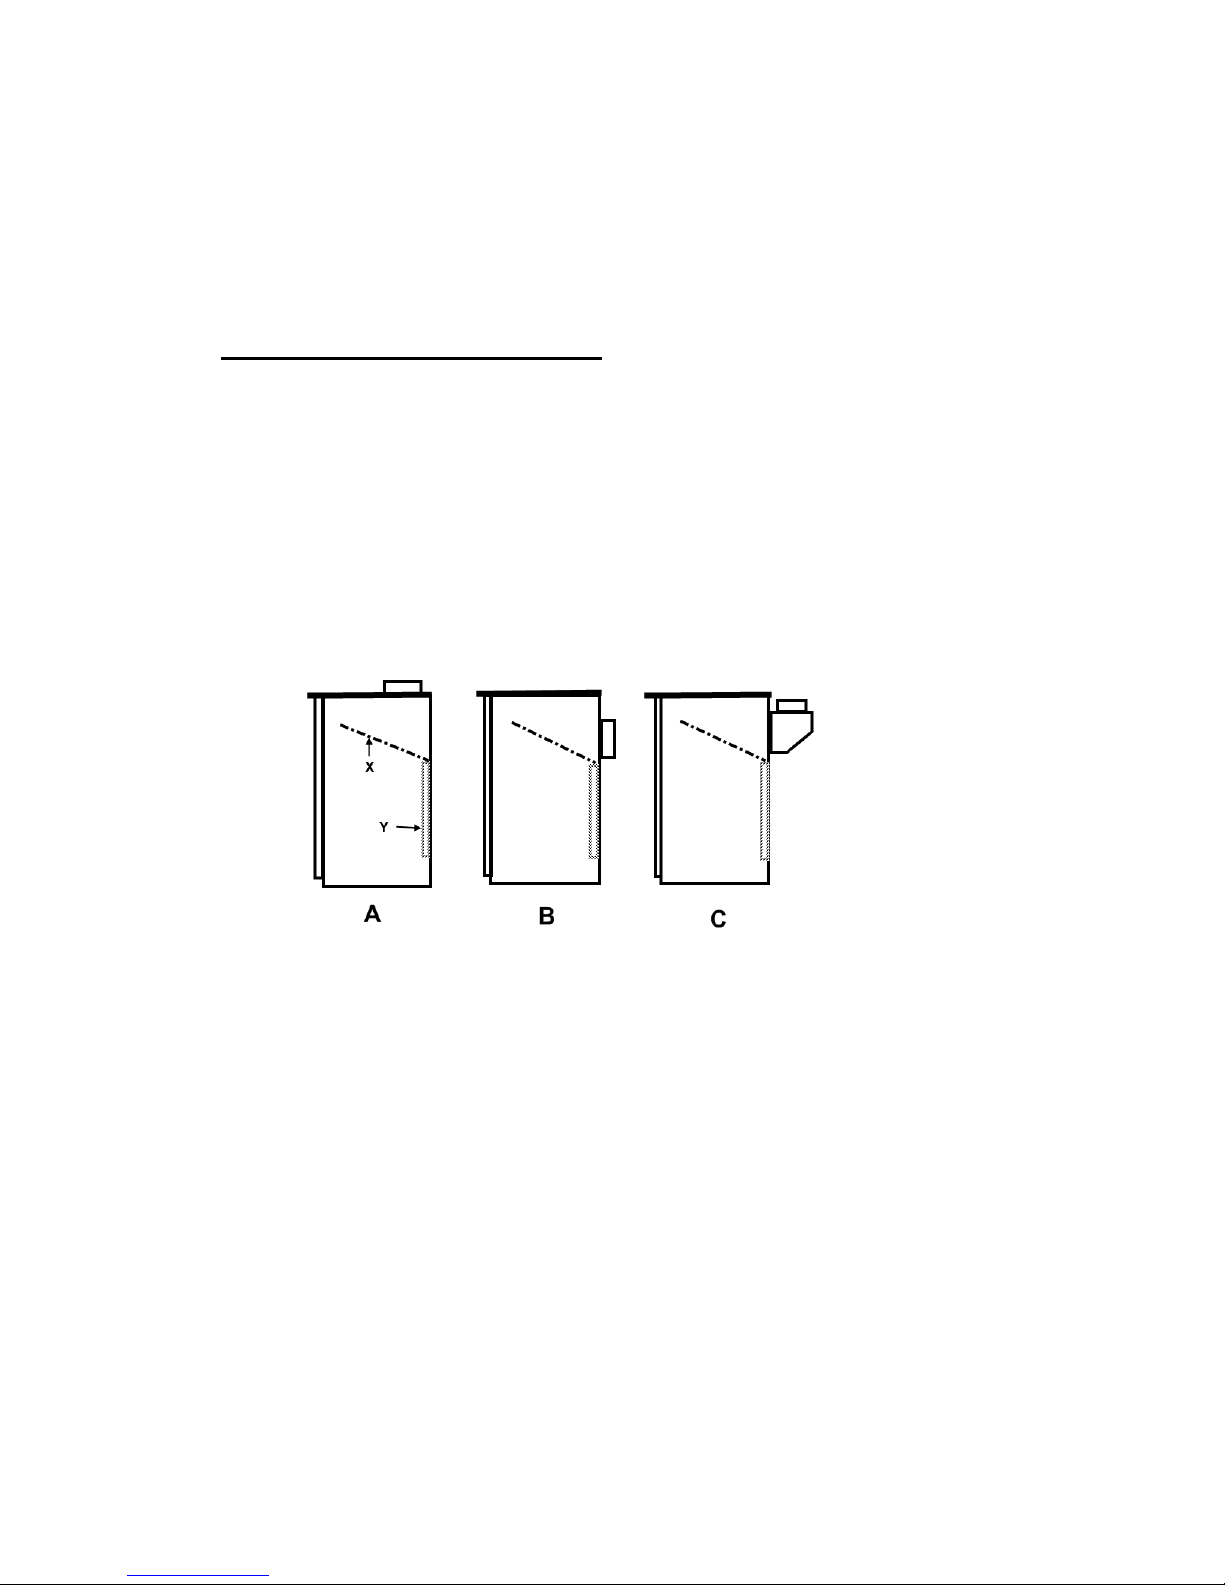
X= Position of baffle plat
Y = Back protection brick
Diagrams showing from the top (A), back (B) and back box (C) outlet baffle plate position.
Please Note: All Profile top stoves use the 6mm black rope seal supplied under the flue spigot
to bring the flue spigot flush with the stove.

10
Pre –Lighting Check and Commissioning
Check all Building Regulations have been adhered to.
The baffle plate is in the right position.
A smoke test has been done to check the chimney is clear.
Data Plate
All stoves are numbered and performance marked on a data plate which is found on a swinging
arm located under the stove.
Air Vent
Under part J of building regulations an air vent of the appropriate size must be fitted for all
stoves with a kw rating of over 5kw.
Very air tight properties designed with air permeability less than or equal to 5.0 m3/ (h.m2) per
hour, an air vent will need to be fitted for all kilowatts.
It must be considered when fitting air vents that it is taken into account any other appliance
fitted within the room.
Please Note: Extractor fans when operating in the same room or space as the appliance may
cause problems.
Air vent inlet grills must not be inadvertently blocked.
Air vents must not be fitted in positions where they can be inadvertently covered up.
As from the 1st October 2010 a compliant Carbon Monoxide Alarm must be fitted
11
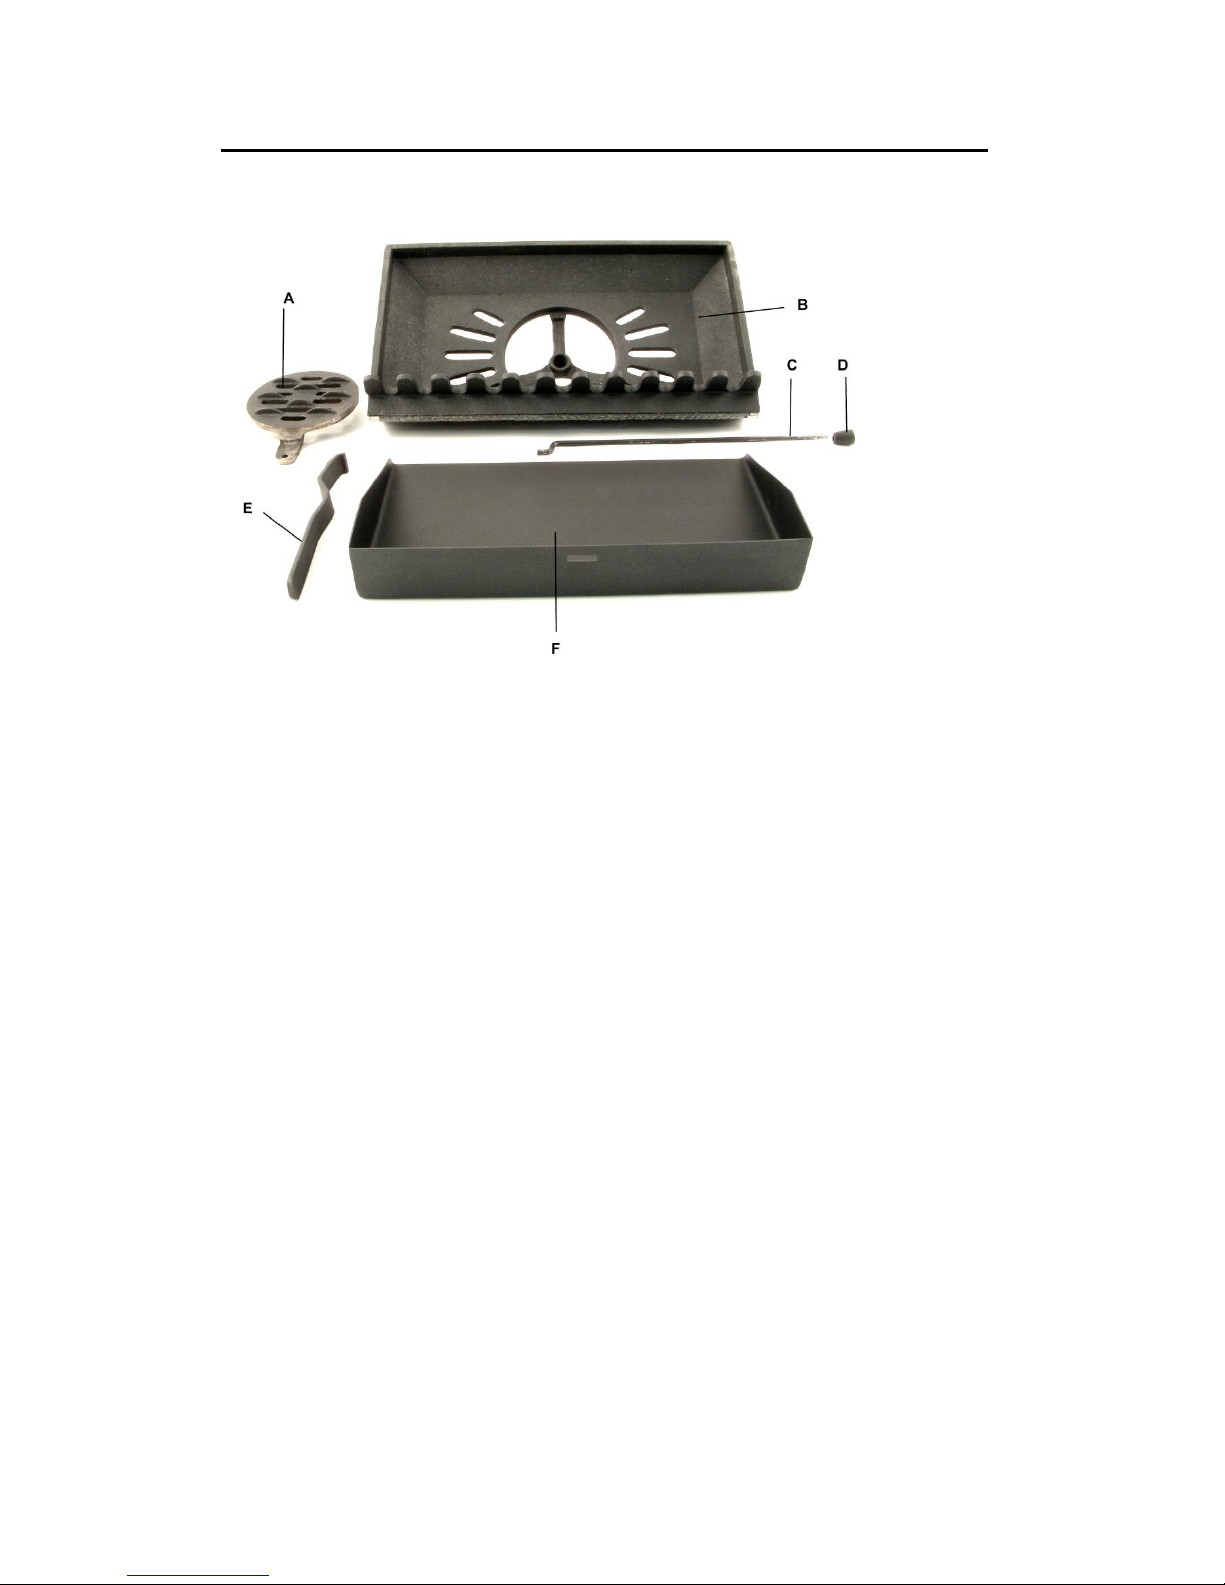
Multi fuel kit fitting instructions for Croft Slimline & Small
This M/F kit consists of five parts:
A. Centre Grate
B. Main Grate
C. Riddle bar
D. Knob for riddle bar
E. Ash pan tool
F. Ash Pan
To fit:
Remove the front panel under the door and the log retainer. Replace rear bricks with new
thicker bricks supplied in kit.
With the rope seal on the main grate (B) facing you tilt the main grate clock wise, insert into
stove lowering so the right hand side is under the brick retaining angle and the left hand leg
slides down between the first brick and a bar that is welded to the stove. Level the main grate
(B) then slide it the rest of the way into the stove. The front main grate (B) should now sit on
the bars on each side at the front.
Remove the blanking bolt on the right hand side of the stove body and slide the Riddle bar (C)
through the hole. Fit the Centre grate (A) with the arm facing forwards, tilt so you are able to
insert the riddle bar (C) through the top of the hole in the arm then screw the Knob for riddle
bar (D) on the end of riddle bar (C) outside the stove.
Fit ash pan and front plate below door. Your existing wood burning log retainer is not used
with the M/F kit.
12
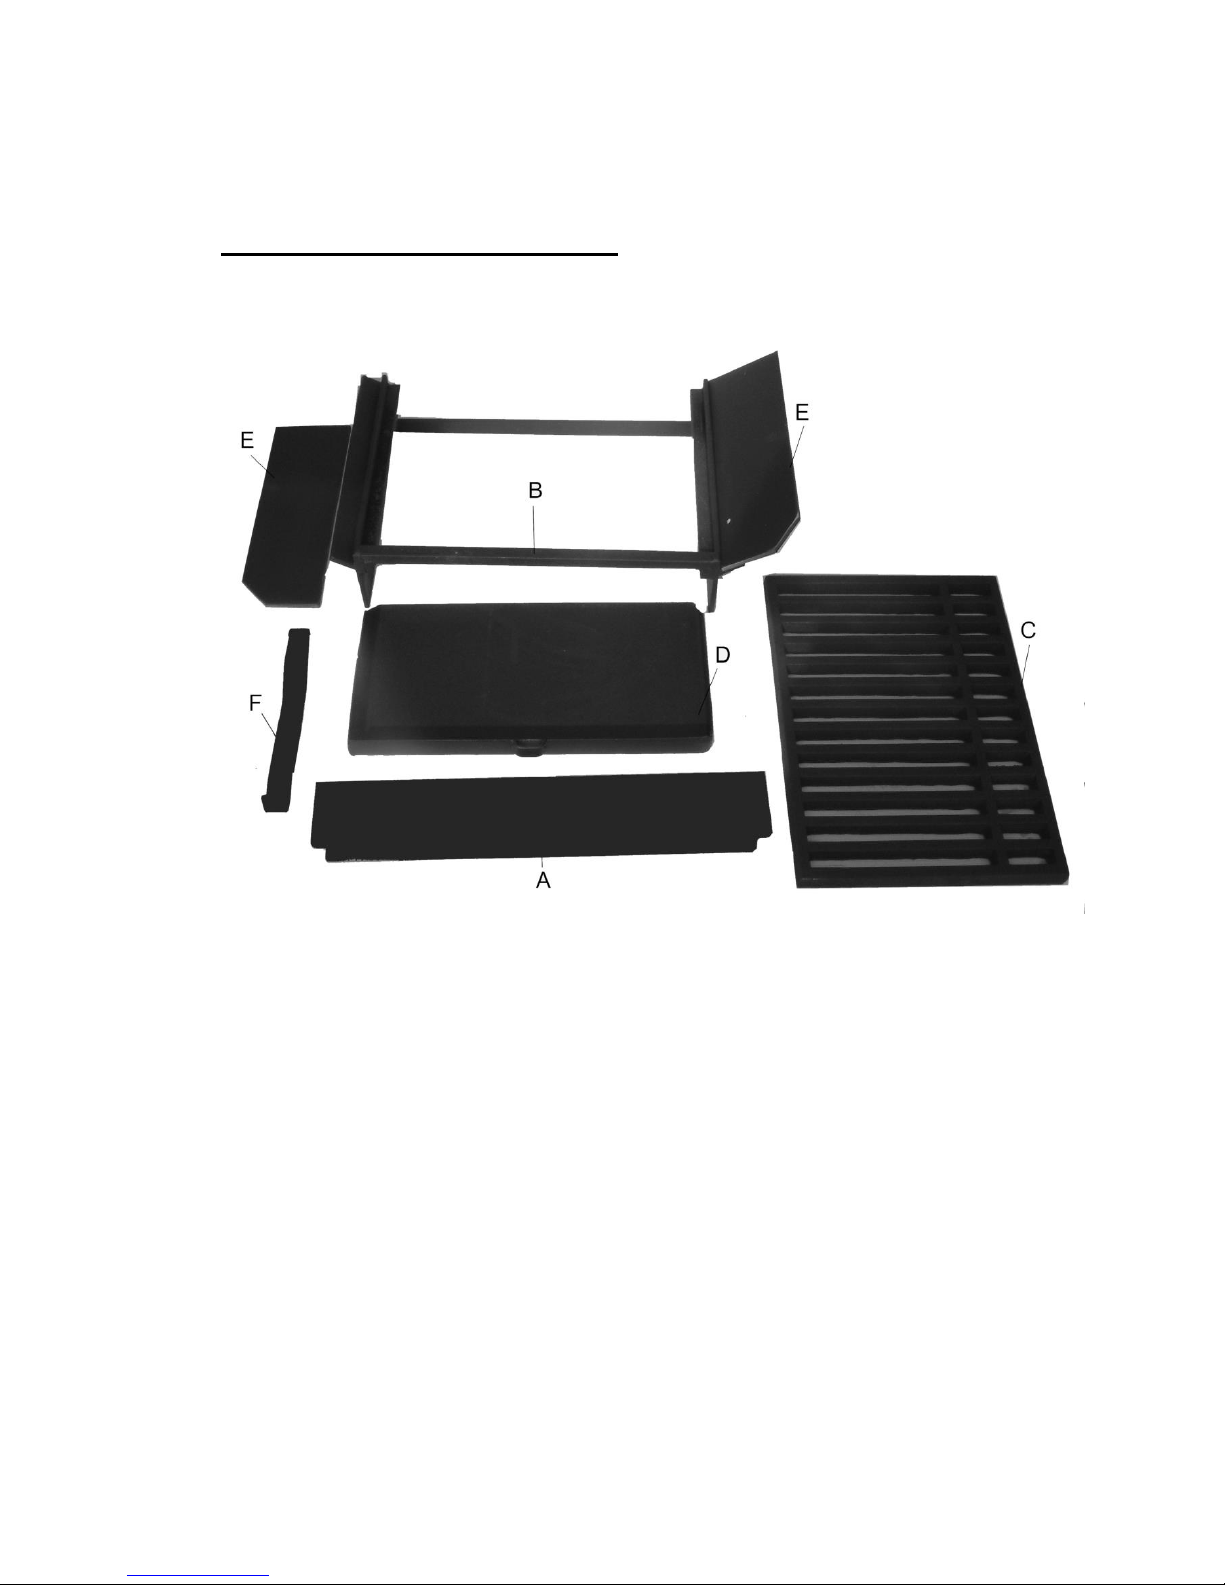
Croft Clearburn Med & Large
The M/F kit consists of six parts:
A. Front plate with slides
B. Grate frame
C. Grate
D. Ash pan
E. Side panel
F. Ash pan & front plate tool.
To fit:
Remove the blank plate under the door and log retainer.
Fit grate frame between the bars welded in the bottom of the firebox with the front solid bar of
the frame faced forward.
Fit cast grate into grate frame.
Fit side plate on to the grate frame with cut-outs forward.
Fit ash pan and front plate with slides and refit log retainer with the long spikes facing up.

13
Table of mean flue temperatures with closed doors
Stove Type
Flue gas temp down stream of spigot,
closed doors.
Croft Clearburn Slimline
248C
Croft Clearburn Small
317C
Croft Clearburn Medium
348C
Croft Clearburn Large
340C
Croft Clearburn Small with log
store
317C
Flue Gas Mass Flow
Stove Types
Flue gas mass flow (gs)
Croft Clearburn Slimline
5.2
Croft Clearburn Small
6.6
Croft Clearburn Medium
8.4
Croft Clearburn Large
11.6
Croft Clearburn Small with log store
5.2
Stove Performance
Croft Clearburn Small Slimline 6.5kw nominal 79.6% Net Efficiency
Croft Clearburn Small 8.2kw nominal 76.2% Net Efficiency
Croft Clearburn Medium 11.4kw nominal 75.9% Net Efficiency
Croft Clearburn Large 12.9Kw nominal 72.9 Net Efficiency
Croft Clearburn Small with log store 8.4kw nominal 76.2% Net Efficiency
All stoves are tested to nominal outputs and will well exceed these kilowatt ratings.
14
EC Declaration Of Conformity
The Undersigned, representing the following:
Manufacturer
Dean Forge Ltd
Dean Prior, Buckfastleigh, Devon, TQ11 0LS
Herewith declare that the products:
Description
Product Code
Croft Clearburn Junior
STDFCRJL, STDFCRJ
Croft Clearburn Junior Inset
STDFCRJIN
Junior 105 SE
STDFJ105L, STDFJ105H,
STDFJ105HWD
Croft Clearburn Slimline 5 SE
STDFCRSL5
Croft Slimline 6
STDFCRSL
Croft Clearburn Small
STDFCRSM, STDFCRSML
Croft Clearburn Medium
STDFCRM, STDFCRML
Croft Clearburn Large
STDFCRL
Description of product:
Croft Clearburn wood and multifuel heating stove product range.
Steel bodied stove fitted with cast iron doors. Supplied in various sizes to give a
range of heat output options.
Are in conformity with the provisions of the following EC Directive (S) when
installed in accordance with the installation instructions in the product
documentation:
98/106/EEC- 305/2011 Construction Products Directive
And the standards referenced below have been applied:
EN 13240: 2001 + Amendment A2: 2004 & inset BS EN13229:2001 + A1: 2003
+ A2: 2004Provisions to which the product conforms:

15
Product: Roomheater fired by solid fuel as covered under the scope of the standards
listed.
Intended use: Space heating in residential building.
Characteristic
Performance
Report
Fire Safety
Satisfies
Emission of combustible
products and Thermal
output/Efficiency
Croft Clearburn Junior- STDFCRJL/
STDFCRJ
Co @ 13% 0² Wood 0.31% Ancit 0.34%
5Kw @ 83% Wood –5Kw @ 66.2% Ancit
6348-01
Croft Clearburn Junior Inset- STDFCRJIN
Co @ 13% 0² Wood 0.35% Ancit 0.40%
5Kw @ 80.3% Wood -4.7Kw @ 73.2% Ancit
6700-1
Junior 105SE- STDFJ105L/ STDFJ105H/
STDFJ105HWD
co@ 13% 0² Wood 0.31% Ancit 0.34%
5.3Kw @ 75.7% Wood -5Kw @ 66.2% Ancit
6931-SE-2
Croft Slimline 5- STSFCRSL5
Co @ 13% 0² Wood 0.28% Ancit 0.30%
5Kw @ 81.6% Wood –4.9Kw @ 75.8%
Ancit
6042-1
Croft Clearburn Slimline 6- STDFCRSL 6
Co@ 13% 0² Wood 0.37%-
6Kw @ 79.6% Wood
6348-04
Croft Clearburn Small- STDFCRSM/
STDFCRSML
Co@ 13% 0² Wood 0.28%- 8.2Kw @ 76.2%
Wood
6348-02
Croft Clearburn Medium- STDFCRM/
STDFCRML
Co@ 13% 0² Wood 0.44%- 11.4Kw @
75.9% Wood
6348-03
Croft Clearburn Large- STDFCRL
Co@ 13% 0² Wood 0.22%- 13.9Kw @
72.9% Wood
6700-2
Release of dangerous
substances
None
Surface temperature
Satisfies
Mechanical resistance (to
carry a chimney/flue)
Maximum weight to be supported
30Kg
Test laboratory: 0692
Name: M.P Chew Signature:
Position: Technical Director (s) Date: 24th September2012

16
THE DEAN FORGE FABRICATION LTD STOVES GUARANTEE
Dean Forge Fabrication Ltd offers a five year guarantee which covers the main body of the
stove for manufacturing defects.
In the event of any failure we will replace any defective part free of charge, labour cost
excluded.
This guarantee is invalid if the stove is not assembled, installed by a HETAS registered
engineer or recognised competent person or operated as per these instructions or properly
maintained or does not comply with current building regulations and any regional legislation
in force at the time.
Dean Forge Fabrication Ltd does not guarantee the onsite assembly, installation or
operation of the stove. Please seek advise from your supplier / installer for any relevant
guarantees applicable to the installation.
Dean Forge Fabrication Ltd will not be held liable for any consequential or incidental loss,
damage or injury, however caused.
Claims under this guarantee should be first made through your retailer.
This guarantee is only applicable in the UK.
Nothing in this guarantee shall effect your statutory rights.
Exclusions
The following consumable parts are not covered by this guarantee:-
Fire grate, log retainer, baffle plate, fire bricks, glass panels and door seals.
Paint is also excluded from the guarantee as it will eventually deteriorate due to the normal
working of the stove.
Your assistance is requested by filling in and returning the product Registration and
Guarantee Form. This will help maintain our records and assist us in identifying your stove
in the unlikely event of any problem occurring and also when you need to order any spare
parts.

17

18
Dean Forge Fabrication Ltd
Dean Prior
Buckfastleigh
Devon
TQ11 0LS
PRODUCT REGISTRATION
Name ..............................................................................................................
Address ..........................................................................................................
.......................................................................................................................
.......................................................................................................................
...............................................Phone Number: .................................................
Suppliers Details:
Name ..............................................................................................................
Address ..........................................................................................................
.......................................................................................................................
.......................................................................................................................
...............................................Phone Number: .................................................
Installers Details:
Name ..............................................................................................................
Address ..........................................................................................................
.......................................................................................................................
.......................................................................................................................
...............................................Phone Number: .................................................
HETAS Registration Number…………………………………………………….
Date of Purchase: ....................................... Date of Installation:...................................
Stove Serial No: ....................................... Model: ……………………………..
This manual suits for next models
7
Table of contents
Other Dean Forge Stove manuals


Popular Stove manuals by other brands

Plamen International
Plamen International Nera 8G Installation and operating instructions

Lennox
Lennox G21Q Series installation instructions

Heatilator
Heatilator Eco Choice PS50-C owner's manual

Euroheat
Euroheat Nestor Martin IT13 Installation & servicing instructions

HWAM
HWAM Figaro user manual

St. Croix
St. Croix Hastings installation manual


USSC
USSC Hearth Focus 6039HF owner's manual

MCZ
MCZ CLUB AIR 10 M1 OPERATION AND CLEANING

Becken
Becken BFE4915WH instruction manual

Lennox Hearth Products
Lennox Hearth Products Vintage VIN Installation and operation manual

Angelo Po
Angelo Po 1G1FAPG Use and installation manual

FDI
FDI Rocket instruction manual