dellonda baridi DH178 User manual
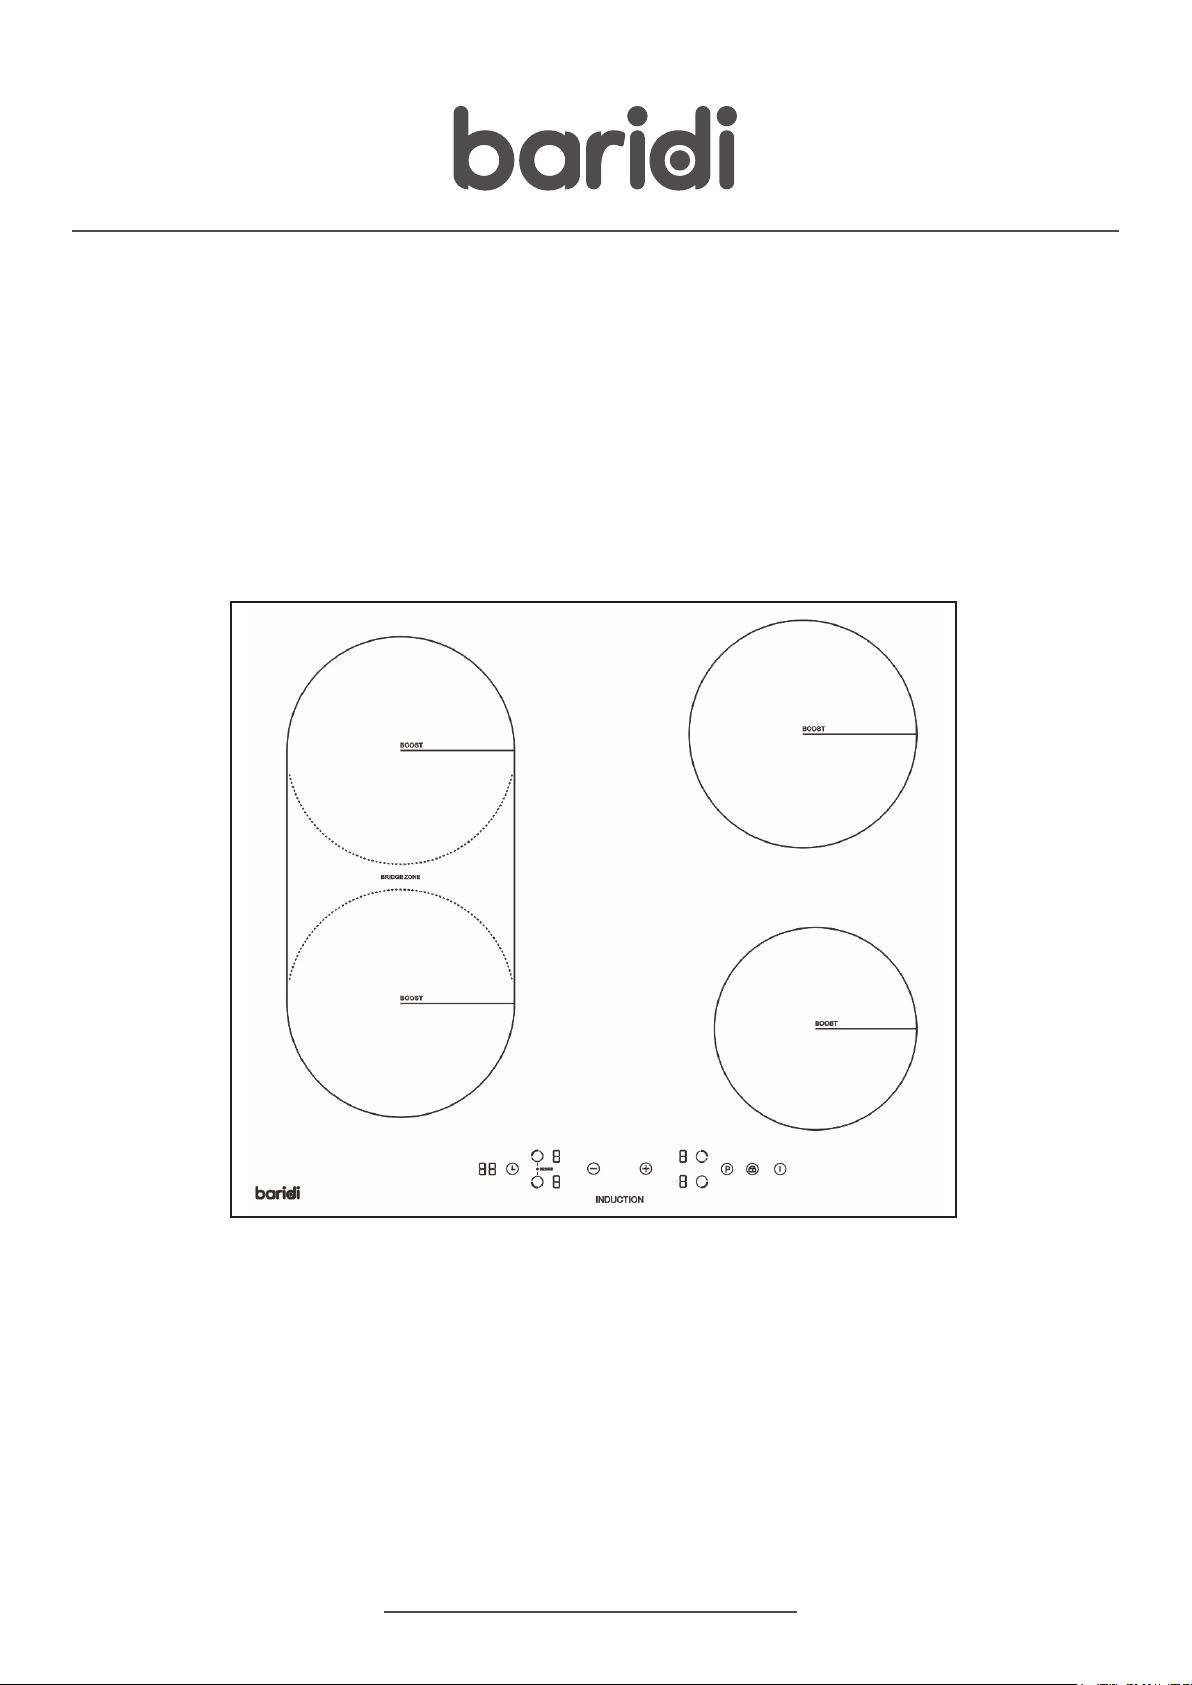
Baridi 60cm Bridge Zone Induction Hob, 4 Zones, Boost
Function, 9 Power Settings, 2800W
Model No. DH178
Thank you for purchasing a Dellonda product. Manufactured to a high standard, this product will,
if used according to these instructions, and properly maintained, give you years of trouble free performance.
DH178 Issue: 3 21/10/22
www.dellonda.co.uk
Important Information
Please read these instructions carefully. Note the safe operational requirements, warnings & cautions. Use the product correctly and with care
for the purpose for which it is intended. Failure to do so may cause damage and/or personal injury and will invalidate the warranty. Keep these
instructions safe for future use.
Refer to
instruction
manual
Warning:
Hot
Surface
SPECIFICATION
Cable Length: ....................................................................... 1m
Colour: .............................................................................. Black
Installation:..................................................................... Built In
Number of Hobs:.......................................... 4/5 (Bridge Zone)
Power:.............................................................................2800W
Product dimensions:...................................590 x 520 x 60mm
Supply: ........................................................................220-240V
Surface: ............................................................. Ceramic Glass
Type: ...........................................................................Induction
SAFETY INSTRUCTIONS
• ELECTRICAL SAFETY
• Dellonda recommend that installation and repairs are carried out by a suitably
qualied electrician.
• WARNING! It is the user’s responsibility to check the following:
• Check all electrical equipment and appliances to ensure that they are safe before
using. Inspect power supply leads, plugs and all electrical connections for wear
and damage. If the product is used in the course of business duties, it must be
maintained in a safe condition and routinely PAT (Portable Appliance Test) tested.
• ELECTRICAL SAFETY INFORMATION: It is important that the following information is read and understood.
• IMPORTANT: The appliance must NOT be connected to the mains supply by means of a 13A plug and socket.
• This appliance must be wired into a 30A double pole switched fused spur outlet, having 3 mm contact separation
and placed in an easily accessible position adjacent to the appliance. It should not be located above the
appliance and no more than 1.25m away from it.
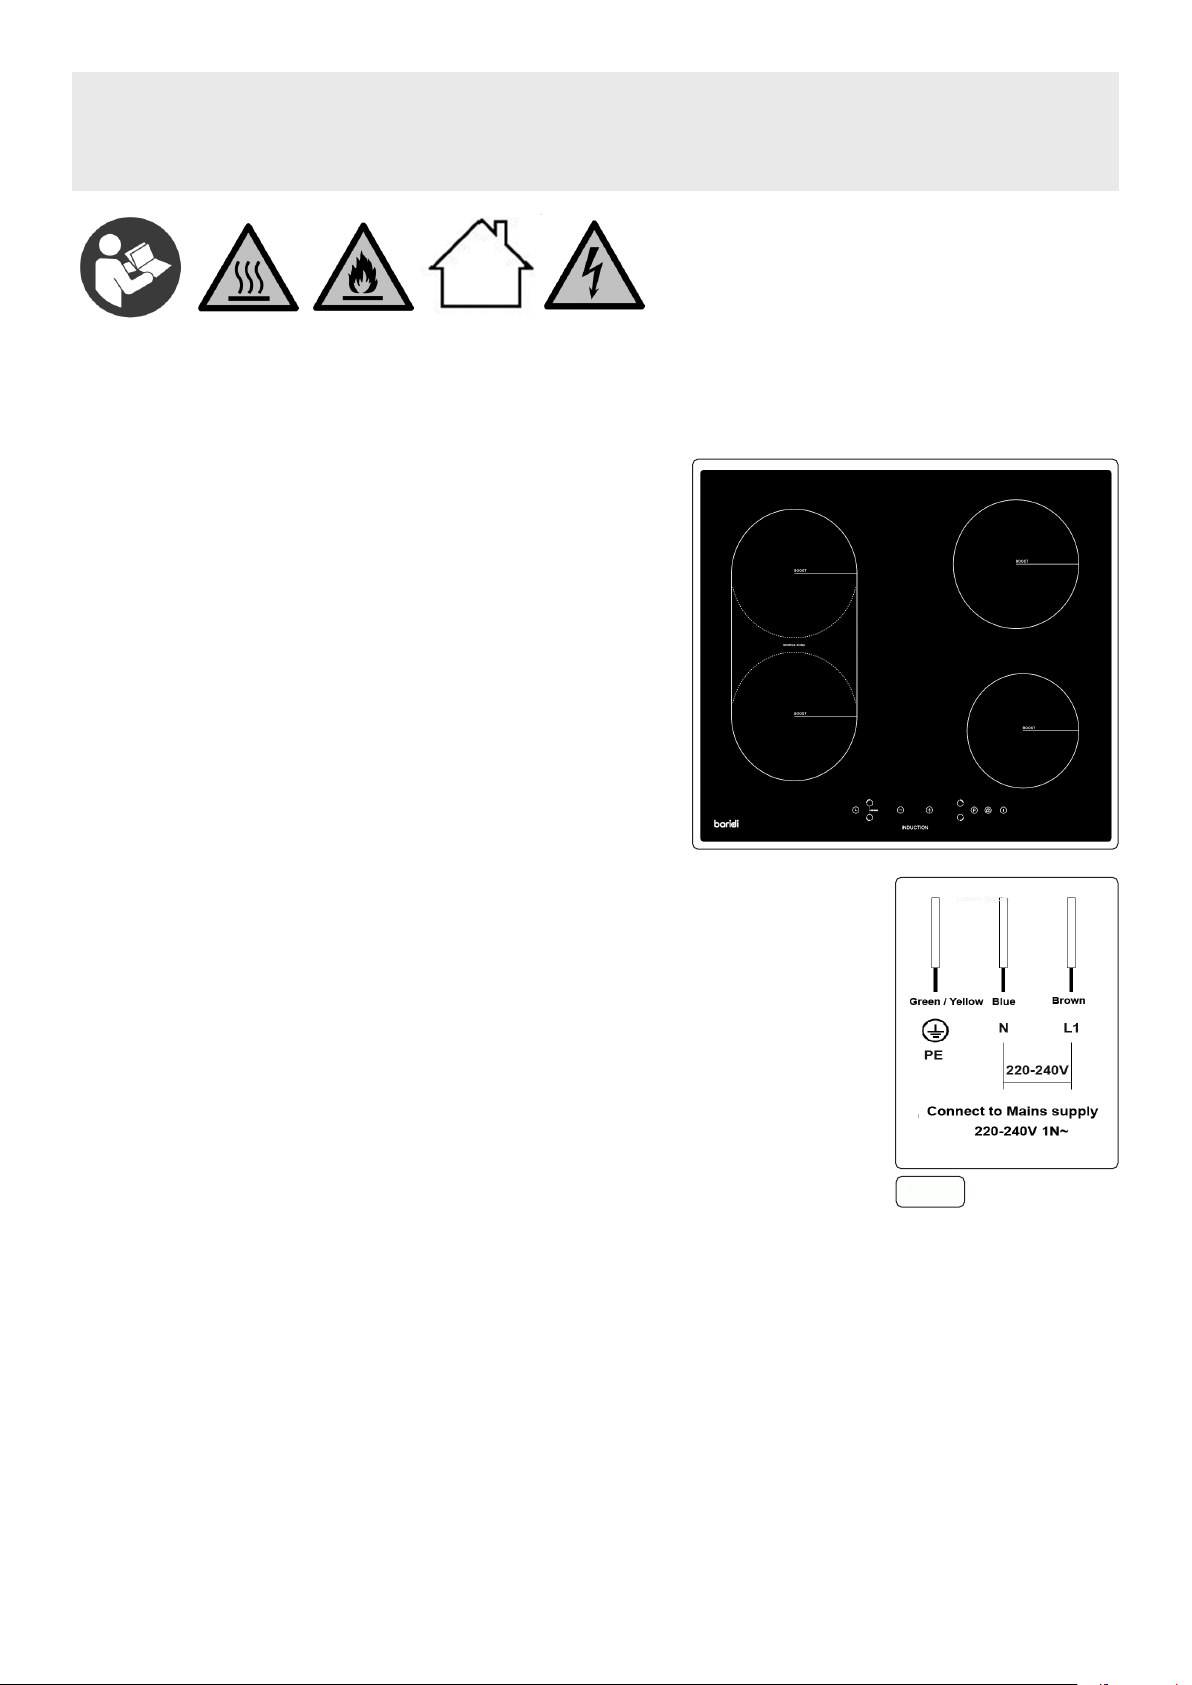
• The “blue” neutral wire must be connected to the terminal marked with letter (N) - the live wire (L1) must be
connected to the terminal marked with letter (L1) (220-240V 1N~). see Fig.1.
• Ensure that the insulation on all cables and on the appliance is safe before connecting it to the power supply.
• Regularly inspect power supply cables and plugs for wear or damage and check all connections to ensure that
they are secure.
• The cable can be looped if necessary, but make sure that is not kinked or trapped when the hob is in position.
Care must be taken to avoid the cable being in contact with hot parts of the appliance.
• IMPORTANT: Ensure that the voltage rating on the appliance suits the power supply to be used and that the unit
is wired in accordance with these instructions.
• DO NOT pull the appliance by the power cable.
• DO NOT use worn or damaged cables.
• Ensure that any faulty item is repaired or replaced immediately by a suitably qualied electrician.
• GENERAL SAFETY
• The appliance and its accessible parts become hot during use. Care should be taken to avoid touching heating elements.
• This appliance can be used by children aged from 8 years and above and persons with reduced physical, sensory or mental capabilities or lack of
experience and knowledge or they have been given supervision or instruction concerning use of the appliance in a safe way and understand the
hazards involved. Children shall not play with the appliance. Cleaning and user maintenance shall not be made by children without supervision.
• A steam cleaner is not to be used.
• Accessible parts may become hot during use. Young children should be kept well away when in use.
• DO NOT use abrasive products to clean the ceramic surface to avoid scratching it. Otherwise, severe failure might happen to the appliance.
• OPERATIONAL SAFETY
• DO NOT allow paper or cloth to come in contact with any heating element.
• It is specically designed for use when heating or cooking food. The use of corrosive chemicals in heating or cleaning will damage the appliance
and could result in injury.
• If food being prepared should ignite, switch off the hob and disconnect from supply power.
• Only use utensils that are suitable for use with ceramic hobs.
• WARNING! DANGER OF EXPLOSION! Liquids and other foods must not be heated in sealed containers since they are liable to explode.
• DO NOT allow any accessories or electric cables to contact the hot parts of the appliance.
• HOT SURFACES! RISK OF BURNS! During use the appliance becomes hot.
• WARNING! Accessible parts may become hot during use. Young children should be kept away.
• Never move racks or pans when they are hot. Wait until they cool.
Warning:
Can cause
Fire
Indoor use
Only
Warning:
Electricity
1800/2100W
1200W
1200W
1500W
1800/2100W 1800/2100W
2800W ZONE
g.1

• IMPORTANT! Always switch off the electricity supply at the mains during installation and maintenance.
• DO NOT use the ceramic hob until you have read this instruction manual.
• The ceramic hob is intended for household use only.
• Ensure that small items of household equipment, including connection leads, do not touch the hob as the insulation material of this equipment is
usually not resistant to high temperatures.
• DO NOT leave the ceramic hob unattended when frying. Oils and fats may catch re due to overheating or boiling over.
• DO NOT switch on the hob until a pan has been placed on it.
• DO NOT put pans weighing over 25kg on the hob.
• DO NOT use the ceramic hob in the event of a technical fault. Any faults must be xed by an appropriately qualied and authorized person.
• In the event of any incident caused by a technical fault, disconnect the power and report the fault to the service centre to be repaired.
• GENERAL INFORMATION
• This appliance is designed for domestic household use and must be built into a standard kitchen cabinet or housing unit.
• The appliance surfaces will become hot during use and retain heat after operation.
• Please dispose of the packaging material carefully. Packaging material can be dangerous to children.
• DO NOT allow cable to come into contact with the heating areas of appliance.
• DO NOT install the appliance next to curtains or soft furnishings.
• The appliance must be placed in such a way that the power supply is accessible at all times.
• Before connecting the appliance to the power supply, check that the power supply voltage and current rating corresponds with the power supply
details shown on the appliance rating label.
• Never use a damaged appliance! Disconnect the appliance from the power source and contact your supplier if it is damaged.
• Danger of electric shock! Do not attempt to repair the appliance yourself. In case of malfunction, repairs are to be conducted by suitably qualied
personnel only.
• To avoid damaging the cord, do not squeeze, bend or chafe it on sharp edges. Keep it away from hot surfaces and open ames as well.
• Lay out the cord in such a way that no unintentional pulling or tripping over it is possible.
• DO NOT open the appliance casing under any circumstances. Do not insert any foreign objects into the inside of the casing.
• Always operate the appliance on a level, stable, clean and dry surface. Protect the appliance against heat, dust, direct sunlight, moisture, dripping
and splashing water.
• CLEANING
• Always disconnect the power supply prior to cleaning the appliance. If the switched fused connection unit is difcult to reach, shut off the power
supply by using the corresponding circuit breaker at the distribution board.
• Clean the appliance thoroughly before rst use. The hob should be cleaned regularly and any food deposits removed.
• Never clean the hob surfaces by steam cleaning.
• The ceramic surface should only be cleaned with warm soapy water, using either a sponge or soft cloth. No abrasive cleaners should be used.
• Any stains that may appear on the ceramic surface will have originated from food splashes or spilt food, these splashes occur during the cooking
process. These could possibly be a result of the food being cooked at an excessively high temperature or being placed in cookware that is too
small.
• INSTALLATION
• ELECTRICAL CONNECTION
• Review and understand Safety Section 1 before installing this unit.
• Dellonda strongly recommend this work to be conducted by suitably qualied personnel only.
• Before connecting the appliance, make sure that the supply voltage marked on the Rating Plate corresponds with your mains supply voltage.
• WARNING: THIS APPLIANCE MUST BE EARTHED.
• IMPORTANT: The appliance must NOT be connected to the mains supply by means of a 13A plug and socket.
• This appliance must be wired into a 30A double pole switched fused spur outlet, having 3 mm contact separation and placed in an easily
accessible position adjacent to the appliance. It should not be located above the appliance and no more than 1.25m away from it. See Fig.1.
• The “blue” neutral wire must be connected to the terminal marked with letter (N) - the live wire ( L1) must be connected to the terminal marked
with letter (L1) (220-240V 1N~). see Fig.1.
• The mains cable must not touch any hot metal.
• Care must be taken to ensure that the temperature of the mains supply cable does not exceed 50°C.
• If the mains supply cable is damaged, then it must be replaced by an appropriate replacement.
• INSTALLING THE HOB INTO THE KITCHEN WORK SURFACE
• The kitchen area should be dry and aired and equipped with efcient ventilation. When installing the hob, easy access to all control elements
should be ensured.
• POSITIONING THE APPLIANCE SEE FIG.2 & FIG.3
• The kitchen units that are in direct contact with the
appliances must be heat-proof (min. 95°C).
• The appliance can be installed on a work surface
with a distance of between 30 and 40 mm and near
to walls which are higher than the work surface,
maintaining a minimum distance of 100 mm (see
g.3).
• Carry out all cutting of the unit and work surface
then carefully remove shavings or sawdust before
inserting the appliances.
• To ensure a correct ventilation of the hob please
comply with the dimensions shown in g.3.
• Minimum ventilation clearance requirements are
70cm above the hob, 5cm below the underside and
2cm from the rear (g.3).
• Make sure the surface is level and square and that
no part interferes with the space required for installation.
• Prepare the cut as indicated (see installation dimensions g.2, g.3).
• Hob requires a rectangular hole of 560mm wide by 490 mm deep.
• Refer to g.2 and g.3 for location .
• Apply the seal strip (supplied) to the underside edge of the hob, and leave approx. 3mm from the edge of the glass. DO NOT use silicone.
• Cut any excess and bring the two ends of the seal together so they match.
Fig.2
590 520
50
560
50
50
50
490
Seal
g.2

• Fix the brackets (4 pcs) on the front side and rear side by screw. Put the hob in the
cut-out cabinet, and center it. Ensure that the front edge of the hob is parallel to the
side edge of the work surface.
• IMPORTANT: You must observe the ventilation requirements shown in g.3.
• IMPORTANT: There are ventilation spaces around the outside of the hob. YOU
MUST ensure that these spaces are not blocked by the work top, when you put the
hob into position (see g.3).
• IMPORTANT: Do not use a silicon sealant to seal the appliance against the
aperture. This will make it difcult to remove the hob from the aperture in future,
particularly if it needs to be serviced.
• OPERATION
• CHOOSING THE CORRECT COOKWARE
• Only use cookware with a base suitable for induction cooking. Look for the induction
symbol on the packaging or on the bottom of the pan.
• You can check whether your cookware is suitable by carrying out a magnet test.
Move a magnet towards the base of the pan. If it is attracted, the pan is suitable for
induction.
• If you do not have a magnet:
• 1. Put some water in the pan you want to check.
• 2. Follow the steps under ‘to start cooking’.
• 3. If the Incorrect Pot icon does not ash in the display and the water is heating, the
pan is suitable.
• Cookware made by the following materials is not suitable: pure stainless steel,
aluminium or copper without a magnetic base, glass, wood, porcelain, ceramic, and
earthenware.
• DO NOT use cookware with jagged edges or a curved base.
• Make sure that the base of your pan is smooth, sits at against the glass, and is the same
size as the cooking zone. Always centre your pan on the cooking zone.
• OPERATION
• WARNING! IF A HEATING ZONE IS HOT, IT IS LABELLED . DO NOT TOUCH THE
SURFACE.
• HEATING
• To turn the unit on, touch the On/Off button. The unit will 'beep', all indicators will light up for
one second, go out and the unit will be in standby mode.
• Place a suitable pan on the cooking zone that you wish to use. Make sure the bottom of the
pan and the surface of the cooking zone are clean and dry.
• Select the heating zone to be used and select a heat setting by using the Increase /
Decrease button.
• The bridge zone function is activated by holding down the front and rear left hand zone
indicators at the same time.
• To cancel bridge zone mode, touch the front or rear left hand zone indicator. Each zone can
be run in boost mode, which can be selected by touching the power boost button.
• The hob has a power management system which is activated if too many hob elements are
running on high settings. Elements may reduce their set value or shut off automatically.
• NOTE: If no heat setting is selected, the hob will turn off within one minute. The heat setting
can be modied at any time during cooking.
• When you have nished cooking, select the zone and using the Decrease button return the
setting to '0'.
• TIMING
• The timer can be used to simply measure time elapsed or to turn off a zone once the set
time is reached. The timer can be set between 1 and 99 minutes.
• To measure time elapsed make sure the hob is turned on and no zone selection key is
activated (zone indication ‘-‘ is not blinking).
• NOTE: you can set minute minder before or after cooking zone power setting nished.
• Touch Timer key, “00” will show in the timer display and the right hand “0” will blink.
• Set the time by touching the “+” “-” control of the timer. To set beyond 9 minutes, press the
Timer key again and the left hand "0" will blink. Use the Increase / Decrease buttons to set
your required time.
• When the time is set, it will begin to count down immediately. The display will show the
remaining time.
• The buzzer will sound for 30 seconds and the timer indicator will show “- -” when the set
time has elapsed.
• To switch off one or more cooking zones rstly touch the heating zone selection control
that you want to set the timer for.
• Set the time required as above i.e. "+" or "-" and count down will begin.
• NOTE: A red dot will appear against the relevant Zone Indicator to indicate which zone or
zones are being timed.
• To cancel a Timer, touch the Zone control, touch the decrease control to set the timer to "0".
• CLEANING
• Always disconnect the power supply prior to cleaning the appliance. If the switched fused connection unit is difcult to reach, shut off the power
supply by using the corresponding circuit breaker at the distribution board.
• Clean the appliance thoroughly before rst use. The hob should be cleaned regularly and any food deposits removed.
• Never clean the hob surfaces by steam cleaning.
• The hob ceramic should only be cleaned with warm soapy water, using either a sponge or soft cloth. No abrasive cleaners should be used.
• Any stains that may appear on the hob will have originated from food splashes or spilt food, these splashes occur during the cooking process.
g.3
ICON PURPOSE
ON / OFF
INCREASE SETTING
CHILD LOCK
TIMER SELECTION
DECREASE SETTING
ZONE INDICATOR
INCORRECT POT
BRIDGE SELECTION
These could possibly be a result of the food being cooked at an excessively high temperature or being placed in cookware that is too small.
• You should select a cooking temperature and function that is appropriate for the food that you are cooking. You should also ensure that the food
is placed in an adequately sized dish and that you use the drip tray where appropriate.
PROBLEM SOLUTION NOTE
Everyday soiling on glass:
ngerprints, marks, stains left by
food or non-sugary spills on the
glass.
1. Switch the power to the hob off.
2. Apply a hob cleaner while the
glass is still warm (but not hot!).
3. Rinse and wipe dry with a clean
cloth or paper towel.
4. Switch the power to the hob back
on.
• When the power to the hob is switched off, there will be no ‘hot
surface’ indication but the cooking zone may still be hot! Take
extreme care.
• Heavy-duty scourers, some nylon scourers and harsh/abrasive
cleaning agents may scratch the glass. Always read the label to
check if your cleaner or scourer is suitable.
• Never leave cleaning residue on the hob: the glass may
become stained.
Boilovers, melts, and hot sugary
spills on the glass.
Remove these immediately with a
sh slice, palette knife or razor blade
scraper suitable for ceramic glass
hobs, but beware of hot cooking
zone surfaces:
1. Switch the power to the hob off at
the wall.
2. Hold the blade or utensil at a 30°
angle and scrape the soiling or spill
to a cool area of the hob.
3. Clean the soiling or spill up with a
dish cloth or paper towel.
4. Follow steps above for everyday
soiling on glass.
• Remove stains left by melts and sugary food or spillovers
as soon as possible. If left to cool on the glass, they may be
difcult to remove or even permanently damage the glass
surface.
• Cut hazard: when the safety cover is retracted, the blade in a
scraper is razor-sharp. Use with extreme care and always store
safely and out of reach of children.
Spills on the touch panel. 1. Switch the power to the hob off.
2. Soak up the spill.
3. Wipe the touch control area with a
clean damp sponge or cloth.
4. Wipe the area completely dry with
a paper towel.
5. Switch the power to the hob back
on.
The hob may beep and turn itself off, and the touch controls
may not function while there is liquid on them. Make sure you
wipe the touch control area dry before turning the hob back on.
PROBLEM POSSIBLE CAUSE SOLUTION
The hob cannot be
turned on.
No power. Make sure the hob is connected to the power supply and that it is
switched on.
Check whether there is a power outage in your home or area.
If you’ve checked everything and the problem persists, call a
qualied technician.
The touch controls are
unresponsive.
The controls are locked. Unlock the controls. See Operation section for child lock
instructions.
The touch controls are difcult
to operate.
There may be a slight lm of
Water over the controls or you
May be using the tip of your
Finger when touching the
Controls.
Make sure the touch control area is dry and use the ball of your
nger when touching the controls.
• TROUBLESHOOTING

The glass is being scratched. Rough-edged cookware.
Unsuitable, abrasive scourer or
cleaning products being used.
Use cookware with at and smooth bases. See ‘Choosing the right
cookware’.
See ‘Care and cleaning’.
Some pans make crackling or
clicking noises.
This may be caused by the
Construction of your cookware
(layers of different metals
Vibrating differently).
This is normal for cookware and does not indicate a fault.
The induction hob makes a low
humming noise when used on a
high heat setting.
This is caused by the technology of
induction cooking.
This is normal, but the noise should quieten down or disappear
completely when you decrease the heat setting.
Fan noise coming from the
induction hob.
Acooling fan built into your
Induction hob has come on to
Prevent the electronics from
Overheating. It may continue to run
even after you’ve turned the induction
hob off.
This is normal and needs no action. Do not switch the power to the
induction hob off at the wall while the fan is running.
Pans do not become hot and
appears in the display.
The induction hob cannot
Detect the pan because it is not
suitable for induction cooking.
The induction hob cannot detect the
pan because it is too small for the
cooking zone or not properly centred
on it.
Use cookware suitable for induction cooking. See section
‘Choosing the right cookware’.
Centre the pan and make sure that its base matches the size of
the cooking zone.
The induction hob or a cooking
zone has turned itself off
unexpectedly, a tone sounds
and an error code is displayed
(typically alternating with one or
two digits in the cooking timer
display).
Technical fault. Please note down the error letters and numbers, switch the
power to the induction hob off at the wall, and contact a qualied
technician.
• ERROR CODES
ERROR CODE TYPE OF FAULT SOLUTION
E4/E5 Temperature sensor failure Please contact the supplier
E7/E8 Temperature sensor of the IGBT failure.
E2/E3 Abnormal supply voltage Please inspect whether power supply is normal. Power on after the
power supply is normal.
E6/E9 Bad induction hob heat radiation Please restart after the induction hob cools down.
Dellonda Limited
Kempson Way, Suffolk Business Park, Bury St Edmunds, Suffolk. IP32 7AR
Environment Protection and Waste Protection and Electrical Equipment Regulations (WEEE)
Recycle unwanted packaging materials. When this product is no longer required, or has reached the end of it’s useful life, please dispose of it in
an environmentally friendly way. Drain any fluids (if applicable) into approved containers, in accordance with local waste regulations. Under the
Waste Batteries and Accumulators Regulations 2009, Dellonda would like to inform the user that this product contains one or more batteries. It
is our policy to continually improve products and we reserve the right to alter data, specifications and parts without prior notice. No liability is
accepted for incorrect use of this product. Guarantee is 12 months from purchase date, proof of which is required for any claim.
Information for domestic electric hobs
Model identification
Type of hob
Number of cooking zones and/or
areas
Symbol Value Unit
4 zones
1 area
Heating technology (induction cooking zones
and cooking areas, radiant cooking zones,
solid plates)
For circular cooking zones or area: diameter
of useful surface area per electric heated
cooking zone, rounded to the nearest 5 mm
For non-circular cooking zones or areas:
length and width of useful surface area per
electric heated cooking zone or area,
rounded to the nearest 5 mm
Energy consumption per cooking zone or
area calculated per kg
Energy consumption for the hob calculated
per kg
Ø
L
W
ECelectric cooking
electric hob
EC
cm
cm
Wh/kg
Wh/kg
Electric hobs
187.2
Right down:16.0
Right up:18.0
Left down:191.1
Left up:185.7
Left bridge area:178.7
Right down:190.7
Right up:185.7
Induction
cooking
Left down:18.0
Left up:18.0
Left bridge area:18.0*38.0
DH178
Table of contents
Other dellonda Hob manuals

Popular Hob manuals by other brands


Casselin
Casselin CPAI350K1 manual

Zanussi
Zanussi U31219 ZVM 640 N/X Installation and operating instructions

ROSIERES
ROSIERES RBI647 Instructions for use and installation

Lincat
Lincat Silverlink SLI21 Installation, operating and servicing instructions

AEG
AEG IKE64651FB user manual

Berghoff
Berghoff Tronic Series manual


