dellonda DG101 User manual
Model No. DG101
Thank you for purchasing a Dellonda product. Manufactured to a high standard, this product will,
if used according to these instructions, and properly maintained, give you years of trouble free performance.
www.dellonda.co.uk
Self-Propelled Petrol Lawnmower Grass Cutter
144cc 18”/46cm 4-Stroke Engine
DG101 Issue:2 13/05/2021

Important Information
Please read these instructions carefully. Note the safe operational requirements, warnings & cautions. Use the product correctly and with care
for the purpose for which it is intended. Failure to do so may cause damage and/or personal injury and will invalidate the warranty. Keep these
instructions safe for future use.
Wear
Safety
Footwear
Warning!
Live electrical
parts
Read manual
before use
Warning! Keep
bystanders away
Warning!
Keep away from
moving parts.
Warning!
DO NOT operate
on slopes
Wear ear
protection
Wear protective
clothing
Start/brake lever
Warning!
Ejected objects
Warning!
Keep hands and
feet away from
the blades
Warning!
Hot surfaces
Remove spark
plug connection
before
performing
maintenance
Safety Instructions
9Read and fully understand instruction manual before using the lawnmower. Retain manual for future use and future users.
9Users must be fully trained before using lawnmower.
WARNING! Keep hands and feet away from moving blades. Be aware of the danger of being drawn in by moving parts.
WARNING! Be aware of live electrical parts and hot surfaces.
9Suitable/protective clothing (long trousers) and appropriate PPE must be worn: ear protection, safety, slip resistant footwear.
8DO NOT use whilst tired, ill or under the inuence of alcohol or other drugs.
8DO NOT use indoors or an unventilated area due to danger from exhaust fumes.
9ALWAYS inspect and risk assess the area to be worked prior to mowing. Review for items such as foreign objects (stones, toys, wires
sticks, bones), slope, ditches, drop-os.
8DO NOT use the mower on slopes. Be aware of the risk of overturning on too steep a slope. DO NOT use where the gradient is more
than 20o or motor seizure may occur. Always ‘travel’ along slope contours not up and down slopes.
9ALWAYS inspect the unit prior to use for loose ttings, fatigue and damage.
8DO NOT add fuel while the engine is running or the mower is hot. Only add fuel in a well ventilated location. Remove all sources of
ignition.
9Check oil level before rst/use.
9ALWAYS keep bystanders and pets at a safe distance from the mower when in use.
9Only use the lawnmower when there is good visibility (daylight or good articial light.)
8DO NOT use the mower without either the grass bag or deector tted.
8DO NOT use the mower if there is a risk of lightning.
8DO NOT use in the rain.
8DO NOT leave the mower running without supervision.
9Allow the unit to cool down completely before moving or storing.
9Before carrying out any maintenance or adjustments, turn o the engine and disconnect the spark plug. Ensure all moving parts have
come to a complete standstill and cannot start again unexpectedly.
9Use genuine replacement parts only.
9Keep the lawnmower in good operating condition and perform regular maintenance. Keep lawnmower clean.
9Check for and replace worn or damaged parts.
8DO NOT modify the lawnmower in any way. DO NOT tamper with or modify safety features in any way.
NOTE: This appliance can be used by children aged from 8 years and above and persons with reduced physical, sensory or
mental capabilities or lack of experience and knowledge if they have been given supervision or instruction concerning use of the
appliance in a safe way and understand the hazards involved. Children shall not play with the appliance. Cleaning and
user maintenance shall not be made by children without supervision.
About the Product
Powerful RATO 144cc 4-stroke engine with recoil pull start. Self-propelled drive system reduces fatigue and makes mowing your lawn effortless.
46cm (18”) Cutting width, perfect for accurate and efcient cutting of medium to large gardens. Easy 1-lever height adjustment system with eight
height variations ranging from 25-70mm. Rear discharge with 65L grass collection bag. Soft grip handles for comfort during use and folding
handles for easy storage. Speed control lever.
3
Assembly
Assembling the handle
• NOTE: Carefully unfold the lawnmower handle, taking care not to pinch or damage the lawnmowers control cables.
• Lift the Handle panel (part 13) with cup holder away from the unit and sit on the oor ensuring not to pinch or damage the travel speed cable.
• Identify the control lever assembly Items 1 and 2 from the parts list, refer to the diagram below to on how to rotate and position parts 1.4 and 1.6
together and secure in place with the quick coupler.
• Offer into place the complete handle assembly (without the handle panel 13). We suggest you t the handle onto the outside of the xing position
bracket, line up the holes and pass the 4 bolts through the holes and loosely x the nuts on the inside face (fully tighten all xings at the end of
assembly).
• Once the handle is bolted to the mower lift the handle panel (13) up and place it onto the handle assembly use the screws already in the handle
arms to screw into place, ensure all the cables are free, not obstructed or wrapped around the handle.
• Use the two cable management clips to neatly arrange the control cables onto the handle assembly. Make sure they are not kinked and can all
move freely.
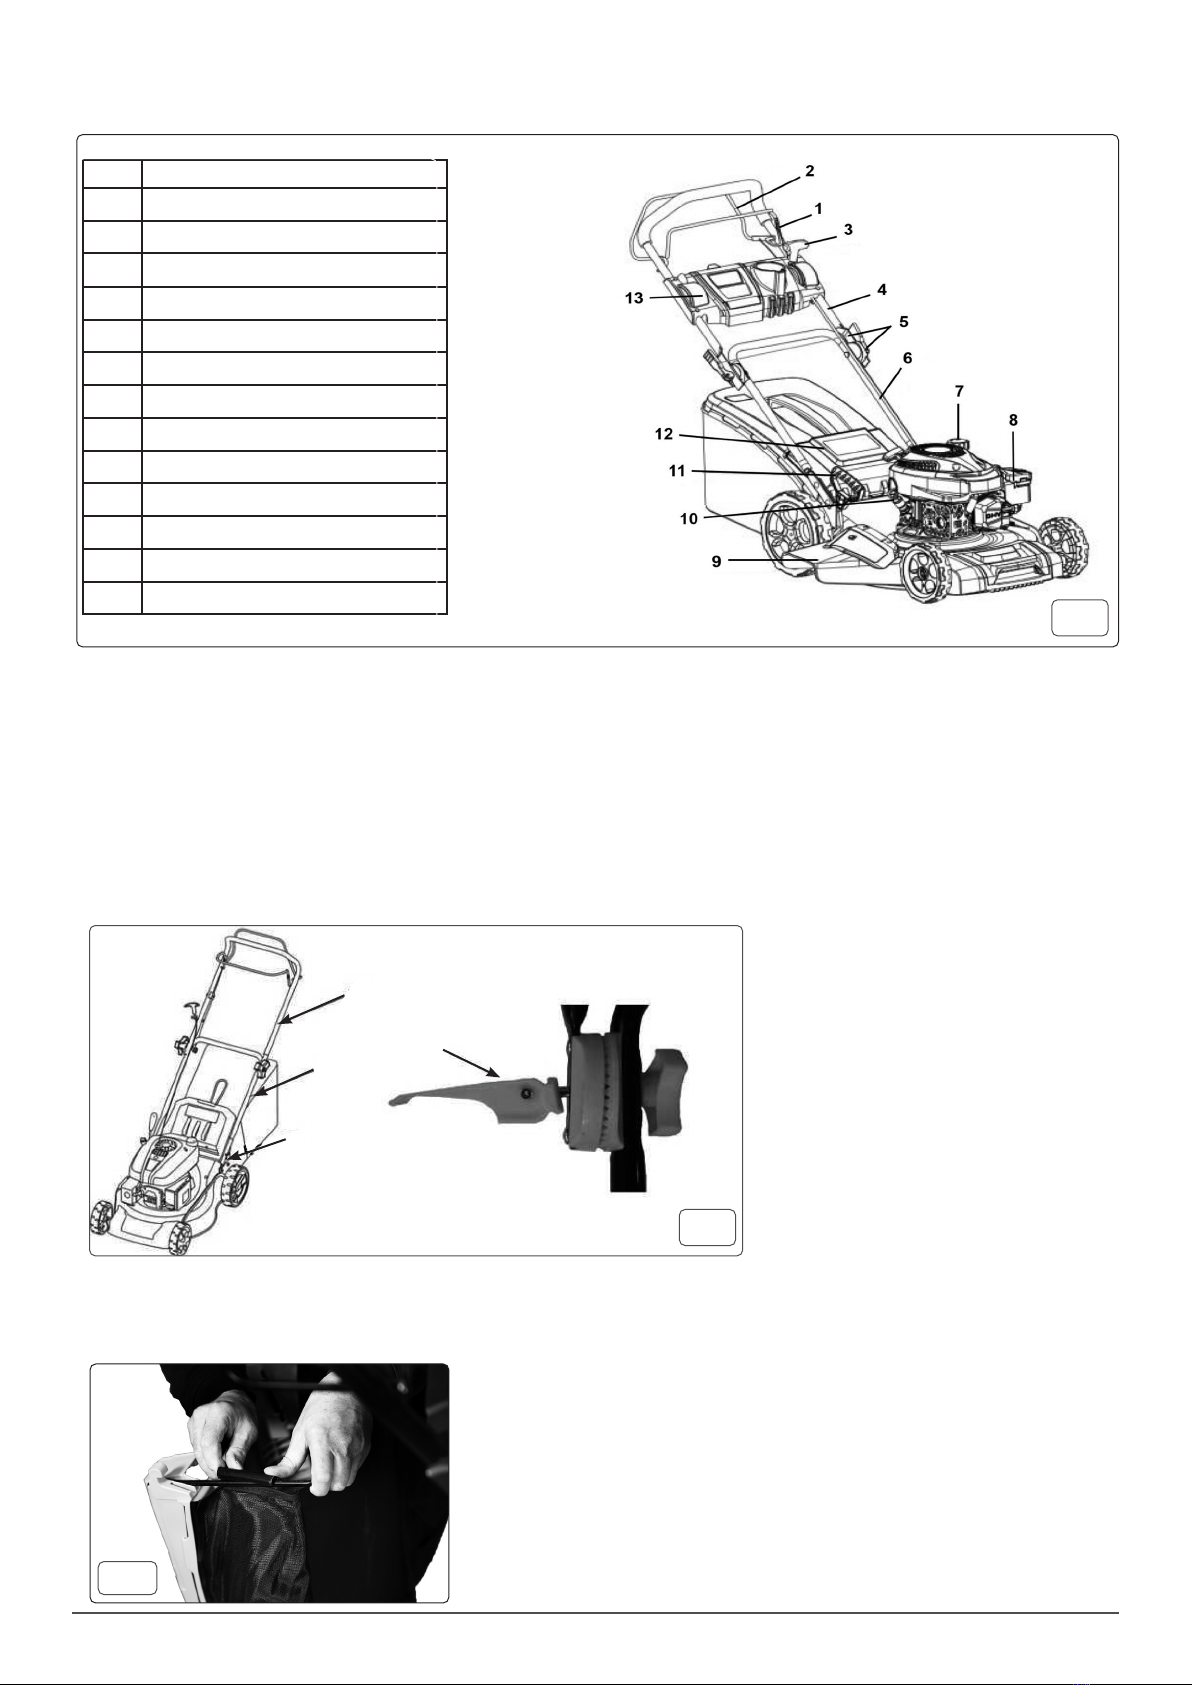
Assembling the Grass Catcher
• Clip the plastic hooks at the end of the textile part of the grass catcher to the metal frame (Fig.3).
• The catcher is tted with a ‘Full’ indicator ap. When the ap on the catcher closes, the bag needs to be emptied.
Item Description
1 Start/ brake lever
2 Travel lever
3 Travel speed control
4 Handle (Top)
5 Handle xing screw with Quick Coupler
6 Handle (Bottom)
7 Fuel tank cap
8 Air lter cover
9 Side deector
10 Cap (c/w Oil dipstick)
11 Height adjustment lever
12 Grass cover for rear deector
13 Handle panel
Fig.1
Fig.1-4
Fig.1-6
Fig.2
1
Fixing position
Fig.3
4
Preparation
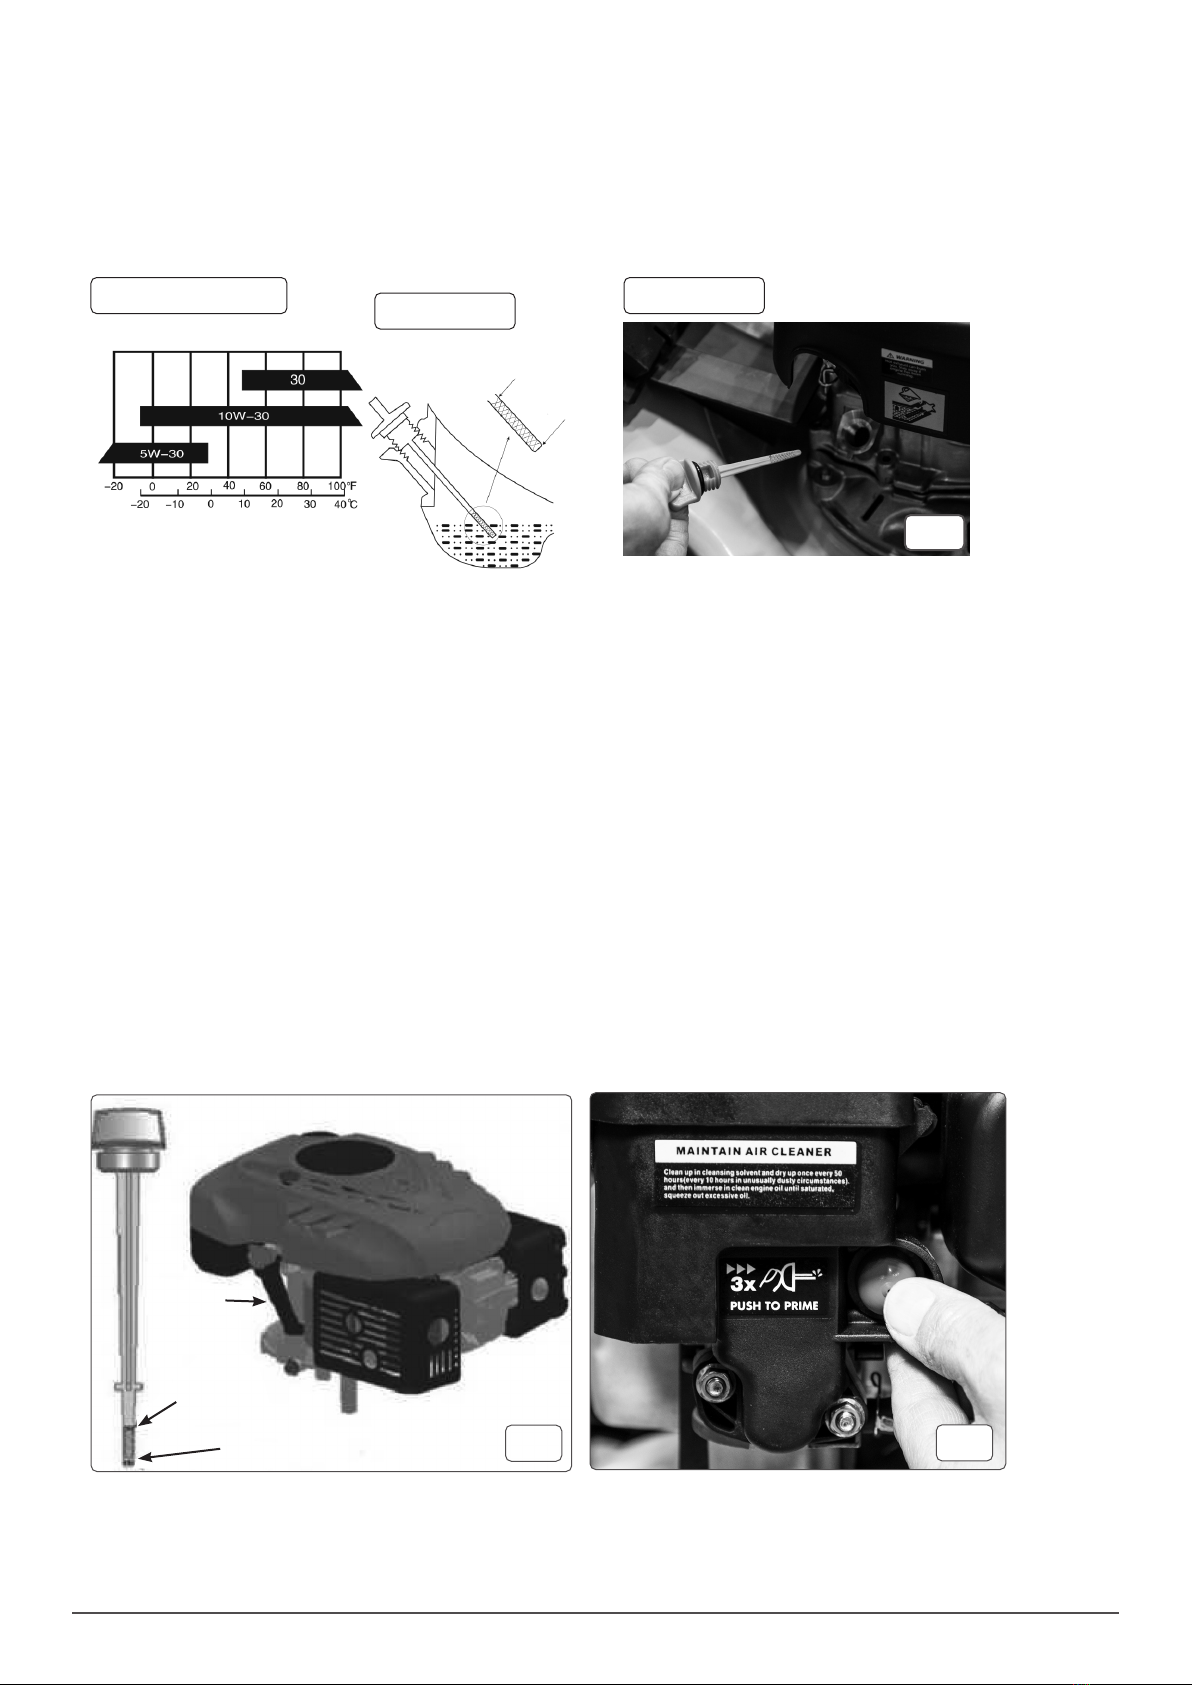
• OIL LEVEL - Note: THE UNIT IS SUPPLIED WITHOUT ENGINE OIL.
• Remove the oil ller cap (Red/Orange) by rotating to the left, Use any good SAE30 or SAE15W-30 oil, try to buy one with and extendible ller
nozzle or use a suitable funnel to avoid spillage. Approximately 350-400ml of oil will be required on rst lling, Constantly check the dipstick until
the correct level is achieved. Screw the dipstick in each time carefully and remove the opposite way, wipe the dipstick clean each time to ensure
an accurate reading. Do not over-ll.
• Before each use, unscrew the dipstick and check oil level. (Fig.1.6, Fig.3). Top up if necessary.
• Markings on the dipstick indicate maximum and minimum oil levels.
• FUEL LEVEL - Note: The unit is supplied without fuel. The tank holds a maximum of 1 litre.
• Recommended fuel is lead free and at least 95 octane.
• WARNING: DO NOT overll the fuel.
• WARNING: DO NOT add fuel when the engine is either running or mower is hot.
Operation/Starting the mower
NOTE: Read and fully understand the safety instructions before using this lawnmower.
• WARNING: Turn mower off before making any adjustment or adding components.
• The throttle lever has two start positions
• COLD ENGINE - Push throttle all the way forward.
• WARM ENGINE - Pull the throttle lever all the way back.
• To start the unit, pull the start/brake lever (Fig.1.1) towards the handle (Fig.1.4) and hold it there to allow the motor to spin.
• When initially starting the unit from cold, prime the unit by depressing the priming bulb three or four times (Fig.5).
• Sharply pull the starter cord to it’s extent and allow it to rewind gently under control. The engine should start after 2-4 pulls.
• To turn the engine off, release the start/brake lever slowly. (Only let go or release quickly in an emergency as this can damage your engine).
• NOTE: The cutting blade may not stop immediately.
• The travel of the unit is controlled by the Travel lever (Fig.1.2). When the lever is pulled toward the handle, the mower will start moving.
• To stop the forward motion of the mower, release the Travel lever.
• The speed of travel of the mower is controlled by the ‘T’ shift lever (Fig.1.3). Fully back is slowest speed, fully forward is fastest.
• NOTE: Only move the Travel Speed Control lever when the engine is running.
Fig.4
Fig.1-10
Min
Max
Fig.5
SAE Oil recommendation Oil level reading
Oil ller location
Fig.3

5
• To adjust the height of cut, use lever (Fig.1.11). There are 8 set positions for the lever giving a range of cut heights from 25 to 70 mm.
• The mower can be used for a number of applications e.g. mowing with grass collection, with rear discharge, side discharge or mulching.
• When the grass catcher is tted, grass clippings are discharged into it. When full, the ap will close.
• Without the grass catcher installed, the grass catcher cover serves as a deector that directs the movement of the grass clippings towards the
ground. A row of grass clippings is thereby formed behind the lawnmower.
• When side discharge is required, ensure the engine is turned off before attaching the side discharge deector. Lift the side discharge cover and
attach side discharge deector (Fig. 6). To mow with side discharge, it is necessary to install the mulching plug into rear discharge chute (Fig. 7).
• When mulching is required, ensure the engine is turned off before installing the plug (Fig.7)
• To adjust the height of cut, use lever (Fig.1.11). There are 8 set positions for the lever giving a range of cut heights from 25 to 70 mm.
Maintenance
DO NOT attempt any cleaning or maintenance without having disconnected the spark plug.
• Allow the engine to cool before attempting any cleaning or maintenance.
• Regular maintenance will increase the life of your unit.
• After each use and before stowage, wipe off and dry all outer surfaces.
• Clean the air lter regularly. Unclip the air lter cover (g.1.8) and remove any debris from the foam lter.
• To change the motor oil, with suitable receptacle in place, remove dip stick (Fig.1.10) and tilt the unit to fully drain it. Replace the dip stick after
draining and rell as described in the Preparation section and FWig.3. DO NOT overll. Start the engine and run for a short time. Stop the engine
and after 1 minute, measure the oil level. Add oil if required.
• NOTE: Drain oil before removing the blade.
• When removing the blade, wear safety gloves to avoid personal harm.
• To remove blade (Fig. 8), hold blade rmly with one gloved hand to prevent it rotating and use suitable spanner to undo the nut. NOTE: Take care
to not lose the woodruff key. When replacing the blade, tighten to 40 Nm.
Fig.8
Fig.6 Fig.7

Specication
Dellonda Limited
Kempson Way, Suffolk Business Park, Bury St Edmunds, Suffolk. IP32 7AR
Environment Protection and Waste Protection and Electrical Equipment Regulations (WEEE)
Recycle unwanted packaging materials. When this product is no longer required, or has reached the end of it’s useful life, please dispose of
it in an environmentally friendly way. Drain any fluids (if applicable) into approved containers, in accordance with local waste regulations.
It is our policy to continually improve products and we reserve the right to alter data, specifications and parts without prior notice. No
liability is accepted for incorrect use of this product. Guarantee is 12 months from purchase date, proof of which is required for any claim.
Attribute Value
Power Source Petrol
Type Push Lawn Mower
Propulsion Type Self Propelled
Engine Type 4 Stroke
Engine Size 144cc
Engine Speed 2800rpm
Rated Power 2.5kW
Emissions Rating 75/95dB(A)
Vibration Rating 4.8 m/s2 / 2.4 m/s2
Petrol Tank Volume 1L
Grass Collection Volume 65L
Blade Style Rotary
Cutting Width 46cm/18”
Height Adjustment 25-70mm
Table of contents
Other dellonda Lawn Mower manuals


