DELTA DORE TYXIA 4940 User manual
>3s
www.deltadore.com
ÀHalogène 230V ou incandescente 230V / 230 V halogen or 230 V incandescent bulbs
ÁFluocompacte 230V à économie d’énergie / 230V energy-saving compact fluorescent bulbs
ÂAmpoule LED 230V / 230V LED bulbs
ÃHalogène ou LED 12V TBT avec transformateur électronique AC ou DC / Very low voltage 12V halogen
or LED bulbs with AC or DC electronic transformer
ÄHalogène 12V TBT avec transformateur ferromagnétique ou torique / Very low voltage 12V halogen
bulbs with ferromagnetic or toroidal transformer
Raccordement / Connection / Anschließen / Collegamento /
Conexión /Podłączenie / Aansluiting
Recommandations / Recommendations / Empfehlungen / Raccomandazioni /
Recomendaciones / Zalecenia / Aanbevelingen
32
FR Notice d’installation
EN Installation guide
DE Installationsanleitung
IT Guida di installazione
ES Manual de instalación
PL Instrukcja instalacji
NL Installatiehandleiding
Module de tableau variateur d’éclairage
Lighting dimmer control panel module
Beleuchtungsmodul für Stromkästen
Modulo del quadro variatore di illuminazione
Módulo de cuadro regulador de iluminación
Moduł tablicowy z regulatorem oświetlenia
Module voor paneel van dimmer
Fonctionnement /Operation / Funktionsweise / Funzionamento / Funcionamiento / Działanie / Werking
N L
A B C
Voyant
LED
Kontrollleuchte
Spia
Testigo
Lampka sygnalizacyjna
Lampje
Test
Prueba
A
B
TYXIA
2600
Commande filaire locale /
Local hard-wired control /
Lokaler Schaltereingang /
Comando filare locale /
Mando filar local /
Lokalne sterowanie
kablowe /
Lokale bedrade bediening
Emetteurs radio / Wireless transmitters / Funksender /
Emettitori radio / Emisores radio / Nadajniki radiowe /
Draadloze zenders
4
FR
Commande éclairage
EN
Lighting control
DE
Beleuchtungssteuerung
IT
Comando illuminazione
ES
Control iluminación
PL
Sterowanie oświetleniem
NL
Bediening verlichting
FR
Réglage variation (X%)
EN
Dimming setting (X%)
DE
Einstellung Dimmer (X %)
IT
Regolazione variazione (X%)
ES
Ajuste de la regulación (X %)
PL
Regulacja natężenia (X%)
NL
Dimregeling (X%)
4 4
4 4
4
(0 -> X%)
-
Commander des lampes fluocompactes / Controlling compact fluorescent lights / Kompaktleuchtstofflampen steuern / Comandare le lampade fluocompatte / Controlar
bombillas fluocompactas / Sterowanie świetlówkami kompaktowymi / Fluocompactlampen bedienen
5
N
L
10 A
B
A
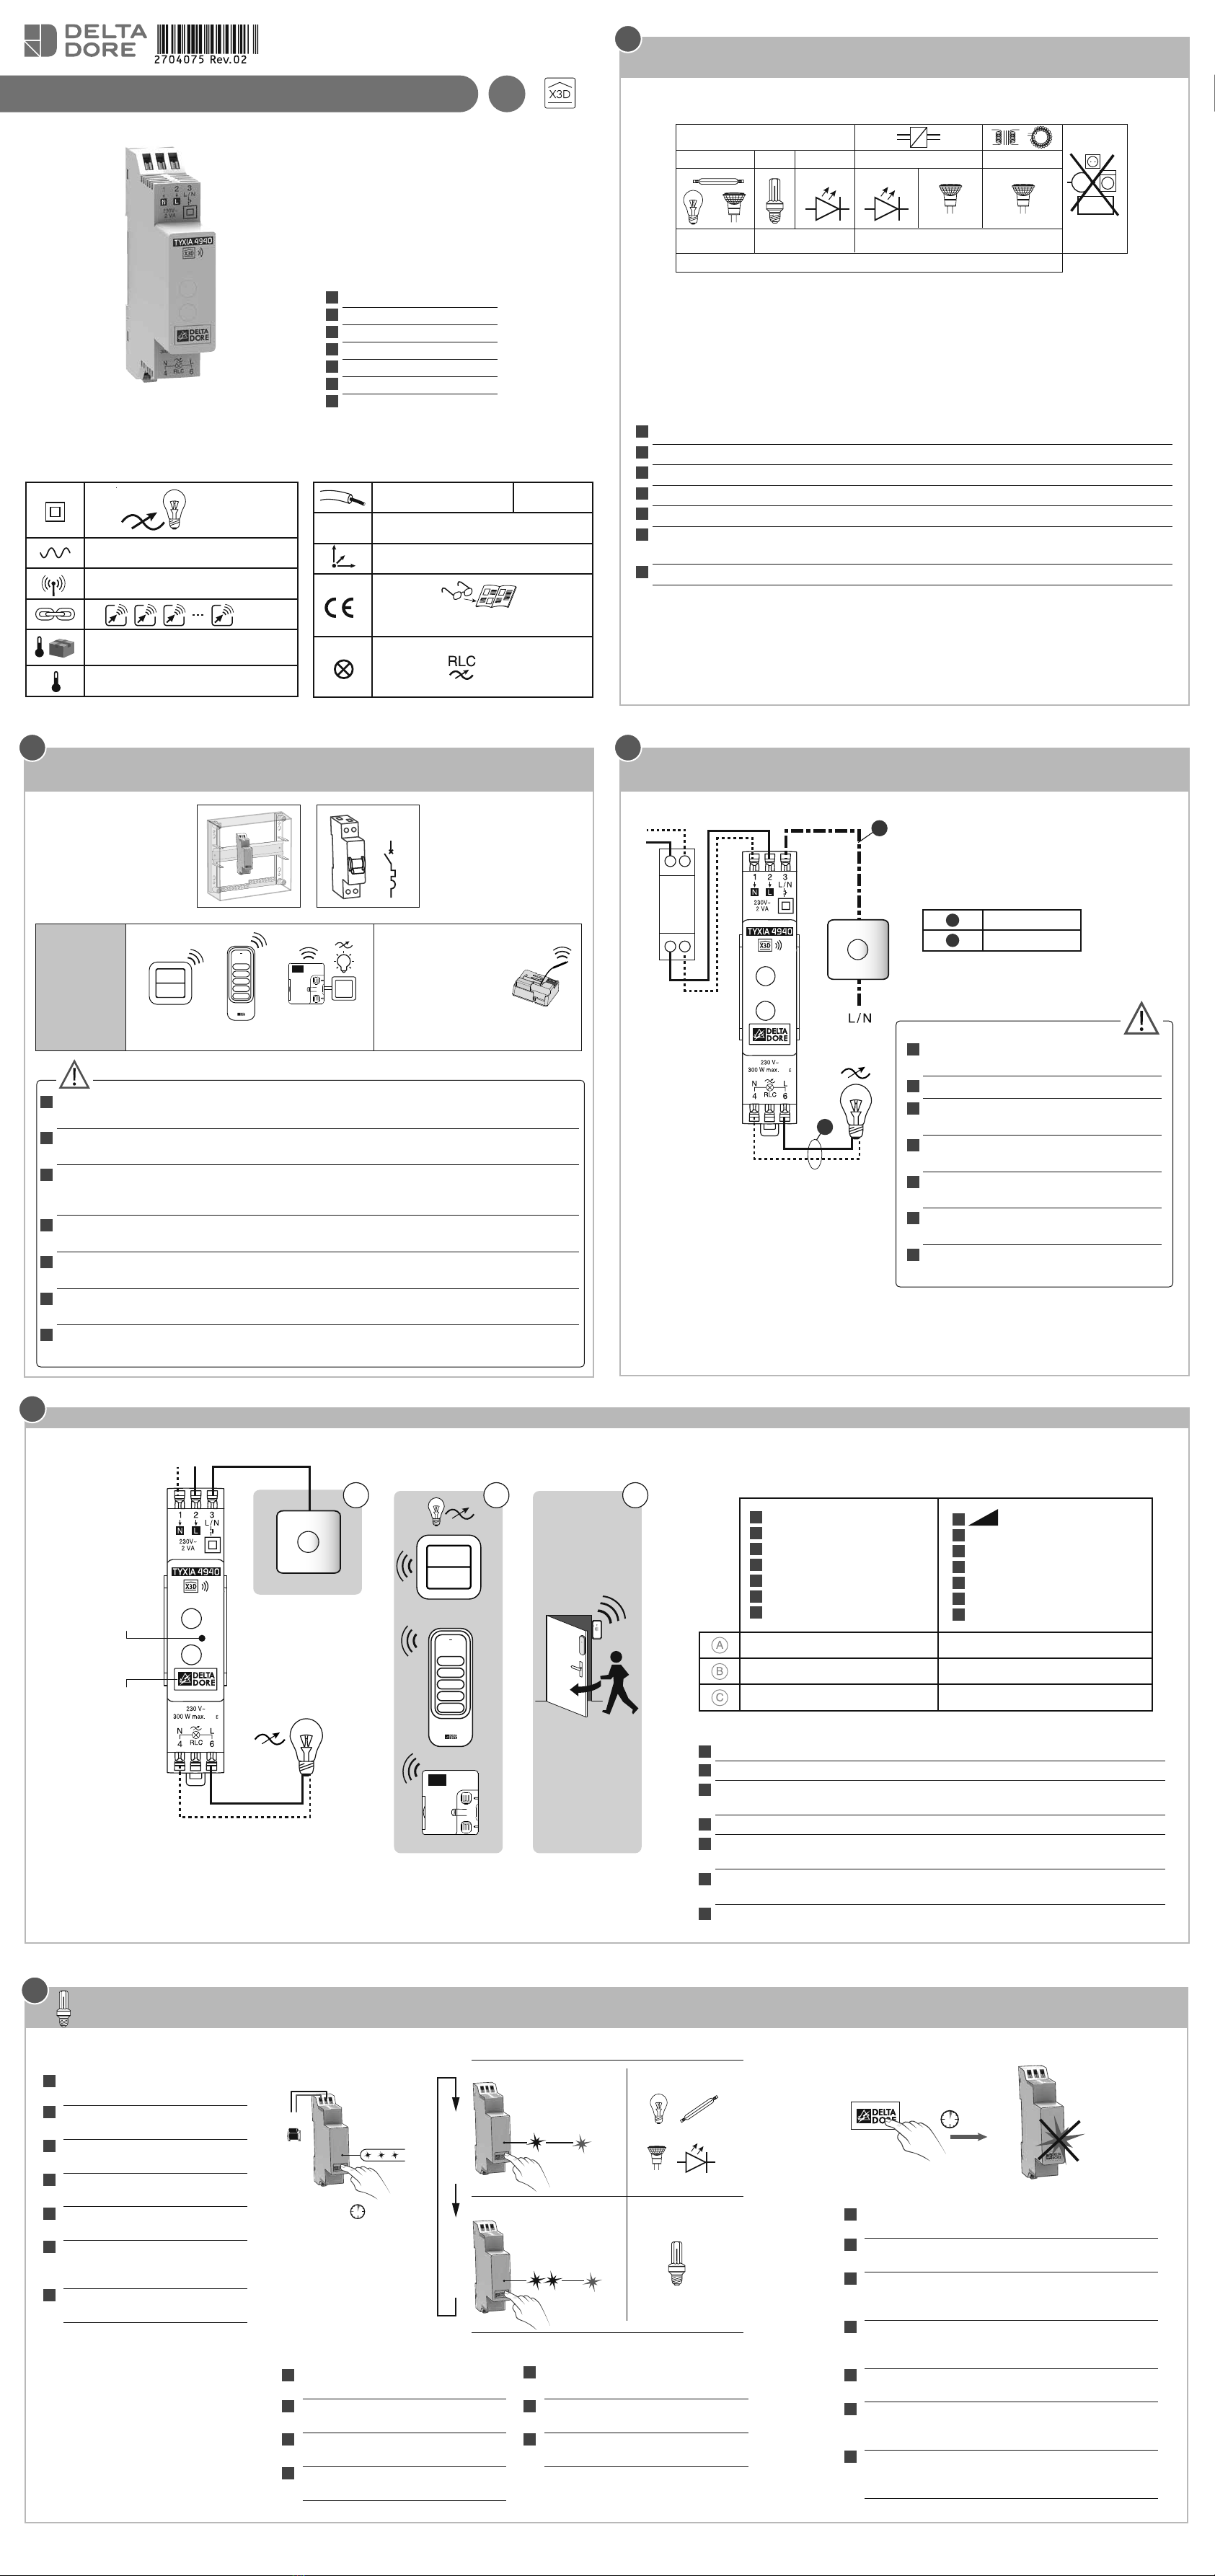
FR Ne pas mettre sous tension avant d’avoir
raccordé la charge.
EN Do not switch on before connecting the load.
DE Nicht unter Spannung setzen, bevor die Last
angeschlossen ist.
IT Non mettere sotto tensione prima di avere
collegato il carico.
ES No encender antes de haber conectado la
carga.
PL Nie podłączać do prądu przed podłączeniem
obciążenia.
NL Niet onder spanning plaatsen voordat de
belasting werd aangesloten.
FR
Installer cet appareil en armoire électrique non métallique. Coupe circuit 10A obligatoire.
Eloigner au maximum ce produit d’autres appareils générant de fortes interférences électriques.
EN
Install this unit in a non metallic electrical cabinet. 10A circuit breaker required.
Position this product as far away as possible from other units that generate strong electrical interference.
DE
Dieses Modul eignet sich ausschließlich für nicht metallische Stromkästen. 10A-Schutzschalter absolut
nötig. Das Modul so weit wie nur möglich von anderen Geräten fernhalten, die starke elektrische
Interferenzen erzeugen.
IT
Installare questo apparecchio in un armadio elettrico non metallico. Valvola fusibile 10A obbligatoria.
Allontanare al massimo questo prodotto da altri apparecchi che generano forti interferenze elettriche.
ES
Instalar este dispositivo en un cuadro eléctrico no metálico. Cortacircuitos 10A obligatorio.
Alejar al máximo este producto de otros dispositivos que generen fuertes interferencias eléctricas.
PL
Zainstalować urządzenie w szae elektrycznej niemetalowej. Wymagany automatyczny wyłącznik 10A.
Odsunąć urządzenie jak najdalej od innych urządzeń generujących silne zakłócenia elektryczne.
NL
Installeer dit apparaat in een niet-metalen schakelkast. Zekering van 10A verplicht.
Houd dit prouct zo ver mogelijk van andere producten die elektrische interferentie genereren.
Compatibilité / Compatibility / Kompatibilität / Compatibilità / Compatibilidad /
Kompatybilność / Compatibiliteit
1
300 W max
Mini 5 W
200 W max
LEDLED M
Hi-Fi
230 V~, 50 Hz
À Á Â Ã Ä
100 W max
FR Vérifiez que votre éclairage est adapté à la variation (dimmable, «gradable», variable).
EN Make sure that your lighting is compatible with the dimming system (dimmable, gradable, variable)
DE Vergewissern Sie sich, dass Ihre Beleuchtung für Dimmer geeignet ist (dimmbar, „gradable”).
IT Verificate che la vostra illuminazione sia adatta alla variazione (dimmerabile, “graduabile”, variabile).
ES Compruebe en las características del fabricante de la iluminación, que ésta, es regulable
PL Sprawdź, czy można zastosować ściemnianie do twojego oświetlenia (regulacja natężenia światła,
opcja ściemniania, regulacji światła).
NL Controleer of de verlichting geschikt is om te worden gedimd (dimmable, dimbaar).
8 ampoules max. / 8 light bulbs max. / 8 Lampen max. / max. 8 lampadine /
8 bombillas como máximo. / Maks. 8 żarówek / Maximaal 8 lampen
TYXIA 2310 TYXIA 17xx ERX x000TYXIA 2600
10 A
A
B
TYXIA
2600
1
FR Voyant vert : Sortie OFF / Voyant rouge : Sortie ON / Voyant éteint : Pas d’alimentation
EN Green LED: Output OFF/Red LED: Output ON/LED is switched off: No power supply
DE Grüne Kontrollleuchte: Ausgang OFF/Kontrollleuchte rot: Ausgang ON/Kontrollleuchte
aus: Keine Spannungsversorgung
IT Spia verde: Uscita OFF / Spia rossa: Uscita ON / Spia spenta: Assenza di alimentazione
ES Testigo verde: Salida OFF / Testigo rojo: Salida ON / Testigo apagado: Ausencia de
alimentación
PL Zielona lampka sygnalizacyjna: Wyjście OFF / Lampka sygnalizacyjna pali się na
czerwono: Wyjście ON / Lampka sygnalizacyjna zgaszona: Brak zasilania
NL Groen lampje: OFF-uitgang / Rood lampje: On-uitgang / Lampje gedoofd: Geen voeding
Répéteur / Repeater /
Repeater / Ripetitore /
Repetidor / Przekaźnik /
Herhaler
Compatible /
Compatible /
Kompatibilität /
Compatibile /
Compatible /
Kompatybilne /
Compatibel
230 V~ (L + N)
230 V~, 50 Hz - 2 VA
868 MHz (EN 300 220) 100 m
16 max.
-10°C / +70°C
-10°C / +40°C
1,5 mm2100 m Max.
IP IP 30
1 module 11 x 90 x 71 mm
Important product information (Ê Ë)
230 V~
Longueur maximale / Maximum length /
Maximale Länge / Lunghezza massima /
Longitud máxima / Długość maksymalna /
Maximale lengte
A100 m max
B100 m max
FR Appuyez 3 secondes sur la touche
jusqu’à ce que le voyant clignote.
EN Press the button for 3 seconds
until the LED flashes.
DE Drücken Sie 3 Sekunden die Taste,
bis die Kontrollleuchte blinkt.
IT Premete per 3 secondi il tasto
fino a quando la spia lampeggia.
ES Pulse durante 3 segundos la tecla
hasta que el testigo parpadee.
PL Nacisnąć przycisk na 3 sekundy do
chwili, gdy lampka sygnalizacyjna
zacznie migać.
NL Druk gedurende 3 seconden op de
toets tot het lampje knippert.
FR Appuyez brièvement sur la touche pour
changer de mode.
EN Briefly press the button to change
mode.
DE Drücken Sie kurz die Taste, um den
Modus zu wechseln.
IT Premete brevemente il tasto per
cambiare modalità.
ES Pulse brevemente la tecla para cambiar
de modo.
PL Nacisnąć na krótko przycisk, aby
zmienić tryb.
NL Druk kort op de toets om de modus te
wijzigen.
FR Appuyez 3 secondes sur la touche jusqu’à ce que le
voyant cesse de clignoter pour valider et sortir du mode.
EN Press the button for 3 seconds until the LED stops
flashing to confirm and exit the mode.
DE Drücken Sie 3 Sekunden die Taste, bis die Kontrollleuchte
nicht mehr blinkt, um zu bestätigen und den Modus zu
verlassen.
IT Premete per 3 secondi il tasto fino a quando la spia
smette di lampeggiare per confermare e uscire dalla
modalità.
ES Pulse durante 3 segundos la tecla hasta que el testigo
deje de parpadear para validar y salir del modo.
PL Nacisnąć przycisk na 3 sekundy do chwili, gdy lampka
sygnalizacyjna przestanie migać, aby zatwierdzić i wyjść
z trybu.
NL Houd de toets 3 seconden ingedrukt totdat het lampje
stopt met knipperen om te bevestigen en de modus te
verlaten.
Ê
...
ON
230V~
50 Hz
>3s
A
B
Green Green
Red
1x
2x
...
Green
Red
... ... ...
ÊË
Ë
Ì
Ì
Ë
TYXIA 4940

10s3s 7s
RESET OK
OFF
... ... ... .. .. .... .. ..
>20s
Green
> 10s
1 2 3
OK
3s
7s
... ... ...
OFF
.. .. .... .. ..
Green
>3s
>3s
1
2
1 2
ON
230V~
50 Hz
OK
3
>3s
>3s >3s
... ... ... 1
2
OFF
Min.
0%
100%
Max.
1 2 3 4
ON
230V~
50 Hz
>3s >3s
... ... ...
OFF
Min.
0%
100%
Max.
1
23
ON
230V~
50 Hz
>3s
>3s
... ... ...
OFF
1
2
Exemple 1 / Example 1 / Beispiel 1 /
Esempio 1 / Ejemplo 1 / przykład 1 /
Voorbeeld 1
Exemple 2 / Example 2 / Beispiel 2 /
Esempio 2 / Ejemplo 2 / przykład 2 /
Voorbeeld 2
Association / Association / Einlernen / Associazione / Asociación / Przypisanie / Koppeling
FR Ê Mettez l’installation sous tension. Appuyez 3 secondes
sur la touche du récepteur jusqu’à ce que son voyant clignote. Relâchez.
EN ÊSwitch on the installation. Press the receiver button for 3 seconds until
its LED flashes. Release
DE ÊSetzen Sie die Anlage unter Spannung. Drücken Sie 3 Sekunden lang
auf die Taste des Empfängers, bis dessen Kontrolllampe blinkt. Lassen
Sie die Taste los.
IT ÊMettete l’installazione sotto tensione. Premete per 3 secondi il tasto del
ricevitore fino a quando la sua spia lampeggia. Rilasciate
ES ÊConecte la alimentación. Pulse 3 segundos la tecla del receptor hasta el
testigo parpadee. Deje de pulsar.
PL ÊPodłącz instalację do prądu. Przez 3 sekundy przytrzymaj naciśnięty
przycisk na odbiorniku, aż do mignięcia lampki na nim. Puść.
NL ÊZet de installatie onder spanning. Druk gedurende 3 seconden op de
toets van de ontvanger tot het lampje knippert. Laat de toets los.
ËSur l’émetteur, envoyez l’ordre d’association
(voir sa notice).
ËSend the association command to the transmitter
(refer to the user guide).
ËGeben Sie über den Sender die Zuordnungsanweisung
(siehe entsprechende Anleitung).
ËSull’emettitore, inviate l’ordine di associazione
(vedere le relative istruzioni).
ËEn el emisor, envíe la orden de asociación
(ver las instrucciones).
Ë Wyślij polecenie przypisania z nadajnika
(patrz instrukcja nadajnika).
ËVerstuur het verbindingscommando op de zender
(zie handleiding).
Ì Vérifiez que le voyant du
récepteur ne clignote plus. Les produits sont associés.
ÌMake sure that the receiver LED has stopped flashing.
The products are associated.
ÌAchten Sie darauf, dass die Kontrollleuchte am Empfänger jetzt
nicht mehr blinkt. Die Geräte sind nun miteinander verbunden.
ÌVerificate che la spia del ricevitore non lampeggi più.
I prodotti sono associati.
ÌCompruebe que el testigo del receptor haya dejado de parpa-
dear. Los productos se asocian.
Ì Sprawdź, czy lampka na odbiorniku przestała migać.
Produkty zostały przypisane.
ÌControleer of het controlelampje van de ontvanger niet meer
knippert. De producten zijn met elkaar verbonden.
Exemple / Example /
Beispiel / Esempio /
Ejemplo / przykład /
Voorbeeld
FR Maintenez appuyé 20 secondes :
- après 3 secondes, le voyant clignote lentement.
- après 7 secondes, le voyant clignote rapidement.
Maintenez l’appui jusqu’à ce que le voyant s’éteigne. Relâchez.
EN Press and hold for 20 seconds:
- after 3 seconds, the LED flashes slowly.
- after 7 seconds, the LED flashes quickly.
Press and hold the button until the LED goes out. Release.
DE Halten Sie die Taste 20 Sekunden lang gedrückt:
- Nach 3 Sekunden blinkt die Kontrollleuchte langsam.
- Nach 7 Sekunden blinkt die Kontrollleuchte schnell.
Halten Sie die Taste so lange gedrückt, bis die Kontrollleuchte ausgeht. Lassen
Sie die Taste los.
IT Mantenete premuto per 20 secondi:
- dopo 3 secondi, la spia lampeggia lentamente.
- dopo 7 secondi, la spia lampeggia rapidamente.
Mantenete la pressione fino a quando la spia si spegne. Rilasciate.
ES Mantenga pulsado 20 segundos:
- después de 3 segundos, el testigo parpadea lentamente.
- después de 7 segundos, el testigo parpadea rápidamente.
Mantenga pulsado hasta que el indicador se apague. Deje de pulsar.
PL Przytrzymaj naciśnięty przez 20 sekund:
- po 3 sekundach lampka miga wolno.
- po 7 sekundach lampka miga szybko.
Przytrzymać naciśnięty przycisk aż do zgaśnięcia lampki. Puść.
NL Houd 20 seconden ingedrukt:
- na 3 seconden knippert het controlelampje langzaam.
- na 7 seconden knippert het controlelampje snel.
Houd de toets ingedrukt tot het controlelampje uitgaat. Laat de toets los.
Effacer toutes les associations / Remove all associations / Alle
Zuordnungen löschen / Cancellare tutte le associazioni / Borrar
todas las asociaciones / Usuwanie wszystkich przypisań /
Alle koppelingen wissen
10
Effacer une association / Remove an association / Zuordnung löschen / Cancellare un’associazione /
Borrar una asociación / Usuwanie przypisania / Een koppeling verwijderen
FR Ê Maintenez appuyé 10 secondes :
- après 3 secondes, le voyant clignote
lentement.
- après 7 secondes, le voyant clignote
rapidement. Relâchez.
EN Ê Press and hold for 10 seconds:
- after 3 seconds, the LED flashes slowly.
- after 7 seconds, the LED flashes quickly.
Release.
DE ÊHalten Sie die Taste 10 Sekunden lang
gedrückt:
- Nach 3 Sekunden blinkt die Kontrollleuchte
langsam.
- Nach 7 Sekunden blinkt die Kontrollleuchte
schnell. Lassen Sie die Taste los.
IT ÊMantenete premuto per 10 secondi:
- dopo 3 secondi, la spia lampeggia
lentamente.
- dopo 7 secondi, la spia lampeggia
rapidamente. Rilasciate.
ES Ê Mantenga pulsado 10 segundos:
- después de 3 segundos, el testigo
parpadea lentamente.
- después de 7 segundos, el testigo
parpadea rápidamente. Deje de pulsar.
PL Ê Przytrzymaj naciśnięty przez 10 sekund:
- po 3 sekundach lampka miga wolno.
- po 7 sekundach lampka miga szybko.
Puść.
NL ÊHoud 10 seconden ingedrukt:
- na 3 seconden knippert het controlelampje
langzaam.
- na 7 seconden knippert het controlelampje
snel. Laat de toets los.
ËValidez sur l’émetteur
(voir sa notice).
ËConfirm on the transmitter (refer
to the user guide).
ËBestätigen Sie am Sender (siehe
entsprechende Anleitung).
Ë Confermate sull’emettitore (ve-
dere le relative istruzioni).
Ë Valide en el emisor
(ver las instrucciones).
Ë Zatwierdź na nadajniku
(patrz jego instrukcja).
ËBevestig op de zender
(zie handleiding).
Ì Vérifiez que le voyant du
récepteur ne clignote plus.
Les produits ne sont plus associés.
ÌMake sure that the receiver LED
has stopped flashing. The products
are no longer associated.
ÌAchten Sie darauf, dass die
Kontrollleuchte am Empfänger
jetzt nicht mehr blinkt. Die Geräte
sind nun nicht mehr miteinander
verbunden.
Ì Verificate che la spia del
ricevitore non lampeggi più. I pro-
dotti non sono più associati.
Ì Compruebe que el testigo del
receptor haya dejado de parpa-
dear. Los productos ya no están
asociados.
Ì Sprawdź, czy lampka na
odbiorniku przestała migać. Pro-
dukty nie są już przypisane.
Ì Controleer of het controlelampje
van de ontvanger niet meer knip-
pert. De producten zijn niet langer
met elkaar verbonden.
9
Réglage des valeurs Min. et Max. de la plage de variation / Setting the Min. and Max. dimming range values /
Einstellung der Unter- und Obergrenze des Dimmbereichs / Regolazione dei valori Min. e Max. dell’intervallo di
variazione / Ajuste de los valores mín. y máx. del intervalo de regulación / Ustawienie wartości min i max dla
zakresu ściemniania / Instellen van de min. en max. waarden van het dimbereik
Test / Prueba /
FR ÊAppuyez 3 secondes sur la
touche du récepteur jusqu’à
ce que son voyant clignote.
Relâchez.
EN ÊPress the receiver button for
3 seconds until its LED
flashes. Release.
DE ÊDrücken Sie 3 Sekunden
lang auf die Taste des
Empfängers, bis dessen
Kontrolllampe blinkt. Lassen
Sie die Taste los.
IT ÊPremete per 3 secondi il
tasto del ricevitore fino a
quando la sua spia lampeg-
gia. Rilasciate.
ES ÊPulse 3 segundos la tecla
del receptor hasta el testigo
parpadee. Deje de pulsar.
PL ÊPrzez 3 sekundy przytrzymaj
naciśnięty przycisk na
odbiorniku, aż do mignięcia
lampki na nim. Puść.
NL ÊDruk gedurende 3 seconden
op de toets van de ontvanger
tot het lampje knippert. Laat
de toets los.
ËPar appui prolongé sur le bouton
poussoir de la commande filaire
locale, réglez le nouveau seuil
Min. ou Max.
ËSet the new Min. and Max. limit
values by pressing and holding the
push button.
ËStellen Sie die neue Unter- bzw.
Obergrenze durch längere Betä-
tigung der Drucktaste am lokalen
kabelgebundenen Schalter ein.
ËEffettuando una pressione prol-
ungata del pulsante del comando
filare locale, regolate la nuova
soglia Min. o Max.
ËAl dejar de pulsar la tecla del
control filar local, ajuste el nuevo
umbral mín. o máx.
Ë Naciskając dłużej przycisk
lokalnego sterowania ustaw nowy
próg min i max.
ËStel de nieuwe min. of max. grens
in door lang op de drukknop
van de lokale draadbediening te
drukken.
Ì Enregistrez le seuil en appuyant
3 secondes sur la touche du
récepteur jusqu’à ce que son
voyant ne clignote plus.
ÌPress the receiver button for 3 se-
conds until its LED stops flashing
to record the limit values.
ÌDrücken Sie zur Speicherung des
neuen Werts 3 Sekunden lang
auf die Taste des Empfängers, bis
dessen Kontrolllampe nicht mehr
blinkt.
ÌRegistrate la soglia premendo
per 3 secondi il tasto del ricevi-
tore fino a quando la sua spia
non lampeggia più.
ÌGuarde el umbral pulsando 3
segundos la tecla del receptor
hasta que el testigo deje de
parpadear.
Ì Zapisz próg przytrzymując
naciśnięty przez 3 sekundy pr-
zycisk na odbiorniku, aż lampka
na nim przestanie migać.
Ì Registreer de grenswaarde
door gedurende 3 seconden op
de toets van de ontvanger te
drukken tot het lampje niet meer
knippert.
Utilisation /Use/ Einsatz/ Utilizzo/ Utilización/ Zastosowanie/ Gebruik
11
5s
X%
0% x%
Appui maintenu / Press and hold /
Langer Tastendruck / Pressione mantenuta
/ Pulsación larga / Przytrzymać przez /
Ingedrukt houden
5s
X%
0% 0%
Appui bref / Briefly pressing /
Kurzer Tastendruck / Pressione breve /
Pulsación corta / Nacisnąć krótko /
Kort indrukken
5s
X%
0% 100%
0 -> X% -> 0 0 -> X% -> 100%
FR Commande de l’éclairage / EN Lighting control / DE Beleuchtungssteuerung / IT Comando dell’illuminazione /
ES Control de la iluminación / PL Sterowanie oświetleniem / NL Bediening van de verlichting
Ì Recommencez les opéra-
tions pour l’un et l’autre des
réglages (Min. et Max.).
ÌRepeat the operations for
each of the settings (Min.
and Max.).
ÌWiederholen Sie den Vor-
gang für den zweiten Wert
(Ober- und Untergrenze).
ÌRicominciate le operazioni
per entrambe le regolazioni
(Min. e Max.).
ÌRepita los pasos para am-
bos ajustes
(mín. y máx.).
Ì Powtórz czynności dla
poszczególnych ustawień(-
min i max).
Ì Voer de handeling nogmaals
uit voor de andere instelling
(min. en max.).
6
7 8
Appui bref / Briefly pressing /
Kurzer Tastendruck / Pressione breve /
Pulsación corta / Nacisnąć krótko /
Kort indrukken
FR Réglage de la variation (X%) / EN Setting the dimming (X%) /
DE Einstellung des Dimmers (X %)/
IT Regolazione della variazione (X%) /
ES Ajuste de la regulación (X %) /
PL Regulacja natężenia (X%) / NL Dimregeling (X%)
0% 100%50%
Green
Green
FR Appuyez brièvement sur la touche.
EN Briefly press the button.
DE Drücken Sie kurz die Taste.
IT Premete brevemente il tasto.
ES Pulse brevemente la tecla.
PL Nacisnąć na krótko przycisk.
NL Druk kort op de toets.
Table of contents


