DELTA P VR3 User manual

OperatorsManual
Warning!
Failure to read and understand this instruction manual in full may result
in mis-use of the equipment, injury or even death.
Multi gas, multi mode
decompression computer

Copyright Delta P Technology Ltd.2006V5.0
Software Upgrades
Visit www.vr3.co.uk for information on recent
software upgrades which may supersede
certain sections of this manual
Warning!
The is an aid to air and mixed gas open and
closed circuit diving. When undertaking any form of diving,
divers should always carry backup tables and depth/time
instrumentation in case of equipment failure.
VR3
02
Cover image photo © Leigh Bishop
Please check
for updates to
this manual on our
website at
www.vr3.co.uk
Want to know how to install your PIN (s)? See Page 33, (Pin Num screen)
It is highly recommended that you take the time to read this manual cover to cover. This
will give you an insight on the philosophy behind VR dive computers and enable you to
more easily locate advice on specific features and functions when you require it.

introduction..............................................................................................06
power system...........................................................................................06
changing the battery.................................................................................07
basic functions...........................................................................................08
decompression algorithm..........................................................................09
VPM based optional deco algorithm........................................................09
user interaction...........................................................................................10
pc link...........................................................................................10
battery compartment................................................................................10
control switches...........................................................................................11
power up..................................................................................................12
time change screen...................................................................................13
home screen.......................................................................................14-15
the menus............................................................................................16-41
dive modes menu................................................................................16-18
XFunc.......................................................................................................16
XDec.........................................................................................................17
big graphics (bg) mode............................................................................17
light..........................................................................................................18
stops..........................................................................................................18
options menu......................................................................................19-33
profile.......................................................................................................20
03
Copyright Delta P Technology Ltd.2006V5.0
contents

Copyright Delta P Technology Ltd.2006V5.0
04
gas list screen......................................................................................20-21
log screen............................................................................................21-22
markers....................................................................................................22
calendar..............................................................................................23-24
setup screen (including Color Screen adjustment).............................25-27
no stop screen.....................................................................................27-28
fly time screen.............................................................................................28
pc link screen.............................................................................................29
dive plan screen.............................................................................................30
language...................................................................................................31
altitude......................................................................................................31
games......................................................................................................32
pin number screen........................................................................................33
gas list menu.......................................................................................34-41
selecting gases........................................................................................34
adjusting gases........................................................................................35
activating gases........................................................................................36
changing gases....................................................................................37-38
selecting closed circuit gases....................................................................39
moving from closed to open circuit............................................................40
changing diluent.............................................................................................41
dive mode and simulate mode.............................................................42-50
contents

Copyright Delta P Technology Ltd.2006V5.0
05
contents
diver on the line.............................................................................................45
graphics...................................................................................................45
command area.....................................................................................46-47
closed circuit dive screens...................................................................48
warnings..................................................................................................49
decompression stop violation......................................................................50
switch.......................................................................................................50
air break...................................................................................................50
rebreather and analyser links..............................................................51-61
calibration with analyser (open circuit VR3)........................................51-52
calibration with analyser (closed circuit VR3)......................................53-54
analysing a gas........................................................................................55
semi closed rebreather link......................................................................56
closed circuit rebreather link...............................................................57-61
calibration at altitude................................................................................61
oxygen sensors........................................................................................62
gas calculator mode.................................................................................63
key to icons..............................................................................................64
warranty and service................................................................................65
maintenance tips for your VR3 and VR2..................................................66
specifications............................................................................................67
registration and warranty form..................................................................67

Copyright Delta P Technology Ltd.2006V5.0
06
power system
introduction
The VR3 is designed as anair /nitrox / trimix, multi-mode decompression
computer. It can be purchased in four configurations.
Open Circuit Air/Nitrox
Open and Closed Circuit Air/Nitrox
Open Circuit Air/Nitrox/Trimix
Open and Closed Circuit Air/Nitrox/Trimix
In Open Circuit mode with the I/O connector activated and the cable linked
to an external oxygen cell located within a semi-closed circuit rebreather,
a VR computer will read semi-closed circuit decompression.
The VR3 is designed to integrate with our custom dive logging system.
It is also fully user programmable by PIN (see page 33) should you
choose to upgrade from one configuration to another or as more new
accessories or features are introduced.
VR3suse 1 xAA disposable battery. Alkaline, Lithium or Lithium Manganese
batteries between 1.5 and 3.6v can be used. Use of any other battery will
damage the unit and will invalidate the warranty.
The battery must be inserted with the + end entering the unit first.
Check the battery spring is in the cap before inserting battery.
The battery life is highly dependent on the operating mode of the active
backlight (see pages 18 and 26). Without lighting, the unit will work
continuously for approximately 100 hours diving. If the unit is turned off
(‘sleep’ mode), the battery keeps the internal systems going for 1 year.
Every week of “sleep mode” reduces the available dive hours by approximately
2 hours. These figures are approximate based on an ambient temperature
of 20°C, a 1.6V alkaline battery and a VR with a monochrome screen.
Battery voltage is displayed on the front and main screens. A " Battery
Low ” warning will show at 1.1V with a standard alkaline battery.
Lithium batteries have a faster discharge curve than standard cells and
although they last longer, they discharge quickly towards the end of their
life. When a lithium battery's voltage begins to drop quickly, change it.
Units are shipped with the battery installed. It is recommended that a battery
is left in at all times, unless you intend to store the unit for more than three

Copyright Delta P Technology Ltd.2006V5.0
07
When changing the battery ensure the VR3 is switched off (blank screen).
Whenever possible change the battery before the existing one goes flat. If
the battery is allowed to go flat then all stored data such as the gas list and
logbook will be lost.
Before replacing the battery, it is good practice to turn the unit on and then let
it turn itself off so that you have as much time as possible to change it.
You have 30 seconds to remove and replace a battery. If you take longer
than this, the VR computer may reset itself and you may lose your time, date,
gaslist and dive log settings. Be especially vigilant if changing the battery
during a series of dives as areset will cause residual tissue
saturation data to be lost.
When changing the battery, if the VR3 appears to “lock” in a screen,
simply leave it for three minutes (with the battery in) and it will reset.
If the battery goes completely flat, or if on changing the battery the screen
appears to freeze, put a new battery in and screw in the cap until the screen
flashes on. Stop screwing in the cap and allow the unit to turn on and go
into the start up screen. After a short time it will turn off ( the backup
battery is now charged) and you may continue screwing in the cap.
changing the battery
months. When you start diving again and install a new battery, you will
need to reset your gas list and set up data.

08
The VR3 has the following basic functions:
Time and date.
Light mode (various light functions).
Programmable safety factor.
Metric or imperial use.
PC Link for uploading and downloading of setup and dive data.
On screen logbook of 100 dives.
Time to fly information.
Open and closed circuit modes.
Open circuit bailout option from closed circuit dives.
Gas switches programmable above and below water.
PO2, decompression violation, air break and ascent rate warnings.
List of all decompression stops.
Total time to surface display.
CNS and OTU tracking.
Temperature reading.
Copyright Delta P Technology Ltd.2006V5.0
basic functions

The VR3 uses a derivative of the Buhlmann ZHL 16 algorithm. Exactly the
same adaptation is used in the Proplanner decompression software.
The new versions of both systems employ some of the latest thinking in
practical microbubble avoidance. This may seem to modify the dive profile
compared with standard parallel compartment models. The modification
takes the form of deepwater microbubble controlling decompression stops.
In certain circumstances the VR3 will prompt you to do a short decompression
stop, or stops, well below the bulk of the decompression sequence. Along
with the other modifications to the remaining profile, this helps to reduce
the problems associated with potential microbubble growth.
On all decompression dives, the VR3 will prompt for deep-water micro
bubble controlling stops of 2 minutes in duration. Deep-water
(microbubble) stops are recognised by their duration (normally two
minutes) and a + next to the time. It is vital that microbubble stops are
conducted correctly for a safe decompression.
Should a microbubble stop be missed, a “use table” message will
appear. The decompression displayed, although very close to the
required duration, may be in error. If this occurs consult backup tables
and add additional safety stops as required. While continued diving is
possible on the VR3, the decompression displayed may not be exactly
that required. “Use tables” will show for 24 hours.
9
Copyright Delta P Technology Ltd.2006V5.0
decompression algorithm
In late 2005 a new option, the V1 upgrade, was released to give VR owners a
choice between the standard VR decompression algorithm AND a new
algorithm incorporating a variable permeability model. There is a V1 upgrade
path for all VR computers although for older models a hardware change is also
required, (see www.vr3.co.uk for full information.) Owners of Version 5.0
VR3s and VR2s can upgrade to V1 simply by purchasing and installing a PIN.
Depending on gas selection and dive depth and time, the VPM based option
will in some cases provide a reduced decompression requirement, although this
is not always true. What the new algorithm does is smooth out the profile.
There are no deep micro-bubble stops and ‘normal’ decompression stops begin
much deeper. In general, intermediate stops are longer and shallower stops are
shorter. Once V1 is enabled, divers can switch to the algorithm they prefer for
the type of diving they are doing, even in between dives if they wish. On every
dive the VR computer records tissue and bubble states using both algorithms so
divers can swap between the two without compromising their ability to switch
back.

User Interaction with your VR computer takes three forms:
PC link
Battery Compartment
Control Switches
The PC link on the VR computer is used either to download dive data
(page 29) into a PC or upload gas data into the VR. You have a choice of
connecting either via infra red link or via direct cable link. The direct cable
link will connect with all VR2s but only with VR3s that have a 7 pin I/O
connector, (i.e. those manufactured since June 2003). On the VR2 the infra
red signal beams from the centre at the back behind the screen and on the
VR3 from the bottom right hand corner of the front of the screen. (On older
models, pre-June 2003, the signal beams from the top of the screen under
the VR3 logo).
With pc link you can use the VR Software Suite package which includes:-
Prolog dive logging software to download dives and upload gas lists
Proplanner decompression planning software
Decobooks to upload text to read on your VR during decompression
Screensaver / Logo Generator to upload a graphic to your VR
PIN and Security Information upload facility
For full instructions on using the Software Suite see the User Guide included
on the CD-Rom. A sample version of Prolog is supplied with each new VR
computer to allow users to see and interact with examples of downloaded
profiles.
10
Copyright Delta P Technology Ltd.2006V5.0
user interaction
pc link
battery compartment
The battery compartment is opened using a dedicated tool. O-rings (N70
18 x 2mm Nitrile) should be replaced after 10 battery changes or if
they become damaged or worn.
The battery must be inserted positive + end first or the VR will not work. It
must move freely within the battery cap. If the battery coating is too thick
and fits too tightly in the cap, this may lead to power supply problems
during the dive. Screw the cap in until the thread bottoms out and keep
the thread clean as this provides the system earth.

The VR3 has two slide switches on the front. All functions are accessed
via these switches. There are four modes of operation:
1.A short push and release of one switch - this is used for all non-critical
functions.
2.A push and long hold of one switch. The switch is held until the screen
changes. In certain modes such as clock setting, a hold will increment
or decrement the number by 10. A short push increments or decrements
by 1. In dive mode this provides security against accidental switching to
the Gas Change and Decompression screens.
3.Shown as with the option between the arrows, a short push of both
switches - often used to switch to a new field in order to change it.
4.Shown as with the option between the arrows,a long push and hold
of both switches - often used for critical functions such as switching from
open to closed circuit.
On the surface, if no switch is pushed the VR3 will turn itself off after 30
seconds to save power. To avoid this, a short push on both switches in
the home screen will activate the legend “dive now” and give you
five minutes operation in between switch pushes. This is especially
useful when you are learning how to use your VR3 and also when you
are downloading dives.
For more details of switch use, please refer to the relevant sections of the
manual.
11
Copyright Delta P Technology Ltd.2006V5.0
control switches

The VR3 is activated by pushing and holding either switch.
You will then be prompted to power up(left switch). If the battery has
not just been replaced the next screen to be displayed will be the home
screen (page 14).
If the batteries have just been changed the time change screen may be
displayed, (page 13).
It is not necessary to power up the VR3 before you dive. The screen will
automatically power up within a minute of exposure to an absolute pressure
of 1.3 Bar or greater. If you want the screen to be on from the moment
you enter the water, use the dive now feature, which is activated by a
short press of both switches in the Home screen. When "dive now" is
showing the screen will stay activated for 5 minutes between
switch pushes. If the VR does not turn on, check to see if the pinhole on
the rear may be blocked or covered.
12
Copyright Delta P Technology Ltd.2006V5.0
power up
Below the time and date on the power up screen are two lines
available for personal security information programming (see page
33). Also shown are altitude atmospheric pressure, battery voltage,
temperature and, on the bottom line, the current version of software
installed in the VR3. In the power up screen a short push of the
right switch toggles between a clock and tissue loading display.
power up screen

13
Copyright Delta P Technology Ltd.2005 V3.0
time change screen
This is automatically displayed if the battery has been removed and the
internal power backup has discharged (approximately 5-10 minutes).
If a battery has not just been changed, then the time change screen is
accessible from the Options Menu under the SETUP sub menu. The
VR3 is not a precision chronograph, but it does meet the European PREN
standard for digital dive timing devices. You may need to adjust it
occasionally in order to display the correct time.
Changing the time will not affect desaturation calculations.
The highlighted numbers are those which will change when a key is
pressed. + and - will increment or decrement the number (short push). A
push and hold of + will increment the highlighted number by 10. Holding -
will decrement the number by 10. Pushing both buttons together (short
push), , will move the highlight to the next field to change; it can then
be changed in the same manner. Pushing and holding both
switches will exit the screen and SAVE the changes. After a
SAVE, the unit will then turn off.
time change screen
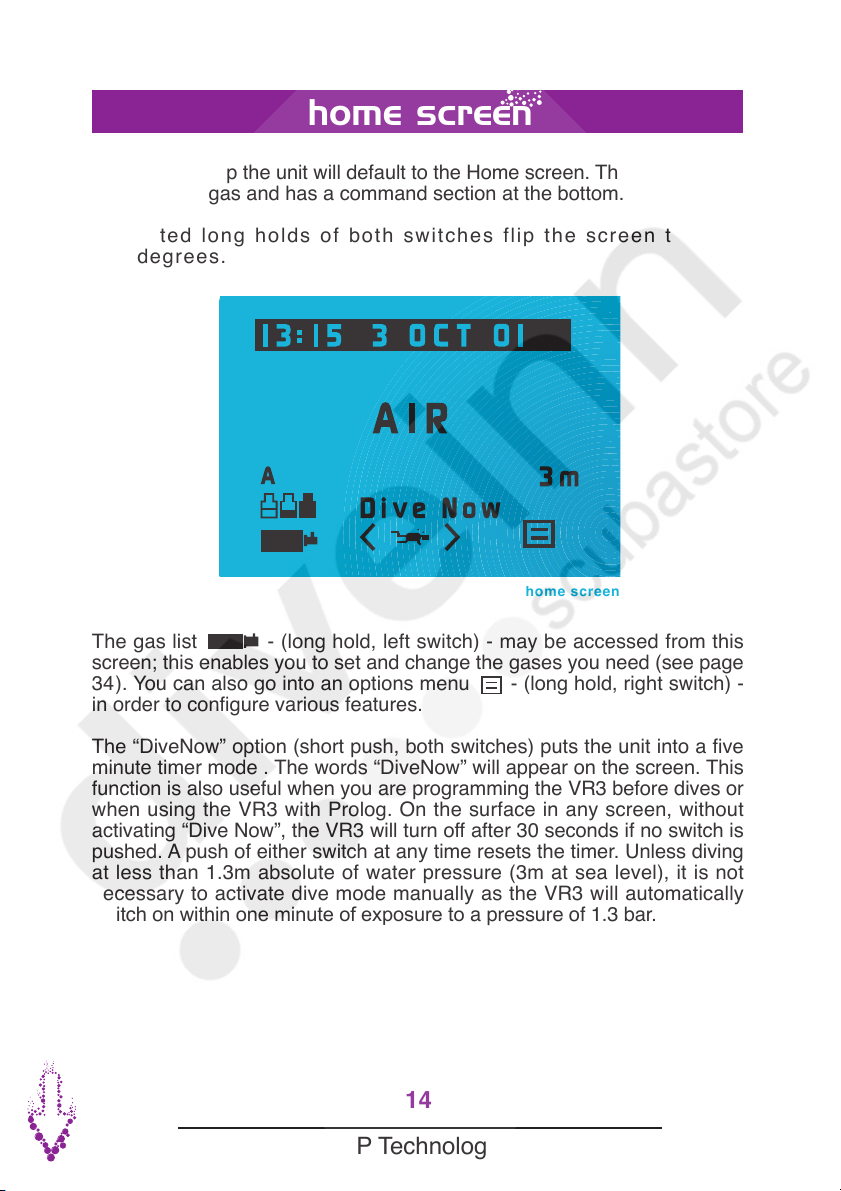
The gas list - (long hold, left switch) - may be accessed from this
screen; this enables you to set and change the gases you need (see page
34). You can also go into an options menu - (long hold, right switch) -
in order to configure various features.
The “DiveNow” option (short push, both switches) puts the unit into a five
minute timer mode . The words “DiveNow” will appear on the screen. This
function is also useful when you are programming the VR3 before dives or
when using the VR3 with Prolog. On the surface in any screen, without
activating “Dive Now”, the VR3 will turn off after 30 seconds if no switch is
pushed. A push of either switch at any time resets the timer. Unless diving
at less than 1.3m absolute of water pressure (3m at sea level), it is not
necessary to activate dive mode manually as the VR3 will automatically
switch on within one minute of exposure to a pressure of 1.3 bar.
After a power up the unit will default to the Home screen. This shows date,
time, current gas and has a command section at the bottom.
Repeated long holds of both switches flip the screen through
360 degrees.
14
Copyright Delta P Technology Ltd.2006V5.0
home screen
home screen
The Pressure transducer lies below the pinhole to the rear of a VR computer. In
order for the computer to function, this pinhole must not be covered or blocked
in any way. If it does get blocked, remove debris carefully but NEVER insert a
sharp object or direct a jet of water into the pinhole for fear of damaging the
pressure transducer irrevocably.

home screen
DVo
AIR
15 15 6 APR 04
3m
A
On the bottom line in the Command section a short push of either the left
or right switch will change between functions.
A short press of the left switch will toggle between gas
and DVo (Dive modes menu) options. A short push of the right
switch will toggle between the OPTIONS menu and the O2
icon if you have purchased the PIN to activate the I/O connector for use with
an external oxygen sensor and XFunc (see page 16) is set to Xo2.
The Gas Calculator screen (page 63) is also available via the right switch
if you have purchased this feature.
The High Pressure Link screen (released in mid - 2006), if
purchased, will be accessible via the left switch when the HP link is activated
and XFunc (see page 16) is set to HP.
Once a function is shown a long push will activate it.
15
Copyright Delta P Technology Ltd.2006V5.0

16
Copyright Delta P Technology Ltd.2006V5.0
the menus
dive modes
The features of the VR3 are contained in 3 major menus:
Dive modes menu
Options menu
Gas list
dive modes screen
The Dive Modes (DVo) screen is accessible by a long push of the left
switch from either the Home Screen or the Dive Screen when DVo is
displayed. (If the gas bottle icon is displayed in the bottom left corner of
the screen, a short push of the left switch will bring up DVo).
The screen allows the diver to get quick access to a number of useful
controllable features. In the screen, a short push of both switches will
move the highlight from one feature to the next, a short push of either the
left - or right + switch will change the setting.
If you do not have a particular feature enabled, the highlight will not land
on it.
XFunc
+
Dive Modes
BG
OFF
XDec
OFF
StopD
4.5m
XFunc
OFF
Light
On
Change XFunc to correspond to the type of sensor connected to the I/O port:
i. OFF = no sensor connected.
When no sensors are connected Xfunc should be set to OFF to avoid
connector damage.
ii. XO2 = External PO2 sensor (analyzer or rebreather) connected.
iii. HP = External HP sensor connected.

17
Copyright Delta P Technology Ltd.2006V5.0
You have the option to purchase this feature to allow you to double the
size of the depth and time digits in the Dive Screen. Note that CNS% and
Time to Surface (TTS) information will not appear on the Dive Screen
while Big Graphics Mode is ON. Your No Stop Time (NST) remains visible,
as do your decompression ceiling and time at stop, if you are carrying out a
decompression dive.
dive screen big graphics dive screen regular graphics
AIR
-25
21.0m
13
NS
T
DVo
21.0m
AIR
0
2
13
ns
c
TT
S
-25
NS
T
DVo
XDec
This feature is enabled when you purchase one of our rebreather linking
cables and the relevant software to allow you to track real time
decompression via an external oxygen cell. In closed circuit mode the
XDec setting controls which PO2figure is used in the decompression and
tissue updating calculations. (In semi closed mode the PO2is reported as
an FO2). To summarise, when XDec = ON the reading from the external
sensor is used. When XDec = OFF the selected gas and internal setpoint
are used.
big graphics (bg) mode

light
Switch between five screen backlight modes
Tm ..............Light on for 10 seconds at the surface or underwater
DTm............ Light on for 10 seconds underwater
On............... Light always on at the surface and underwater
DOn............ Light off at the surface, light on underwater
OFF............. Light always off (not an option in Colour Screen VRs).
18
Copyright Delta P Technology Ltd.2006 V5.0
stops
Switch between 3 optional final decompression stop depths, 3m, 4.5m and
6m.
The DVo backlight settings are separate from the light settings in the
setup menu. Whichever light option you choose in either menu will
over-ride any previous settings in either menu. Practically, you will find
that you use the DVo menu more as this screen is accessible
during a dive.

From Home screen a long push on the right hand switch when is
displayed accesses the Options menu. A short push of the left switch
moves the highlight downwards. A long push on the left switch moves
the highlight upwards. A short push on the right switch confirms your
selection and takes you into your chosen screen. A short push on both
switches returns you to the Home screen.
options menu screen
19
Copyright Delta P Technology Ltd.2006V5.0
options menu
The following pages take you through each of these options in turn.
NST
SIM
PIN
???

Go into the gas menu and set up your first set of gases. Now exit back to
the main screen. Go to the OPTIONS menu, select PROFILE and use the
+ button to pick a profile memory into which you want it saved (A,B or C).
Press SAVE . That set of gases is saved into the profile you selected.
You can then repeat the process to setup PROFILES B and C. A short
push on the left switch will return you to the OPTIONS menu. To
restore any of the saved profiles, go to the PROFILE menu and use + to
bring up the profile you want (A,B.C). A short push of both switches
programs the set of gases in the selected profile into your VR3. You will
see the word RESTORED. Then a short push on the left switch takes
you into the ADJUST screen and a long push on both switches takes
you into the SELECT screen. Here you can double check which gases
you have set by repeated short pushes of the left switch . If they are
correct a short push on the right switch returns you to the Home
screen.
20
Copyright Delta P Technology Ltd.2006V5.0
profile
profile screen
gaslist
This option displays all ON gases and their maximum operating depths
(MOD’s). It acts as a guide as to how the computer is currently set up.
returns you to the options menu. takes you to the next page of gases.
takes you to the profile screen.
Table of contents
Popular Diving Instrument manuals by other brands


Nauticam
Nauticam WIDE ANGLE CONVERSION PORT 2 instruction manual

POSEIDON
POSEIDON Xstream Series user manual

Dräger
Dräger ABIL-R Series Instructions for use

Sherwood Scuba
Sherwood Scuba SR2 Service manual

Atomic Aquatics
Atomic Aquatics BC1 owner's manual

Kirby Morgan
Kirby Morgan 525-100 quick start guide


