Crest Audio CR-4 User manual

Page 1

Page 2
CREST
CR-4 Dive Computer
Applicable to SW version C01-5C
USER GUIDE

Page 3
CREST CR-4 Dive Computer User Guide
1. Screen and Functions 5
1.1 Button function 5
1.2 Menu 6
1.3 Watch Mode and Dive History & System Information 9
1.3.1 Watch Mode 9
1.3.2 Dive History & System Information 12
1.3.3 Watch Mode Settings 14
1.4 Scuba Mode and Settings 18
1.4.1 Scuba Mode 18
1.4.2 Scuba Mode Settings 24
1.5 Freediving Mode and Settings 31
1.5.1 Freediving Mode 31
1.5.2 Freediving Mode Settings 33
1.6 Gauge Mode 37
1.7 Plan Mode 39
1.8 Timer Mode 41
1.9 Log Mode 42
1.10 Settings Mode 44
1.11 Synchronization Mode 51
2. CREST Contact info 52

Page 4
CR-4 Quick Start Guide
Notice:
1. To charge your CR-4 dive computer, first plug the cable into the Clip and use a safe,
qualified USB adaptor and connect it to power supply. Do not use unsafe, unqualified
USB adaptors.
2. Then match the Clip to the contact points on the back of CR-4. Once it’s in place, you
should see growing build up motion indicator of battery on the monitor.
Warnings:
3. Divers should receive proper diving training from registered and qualified dive facilities
or professionals and should fully understand safety precautions before using CR-4
dive computer.
4. There are no existing dive computers, algorithm, dive table, dive formula or dive plans
that could help to eliminate diving risks such as DCI or oxygen toxicity. All diving
activities carry risks. CR-4 dive computer cannot predict mental health or physical
conditions of divers which could affect diving activities and result in diving risks. It is
recommended for divers to consult with professional medical doctors before
participating in diving activities. The best way to avoid diving risk is not to dive.
5. This product is manufactured for recreational diving experiences. Do not use it to dive
deeper than your certified diving depth limits or use it in an environment you are not
trained for.
6. We provide better user experiences by constantly improving and upgrading our
product software. Please refer to our official website for complete user manual and
instructions.

Page 5
1. Screen and Functions
1.1 Button function
Name :Power
Button
Locate:Left Top
Func :Power
Switch / Exit
Name :Up Button
Locate:Right Top
Func :Move
Pointer Up / Acees
more Settings
Name :Mode /
Select Button
Locate:Right Middle
Func :Menu / Enter
Value
Name :Down Button
Locate:Right Down
Func :Move Pointer
Down / Access Dive
History & System
Information (Under
Watch Mode)

Page 6
1.2 Menu
1.2 Menu
Description: Watch Mode
To Access: Default mode when your turn
on.
To Exit: Press Power Button once.
Description: Scuba Mode
To Access: Under Menu, press Mode
Button to select Scuba Mode.
To Exit: Press Power Button once.
Description: Freediving Mode
To Access: Under Menu, press Mode
Button to select Freediving Mode.
To Exit: Press Power Button once.

Page 7
1.2 Menu
Description: Gauge Mode
To Access: Under Menu, press Mode
Button to select Gauge Mode.
To Exit: Press Power Button once.
Description: Plan Mode
To Access: Under Menu, press Mode
Button to select Plan Mode.
To Exit: Press Power Button once.
Description: Timer Mode
To Access: Under Menu, press Mode
Button to select Timer Mode.
To Exit: Press Power Button once.

Page 8
1.2 Menu
Description: Dive Logs
To Access: Under Menu, press Mode
Button to select Log Mode.
To Exit: Press Power Button once.
Description: Settings
To Access: Under Menu, press Mode
Button to select Settings.
To Exit: Press Power Button once.
Description: Synchronization Mode
(SYNC Mode)
To Access: Under Menu, press Mode
Button to Select SYNC Mode.
(Synchronization Mode).
This function will activate the wireless sync
transmission. The watch will broadcast
signals as long as it is turned on and the
screen icon shows a blinking dotted line.
To Exit: Press Power Button once.

Page 9
1.3 Watch Mode and Dive History & System
Information
1.3.1 Watch Mode
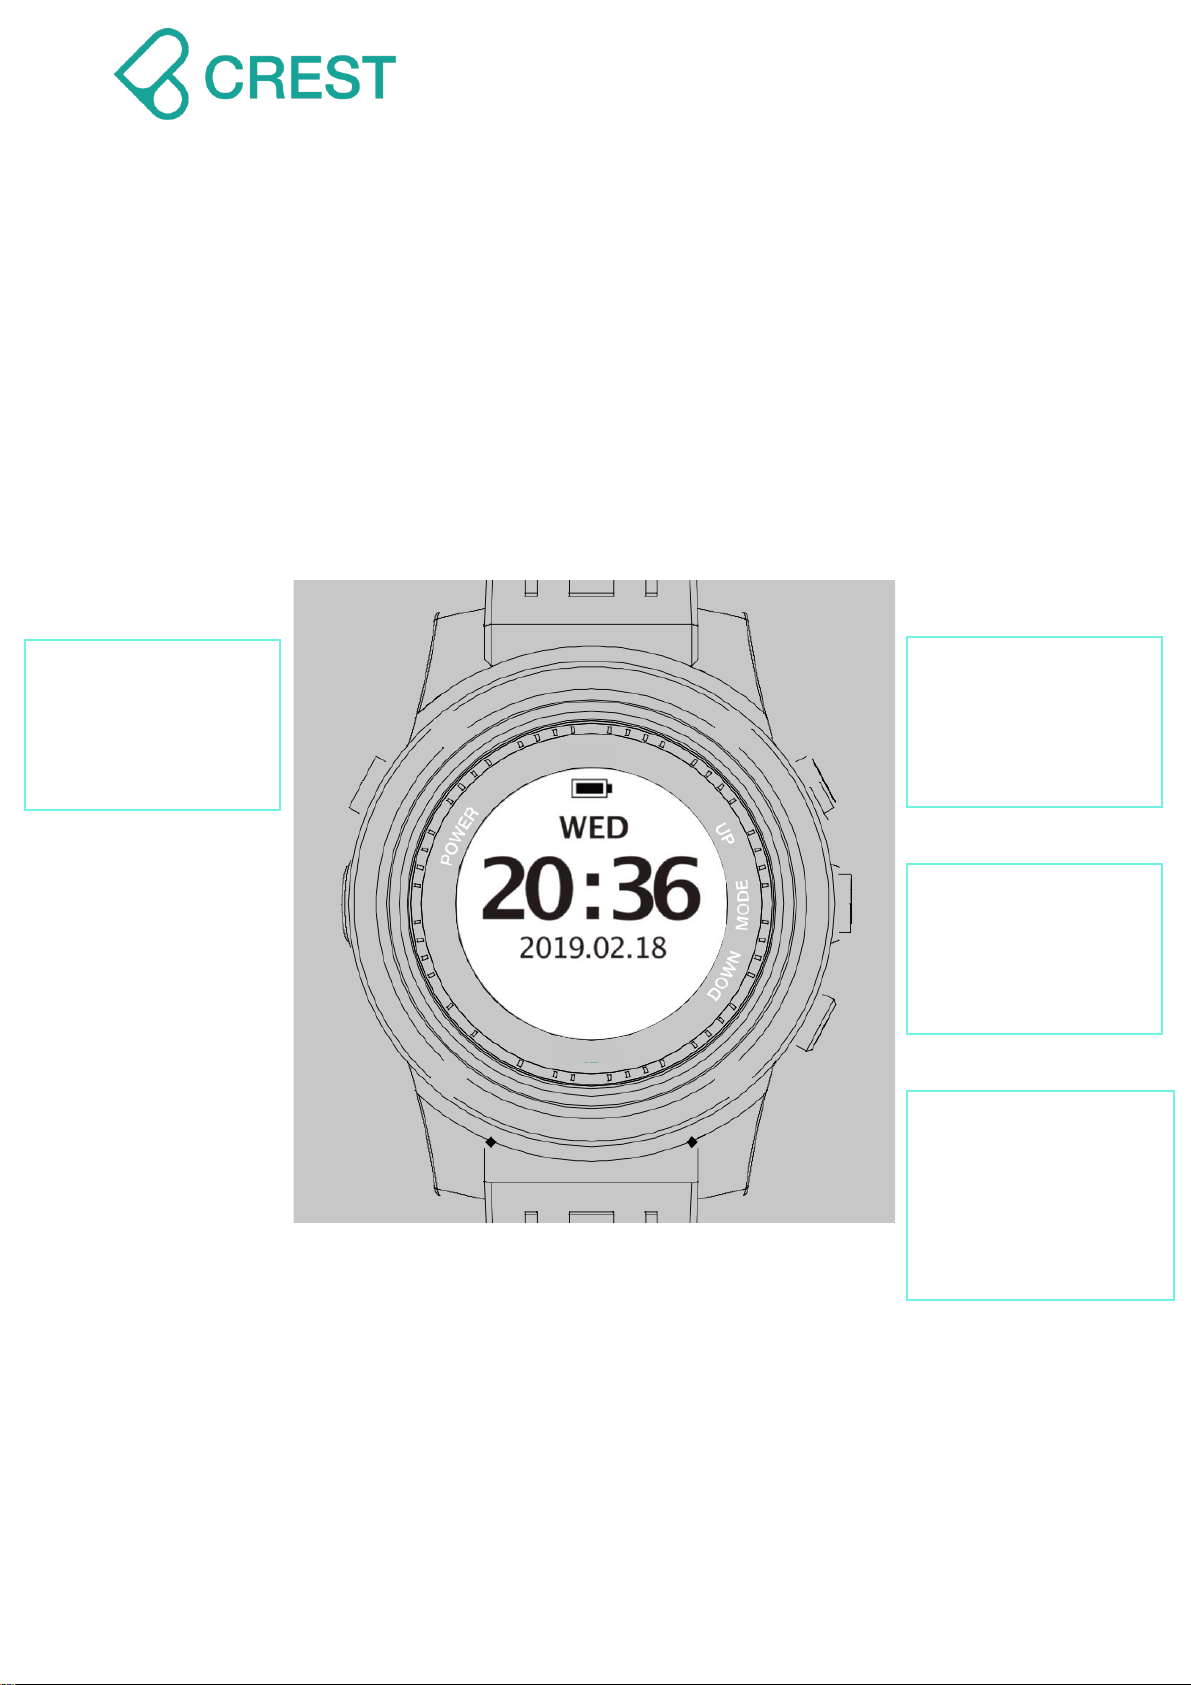
Description: Start Status when your turn
on. Displays day of the week, current time
and calendar date.
To Access: Under Menu, press Mode
Button to select Watch mode or press
Power Button to go back to Start Status.
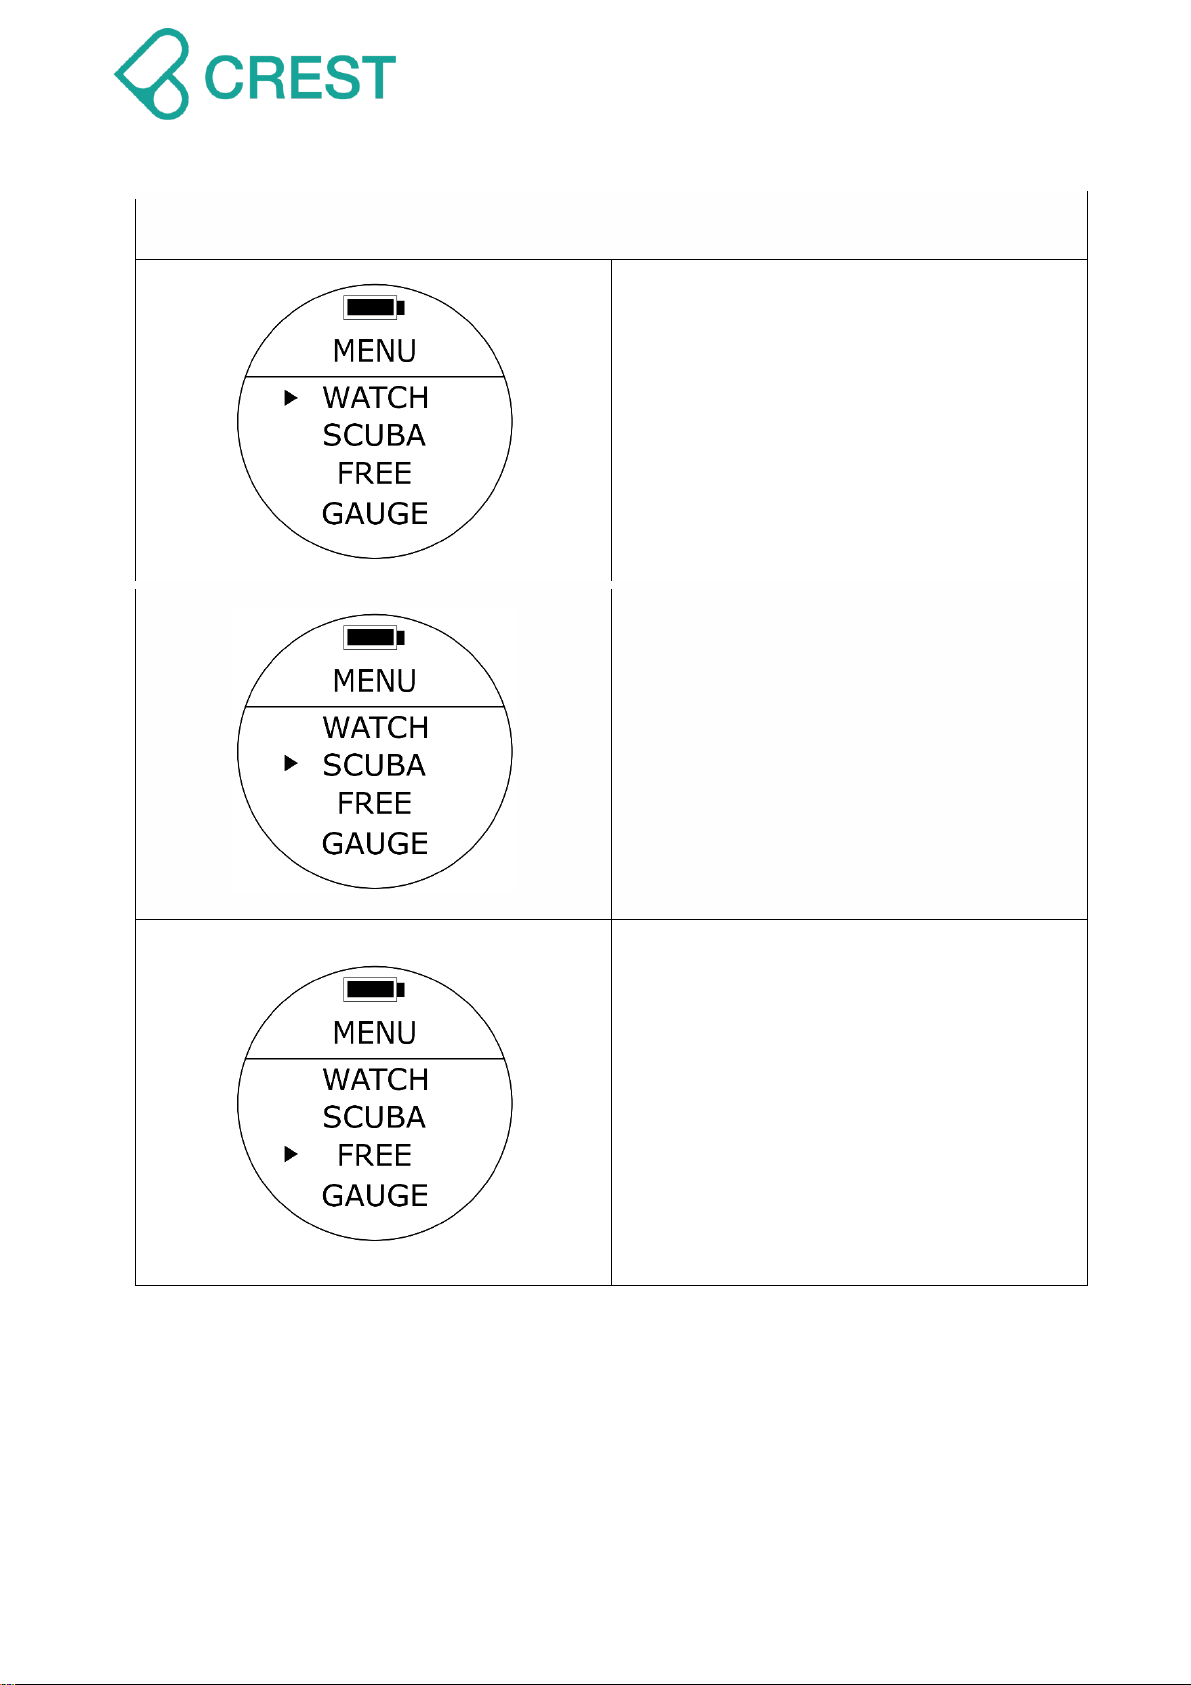
:Auto Mode –Scuba Mode.
Icon of Auto Mode of your selection will display
at Watch Mode for quicker identification.
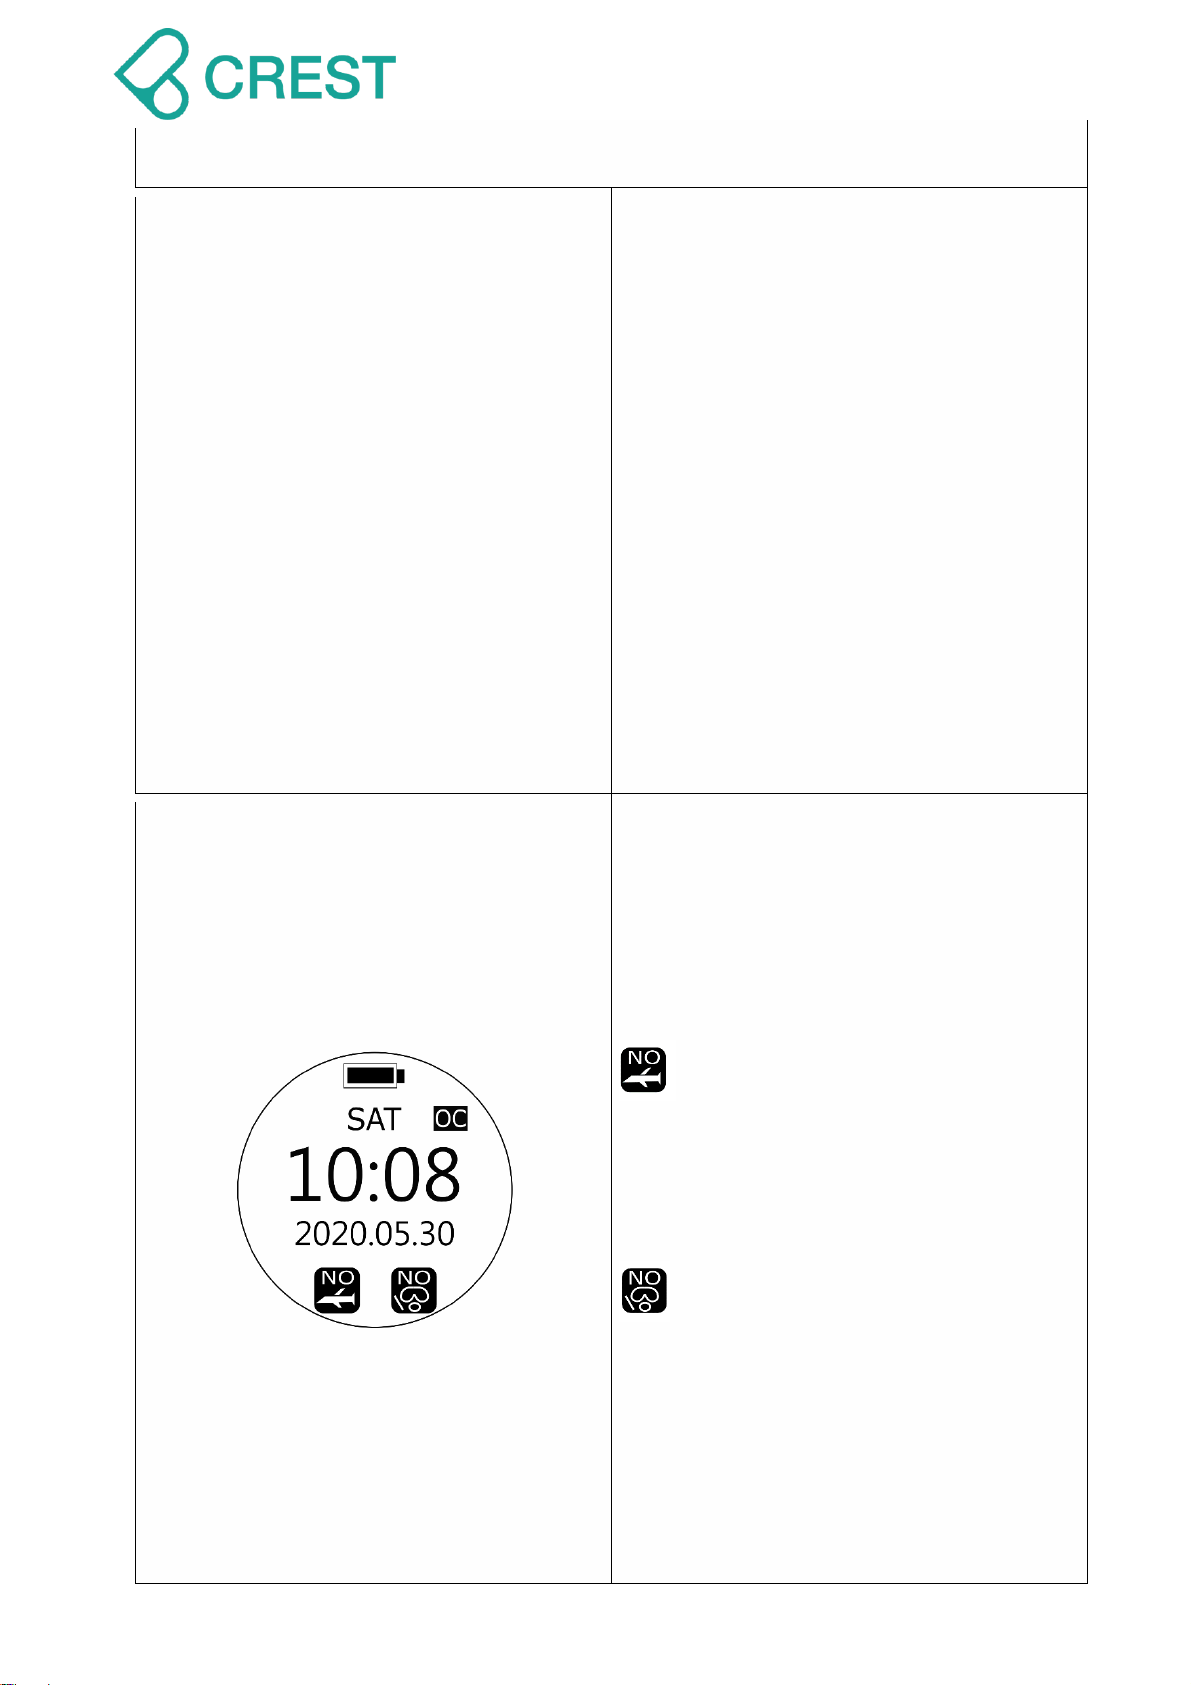
OC: Open Circuit Scuba mode diving
history
FD: Freediving mode diving history
GA: Gauge mode diving history
Events during this function:
1. Start Status:
Start Status display Once you turn on the dive
computer.
Under this status, dive computer will show
Start Status display with backlight on.
2. Standby Status:
Once you cease operating the dive computer
for 30 seconds under Start Status, dive
computer will enter Standby Status
automatically.
Under this status, dive computer will show
Start Status display without backlight.
⚫If you would like to wake up the backlight,
simply press any buttons.
3. Sleep Status:
Once you cease operating the dive computer
for 5 minutes, 10 minutes, or 30 minutes under
Standby Status, dive computer will enter Sleep
Status automatically.
(You can change this time by changing the
Auto Power Off Time Setting (Power)).
Under this status, dive computer will not show
Start Status display and backlight will remain
dark.
You may wake up dive computer by twisting it
over 45 degrees for 1 second to 2 seconds to
activate or press any button.

Page 10
1.3.1 Watch Mode
⚫If you twist it to activate, dive computer
will show Start Status display with
backlight on for 30 seconds and resume
Sleep Status.
⚫If you press any key to activate, dive
computer will resume Start Status.
4. Auto Shutdown Status:
Once you cease operating the dive computer
24 under Sleep Status, dive computer will
enter Auto Shutdown Status automatically and
shutdown completely.
⚫If you need to operate dive computer,
please press Power Button to activate.
WARNING:
Before any dive, always check your dive
computer status, complete related settings
and go back to Watch mode for dive
computer to automatically start when you
enter water.
Description: No FLY Reminder and No
Diving Reminder
Displays No FLY Reminder and NO DIVE
Reminder after dives executed under
SCUBA Mode and/or GAUGE Mode.
1. No FLY Reminder: if this icon
shows on the screen, DO NOT
take flights or head to high
altitude environment. For exact
No FLY recommendation time
countdown please check Dive
History page.
2. NO DIVE Reminder: if this icon
shows on the screen, DO NOT
continue diving activities. For
exact NO DIVE recommendation
time countdown please check
Dive History page.
Scuba Mode, Freediving Mode
and Plan Mode will remain
locked during NO DIVE
recommendation time
countdown.

Page 11

Page 12
1.3.2 Dive History & System Information
Description: Last Dive
Displays latest dive log:
Calendar date, Time;
NO FLY: No FLY recommendation time
countdown;
NO DIVE: NO DIVE recommendation
time countdown;
SI: Surface Interval time counting
(continues until diver starts a new dive).
To Access: Under Watch Mode, press
DOWN Button once.
Description: SCUBA HISTORY
Displays dives under Scuba Mode:
Dive counts
Accumulated dive time
Depth (Maximum Operating Depth)
To Access: Under Watch Mode, press
DOWN Button twice.
Description: FREEDIVING HISTORY
Displays dives under Freediving Mode:
DIVES: Dive counts
DEPTH: Maximum Operating Depth
(MOD)
LOT” Length of Time
To Access: Under Watch Mode, press
DOWN Button three times.

Page 13
1.3.2 Dive History & System Information
Description: VERSION
Displays system information of dive
computer.
HW: Hardware version of dive computer
SW: Software version of dive computer
SN: Serial Number of dive computer
To Access: Under Watch Mode, press
DOWN Button four times.
To Exit: Under Watch Mode, press DOWN
Button four times.

Page 14
1.3.3 Watch Mode Settings
Description: Date Settings
To Access: Under Watch Mode, press the
UP Button once, and press UP Button /
DOWN Button to locate the cursor and
then press MODE Button once to select
the desired settings. The values at the
bottom of the screen will blink.
DATE Settings: Changes the values of 3
groups of digits corresponding to Month,
Day and Year using UP Button / DOWN
Button to select and accept the selection
with MODE Button.
Description: Date Format Settings
To Access: Under Watch Mode, press the
UP Button once, and press UP Button /
DOWN Button to locate the cursor and
then press MODE Button once to select
the desired settings. The values at the
bottom of the screen will blink.
DATE FORMAT Settings: Changes the
order in which the Day, Month and Year
are displayed on dive computer to
accommodate the region of the world you
live in. Use UP Button / DOWN Button to
select and accept the selection with MODE
Button.
Default: YYMMDD
Setup range:
YYMMDD / DDMMYY / MMDDYY
Description: Time Settings
To Access: Under Watch Mode, press the
UP Button once, and press UP Button /
DOWN Button to locate the cursor and
then press MODE Button once to select
the desired settings. The values at the
bottom of the screen will blink.
TIME Settings: Changes the values for
Hours and Minutes so the correct time can
be displayed on dive computer. Use UP

Page 15
1.3.3 Watch Mode Settings
Button / DOWN Button to select and
accept the selection with MODE Button.
Note:
Please be aware that this dive computer
will not self-adjust for daylight savings
time.
Description: UTC Settings (Coordinated
Universal Time Settings)
To Access: Under Watch Mode, press the
UP Button once, and press UP Button /
DOWN Button to locate the cursor and
then press MODE Button once to select
the desired settings. The values at the
bottom of the screen will blink.
UTC Settings: Change the values
corresponding with your particular time
zone with the UP Button / DOWN Button
and accept the selection with MODE
Button.
Default: UTC+8.
Setup range:
UTC -12 ~ +12.
Note:
Make sure you edit your CORRECT UTC
+ or - hours for your particular time
zone first then go to settings again and,
if needed, edit your TIME settings. If
you do it backwards, time will not
coincide & information will be
inaccurate.
Description: Time Format Settings
To Access: Under Watch Mode, press the
UP Button once, and press UP Button /
DOWN Button to locate the cursor and
then press MODE Button once to select
the desired settings. The values at the
bottom of the screen will blink. Use UP
Button / DOWN Button to select and
accept the selection with MODE Button.
Default: 24H

Page 16
1.3.3 Watch Mode Settings
Setup range:
12H / 24H
Description: Auto Active Mode at depth
(AUTO MODE)
To Access: Under Watch Mode, press the
UP Button once, and press UP Button /
DOWN Button to locate the cursor and
then press MODE Button once to select
the desired settings. The values at the
bottom of the screen will blink.
Auto Active Mode will be the automatic
default mode dive computer access
immediately after it senses a depth of at
least 1.0 m (3.3 ft.).
Default: Scuba (Scuba Mode)
Setup range:
Scuba Mode, Freediving Mode, or
Gauge Mode
For Log Start Depth please go to Log Start
Settings.
Description: Log Start at Depth Setting
(LOG START)
To Access: Under Watch Mode, press the
UP Button once, and press UP Button /
DOWN Button to locate the cursor and
then press MODE Button once to select
the desired settings. The values at the
bottom of the screen will blink.
Dive Log will start recorded
automatically after it senses a depth of
at least 1.0 (3.3 ft.)
Default: 1.0 m (3.3 ft.)
Setup range:
1.0 m (3.3 ft.), 1.5 m (4.9 ft.), 2.0 m (6.5
ft.), 2.5 m (8.2 ft.), 3.0 m (9.48 ft.)
Note:
This setting will automatically apply to
Scuba Mode, Gauge Mode and
Freediving Mode.

Page 17
1.3.3 Watch Mode Settings
Description: Language Settings
To Access: Under Watch Mode, press the
UP Button once, and press UP Button /
DOWN Button to locate the cursor and
then press MODE Button once to select
the desired settings. The values at the
bottom of the screen will blink.
Default: English.
Setup range:
ENG for English, CH for Traditional
Chinese, SPN for Spanish.
Description: Exit
To Access: Under Watch Mode, press the
UP Button once, and press UP Button /
DOWN Button to locate the cursor at EXIT
and then press MODE Button to select; or
press Power Button once.

Page 18
1.4 Scuba Mode and Settings
1.4.1 Scuba Mode
Description: Scuba Preview Mode
Image on Top: Normal Display
Image at bottom: Large Display
OC: Open-Circuit Scuba
: Battery Status
000.0 m: Current depth.
CF: Conservative. 3 levels to select:
CF-1(Conservative), CF-2(Normal), and
CF-3(Aggressive). Default: CF-2.
TIME: Dive Time.
PPO2: Current setup of PPO2 (partial
pressure of oxygen).
Default: 1.4.
Setup range: 1.2 - 1.6.
MOD: Maximum Operating Depth
suggestions.
O2%:Oxygen percentage value.
Default: 21%.

Page 19
1.4.1 Scuba Mode
Description: Scuba Under Water Mode
Image on Top: Normal Display
Image at bottom: Large Display
18.6m: Current Depth
NDL: The Non-Decompression Limit time
in minutes, will show 99 when NDL
exceeds 99 minutes.
:Ascent speed in meter/minute. If diver
exceeds 10 meter/minutes, there will be
alarm warning (short beeping repeated)
with vibration.
:Descent speed in meter/minute.
NO arrow icon: Diver is stationary.
09:35: Current time.
TIME: Dive time.
TEMP:Water temperature.
Description: Scuba Under Water Mode –
When the NDL has not been exceeded
Image on Top: Normal Display
Image at bottom: Large Display
005.6m: Current Depth
STOP: When divers ascend to 5m (16.4
ft), diver computer will start Safety Stop
countdown of 5 minutes automatically.
If diver do not complete Safety Stop and
ascent, there will be alarm warning
(short beeping repeated) with vibration,
and this dive will end according to Log
Stop settings.
TIME: Dive time.
CEILING: The depth at which divers
should ascend to and remain.
TEMP:Water temperature.

Page 20
1.4.1 Scuba Mode
Description: Scuba Under Water Mode –
When the NDL has not been exceeded
Image on Top: Normal Display
Image at bottom: Large Display
CLEAR: When divers finish Safety Stop
at the CEILING depth, dive computer
will show the word CLEAR indicating
that it is OK to perform a slow ascent to
the surface.
:Ascent speed in meter/minute.
:Descent speed in meter/minute.
NO arrow icon: Diver is stationary.
09:35: Current time.
TIME: Dive time.
TEMP:Water temperature.
Description: Scuba Under Water Mode –
When the NDL has been exceeded
Image on Top: Normal Display
Image at bottom: Large Display
NDL: The Non-Decompression Limit
time in minutes, will show 99 when NDL
exceeds 99 minutes.
If it reaches 4 minutes remainng, there
will be alarm warning (short beeping
repeated) with vibration. Divers should
ascend slowly and end your dive.
When exceeds NDL time, the first 3
minutes will be shown in:
- minutes: seconds
CEILING: The depth at which divers
should ascend to and remain when they
are required to perform decompression
stops.
Other manuals for CR-4
1
Table of contents
Other Crest Audio Diving Instrument manuals