Derksen USA PHOS 20 User manual

Instruction Manual PHOS 20 / LAP 20 LED Projector
Version 1.3, English
Tuesday, 19 April 2011
___________________________________________________________________________
info@derksen.com | DERKSEN USA | www.derksen.com Page 1of 10
PHOS 20 / LAP 20
LED PROJECTOR
INSTRUCTION MANUAL

Instruction Manual PHOS 20 / LAP 20 LED Projector
Version 1.3, English
Tuesday, 19 April 2011
___________________________________________________________________________
info@derksen.com | DERKSEN USA | www.derksen.com Page 2of 10
W
Thank you for deciding to buy this high quality product. The PHOS 20 / LAP 20 LED projec-
tor is built exclusively in Germany and therefore incorporates the typical German high stan-
dards of quality and safety. We hope you enjoy many fascinating hours with your new projec-
tor! To use the machine effectively and safely please read the instruction manual carefully
first.
Contents:
- LED Projector PHOS 20 / LAP 20
- Glass gobo, already in the machine
- Instruction manual
Optional accessories include:
- glass gobos, individuallycreated according to your design
Warnings
Warnings are printed to make you aware of the possible dangers to your health and others
around you. Read these warnings carefully so you can use the machine safely
.
Directions
Directions on how to use the machine should help you to set it up and use it as well as in- i
forming you about how to prevent damage to it through improper employment.
Table of Contents
A look at the machine and titles of the important
parts
.....................................................
3
Installation
...............................................................................................................................
4
What you should know before the
installation
..........................................................................
4
Permanent installation of the LED Projector
............................................................................
4
Set up and
Operation
.............................................................................................................
5
Placement of the glass
gobo....................................................................................................
5
Focusing of the projected image
..............................................................................................
5
Safety
Instructions
.................................................................................................................
6
Safe surroundings and operating
conditions
............................................................................
6
Care to be taken when connecting to power supply
................................................................
6
Care to be taken when setting up and
operating......................................................................
7
Transport, Cleaning and
Repair
............................................................................................
7
Specifications
.........................................................................................................................
8
Instruction Manual PHOS 20 / LAP 20 LED Projector
Version 1.3, English
Tuesday, 19 April 2011
___________________________________________________________________________
info@derksen.com | DERKSEN USA | www.derksen.com Page 3of 10
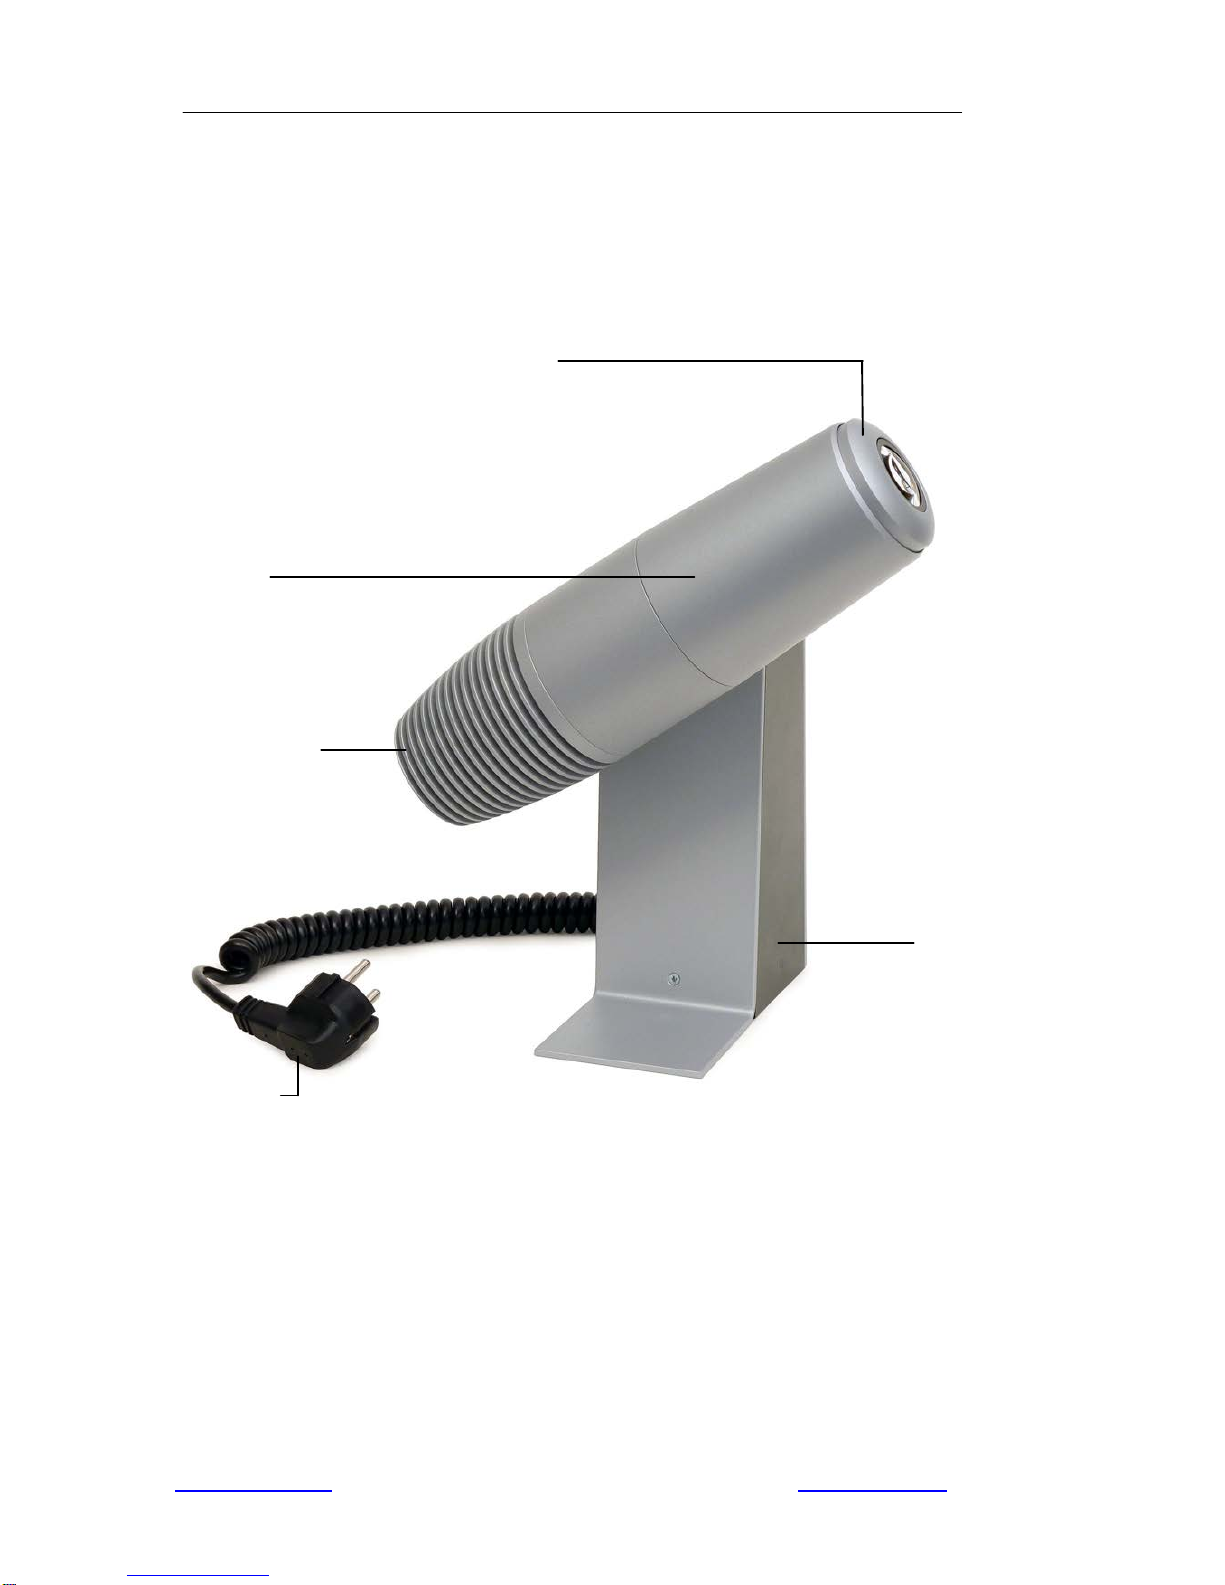
Diagram 1: A look at the machine and titles of the important parts
lens ring, turn to focus the projected image
lens tube
cooling element
base
power plug

Instruction Manual PHOS 20 / LAP 20 LED Projector
Version 1.3, English
Tuesday, 19 April 2011
___________________________________________________________________________
info@derksen.com | DERKSEN USA | www.derksen.com Page 4of 10
W
1. Installation
What you should note before installation:
1. The projector can be set up on a flat, level surface without a permanent fixture or it can
be fixed to a wall or ceiling.
2. A permanent fixture should only be made by qualified personnel.
3. The machine weighs 2.8 kg so ensure the wall, ceiling or the construction intended to
hold it is stable enough to support a weight of at least 12 kg.
4. The national safety committee have ruled that extra safety measures must be taken for
overhead constructions so to this end use a safety cable.
5. The power cable andplug should never be damaged in any way.
6. The power cable must be disconnected when mounting the machine onto a wall or
ceiling outlet. This work should only be carried out by a qualified electrician.
Diagram 2: Assembly or removal of the mounting plate
mounting plate
base (rotated view)

Instruction Manual PHOS 20 / LAP 20 LED Projector
Version 1.3, English
Tuesday, 19 April 2011
___________________________________________________________________________
info@derksen.com | DERKSEN USA | www.derksen.com Page 5of 10
i
Fixed installation of the LED projector
1. Switch the projector on and decide on the precise place you want the machine to be
fixed to give the desired optimal result.
2. Mark the eventual position on the floor, wall or ceiling.
3. Switch the machine off and disconnect it from the mains.
4. Remove the mounting plate by removing the 3 side screws.
5. Place the plate on the marked position and mark where the screw holes are to go.
6. Use at least 2 securityscrews, on soft surfaces even more.
7. Fix the mounting plate in place provisionally with 1 screw in the center so you can set up
the direction of the projector exactly through turning the plate.
8. Fix the mounting plate in its permanent position using at least 2 screws.
9. Fix the projector onto the plate using the 3 side screws then check it is held fast and safe
in its place.
Variation: Fixed installation onto an electrical ceiling or wall outlet
1. After fixing the mounting plate in position disconnect the power cable from the projector.
To do this you must undo the 3 screws in the connector block. Loosen the strain relief
screw in the cable anchorage and pull the cable out.
2. Close the strain relief screw up tight or you won't be able to insert the mounting plate into
the housing.
3. Make the final electrical connection through an opening in the mounting plate according
to regulations. This work should only be carried out by a qualified electrician.

Instruction Manual PHOS 20 / LAP 20 LED Projector
Version 1.3, English
Tuesday, 19 April 2011
___________________________________________________________________________
info@derksen.com | DERKSEN USA | www.derksen.com Page 6of 10
i
i
2. Set Up and Operation
Placement of the glass gobo
Individual glass gobos can be created according to your own design and ordered directly
from Derksen USA. Glass gobos are made from heat resistant, metal coated glass and
dichroic color filters. They hold their colors for a long time even when in constant use and
come with a manufacturer’s 5 year guarantee.
1. Only use gobos that have exactly the correct measurements: diameter: 50.0 mm, maxi-
mum image size: 32 mm
2. Switch the machine off and wait until it's suitably cooled down.
3. Remove the lens tube, (the front half of the projectors body) by turning it anti clockwise.
4. Remove the wire spring ring by pressing the ends together.
5. Carefullyplace the gobo in the opening. Take care to ensure its laying flat.
Positioning the gobo:
The motif must be placed as a mirror image and upside down.
6. Replace the wire spring ring and push it against the gobo ensuring that the gobo is firmly
fixed and cannot slip or move at all.
7. Tip: The setup of your gobo can quickly be checked by switching the machine on and
holding the lens tube in front of it.
8. Once you're satisfied with the result of the set up screw the lens tube back on the main
part of the body.
Diagram 3: setting up the glass gobo
wire spring ring
glass gobo
Cooling element

Instruction Manual PHOS 20 / LAP 20 LED Projector
Version 1.3, English
Tuesday, 19 April 2011
___________________________________________________________________________
info@derksen.com | DERKSEN USA | www.derksen.com Page 7of 10
W
W
Focusing the projected image
The PHOS 20 / LAP 20 LED projector is suitable for projecting images over distances
ranging from 0.5 to 3 meters increasing in darkness up to 8 meters.
1. Turn the lens ring until the projected image is sharply defined on the chosen
backdrop.
2. Attention: The lens ring should not be turned so far out that the groove at the end of
the lens tube becomes visible.
3. Safety Precautions
Safe surroundings and operating conditions
- The machine should only be used in dry, closed rooms or spaces.
- Allow the machine to cool down (circa 15 minutes after switching it off), before changing
a gobo or transporting it.
- The light source has an average lifetime of 30,000 working hours and can only be
replaced by the manufacturer.
- The machine is designed to operate at normal room temperatures so it can be damaged
by temperatures which are too high or by direct sunlight.
- Make sure the cooling element is never covered or obstructed by anything.
- If the machine is situated in an enclosed space, i.e. between walls, above a false ceiling
or inside a cupboard the space must be ventilated.
- Don't place the machine near to fluids. Ensure that no containers of liquid, i.e. flower
vases or bottles of drinks are nearby. If the machine comes into contact with liquid it
could result in electric shocks and fires.
- Don't place the machine near easily inflammable substances, i.e. petrol, alcohol or
cleaning fluids. If the machine comes into contact with these substances it could also
result in electric shocks and fires.
- Check supporting constructions whether on walls, ceilings or free standing to make sure
they're stable and can't tip over.
- Don't place the machine on shaky supports, moveable objects, uneven or vibrating
surfaces.
- The carrying wall, ceiling or supporting construction must be able to hold 4 times the
weight of the machine plus additional accessories, so at least 12 kg. Pay attention to
local safety rules. Take extra safety measures where overhead appliances are
concerned by using a safety cable or something similar.
- Don't leave the machine unattended in the presence of children.

Instruction Manual PHOS 20 / LAP 20 LED Projector
Version 1.3, English
Tuesday, 19 April 2011
___________________________________________________________________________
info@derksen.com | DERKSEN USA | www.derksen.com Page 8of 10
W
Care to be taken when connecting to the power supply
- Ensure the voltage of the electricity supply system and the voltage of the machine are W
compatible. To this end take note of the typed stickers on the machine.
- The power cable must not be damaged. Ensure no strain or pressure is put on the cable.
- The cable shouldn't be twisted, bent, frayed or clamped. A damaged cable can result in electric
shocks and fires and must be renewed.
- Only use the machine with a completelyclosed body.
- Protect yourself from electric shocks by ensuring the machine isn't used in damp
surroundings or near spraying or dripping water.
- If liquid gets into the machine despite all precautions it must immediately be
disconnected from the power source. Don't touch the body, the influx of liquid could
cause an electric shock. Don't use the machine again until you're sure it's completely dry.
- Unplug the machine when it's not being used for long periods of time.
Care to be taken when setting up and operating
- Only use the supplied glass gobos in the machine. Don't use any other objects or film or
foil materials.
- Avoid touching the hot projector when it's in use if possible. Switch it off and leave it to
cool for at least 15 minutes before changing a gobo.
- Don't meddle inside or damage the machine in any way because that would contravene
the safety rules and negate the guarantee.
- If you hear unusual noises, see smoke or notice a strong smell switch the machine off
straight away and call a service technician. To carry on using the machine could result in
electric shock or fire.
Transport, cleaning & repair
- Transport and post the machine in its original packing if possible. If that's not possible
you can use a cardboard box with suitable inner protection.
- Only use a soft cloth to clean the outside of the machine. Don't use any strong cleaners
such as alcohol or petrol and only use recommended optical cleaners to clean the lens.
- Only a qualified service technician can carry out repairs to the machine and only original
replacement parts must be used.

Instruction Manual PHOS 20 / LAP 20 LED Projector
Version 1.3, English
Tuesday, 19 April 2011
___________________________________________________________________________
info@derksen.com |DERKSEN USA |www.derksen.com Page 9of 10
Specifications:
item:
PHOS 20 / LAP 20
body:
aluminum
weight:
2.8 kg
on / off switch:
on the back side of the machine foot
voltage:
90-264 V / 47-63 Hz
power consumption:
60 VA
light source:
20 W high power LED
projection distance in room light:
3 m
projection distance in darkness:
8 m
average lifetime of the light source:
30,000 hours
color temperature in °Kelvin:
6,500
luminosity of the light source in Lumen:
1,000
gobo size / image size:
50 mm ø / 32 mm ø
Components:
Standard series with high power LED, 85mm standard lens, mounting plate for standing or
fixing to walls or ceilings, power cable with plug. The machine is ready to plug in and run.
Required accessories: Glass gobo with individuallydesigned motif.
Measurements:
Safety certificates:
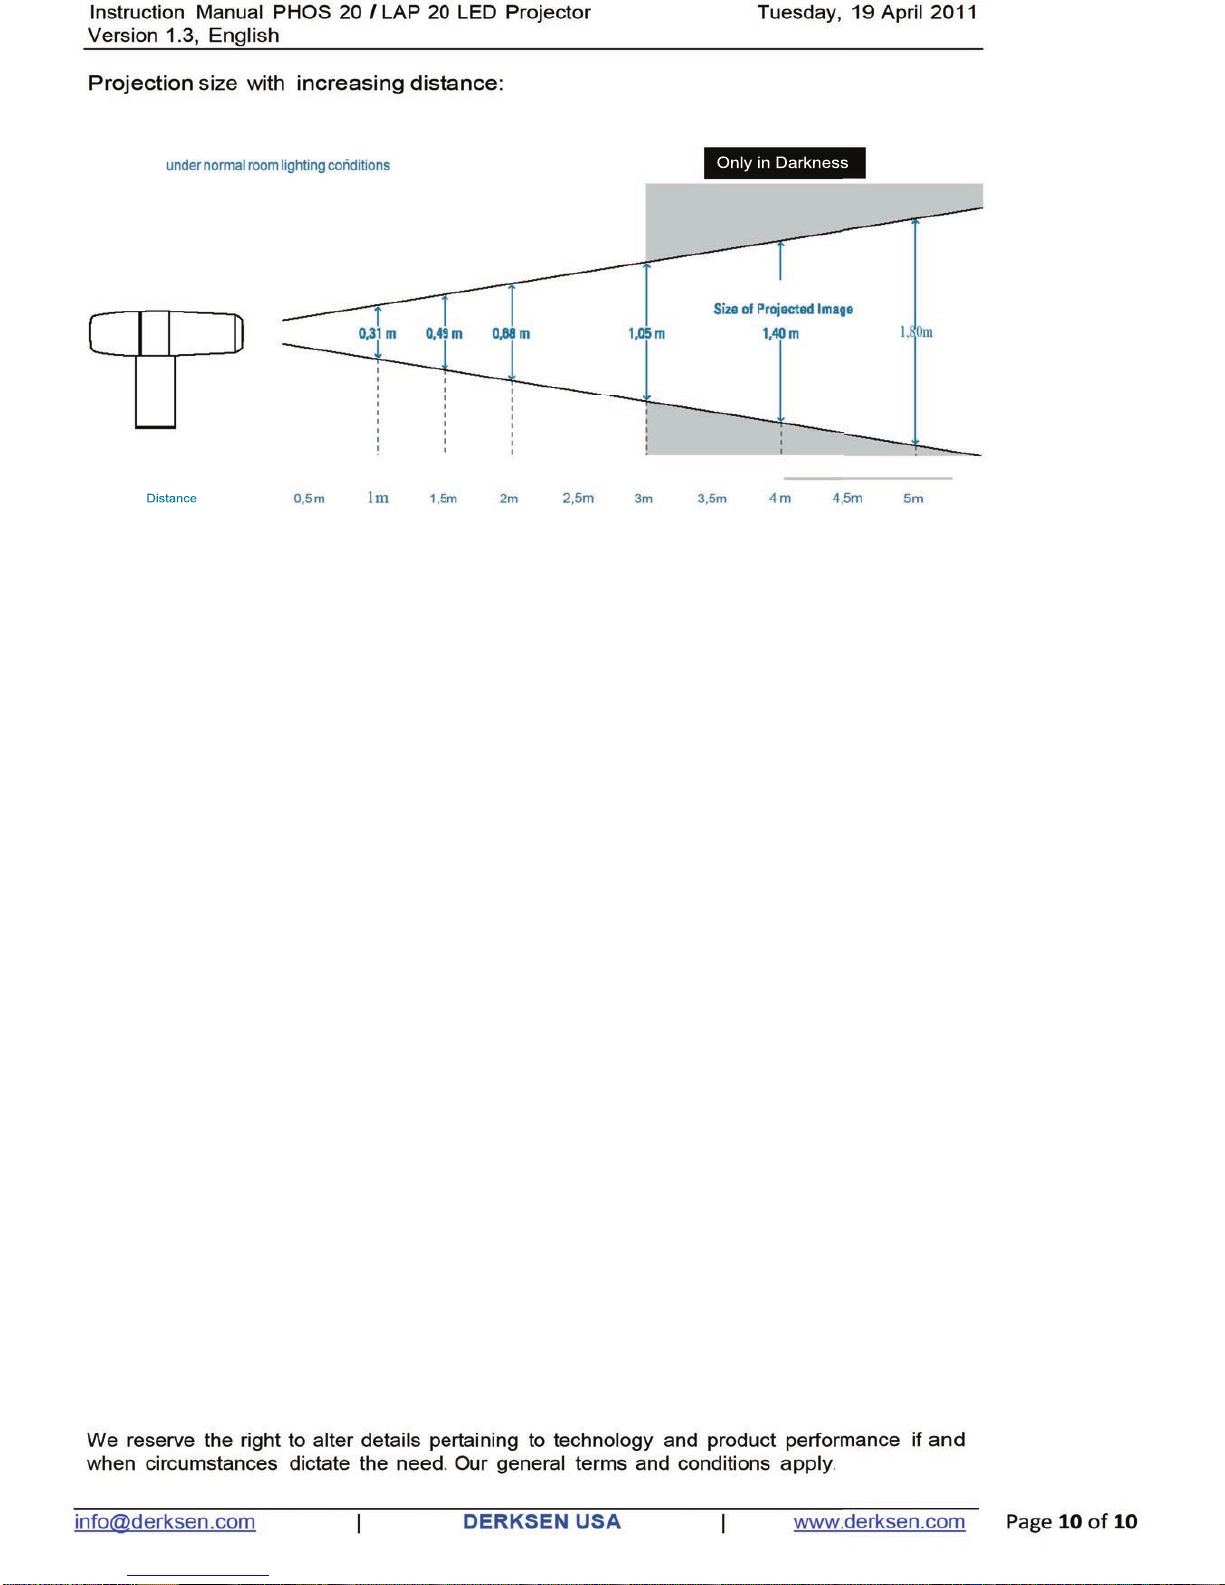
Distance
Only in Darkness
This manual suits for next models
1
Table of contents
Other Derksen USA Projector manuals


