Designer Appliances Aerobic User manual


OPERATOR GUIDANCE MANUAL
Table of Contents: Page
Windows Overview 2
Macintosh Overview 2
Plug and Play Installation 2
Hand Placement and Button Use 3-4
Mouse Properties Setting 4
Button Reassignment 4
Windows® Smart Move 5
Re-Syncing Cursor & Mouse. 5
Glide Well™ Mouse Mats. 5
Maintenance and Mouse Service 5
CD ROM Content 7
Nib™ & McNib™ Click-less Software 8
Nib (PC) Short Instruction Set 8
McNib (Mac) Short Instruction Set 13
Gestures Cheat-sheet 18
Computer Posture and Use 19
Condensed User Guide 21
Work Station Posture 24
Regulatory Information 25
Product Part Numbers 27
Contact Details 27
V 3.1: © Designer Applainces Inc 2002-2005 All Trademarks the property of their respective owners. Page # 1

OPERATOR GUIDANCE MANUAL
Hello
And thank you for making a most sensible purchase of the World’s first biomechanically
designed, Functionally Neutral so more “Aerobic” in use, computer mouse. The
common factor in most problems of computer overuse is the need to constantly apply
grip. It is now believed that avoiding the need to grip helps maintain better circulation to
the hand and so keeps tissues more oxygenated so help maintain an aerobic equilibrium.
AirO2bic™ mouse benefits form optical tracking for longer, more accurate and
maintenance free service and performance. It has three buttons, the third being actuated
by pressing the scroll wheel.
Installation is simple “plug n play” via a USB port.
Windows®
USB installation is simple, follow the new hardware prompts as they appear and let
Windows® find its own driver if the choice is offered, Microsoft® standard USB drivers
will provide most of the functionality that you need. Visit www.aerobicmouse.com to
check on updates and other user support information.
Macintosh
Macintosh OSX 10.X drivers provided should be sufficient for a problem free installation. This will
then provide utility within the “Classic” environment but OSX 10.X must be on board to achieve
this.
All Users:
Periodic updates and changes can be checked out on the Support Section of the
www.aerobicmouse.com website. You need to register at the website to be able to access
this service. Log on to the website and click on the “Register” in the bottom of the Black
Page Header. Purchases of PC or Mac Versions of the Clickless Software will need to
register to get updates.
Email Policy. *Please note!*
You will be asked for an email address. This will be used solely for the purposes of
updating users in regards to information relating to their products. It will not be used to
“spam you”, given or “loaned out” to any other organization. We use email too!!!
you can call toll free 1 866 WE MOUSE
V 3.1: © Designer Applainces Inc 2002-2005 All Trademarks the property of their respective owners. Page # 2
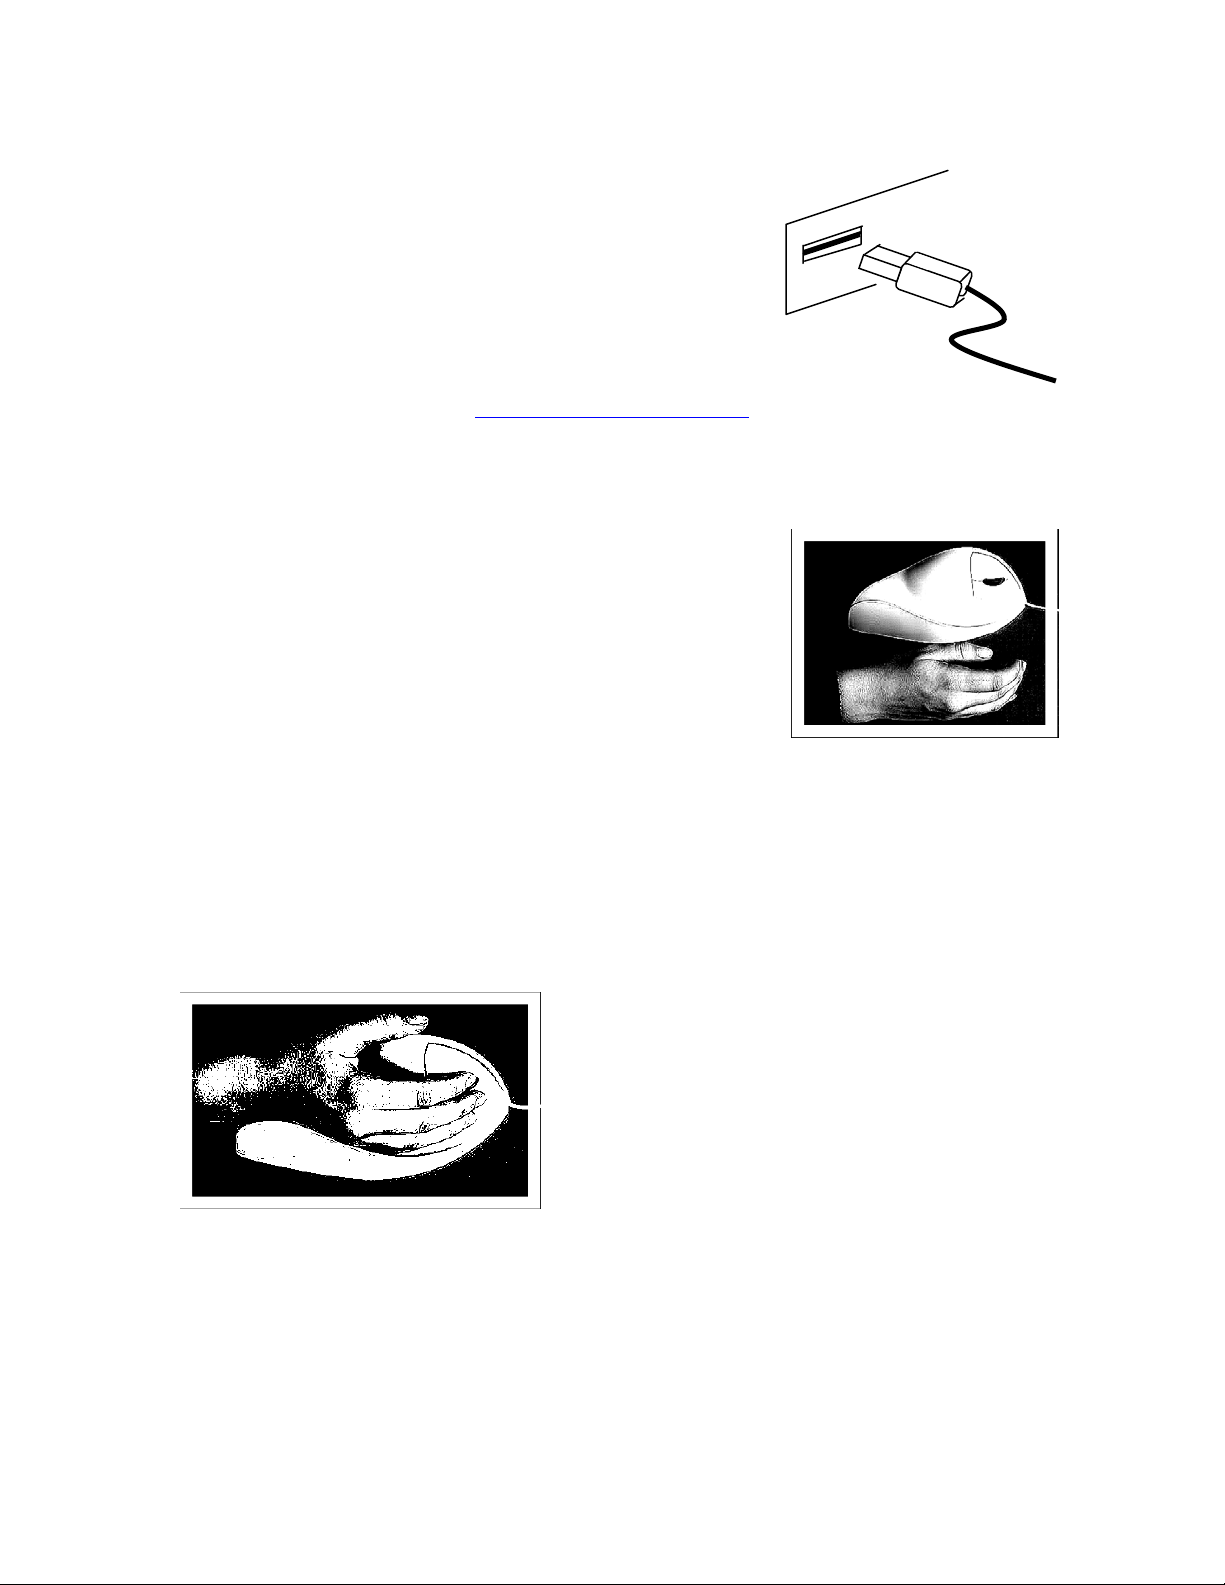
1. Plug and Play Installation
USB Port.
Note: PC users; If your mouse is not recognized (does not
work) ensure that you have all the latest Microsoft® updates
including and especially USB 2.0 Fast USB Driver.
Those preferring to use PS/2 can purchase an adaptor and NT 4.0 users needing
Hand Placement and Button Use:
Place your hand in a vertical orientation on a flat surface and
let it relax. Place your hand into the AirO2bic™ mouse so
that the “button mound” meets and makes contact with the
base of the palm of the hand, comfortably. As a guide;
average sized hands should place the middle crease (of 3
creases) seen on the inside of the wrist at the rear edge of the
mouse. Larger hands will more likely be at the first crease
nearest the fingers and smaller hands, the crease on the elbow
side of the wrist, so further in. Allow the wrist and forearm to “relax” into the
“wrist/forearm guide”. The thumb should be free to float or rest in its normal “at rest”
position. DO NOT “force” the thumb into a position where the muscles are kept tensed
by moving it from its resting orientation so as to locate it on the mouse. Fingers and
thumbs support themselves and attempts at artificial support of them on a device will
invariable cause a forced so static posture if a predetermined “support” surface is
provided. Functional Neutral is best achieved by allowing your fingers and thumb to
locate themselves.
There is no need to use the tip of the fingers to
press the mouse buttons causing fingers to “claw”.
A small movement of the finger easily presses the
buttons. Likewise the scroll wheel can be rolled
using the inside of the middle finger and pressing
with the middle finger activates the third button
and it is also typical that the middle finger operates
the lower button.
For the most “muscle tension” free mousing technique use Nib™ (PC) or McNib™
(Mac) click-less software, a 30-day demo version can be loaded from the CD supplied.
V 3.1: © Designer Applainces Inc 2002-2005 All Trademarks the property of their respective owners. Page # 3

Right Handed: Buttons and Finger Positions
Right Index finger
Upper Button
Middle Button
& Scroll Wheel
Lower Button
Left Handed: Buttons and Finger Positions
Left Index finger
Upper Button
Middle Button
& Scroll Wheel
Lower Button
Remember for right-handed mice the “Left Click Button” is now the upper button and the
Right Click is now the lower button. This will be instinctive in use. For left-handed
users the configuration is the same, the upper button is “Left Click” and the lower button
“Right” but buttons can be user specified as required in the mouse control panel or by
downloading and installing the Airobic Panel ™ Over Driver (see below).
Mouse Acceleration (PC) & Tracking (Mac) Settings.
You may wish to reconfigure your mouse settings to adjust click rate, speed and button
functions to find the settings you prefer.. PC users (also see Windows® Smart Move
below) click on “Start-Settings-Control Panel-Mouse (Properties)” or click on the mouse
icon on the lower right of screen (PC) status tray if one is present. Mac Users select
increase “Tracking Speed” in Keyboard and Mouse from System Preferences. If you find you
are running out of room when using your AirO2bic™ mouse, try increasing the
Acceleration (PC) Tracking (Mac) setting to reduce the distance traveled over your mouse
mat relative to that traveled by the cursor on the screen. For other advice see “Mouse
Mats” below.
Re-Assigning Mouse Buttons: (Aerobic Panel Download. Windows 2000 & XP Only)
This is typically achieved by using standard properties found in the Mouse Properties
Section of Control Panel. In some case however certain PC suppliers or previous
manufacturer’s driver installations can alter this utility and we have therefore developed
our own “OverDriver” called the Aerobic Panel that is provided on the enclosed CD with
updates as they occur on the member download section of the website. This will add an
extra Tab to the Mouse Properties section allowing for reassignment of all 3 buttons.
Request or suggestions for other functionality in this application are invited (but inclusion
not guaranteed).
V 3.1: © Designer Applainces Inc 2002-2005 All Trademarks the property of their respective owners. Page # 4

Windows® Smart Move (Mouse Properties/Setup/Motion Tab)
“Smart Move causes the cursor to jump to the highlighted button of a new dialogue box”
What this results in is your cursor changing position independent of mouse movement.
This means that the mouse position on your mouse mat and the cursor position on the
screen will become out of sync. The result is that you can run out of mouse mat and need
to “re-sync” the mouse and the cursor position frequently by moving the mouse. If this
happens there is no need to pick up your mouse to do this! (see: Re-Sync below). By
switching Smart Move Off you avoid losing sync in this way.
Our Suggestion: “Turn Smart Move Off”
Re-Syncing Cursor & Mouse.
From time to time you may find that the cursor position on the screen becomes out of
sync relative to the position of your mouse on your mouse mat (also see Mouse
Properties Settings above). Your AirO2bic™ mouse is an optical mouse and so does not
require lifting to re-sync the mouse to the cursor. Simply move your mouse near to each
edge of your mouse mat (North, South, East and West) and it will automatically re-sync
itself. This works because if the cursor reaches any edge of the screen before the mouse
reaches the equivalent edge of the mouse mat then cursor stops and waits. Because
AirO2bic™ mouse is optical as soon as you move in the opposite direction the cursor
immediately starts to move in that direction, so taking up the “out of sync slack” that
existed before.
Once you have your mouse settings optimized and you get to “know your mouse mat
operating zone”, this process will become instinctive on the few occasions it will be
necessary.
Glide Well™ Mouse Mats.
These are specially made to work with the feet of AirO2bic™
mouse to reduce friction and so the amount of effort used when
you are mousing. They also provide sufficient mousing area to
work effectively and give a constant reminder of better working
postures.
If you have an old mouse mat designed for a roller ball type
mouse made of cloth or hard plastic surface, this should be
replaced. These surfaces were designed to create traction with
the roller ball so as to make it move. With optical mice this is
not necessary and the extra drag it creates is not neede
www.aerobicmouse.com
d.
Maintenance and Mouse Service:
You should regularly clean your mouse mat surface to keep it smooth and slippery;
computer cleaning polishes and tissues should be OK.
The body or AirO2bic™ mouse is made of a durable lightweight material specially
selected for its “back to new” cleaning properties. This is not possible to achieve with
V 3.1: © Designer Applainces Inc 2002-2005 All Trademarks the property of their respective owners. Page # 5

the “furry” materials that other manufacturers may use that feel “nice” when new, which,
due to the mouse work load (and constant grip), can eventually wear down. We want our
products to look as good as they work for the long period of service we expect that you
should get from them. The regular use of computer cleaning materials will remove the
small build up of debris that will occur in normal use.
You might be advised to replace your mouse mat once a year and mouse feet
periodically, which will be dependent upon your extent of usage and your hand weight.
Mouse Feet Replacement.
Your AirO2bic™ mouse comes with a replacement self adhesive feet attached to a card
as in the example (the number of spare feet supplied may differ; this
image is for the purpose of identifying the spare feet card within the
mouse packaging only). If you notice wear on the mouse feet or find it
more difficult to move around you can replace them by simply using a
pin or pointed object to lift the old feet, remove any adhesive material
left behind and then carefully peel off a new foot from the card and
locate it within the mouse foot guide. This will make your AirO2bic™
mouse glide like new again. Contact us if you need further supply in
the future and remember mouse mats wear out too.
Mousing Surfaces:
Optical mice are effectively “cameras” taking pictures many thousands of times a second.
The mousing surface is a critical component in that process acting as a mirror and lens to
translate your movement as cursor movement on your screen. Any imperfections in the
mousing surface that can develop over time from the wearing of wrist jewelry or other
work activity on the desk surface may mark or score the surface leading to deterioration
in mousing performance. Often this causes jerky cursor movements and is often
considered a problem with the mouse. To test mouse optical performance; take a piece
of plain white printer paper, ideally Bright 100+. If movements are smooth and accurate
on the paper then it is the mousing surface that has a problem. If you are using a mouse
mat then it is time to replace it. If you are using your desk top as the mousing surface
then it has become scored and will continue to give problems so it is time to buy a mouse
mat, which is easier and cheaper ad more serviceable than replacing a desk.
Shinny or Glossy Surface mousing problems: if you use a shiny, heavily varnished or
lacquered desk surface and notice problems at certain times of the day and year, this
maybe due to a strong light source from a window being reflected into the optical path.
Using a mouse mat typically avoids this.
Those using the older slightly rough surfaced mouse mats, designed to make sure that
there is sufficient friction to roll the “roller ball”, can now replace them and so remove
this friction as, though seemingly small, the extra effort this creates is no longer needed.
V 3.1: © Designer Applainces Inc 2002-2005 All Trademarks the property of their respective owners. Page # 6

CD - FILES ON THE CD ROM PROVIDED: (Alphabetical as they will appear)
1. Mac Software Folder
McNib.dmg: Time Restricted, expires after 30-days, Software Key unlocks.
McNib (only) Instruction Set.
Nib Tutorial Video
2. Manuals & Brochures
Operator & Guidance Manual (copy of this manual)
Usage & Warranty Manual
Product Range Overview
3. PC Software Folder
Aerobic Panel Folder.
Aerobic Panel.msi Software (see Re-Assigning Mouse Buttons: page 4)
Release Notes.
Nib Software Folder.
Nib.msi Time Restricted, expires after 30-days, Software Key unlocks.
Nib (only) Instruction Set.
Nib Tutorial Video
4. Section 508 Information (of Interest to US Government Purchasers)
AirO
2bic™ Mouse VPAT
Meet Section 508 Flyer
Nib Software VPAT
The Virtually Hands Free™ mousing System VPAT
Software Updates
To check for later versions or if having installation issues please visit the member download section of
www.aerobicmouse.com. You need to be registered to access this section and use a real email address,
accurately entered, as a confirmation email is sent to you to activate the registration.
Upgrading to Clickless Software.
Those wishing to upgrade to Clickless will receive the applicable “existing user discount”
by purchasing on-line at www.aerobicmouse.com and selecting “Shop Now”. Choose
either Nib for PC or McNib for Mac versions and at the check out enter “NIBUPGRADE”
or “MCNIBUPGRADE” as the promotional code, click on “update” (button to the left) and
an existing users discount will be applied. Please enter the serial number of your mouse
in the comments box to confirm the upgrade. Orders will not otherwise be processed.
V 3.1: © Designer Applainces Inc 2002-2005 All Trademarks the property of their respective owners. Page # 7
Nib™ & McNib™ (with Gestures) Click-less Software.
(This Information applies to demo and full, Purchased, versions)
hen re-established.
Nib™ (for PC) & McNib™ (for Mac) work by intelligently monitoring
your cursor moves on the screen. When you pause the mouse click is
made for you. These software are a reinvention and a platform
extension of a program called MouseTool. Nib™ & McNib™ allow
users to point at the screen and have it click for them by pausing over
the icon or file. As most clicks are left or AirO2bic™ mouse upper
button clicks, a toolbar is displayed so that a right or a double click can be selected by
pausing over that icon. In a new development Gesture technology removes the need to
go to the toolbar for that purpose, users pause over the file or icon then “Gesture” the
type of click they need, e.g. to the right and return to perform a right click. The default
left clicks is t
They are different to all other dwell time programs in that they have visual indicators at
the cursor that allow users to see what is happening in the part of the screen they are
viewing. They are optimized for web browsing and so uses can surf all night (taking
breaks as needed) and not have to click a button. They also have intelligent break timers
that monitor activity and adjust the time to the next break on that basis. The PC version
has the option to disable the keyboard and mouse for the duration of the break.
Nib (for PC) Short Instruction Set: (see “On Board” Help for further detail)
HotSpot ™
A prompt at the cursor lets you know what Nib is doing
Hyperlink
A cursor prompt lets you know where Nib is going on the web
DragnMove™ highlights text, copies & pastes and moves frames. Click Count
monitors User & Software clicks so users know just how much muscular activity they
save.
Break Timer sets an interval between breaks as well as the Break Duration.
Hotkeys allow keyboard emulation of many mouse button functions and
V 3.1: © Designer Applainces Inc 2002-2005 All Trademarks the property of their respective owners. Page # 8

ApplyNib sets different functions in different windows.
Upon opening Nib for the first time, the timer is activated and you will see it start to
count down in the blue upper section of the Toolbar sho
bottom of the screen). The “auto-click” function is
"Off" and so the Toolbar looks like this.
wn (and in the menu bar at the
he simplest way to turn it on (and off, as it is a toggle function) is to use the “Hotkey”
efault Option Settings: “Comfy User” Suggested Options:
ause Time the “Dwell Period” between the cursor stopping and the click.
ick before
e next click will be “primed”.
T
combination of “Alt+O” keys (that is the letter O not a zero), This Hotkey function
switches Nib On and Off making the Green dot appear when Nib “auto-click” is On. The
Timer is always working when Nib is open and
continues to work after the 30-day trial period is over.
D
P
Pause Zone the distance in pixels (screen dots) that you have to move after a cl
th
V 3.1: © Designer Applainces Inc 2002-2005 All Trademarks the property of their respective owners. Page # 9

Audible Track makes a sound when a click occurs (leave it off it’s annoying!).
Start Nib when Windows Start starts Nib when Window’s starts.
you will
ar for the “Next Click” only. Afterwards it goes back to the
efault left click. To change a click to a double click, pause over the vertical dots on the
nable Gestures turns the gestures function on when checked. If triggered accidentally
For those with
visual color impairment BallPark is a much larger circle than HotSpot and
ragnMove Value Box; think of Pause Time (described above) as the time before the
f
ause time is set to 4 and DragnMove set to 6, after 4 tenths of a second pause HotSpot
that typically highlight blue (or purple if clicked in the past).
heck it and the Hyperlink triangle (shown above) will form over the period of time set
s is to prevent accidental closure of files.
reak Timer.
encourage better break behavior and allows users to look at or listen to
vorite pictures or music, screen savers, listen to Internet News or Radio stations if
Keep Nib on Top refers to the Nib Tool bar. When you get used to Gestures
not need the Nib Toolbar.
"Override Next Click Only" allows you to change the default left click to a double or
right click from the Toolb
d
Toolbar until it “clicks” down. Move to the item, like a file or program link on Windows
Desktop and when you stop it will do a double click so open the item. A Right (menu)
click works the same way only this time by pausing over the “lower dot” on the Toolbar.
Nib Gestures (see cheat sheet below) allows you to make Gestures to change the default
click to a left or a right and also drag items under DragnMove.
Visual Dragging Indicator keeps HotSpot “lit” while you are dragging.
Esimply land outside of BallPark and the gesture will be ignored.
appears away from the cursor.
DragnMove enables it when checked. A prompt will open when first checked.
Enable
D
button is clicked down and DragnMove time over which the button is held down. So i
P
will appear as the click takes place and the DragnMove setting hold the button down, so
keep HotSpot visible, for another 6 tenths of a second. If you move while HotSpot is
visible DragnMove is frozen until you stop again and after you do, and HotSpot
disappears, whatever you are dragging is let go. Remember to let the cycle, HotSpot
appearing and disappearing, complete. Increase the DragnMove value to give you more
time to drag, highlight etc.
Enable Hyperlink to have Nib give you time to review a hyperlink on any web page or
where there are active links
C
in the “input box”. A value of 10 = 1 second.
Close Window Prompt uses the same blue triangle visual indicator when the cursor is
placed over a “Red X close window box”. Thi
B
Please Note: A new standalone break timer called StopWatch™ is coming soon. This
is a new way to
fa
V 3.1: © Designer Applainces Inc 2002-2005 All Trademarks the property of their respective owners. Page # 10
connected and permission to visit such sites is provided. It also “calls a break” on the
basis of time verses activity (as does Nib), but it also has the option to call a break on a
time base only if desired. It will be downloaded-able from the aerobicmouse.com
website and also a new site, www.StopWatchBreakMedia.com will be the location for
selection and support of the services that StopWatch™ break will provide.
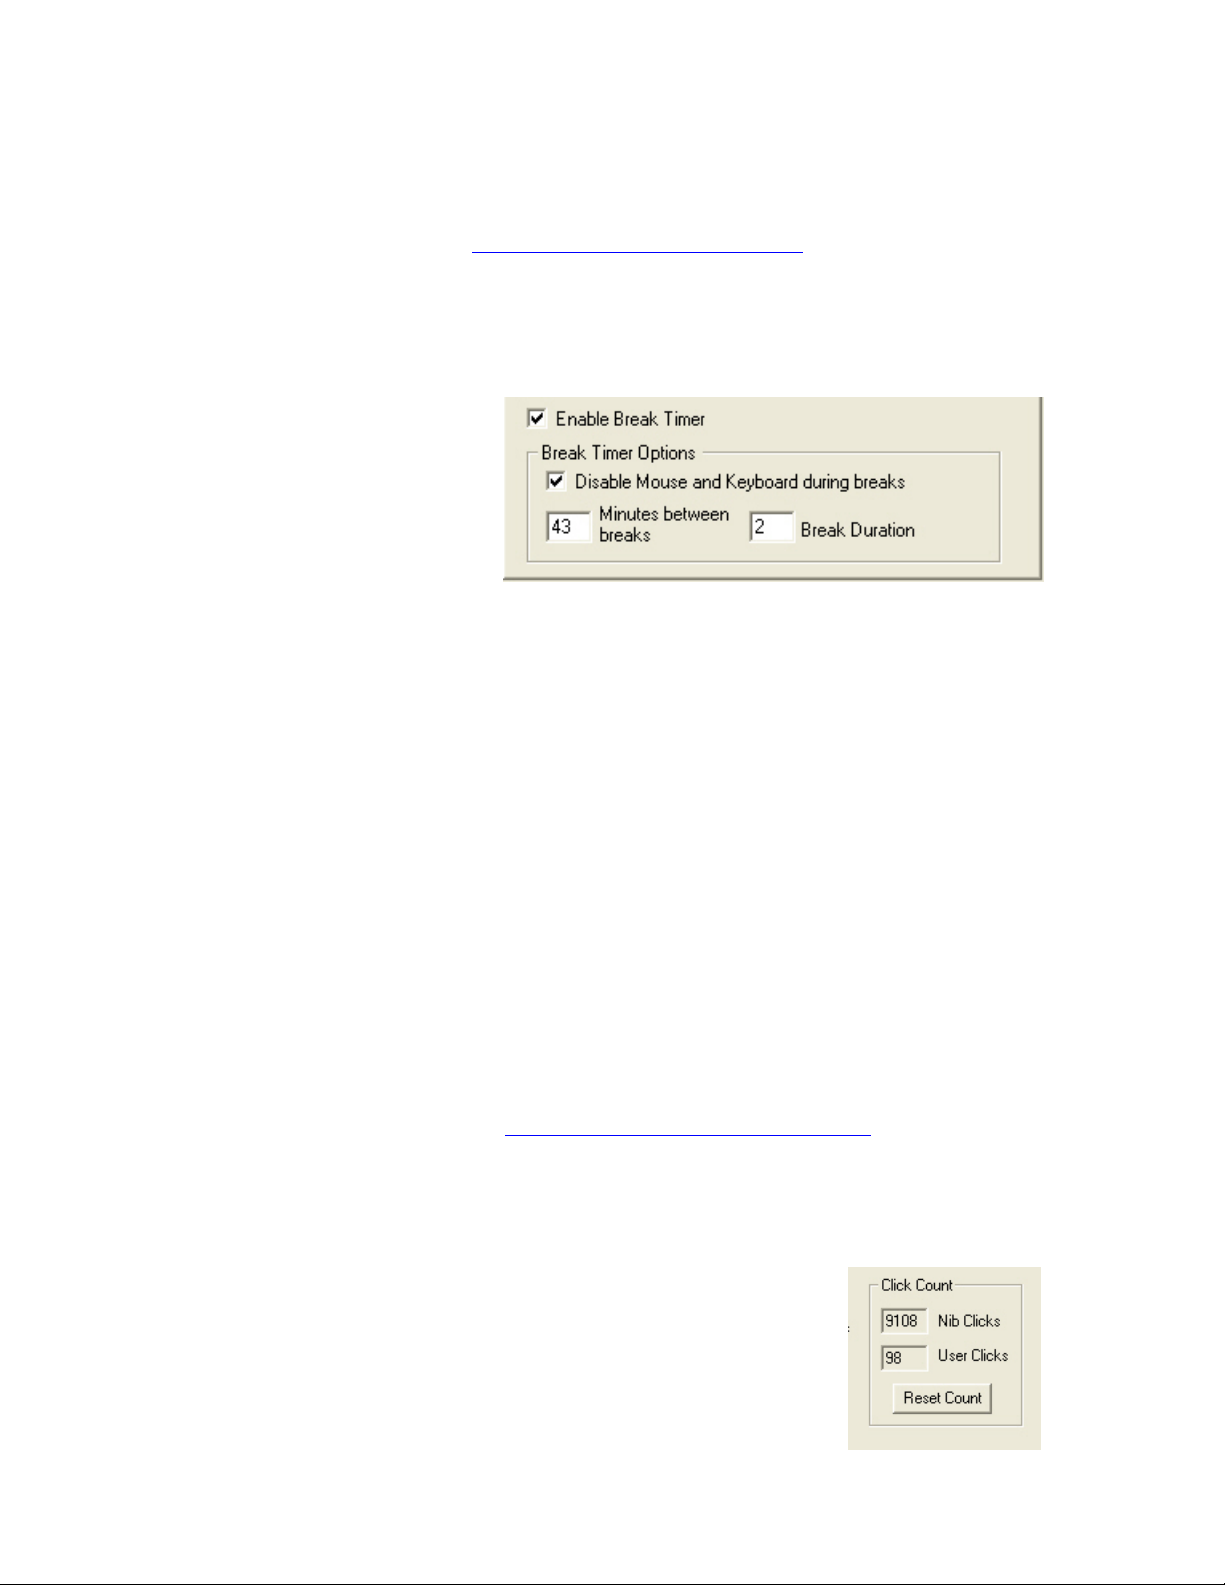
Disable Mouse and Keyboard during breaks (PC Version ONLY) is a user option that
disables the mouse and keyboard during the scheduled break, for those that need more
Positive Motivation” to take a break to just stretch or walk around. Dehydration is
ter 30 seconds the system starts to add time back to the count down
the next break. You will see it say “Adding Back” when this happens. In the example
emains at the Break Duration time set
ntil you stop keyboarding or mousing and so allow it to count down. If you have the
“
considered a contributory
factor in regards to fatigue, so a
walk to the water fountain
stretches and aerates muscles
as well as re-hydrating tissues.
Minutes between breaks this
is the total “hands on” time that you spend typing or mousing before the system prompts
you to take a break. It is not just a count down timer. If you stop working with the
mouse or keyboard af
to
above if you have 10 minutes to go before a break when you stop to answer the phone
say, for a total of 1 minute (which is half the 1 minute break duration) then 21.5 minutes
will be added back as you have taken a mini-break amounting to half of that of the full
break set, so you get half of the “hands on” work time back. This helps to manage
productivity not risk.
Break Duration this is the length of time you spend in the break. If Disable Mouse and
keyboard is not checked, you simply get a box that prompts you to take the break. If you
continue to work the countdown in Break Timer r
u
“Disable” checked then when the box appears the keyboard and mouse are disabled and
the timer counts down until the break is over and the mouse and keyboard are re-enabled.
Some will punch keys and shake their mouse because they forget that they have checked
the box. Others, who might need a letter that explains to their boss why they aren’t
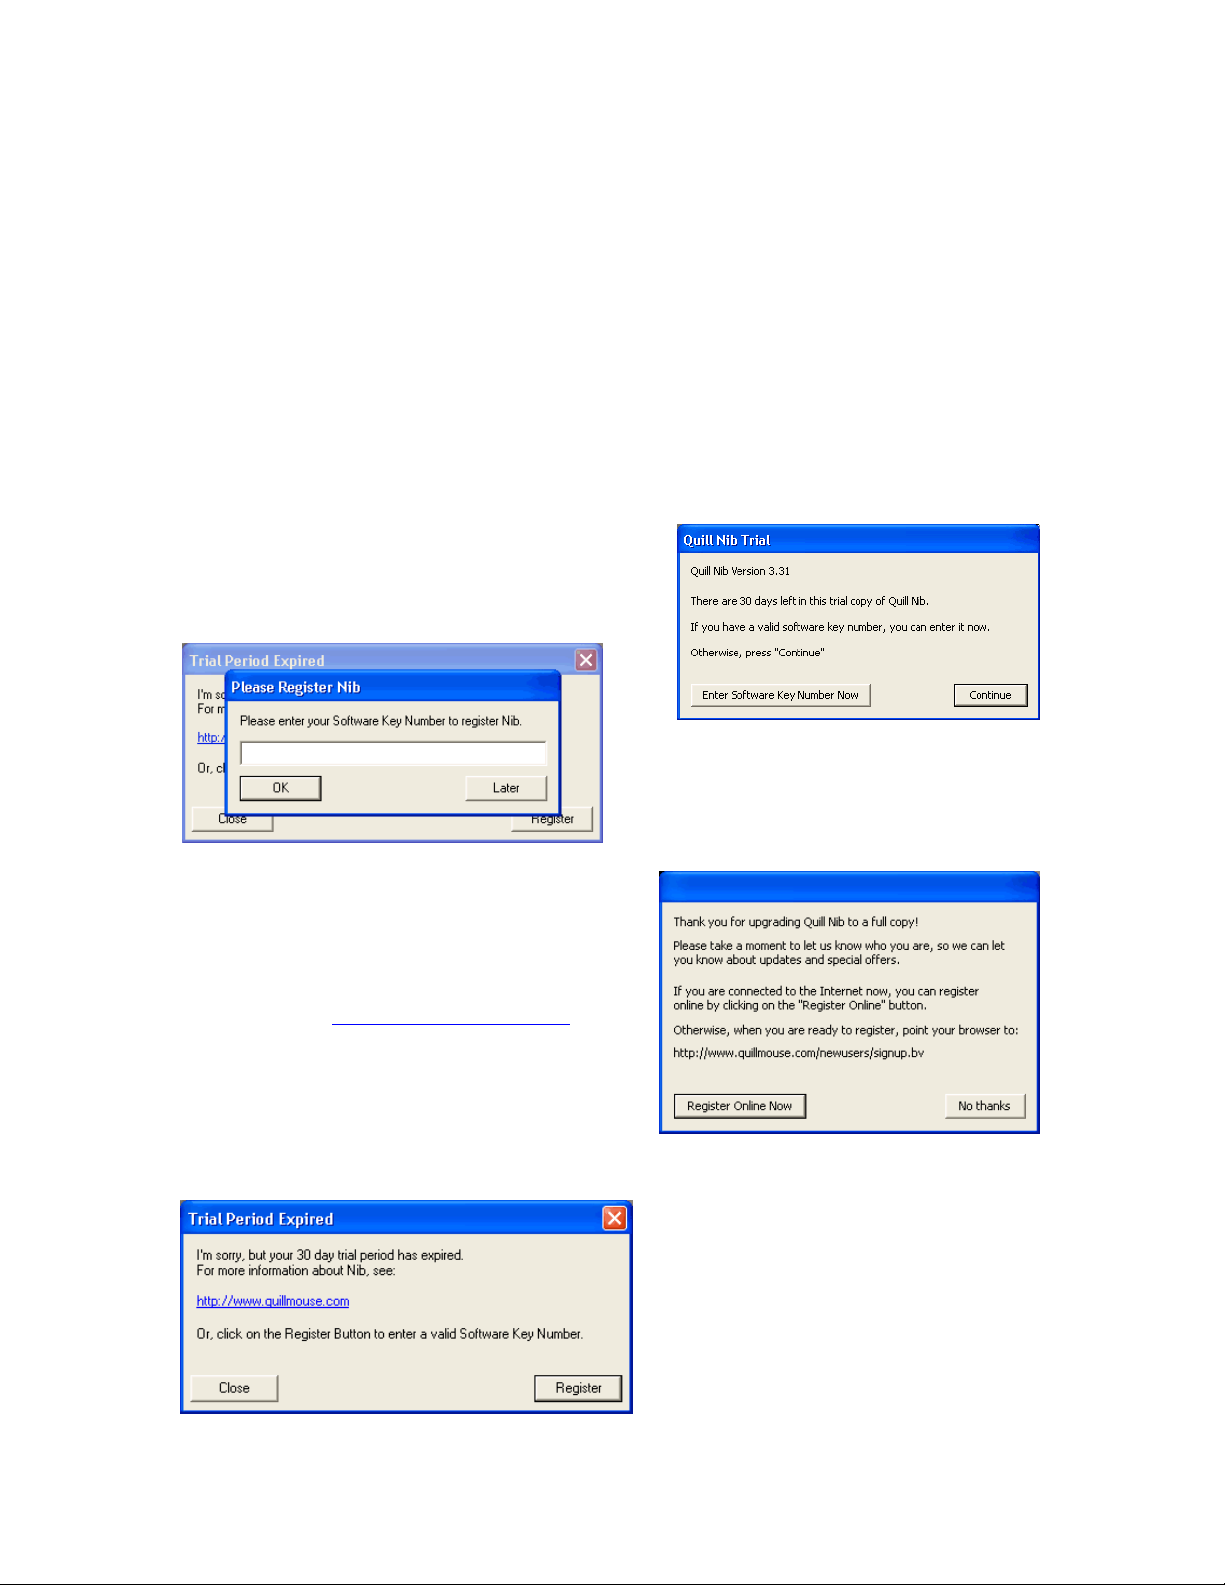
About Box tells you which version you have, your software key number and, if a demo
version, how many days are left in the trial.
Click Count
that Nib software has
erformed, user clicks are “manual’ clicks performed. The figures
ual and typical of a day in the life of this Designer
ppliances Inc employee!
Nib Clicks are the number of “auto-clicks
p
shown are act
A
Page # 11V 3.1: © Designer Applainces Inc 2002-2005 All Trademarks the property of their respective owners.
Hotkey & ApplyNib Functions
S
V 3.1: © Designer Applainces Inc 2002-2005 All Trademarks the property of
their respective owners. Page # 12
ee the “on board” user instructions for a fuller explanation of the above and also how to
se and apply Hotkey and ApplyNib functions.
or as a part of the Virtually Hands Free™
ousing system and have your software key you will be asked to enter it during
e limitation. If you received you software key after
ou will be reminded how many days are left
fter clicking on the “enter Serial Number
ey Box you will see this window. Enter
our Software Key and click OK
Then you will see this window confirmi
registration and activation on your computer.
e also advise that you register by clicking on
u
Software Activation.
If you have purchased Nib Software standalone
m
installation. This will remove the tim
installation and use there are two options for full, time unrestricted, activation: -
On Windows Start Up or via the “About” tab found in Nib Options
Y
and prompted to enter a Software Key.
A
K
y
ng
W
the “Register Online Now” tile or you can do it
later online at www.aerobicmouse.com. This
ensures you get update notifications.
Email Policy. *Please note!*
You will be asked for an email address. This will be used solely for the
purposes of updating users in regards to information relating to their
oducts. It will not be used to “spam you”, given or “loaned out” to any other organization. We use email too!!!
your evaluation period has expired
en you will see this window. If you
urchase a software key click on the
pr
If
th
p
register button to open the Software Key
Input box seen above.
McNib (Mac OS 10X is required and McNib will perform clicks over Classic
Environment)
HotSpot ™
A prompt at the cursor lets you know what Nib is doing
DragnMove™ highlights text, copies & pastes and moves frames.
Mouse History monitors User & Software clicks so users know just how much muscular activity
they save and how many pixels they travel.
Break Timer sets an interval between breaks as well as the Break Duration.
Hotkeys allow keyboard emulation of many mouse button functions and
ApplyNib sets different functions in different windows.
McNib Short Instruction Set:(see “On Board” Help for further detail)
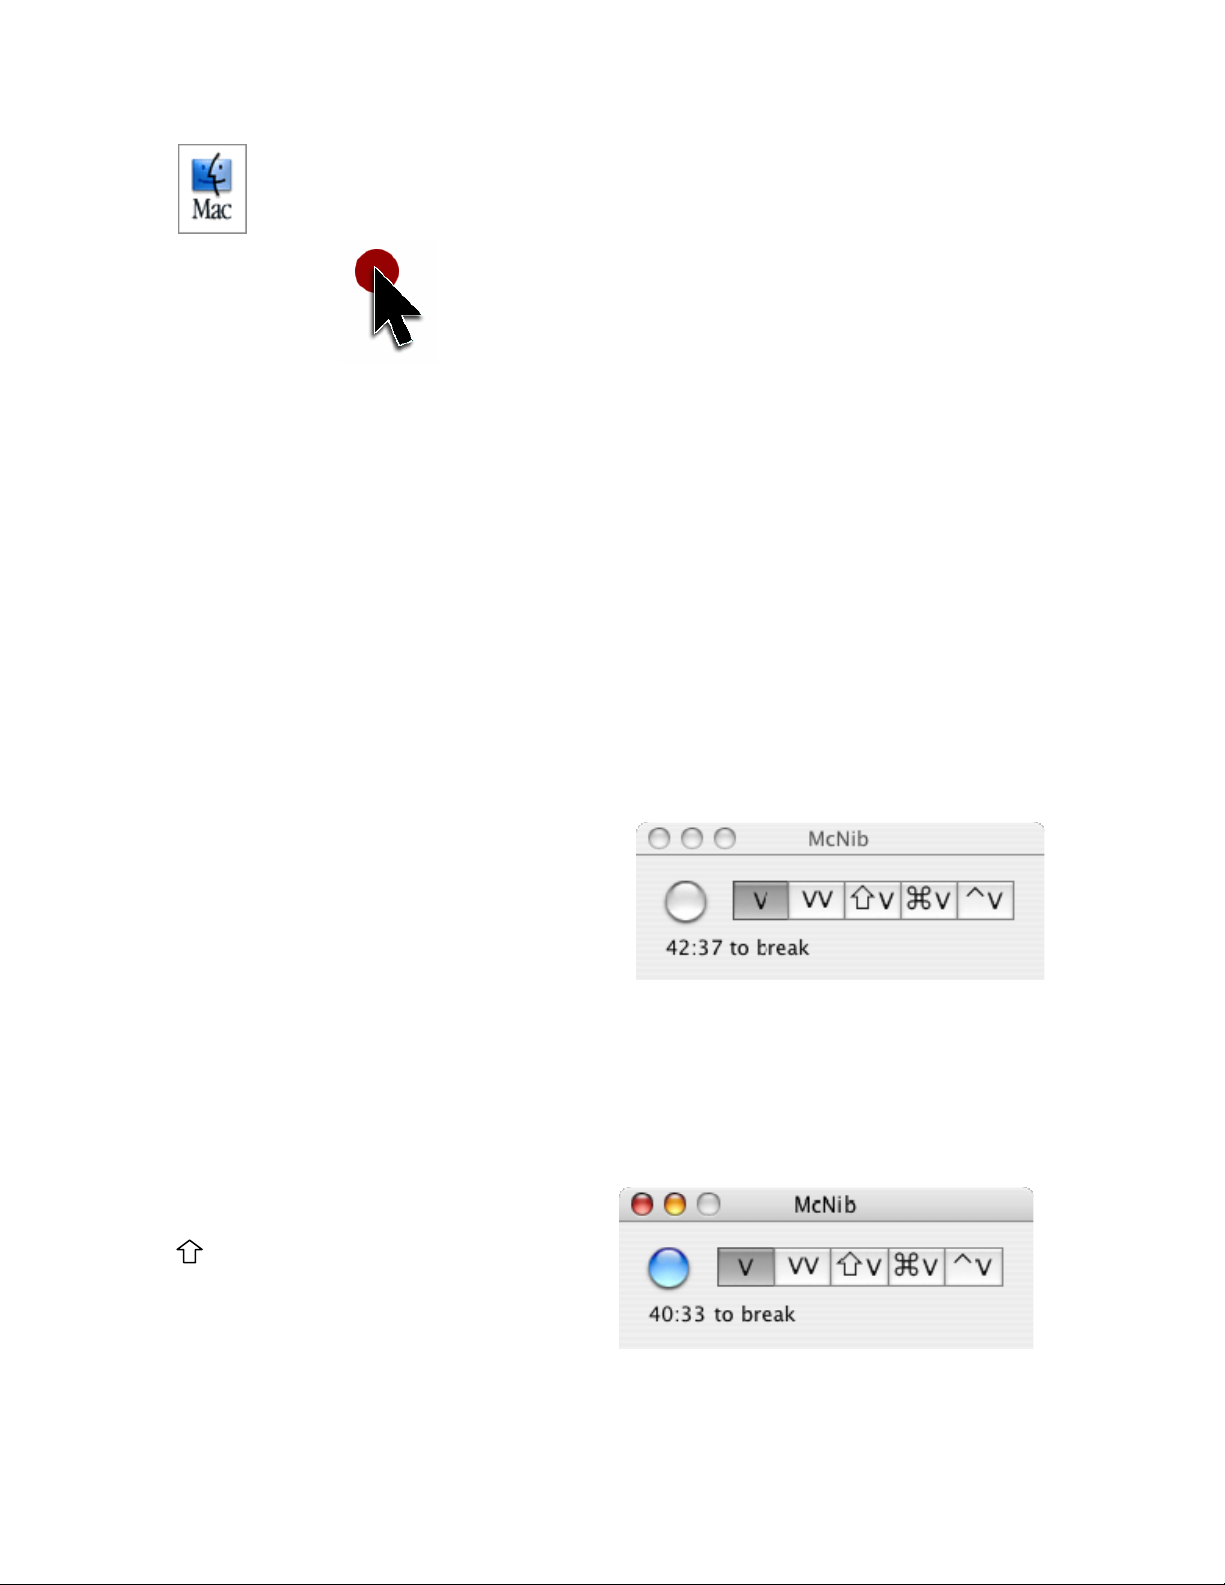
When McNib first starts, it looks like this:
The round button on the left turns McNib on or off.
The simplest way to turn it on (and off, as it is a
toggle function) is to use the “Hotkey”
combination of “Ctrl+O” keys (that is the letter O
not a zero). When McNib is on, it will click the mouse each time the mouse pauses.
The buttons to the right change the way McNib clicks. For example, if you click on the "VV" button,
which then turns gray, to show it is “primed” then McNib will send a double click the next time you
pause the mouse and then return to performing left clicks. The different buttons generate these
types of clicks: (Note blue circle which means “McNib On”)
VSingle click (default)
VV Double click
VShift click
aV Command click
^V Control click
Break Timer: if enabled, is seen when the McNib window is open.
V 3.1: © Designer Applainces Inc 2002-2005 All Trademarks the property of their respective owners. Page # 13
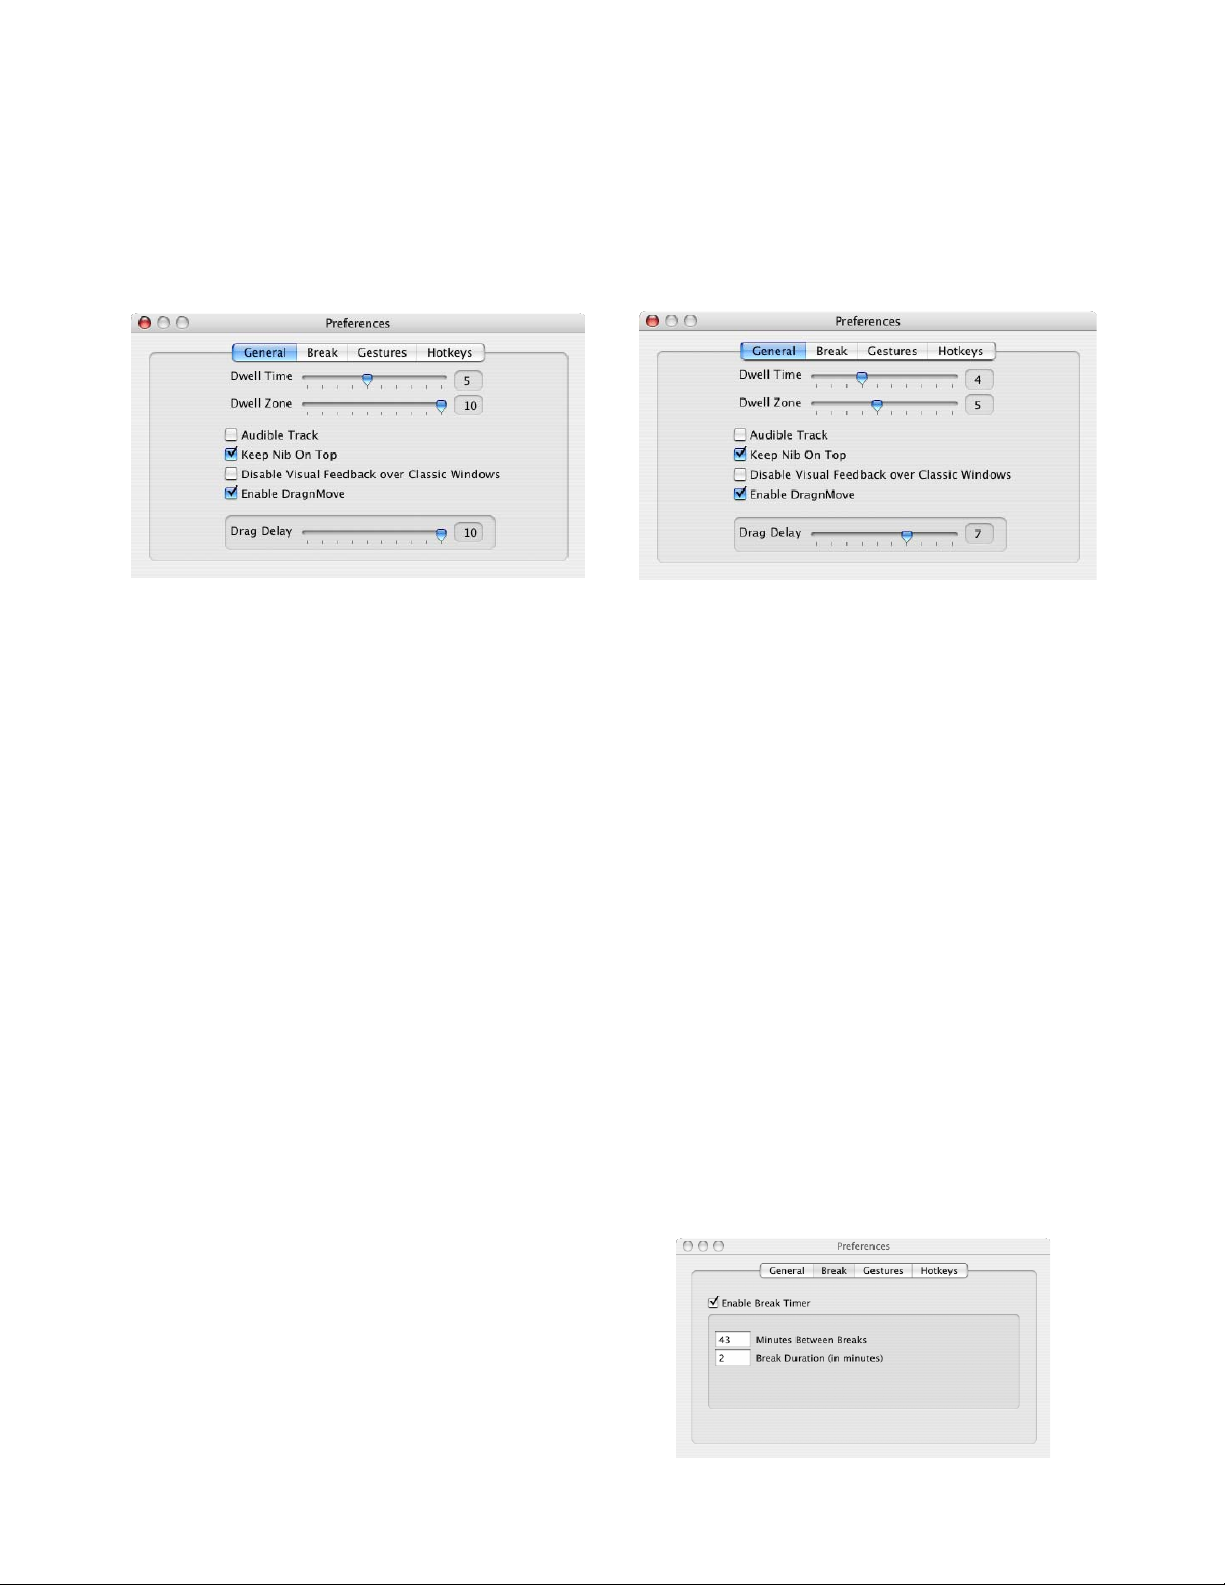
eview: McNib Preferences.Quick R
General (tab):
efault Settings: “Comfy User” Suggested Options:
u have to move after a click before the next
lick will be “primed”.
!).
Tool bar
Classic users, once they become accustomed
ond. If you move while HotSpot is visible Drag Time is frozen until you stop again
a pot disappears, whatever you are dragging is let go. Remember to let
g and disappearing, complete. Reduce the Drag time value as you get
s the timer On and the count down
D Option
Dwell Time the “Dwell Period” between the cursor stopping and the click.
Dwell Zone the distance in pixels (screen dots) that yo
c
Audible Track makes a sound when a click occurs (leave it off it’s annoying
Keep McNib on Top refers to the McNib
ot need the McNib Toolbar. . Once you get used to Gestures you will likely
n
Disable Visual Feedback Over Classic Windows
to McNib will find this easier to work with.
Enable DragnMove enables it when checked.
Drag Delay; think of Dwell Time (described above) as the time before the button is clicked down
and DragnMove “Drag Time” the duration over which the button is held down. So if Dwell time is
set to 4 and Drag time set to 6, after 4 tenths of a second pause HotSpot will appear as the click
takes place and DragnMove will hold the button down, so keep HotSpot visible, for another 6
nths of a secte
and fter you do, and HotS
ppearinthe cycle, HotSpot a
more comfy.
Break (tab):
nable Break turnE
is seen in the McNib window.
V 3.1: © Designer Applainces Inc 2002-2005 All Trademarks the property of their respective owners. Page # 14

Minutes between breaks this is the total “hands on” time that you spend typing or mousing before
e system prompts you to take a break. It is not just a count down timer. If you stop working with
yboard after 30 seconds the system starts to add time back to the count down to
e next break. You will see it say “Adding Back” when this happens. In the example above if you
f 1
minute (which is half the 1 minute break durat n) then 21.5 minutes will be added back as you
on” work time back. This helps to manage productivit
Break Duration this is the length of time you spend in the break.
Feel free to reduce these as they are defau
Gestures (tab);
nable Break turns Gestures On and reduces the need to visit the McNib Toolbar, so you can also
euver. If triggered accidentally simply land outside of Ball Park and the
gesture will be ignored. Increase the Zone setting to increase BallPark’s size. For those
tSpot and appears
way from the cursor.
otkey (tab): the keyboard can be used to call HotKeys
bout McNib tells you which version you have, your
any
th
the mouse or ke
th
have 10 minutes to go before a break when you stop to answer the phone say, for a total o
io
have taken a mini-break amounting to half of that of the full break set, so you get half of the “hands
y not risk.
lt settings and are not intended recommendations
E
uncheck the McNib always on tip once you are comfy.
Gesture Zone Size varies the size of “Pall Park” the target zone that, if you land in, completes the
gesture man
with visual color impairment BallPark is a much larger circle than Ho
a
H
for the functions described. The HotKey settings can be
changed by the user.
Mouse History.
McNib Clicks are the number of “auto-clicks that McNib
software has performed, user clicks are “manual’ clicks
performed. Pixel distance traveled is also displayed.
A
software key number and, if a demo version, how m
days are left in the trial.
V 3.1: © Designer Applainces Inc 2002-2005 All Trademarks the property of their respective owners. Page # 15

Software Activation.
When you first open McNib, whether you have purchased it as
a part of the Virtually Hands Free™ mousing system or you are
running the 30-day evaluation version you will be asked to
enter a software key. Please enter it if you have one or click
“Later”
g on
register. Doing so removes the time limitation.
the 30-da art, this message.
After registration you will be pro
register on line.
Email Policy. *Please note!*
You will be asked for an email address. This will for the purposes of updating users in regards to information relating to their
products. It will not be used to “spam you”, given or aned out” to any other organization. We use email too!!!
ting www.aerobicmouse.com
You can do it at anytime from the “About McNib” menu and clickin
not enter a Software key within
y evaluation period you will see a
window containing, in p
If you do
A separate window will ask you to enter a serial
number or McNib will suspend.
mpted to
be used solely
“lo
We advise that you register from this point or on line by visi . This
otifications.
ensures you get update n
V 3.1: © Designer Applainces Inc 2002-2005 All Trademarks the property of their respective owners. Page # 16

V 3.1: © Designer Applainces Inc 2002-2005 All Trademarks the property of their respective owners. Page # 17
atically
the McNib icon into the list of programs to start automatically.
the mouse before clicking, and changes its behavior based on
ks intelligently on menus; it only clicks the first time you
that, it won't click until you pause on either an
em or on something outside the menu. It does this because clicking on menu titles or
ouse manually, you learn to not
click on these items; so McNb doesn't click on them either.
he other time McNib uses its Window Intellig
McNib clicks on a button, it just sends a single click, even
lease Note: Turn On OSX’s Accessibility Features
essibility features, so in order to use it you
bility features are turned on.
cnabled. If it isn't,
then McNib prompts you to turn it on.
To turn Accessibility on or off, go to the System Preferences window and click on "Universal
Access" then click on "Enable access for assistive devices".
Starting McNib Autom
You can have McNib start automatically each time you log into yo
1. Open up OS X's System Preferences window
2. Click on Accounts
3. Click on Startup Items
4. Drag
ur account. To do this:
McNib's Window Intelligence
What it is
McNib looks at each window under
what it sees. For example, McNib clic
pause on a menu title at the top of the screen. After
active menu it
inactive menu items closes the menus. When you are using the m
i
T ence is when it clicks on buttons. You don't need to
drag when clicking on buttons -- so when
if dragging is enabled.
P
McNib's Window Intelligence depends on OS X's Acc
need to make sure that the Accessi
Each time you first start McNib, the program che ks to make sure Accessibility is e

Gestures Cheat sheet (PC & Mac)
Control- and Double-clicks
Gesture: Move to the right and
back.
Result: PC Left/ Mac Ctrl Click.
Gesture: Move to the left and
back.
Result: PC Right/ Mac Double
Turning Nib On Or Off
Gesture: Counter-
clockwise circle, starting
at the top.
Result: Turn on or off.
Gesture:
Clockwise circle,
starting at the
top.
Result: Turn on
or off.
Use DragnMove
Gesture: Move down
and back.
Result: Click using
DragnMove.
V 3.1: © Designer Applainces Inc 2002-2005 All Trademarks the property of their respective owners. Page # 18

Operator Guidance Manual: Back up copy
ent file on the CD provided, A copy of the
software license, which you he by opening the CD envelope, is
found in the Installation and Warranty Manual in hardcopy and on the CD.
Email [email protected]
The Operator Guidance Manual is a docum
reby agree to and confirm
for replacements.
Computer Posture and Use.
Functional Neutral: The Convergence of Biomechanics and Biochemistry.
Functional Neutral (FN) is now being adopted as the cornerstone of good ergonomic
practice. FN is like being at “biochemical idle”, e small hand muscles being in neutral
yet you are still working productively. Muscles
if you can find a posture that allows them to “i they are more
free service a erienced people
unctional Neutral allows definable ergonomics
ood by an appreciation of the two “Functionally
Active” postures called Static and Dynamic Posture.
Dynamic Posture (DP) is a regime in which muscles are tensed and relaxed within a
relatively small time cycle. Though this maybe very repetitive the fact th es are
not held under constant loa there is a rest interval in between each muscle
tensioning event. This allo to return normal and with it
biochemical re-equilibratio re-aeration so maintaining a
state. When muscles contract blood is squeezed out and working muscle up to 50
times more oxygen compared to being at rest. When muscles relax fresh blood is drawn
in, so each contraction/relaxation cycle pumps blood in and out of the tissues in its
ice buttons employs DP. On its own, DP is more likely to
tire (resource exhaustion) than cause injury though it may be a factor if injuries are
present or when used alongside of Static Posture, or grip. One piece of evidence that
seems to go unnoticed in regards to the debate over mouse or keyboard is, predominantly,
the mousing limb becomes injured first and worst! An explanation follows.
Static Posture (SP): SP is con ions in which muscles are tensed and
held tense, which is the post d when constant grip is applied to anything. There
is probably no other “non computer” task performed in a resting posture, that can
motivate individuals to maintain grip for so long as does mousing, web surfing
especially. The mousing posture does not involve other muscle groups that consume
ugh oxygen to precipitate an increase in circulation or invoking feelings of fatigue;
ke carrying a shopping bag or, further back in our development, swinging from trees.
ensed muscles limit blood flow, an obvious clue being that mouse user’s hands often
th
are engines that are never switched off so
dle” and still work then
keep valuable and explikely to deliver years of problem nd
off disability and in the work pool. F
standards to be set. It is better underst
at muscl
near or actual
nd an aerobic
s use
d means that
ws the circulation
n which includes
vicinity.
Keyboarding and clicking m
working under
ure adopte dit
e
lino
T
V 3.1: © Designer Applainces Inc 2002-2005 All Trademarks the property of their respective owners. Page # 19
Table of contents


