DET DET-3300XST User manual

1
DET
Ultra Short-Throw Laser Projector
USER MANUAL
Serial
DET Short-Throw Laser Projector Models
XGA
DET-3300XST
DET-3600XST
WXGA
DET-3300WST
DET-3600WST
1080P
DET-3300PST
DET-3600PST

2
Table of Contents
Table of Contents..............................................................................................................................2
Usage Notice.....................................................................................................................................3
Safety Information............................................................................................................................3
Package Overview ............................................................................................................................4
Product Overview.............................................................................................................................5
Input/Output Connections...............................................................................................................6
Laser Projector IR Receiver.......................................................................................................8
Laser projector ceiling................................................................................................................9
Projection Distance...................................................................................................................10
Connecting the Projector ...............................................................................................................11
Powering the projector On / Off .............................................................................................12
Adjusting the Projected Image...............................................................................................14
Manu Tree.....................................................................................................................................16
Manu..............................................................................................................................................17
Picture...........................................................................................................................................18
Sound............................................................................................................................................20
Option............................................................................................................................................21
3D...................................................................................................................................................23
Network.........................................................................................................................................24
Information...................................................................................................................................25
RS232 Commands and Protocol Function List..................................................................27
RS232 Commands Function List ...........................................................................................27
Wall Mount Installation .................................................................................................................28
Maintenance and troubleshooting ................................................................................................29
Warranty and copyright information.............................................................................................30
Troubleshooting..............................................................................................................................30

3
Usage Notice
Safety Information
The equilateral triangle exclamation alerts you to the attached device
An important description of the operation and maintenance of the data.
Warning:
Using the proper power cord that the machine comes with.
Be careful:
The power cord that the projector comes with can only be used with this projector.
Do not use it with any other machines.
Warning: To reduce the risk of fire or electric shock, do not expose this projector
to rain or moisture.
Be careful: To keep away from shocking, please do not use the extension lines, power
sockets or any other plugs, which are not totally inserted by the plug, so as not
to expose the plug.
Attention: The power strip must be installed nearby the unit and convenient to use
because of the pluggable plug.
4
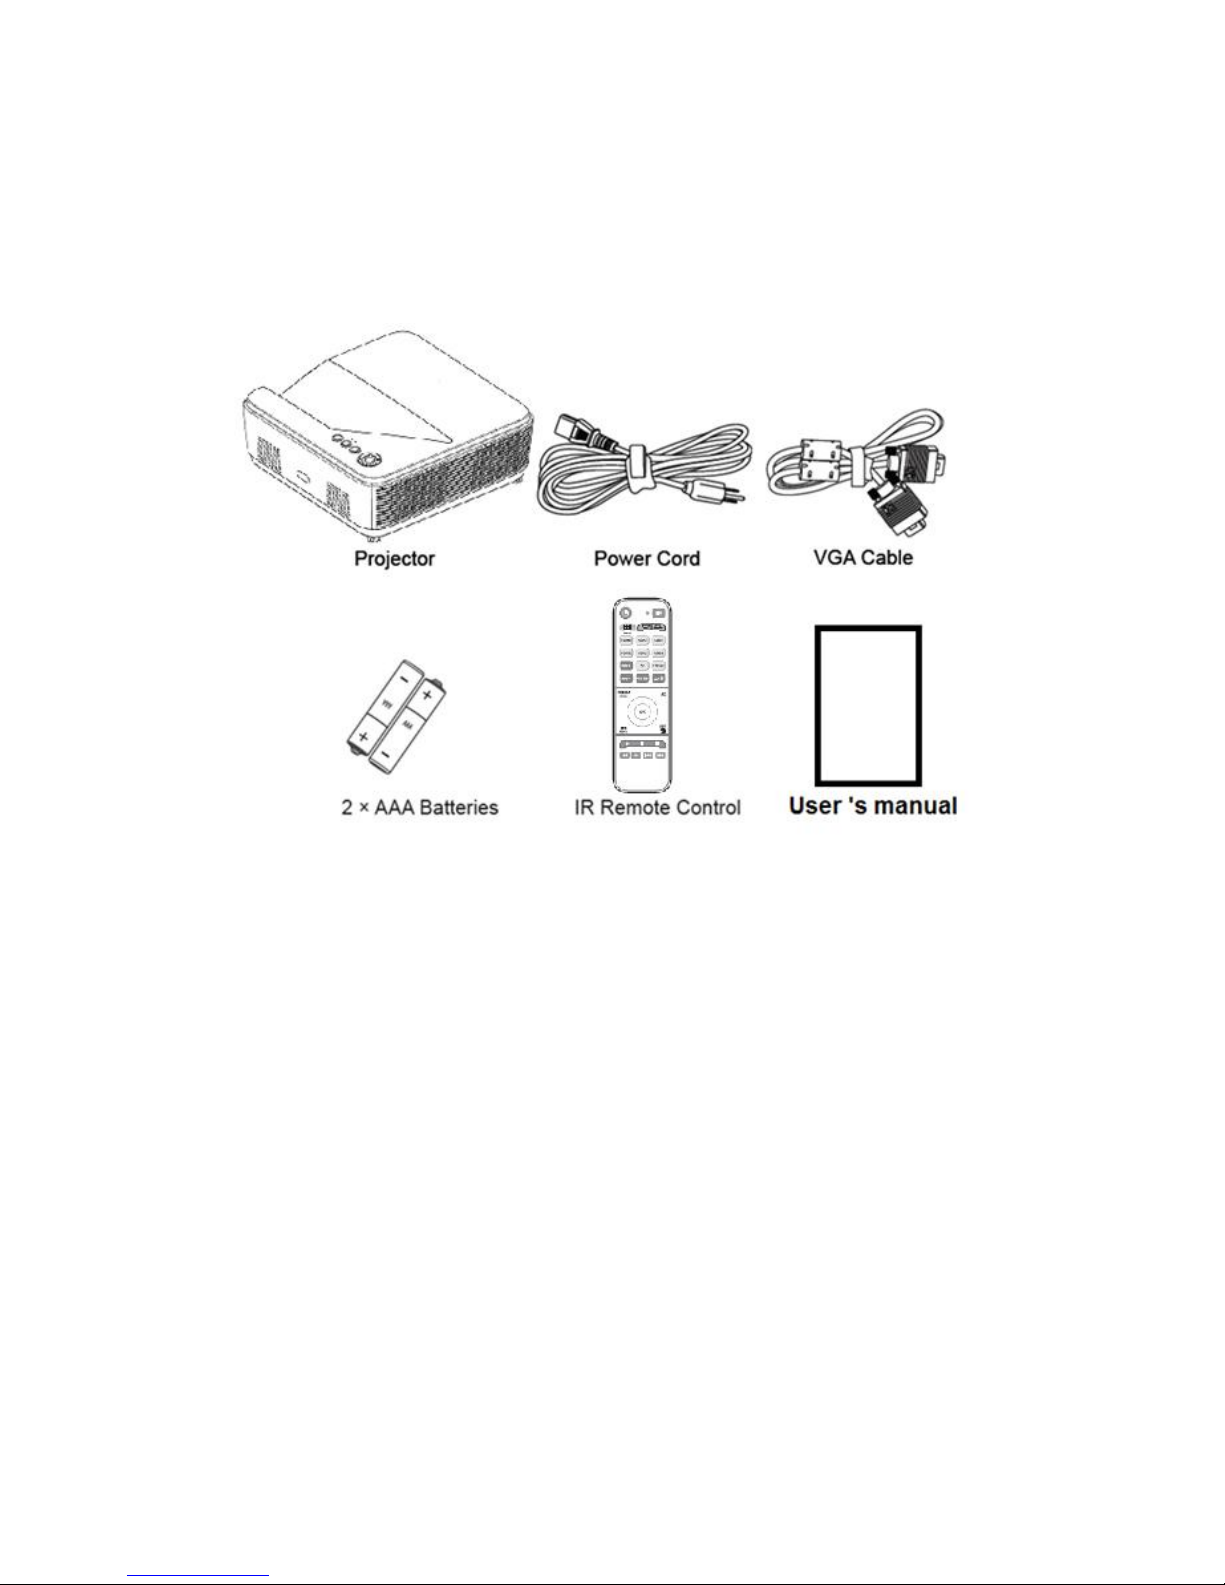
Package Overview
Unpack and inspect the box contents to ensure all parts listed below are in the box.
If something is missing, please contact your nearest customer service center.
Installation of the Batteries
If you want to open the battery cover, please face up the controller at first. Press
the grip point on the cover and push down as the arrow it points. Then the battery
cover could be open.
Take out the old batteries first (if it’s necessary), then put 2 AAA batteries in
it, the polarity the batteries depends on the bottom of the battery container shows.
The positive pole points to (+), and the negative pole points to (-).
Aim at the bottom of the controller and push back till it is in place.
Uninstallation of the batteries
Take off the cover of the controller and take out the batteries.

5
Product Overview
Main Unit
1. Power button
2. WIFI LED
3. Menu button
4. Left select keys
5. Up select keys
6. OK button
7. Right select keys
8. Down select keys
9. WIFI button
10. Laser projector lens

6
Input/Output Connections
11.IR Receiver
12.min-USB port
13. RS-232 Connector (9-pin DIN Type)
14. Audio Output Connector (3.5mm Mini Jack)
15. Audio Input connector (3.5mm mini jack)
16 Audio Input connector
17. VGA-In/YPbPr Connector
18.Height adjustment knob
19. .Power Socket
20.RJ45.Connector
21.USB .Connector
22.Foucus Scribing
23.HDMI .Connector
24.VGA .Connector

7
Remote Control
1. Power button
2. Focus test
3. HDMI1, HDMI2, VGA1, VGA2, USB1, USB2, AV
4. Volume+
5. Volume-
6. Picture model
7,8,9. Four Directional select keys
10. Menu
11. Play button
12. Stop button
13. Fast rewind button
14. Fast forward button
15. Mute button
16. IR LED
17. Keystone +/-
18. FREEZE
19. Projection mode
21. 3D Format
22. OK button
23. Right select
24. Return button
25. Stop button
26. Next button 27. Last button
8
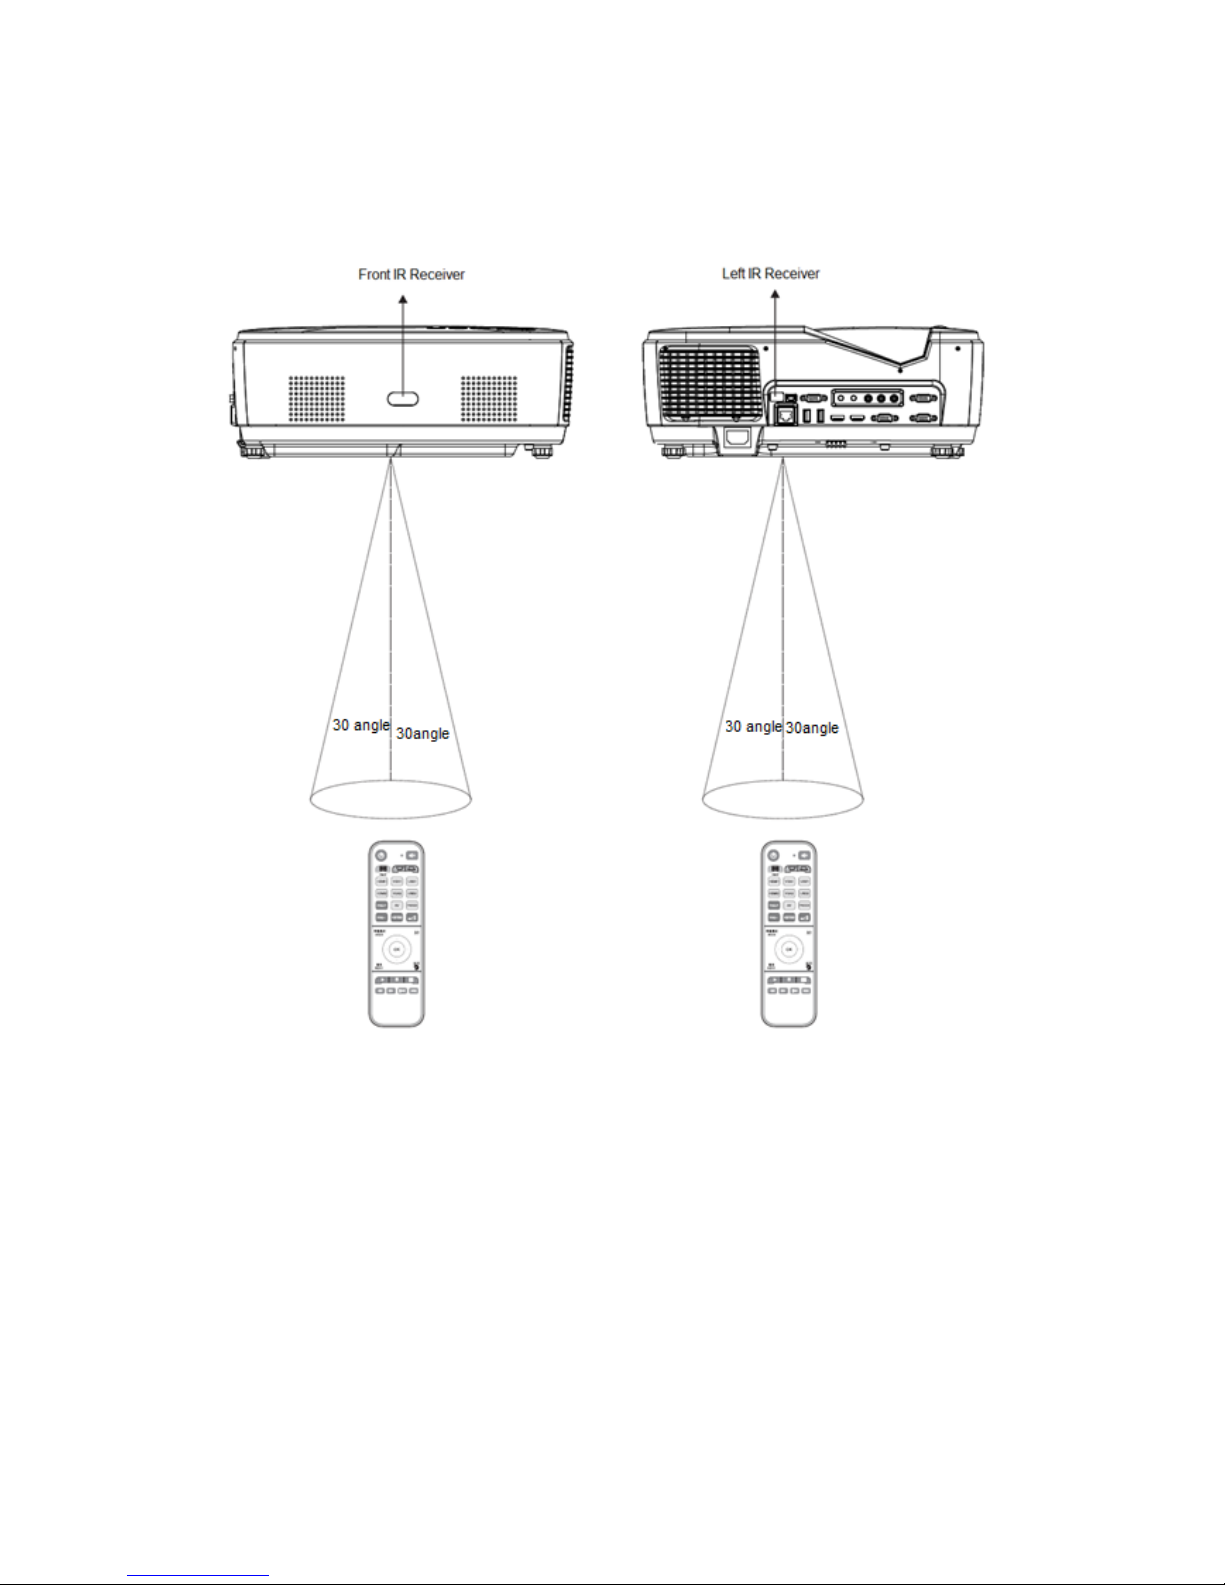
Laser ProjectorIR Receiver
Effective range of remote control
Both the front panel and interface panel of the projector have the IR remote sensor. When
holding the controller, it must keep an orthogonal angle of thirty degrees with the IR remote
sensor to make it work well. The distance between the controller and the sensor should not be
over 8 meters. There should not be any obstacles of blocking the IR beam between the controller
and the IR sensor.

9
Laser projector ceiling
10
Projection Distance
XGA /WXGA/1080P series: Projection Image Size from 80” to 150.0” (0.4to 0.756
meters).
XGA(4:3)
inch
Screen wide
Screen High
Project distance
80
162.6
121.9
40.3
100
203.2
152.4
50.4
110
223.5
167.6
55.4
120
243.8
182.9
60.5
140
284.5
213.4
70.6
150
304.8
228.6
75.6
Unit: cm
WXGA(16:10)
inch
Screen wide
Screen High
Project distance
80
172.3
107.7
40.1
100
215.4
134.6
50.2
110
236.9
148.1
55.2
120
258.4
161.5
60.2
140
301.5
188.4
70.3
150
323.1
201.9
75.3
Unit: cm
1080P(16:9)
inch
Screen wide
Screen High
Project distance
80
177.1
99.6
40.7
100
221.4
124.5
50.9
110
243.5
137.0
56.0
120
265.7
149.4
61.1
140
309.9
174.3
71.3
150
332.1
186.8
76.4
Unit: cm

11
Connecting the Projector
Connect to Computer/Notebook
Usage Notice
Do:
Turn off and unplug the power plug from the AC outlet before cleaning the product.
Use a soft dry cloth with mild detergent to clean the display housing.
Disconnect the power plug from AC outlet if the product is not being used for a long
period of time.
Do not:
Block the slots and openings on the unit provided for ventilation.
Use abrasive cleaners, waxes or solvents to clean the unit.
Use under the following conditions:
- In extremely hot, cold or humid environments.
Ensure that the ambient room temperature is within 5 - 40°C.
Relative Humidity is 5 - 40°C, 80% (Max.), non-condensing.
- In areas susceptible to excessive dust and dirt.
- Near any appliance generating a strong magnetic field.
- In direct sunlight.

12
Eye Safety Warnings
▀■Avoid staring/facing directly into the projector beam at all times. Keep your
back to the beam as much as possible.
▀■When projector is used in a classroom, adequately supervise students when they
are asked to point out something on the screen.
▀■In order to minimize the laser power, use room blinds to reduce ambient light
levels.
Powering the projector On / Off
Powering On the Projector
1. Remove the lens cap. (optional)
2. Securely connect the power cord and signal cable. When connected, the
POWER/STANDBY LED will turn Amber.
3. Turn on the laser by pressing “ ” button either on the top of the projector
or on the remote. The POWER/STANDBY LED will now turn Green.
The startup screen will display in approximately 5 seconds. The first time you use
the projector, you will be asked to select the preferred language and power saving
mode.
4. Turn on and connect the source that you want to display on the screen (computer,
notebook, video player, etc). The projector will detect the source automatically.
If not, push menu button and go to “OPTIONS”. Make sure that the “Source Lock”
has been set to “Off”.
If you connect multiple sources at the same time, press the “SOURCE” button
on the control panel or direct source keys on the remote control to switch between
inputs.

13
When Power mode (Standby) is set to Eco (<0.5W), the VGA output and Audio pass-through will
be deactivated when the projector is in standby.
Turn on the projector first and then select the signal sources.
Installation
Powering off the projector
1. Press the “ ” button on the remote control or on the control panel to turn off the projector.
The following message will be displayed on the screen.
Press the “ ” button again to confirm otherwise the message will disappear after 15
seconds. When you press the “” button for the second time, the fan will start cooling
the system and will shut down.
2. The cooling fans continue to operate for about 10 seconds for cooling cycle and the
POWER/STANDBY LED will Flash Green. When the POWER/STANDBY LED lights solid
Amber, the projector has entered standby mode.
If you wish to turn the projector back on, you must wait until the projector has completed the

14
cooling cycle and has entered standby mode. Once in standby mode, simply press “ ”
button to restart the projector.
3. Disconnect the power cord from the electrical outlet and the projector.
4. Do not turn on the projector immediately following a power off procedure.
Warning Indicator
When the warning indicators (see below) come on, the projector will automatically shutdown:
“Laser” LED indicator is lit red and if “POWER/STANDBY” indicator flashes amber.
“TEMP” LED indicator is lit red and if “POWER/STANDBY” indicator flashes amber. This
indicates the projector has overheated. Under normal conditions, the projector can be
switched back on.
“TEMP” LED indicator flashes red and if “POWER/STANDBY” indicator flashes amber.
Unplug the power cord from the projector, wait for 30 seconds and try again. If the warning
indicator light up again, please contact your nearest service center for assistance.
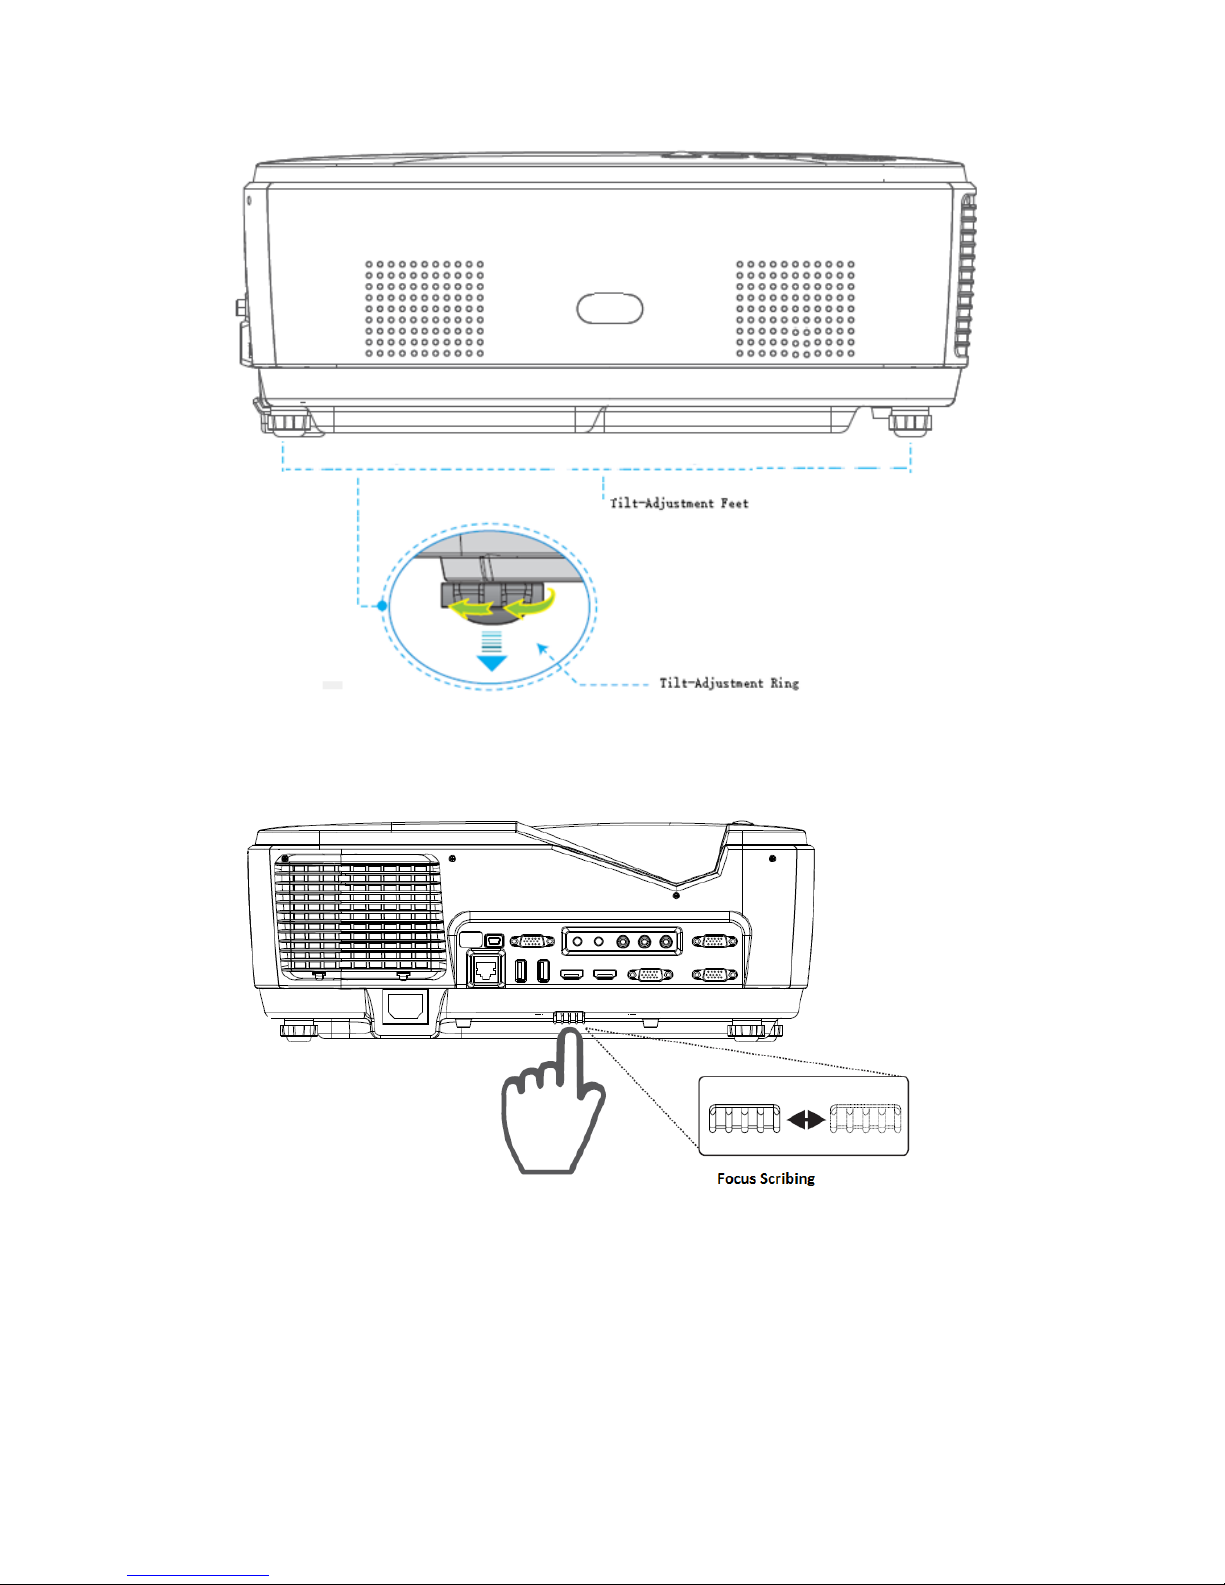
Adjusting the Projected Image
Adjusting the Projector’s Height
The projector is equipped with elevator feet for adjusting the image height.
1. Locate the adjustable foot you wish to modify on the underside of the projector.
2. Rotate the adjustable ring clockwise to raise the projector or counter clockwise to lower it.
Repeat with the remaining feet as needed. feet as needed.
15
Adjusting the Projector’s Focus
To focus the image, rotate the focus ring until the image is clear.
XGA /WXGA 1080Pseries: The projector will focus at distances from 0.40 to 0.76meters.

16
Manu Tree

17
Manu
The Projector has multilingual On-screen Display menus that allow you to make image
adjustments and change a variety of settings.
How to operate
Press the MENU button to open the OSD menu. Press the cursor ◄► button to move to the
Image Menu.
Press the cursor ▲▼ button to move up and down in the Image menu. Press ◄► to enter
and changevalues for settings
Press the Enter button to save the changevalues
Press the Menu button to return to main menu

18
Picture
Picture Mode
There are many factory presets optimized for various types of images.
Bright: Maximum brightness from PC input.
Computer: Good color and brightness from PC input.
Movie: For home theater.
Standard: Standard model
Text: This mode is recommended for projecting in a classroom.
User: User’s settings.
3D: Recommend setting for 3D mode enabled. Any further adjustments by the user in
3D will be saved in this mode for further use.
Brightness
Adjust the brightness of the image.
Press the to darken image.
Press the to lighten the image.
Contrast
The contrast controls the degree of difference between the lightest and darkest parts of
the picture.
Press the to decrease the contrast.
Press the to increase the contrast.
Color
Press into the next menu as below and then use or to select item.
Red Gain/Green Gain/Blue Gai: Use or to select Red, Green, Blue, Cyan, Magenta
and Yellow Colors.

19
Hue
Select to enter the Hue Manager. Press the ◄► buttons to adjust the Hue.
Sharpness
Adjust the sharpness of the image.
Press the to decrease the sharpness.
Press the to increase the sharpness.
Nosie Reduction
Press the ◄► buttons to select “high”, ”middle”or “low”adjust the noise reduction.
Aspect Ration
Use this function to choose your desired aspect ratio.
4:3: This format is for 4×3 input sources.
16:9-I: This format is for 16×9 input sources, like HDTV and DVD
enhanced for Wide screen TV. (576i/p)
16:10: This format is for 16×10 input sources, like HDTV and DVD
enhanced for Wide screen TV. (480i/p)
Point to point: This format displays the original image without any
scaling.
4:3
1024 x 768 center
16:9-I
1024 x 576 center
16:10
854 x 480 center
Point to point
No resize image, This format shows
theoriginal image without scaling

20
Sound
Sound Mode
There are many factory presets optimized for various types of sound.
Treble
Displays the treble setting bar.Number for Remote ID setting used.
Bass
Displays the bass setting bar.Number for Remote ID setting used.
Balance
Displays the balance setting bar.Number for Remote ID setting used.
Mute
Select “open” the speaker will be enabled
Select “close” the speaker will be mute
Volume
Displays the Volume setting bar.Number for Remote ID setting used.
This manual suits for next models
5
Table of contents
Other DET Projector manuals


