Deus XP User manual

USER'S MANUAL


Page 60
Page 02
Page 04
Page 05
Page 06
Page 07
Page 08
Page 09
Page 10
Page 11
Page 12
Page 13
Page 15
Page 15
Page 16
Page 17
Page 18
Page 18
Page 20
Page 21
Page 22
Page 23
Page 24
Page 25
Page 26
Page 26
Page 26
Page 27
Page 27
CORDELESS HEADPHONES
Menu —
Discrimination-Sensitivity-Ground
Frequency-Tones-Volume-Coil
Pairing with a new coil —
Factory Programmes —
Replacement of the backphone —
POWER SUPPLY - BATTERIES
Low battery lights —
Battery life —
Charging time and charging progress —
Charge —
Battery durability —
Replacement —
Precautions —
EXPERT
Multi-Tones —
Pitch —
Multi-Tones, thresholds and tones —
TX Power —
Frequency shift —
Silencer —
Multi-Notch —
Page 29 / 30
Page 30
Page 31
Page 31
Page 32
Page 32
Page 32
Page 33
Page 34
Page 34
Page 35
Page 36
Page 36
Page 37
Page 38
Page 39
Page 39
Page 40
Page 41 / 42
Page 43
Page 44 / 45
Page 46
Page 47
Page 48
Page 49
Page 50 / 51
Page 52 / 53
Page 54 / 55
Page 56 / 57
Page 58
QUICK START
—
TECHNICAL INTRODUCTION —
LIST OF PARTS —
ASSEMBLY —
USE
Remote control —
Factory programs, Description —
Starting up —
MENU
Discrimination —
Sensitivity —
Frequency —
Iron Level —
Reactivity —
Audio Response —
Notch —
GROUND
General —
Manual Mode —
Pumping Mode —
Tracking Mode —
Beach Mode —
STATIC
Pinpoint, Retune —
OPTION
Programmes —
Coil —
Pairing with a new coil
—
Conguration —
Speakers —
Back light —
Contrast —
Clock setting —
Update —
PRACTICAL INFORMATION —
PRECAUTIONS FOR USE —
TROUBLESHOOTING AND SOLUTIONS —
TECHNICAL CHARACTERISTICS —
ACCESSORIES —
SPARE PARTS —
RECOMMENDATIONS / LAW —
FACTORY PROGRAMMES —
YOUR SETTINGS —
MENU STRUCTURE —
DECLARATION OF CONFORMITE —
WARRANTY —
01
TABLE OF CONTENTS

CONGRATULATIONS ON THE PURCHASE OF YOUR XP METAL DETECTOR
AND WELCOME TO THE WORLD OF RESEARCH AND EXPLORATION!
®, the rst fully wireless detector
You have invested in a high-tech detector capable of exceptional performance, which was
designed and developed in France. You are therefore helping our company to further research
in the eld of metal detecting and we thank you for your contribution.
02
Dēus is innovative in terms of metal detector design as it oers an architecture based on three
elements communicating via a digital radio link. In this new design the coil, remote control
and audio headphones have each been made independent through the integration of very
compact, high-capacity lithium batteries.
An ultra-miniature electronic circuit, incorporated in the search coil, digitises and analyses
the signals. Data are then sent to the headphones and remote control in real time via a digital
radio link. With this method, the signal is processed at source and not conveyed via a wire link,
which greatly improves data quality.
Incorporating components from leading-edge technologies such as scientic instrumentation
has enabled us to produce a powerful, rapid, lightweight, compact and fully controllable digital
detector.
Whether you are an experienced user or a beginner, Dēus lets you decide whether or not to
modify any of its settings. Powerful pre-congured factory programmes enable all users to get
started immediately, while expert detectorists can choose more advanced parameters via the
intuitive interface.
What is described in this manual as the "Remote Control" is in fact the user interface, known as
the ‘control box’ on conventional detectors.
It enables the detector’s many functions to be precisely adjusted via a graphical interface.
It can also receive programme updates (via internet) through its USB socket.

Dēus is also exceptional in being able to function without the remote control, with just the
coil and the wireless headphones, for an even more compact, lightweight conguration
(just 875 g)!
Like the remote control, the headphones contain all the components needed for detection,
they are a genuine control unit in themselves, but on an ultra-miniature scale. They take over
in the absence of the remote control for adjusting the detector settings.
With the headphones you can turn Dēus on and o, change the main detection settings such
as sensitivity, discrimination, ground balance, tone, frequency (4 kHz, 8 kHz, 12 kHz, 18 kHz),
volume, etc. as well as selecting the factory programmes or those previously congured with
the remote control!
Performance is identical whether you are searching with or without the remote control!
Lastly, the new patented* XP stem has the combined advantages of an S-shaped stem and a
straight telescopic stem.
It enables you to deploy or fold away the device in just a few seconds, and to change the coil
in an instant.
Its user-friendly design ensures comfort and convenience for the user: length adjustable by
millimetre increments, improved operating angle and shaped rubber handle for a rm, controlled
grip.
So now you’re ready for a new adventure!
*Patent application underway
03

LIST OF PARTS
The box for your Dēus metal detector contains the following parts:
04

Fitting the coil on the stem
Insert the rubber washer in the
lower shaft.
Line up the stem with the coil
and t the two parts together.
Install bolt and nut
3 positions
05

To switch o Dēus
Hold down Power for two seconds on the remote control
Press left- and right-hand buttons on the headphones.
-
-
YES
NO
DISC
SENS
GND
FREQ
TONE
VOL
COIL
After charging your device. (pg 33)
Switch on
the remote control
Switch on
the headphones
Validate or not the use
of the loudspeaker
-
-
-
-
OUI
-
-
Do not switch on Dēus when the coil is near a metal surface, inside a car, or when the stem has
been folded away, as this may interfere with calibration and lead to abnormal performance.
If this should occur, switch Dēus o and move away from any metal masses before switching it on again.
Nevertheless, this does not represent any risk to the equipment or its electronics!
By default you begin by using the 1 - BASIC 1
factory programme which is suitable for general use.
If you wish to test one of the 9 other factory programmes,
simply scroll through them with
08
The LED on the coil gives 20 long, successive ashes to indicate that it is
waking up and recalibrating.
Once recalibration is complete, the coil becomes operational
and its LED ashes every second.
When the coil is on standby, its LED ashes every 4 seconds, whereas when it is on it ashes every second.
Hold down Power for two seconds on the remote control

From the main menu navigate with to change the programmes
Name of the active programme
MENU G.B.
OPTION
1 - BASIC 1
1 - BASIC 1
2 - GM POWER
3 - DEUS FAST
4 - PITCH
5 - G-MAXX
6 - RELIC
7 - WET BEACH
8 - ALL METAL
9 - BASIC 2
General use (12 kHz).
Similar settings to the XP Gold Maxx Power detector,
powerful and fast.
Faster than the Gold Maxx Power with small targets on
iron-infested ground.
Responsive pitch that varies in frequency and amplitude according
to the signal’s strength, same speed as the Gold Maxx Power.
Similar settings to those of the XP G-Maxx1 detector, medium
speed, particularly eective for large masses and highly
conductive coins.
Slower than the G-Maxx1, adapted for large, deep masses in
relatively uncontaminated ground.
Tuned to operate more eectively on wet beaches, although in
situ adjustments are needed for the ground eect, either by
pumping or manually (pg 17).
Suitable for deep searching for all targets, a dynamic all
metals mode.
Ease of operation with settings that oer greater stability, perfect
for starting out while avoiding false signals.
(pg 50/51)
07

After charging your device. (pg 33)
08
-
-
YES
NO
DISC
SENS
GND
FREQ
TONE
VOL
COIL
Switch on
the remote control
Switch on
the headphones
Validate or not the use
of the loudspeaker
-
-
-
-
OUI
-
-
The LED on the coil gives 20 long, successive ashes to indicate that it is
waking up and recalibrating.
Once recalibration is complete, the coil becomes operational
and its LED ashes every second.
When the coil is on standby, its LED ashes every 4 seconds, whereas when it is on it ashes every second.
By default you begin by using the 1 - BASIC 1 factory programme which is suitable for general use.
If you wish to test one of the 9 other factory programmes,
simply scroll through them with
To switch o Dēus
Hold down Power for two seconds on the remote control
Press left- and right-hand buttons on the headphones.
Hold down Power for two seconds on the remote control
Do not switch on Dēus when the coil is near a metal surface, inside a car, or when the stem has
been folded away, as this may interfere with calibration and lead to abnormal performance.
If this should occur, switch Dēus o and move away from any metal masses before switching it on again.
Nevertheless, this does not represent any risk to the equipment or its electronics!

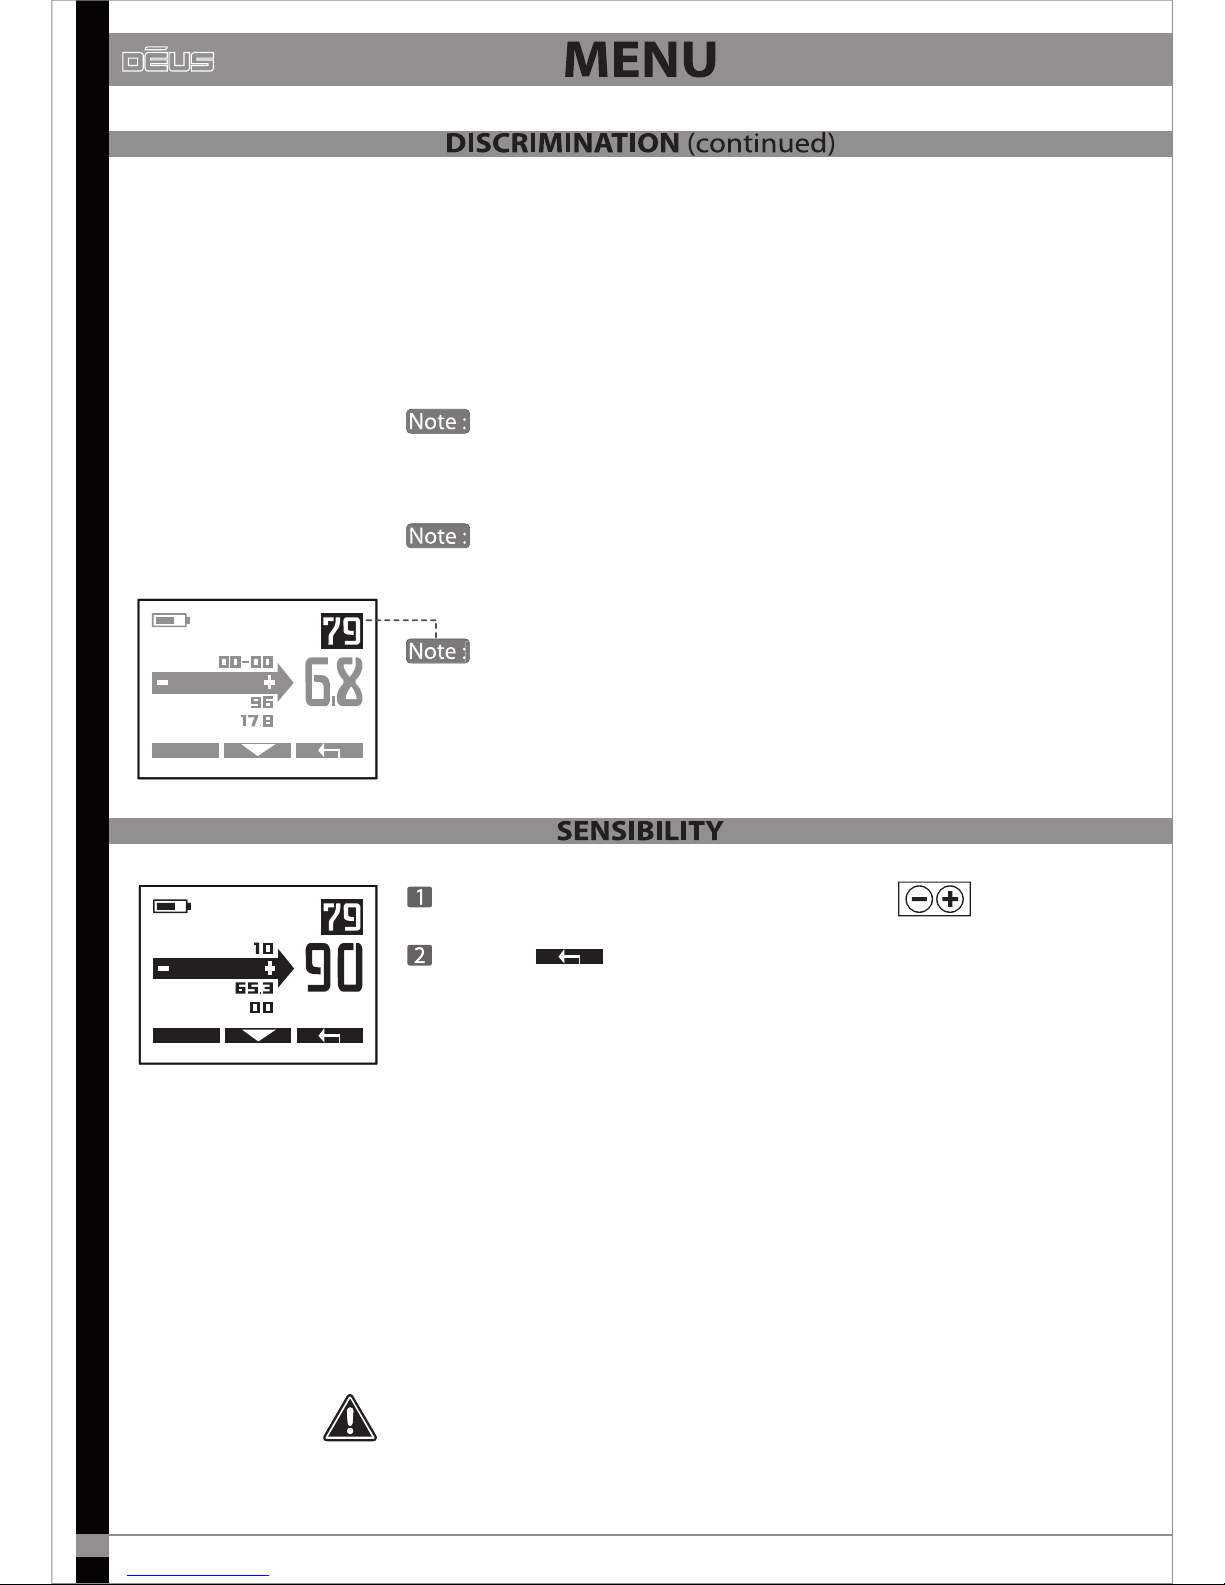
Adjust the Discrimination level (from 0 to 99) with
Exit with to return to the main menu.
Discrimination enables undesirable targets to be rejected by raising or
lowering a threshold below which certain metals are dierentiated.
The conductivity scale (0 to 99) for metal targets shown below will help
you better understand the discrimination range and its limits, and see
how it corresponds to the digital display of target conductivity on the
remote control main menu.
Increasing the discrimination value enables you to gradually reject any
target whose conductivity is lower than the setting. For example, if you
tune the discrimination level to 10, you will reject iron with a value of
between 0 and 10. If you tune it to 40 you will also eliminate small
pieces of aluminium foil whose conductivity is less than 40.
If you wish to reject other rubbish with higher conductivity, such as pull
tabs from aluminium drinks cans, lead shot or copper hunting cartridges
(whose conductivity is 60-75), you must also be prepared to accept the
elimination of certain noble metals with similar conductivity.
If you are particularly bothered by contamination registering as highly
conductive on the digital screen, and you still wish to reject it, it is better
to do so using the NOTCH rejection setting.
Conguring the main detection settings.
Press menu
Scroll through the menu by pressing
MENU
MENU G.B.
OPTION
1 - BASIC 1
Coke Foils Bronze coins
(medium size)
Large silver and
copper coins
Iron
Nails
Small targets
Small jewels, leads
Fine coins
Poor aloys
€uros : 1/2/10/20/50 cts
Small pure silver coins
MENU
EXPERT
NOTCH
SENS.
FREQ.
DISC
09
0 10 20 30 40 50 60 70 80 90 99
10
Two alternatives involve selecting a low level of discrimination, between
5 and 10, then using either:
1/ The digital target display to more or less visually discriminate a target
category.
2/ The Multi-tone mode to discriminate undesirable targets using a selected
audio tone.
In both cases the decision then lies with you on whether or not to dig.
Depending on the frequency setting used, a target’s conductivity
is perceived dierently by the detector. The digital conductivity display
may therefore vary depending on the frequency.
The 0 to 10 range relates to the rejection of iron. To achieve greater
precision in this range there is a digit after the decimal point (from 2.1 to 9.9),
which in eect gives you 82 dierent levels for iron.
In several menus, particularly at the top right of the Discrimination
screen, a reminder of the target conductivity index is displayed, which helps
you when adjusting the discrimination level.
MENU
EXPERT
NOTCH
SENS.
FREQ.
DISC
In several menus, particularly at the top right of the Discrimination
In several menus, particularly at the top right of the Discrimination
MENU
EXPERT
DISC
FREQ.
IRON VOL.
SENS
Adjust the Sensitivity level (from 0 to 99) with
Exit with
Sensitivity is often simplistically described as the setting which adjusts
the device’s power level. However this is incorrect. As its name indicates,
it actually determines the device’s sensitivity level. It reacts after receiving
a signal via the receiver coil. Nevertheless, the results are somewhat similar
in practice, as increasing a device’s sensitivity enables it to detect the
presence of more distant targets. However it must be noted that this
setting has no eect on the power emitted.
The most commonly used sensitivity levels range from 70 to 90. It may be
necessary to reduce the level if there is too much interference, as is often
the case near overhead or buried power lines, fences, radio-relay stations,
mobile telephones, computers, televisions, etc.
Do not test your device in your home as there is considerable electromagnetic
and metal interference in urban environments.

Scroll through the frequencies with
Exit with
Dēus gives you the choice of four detection frequencies (4 kHz, 8 kHz,
12 kHz and 18 kHz) which cover most detection needs.
They enable you to adapt your research more closely to the
characteristics of the ground and the targets to be detected.
MENU
EXPERT
SENS.
IRON VOL.
REACTIVITY
FREQ.
KHZ
Small coins made from any alloy (gold, silver, copper, etc.) and bigger but very ne coins,
low conductivity gold coins, lead, rings, sheet metal, aluminium foil.
Small objects can be found even on mineralised ground contaminated with iron.
Discriminates (distinguishes) coke (coal) more easily.
More unstable on non-mineralised and moist ground.
Here is a non-exhaustive list of the most likely targets that may be detected according to
the frequency:
4 kHz
8 kHz
12 kHz
18 kHz
Large, mainly ferrous and non-ferrous masses.
Coins of sucient conductivity and size.
All other medium or relatively small targets in non-mineralised ground relatively
uncontaminated by iron.
Good for ferrous masses and militaria.
General use.
Coins and large masses, militaria.
Medium and small targets in low-mineralised ground.
General use, small coins.
Coins of all sizes in medium to highly mineralised ground.
11

12
Remember that generally speaking, all frequencies can detect all
kinds of targets, so for example a frequency of 4 kHz will detect a very
small target and a frequency of 18 kHz will detect a large, deep mass.
However, the 18 kHz frequency will lead you to discover a relatively higher
number of small targets that cannot compare with that achieved with a
frequency of 4 kHz. Similarly, sometimes the 18 kHz frequency can be
slightly less eective with a large mass.
If you are just starting out, the 8 kHz frequency is a good compromise for
general use. On a wet beach the 18 kHz frequency will be better at nding
small gold jewellery such as chain necklaces and bracelets that are usually
so dicult to detect.
MENU
FREQ.
REACTIVITY
AUDIO RESP.
IRON VO.
Adjust the Iron Level (from 0 to 5) with
Exit with
You have the option of controlling the sound volume of the low-pitched
tone which generally corresponds to iron. Depending on the circumstances,
this enables more attention to be paid to other sounds, by reducing those
generated by iron.
On the other hand, some users prefer that the low-pitched signals from
iron are more audible, as they know that good targets at the detector’s
range limit in mineralised ground sometimes generate low amplitude,
low-pitched sounds.
- At 0 the low-pitched tone is cut o.
-At 5 the low-pitched tone will have a sound level equivalent to other medium
- or high-pitched tones.
If the discrimination threshold is too low, 0 or 2 for example,
most iron will generate not low- but medium-pitched tones, as you will
practically be in the All Metals mode. In this case, the iron level setting
will not be of much use.

Adjust the Reactivity from -2 to +3 with
Exit with
EXPERT
MENU
IRON VOL.
AUDIO RESP.
NOTCH
REACTIV.
Large masses and coins, in ground uncontaminated by iron.
Large masses and coins, in ground with little iron contamination,
and general use.
General use, and mineralised soils contaminated with iron.
Dicult soils contaminated with iron, hot rocks, etc.
Very dicult soils, highly contaminated with iron and hot rocks,
sensitivity to small targets.
0
1
2
3
4/5
Most likely nds with the recommended settings are as follows:
13
Reactivity is a vital setting that determines the detector’s performance
in terms of speed of analysis and selectivity.
If a soil contains a great deal of iron, hot rocks or other mineralised
debris, soil penetration is generally reduced, as is a detector’s ability to
identify targets similar to iron.
In these conditions, Dēus enables you to select a high degree of
reactivity which will help you speed up the analysis of signals.
On the other hand, if the ground is ‘clean’, it is better to reduce the
reactivity and sweep more slowly, in order to be more sensitive to deep
masses and obtain more thorough penetration.
Users familiar with the Gold Maxx Power have already had a foretaste
of the reactivity of XP’s detectors. And even though Dēus is a particularly
fast and selective detector, you now have the option of adjusting the
reactivity setting to make it even more selective!
By way of example, and to help you better understand the reactivity
levels available, you should note that the reactivity of most detectors
on the market is generally only equivalent to level -1 of the Dēus.
This is true, for instance, of the Gold Maxx and earlier XP models.
The Gold Maxx Power has a reactivity equivalent to level 0 of the Dēus.
Higher reactivity levels (1, 2, 3) enable the detector to tolerate
fast sweeps better.

REACTIVITY
14
Example
Passing the coil over an iron object close to
the surface then over a noble metal target
(ring).
0
1
2
3
4
5
With a low Reactivity level, the iron is detected
for a longer duration, to the extent that it
completely hides the ring.
A high Reactivity level enables you to
distinguish the ring completely from the iron.
The audio signal fully indicates the target.
Full sound
Short sound
No sound
With a medium Reactivity level, you begin
detecting the ring.
The audio signal partially indicates the target.
In terms of pure performance, the greatest detection ranges are obtained with low reactivity
levels. However, you will nd more targets on dicult ground with medium or high reactivity
levels.
So do not just rely on performance in optimal conditions.
Depending on the reactivity level, you will notice that the length of the audio signal varies
when it passes over a target:
Low reactivity (-2, -1) = long sound High reactivity (1, 2, 3) = short sound
Evidently the length of any false signals (the crackling of iron for example) will vary proportionately
as well.
You are therefore advised not to constantly change the reactivity level, as this may interfere
with your ability to distinguish good and bad sounds.

The Audio Curve enables you to amplify the sound volume of distant
targets and therefore to be more alert to them.
It gives the sensation of greater power, however it does not provide
any additional depth as this setting only aects the sound curve (the
dynamic range of sounds).
By amplifying small signals you will also be amplifying small
spurious false signals.
By increasing the sound response you will compress the dyna-
mic range and thus reduce the appreciation of a target’s distance.
Notch complements discrimination: it enables a‘window’ of targets to
be rejected whereas discrimination rejects all targets below a selec-
ted threshold.
For example, if you detect a redundant, undesirable target in the
ground, you can decide just to reject the corresponding conductivity
group and continue to detect targets whose conductivity is higher
and lower than those in this group.
If the reference target has a conductivity of 37, adjust the Notch
value to 34-40 using
All targets whose conductivity is between 34 and 40 will then be
silenced.
Exit with
By default, the width of the rejection window is 6 points.
EXPERT
MENU
AUDIO RESP.
DISC
SENS
NOTCH
Adjust the Audio Curve from 0 to 5 with
Exit with
MENU
REACTIVITY
NOTCH
DISC
AUDIO R.
Distance à la cible
Niveau sonore
5
4
3
2
1
0
By amplifying small signals you will also be amplifying small
By amplifying small signals you will also be amplifying small
By increasing the sound response you will compress the dyna-
By increasing the sound response you will compress the dyna-
By default, the width of the rejection window is 6 points.
By default, the width of the rejection window is 6 points.
15
AUDIO CURVE

16
General features
The dierent levels of soil mineralisation you encounter when prospecting
can sometimes aect the performance of your detector.
For example, this may be due to natural magnetic mineralisation such as
iron oxide, hot rocks and magnetite, or sporadic mineralisation from sites
of former human settlement (also magnetic): hearths, pottery, hot rocks,
slag, etc. At the seashore this may also involve mineralisation ranging from
magnetic grade (black sand) to electrical conductor grade (salt water)
depending on the beach or region.
If you are an experienced detectorist you may wish to optimise your
searches to achieve better penetration in some of these mineralised soils.
In magnetic ground with relatively uniform mineralisation, a setting
which is adjusted according to the ground eect will improve penetration
by reducing the amplitude of the ground signals sent back by the receiver
circuits. This ‘adapted setting’involves adjusting your ground balance
value to the mean value of the ground being prospected, while adding
1 so as not to hear the ground signals as much. The tracking and
pumping modes do this automatically if the ground conditions allow it.
Attention: As the ground balance setting is the one requiring the most
experience of the ground, we recommend that you read this chapter
carefully and use the dierent ground balance modes advisedly, while
acquiring your own experience of the ground.
By default, remain in manual mode at level 90 on inland ground and on
dry beach sand.
If the ground is not mineralised there is no need to adjust your
ground balance to a level other than 90: since the ground does not send
back any signicant spurious echo the performance will be optimal even
at level 90 and you will reduce interference resulting from knocks to the
coil.
MENU G.B.
OPTION
1 - BASIC 1
On the main menu, two values are permanently displayed:
The ground mineralisation index
(level measured constantly by Dēus for information).
The actual level of ground eect corrections
(adjustment underway)

Go to Pumping with
Press and pump the coil on the ground several times until
you obtain the display G.B OK
Exit with
G.B.
TRACKING
PUMPING
BEACH
MANUAL
START
Go to Manual with
Adjust with
Exit with
G.B.
MANUAL
BEACH
TRACKING
PUMPING
START
SOL
MANUAL
BEA
TRACKING
IN PROGRESS
G.B OK
Press Ground
4 modes are available:
MANUAL - PUMPING - TRACKING - BEACH (ON / OFF)
G.B.
17
You can manually adjust the ground rejection levels from 60 to 95 (Beach
O mode) or from 0 to 30 (Beach On mode)
90 is the default level, it is the most common level which enables you to
reject all magnetic minerals found in the ground.
By reducing this gure towards 87 you will begin detecting hot rocks,
and knocks to the coil may result in false signals. Even lower, between
75/85, pottery and the ground itself will begin interfering with your
device.
If you are inexperienced in working with ground eects, we
strongly suggest that you limit yourself to a Ground Balance level of 90,
which is the default setting, and is the most stable reference level
recommended for inland ground. Levels lower than 90 will result in
increasing instability.

18
15 cm
~
IN PROGRESS
G.B.
MANUAL
BEA
TRACKING
G.B FAIL
Pumping is a semi-automatic process which allows you to adjust the
ground balance in a zone that you have determined as being representa-
tive of the mean level of the ground being prospected.
Henceforth, the measured value of the ground is entered in memory and
used as the new active ground balance value.
If this value is unsuitable, or if it generates too much instability, you can
repeat the process in a dierent zone or switch to manual mode in order
to modify it by, for instance, adding several extra rejection points.
If a metal target is detected while you are pumping, Dēus will
recognise this and display the message
G.B FAIL
It will then retain the previous ground balance value.
This problem is generally caused by iron being omnipresent. If this is the
case then move to another location and restart the pumping mode.
In low- or non-mineralised ground, there is no need to adjust the
ground balance and you are advised to remain on 90 for greater stability.
MANUAL
PUMPING
SOL
BEACH
TRACKING
Go to Tracking with
Exit with
In this mode, Dēus repeatedly scans the ground and digitally lters the
extracted signals to determine the mean value on a continual basis.
This mode may be useful in soils with relatively uniform mineralisation,
and where the mineralisation varies gradually from zone to zone, which
is often the case in naturally mineralised ground. In this case, Dēus
automatically readjusts the ground balance according to the most
recent value measured.
However, in ground where mineralisation has resulted from human
presence (ancient settlements, for example) this mode may be unsuitable
due to the disparity in the ground events.
Table of contents
Other Deus Metal Detector manuals

Popular Metal Detector manuals by other brands


Velleman
Velleman CS150 user manual

Fisher Research Labs
Fisher Research Labs F2 operating manual

Bounty Hunter
Bounty Hunter DISCOVERY 2200 owner's manual

Teknetics
Teknetics TreasureTek Elite owner's manual

Whites
Whites Coinmaster 1TR Deluxe Operator instructions

C-SCOPE
C-SCOPE CS880 operating instructions


