deviceSTYLE Brunopasso PD-1 User manual


2
ENGLISH
Introduction
This product has been designed so that coffee pods can be used for easy preparation of espresso
or cappuccino coffee with simple operation.
Please read this manual carefully before use and handle the machine correctly.
This manual applies for the PD-1 as well as for the PD-1PLUS.
Accessories
The following accessories are enclosed with this product. Make sure not to overlook any accessories.
Accessories for PD-1:
Pod tray set (pod tray, pod filter)
Accessories for PD-1PLUS:
Pod tray set (pod tray, pod filter), milk pitcher, outer tray
* The pod tray is packed in foamed styrene.
Important Safeguards
Read all of the safety and operating instructions before operating this appliance. Adhere to all
warnings on the appliance and in the instruction manual.
IMPORTANT : units are designed for operation on 220 to 240 V AC only.
1. The appliance should be connected to a
power supply only of the type described
in the instruction manual or as marked
on the appliance.
2. The appliance must not be immersed.
3. The appliance shall not be exposed to
dripping and splashing - for example,
near a bathtub, washbowl, kitchen sink,
laundry tub, in a wet basement, or near
a swimming pool, etc. Do not place an
object containing liquid, such as a flower
vase, on the appliance.
4. When pulling the plug from the wall out-
let:
1) Do not pull or insert the plug with wet
hands.
2) Do not pull on the cable, but hold the
plug when pulling it.
5. Do not bend the power cable excessively,
do not heat it, do not fix it with staples,
do not place heavy objects onto the
cable, and do not subject it to any other
excessive influences.
6. Watch out for children's pranks.
7. Do not insert pins, clips, needles, etc.
into the appliance.
It is to be feared that this will cause ac-
cidents, fire, or electric shocks.
8. Do not apply inflammable spray to the
appliance.
9. IF AN ABNORMAL SMELL OR SMOKE IS
DETECTED, IMMEDIATELY UNPLUG THE
APPLIANCE FROM THE WALL OUTLET.
CONTACT YOUR DEALER OR NEAR SER-
VICE CENTER.
10. Pull the plug from the receptacle when
the appliance is not to be used.
11. Do not place the appliance at an unstable
location.
12. Do not wipe the body with alcohol, thin-
ner, or similar chemicals.
13. If the supply cord is damaged, it must
be replaced by the manufacturer, its ser-
vice agent or similarly qualified persons
in order to avoid a hazard.
Never try to repair or modify the appli-
ance yourself.
Do not throw the appliance
away with the normal house-
hold waste at the end of its
life, but hand it in at an official
collection point for recycling.
By doing this you will help to
preserve the environment.
3
ENGLISH
Installation place
This machine generates steam with high temperature and high pressure to make tasty espresso. This means
that sufficient attention must be paid to the installation place. Directly after use, the extraction opening, the
steam nozzle, the handle part, etc. are extremely hot and sufficient care should be taken not to touch them.
●Never place this machine on top of or close to elec-
tric products or precision machines.
Water drops, steam, etc. can cause trouble for the
machine underneath.
●Place the machine only onto a stable surface.
Otherwise this product may drop down and become
damaged.
●Do not place this product near objects for which
discoloration, deformation, etc. from water drops,
hot water, etc. is to be feared.
Water drops or steam can cause discoloration or
damage.
Cautions for use
Important
●Never raise the lever during extraction.
Hot water or steam may spray out, which is very
dangerous.
●Do not switch on the espresso switch or the steam
switch while the water tank is empty.
This can cause defects.
●During extraction and for some time after it, take
care not to touch hot parts (especially exposed metal
parts) with your skin or with cables.
●Always empty the water tank after use. The water
can become bad or the water in the tank can freeze
in case of low temperatures, and this can cause de-
fects.
●Always fill fresh water into the water tank.
Never fill in hot water or milk, coffee, alcohol, juice,
or other liquids than water, as this can cause defects.
●Connect the power cable to a wall receptacle.
When many appliances are connected to a single out-
let or when extension cables are used, the machine
may not only be able to exhibit its full ability, but
abnormal heating may be caused.
●When handling metal parts like the float part or the
water tray cover, take care not to hurt yourself on
the edges etc.
●Do not install the product at places where water
may splash onto it.
This can cause short-circuits.
●Do not place the product at locations which can be-
come hot because of direct sunlight etc.
The plastic parts may become deformed.
●Do not place the products at locations where it is
within reach of small children.
Burns or injuries from dropping down can be
caused.
Special care must be taken directly after use that
hot parts are not touched.
Introduction (continued)
Introduction ...................................................... 2
Important Safeguards ......................................... 2
Cautions for use ................................................. 3
Installation place ................................................. 3
Contents ............................................................. 3
Names .............................................................. 4
Before first use ................................................ 5
Preparing espresso coffee ............................... 8
Making milk foam........................................... 12
How to make good milk foam ........................ 13
Replacement of the water softening resin filter
.................................................................. 14
Servicing after use ......................................... 15
Descaling........................................................ 16
Cleaning of float part and filter tray set .......... 18
Troubleshooting .............................................. 19
Specifications ................................................. 20
Contents

4
ENGLISH
Names
1
2
3
4
5
6
Pod tray set*
7
Steam nozzle*
8
9
Float*
10
11
12
13
14
15
16
20
17
18
19
21 22
23
24
25
26
27
28
1.
Water level warning indication
2.
steam POWER button
3.
Steam thermometer
4.
Steam ON indicator
5.
Steam ON/0FF button
6.
Pod tray set*
Stored separately as an accessory in foamed
material in the unit.
7.
Steam nozzle*
8.
Water tray cover
9.
Float*
10.
Water tray
11.
Handle
12.
espresso POWER button
13.
Espresso thermometer
14.
Espresso extraction ON/OFF button
15.
Espresso ON indicator
16.
Pod holder
17.
Push release (Tank open) button
18.
Water tank
19.
Tank cover
[Pod tray set]
20.
Pod filter
Pod filters can be purchased as expendable supplies.
21.
Pod tray
[Float]
The float part together with the float holder is inserted
as a set into the water tray.
22.
Float holder
23.
Float
[Steam nozzle]
24.
Steam nozzle O ring
25.
Steam nozzle
26.
Outer steam nozzle
27.
Outer tray (PD-TR1)
PD-1: Sold separately
PD-1 PLUS: Accessory
28.
Milk pitcher PD-MP500)
PD-1: Sold separately
PD-1 PLUS: Accessory
[Pod tray set]
* Parts marked with an asterisk can be removed.
[Float] [Steam nozzle]
5
ENGLISH
Before first use
Before first use, adjust the height of the pod holder and clean the inside.
Wash the pod tray set and the
outer steam nozzle with water.
Wipe the pod holder thoroughly with a
moist cloth or similar.
1.
Adjusttheheightofthepodtray
asdescribedbelow.
①Place the pod tray set onto the pod
holder.
2.
First, match the “|” mark of
the pod tray with the first dot
to the right of “down” on the
pod holder.
②Set a coffee pod.
For height adjustment, set a coffee pod onto the
pod tray set.
Set the coffee pod horizontally and with the tab
to the front.
①
③Lower the handle all the way and
check the hardness.
When the handle is pushed down
strongly, there should be a good re-
sponse when it becomes horizontal.
④When lowering the handle feels too
hard or too soft, adjust the height of
the pod tray.
1. Raise the pod tray slightly.
2. Turn a little for lowering.
Counterclockwise turning increases the height.
Clockwise turning reduces the height.
②
③
Pod holder
down
up
down
“|” mark of the pod tray
Adjust the height of
the pod tray without
switching the power
on.
Adjust the height with a
coffee pod used by you.
●Remove the coffee pod after completion of pod tray height adjustment.
Important: First, the height of the pod tray must be adjusted.
④
Do not yet switch on the power for the
operations on this page.
Softer Harder
(Lower) (Higher)
Raise
and turn
Tips
Pod holder
Coffee pod Pod tray set
Tab
(Continued on the next page)
Pod tray
set

6
ENGLISH
Pass hot water through the
espresso extraction opening and
clean it.
①Press the “push release” (Tank open)
button to open the tank cover.
3.
Before first use (continued)
⑥
push
release
②Take out the water tank.
1)
2)
③Fill water into the water tank.
Fill in max. 1.5 liters of water.
Do not fill water above the indicated line.
This unit is equipped with a
water softening resin filter in
the tank, and hard water is
changed to soft water, but
with use for a long time, min-
erals will be deposited in the
water passages. Continued
use in this condition will cause
trouble.
The water softening resin fil-
ter should be replaced ap-
proximately every 2 months
with normal use.
⑤Pull the handle all the way down and
set a cup.
1) Push the handle securely all the way down.
2) Set a cup onto the tray cover.
⑥Insert the plug of the power cable into
a wall outlet.
Do not fill in
water above
this line.
①
③
④
⑤
Perform the operation without
setting a coffee pod.
Connect the power
cable directly to a wall
outlet. Connection to
an extension cable is
not only dangerous,
but the supplied volt-
age may not be suffi-
cient for the product to
exhibit its full perfor-
mance.
②
When removing the water tank, hold the ma-
chine down so that it will not move.
④Set the water tank into the body.
At this time, insert the tip of the hose in the tank
securely into the water supply port of the body.
Incomplete insertion can lead to leakage of water.
Push the tank cover to close it.
Check once more that the handle has
been pushed down securely. The
handle may jump up when it is not
pushed down sufficiently.
Switch on the power for the operations
shown on this page.
Tips
Tips
Tank hose
Body water
supply port

7
ENGLISH
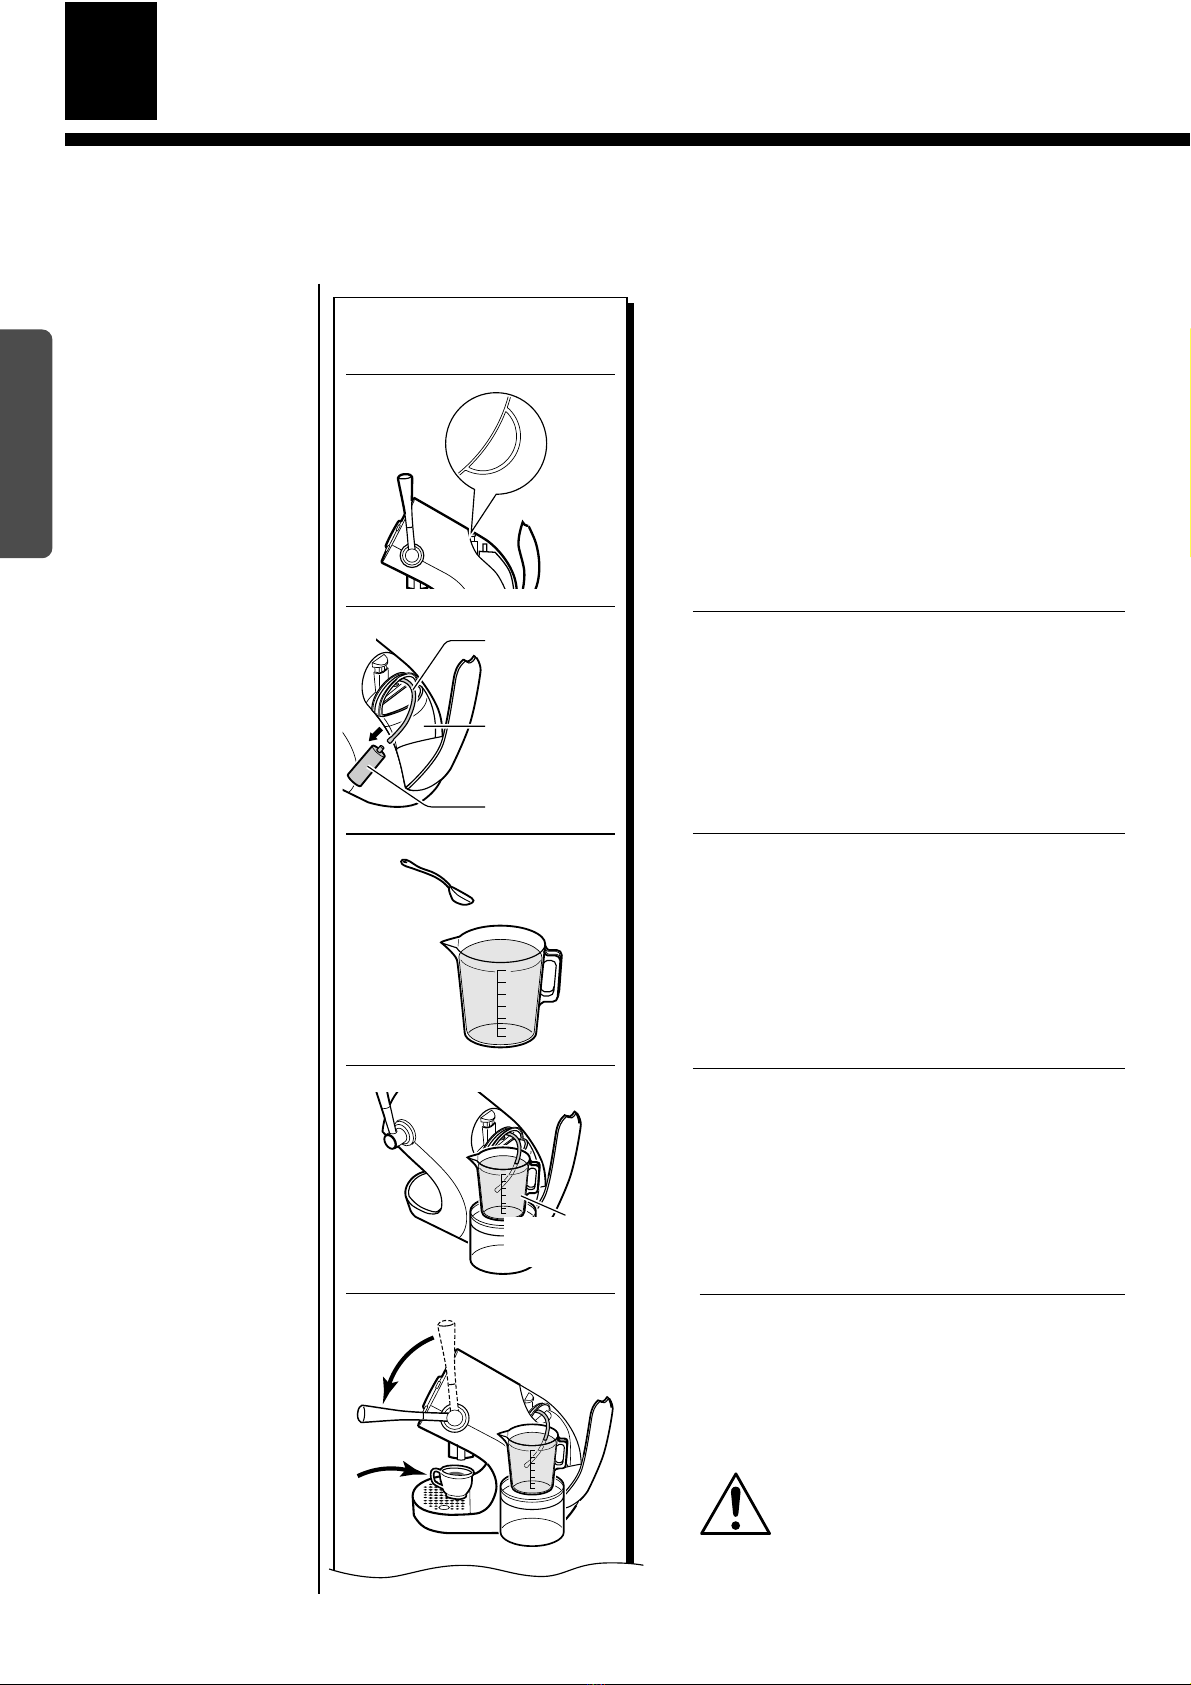
Pass hot water through the steam
nozzle to clean it.
①Press the steam POWER button.
Perform the following operation
after the temperature indication
of the steam thermometer is in
the green range and the needle
has stopped rising.
4.
②Insert the steam nozzle approxi-
mately half way into a container
with water and press the steam
ON/OFF button.
Always use a milk pitcher with
a handle or similar, as the con-
tainer with water becomes hot.
water
③After steam has been discharged for
approximately 30 seconds, press the
steam ON/OFF button again to stop
the steam.
(There is no automatic stop.)
Replace the water in the container and
repeat several times.
steam
POWER
Before first use (continued)
⑦Press the espresso POWER button.
Perform the following operation
after the temperature indication
of the espresso thermometer is
in the green range and the
needle has stopped rising.
⑧Press the espresso extraction ON/OFF
button.
Press the espresso extraction ON/OFF button
again to stop when the cup is full.
(There is no automatic stop.)
Discard the hot water from the cup
and repeat several times.
espresso
POWER
⑦
espresso
POWER
⑧
①
②
③
steam
POWER
When hot water is passed,
the operation noise increases,
but this is normal.
Also, when the espresso ON/
OFF button is pressed to stop
extraction, hot water may
continue to drip, but this is
also normal.
After use, always raise
the handle.
Tips
Please be careful, as the
top of the body becomes
hot during operation.

8
ENGLISH
Preparing espresso coffee
In case of operation directly after the procedures of pages 5 to 7, you can check the water level in
the tank and skip the operations of pages 8 and 9 (passing hot water).
Fill water into the water tank.
①Press the “push release” (Tank open)
button to open the tank cover.
1.
①
②Take out the water tank.
④Set the water tank into the body.
At this time, insert the tip of the hose in the tank
securely into the water supply port of the body.
Incomplete insertion can lead to leakage of wa-
ter.
Push the tank cover to close it.
②
④
③
When removing the water tank, hold the ma-
chine down so that it will not move.
③Fill water into the water tank.
Fill in max. 1.5 liters of water.
Do not fill water above the indicated line.
Water level in the tank
The tank has a capacity of approximately 1.5 liters. When the
water level drops and becomes low (approximately 250 to 300
cc), the word “water” of the water level warning lamp part lights.
push
release
steam
POWER espresso
POWER
water
water
⑤Insert the plug of the power cable
into a wall outlet.
⑤
Connect the power
cable directly to a wall
outlet. Connection to
an extension cable is
not only dangerous,
but the supplied volt-
age may not be suffi-
cient for the product to
exhibit its full perfor-
mance.
Do not fill in
water above
this line.
Tips
Tank hose
Body water
supply port
This unit is equipped with a
water softening resin filter in
the tank, and hard water is
changed to soft water, but
with use for a long time, min-
erals will be deposited in the
water passages. Continued
use in this condition will cause
trouble.
The water softening resin fil-
ter should be replaced ap-
proximately every 2 months
with normal use.

9
ENGLISH
Preparing espresso coffee (continued)
Pay attention to the size of the cup.
Large cups like mug cups etc. cannot be set to this product.
Also, when a large cup has been set and the handle is operated, the pot
holder may hit and break the cup when it is lowered.
For safety reasons, always op-
erate the handle after the cup
has been removed.
Perform the operation without
setting a coffee pod.
The handle must be lowered
correctly to the horizontal po-
sition.
2.
①
②Press the espresso POWER button.
Perform the following operation
after the temperature indication
of the espresso thermometer is
in the green range and the
needle has stopped rising.
③Press the espresso extraction ON/OFF
button.
Press the espresso extraction ON/OFF button
again to stop when the cup is full.
(There is no automatic stop.)
When hot water is passed,
the operation noise increases,
but this is normal.
Also, when the espresso
ON/OFF button is pressed to
stop extraction, hot water
may continue to drip, but this
is also normal.
④Remove the cup and raise the handle.
1) Remove the cup to the tray cover and discard
the hot water.
2) Raise the handle all the way.
④
1)
2)
espresso
POWER
②
1)
2)
espresso
POWER
③
First, warm the cup (no coffee pod
is used for this operation).
①Lower the handle to the horizontal
position and set a cup.
1) Push the handle securely all the way down.
2) Set a cup onto the tray cover.
Tips
Tips
Tips
When the handle is held
down (the pot holder raised)
for one or two minutes di-
rectly before setting the cof-
fee pot, the pot holder is
heated and even hotter cof-
fee can be poured.
Please be careful, as the
top of the body becomes
hot during operation.

10
ENGLISH
Preparing espresso coffee (continued)
Preparing a cup of espresso
3.
Take care to prevent burns!
The parts around the pot holder
become hot. Take sufficient care
to prevent burns.
When the height of the pod tray
is not suitable or when the
tightening is loose, coffee will
seep from the gap of the pod
tray set. In this case, refer to
page 11 and adjust the height
of the pod tray.
①Set a coffee pod onto the pod tray set.
Set the coffee pod horizontally and with the tab
to the front.
Therearecoffeepodsforespresso(30cc)andforregularcoffee(100cc).Usethecorrectpodfor
theintendeduse,astheyhavebeenproducedespeciallyforthisuse.
①
②Pull the handle all the way down and
set a cup.
1) Push the handle securely all the way down.
2) Set a cup onto the tray cover.
Check once more that the handle has
been pushed down securely. The handle
may jump up when it is not pushed
down sufficiently.
③Confirm that the espresso thermom-
eter is in the green range and press the
espresso extraction ON/OFF button.
Press the espresso extraction ON/OFF button
again to stop when a suitable quantity has been
reached.
(There is no automatic stop. Dripping continues
for some time after stopping extraction, but this
is normal.
②
③Confirm
1)
2)
espresso
POWER
Coffee pod types and extraction quantities
For espresso
For coffee pods for espresso, roasting, grinding, quantity, etc. have been adjusted so that an
espresso can be prepared easily, and the best result is obtained with an extraction of 30 cc. Please
observe this quantity when preparing an espresso.
Two large measuring spoons are equivalent to 30 cc.
For Café-regular (naming by our company)
For coffee pods for regular coffee, adjustment has been made for an extraction quantity of 100 cc
to obtain the bracing taste and darkness of regular coffee. (It is recommended to measure 100 cc in
advance and to remember the standard extraction quantity.)
For Café lungo
Coffee pods for café lungo have an extraction quantity of 50 to 60 cc as standard, and they are
adjusted for a slightly diluted espresso.
Extraction quantity
for one cup
30cc
100cc
50cc to 60cc
Tips
Pod holder
Coffee pod Pod tray set
Tab

11
ENGLISH
Remove the cup after extraction
has been completed.
1) Remove the cup to the tray cover and discard
the hot water.
2) Raise the handle all the way.
4.
●For safety reasons, always
operate the handle after the
cup has been removed.
●After use, always raise the
handle.
1)
2)
To enjoy espresso even more
Freshness of coffee powder
As coffee pods are closed hermetically, they stay fresh better than normal coffee powder, but the storage location should be
selected so as to avoid high temperatures, and they should not be stored too long.
Select your cup!
Espresso normally is enjoyed in small quantities. Especially the coffee pod system has 30 cc as the
standard. In order to keep the small quantity of coffee from getting cold and to enjoy the rich crema
foam, a thick demitasse cup made of china should be used.
Pod tray height adjustment
With long use, the pod pressure can become insufficient, or it may become too strong with a
different type of pod. In such cases, adjust the pod height as shown below.
Take care to prevent burns!
For some time after use, the pod holder
and its surroundings remain very hot.
Take sufficient care to prevent burns.
down
up
down
Preparing espresso coffee (continued)
5.
30cc
Demitasse cup
Press the button “espresso
POWER” to switch off the power
and discard any water from the
water tray (refer to page 15).
This product has a safety valve
to prevent excessive pressure
in the pump, and water dis-
charged through the safety
valve is collected in the water
tray. Discard the water each
time and wash the tray under
running water.
Tips
1. Raise the pod tray slightly.
2. Turn a little for lowering.
Counterclockwise turning increases the height.
Clockwise turning reduces the height.
Softer Harder
(Lower) (Higher)
Raise
and turn
Avoid continuous espresso extraction.
When espresso has been extracted consecutively 10 time or more,
wait 30 minutes or longer before using the appliance again.
12
ENGLISH
Making milk foam
1.
Making milk foam
①Press the steam POWER button.
Perform the following operation
after the temperature indication
of the steam thermometer is in
the green range and the needle
has stopped rising.
Insert the nozzle into a milk pitcher
with water and press the steam
ON/OFF button.
Generate steam for 1 or 2 seconds and then press
the button again to stop the steam.
As steam continues to come
out for some time after the but-
ton has been pressed, remove
the pitcher after the steam has
stopped.
2.
First, fill the tank with water
and connect the power cable
according to the procedure
on page 8.
Fill the pitcher approximately
one third with cold milk. Foam-
ing increases the volume. The
milk will not foam when it is not
cold.
Do not let the milk boil.
The milk starts to boil
when large bubbles ap-
pear on the surface.
Remaining milk causes prob-
lems in regard to hygiene and
also can cause clogging and
other problems.
①
②②Insert the steam nozzle (for approxi-
mately half of its length) into a milk
pitcher with milk and press the steam
ON/OFF button.
Generate steam for approxi-
mately 30 seconds, according
to your preferences, and press
the steam button again to stop
the steam.
The timing for stopping the steam
should be that the pitcher (the part
with milk in it) feels hot after hold-
ing it for approximately 3 seconds.
(Refer to “How to make good milk
foam” on page 13.)
Important: The following steam nozzle cleaning must be performed
each time.
Milk foaming can be continued.
To continue milk foaming, check that the thermometer indication is in
the green range and that the needle is steady.
steam
POWER
Milk
As steam continues to come out for some time after the button has
been pressed, remove the pitcher after the steam has stopped.
After use, press the button “steam POWER” to switch off the power, and
clean the nozzle again after the temperature has dropped sufficiently.
(Refer to page 13.)
Tips
Tips
Tips
Please be careful, as the
top of the body becomes
hot during operation.
Water

13
ENGLISH
How to make good milk foam
Once you know a few tricks, you can make rich milk foam with much air in it.
Preparations
1. Use cold milk from a refrigerator and with a fat content of 3.6 % or more.
Milk will not foam well when it is not cold.
2. It is recommended to use a stainless steel milk pitcher.
Use of a metal pitcher makes it easier to judge changes in the milk temperature by touch.
3.
Press the steam ON/OFF button again to stop the steam when the milk vol-
ume has increased to approximately 1.5 or 2 times and the pitcher has reached
a temperature of 62 or 63 degrees (feeling hot when touched for 3 seconds).
Just hold the pitcher while making foam, and do not move it.
4.
After use, always clean the nozzle and wipe it dry.
Milk tastes best at approximately 65ºC. Protein changes at temperatures of 70 ºC and higher,
causing loss of taste.
1.
Fill the milk pitcher approximately one third with fresh milk.
2.
Insert the steam nozzle into the
milk as shown and press the
steam ON/OFF button to dis-
charge steam.
①Insert the nozzle into a milk pitcher with water and press the
steam ON/OFF button.
②Generate steam for 1 or 2 seconds and then press the button again
to stop the steam.
As steam continues to come out for some time after the
button has been pressed, remove the pitcher after the
steam has stopped.
After use, point the nozzle to the inside for safety and wipe it dry. (Take care not to
burn yourself.)
③When the steam nozzle has cooled sufficiently, remove the outer
steam nozzle and once again clean steam nozzle and outer steam
nozzle.
Clean the air holes in the outer steam nozzle with a
tooth pick or similar to prevent clogging.
After cleaning, reinstall the outer steam nozzle, point
the nozzle to the inside, and wipe it dry.
Air hole (2)
Outer steam nozzle
Steam nozzle
Insert approximately
half of the outer
steam nozzle.
Insert the outer steam nozzle
near the edge of the pitcher. The
foaming is not good when it is at
the center.
Check the tempera-
ture by lightly
touching with your
fingertip.
Water
14
ENGLISH
Replacement of the water softening resin filter
The water softening resin filter of the water tank can be used for approximately 2 months.
Please replace it periodically as its water softening ability decreases with use over a long time.
Water tank
Water softening resin filter
①Remove the filter (water softening resin fil-
ter) from the water tank.
②Separate the old filter from the tube.
③Insert the new filter securely into the tube.
④Put the filter into the water tank.
Do not use this product without an in-
stalled water softening resin filter. Min-
erals and impurities from unfiltered
water can clog the water passages and
cause trouble.
❉Use the dedicated RF-6 water softening resin
filters (sold separately, 6 filters per pack).

15
ENGLISH
Servicing after use
After every use, check the water in the water tray and discard it, clean the water tray and the
steam nozzle, and wash all parts which can be washed.
Emptying and cleaning the water tray
When water accumulates in the water tray, the
yellow float appears in the hole of the water
tray cover.
Immediately empty the water tray when the
entire float hole appears yellow. It is recom-
mended to empty the water tray early.
Water discharged
from the pump
comes out here.
This product has a built-in safety valve to pro-
tect the pump from excessive pressure.
Water discharged from the safety valve and
water spilled from the water tray cover is col-
lected in the water tray. Empty and wash the
water tray after each use.
Please note that it is easy to overlook the wa-
ter discharged from the pump and pay atten-
tion to the yellow float.
Float
• Raise the front of the water tray a little to
remove and insert it.
• Set the water tray so that it hits the rear
separation.
Emptying the water tank
As water can freeze and damage the product
when the temperature is low, empty the tank
and store it in clean condition.
Cleaning the body
Before cleaning, switch off the power, pull the
plug from the outlet, and wait for the parts to
cool sufficiently before wiping dry with a soft
cloth.
In case of severe dirt, wipe clean with a cloth
moistened with neutral detergent, and then
wipe off any detergent with a moist cloth.
The main body must not be immersed.
Water washing
Water tray, water tank, water tray cover, pod
tray set, and outer steam nozzle can be washed
with water. It is recommended to wash these
parts with running water after each use.
Do not use detergent, as this may impair the
coffee aroma.
Cleaning the steam nozzle.
Clean the steam nozzle after each use by pass-
ing steam through it, as described in step 2 on
page 12. The nozzle can clog when it is left
standing with milk on it.
Take care not to hurt yourself on the tray cover
edges etc.
Float
16
ENGLISH
Descaling
This product is equipped with a water softening filter for removal of minerals etc. from hard
water, but minerals gradually may accumulate on the inside with use over a long time.
Accumulation of scale in the water passages can cause clogging and trouble. Periodically per-
form descaling at the time of filter replacement etc.
Descaling of the espresso extrac-
tion port
①Press the “push release” (Tank open)
button to open the tank cover.
1.
①
②Disconnect the water softening resin
filter from the tube in the water tank.
④Insert the tip of the tube into the citric
acid solution.
Use a suitable base to adjust the height so that
the tube is submerged sufficiently.
④
⑤
③
push
release
③Prepare a citric acid solution in a large
cup.
Dissolve two tablespoons of citric acid in 1.5 li-
ters of lukewarm water.
Tube
Water tank
Water soften-
ing resin filter
Citric acid
Water
1)
2)
②
Citric acid
solution
The handle must be lowered
correctly to the horizontal po-
sition.
⑤Lower the handle to the horizontal
position and set a cup.
1) Push the handle securely all the way down.
2) Set a cup onto the tray cover.

17
ENGLISH
2.
espresso
POWER
steam
POWER
①
②
Descaling (continued)
⑥
espresso
POWER
(Continued on the next page)
Perform the operation without
setting a coffee pod.
When hot water is passed, the
operation noise increases, but
this is normal.
Tips
Tips
⑥Insert the plug of the power cable into
a wall outlet, then press the espresso
POWER button.
Perform the following operation
after the temperature indication
of the espresso thermometer is
in the green range and the
needle has stopped rising.
⑦Press the espresso extraction ON/OFF
button.
Press the espresso extraction ON/OFF button
again to stop when the cup is full.
(There is no automatic stop.)
Discard the hot water from the cup
and repeat several times.
Water
Pass hot water through he steam
nozzle to clean it.
①Press the steam POWER button.
Perform the following operation
after the temperature indication
of the steam thermometer is in
the green range and the needle
has stopped rising.
②Insert the steam nozzle approxi-
mately half way into a container
with water and press the steam
ON/OFF button.
Always use a milk pitcher with
a handle or similar, as the con-
tainer with water becomes hot.
⑦
③After steam has been discharged for
approximately 30 seconds, press the
steam ON/OFF button again to stop
the steam.
(There is no automatic stop.)
Replace the water in the container and
repeat several times.
steam
POWER
Please be careful, as the
top of the body becomes
hot during operation.
③
18
ENGLISH
After use for a long time, disassemble the float part installed on the water tray and the pod tray
set and wash them with water.
Float part and pod tray set can be disassembled as shown below.
Descaling (continued)
Float
Pod tray set
Water tray
When citric acid remains, the
bitter taste and smell will harm
the taste of the coffee.
Wash repeatedly with fresh
water to remove any citric
acid.
[ Float part]
The float part is installed as a set with the float holder by insertion into the tray rib (partition). For
cleaning, remove the float from the float holder and wash it.
After cleaning, set the float into the float holder and insert them to the rib (partition) of the water
tray.
• For some time after use, the pod holder and its surroundings remain very hot. Take
sufficient care to prevent burns.
• When handling metal parts like the float part or the water tray cover, take care not to
hurt yourself on the edges etc.
[Pod tray set]
Cleaning of float part and filter tray set
Tips
Pod filter
Pod tray
Float holder
Float
Fresh
water
Replace the solution by fresh water
to remove the citric acid.
①Replace the citric acid solution by fresh
water and repeat steps 1 and 2 on
pages 16 to 17 to thoroughly remove
any citric acid.
②Install the water softening resin filter
and return it into the water tank.
3.
Tube
Water tank
Water soften-
ing resin filter
①
②

19
ENGLISH
No power
Espresso seeps from the pod
holder
Dripping continues after extraction.
No espresso comes out.
The pump cannot be heard and
no espresso comes out.
No steam comes from the
steam nozzle.
The milk does not foam suffi-
ciently.
The extracted espresso is not
hot enough.
Water leaks from the bottom.
The body becomes hot.
Troubleshooting
If the product does not work, if espresso cannot be made, milk foaming is not possible, etc.,
please check according to the following table.
Symptom
●The power cord is disconnected.
●The height of the pod holder is low (the handle is loose).
→Adjust the height of the pod holder (page 11).
●The pod filter of the pod tray set is dirty. (Clean the filter.)
●This is caused by dripping of coffee in the pod holder, and it is normal.
●The water tank is empty.
●No coffee pod has been set.
●The internal fuse is blown.(Please contact your dealer or near service center.)
●There is not sufficient water in the water tank.
●The steam nozzle is clogged. (Please contact your dealer or near service center.)
●The steam nozzle is clogged. (Please contact your dealer or near service center.)
●There is not sufficient water in the water tank.
●The milk is not cold enough.
●The milk is not fresh.
●Too many appliances are connected to the outlet. (Extraction with too low tempera-
ture may occur when the power supply voltage has dropped. Connect the product to
a wall outlet.)
●Low-fat milk is used. (Use milk with a fat content of 3.6 % or more.)
●Too many appliances are connected to the outlet. (Extraction with too low tempera-
ture may occur when the power supply voltage has dropped. Connect the product to
a wall outlet.)
●Espresso should be drunk when its temperature is 65 to 80 ºC. A milk temperature of
63 to 67 ºC is suitable.
●The water tray is full. (Empty the water tray.)
●The body becomes hot because it radiates the heat of the internal boiler, but this is normal.
Cause
20
ENGLISH
Specifications
Espresso extraction method Pump method, 15 atmospheres
Steam generation method Pump method, 2.5 atmospheres
Length of power cord 1.5 m
Dimensions (W) 217 x (H) 417 x (D) 354 (mm)
Weight (net) 7.7 kg
Power source 220V - 240V AC, 50 Hz
Power consumption
1473 W
657 W (espresso extraction) /816 W (steam generation)
Tank capacity 1.5 liters
Accessories Pod tray set x 1
Milk pitcher x 1 (only for PD-1PLUS)
Outer tray x 1 (only for PD-1PLUS)
Designs and specifications are subject to change without notice.
Expendablesupplies
Parts name Parts number
Pod filter PD1-FP
Water softening resin filter (6 filters per pack) RF-6
This manual suits for next models
1
Table of contents
Languages:


