DGS Real Life Ninja Starter Pack 1 User manual

MATERIALS:
Warped Wall
3 - Main Sections (Only 2 Sections for 10’ Warped Wall)
8 – 3” deck screws forjoining sections inside of Warped Wall
2 – Rock Wall Panels (with pre-installed t-nuts. Top panel comes with ladder mounting block pre-
installed.)
2” Deck Screws forsecuring Rock Wall Panels
4 - wedge bolts
Monkey Bars
2 – 13ft. Side Rails, 13– 4ft. Rungs, 1 - Wooden Lift Support
26– 3/16” Allen head bolts
Four ½” x 4”Bolts with Flat andLock Washers (Monkey Bar to Warped Wall)
Eight 3/8”x 2¼” Bolts with Flat andLock Washers (Monkey Bar to Salmon Ladder)
Salmon Ladder
1 – Header Board
2 – Uprights, 4 - Wedge Bolts
26 - Pegs
4 – 3/8” x 4”Carriage Bolts with Flat andLock Washers
1 – Bar
2 – Pulley Rigs for Top of uprights with 20 - 1½” drywall screws for mounting to top ofuprights
2 – Weights with rope
2 – Post Pads with 16 - 2" Deck Screws
Pegboard
1 – Pegboard with 4 - 12" Pegs
1 – Pegboard Spacer Block (Pegboard toWarped Wall)
3 – ½” x 10” bolts with flatand lock washers (Pegboard toWarped Wall)
1 – Pegboard Mounting Plate (For Pegboard toSalmon Ladder)
3 - 1/2" x 3 1/2" Carriage Bolts with flat washers, lock washer & nuts (Pegboard to Mounting Plate)
3 – 3/8” x 6”bolts with 2flat washers &locking nut (For Pegboard Mounting Plate toSalmon Ladder)
Real Life Ninja Starter Pack 1
Assembly Instructions
Please visit gymsupply.com for product assembly videos.

Tools Needed:
Minimum 3people capable of lifting 100+ lbs
12 ft. Ladder
¾” Socket
9/16” Socket
Adjustable Wrench
Phillips Head Screw Driver
Drill with Hammer setting
3/8” Wedge Bit
Impact Driver
Hammer
3/16” Allen Key
Please visit gymsupply.com for product assembly videos.

Please visit gymsupply.com for product assembly videos.
x 6
x 4
2” Deck Screws
2” Deck Screws
Top Middle Bottom
View from Side
x 6
x 4
2” Deck Screws
2” Deck Screws
Top Middle Bottom
View from above
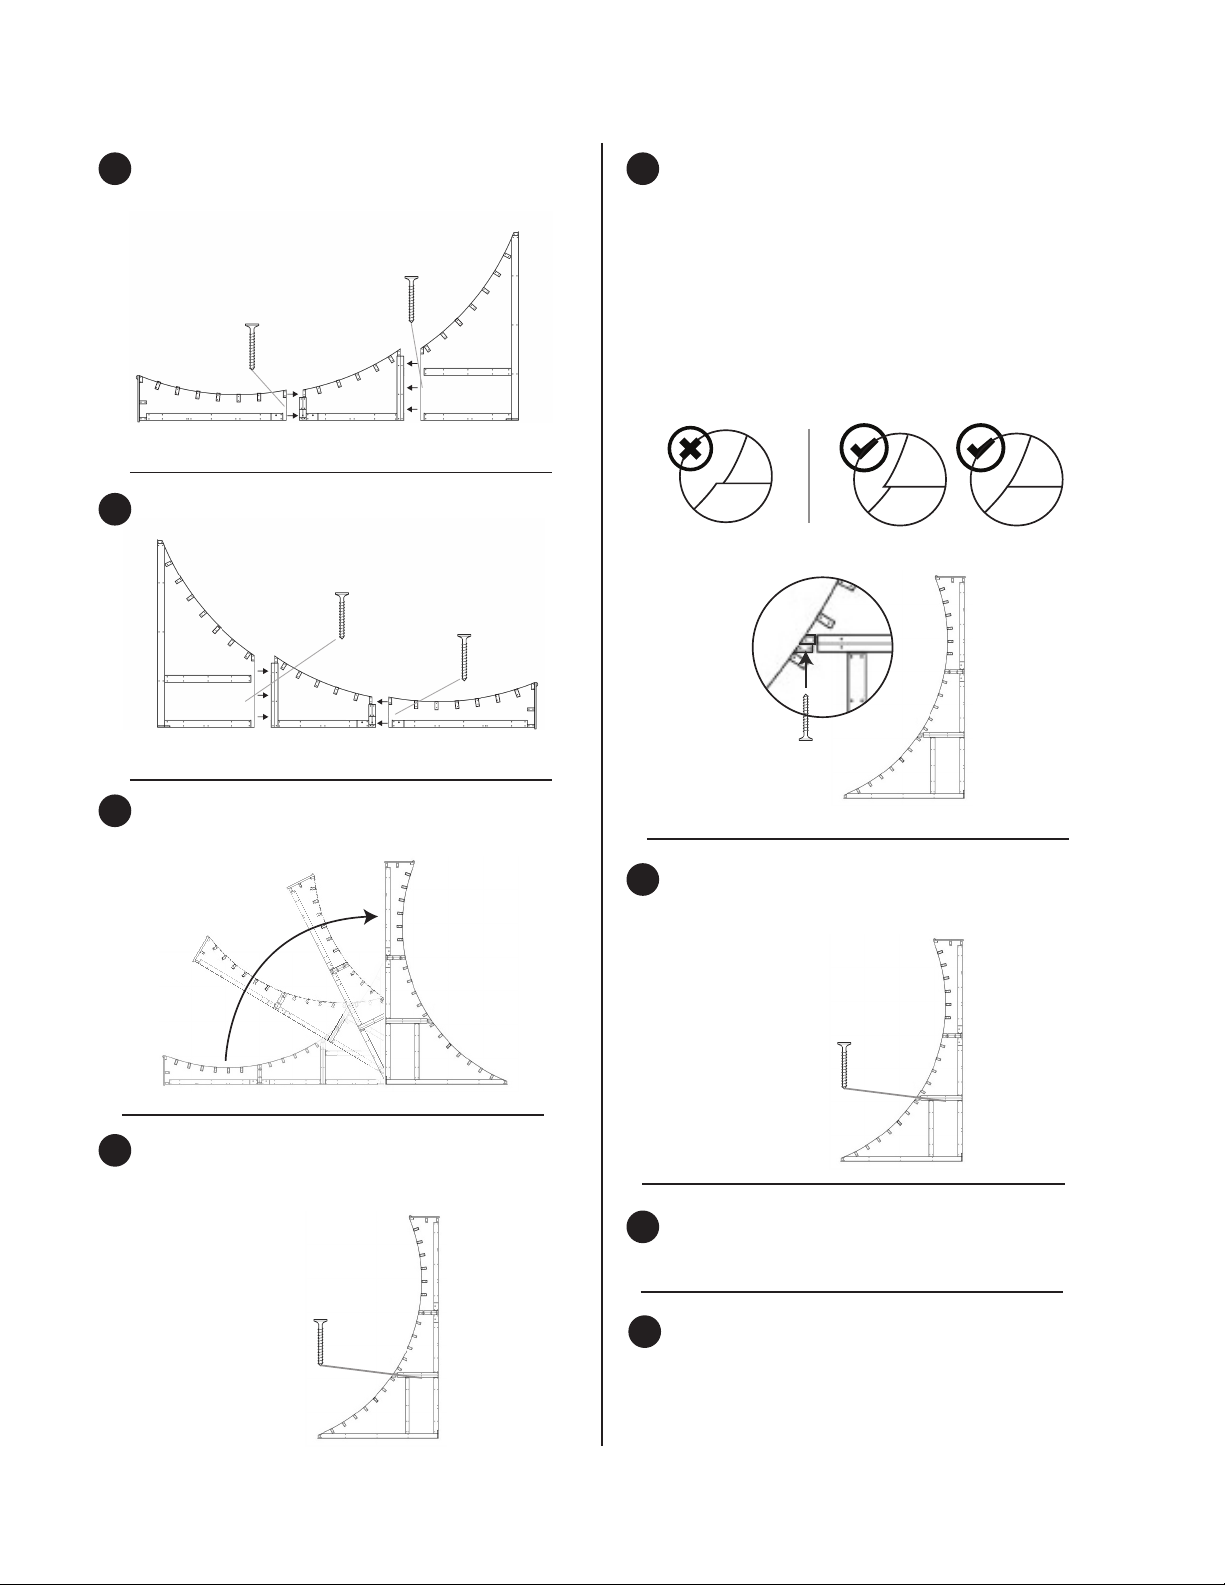
Turn wall 90 degrees onto back
Tip wall into upright position
View from side
Remove previously installed screws
from one side only of bottom section
x 6
2” Deck Screws
REMOVE
ONE SIDE ONLY
x 6
3” Deck Screws
From inside the wall, secure the base section to
the middle section using 3” deck screws
through the abutting braces. Start at the side
which still has 2” deck screws installed, and
work your way across, making sure that the
front surface of the wall is ush.
Any overhang should be on the higher section,
so someone sliding down the face would not
catch on it.
Middle
Bottom
Middle
Bottom
Middle
Bottom
Reinstall previously removed screws
from side of bottom section
x 6
2” Deck Screws
REINSTALL
ONE SIDE ONLY
View from side
View from side Repeat steps 4 through 6 for
top/middle section. (12 and 14ft. walls only)
Lay wall sections on side in appropriate order
1
2
3
4
5
6
7
Move wall into nal position. Wall must be on
a rm level surface, such as concrete. Drill holes
through pre-installed brackets inside wall into
foor and install wedge bolts. (see next page)
8
Please visit gymsupply.com for product assembly videos.
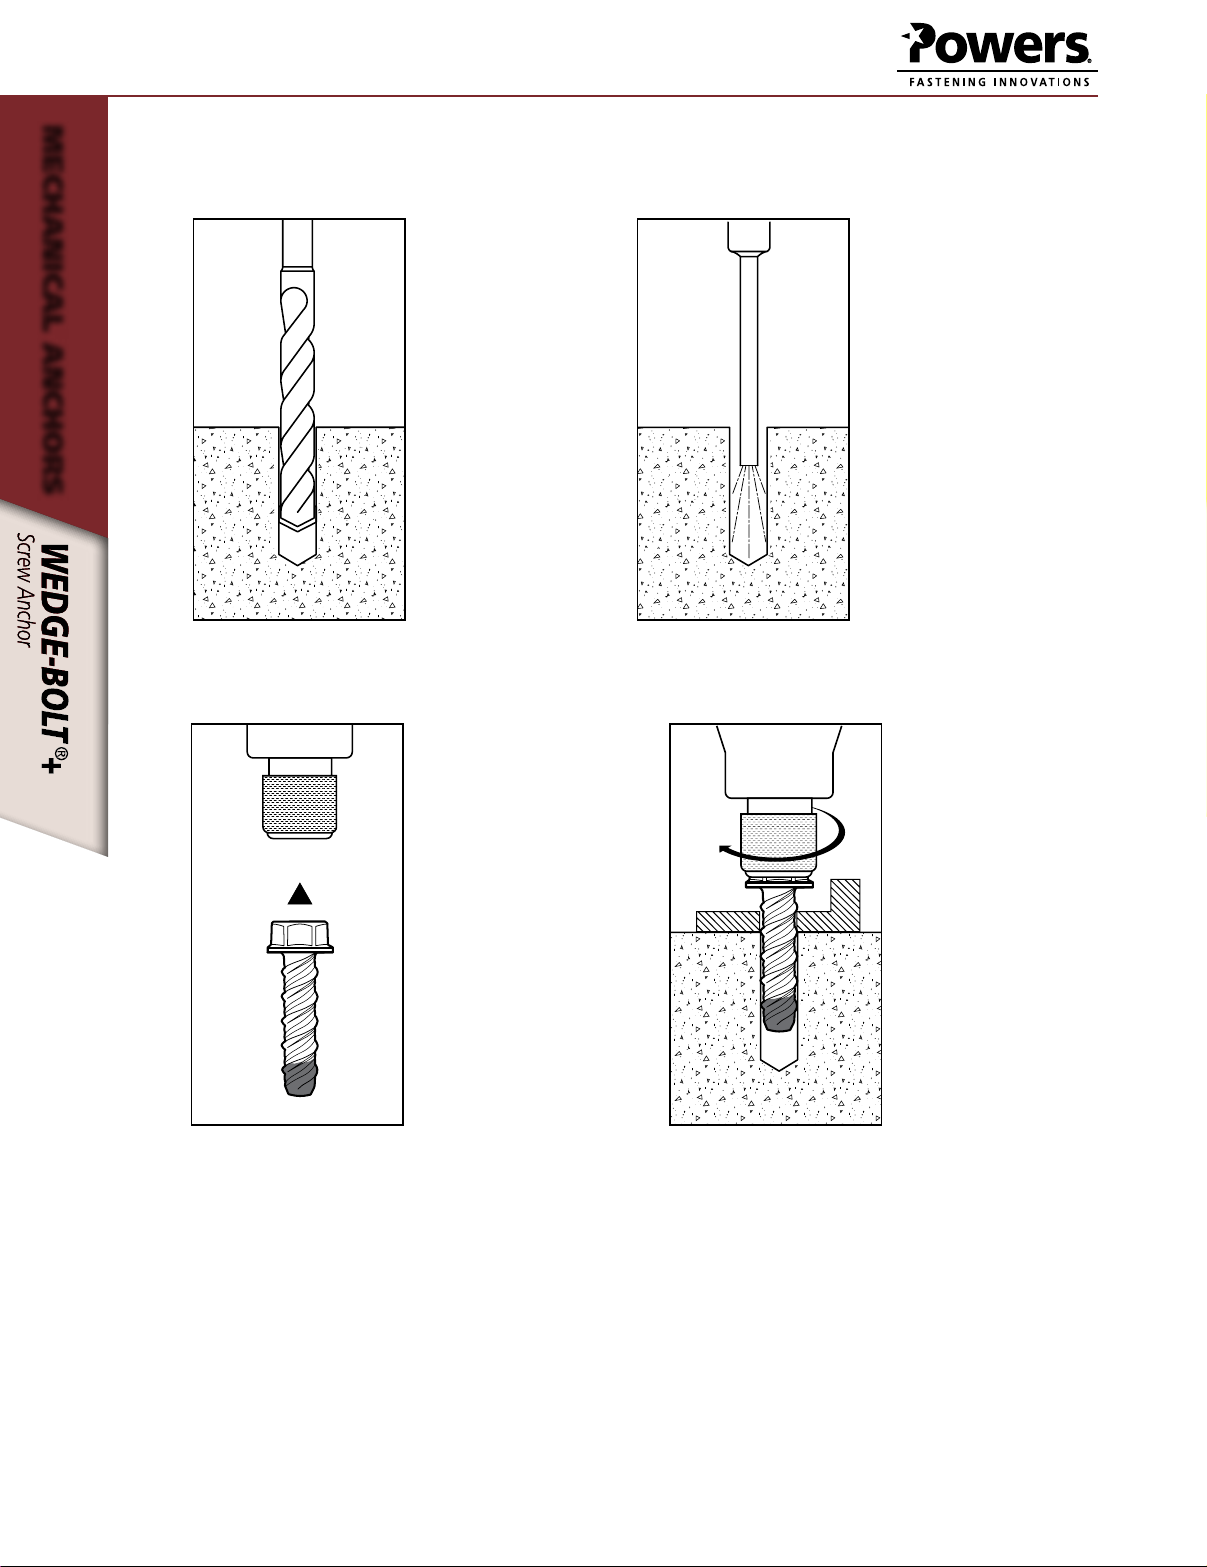
INSTALLATION SPECIFICATIONS
Mechanical anchors
Installation Instructions for Wedge-Bolt+
step 1
Using the proper
3/8" Wedge-bit
size, drill a hole
into the base
material to
Min. 2.5"
depth. The
tolerances of the
Wedge-bit used
must meet the
requirements of
the published
Wedge-bit range
step 2
Remove
dust and
debris from
the hole.
step 3
Select a powered
impact wrench
that does not
exceed 245 ft-lbs
maximum torque,
Tscrew, for the
selected anchor
diameter. Attach
an appropriate
sized hex socket/
driver to the
impact wrench.
Mount the screw
anchor head into
the socket.
step 4
Drive the anchor
through the
fixture and into
the hole until
the head of the
anchor comes
into contact with
the fixture. The
anchor should
be snug after
installation. Do
not spin the
hex socket off
the anchor to
disengage.

View from Top
View from above
Attach wooden lift support to salmon
ladder side and secure with velcro strap
Make sure you are attaching
Lift Support to Salmon Ladder
Side of Monkey Bars
Lay out Monkey Bar Side Rails.
Insert Rungs into pre-drilled holes and fasten with
allen head bolts on each side.
9
10
11
12
Side Rails x 2 • Rungs x 13 • 3/16 Allen Head Bolts x 26
Warped Wall Side
Salmon Ladder Side
Side View
Rung Velcro
Strap
Salmon Ladder Leg
Salmon Ladder Leg
Salmon Ladder Header
View from Front
Side View
Carriage Bolts
x 2
Carriage Bolts
x 2
Header
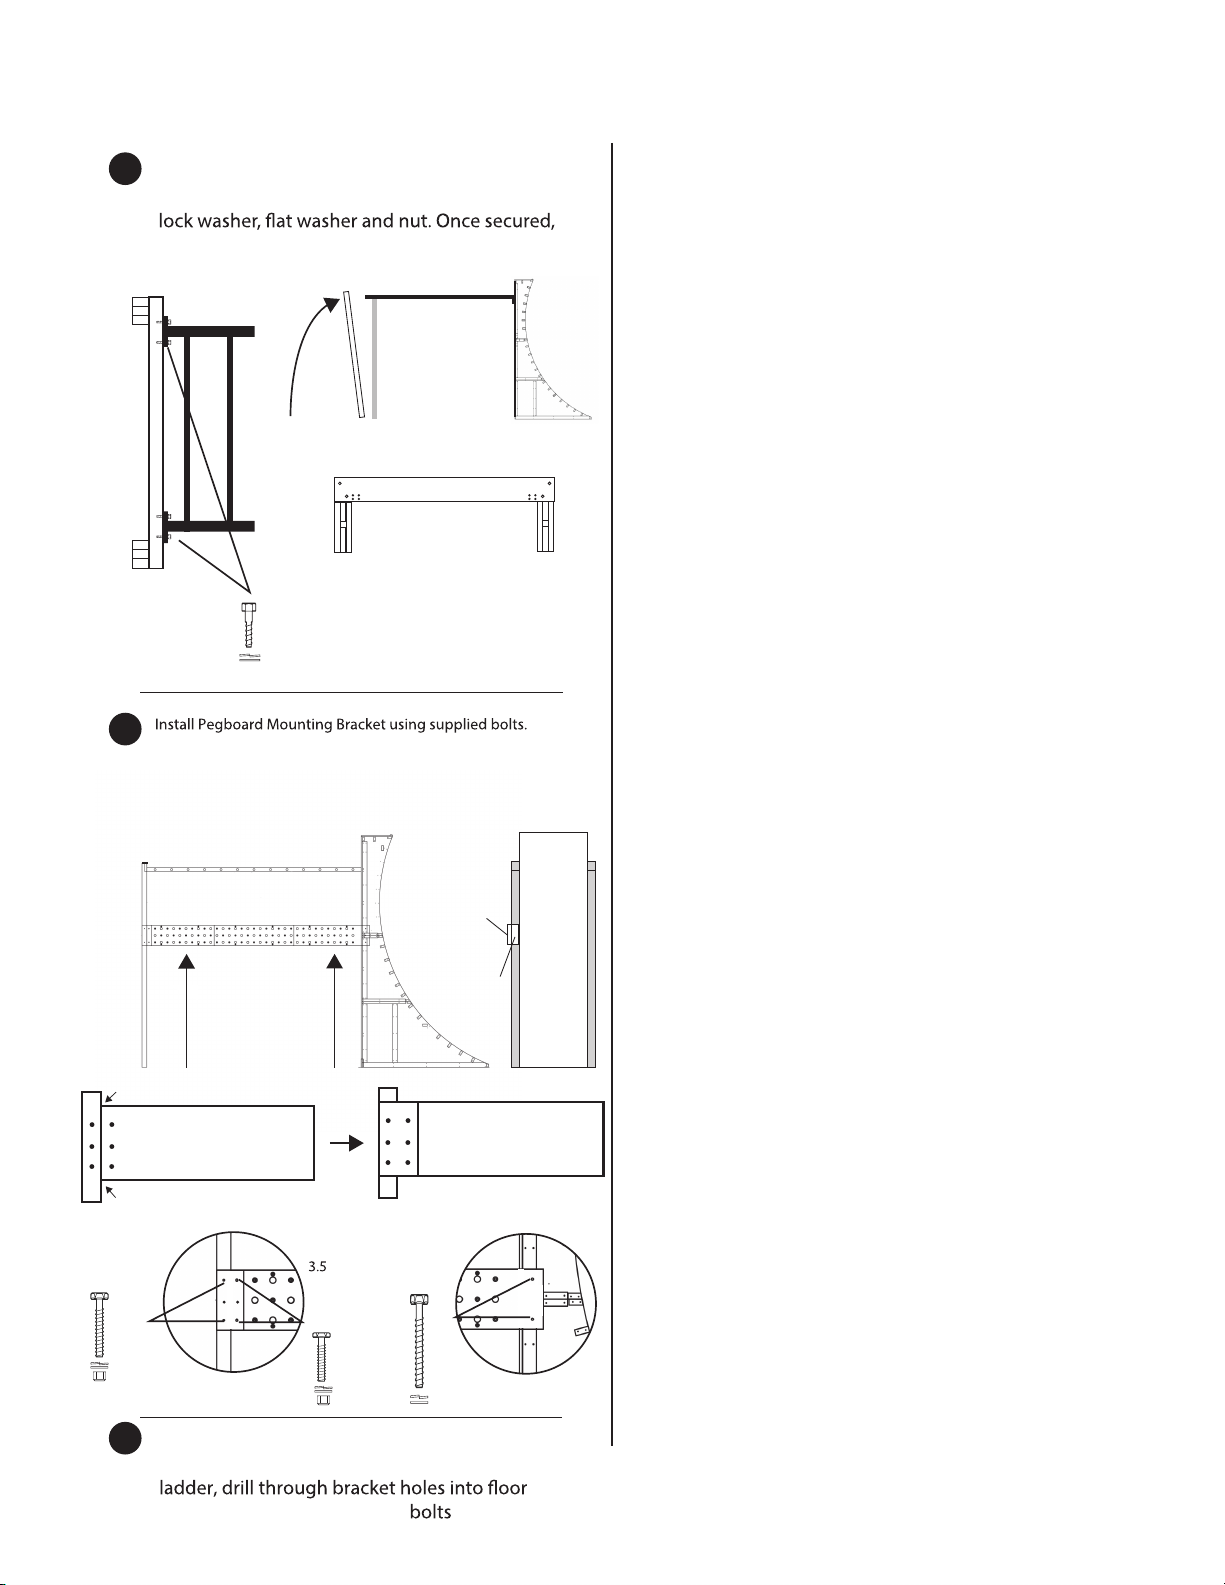
Attach legs of salmon ladder to header using
four pre-installed carriage bolts with at washer,
lock washer and nut on each.
Flat Washer
Lock Washer
Nut
(on each bolt)
2” Deck Screws
Fasten Rock Wall panels to back of warped
wall using 2” Deck Screws into pre-drilled holes.
Be sure the panel with pre-installed mounting
block is installed with the block closest to the
top, and that top edge of panel is ush.
Monkey Bars
wooden lift support
Mounting
Block
13 Lift Warped Wall end of Monkey Bars so that
mounting brackets t into pre-installed wooden
mounting block. Adjust horizontally to line up
bolt holes on brackets and warped wall.
14 Lift other end of Monkey Bars using wooden lift
support, taking care that both sides are lifted
evenly. Secure Monkey Bars to warped wall
using four 1/2”x 3 1/2” bolts with lock washer
and at washer.
ATTENTION:
Wooden Lift support should
never be left unattended and
MUST BE STABILIZED by at least
one person at all times.
Top of Wall
3 1/2” Bolts x 4
Lock Washer
Flat Washer
on Each Bolt
Please visit gymsupply.com for product assembly videos.
Stand Salmon Ladder upright and secure to
monkey bars using eight 2 1/4” bolts with
wooden lift support may be removed.
15
Salmon Ladder Header
Salmon Ladder
Top View
2 1/4” Bolts x 8
Lock Washer
Flat Washer
on Each Bolt
Front View
DGS - 17 Lucienne
Please visit gymsupply.com for product assembly videos.
Mounting Bracket should be on front face of pegboard.
Lift Pegboard into place and secure on Salmon Ladder end.
Secure on warped wall end using supplied bolts through
spacer block into pre-installed inserts in side of warped wall.
16
17 Check to make sure monkey bars and salmon
ladder are square and level. To anchor salmon
and
secure using supplied wedge
6” Bolts
Flat Washer
Locking Nut
x 3
10” Bolts
Flat Washer
x 3
Front of
Warped
Wall
Pegboard
Mounting
Block
x 3
”Locking Nut
CarriageBolts
Flat Washer
Locking Nut
End of Pegboard
abuts back of Salmon
Ladder Upright
Mounting Bracket
bolts to Front of pegboard
and side of salmon ladder
Salmon Ladder Side Warped Wall Side

DGS - 17 Lucienne
Please visit gymsupply.com for product assembly videos.
BACK SIDE VIEW
Cut at middle
1-1/4” Deck Screws
x2 x2
Secure pulleys to top of salmon ladder using 1-1/4”deck screws, to
the top of the salmon ladder, being sure that the longer side of the
pulley arm faces the side of the ladder with peg holes.
Secure pads to back side of salmon ladder using 1-1/4”deck screws,
being sure to leave a 2” space between the pad and upright for the
weights and rope to slide behind.
Unwrap rope and pull taught. Measure to the center of the rope
and cut in the middle, leaving one length of rope extending from
each side of the bar.
Thread cut end of rope over pulley on long side rst, then short
side, so that the rope hangs down towards the pad on the back of
the salmon ladder upright.
Tie weights on to end of each side. Start with two weights and
adjust if needed with more or less depending on desired bar
action after release. Test bar and weight action before cutting
ropes down to desired lengths.
Weights should slide freely behind pads on back of salmon
ladder uprights.
WeightsWeights
SALMON LADDER PULLEY SYSTEM
SIDE VIEW
1-1/4”
Deck
Screws
SALMON LADDER BAR
Table of contents


